Comprehensive guide to Defining Application Routing in Kubernetes Cluster
Table of Contents
This article explains how to configure Kubernetes Ingress. Earthly ensures reproducible builds for DevOps professionals who are using Kubernetes. Check it out.
Defining Application Routing in Kubernetes Cluster
When you’re getting started with Kubernetes, setting up the proper routing can be a challenge. There are a lot of moving parts and understanding how IP address get assigned and what they point to can be confusing at first.
In this article, you will learn what an Ingress is, and its usefulness when routing in Kubernetes. You will also be introduced to Service and how they differ from an Ingress. We’ll start by covering these two essential pieces of Kubernetes before doing a deeper dive into how you can use them to set up effective routing.
For this article, you will use an NGINX image on Docker Hub. You will learn how to make deployments and create services for the NGINX image and use Ingress to forward requests from a domain name to your application. You will also learn how to use Ingress to configure multiple paths for a particular domain and also run your application on HTTPS.
Prerequisites
To follow along with this tutorial, you should have:
What is Ingress and Ingress Controller?
Ingress is a component of Kubernetes that is used to set rules for forwarding the internal IP address on the service to a public domain name that can be accessed by the outside world. You can also use it to convert http to https which is essential for public usage. Ingress can be used to set rules for routing traffic within the cluster without setting up Load Balancers. In general, it is essential for exposing you application to the outside world.
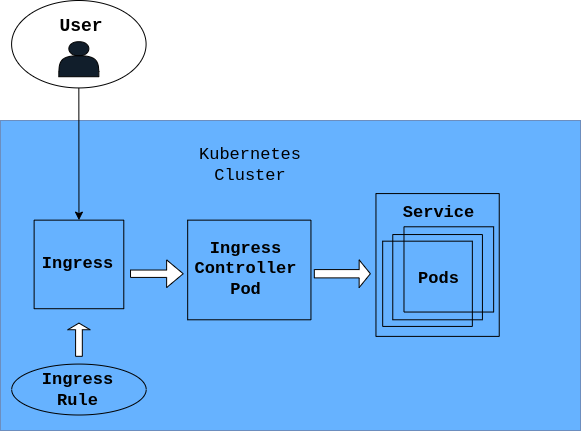
To apply Ingress on your cluster, you need an Ingress Controller. The ingress controller is a pod that runs on your cluster to implement your Ingress rules. The Ingress controller will be the entry point for accessing the application on the cluster.
There are some third-party implementations that can be used to apply an Ingress Controller to your cluster, but in this article, we will use the NGINX Ingress controller.
How Is Service Different from Ingress

Services and Ingresses are used to expose applications operating in Pods. An Ingress cannot direct traffic to a Pod on its own! Traffic must be forwarded to a Service that directs users to the Pod.
The idea behind Services is to give pods a permanent IP address so that whenever a pod fails, its port stays persistent. It can also be used to configure load balancers. Service maps the incoming port (this is exposed by the Service) to the targetPort (the port application is running on in the container) then you can access the application outside the cluster.

While building, you can use the Service to access your application outside the cluster, but it is not ideal in production. This is the major difference between Service and Ingress. Unlike with Ingress, with Service you can’t map public domains, configure paths on a domain, configure HTTPS, etc.
Configuring Ingress in a Cluster

For the practical aspect of this tutorial, we will use a local Kubernetes cluster, minikube. We will also use an NGINX image that is available on Docker Hub, so all we have to do is pull it into the cluster. If you don’t have a running cluster already, run the following command to start it:
minikube startThe first step to configuring Ingress is to install your preferred Ingress controller in your minikube cluster. In this case, since we are using the NGINX Ingress controller, you can run the following command to enable it. The following command automatically starts the NGINX implementation of the Ingress Controller. NGINX Ingress controller comes with the minikube cluster, which is why you don’t need to install anything. When you enable it, then minikube spins up an NGINX Ingress controller pod. If you are working on a production environment (or different environment other than minikube), you will need to look up in the documentation to see how you can set it up there.
minikube addons enable ingressYou can check if the Ingress controller pod is now running in the cluster by running the following command:
kubectl get pods -n ingress-nginxYour output should look like the following:
NAME                                       READY   STATUS      RESTARTS   AGE
ingress-nginx-admission-create-q89fl       0/1     Completed   0          33m
ingress-nginx-admission-patch-6psqq        0/1     Completed   2          33m
ingress-nginx-controller-cc8496874-ddh5l   1/1     Running     0          33m
Now that the Ingress controller is configured, we can now set Ingress rules that the Controller will evaluate.
Start by creating a deployment that contains the NGINX server. This server will be extracted directly from Docker Hub.
Note: The rest of the tutorial will use this deployment.
To get started, create a new YAML file, I called mine nginx.yaml, but it can be anything, and paste the configuration below. In the code below, we are creating a deployment for NGINX. Also included in the file is the Service that will be used to access the NGINX server
apiVersion: apps/v1
kind: Deployment
metadata:
  name: nginx
  labels:
    app: nginx
spec:
  replicas: 1
  selector:
    matchLabels:
      app: nginx
  template:
    metadata:
      labels:
        app: nginx
    spec:
      containers: # get image from Docker Hub
      - name: nginx
        image: nginx:latest # latest version of NGINX on Docker Hub
        imagePullPolicy: Always
        ports:
        - containerPort: 80
          protocol: TCP
---
kind: Service
apiVersion: v1
metadata:
  name: nginx
  labels:
    app: nginx
spec:
  selector:
    app: nginx
  ports:
  - port: 80
    protocol: TCP
    targetPort: 80
  type: ClusterIP
Now, you can apply the NGINX deployment and service configuration in your cluster. You can do this by running the following command:
kubectl apply -f nginx.yamlAfter the command is run you need to wait for some time for the NGINX container to be established completely. You can see if your NGINX container is now running by running the following command to list the pods in the cluster.
kubectl get podsYour output should look something like this:
NAME                    READY   STATUS    RESTARTS   AGE
nginx-8d545c96d-776x4   1/1     Running   0          5m21s
Now, to configure the Ingress rule, create a new file (nginx-ingress.yaml) and paste the following Ingress manifest. The following manifest forwards any requests coming from nginx-local.com to the NGINX server running in the cluster.
apiVersion: networking.k8s.io/v1
kind: Ingress
metadata:
  name: nginx-ingress
  namespace: default
  annotations:
    kubernetes.io/ingress.class: "nginx"
spec:
  rules:
  - host: nginx-local.com
    http:
      paths:
      - path: /
        pathType: Exact
        backend:
          service:
            name: nginx
            port:
              number: 80
Now you can apply the ingress rule you just created by running the following command:
kubectl apply -f nginx-ingress.yamlSince we just made up nginx-local.com, and it is not an actual live domain name, we need to map the Ingress IP address to nginx-local.com locally. This will be done on the /etc/hosts file on your computer.
You can get the Ingress IP address from the following command:
Note: It may take some time for your Ingress IP address to show up.
kubectl get ingressNow, you can run the following command to open the /etc/hosts file:
sudo nano /etc/hostsOn the file you just opened, paste the following text into a new line and save. Replace the IP address 192.168.49.2 in the text below with the IP address of your Ingress.
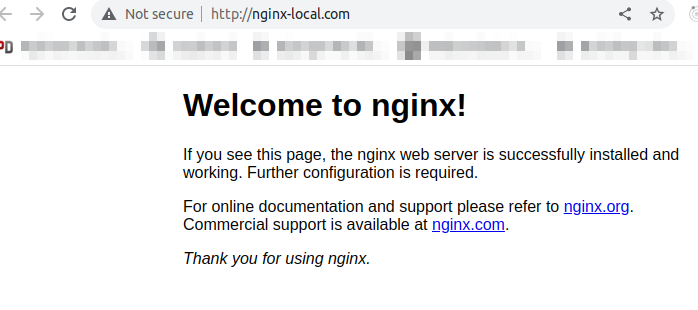
192.168.49.2 nginx-local.comNow open http://nginx-local.com/ in your browser, and you will see that your application is running as expected. Your browser identifies that the site entered is mapped to an IP (Ingress IP address) in the computer /etc/hosts file, then it goes straight there and gets the resources to display. The browser makes a request that was routed to our ingress (because we updated the /etc/hosts/ file). The ingress passed the request on to the controller pod which then transfers the request to the appropriate Service and application pod.

How to Configure Multiple Paths on the Same Host
In this section, you will learn how to configure different paths on the same host using Ingress. The Ingress manifest will be a little different as you will see in the code below.
Since we have only NGINX running, both of the paths we will create here will point to NGINX. You can get this working by pasting the following in your YAML file for Ingress. In the following YAML file, the annotations attribute changed to cater to multiple paths. We also need to state that the pathType is Prefix, unlike before where it was Exact.
apiVersion: networking.k8s.io/v1
kind: Ingress
metadata:
  name: nginx-ingress
  namespace: default
  annotations:
    nginx.ingress.kubernetes.io/rewrite-target: /
spec:
  rules:
  - host: nginx-local.com
    http:
      paths:
      - path: /first
        pathType: Prefix
        backend:
          service:
            name: nginx
            port:
              number: 80
      - path: /second
        pathType: Prefix
        backend:
          service:
            name: nginx
            port:
              number: 80
Now you can apply the ingress rule you just created by running the following command:
kubectl apply -f nginx-ingress.yamlNow you can test your application on the different paths you just created.

Configure Https Forwarding With Ingress
It is important to try your best to make your application as safe as possible for users. One way to do this is by using HTTPS instead of HTTP. By doing this, the user request sent to your app is secured from harmful intent. This can be done with Ingress by defining an attribute called tls in your Ingress manifest and the hosts attribute will have a secretName which contains a TLS key and certificate.
You can do this by pasting the following configuration above the rules attribute.
spec:
  tls:
  - hosts:
    - nginx-local.com
    secretName: nginx-ingress-tls #name of the secret.\
    #We will create this later.
Now we need to create a TLS certificate and key locally then save it as a secret in nginx-ingress-tls. To generate TLS key and certificate, run the following command below:
Note: For production, you will need to purchase TLS certificate from a trusted distributor.
openssl req -x509 -nodes -days 365 -newkey rsa:2048 -keyout tls.key \
-out tls.crt -subj "/CN=nginx-local.com/O=nginx-ingress-tls"
Next, run the following command to save the key and certificate generated as a tls secret:
kubectl create secret tls nginx-ingress-tls \
--key tls.key --cert tls.crt
Now apply the changes you made to the Ingress file. After that is done, when you open your application, you will see that it is running on https://.
Conclusion
Through this guide, you’ve mastered deploying an NGINX image, setting a service, and using Ingress to redirect domain requests to your app. Plus, you’ve figured out multi-path configurations for a domain with Ingress and got your app running on HTTPS.
Now that you’ve got a handle on Kubernetes routing, why not take the next step and optimize your build process too? Give Earthly a whirl. It could be the perfect tool to streamline your workflow.
Looking ahead, consider scaling up your project - try a legit TLS certificate or manage routing for two apps on the same domain. The possibilities are endless!
Earthly Lunar: Monitoring for your SDLC
Achieve Engineering Excellence with universal SDLC monitoring that works with every tech stack, microservice, and CI pipeline.


