Improving Django Performance using Caching

Table of Contents
Performance is a crucial aspect of web development that significantly impacts user experience. The speed and reliability of a website influence users’ engagement and overall satisfaction with the site. Inadequate performance, such as slow page loading times or frequent crashes, can lead to reduced traffic and potential loss.
Django is a powerful web framework that makes building web applications in Python a breeze. However, as your application grows, you might encounter performance issues. Caching is a technique that can help optimize your application’s performance by reducing the amount of time it takes to retrieve data. It is a way of storing frequently accessed data in memory for quick access. Properly implementing caching in your Django application can lead to faster response times and a better user experience. Caching can also help reduce the load on the database server. This can help free up database resources and improve the overall performance of the application. Django’s caching framework provides a flexible and configurable way to implement caching in an application.
In this post, you’ll explore the best practices and techniques for implementing caching in Django. We’ll cover everything from how to identify which parts of your application to cache, to which caching backend to use, to how to cache templates and views. By the end of this post, you’ll have a clear understanding of how to improve your Django application’s performance with caching.
Overview of Django Caching
Django, being a popular web development framework, offers a comprehensive caching framework that makes it easy for developers to implement caching in their applications. The Django caching framework includes several components that work together to provide an efficient caching mechanism.
The primary component of Django’s caching framework is the cache backend. The cache backend is responsible for storing and retrieving data from the cache. Django supports multiple cache backends, including Memcached, Redis, the file system and the database. Developers can choose a backend that best suits their needs based on factors such as performance, scalability, and ease of implementation.
Django’s caching framework also includes a caching middleware that intercepts requests and checks if the requested data is available in the cache. If the data is available, the middleware serves it from the cache, thus reducing the response time. The middleware also updates the cache with new data when a request is made for data that is not available in the cache.
Cache Setup and Configuration
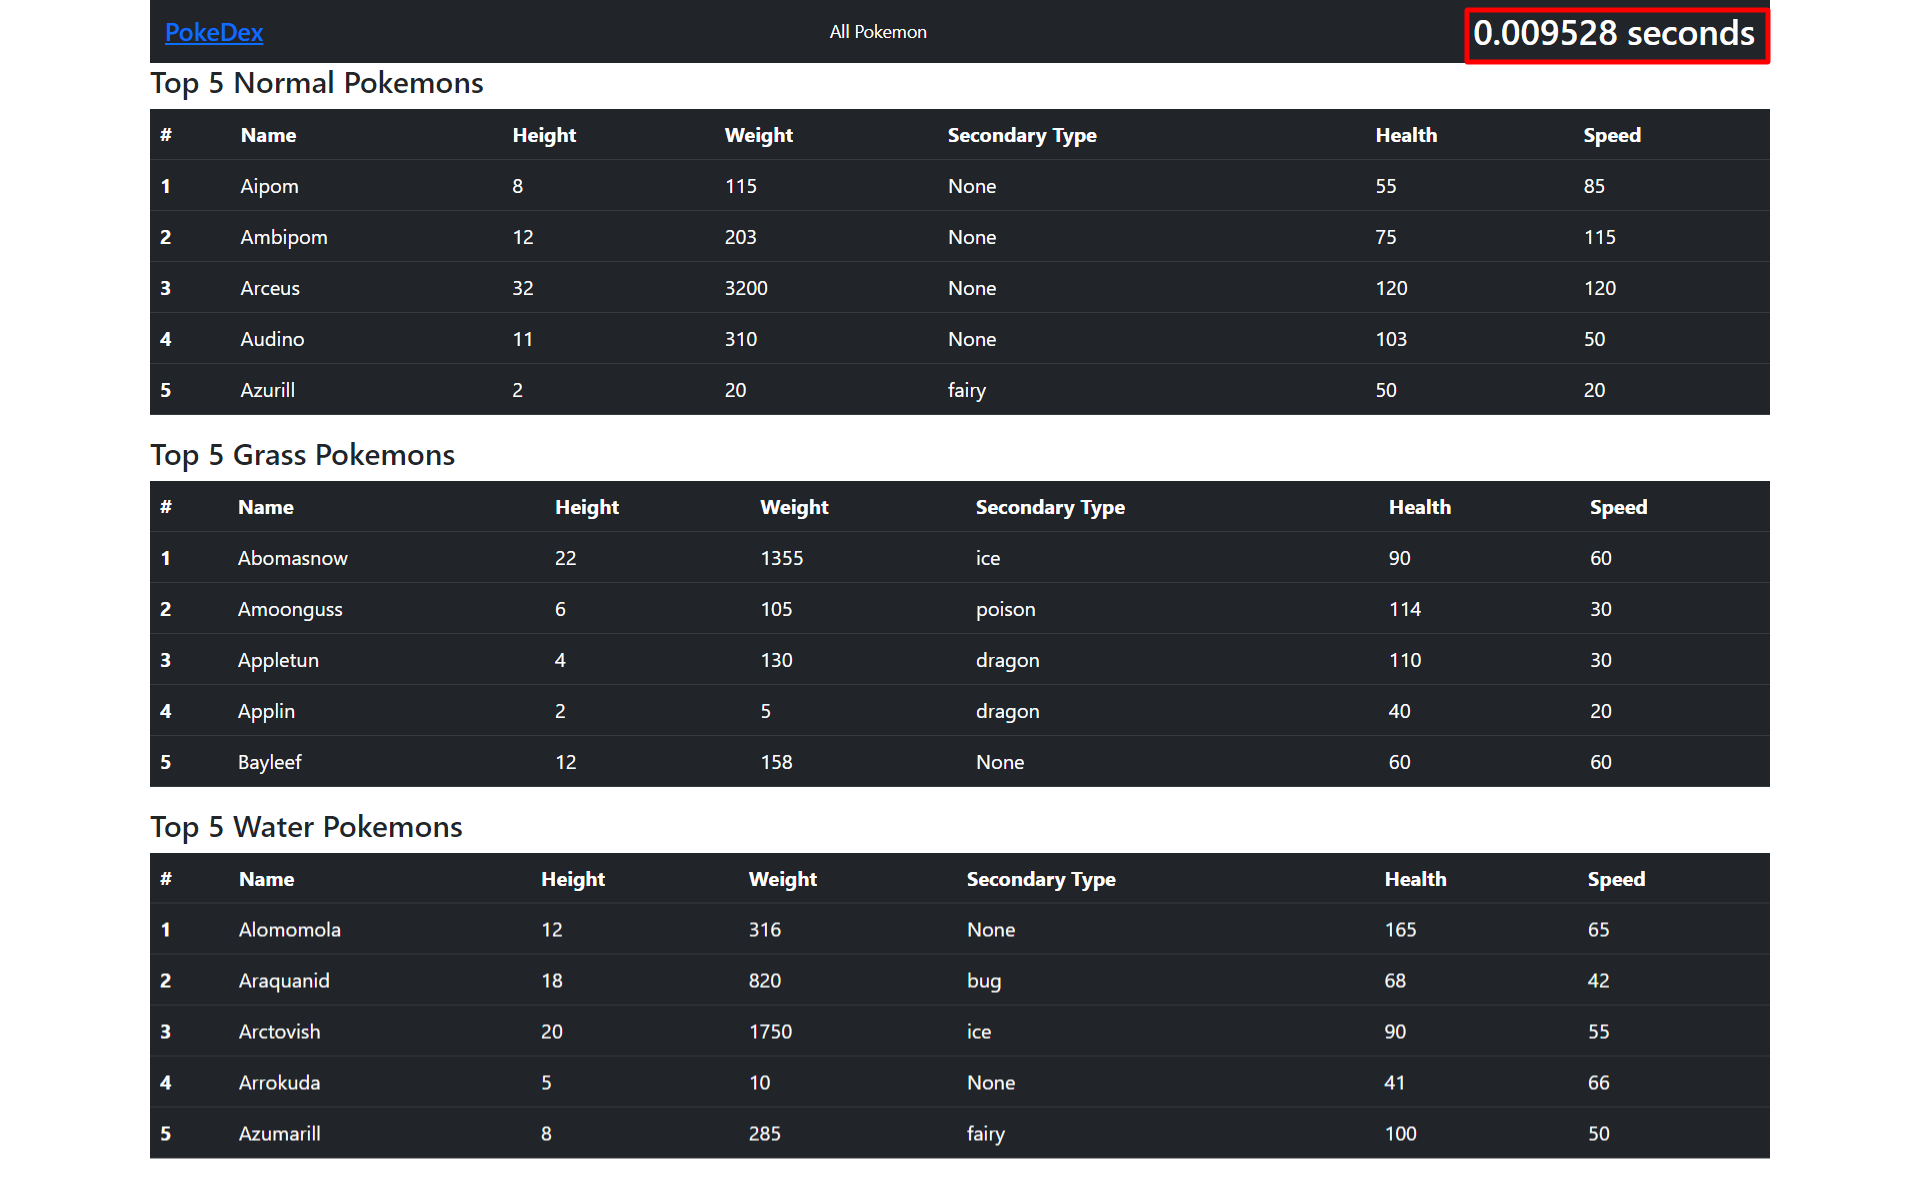
To illustrate the concept of caching in Django, a sample Django Starter Project will be utilized. This project contains a vast database of over 500 distinct Pokemon characters, accompanied by detailed information on each. Additionally, the project conveniently displays the duration of time it takes to process each incoming request in the navbar. It also comes installed with the Django Debug Toolbar to inspect cache strategy. This functionality will prove invaluable in discerning the impact of caching on system performance.
The Caching implementation in Django can be divided into two steps:
Cache Backend: A cache backend in Django is a critical component that serves as an intermediary between the database and the application. Its primary function is to temporarily store frequently accessed data in a specified location, which can include memory, disk, or other external storage systems, for rapid retrieval. In Django, there are mainly three important backends - Database, File System Caching, and Local Memory Cache.
Target: The target for caching refers to the specific block of code that is marked for caching, which can range from the entire website to individual views or templates. To specify the target for caching, developers can use decorators or middleware to identify the code block. Depending on the cache backend chosen, the cache can be stored in memory, disk, or other external storage systems.
In Django, the CACHES setting is a crucial element that allows developers to specify the cache backend for their application. This setting can be defined in the settings.py file and specifies which cache backend will be used to store frequently accessed data temporarily, improving the application’s overall performance. The target can be specified in either the settings.py file or the views file.
Cache Usage and Strategies
In the upcoming section, you will learn about various caching strategies that can be used in Django to optimize the performance of your web application. These caching strategies include but are not limited to database caching, caching using external services such as Redis and file-system caching. You will also learn to use these strategies against different targets such as the whole site, a single view and a template fragment.
Using Database Caching in Per-Site Cache Strategy
Database cache stores cached data in the database. This backend provides a reliable and persistent caching solution and can be further customized to use a specific database engine such as SQLite or Redis. To configure the Database cache, you can add the following code to your settings.py file:
CACHES = {
    'default': {
        'BACKEND': 'django.core.cache.backends.db.DatabaseCache',
        'LOCATION': 'cache_table',
    }
}
In the code snippet above, the BACKEND setting specifies the in-built caching backend (DatabaseCache) and the LOCATION setting specifies the name of the cache table as cache_table where all the cache data will be stored and retrieved. You can modify this setting to use a different table name.
Your cache backend is now set up, to specify the target you have to make changes into the MIDDLEWARE setting in the settings.py file:
MIDDLEWARE = [
# – code-omitted –
    "django.contrib.sessions.middleware.SessionMiddleware",
    "django.middleware.cache.UpdateCacheMiddleware",
    "django.middleware.common.CommonMiddleware",
    "django.middleware.cache.FetchFromCacheMiddleware",
    "django.middleware.csrf.CsrfViewMiddleware",
# – code-omitted –
]
These three middleware classes work together to enable caching in your Django application. The UpdateCacheMiddleware class intercepts the response and stores it in the cache, while the FetchFromCacheMiddleware class retrieves cached responses and serves them. The CommonMiddleware class performs other common middleware tasks such as setting the cache-related headers, Content-Length header and handling conditional GET requests. By adding these middleware classes to your MIDDLEWARE setting, you can enable caching in your Django application and improve website performance. Please note that the order of Middleware is important.
Before testing your newly added cache backend you have to run python manage.py createcachetable to create a new table in the database so that Django can store cached data in the table. After running this command you can run your server using python manage.py runserver and visit http://127.0.0.1:8000/ to check if your cache works or not. After refreshing the page a few times you will find that the time in the navbar is constant. This is because the value of response time is cached by Django and it is returning the cached value.
You can also confirm this by checking the output by Django Debug Toolbar. The below image shows that after caching the particular endpoint hit cache two times which took much less time than executing SQL queries:
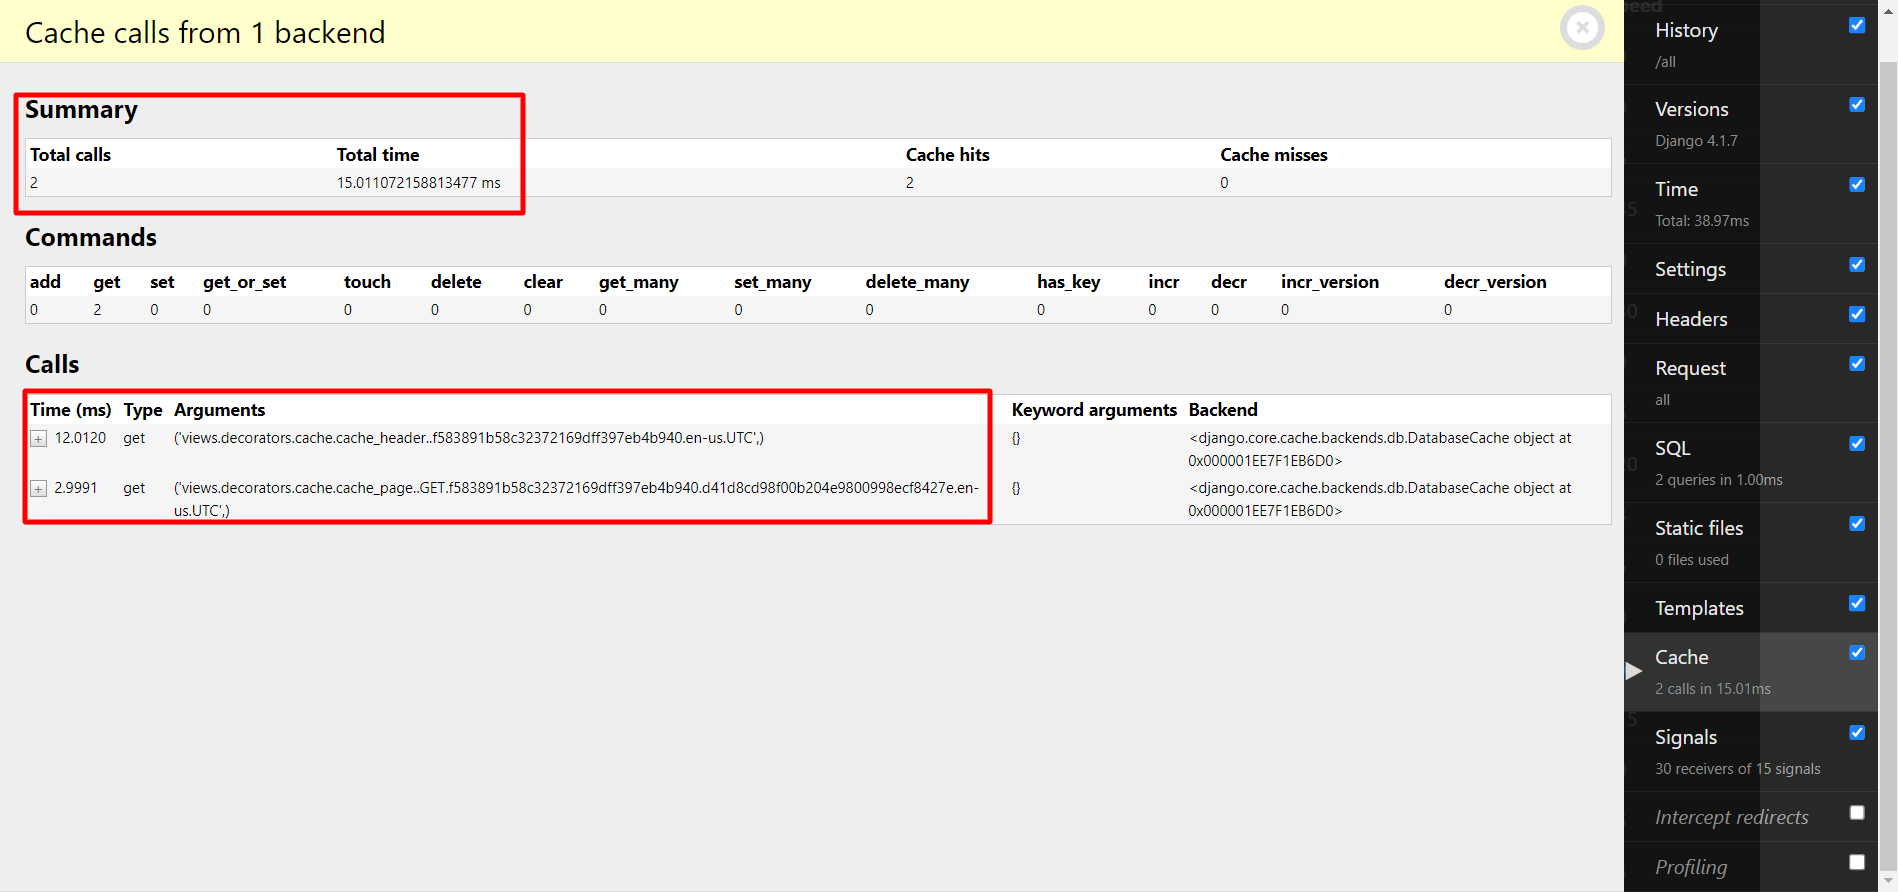
It is important to note that caching will have an impact on all endpoints, as the Middleware processes every incoming server request.
Using Redis to Cache With Per-View Strategy
Django also provides Database caching using a key-value storage server like Redis and Memcached. Redis is much faster than SQL databases because of its in-memory storage. Redis provides many scalability features like efficiency in storage and database partitioning which makes it perfect to use in production systems.
Before implementing Redis as a caching backend you must have Redis installed in your system. Installing Redis is pretty straightforward, you can go through the installation guide for Mac OS and Linux. Note, if you are using Windows you can also work with a Redis Compatible Datastore called Memurai since Redis is built for a Unix-like operating system and Memurai is much easier to set up in Windows.
Also, make sure to remove UpdateCacheMiddleware and FetchFromCacheMiddleware from the MIDDLEWARE setting to remove the whole site cache. Now you are ready to implement caching using Redis, open the settings.py file and make the following changes in your CACHES setting:
CACHES = {
    'default': {
        'BACKEND': 'django.core.cache.backends.redis.RedisCache',
        'LOCATION': 'redis://127.0.0.1:6379',
    }
}
The above setting specifies the RedisCache backend and the Location where the cache should be stored. In this case, Location uses port 6379 which is the default port where Redis runs.
After completing the backend setup, the next step is to set the target for the per-view caching strategy. This strategy involves specifically selecting the views that need to be cached. It is particularly beneficial for websites that have content that changes frequently. Such content should not be cached to display the most up-to-date information on the website. By utilizing the per-view caching strategy, we can ensure that only the intended views are cached and that the website’s visitors are provided with the latest information.
The per-view caching strategy uses a built-in cache_page decorator on the view. Open the views.py file and apply the decorator on the all view as shown in the following code:
from django.views.decorators.cache import cache_page

@cache_page(60)
def all(request):
    start = time.perf_counter()

    all_pokemon = list(Pokemon.objects.all())
    return render(
        request,
        "all.html",{"all_pokemon": all_pokemon,"response_time": \
        f"{(time.perf_counter()-start):6f} seconds"},
    )
The above code snippet demonstrates the use of the cache_page decorator. Firstly, the cache_page decorator is imported to allow it to be used in the code. Then, the all view is decorated with the cache_page decorator, with a timeout of 60 seconds specified as a required argument. This instructs Django to remove the cached data after the specified timeout duration. By using the cache_page decorator, subsequent requests to the all view will serve the cached response if it exists and has not yet expired, potentially improving performance and reducing server load.
To validate the functionality of the implemented caching, ensure that your Django server is running and navigate to http://127.0.0.1:8000/ in your web browser. You will observe that the time displayed in the navigation bar changes with every page refresh, indicating that the content is not cached.
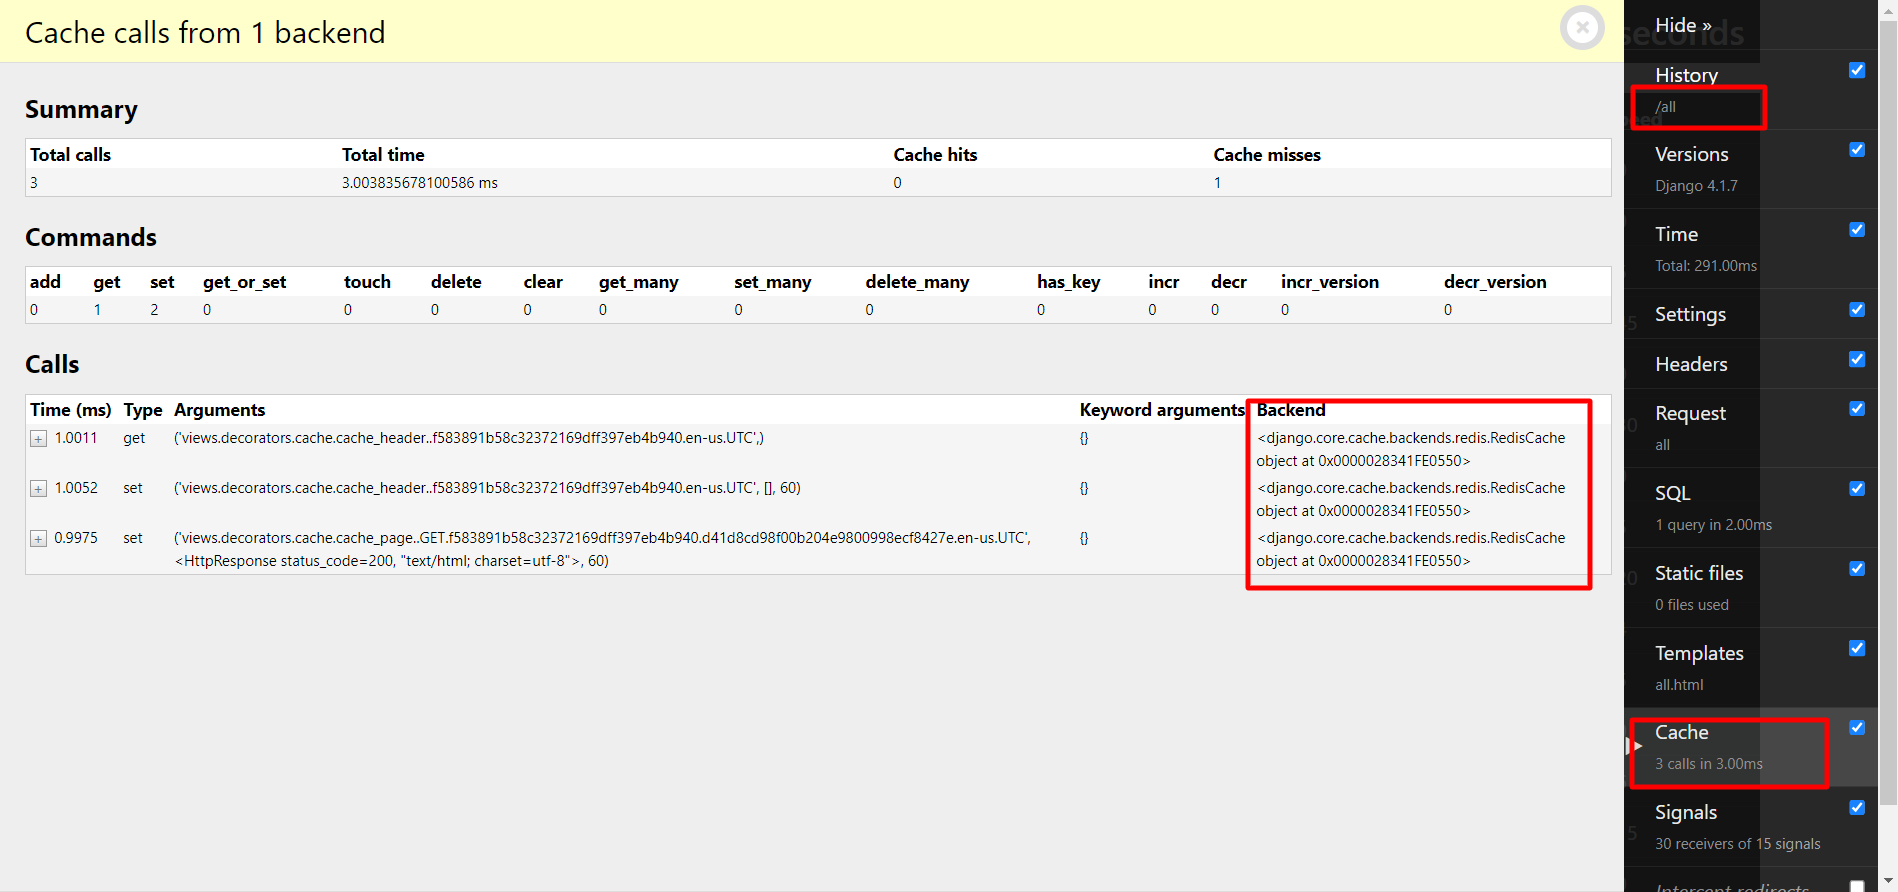
Next, visit the http://127.0.0.1:8000/all endpoint and refresh the page. You will notice that the time displayed in the navigation bar remains the same. This is because Django is caching this view for 60 seconds, as specified in the cache_page decorator. To confirm the caching, you can check the cache section in the Django Debug Toolbar.
Using File System to Cache With Template Fragment Strategy
The File System Caching Backend is suitable for small projects where integrating with an external service like Redis is a bit of overkill. File System Caching stores cached data in a specified directory in your system. You can implement this backend by making the following changes in your CACHES setting in your settings.py file:
CACHES = {
    'default': {
        'BACKEND': 'django.core.cache.backends.filebased.FileBasedCache',
        'LOCATION': BASE_DIR / 'cache' ,
    }
}
In the above code, you instructed Django to use the FileBasedCache backend and store cached data in a cache directory in your project’s folder.
In the Template Fragment caching strategy of Django, a portion of the template can be cached exclusively by using the cache template tag. This technique is particularly useful for caching repetitive and dynamic data in the same template. By wrapping the code block with the cache template tag, the contents within it are cached.
Open the templates/all.html file and make the following changes to it:
{% extends 'base.html' %}
{% load cache %}
{% block title %}
All Pokemons
{% endblock title %}

{% block content %}
{% cache 60 content_cache %}
<table class="table table-dark table-striped mb-3 mt-4">
    — code-omitted —
</table>
{% endcache content_cache %}
{% endblock content %}
In the above code snippet, the cache template tag was loaded and subsequently used to cache a specific block of content within a Django template. Enclosing the content block within the cache template tag enables it to be cached.
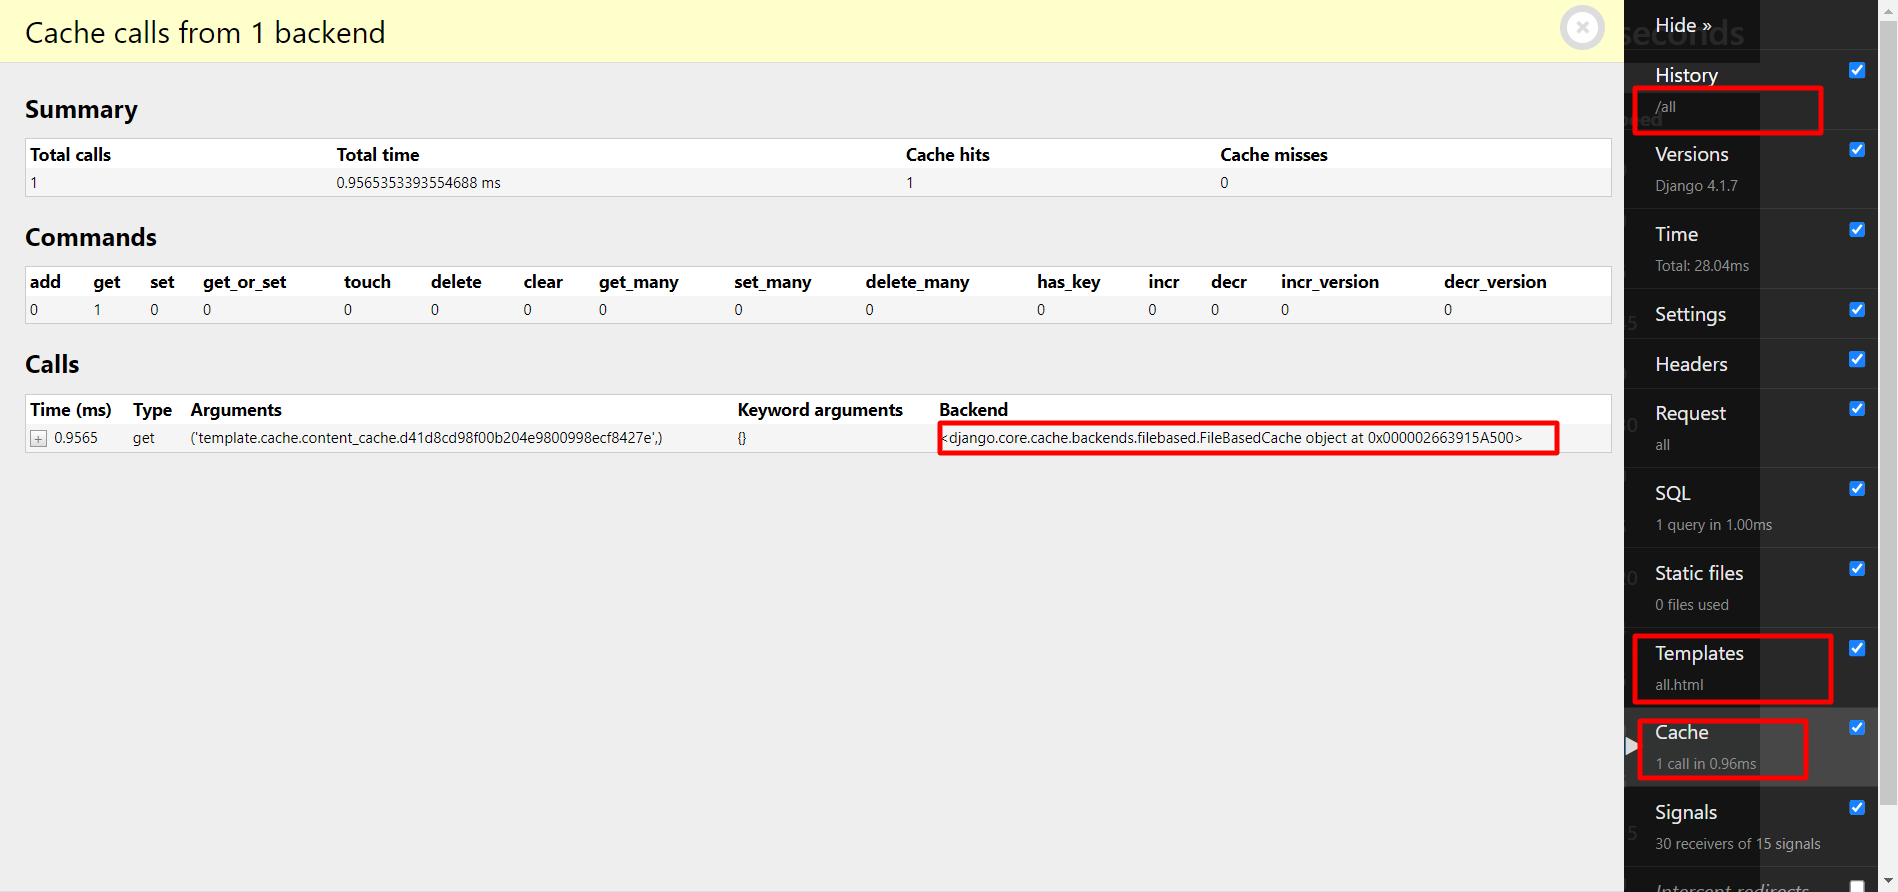
To test it, run the Django server and visit http://127.0.0.1:8000/all , on refreshing the page repeatedly you will find that the time on the nav bar is now changing. Additionally, you can verify that the caching strategy is working by checking the Django Debug Toolbar, which will show that the all endpoint is picking up cache hits from the cache folder where the cached content is being stored.
Take a look at your project directory, you will see a cache directory that contains all the cache for your application. Since these files are binary you cannot read their content. They are meant to be used by Django Caching Backend.
These are the main Django Caching Backends and Caching strategies, you can use any strategy with any of the given Backends interchangeably. Ultimately, the choice of caching backend and strategy depends on the specific needs and constraints of your application.
Cache Invalidation
Cache invalidation is a critical process in software development, involving the removal or invalidation of cached data that is no longer in use by the application. By discarding outdated cache, invalidation frees up space for new data to be stored, ultimately improving the efficiency and speed of the caching process. Effective cache invalidation is essential to maintaining optimal application performance, as stale or expired data can lead to inaccurate or misleading results. The most widely used cache invalidation strategies used in modern software development are:
Time-Based Invalidation: Time-Based cache invalidation is when the cache is cleared after a certain amount of time has passed. This is great for content that doesn’t change frequently, as it reduces the load on the server by serving the same data from the cache.
Key-Based Invalidation: In key-based invalidation, a unique identifier is assigned to each cached item or set of items. When changes are made to the data that corresponds to a specific key, the cache item associated with that key can be invalidated or deleted, ensuring that the next request for that data will result in a fresh retrieval from the original source. This approach offers more granular control over cache invalidation compared to time-based invalidation, which relies solely on time limits to determine when cached data should be cleared.
Cache Optimization
Cache optimization, commonly referred to as cache tuning, is an important technique used in computer science to maximize the performance of applications. The goal of cache optimization is to minimize the amount of time it takes for a computer to access frequently used data. This is done by storing the data in a cache memory, which is much faster than the computer’s main memory. Some of the widely used cache optimization techniques are compression, serialization, and cache middleware. Django does not provide a direct interface to do this but you are free to tweak the caching internals.
Conclusion
Django’s built-in caching framework allows developers to create scalable, high-performing web applications. In this article, we delved into Django’s caching strategies and their impact on improving application performance through reduced database queries and faster response times. We also highlighted the importance of cache invalidation and performance optimization.
In a nutshell, leveraging caching in Django is key to delivering outstanding user experience. And if you’re looking to further level up your Django app’s build process, you might want to give Earthly a try. This open-source build automation tool can help optimize your build performance and ensure consistent, repeatable builds across different environments.
Turn your engineering standards into automated guardrails that provide feedback directly in pull requests, with 100+ guardrails included out of the box and support for the tools and CI/CD systems you already have.