Using Canary Deployments in Kubernetes
Table of Contents
Has a seemingly harmless update ever caused your application to fail in production? Canary deployments, like the proverbial canary in a coal mine, can help you mitigate the chaotic outcomes of such updates that can potentially cause critical downtime.
Canary deployments are based on the routing of user traffic such that you can compare, test, and observe the behavior of any update for a small percentage of users. They are an important roll-out strategy in Kubernetes, especially when tweaks, updates, or entirely new deployments need to be tested. A canary deployment is an improved iteration of an existing deployment that includes all the necessary dependencies and application code. It exists alongside the original deployment and allows you to compare the behavior of different versions of your application side by side. It helps you test new features on a small percentage of users with minimal downtime and less impact on user experience.
In this article, you’ll learn about canary deployments, why they’re important, and how to use them to optimize your deployment process. You’ll also learn how to fit them into an automatic CI/CD framework.
Canary Deployments in Kubernetes
Generally, canary deployments involve making small staged releases or updates that are sent to a fraction of your users for live testing and observation. Once enough feedback is gathered and no bugs are encountered, the release can be rolled out to the rest of your user base.
This means that the original application is updated only after the quality of the update is assured and zero downtime for your users is guaranteed.
It also allows you to compare the behavior of both versions of the application, test the reception of new features, and how they behave in your production environment. You can tweak the percentage of users that will experience the updates, create experiments, and carry out monitored A/B tests to ensure the final version of your application is the best it can be.
How You Can Use Canary Deployments in Kubernetes
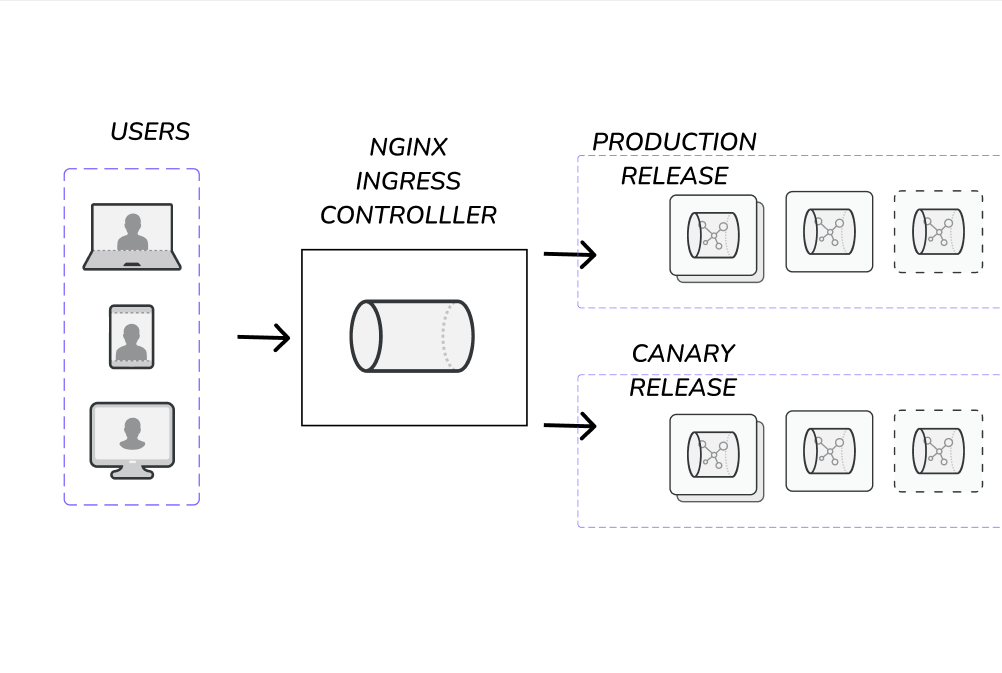
At its core, a canary deployment implements a clone of your production environment with a load balancer routing user traffic between the available environments based on your parameters. You can deploy canary rollouts in a similar manner to regular rollouts.
This feature is available for use on minikube, cloud, or locally managed Kubernetes clusters.
Once added to your Kubernetes cluster, the canary deployment will be controlled by services using selectors and labels. This service provides or forwards traffic to the labeled Kubernetes environment or pod, making it simple to add or remove deployments.
Initially, you can have a specific percentage of users test the modified application, compare both the application deployments, and increase the user percentage as your monitoring and user tests produce no errors. This percentage can be gradually increased until all the users have tested the newer version of the application, and then the older version can be taken offline.
This gradual process alleviates any downtime and reduces the impact of your changes until they are tested live while streamlining the transition between application versions. If there are issues with a particular update, only a small section of the user base will be affected, and you can drop the canary deployment until a more stable update is in place.

Default Kubernetes Request Flow
For canary deployments, the selectors and labels used in the config or YAML file are different than those used in regular deployments.
In Kubernetes, a deployment declares the desired states of pods and ReplicaSets. The Kubernetes controller helps a cluster move towards the desired state from its current state.
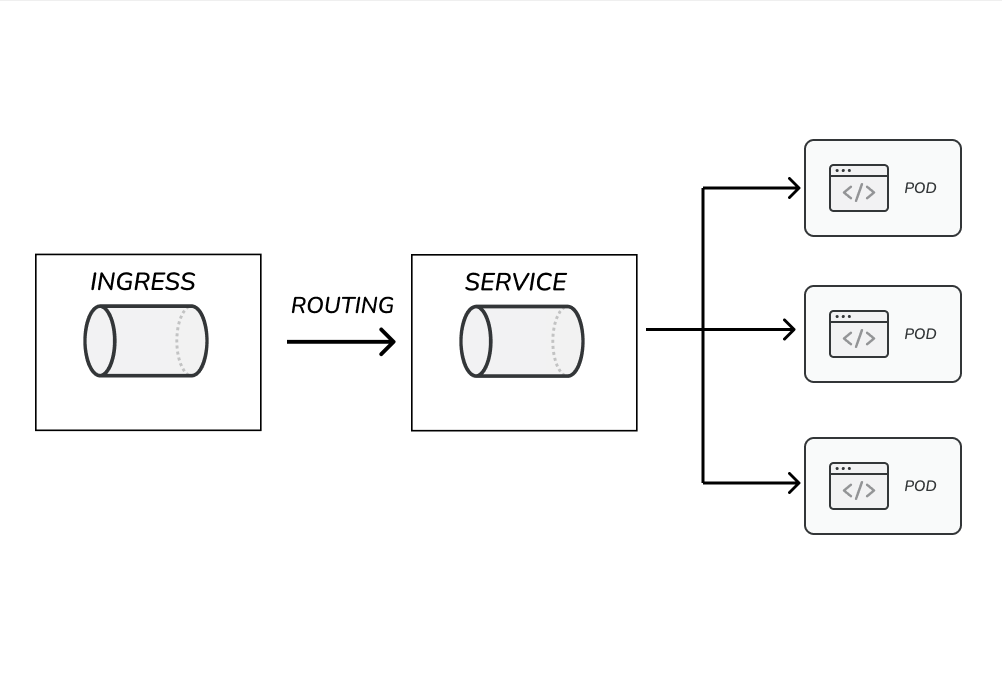
In this flow, you create a service to allow access to all created pods or replicas through a single IP or name, as it abstracts away the individual pod addresses to a specific service name and allows requests within the cluster to reach multiple pods. Then your ingress configuration sets a collection of rules allowing inbound connection to communicate with your cluster services.
In a Kubernetes cluster, you utilize these ingress objects to deploy your application and configure communication both within and outside the cluster.

Deployment Definition
When defining a deployment, you should set up the name of your deployment, the label (Nginx) to match its created objects, the number of replica pods, and the details of the pod to be created.
The following YAML declares a sample-deployment, which creates three pod copies of a labeled nginx application. This nginx application is built with a Docker image named nginx:1.14.2 and is set to communicate outside of its container through port 8080:
apiVersion: apps/v1
kind: Deployment
metadata:
  name: sample-deployment
  labels:
    app: nginx
spec:
  replicas: 3
  selector:
    matchLabels:
      app: nginx
  template:
    metadata:
      labels:
        app: nginx
    spec:
      containers:
      - name: nginx
        image: nginx:1.14.2
        ports:
        - containerPort: 8080
You do not need to explicitly declare a deployment strategy; however, the default deployment strategy in Kubernetes is the RollingUpdate strategy, where pods containing updates replace old pods continuously until all pods are updated. This process is often quick and can be rolled back to a previous deployment.
Canary Service Definition
Next, you have a service definition matching your deployment labeling and defining access ports for the deployment:
apiVersion: v1
kind: Service
metadata:
  name: sample-service
spec:
  selector:
    app: nginx
  ports:
    - protocol: TCP
      port: 80
      targetPort: 8080
This code will create a sample-service object in your cluster, which binds itself to any pod running nginx, defined by the selector label. Any newly created pod from that deployment will also gain access to this service.
It’s important to note the name given to the service, the selector labels, and the ports.
Ingress Definition
The ingress controller is ideal for exposing multiple services through a single external endpoint while also enabling rules to be defined for routing traffic. You can configure ingress controllers to extend your service capabilities and enable external access to your pods with more flexibility:
apiVersion: extensions/v1beta1
kind: Ingress
metadata:
  name: ingress-example
  annotations:
    kubernetes.io/ingress.class: nginx
  labels:
    app: nginx

spec:
  rules:
  -host: example.com
  - http:
      paths:
      - path: /
        backend:
          service:
            name: sample-service
            port:
              number: 80
This code connects to the defined service and extends its capabilities for connections outside the cluster.
Canary Deployment
Suppose you have a running deployment. To set up a canary deployment, you need to create a replica deployment and a service object with an ingress configuration. This ingress configuration reroutes traffic based on set rules between the stable deployment and the canary deployment.
As such, most of the changes will be in the ingress file for canary development:
---
apiVersion: apps/v1
kind: Deployment
metadata:
  name: canary-deployment
  labels:
    app: nginx-canary
spec:
  replicas: 1
  selector:
    matchLabels:
      app: nginx-canary
  template:
    metadata:
      labels:
        app: nginx-canary
    spec:
      containers:
      - name: nginx-canary
        image: nginx:1.23.1
        ports:
        - containerPort: 8080
Here, you create a deployment named canary-deployment with an updated app name and an updated image base. These labels will be used in the service creation as well. The service uses the nginx-canary tag and connects to pods with that label:
---
apiVersion: v1
kind: Service
metadata:
  name: canary-service
spec:
  selector:
    app: nginx-canary
  ports:
    - protocol: TCP
      port: 80
      targetPort: 8080
Here, you add additional annotations that tell Kubernetes that this ingress is a canary one, and the weight annotation denotes the percentage of traffic to be routed to the canary service and, from there, to the canary deployment.
---
apiVersion: extensions/v1beta1
kind: Ingress
metadata:
  name: canary-ingress
  label:
    app: nginx-canary
  annotations:
    nginx.ingress.kubernetes.io/canary: "true"
    nginx.ingress.kubernetes.io/canary-weight: "20"
spec:
  rules:
  -host: example.com
  - http:
      paths:
      - path: /
        backend:
          service:
            name: canary-service
            port:
              number: 80
---
In the first deployment example, any new update will immediately start replacing previous deployments for all your user bases. At the same time, you can roll back updates if any errors occur after the entire user base has been potentially affected.
With canary deployment, your stable version is still online, ideally taking up or servicing a large number of users, while the canary version is given time and the user behavior is observed.
Canary Deployments in CI/CD Frameworks

You can use canary deployments in a CI/CD process, in synergy with monitoring and telemetry. In addition, CI/CD frameworks like Earthly allow you to set automated shifts between versions — with percentages of your user base utilizing different versions of your application — generating metrics that are critical to optimizing application performance and user experience.
You can build a CI/CD pipeline that accepts application updates, adjusts traffic for a section of users, and collates data to be compared with the stable version. With checks on which version performs better, traffic can be fully rerouted to the updated version, or the updated version can be taken offline.
With Earthly, you can create templates for Kubernetes request flows and set arguments for the parameters you want to automate. These templates will be built and deployed on your Kubernetes environment by Earthly and updated with your programmed logic.
For instance, the nginx.ingress.kubernetes.io/canary-weight annotation in the ingress template can be an automated parameter that will change with each programmed deployment cycle, increasing the percentage of users exposed to the updates.
Automating your Kubernetes process is especially helpful for large architectures with multiple deployments that need frequent updates. A microservices architecture where applications run on different environments and need to be configured separately will benefit from an automated deployment process. Such automated deployments also help standardize configurations and their changes over time and improve the repeatability of the process.
Conclusion
You’ve now got the lowdown on canary deployments in Kubernetes - why they matter, what they do, how they’re different from standard deployments, and how to put them to work. If you’re frequently updating apps in Kubernetes, canary deployments could be a real game-changer for you.
To further supercharge your build process while working with Kubernetes, you might want to take a peek at Earthly. This tool could be the next step in optimizing your development workflow.
Turn your engineering standards into automated guardrails that provide feedback directly in pull requests, with 100+ guardrails included out of the box and support for the tools and CI/CD systems you already have.


