How the Docker Image Is Stored on the Host Machine
Table of Contents
This article explains how to create Docker images. Earthly optimizes the build process for Docker images, ensuring reproducibility and cache efficiency. Learn more about Earthly.
Developers and system administrators can create, deploy, and run distributed applications using the Docker platform. Docker containers, which offer a constant and isolated environment for applications to execute in, are running instances of Docker images. They make it simple to maintain, scale, and guarantee that applications function reliably across many contexts.
However, what exactly is an image? What does it include, and where does it reside after we have built it? This article will answer all these questions by explaining the internals of Docker images and how these images are stored on the host machine.
Docker Images

Docker images are pre-built packages (portable artifacts) that contain all the files, configuration, and dependencies needed to run a piece of software. They are used to build and run Docker containers, which are isolated environments that allow applications to run in a predictable and consistent way, regardless of the host environment.
Images are created using a layered file structure, making it simple to share, reuse, and update them. It is the simple cut-down version of the operating system, however it doesn’t include a kernel or a driver. This is because the host system on which Docker Engine is installed provides these vital elements for the proper functioning of containers. They can be pulled from a centralized image repository such as Docker Hub.
For instance, the containerized version of the Ubuntu 22.04 image is 77.8 MB, whilst the official ISO image weighs 3.6 GB. The size has shrunk by about 98%.
$ docker images
REPOSITORY               TAG       IMAGE ID       CREATED         SIZE
ubuntu                   22.04     a8780b506fa4   5 weeks ago     77.8MB
Docker Layers

A Docker layer is a modification to an image file system. The addition of each command in the Dockerfile forms a new image layer. Docker images are formed by stacking multiple read-only layers on top of each other. The following example shows layers for each executed command:
$ docker history openjdk:8-jdk-alpine-with-bash-cli-mode
IMAGE          CREATED        CREATED BY                                      SIZE      COMMENT
be9564ccef2f   3 months ago   /bin/sh                                         5.43MB
a3562aa0b991   3 years ago    /bin/sh -c set -x  && apk add --no-cache   o…   99.3MB
Platforms like Docker and Podman bring the layers together and show them as a single unified object. Each layer also gets its own unique hash identifier for references. The image manifest file contains the layers details associated with the image in the registry.
If multiple images share the same read-only layer, the layer will only be downloaded once. This approach saves space, reduces network load, and reuses parts of images wherever possible.
The snippets below show that the two images (edc5a3f3b57b, d181adc2b1e1) share a common first layer. Here, we use the docker inspect command to get a detailed view of the Docker objects configuration and state. The output also includes information such as layer ID, name, labels, network settings, and so on:
$ docker inspect --format='{{json .RootFS}}' edc5a3f3b57b | jq{
"Type": "layers",
"Layers": [
"sha256:994393dc58e7931862558d06e46aa2bb17487044f670f310dffe1d24e4d1eec7",
"sha256:4ccc88f068b780237695d1377f4b6f218e5cc3a31ca3c32e4d1d6394fc46991a"
]
}
$ docker inspect --format='{{json .RootFS}}' d181adc2b1e1 | jq{
"Type": "layers",
"Layers": [
"sha256:994393dc58e7931862558d06e46aa2bb17487044f670f310dffe1d24e4d1eec7",
"sha256:265ed93d82c9d370b4dc31431c1691d7019667b203745ceaf733cae0daba8374",
"sha256:d956d5eab6ace64c1fe66c1e5080f39ef5cb35fa632d85376067852a9bbabd2d"
]
}When we start a container, Docker uses its basic image and adds an interim read/write layer on top of it. It helps to store the changes made to the container’s file system. It also makes the containers so flexible and portable. Here, only the temporary layer gets either created or destroyed, the base image remains the same. This way,, it is possible to reuse the same basic image repeatedly without mutating its state.
If we spin up three instances of an image, Docker only uses one copy of the base image to create three temporary layers instead of three copies of the base image. These temporary layers in Docker help to store information about the environment variables, files, and other data that are added to the image during the build process. This layered approach is secure as each layer is separate from the others and cannot see the contents of the other layers.
We generally pull the images from the Docker Hub registry. Though Docker Hub is one of the most popular registries, you can also use others such as Amazon ECR, Redhat Quay, and more.
Let’s use the docker pull command to pull the latest MySQL image from DockerHub.
$ docker pull mysql:latestlatest: Pulling from library/mysql
0ed027b72ddc: Pull complete
0296159747f1: Pull complete
3d2f9b664bd3: Pull complete
df6519f81c26: Pull complete
36bb5e56d458: Pull complete
054e8fde88d0: Pull complete
f2b494c50c7f: Pull complete
132bc0d471b8: Pull complete
135ec7033a05: Pull complete
5961f0272472: Pull complete
75b5f7a3d3a4: Pull complete
Digest: sha256:3d7ae561cf6095f6aca8eb7830e1d14734227b1fb4748092f2be2cfbccf7d614
Status: Downloaded newer image for mysql:latest
docker.io/library/mysql:latestAs we see, the image is downloaded from the Docker Hub blob store in numerous layers. The lines with pull complete in the output denote the image layers.
Here, our mysql:latest image has eleven read-only layers stacked on top of each other to form a single, cohesive image object. Further, let’s get the list of images in our local repository using the docker images command.
$ docker images
REPOSITORY         TAG       IMAGE ID       CREATED         SIZE
mysql              latest    7484689f290f   2 days ago      538MB
ubuntu             22.04     a8780b506fa4   5 weeks ago     77.8MB
Yet another method to view the layers of an image is by using the docker inspect command.
Now let’s examine the mysql:latest image using the docker inspect command and the image ID and obtain the SHA256 hashes for each layer.
$ docker inspect 7484689f290fHere, the first line in the layer’s section represents the base layer of the image. In the below snippet the first layer or base layer has an SHA256 hash of d3cc7b6aa7bc. The second layer’s hash is a7f421510691 and so on.
[
    {
      "Id": "sha256:7484689f290f1defe06b65befc54cb6ad91a667cf0af59a265ffe76c46bd0478",
       "RepoTags": [
            "mysql:latest"
        ],
..
.. output truncated ..
..
       "RootFS": {
            "Type": "layers",
            "Layers": [
"sha256:d3cc7b6aa7bc15725c1a856ce06fe436da3fbccf0c9c06b04e45f79b3439c154",
"sha256:a7f421510691bf6a7b344d1efb738b3d343e252e7dde114a0dd86d432ef6000c",
"sha256:6ac2db160c6cf3dcf1aff0ced069aa98da28c50cff5cd3c8881c04f42e3ef1fe",
"sha256:7fe65049a2a940ab927d3f5b2cf0687ecffbdf9d7e9df1daaeddb83bc601f3cb",
"sha256:da1824686db37bbf1ffbffea53295aa853731531a14e70bca24eeb6d91fd6327",
"sha256:d410d4efd0e75456011f265fa113b206dd4da9dccf5151bca714ef6c69a3b8cd",
"sha256:60c4dab21dc337e912d518acc56e5b776e3de4f1d277d074831bb678089b87a6",
"sha256:d00057f8969283fed84044f6103036e18a9d776579d705a85472535ba321df25",
"sha256:2f42ce9d7b80a286af13410c0b64e94c90eca3e7597f7fd82a783aa1f68c2373",
"sha256:8408fed6a9d685236cb024ceea39692743b6c52ea6c4c068b22a6475f742e24a",
"sha256:336175ddf157a8f50c0aae8c0726b1462fd41f30f0b7f84caf6bf5cd02f8de77"
            ]
        },
..
.. output truncated ..
..
]
We’ll take a closer look at the specifics of Docker image storage in the next section.
Docker Image Storage
Docker Storage Drivers are the one which controls the storage of container’s writable layers and image layers on the Docker host machine. The writable layer of the container is ideal for storing the ephemeral data that is created during the runtime; however, it does not survive after container deletion. Further, the storage drivers are also knowledgeable about the mechanics of how these levels interact with one another and its arrangements using the manifest files.
Additionally, Docker supports a wide range of storage drivers, including overlay2, fuse-overlay2, btrfs, zfs, aufs, overlay, devicemapper, and vfs. Let’s obtain the storage driver information from the host machine using the docker info command:
$ docker info | grep -i "Storage Driver"Storage Driver: overlay2In Docker, the root directory is one that hosts the entire data of Docker images and containers. Let’s identify Docker’s root directory information on the host machine using the docker info command.
$ docker info | grep "Root Dir"Docker Root Dir: /var/lib/dockerWe’ve identified that the root directory of Docker is /var/lib/docker.
Image Internals
Every Docker image has a corresponding JSON structure that contains information on the image’s essential attributes, such as the date, the creator, and runtime configuration like entrypoint, networking, and volumes. Use docker inspect command to view the image attributes:
$ docker inspect alpine:latest[
{
"Id": "sha256:9c6f0724472873bb50a2ae67a9e7adcb57673a183cea8b06eb778dca859181b5",
"RepoTags": [
"alpine:latest"
],
"RepoDigests": [
"alpine@sha256:bc41182d7ef5ffc53a40b044e725193bc10142a1243f395ee852a8d9730fc2ad"
],
"Parent": "",
…
… output truncated …
…
},
"Metadata": {
"LastTagTime": "0001-01-01T00:00:00Z"
}
}
]It is an immutable JSON object that contains the historical information and a cryptographic hash of each image layer. Now let’s try to identify the image files and their contents in the root folder of the Docker Engine.

Image ID Extraction
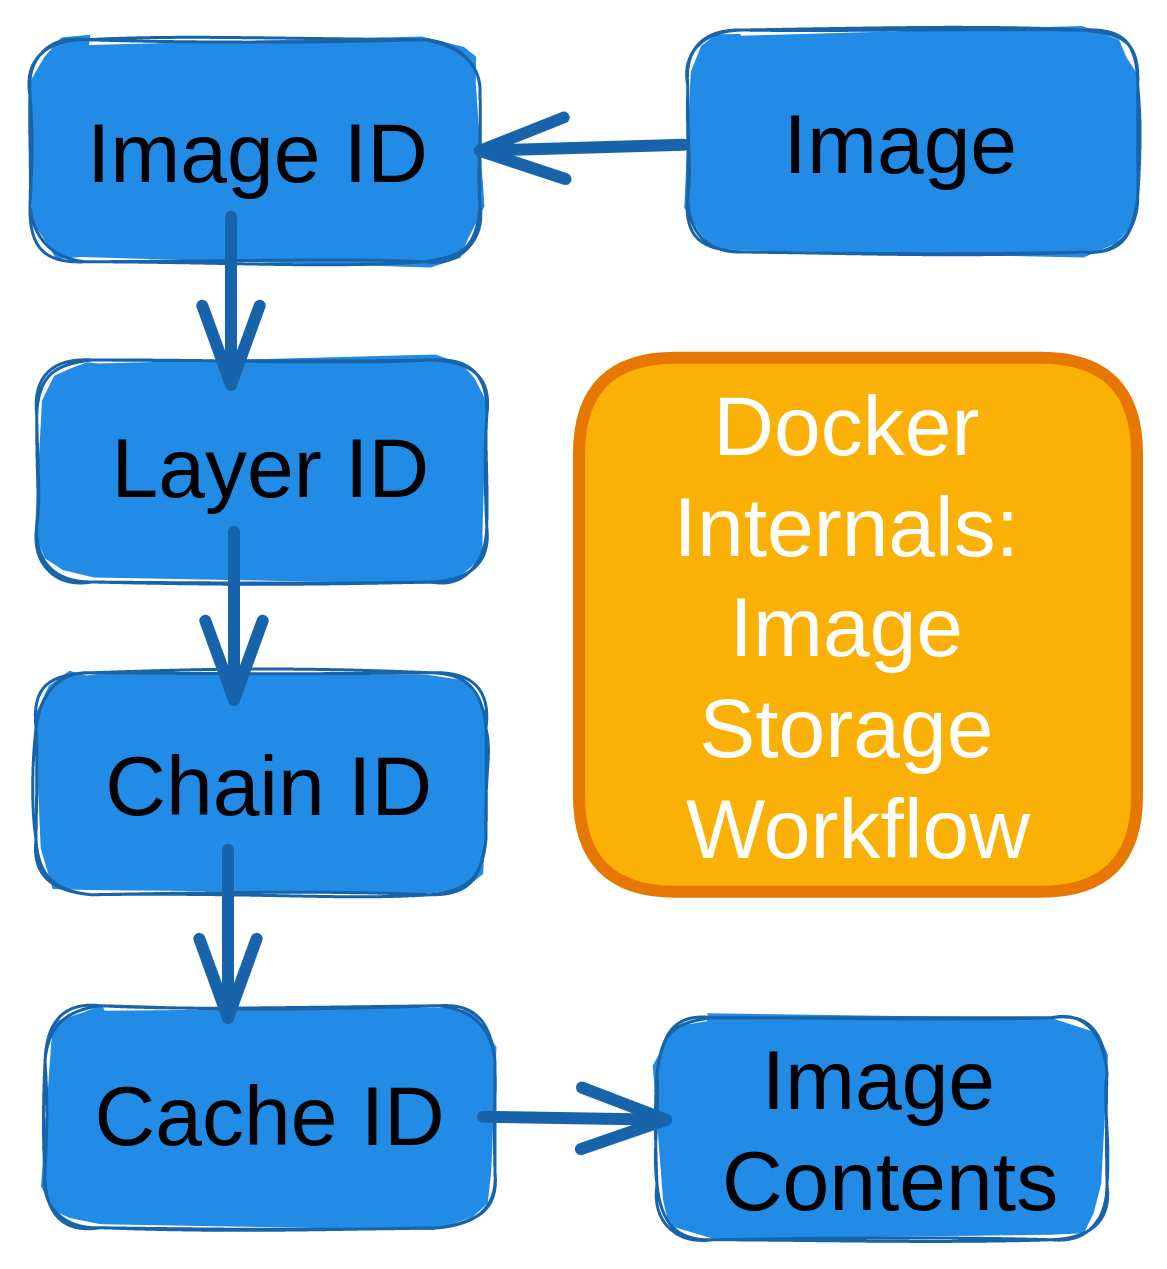
The ImageID in Docker is an SHA-256 hash of the image’s content. It also includes all the metadata, directories, and files associated with the image. It is typically used by the Docker engine to identify an image, despite its name or tag. This means that even if two images have the same name and tag, they will have different Image IDs if their contents are different.
To get the Image ID from the local repository, we use the docker images command:
$ docker imagesREPOSITORY TAG IMAGE ID CREATED SIZE
mysql latest 7484689f290f 2 days ago 538MB
ubuntu 22.04 a8780b506fa4 5 weeks ago 77.8MBDiffID Identification
The Differential ID or DiffID is a unique identifier for all the Docker image layers. Each layer in a Docker image has its own DiffID, which is calculated based on the contents of the specific image layer. It is used to verify the integrity of an image. Also, when two Docker images share the same set of layers, they will have the same DiffIDs for those layers, which allows for efficient storage. We can use the docker inspect command to get the diffIDs of all layers under the RootFS section:
$ docker inspect 7484689f290f[
..
.. output truncated ..
..
"RootFS": {
"Type": "layers",
"Layers": [
"sha256:d3cc7b6aa7bc15725c1a856ce06fe436da3fbccf0c9c06b04e45f79b3439c154",
"sha256:a7f421510691bf6a7b344d1efb738b3d343e252e7dde114a0dd86d432ef6000c",
"sha256:6ac2db160c6cf3dcf1aff0ced069aa98da28c50cff5cd3c8881c04f42e3ef1fe",
"sha256:7fe65049a2a940ab927d3f5b2cf0687ecffbdf9d7e9df1daaeddb83bc601f3cb",
"sha256:da1824686db37bbf1ffbffea53295aa853731531a14e70bca24eeb6d91fd6327",
"sha256:d410d4efd0e75456011f265fa113b206dd4da9dccf5151bca714ef6c69a3b8cd",
"sha256:60c4dab21dc337e912d518acc56e5b776e3de4f1d277d074831bb678089b87a6",
"sha256:d00057f8969283fed84044f6103036e18a9d776579d705a85472535ba321df25",
"sha256:2f42ce9d7b80a286af13410c0b64e94c90eca3e7597f7fd82a783aa1f68c2373",
"sha256:8408fed6a9d685236cb024ceea39692743b6c52ea6c4c068b22a6475f742e24a",
"sha256:336175ddf157a8f50c0aae8c0726b1462fd41f30f0b7f84caf6bf5cd02f8de77"
]
},
..
.. output truncated ..
..
]ChainID Calculation

The ChainID is calculated by concatenating the DiffIDs of the layers in the image and hashing the result using the SHA256 algorithm. It is also used to verify the integrity of an image during transmission. Using the SHA256 values for the current and previous layers to determine the chainID. The formula is shown below.
DiffID = ChainID if the layer is the lowest layer among other layers.
If not, ChainID(n) = sha256sum [DiffID(n-1), DiffID(n)]
Let’s calculate the ChainID for Layer 1:
ChainID(Layer 1) = DiffID(Layer 1)
ChainID(Layer 1) = d3cc7b6aa7bc15725c1a856ce06fe436da3fbccf0c9c06b04e45f79b3439c154
Let’s calculate the ChainID for Layer-2:
ChainID(Layer 2) = sha256sum [DiffID(Layer 1), DiffID(Layer 2)
DiffID(Layer 1) = d3cc7b6aa7bc15725c1a856ce06fe436da3fbccf0c9c06b04e45f79b3439c154
DiffID(Layer 2) = a7f421510691bf6a7b344d1efb738b3d343e252e7dde114a0dd86d432ef6000c
$ echo -n 'sha256:d3cc7b6aa7bc15725c1a856ce06fe436da3fbccf0c9c06b04e45f79b3439c154 sha256:a7f421510691bf6a7b344d1efb738b3d343e252e7dde114a0dd86d432ef6000c' | sha256sum

29bd3d7c6e1683e422776b9d3285e8a3f1272f07656fc63a941cb7729a169100
ChainID(Layer 2) = 29bd3d7c6e1683e422776b9d3285e8a3f1272f07656fc63a941cb7729a169100
Next, let’s calculate the ChainID for Layer 3:
ChainID(Layer 3) = sha256sum [DiffID(Layer 2), DiffID(Layer 3)
DiffID(Layer 2) = a7f421510691bf6a7b344d1efb738b3d343e252e7dde114a0dd86d432ef6000c
DiffID(Layer 3) = 6ac2db160c6cf3dcf1aff0ced069aa98da28c50cff5cd3c8881c04f42e3ef1fe
$ echo -n "sha256:a7f421510691bf6a7b344d1efb738b3d343e252e7dde114a0dd86d432ef6000c sha256:6ac2db160c6cf3dcf1aff0ced069aa98da28c50cff5cd3c8881c04f42e3ef1fe" | sha256sum

9b3abbf0ab6402c9bcb9cce411268ffe24573d790f0333d8ae06794313295dbd
ChainID(Layer 3) = 9b3abbf0ab6402c9bcb9cce411268ffe24573d790f0333d8ae06794313295dbd
CacheID
The CacheID is another unique identifier that is assigned to each layer of the image cache. The CacheID is used to determine whether a layer can be reused from the cache instead of being rebuilt during a subsequent build.
The cacheID facilitates retrieval of the real contents for each layer that are indexed. So using the calculated chainID, navigate to the /var/lib/docker/image/overlay2/layerdb/sha256/<ChainID>/ directory to obtain the content index known as cacheID. Also, the directory includes the parent information of the layer and its size.
$ cat /var/lib/docker/image/overlay2/layerdb/sha256/29bd3d7c6e1683e422776b9d3285e8a3f1272f07656fc63a941cb7729a169100/cache-id5b05639e794f7b0074d8d622843f8816d9e78ac25b6f6f97c49dfda1a39ecd24Lastly, let’s use the CacheID to navigate to the storage driver path [/var/lib/docker/overlay2/]. To access all the files and directories for that layer, navigate to the diff directory:
$ tree /var/lib/docker/overlay2/5b05639e794f7b0074d8d622843f8816d9e78ac25b6f6f97c49dfda1a39ecd24
/var/lib/docker/overlay2/5b05639e794f7b0074d8d622843f8816d9e78ac25b6f6f97c49dfda1a39ecd24
.
├── committed
├── diff
│   └── etc
│       ├── group
│       ├── group-
│       ├── gshadow
│       ├── gshadow-
│       ├── passwd
│       ├── passwd-
│       ├── shadow
│       └── shadow-
├── link
├── lower
└── work
To sum up, the Docker images are stored in layers, each of which is identified by a unique ID called a DiffID. These layers are tied together with a ChainID. The location of the Docker image files on the host machine depends on the storage driver used by Docker. By default, Docker uses the Overlay2 driver, which stores images in a directory called /var/lib/docker/overlay2. However, other storage drivers may use different directories or file systems.
Conclusion
In summary, understanding how Docker images are stored on the host machine is crucial for developers who work with Docker on a daily basis. They can also gain more insights on how Docker is handling image management internally.
With this in-depth understanding of how Docker images are saved on the host machines, developers can better manage their Docker environments and resolve any problems that may arise. Further, developers may enhance their Docker processes and fully utilize the strength and adaptability of Docker containerization.
And if you’re looking to further boost your Docker workflows, you might want to give Earthly a shot. It offers simpler, more reliable builds, enhancing your productivity and efficiency in managing containerized environments.
Earthly Lunar: Monitoring for your SDLC
Achieve Engineering Excellence with universal SDLC monitoring that works with every tech stack, microservice, and CI pipeline.


