Using Portainer with Docker and Kubernetes

Table of Contents
As a developer managing containerized applications can be daunting especially when it comes to using a command-line interface; administrating docker containers, writing complicating, and having to learn the various commands can be intimidating.
Depending on where you land on the spectrum, you might have no problem using a command-line interface; but for many folks, it’s a challenge.
Portainer is an open-source service that provides a visual web view for containerized applications. it is a container management tool for Docker, Docker swarm, Kubernetes, and Azure Container Instances (ACI).
Portainer gives you the ability to deploy and manage your docker containers without having to write code like you’ll normally do with a CLI. With portainer, you have the flexibility of viewing your containerized apps and managing them via a graphical user interface.
In this tutorial, you will learn how to set up, create, and manage docker containers and images with Portainer.
What Is Portainer
Portainer is a containerized web app for managing containerized apps. It gives you a user interface to manage your containerized applications for both local and cloud environments. This reduces the need for command line interfaces.
The portainer architecture requires that you first deploy a portainer server. This server will serve as a central point of operation. You can have the portainer server running on a virtual machine or on a kubernetes cluster as a docker container.
Prerequisites
In this tutorial, you will need the following.
- Docker installed on a ubuntu linux machine.
- Basic knowledge of Docker.
(If you don’t use ubuntu, you can probably adapt these instructions to your distro of choice)
Setting Up Portainer for Docker
First up, you will deploy a portainer app as a docker container to administrate and manage your docker containerized applications.
Since portainer runs as a containerized application, it is required that you create a docker container, configure the volume for persistent storage of the portainer server, and assign port number bindings.
Run the command below to configure a volume called portainer-data :
docker volume create portainer-data
Install the portainer Docker standalone version using the command below:
This command will create a docker container called portainer-ce and run the portainer server in a detached mode.
It will also expose both port 9443 and 8000 and map it to the port 9443 and 8000, respectively. The port binding 9443 gives you access to the portainer GUI, and the port binding 8000 is for the tunneling that enables the connection between the edge agent and the portainer server.
Additionally, this command will mount the docker sock to mount local docker containers and Mount the volume portainer-data to persist data.
docker run -d -p 8000:8000 -p 9443:9443 --name portainer-ce \
--restart=always -v /var/run/docker.sock:/var/run/docker.sock -v \
portainer-data:/data portainer/portainer-ce:latest
Creating and running portainer as a docker container.
Confirm if the portainer server is up and running using the following docker command.
docker ps
Confirming portainer is up and running.
Accessing the Portainer UI
Portainer becomes really useful and powerful when used via the GUI. Since you now have portainer up and running, visit the address below on your favorite browser to access your login page. You’ll need to create a user and log in so you can access the portainer GUI to administer your containers.
https://localhost:9443You should see a page that requires you to create a user to proceed. Fill in the fields, to create a user.
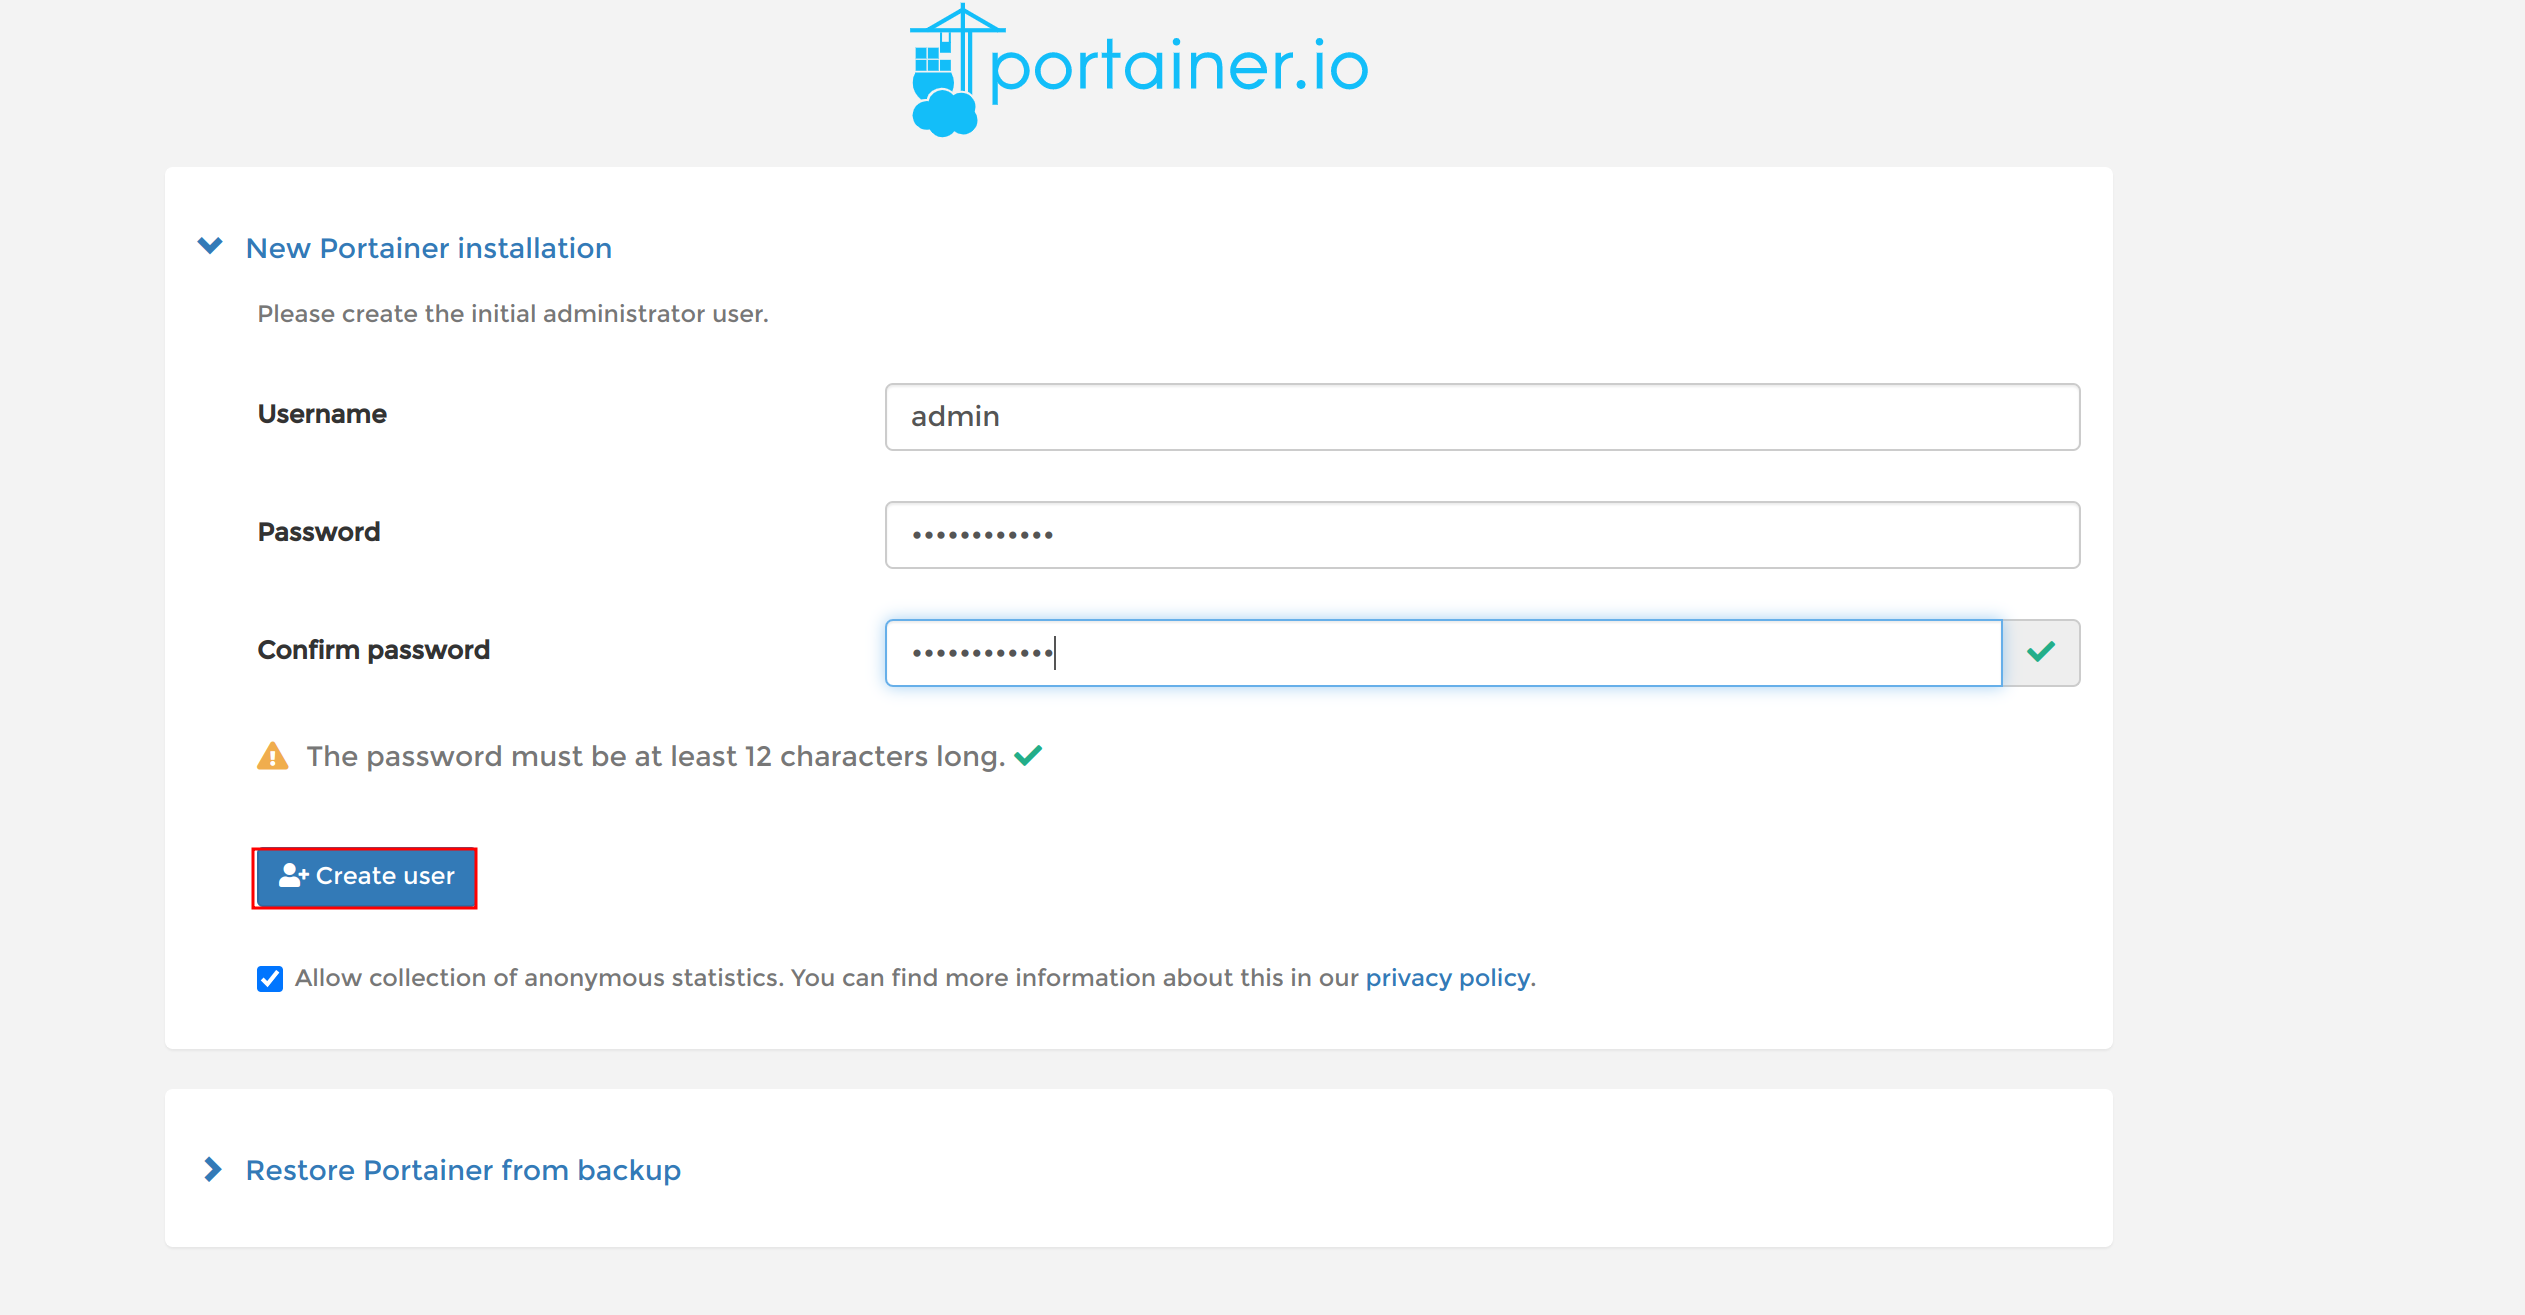
Creating a new user on portainer server.
On successful creation, the page will redirect to a quick setup page.
Managing Docker Containers With Portainer
Up until now, you have created and ran portainer as a docker container. You have also accessed the portainer graphic user interface. It’s now time to manage your docker containers with portainer.
On the quick setup page, click on the Get Started box highlighted below to manage the environment where portainer is currently running on.
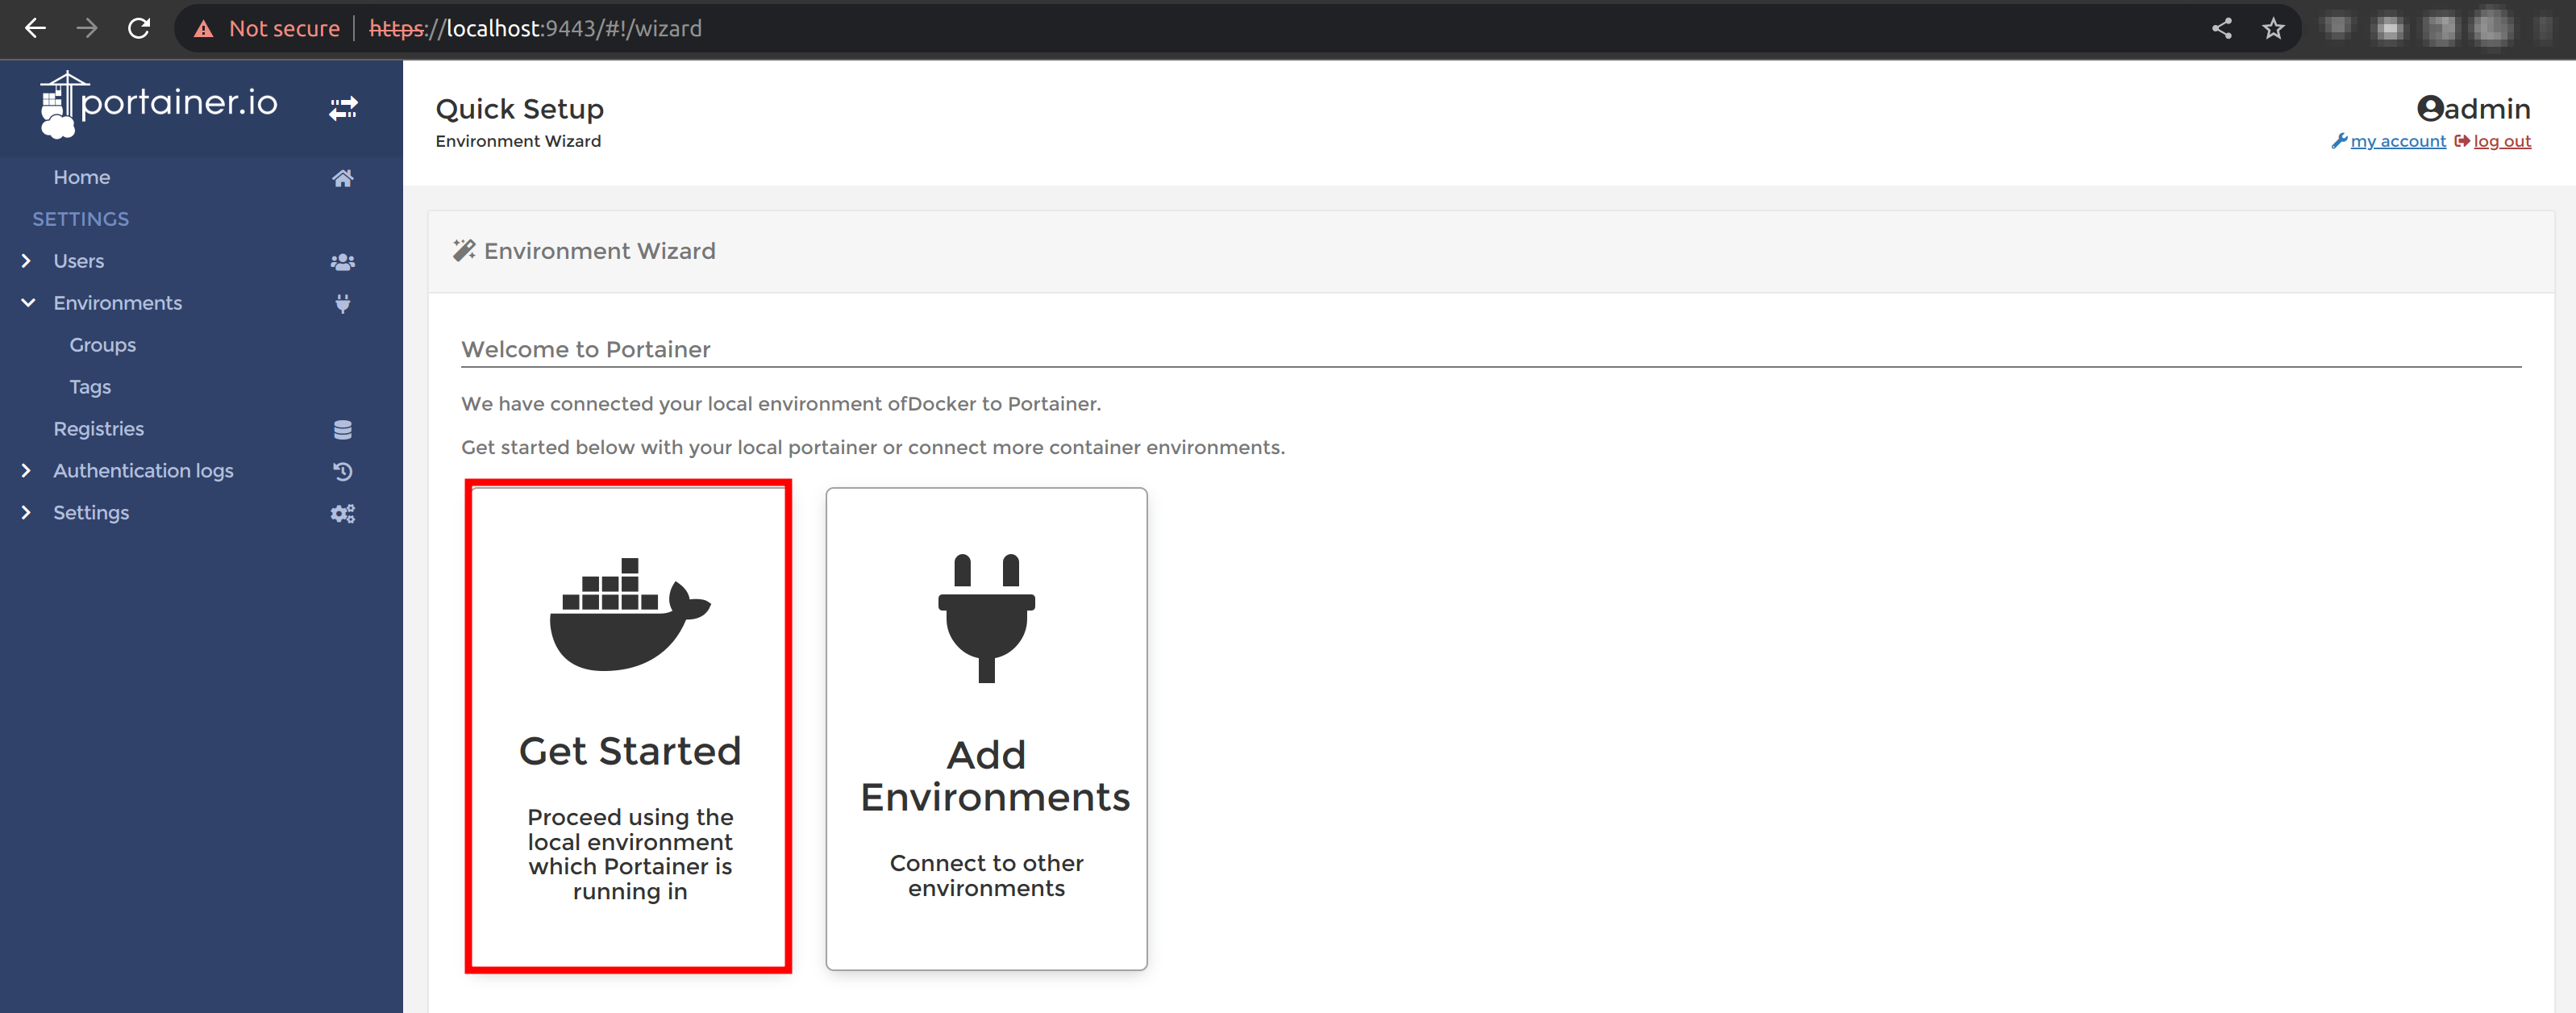
Initializing docker container management with portainer.
You should see all the containers running on your machine together with other resources like stacks, volumes, and images.
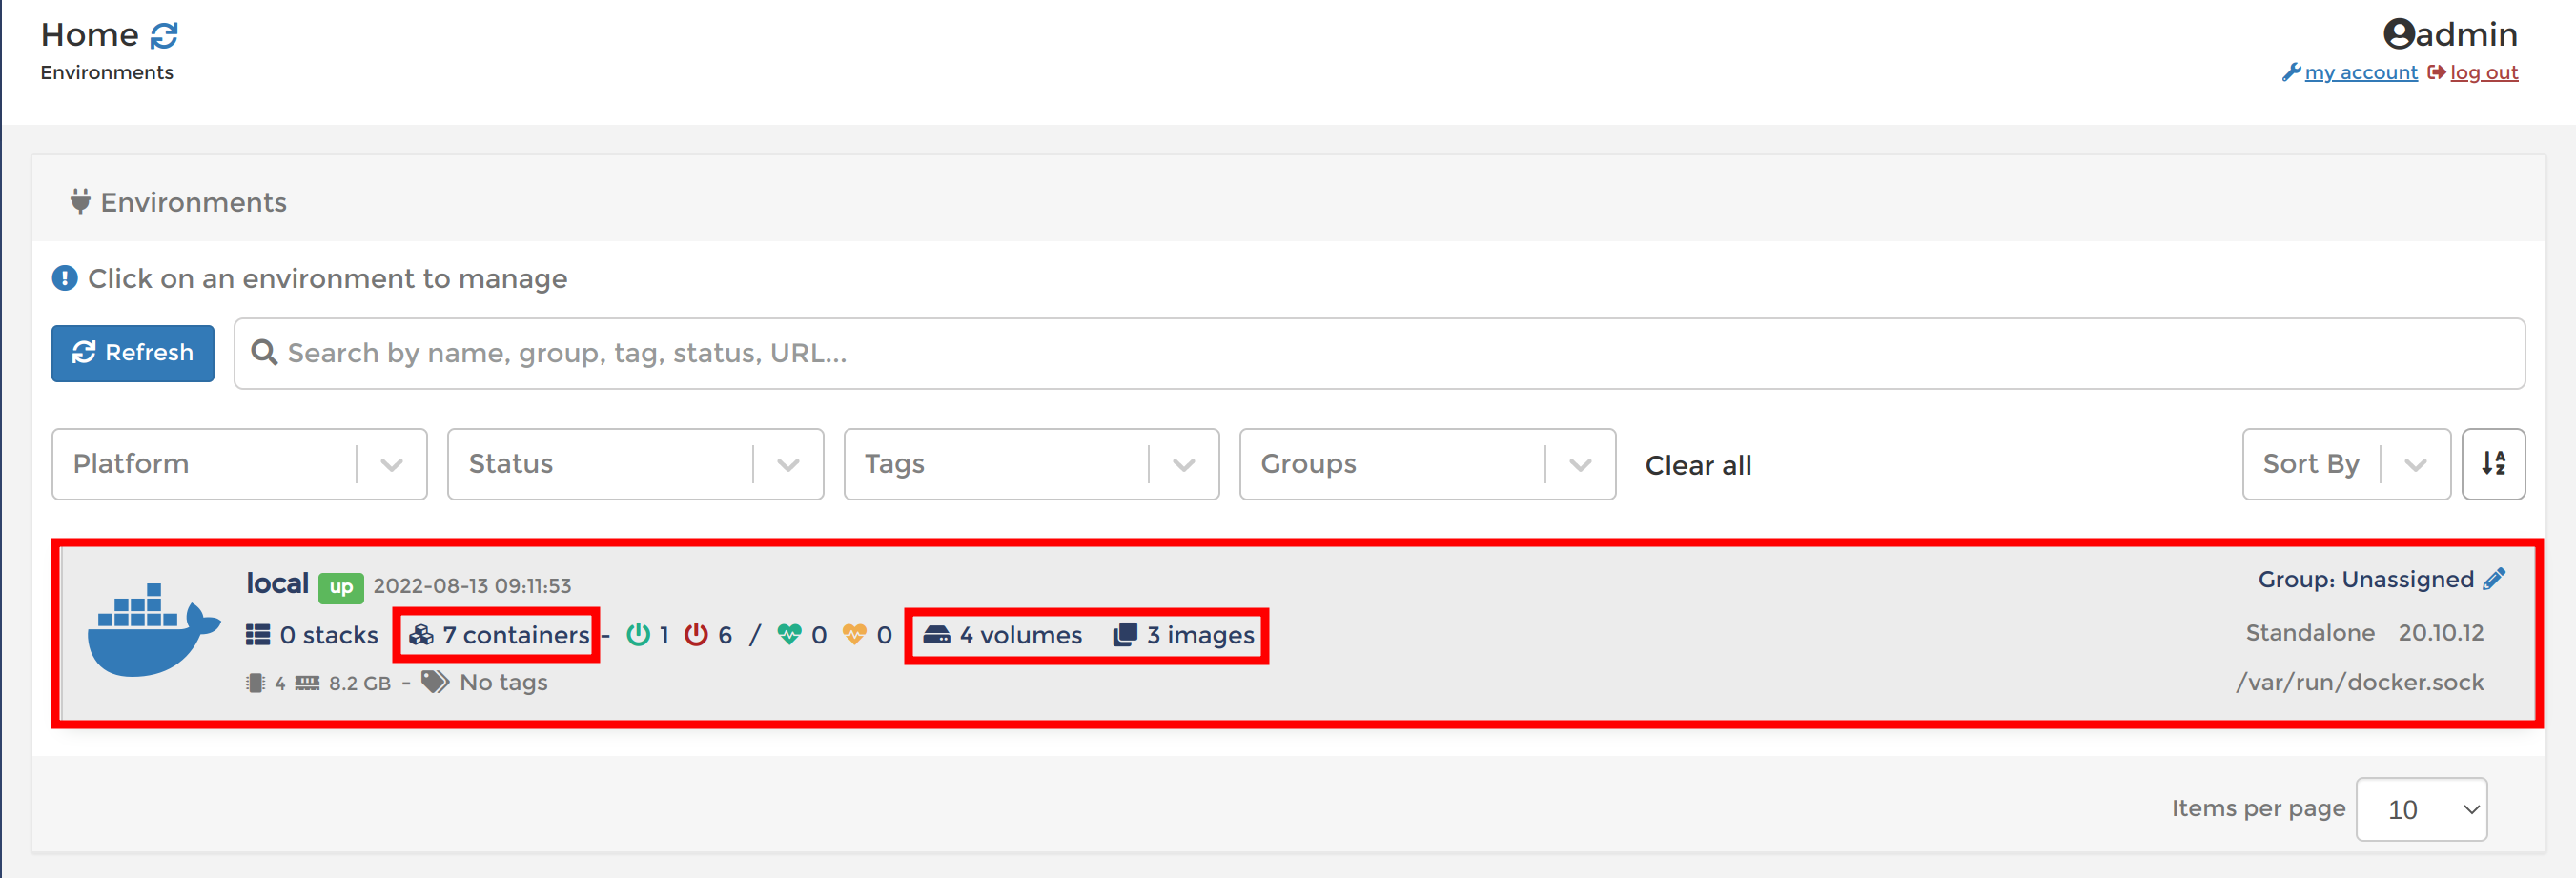
Viewing docker containers and related resources with portainer.
For a detailed view of your docker resources, you can click on the box above to see your docker resources respectively.
The image below showcases the number of docker compose stacks, images, containers, volumes, and networks available on your machine.
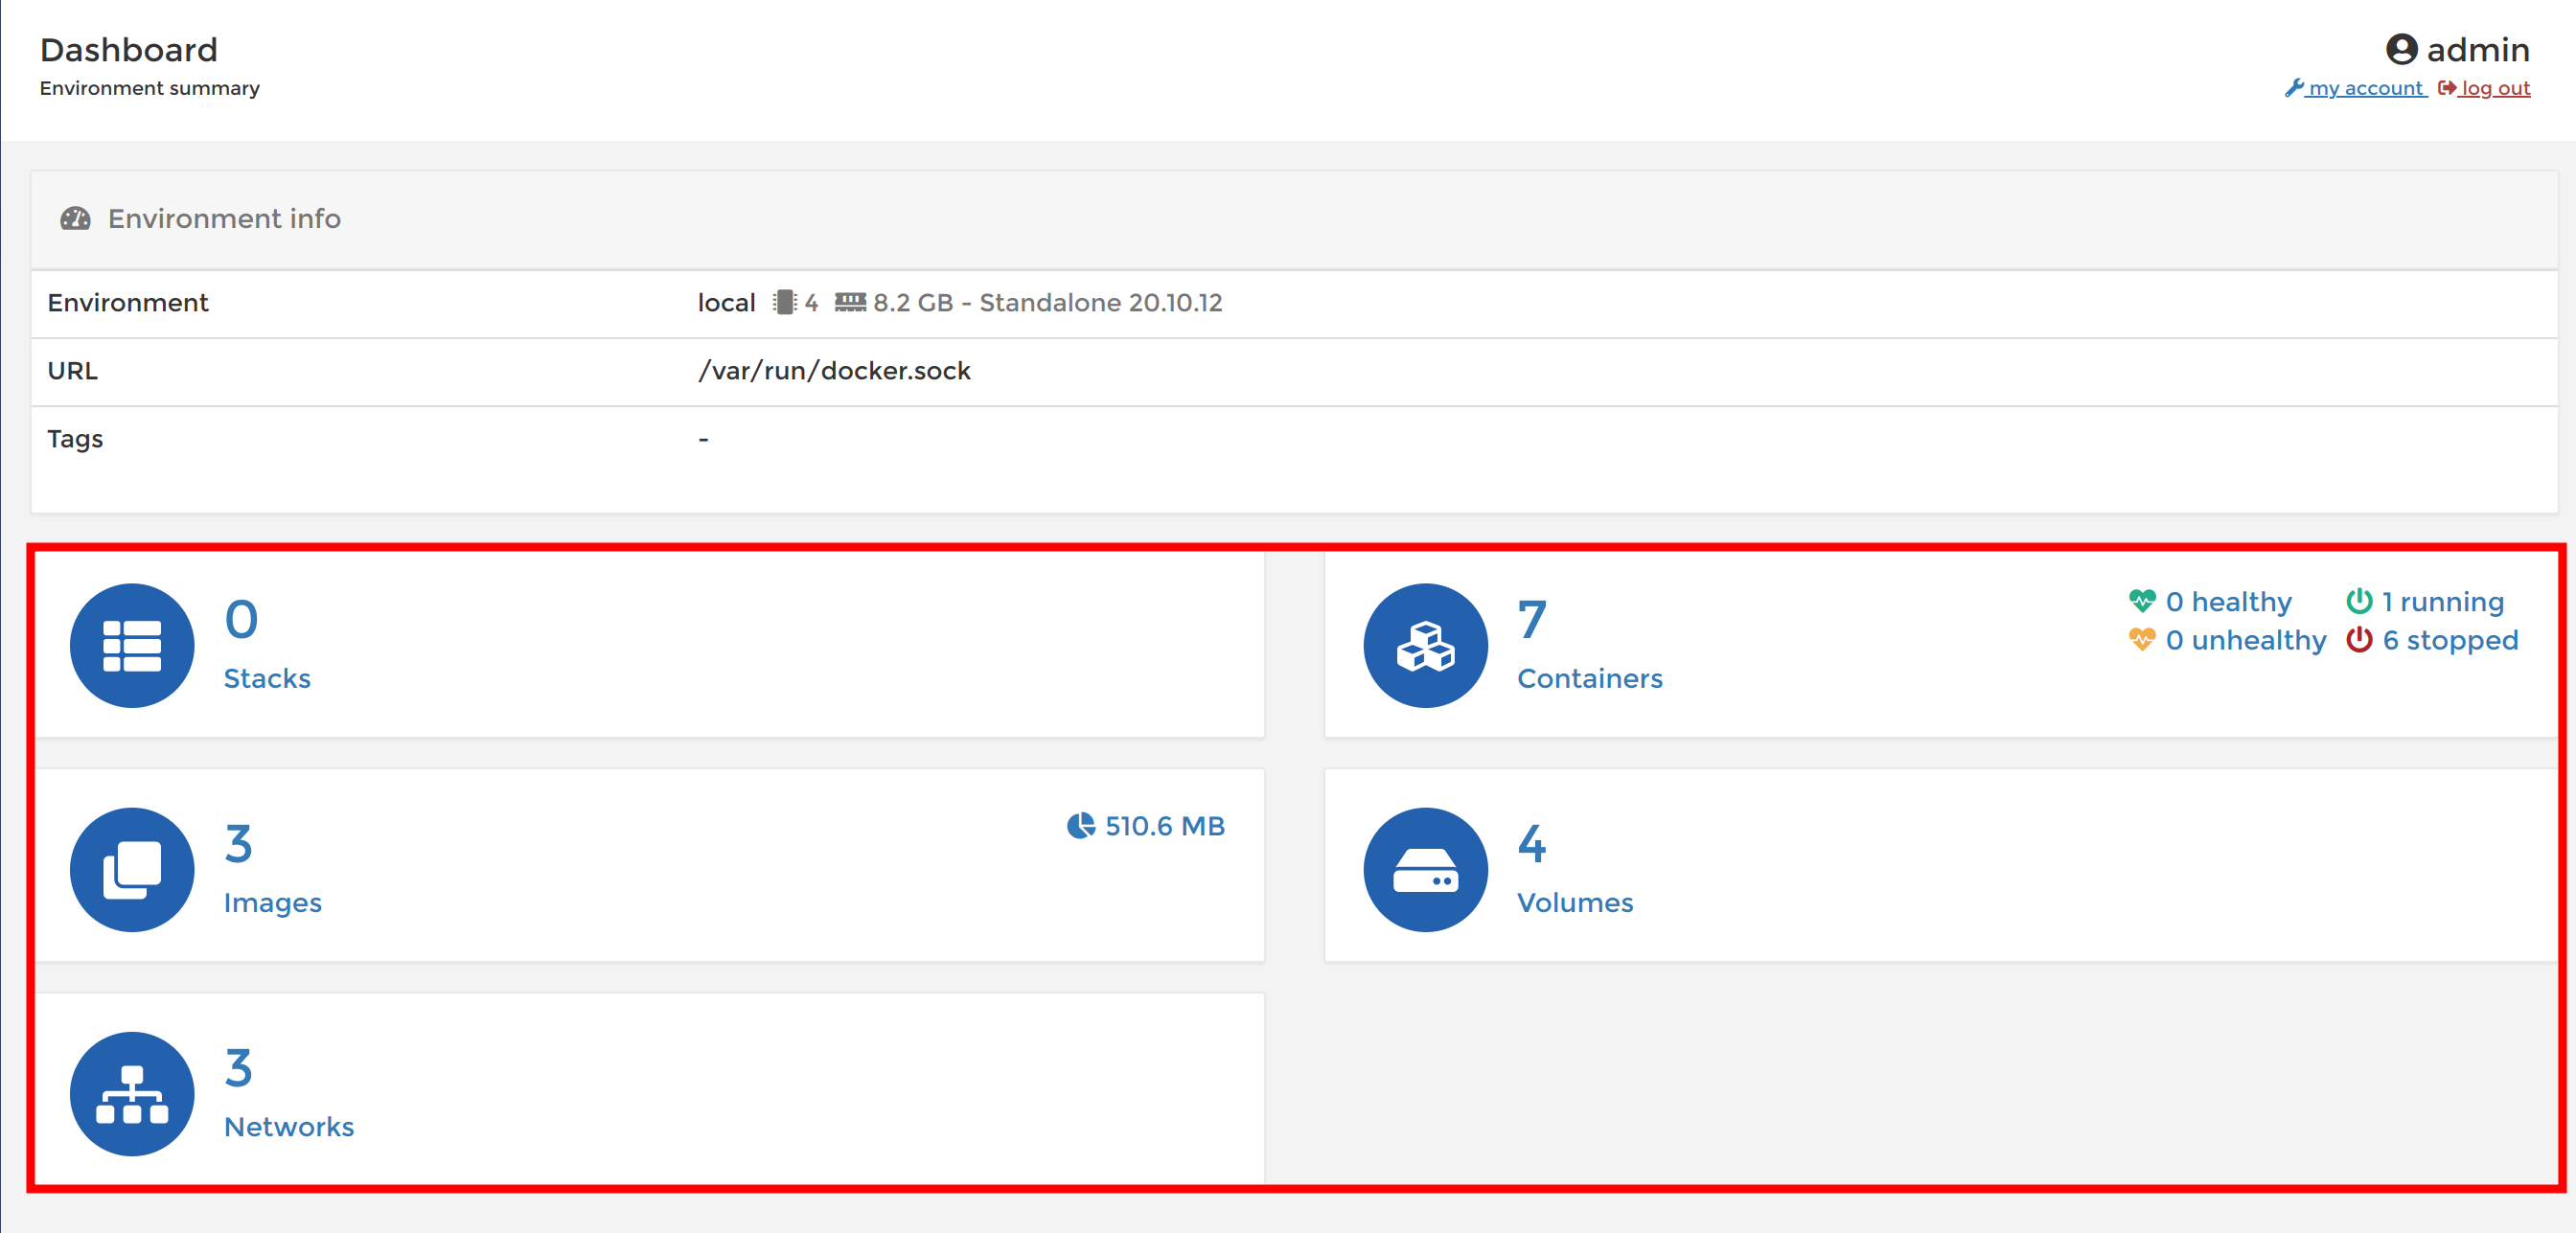
Viewing the portainer dashboard.
Right here in your dashboard, you also have the flexibility to add a docker container, delete a docker container, add a volume, delete a volume as well as docker compose stacks, images, and networks without having to use a command-line interface or write code.
On the right panel in your dashboard, navigate to the containers option **to view your docker containers.
On the containers page, you should see all the containers available on your machine. You also can start,stop,kill,restart, pause,resume,remove as well as add a new docker container.
The image below showcases all docker containers available locally; both the ones that are running and stopped together with their ip-addresses and ports exposed if available.
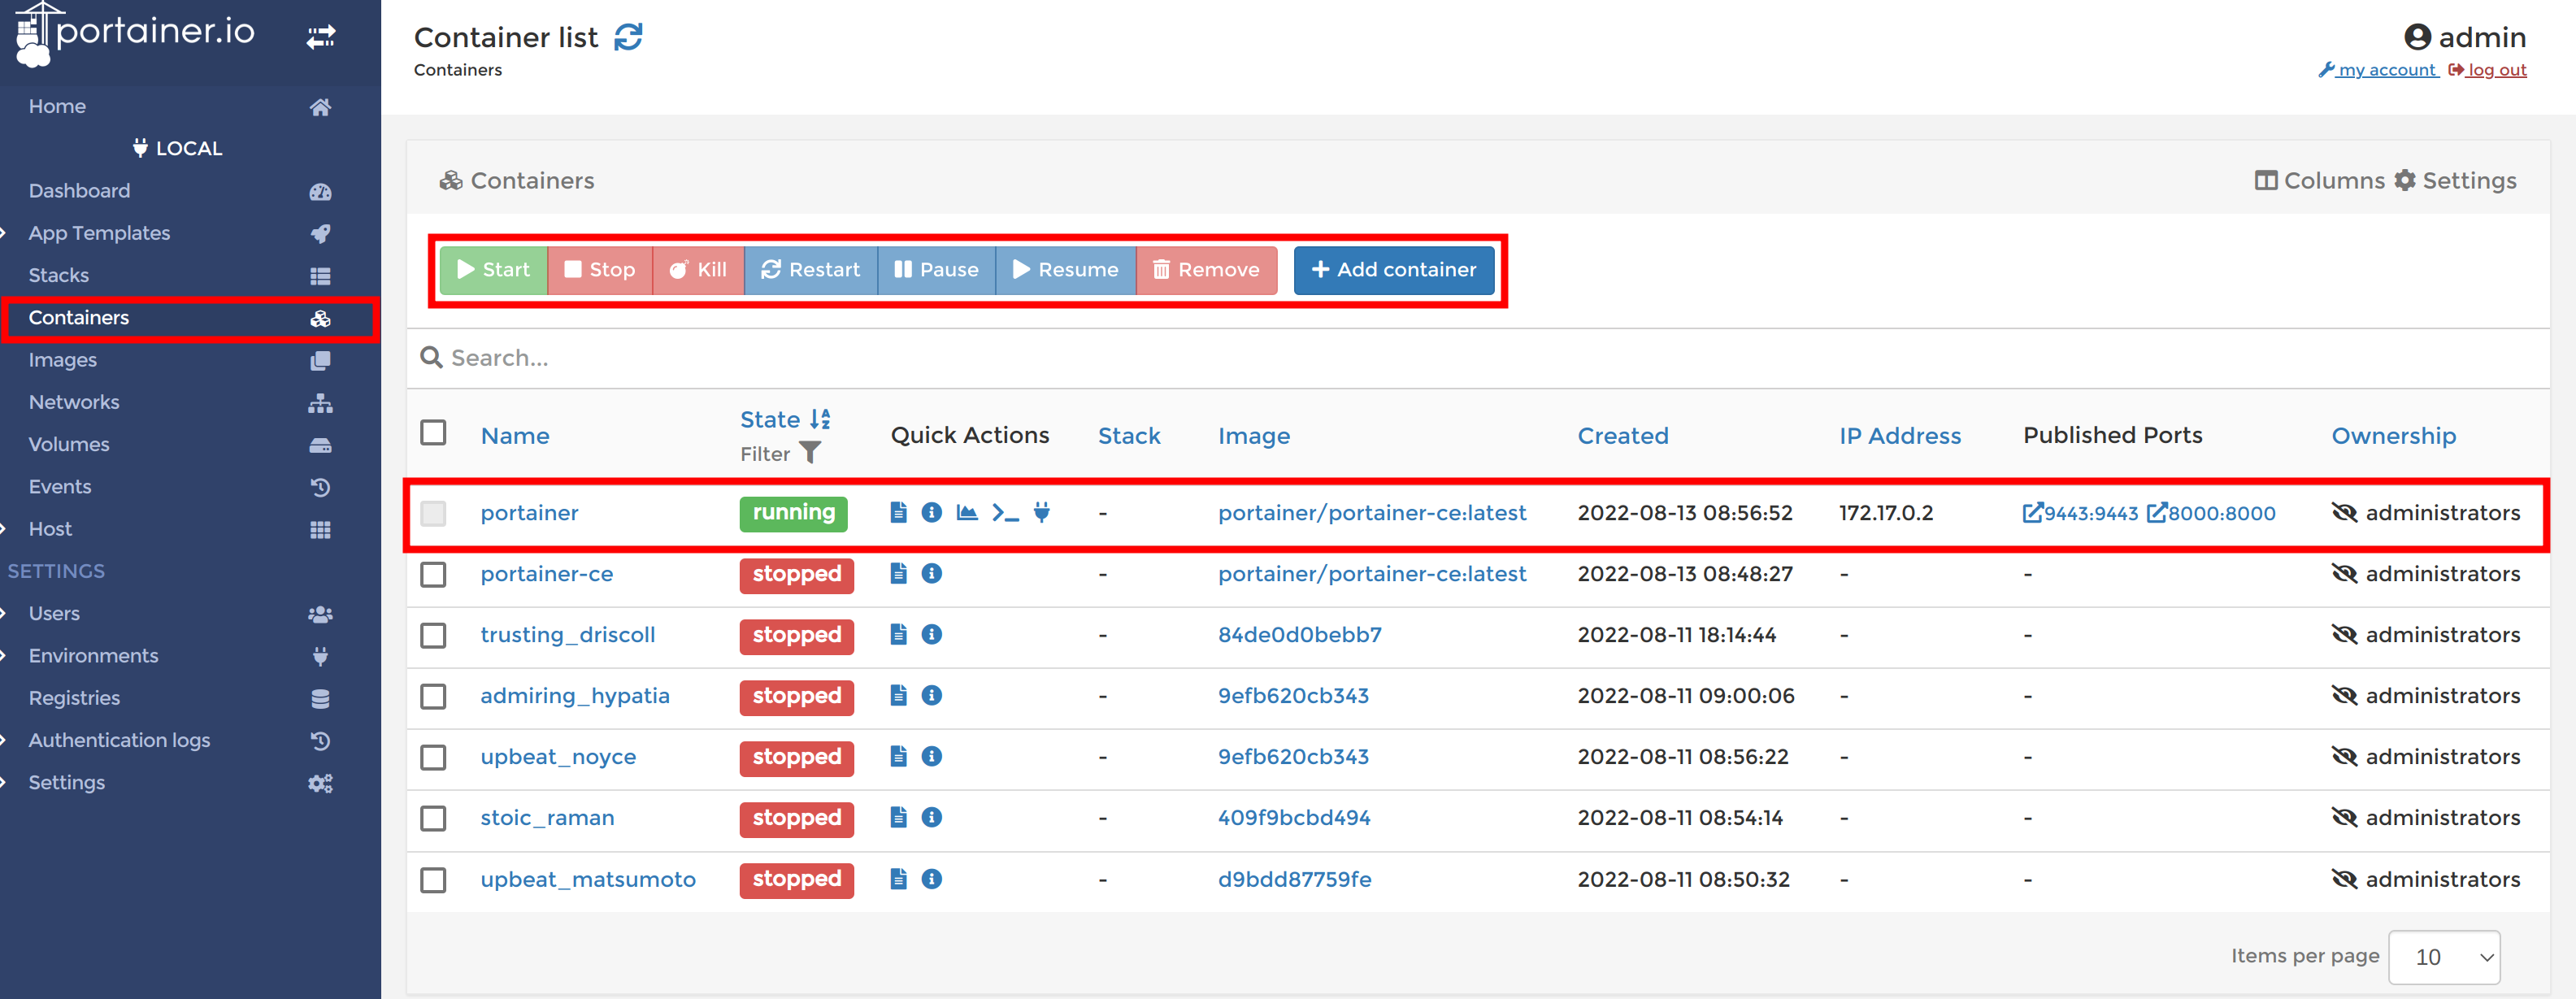
Viewing the portainer container.
To add a docker container, click on the add container button and the page would then navigate to a create container page where you can specify some configuration settings for the container you want to create.
For testing, set the container name to Nginx-web-server and populate the image field with the value - nginx. You’ll need to do this because you will deploy a Nginx web server.
Also, toggle the Publish all exposed network ports to random host ports so portainer can assign random host ports to the network port the container exposes.
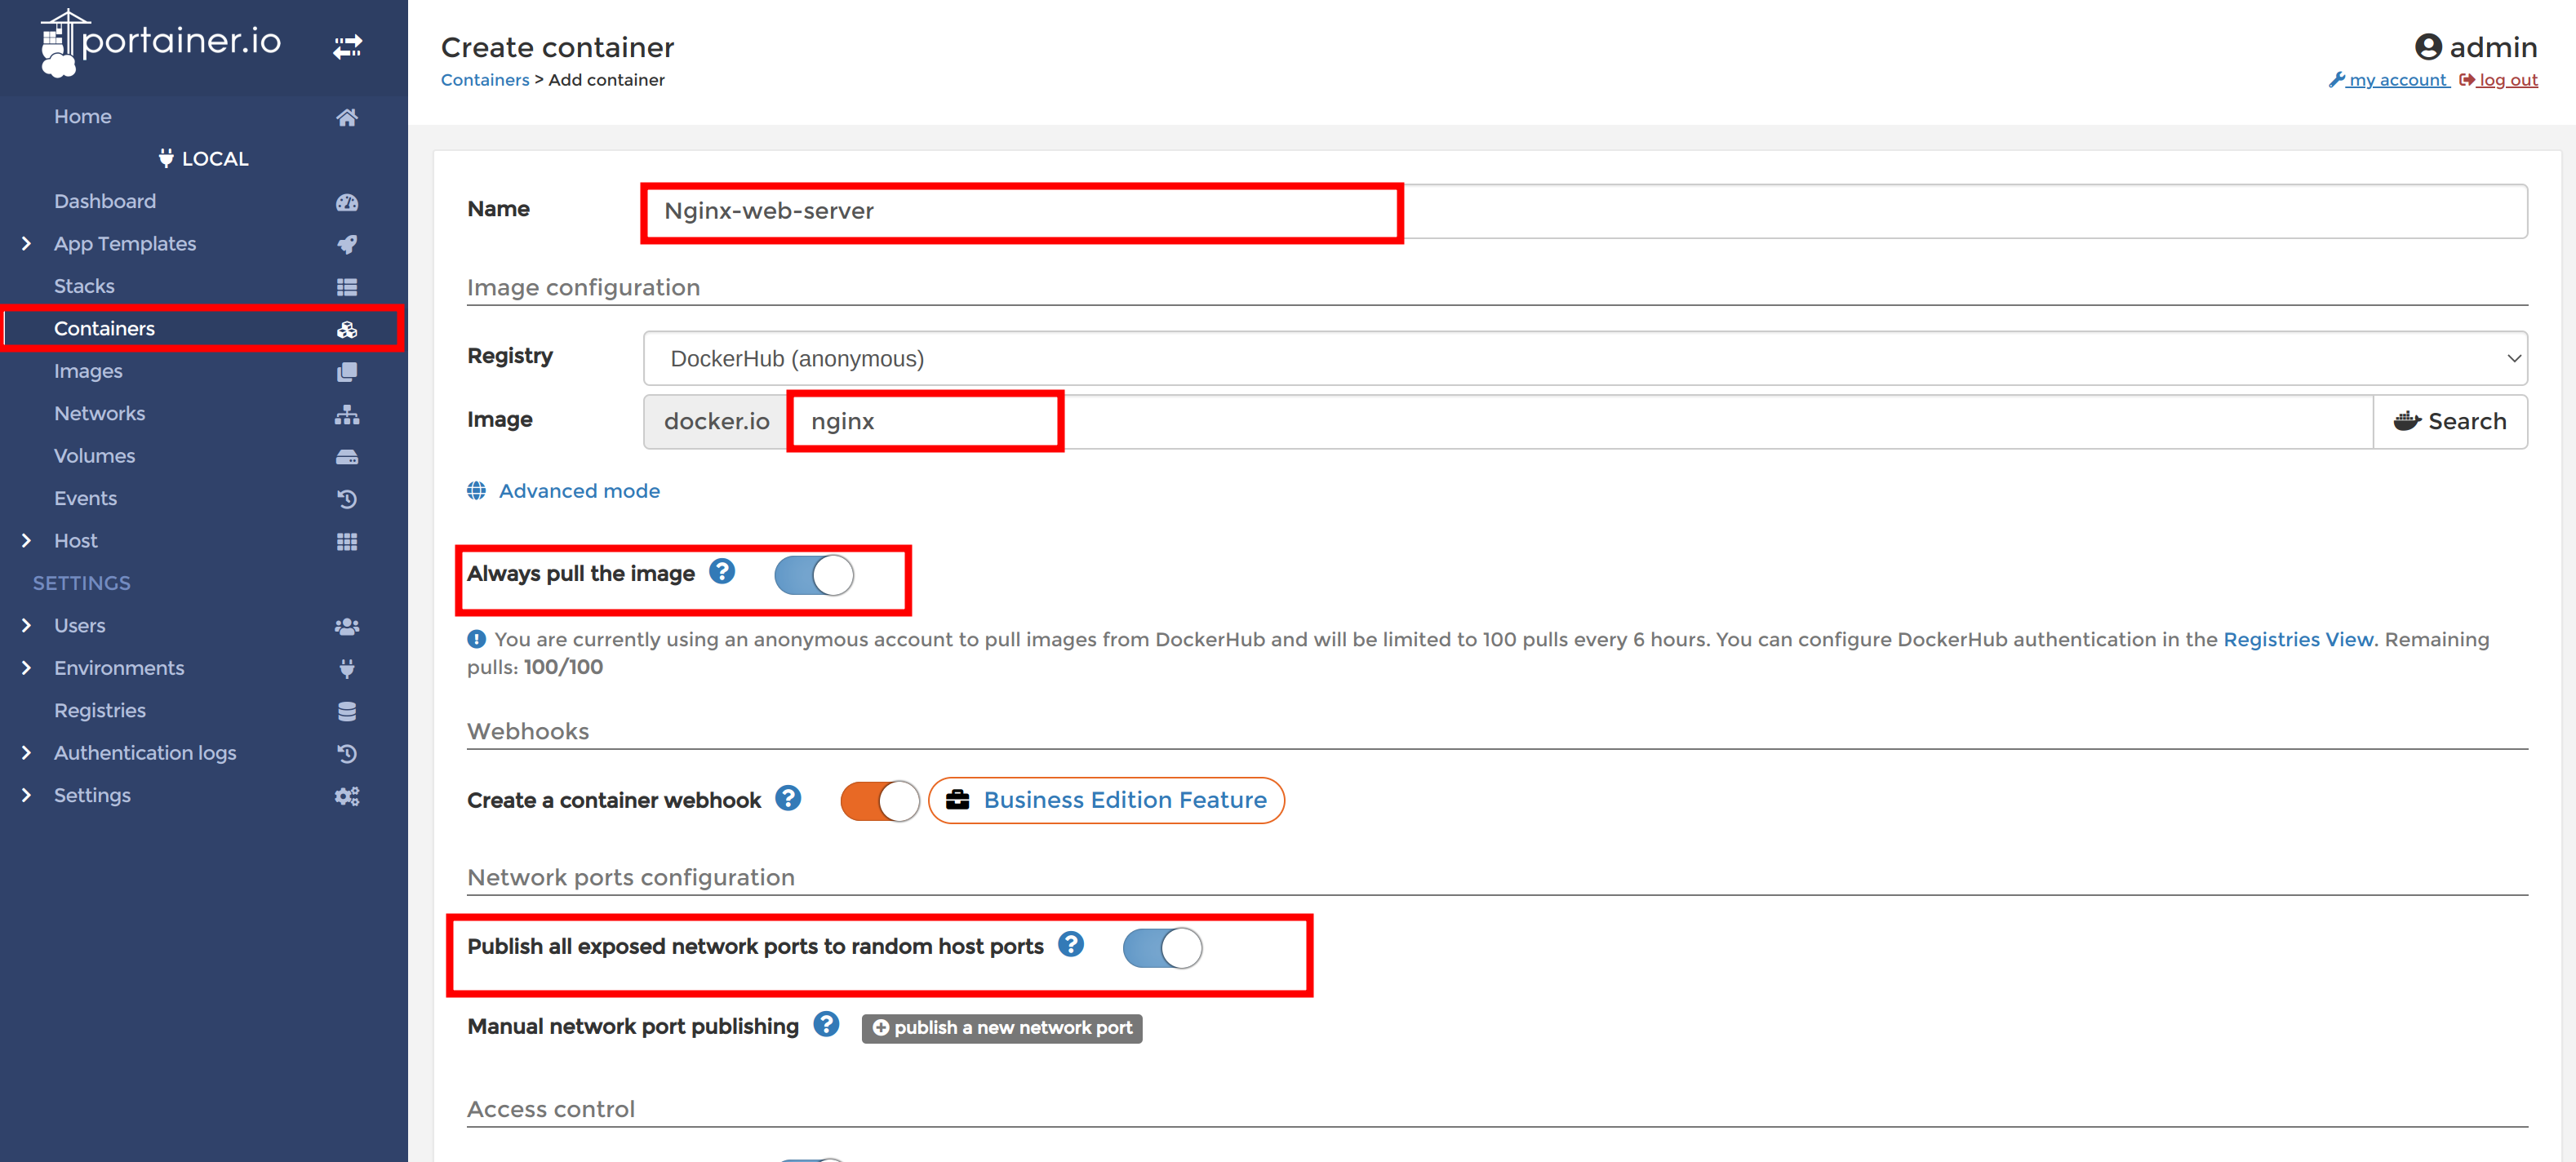
Creating and configuring (Nginx) docker container
Toggle both the always pull the image and auto-remove configuration setting so that portainer constantly gets the latest version of the image, and then stops and remove any existing instance of the container, respectively.
Finally, scroll down to the bottom of the page and click on the Deploy container button to create this container.
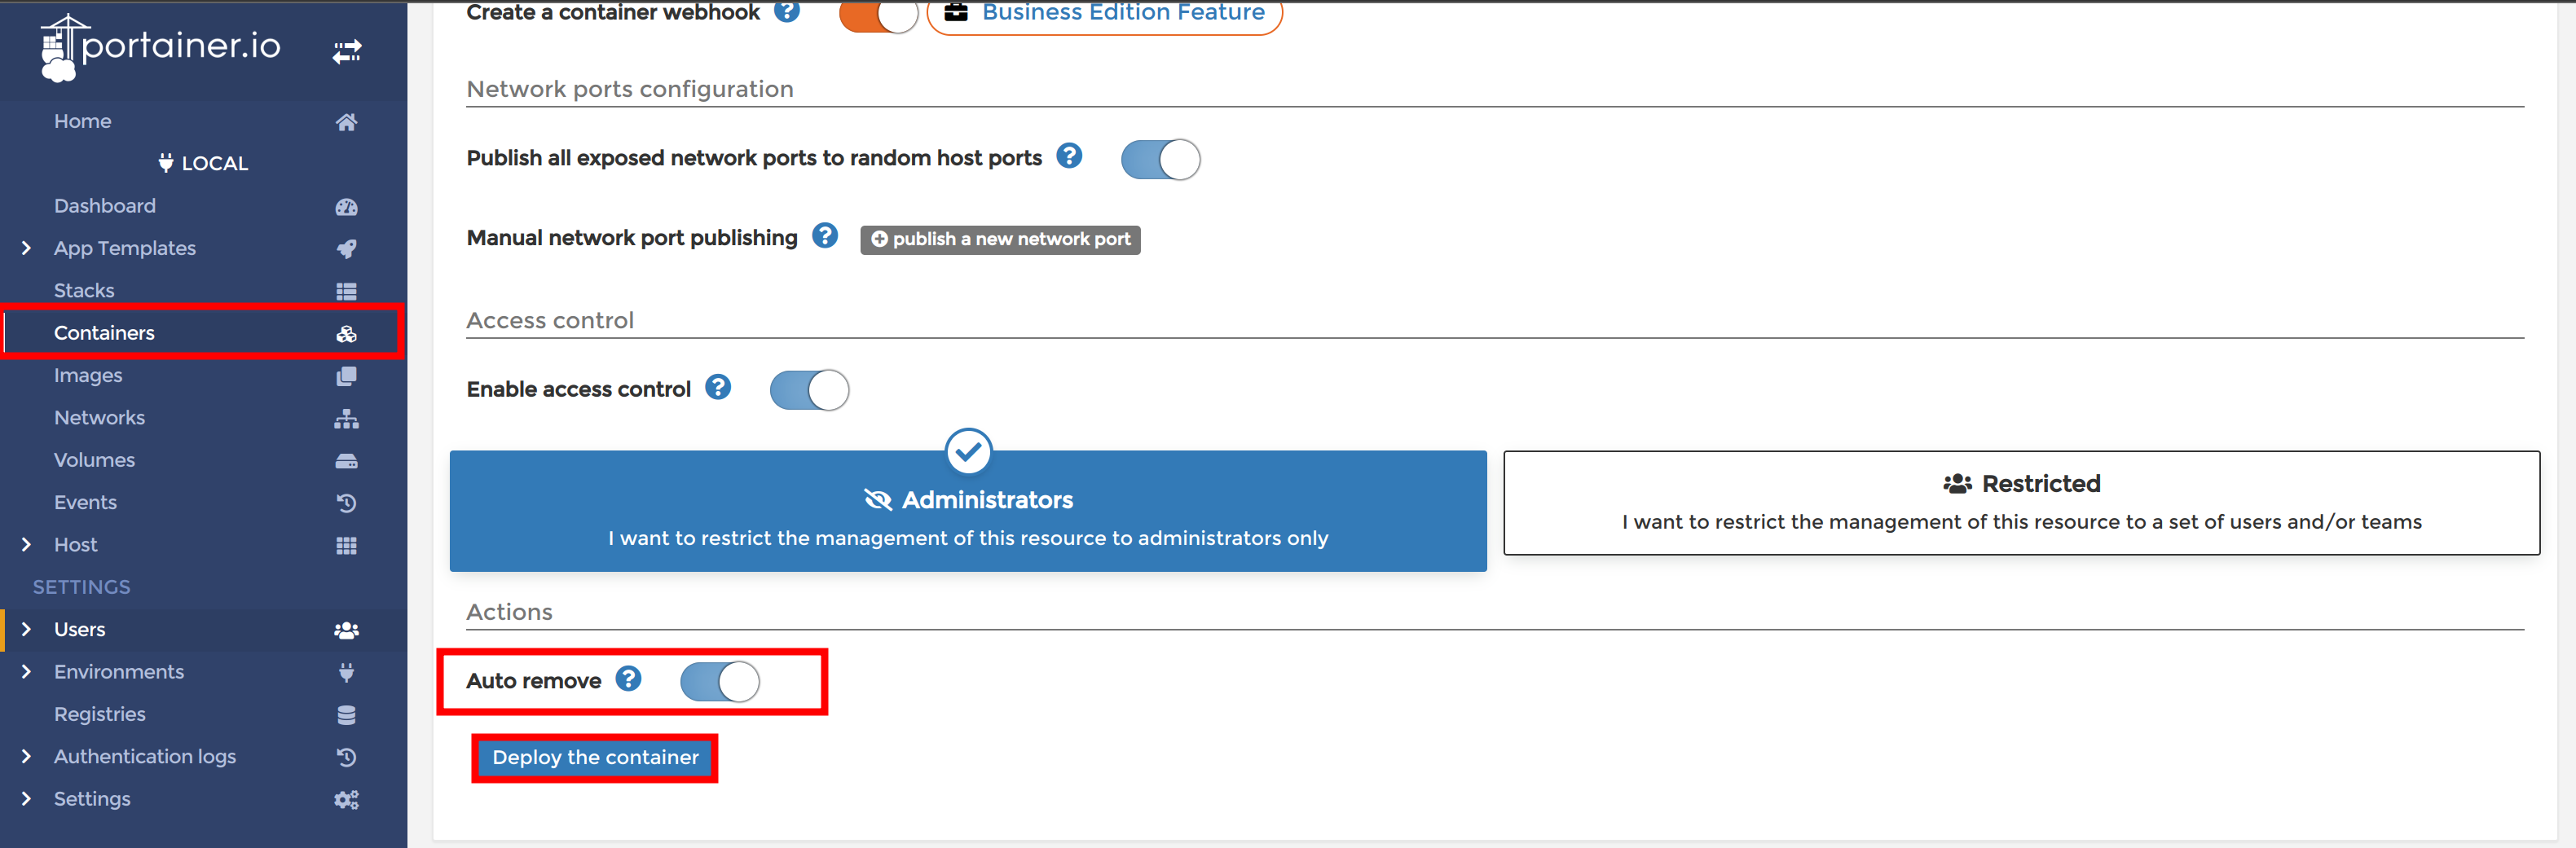
Toggling (Auto remove) configuration and deploying container.
On successful deployment, you should have the nginx container in your container lists in a running state and exposed on port 80.
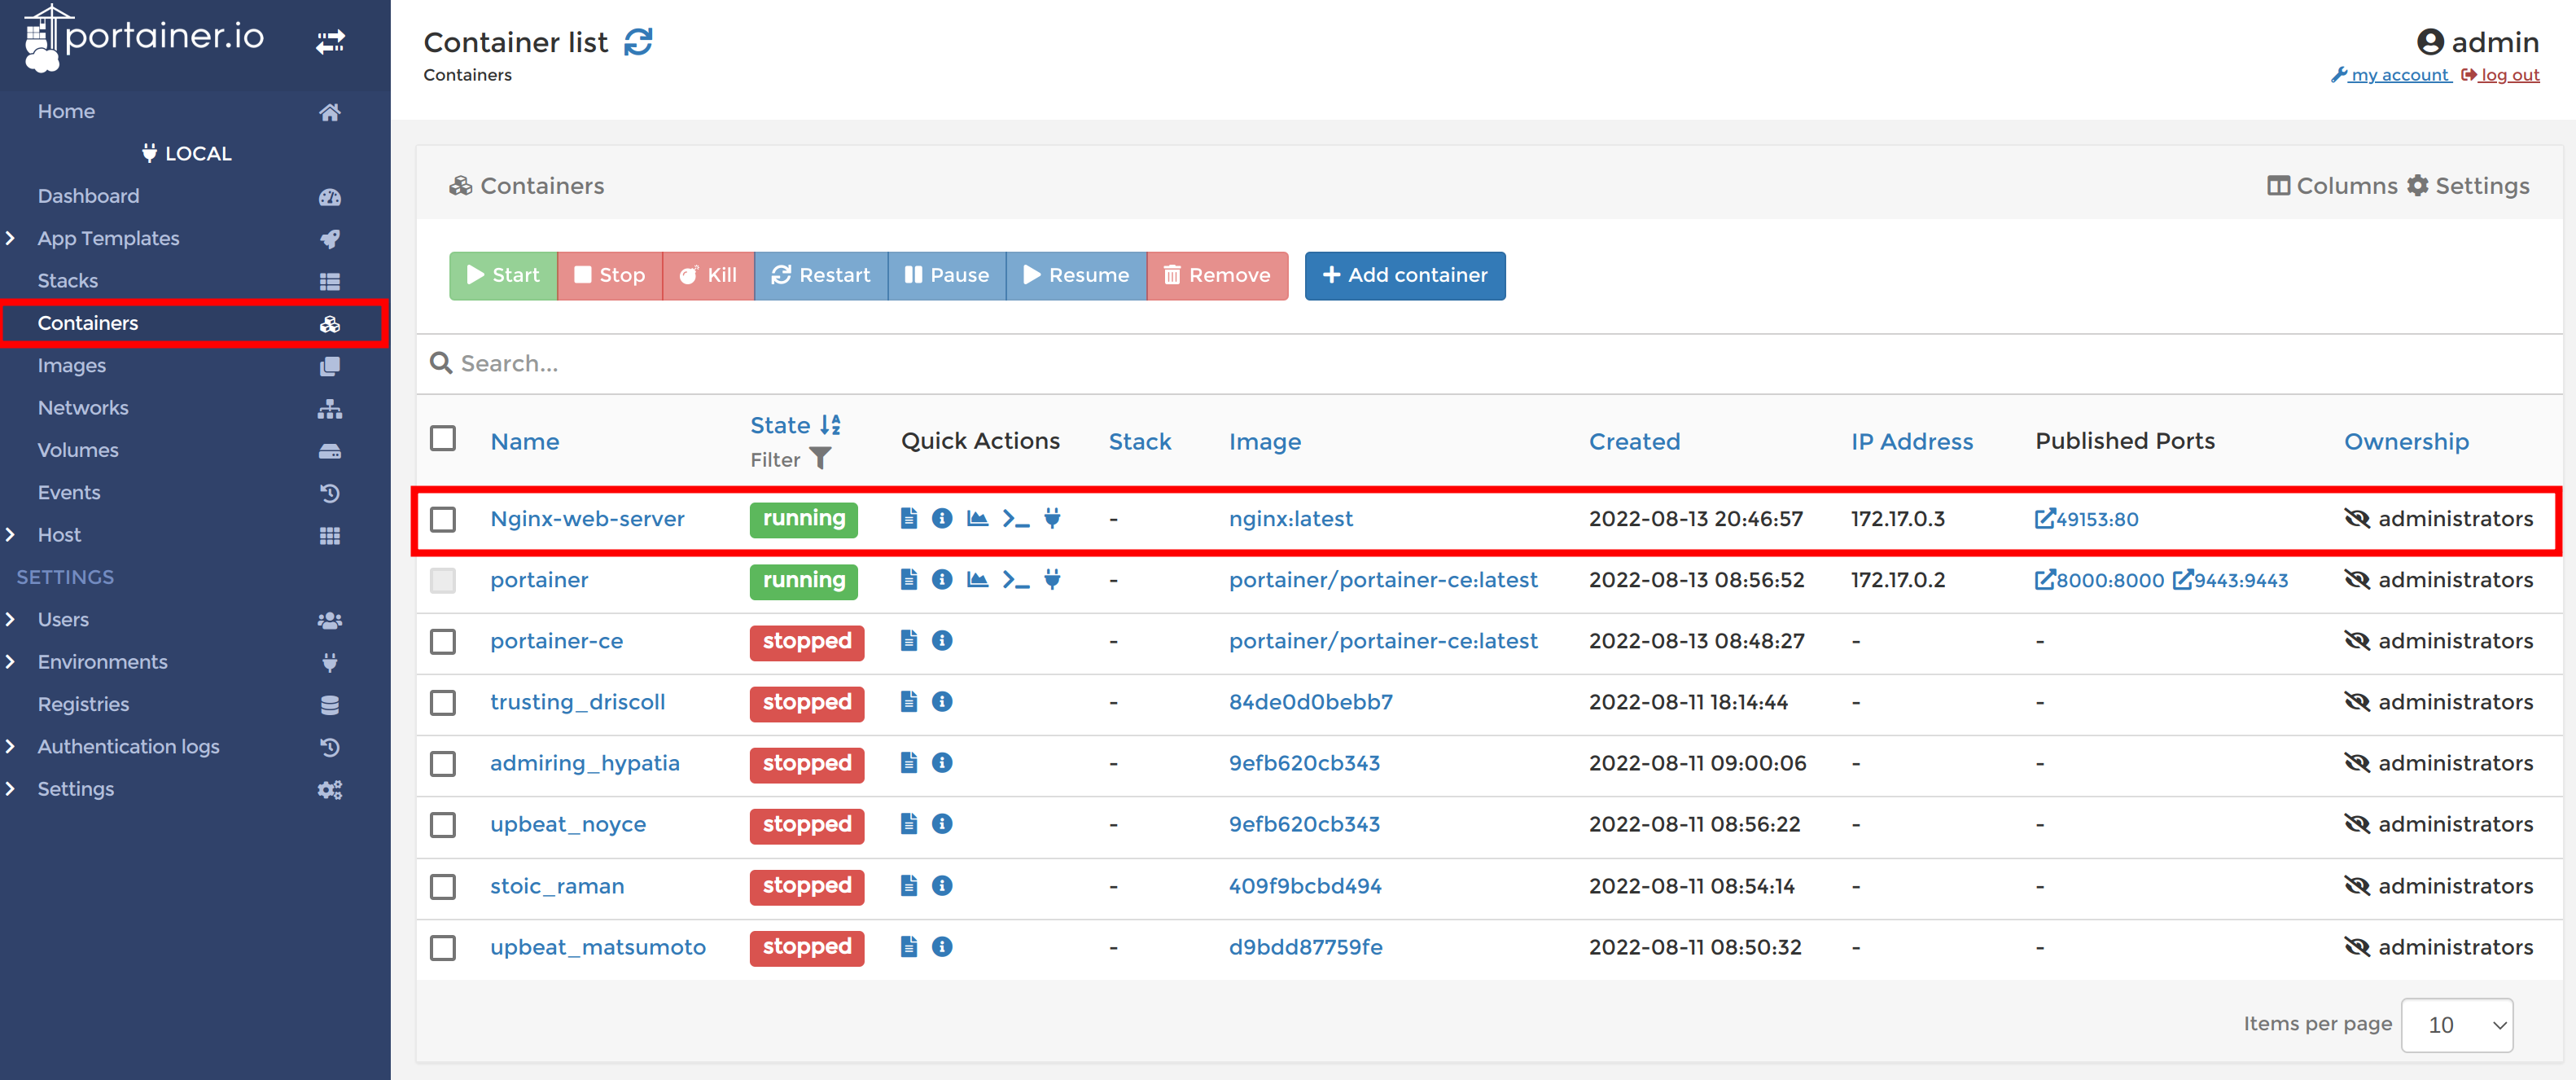
Viewing the nginx docker container
Visit the address localhost:80 on your favorite browser to see the nginx web server welcome page.
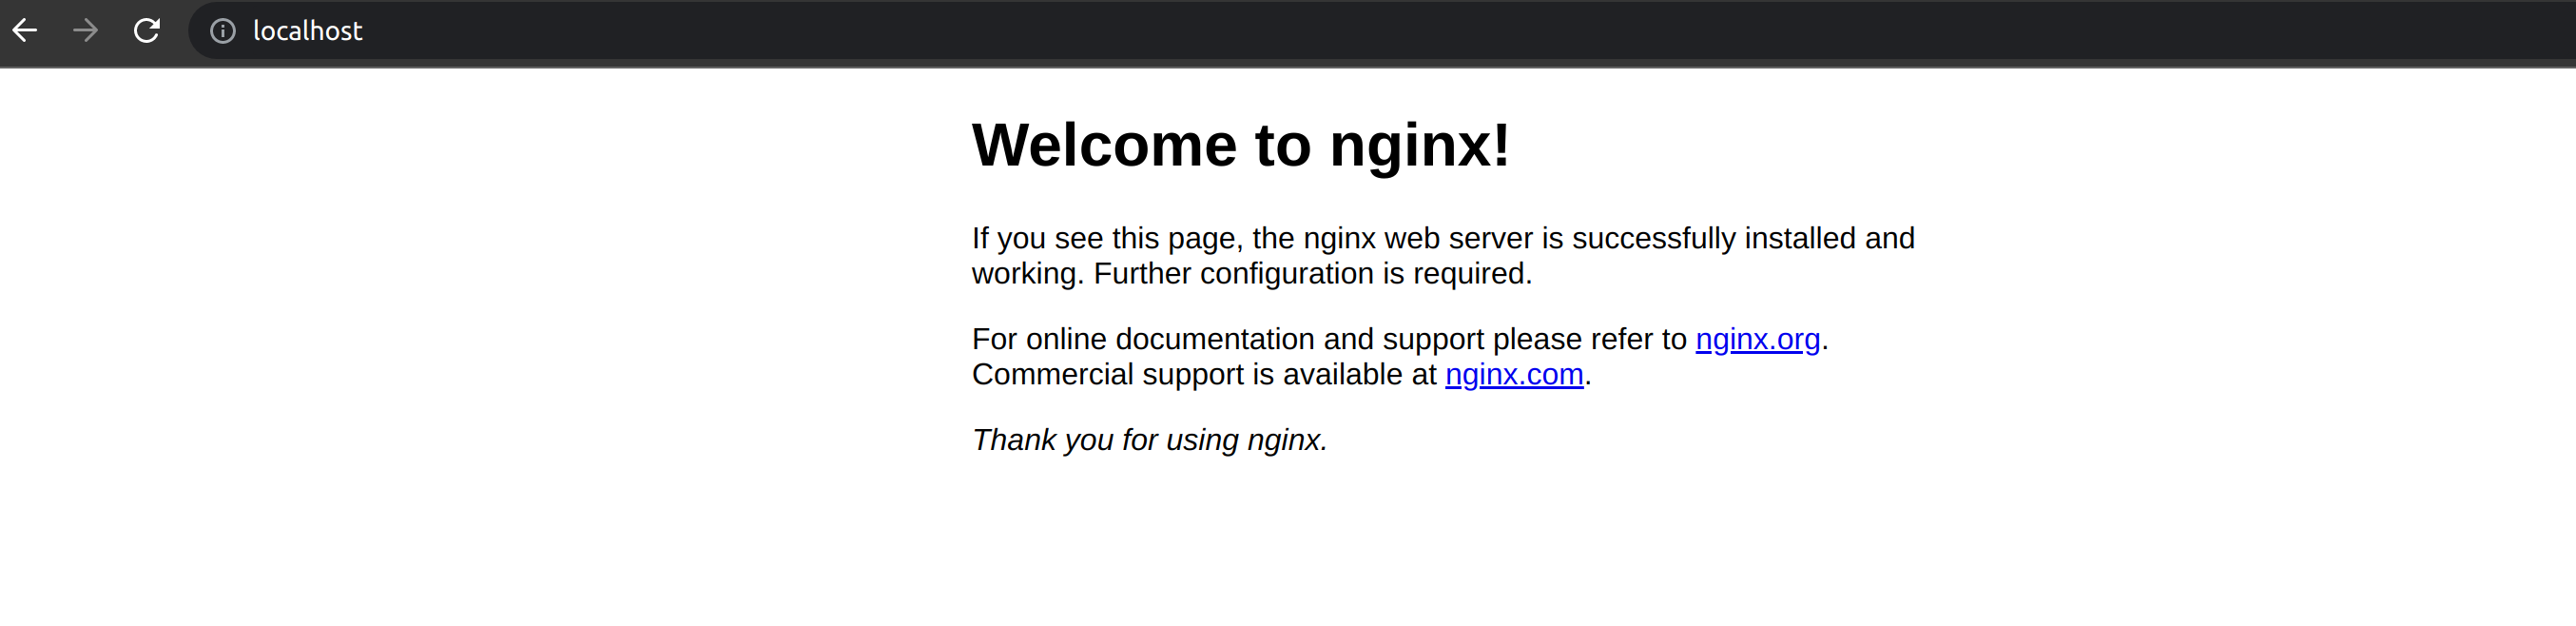
You have now successfully created and deploy an nginx web server with portainer without having to write a single line of code!
Managing Docker Images
Other than just containers you can manage docker images as well with portainer. On the right panel, navigate to the images option to see your images lists.
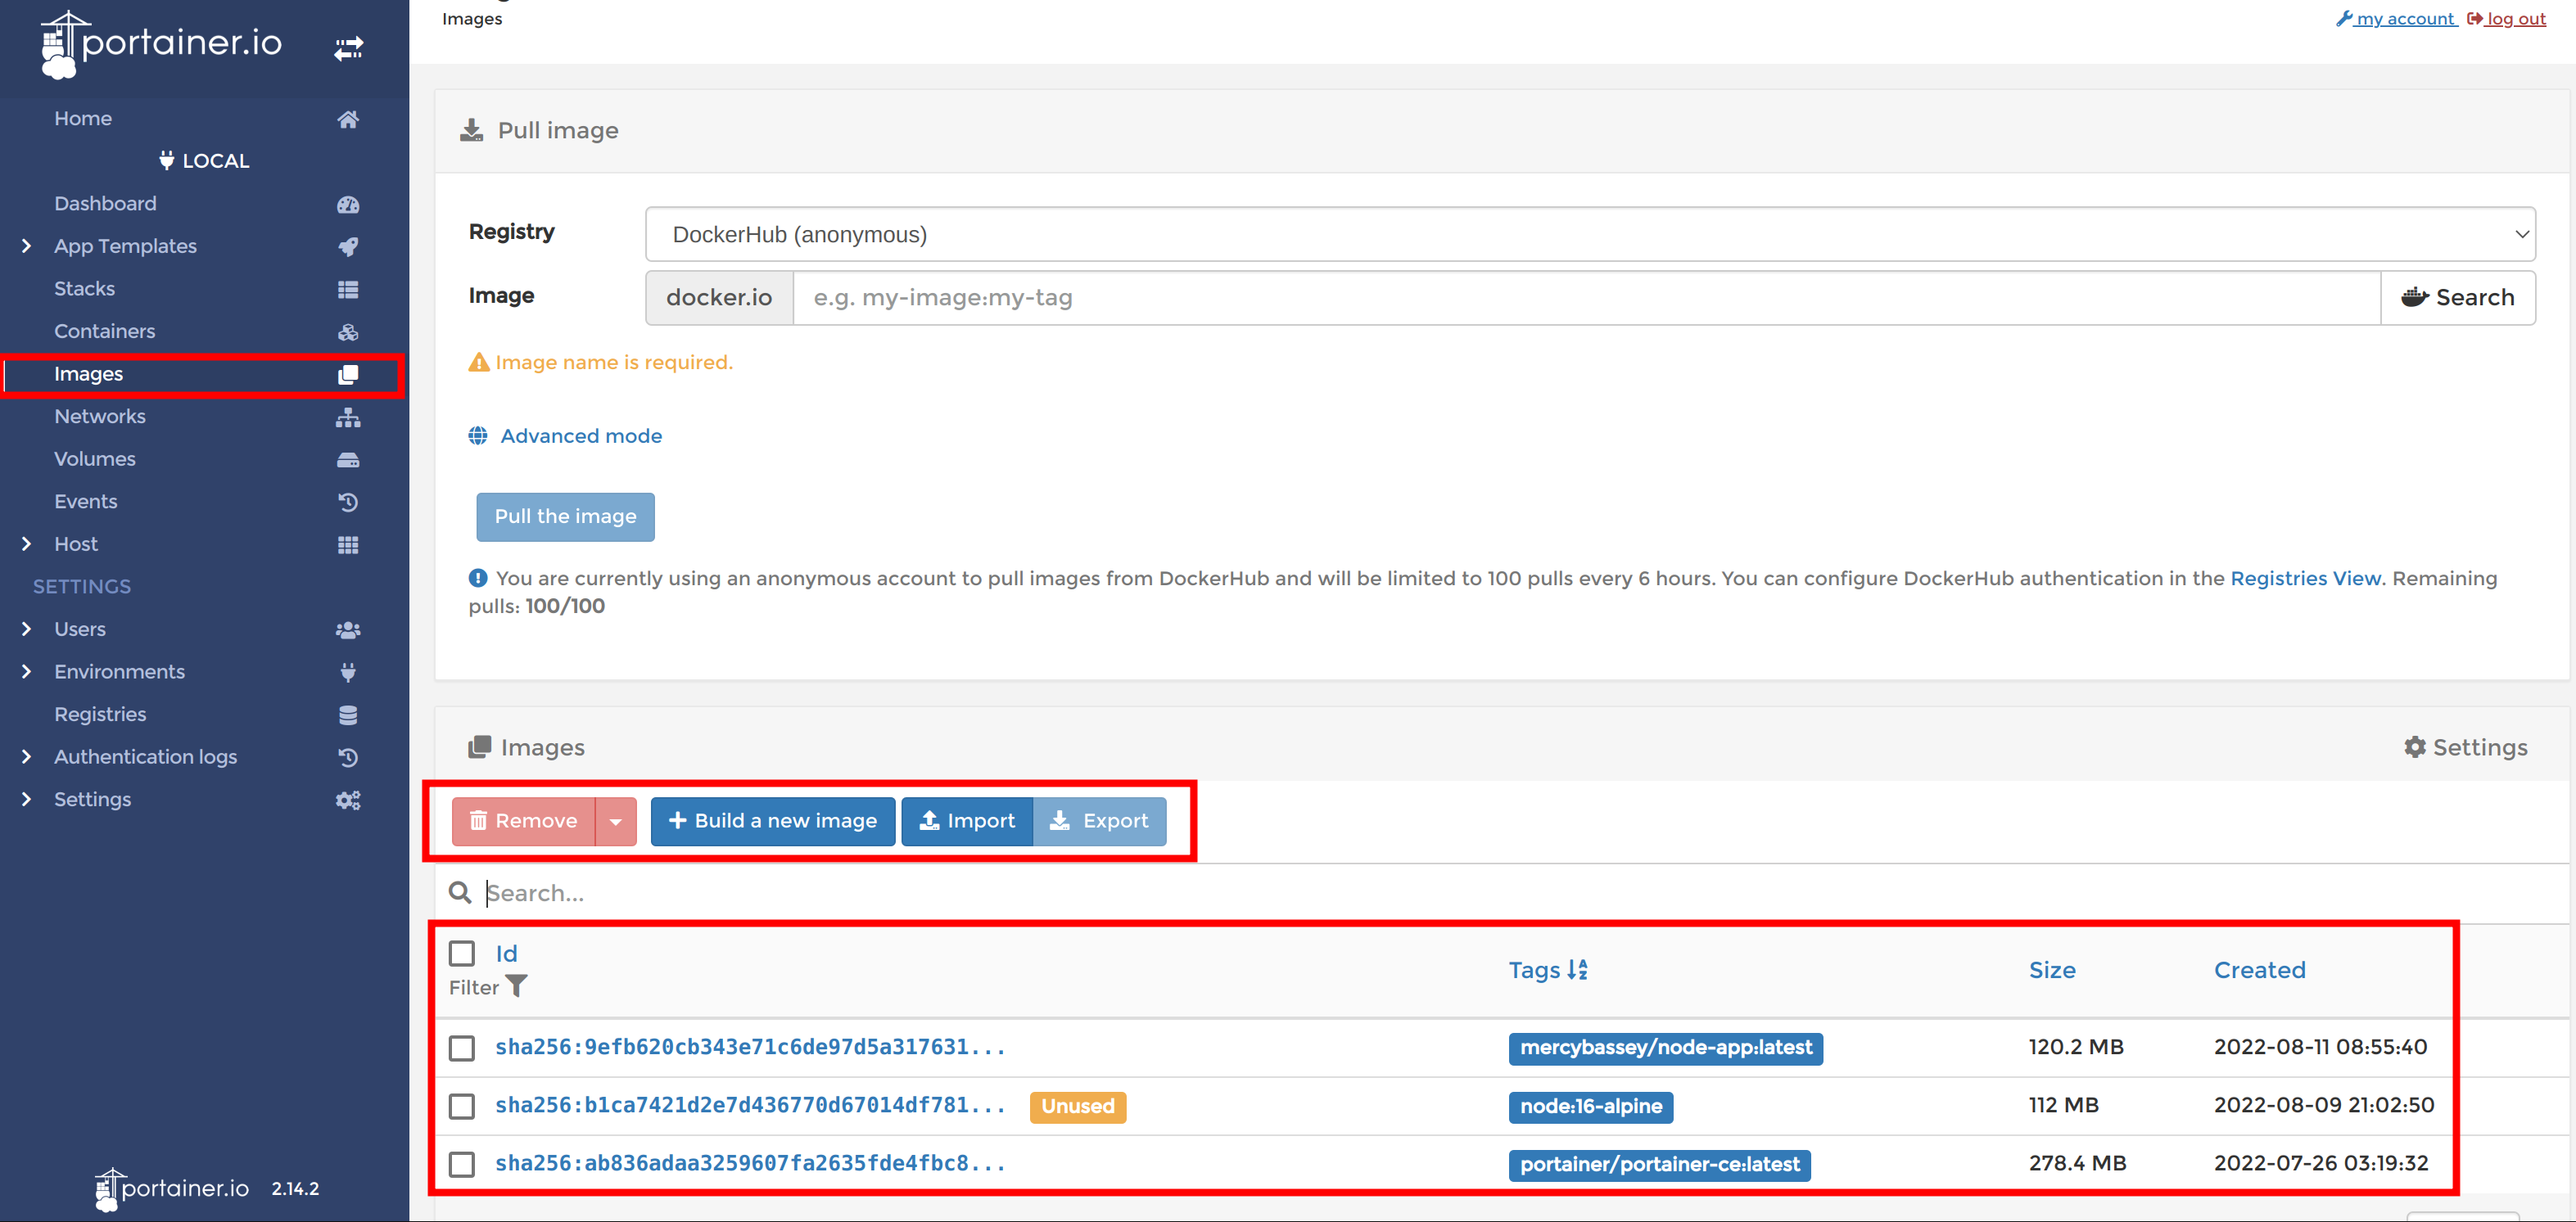
Viewing lists of docker images available on machine
On the images lists page, you can see all the image you have locally. You can also remove, import, export, pull an image from a docker registry and even build a new image.
To build an image, you can simply click on the build image button to build a new image. Portainer provides you with different options to use while building a new image. You can use a web editor provided by portainer, you can upload a dockerfile from your computer, or specify a url to a file.
To pull a docker image from a docker registry, on the pull image section from the image list page; add the image name and tag in the image field to pull an image as shown in the image below:
The image below shows a myvueapp image is to be pulled from dockerhub.
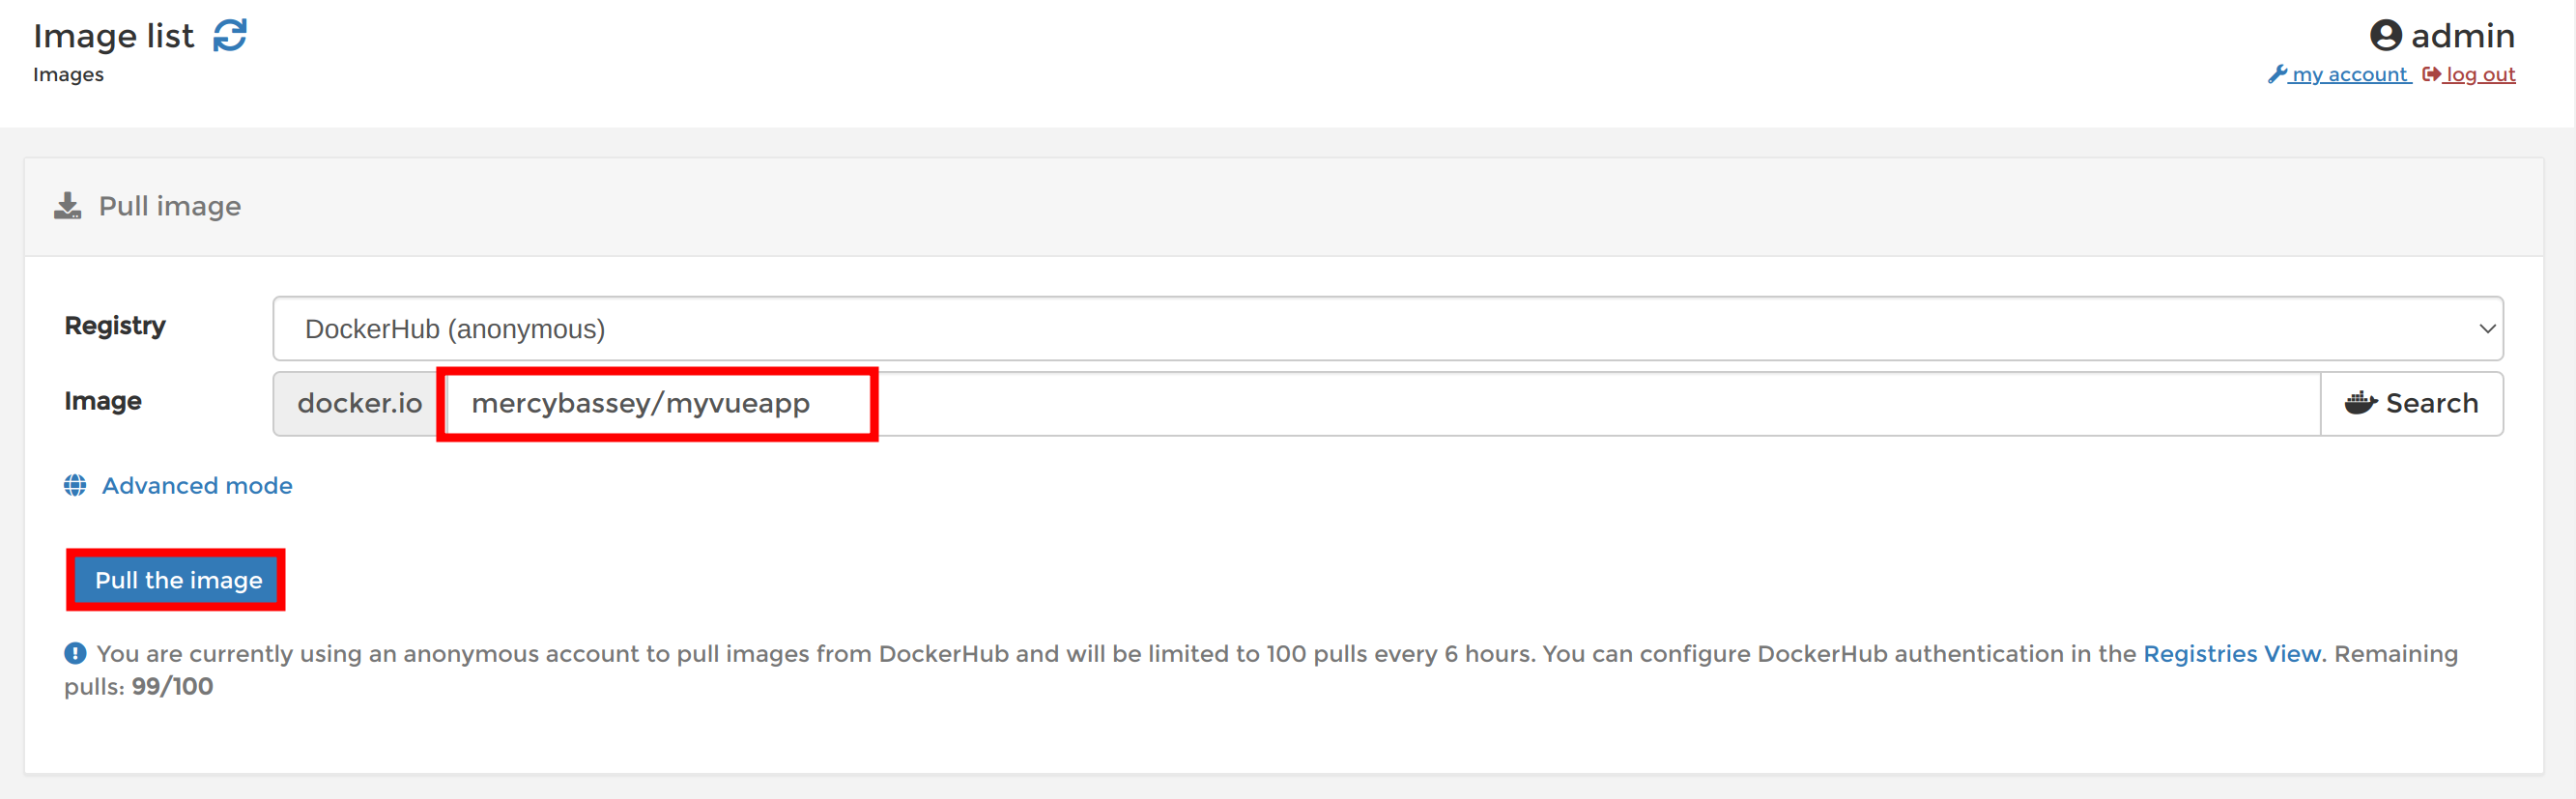
Pulling docker image (mercybassey/myvueapp)
wait for the image to be downloaded successfully as shown below.
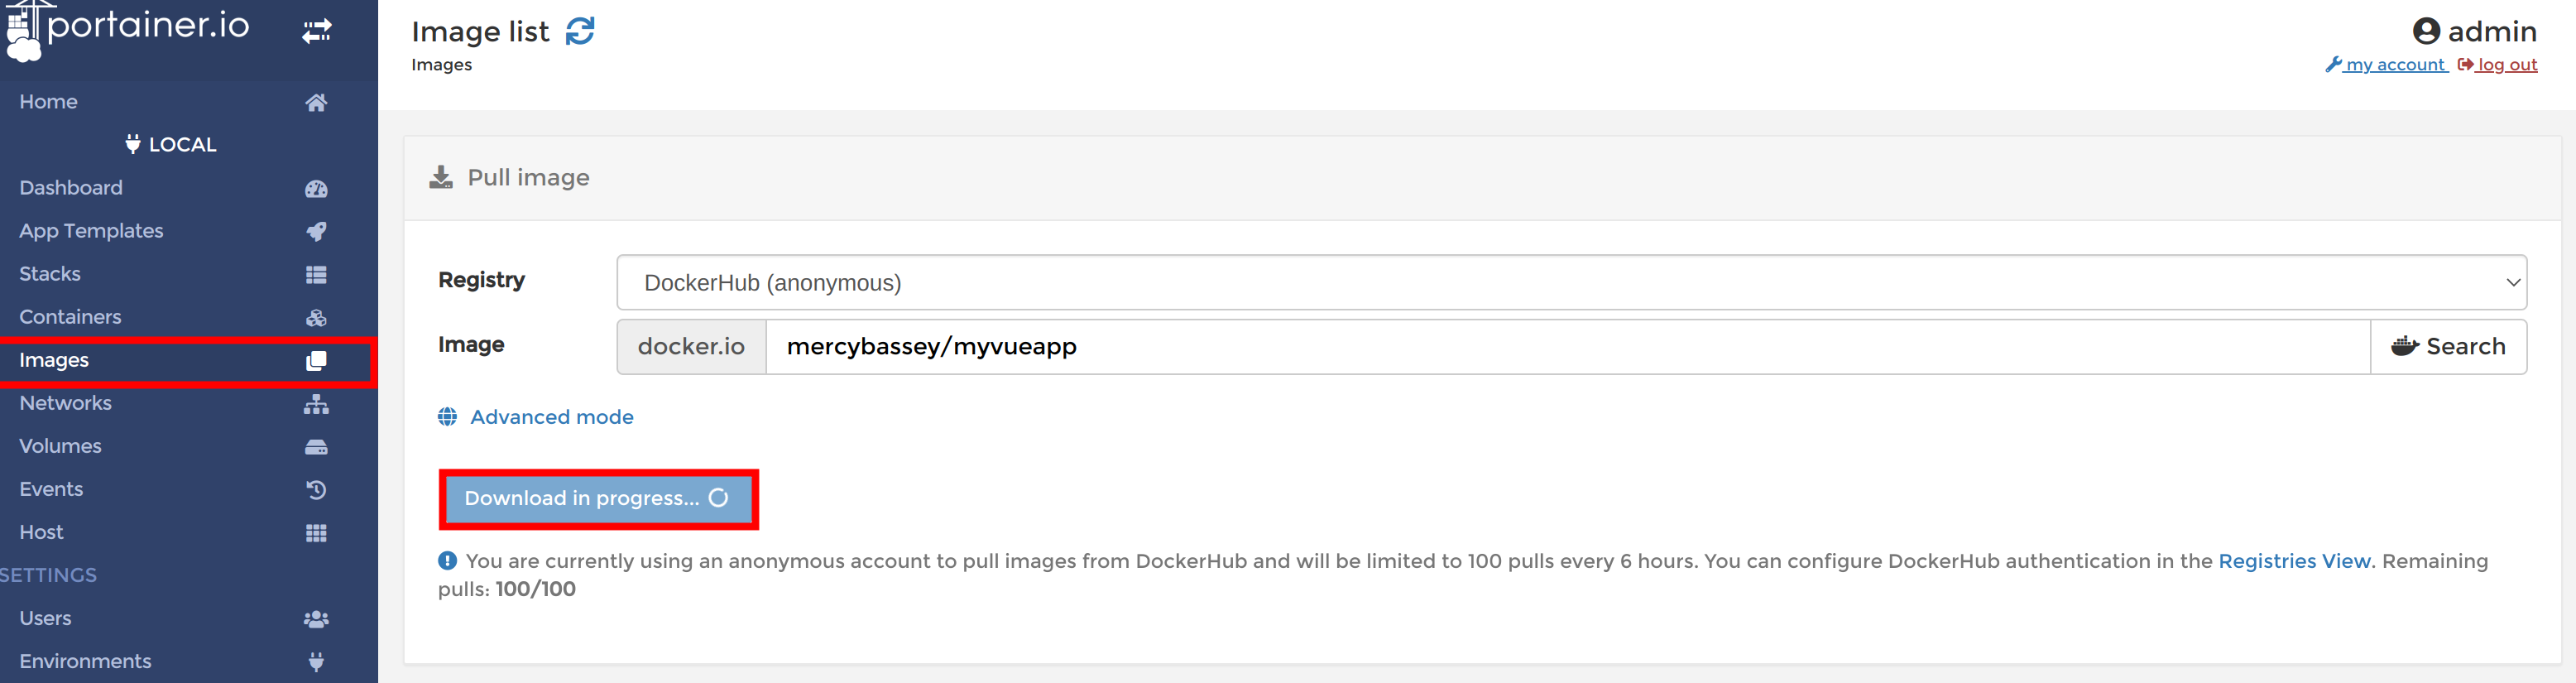
Downloading docker image (mercybassey/myvueapp)
Once downloaded successfully, you should be able to view your newly downloaded image. You have now pulled a docker image from dockerhub effortlessly leveraging portainer
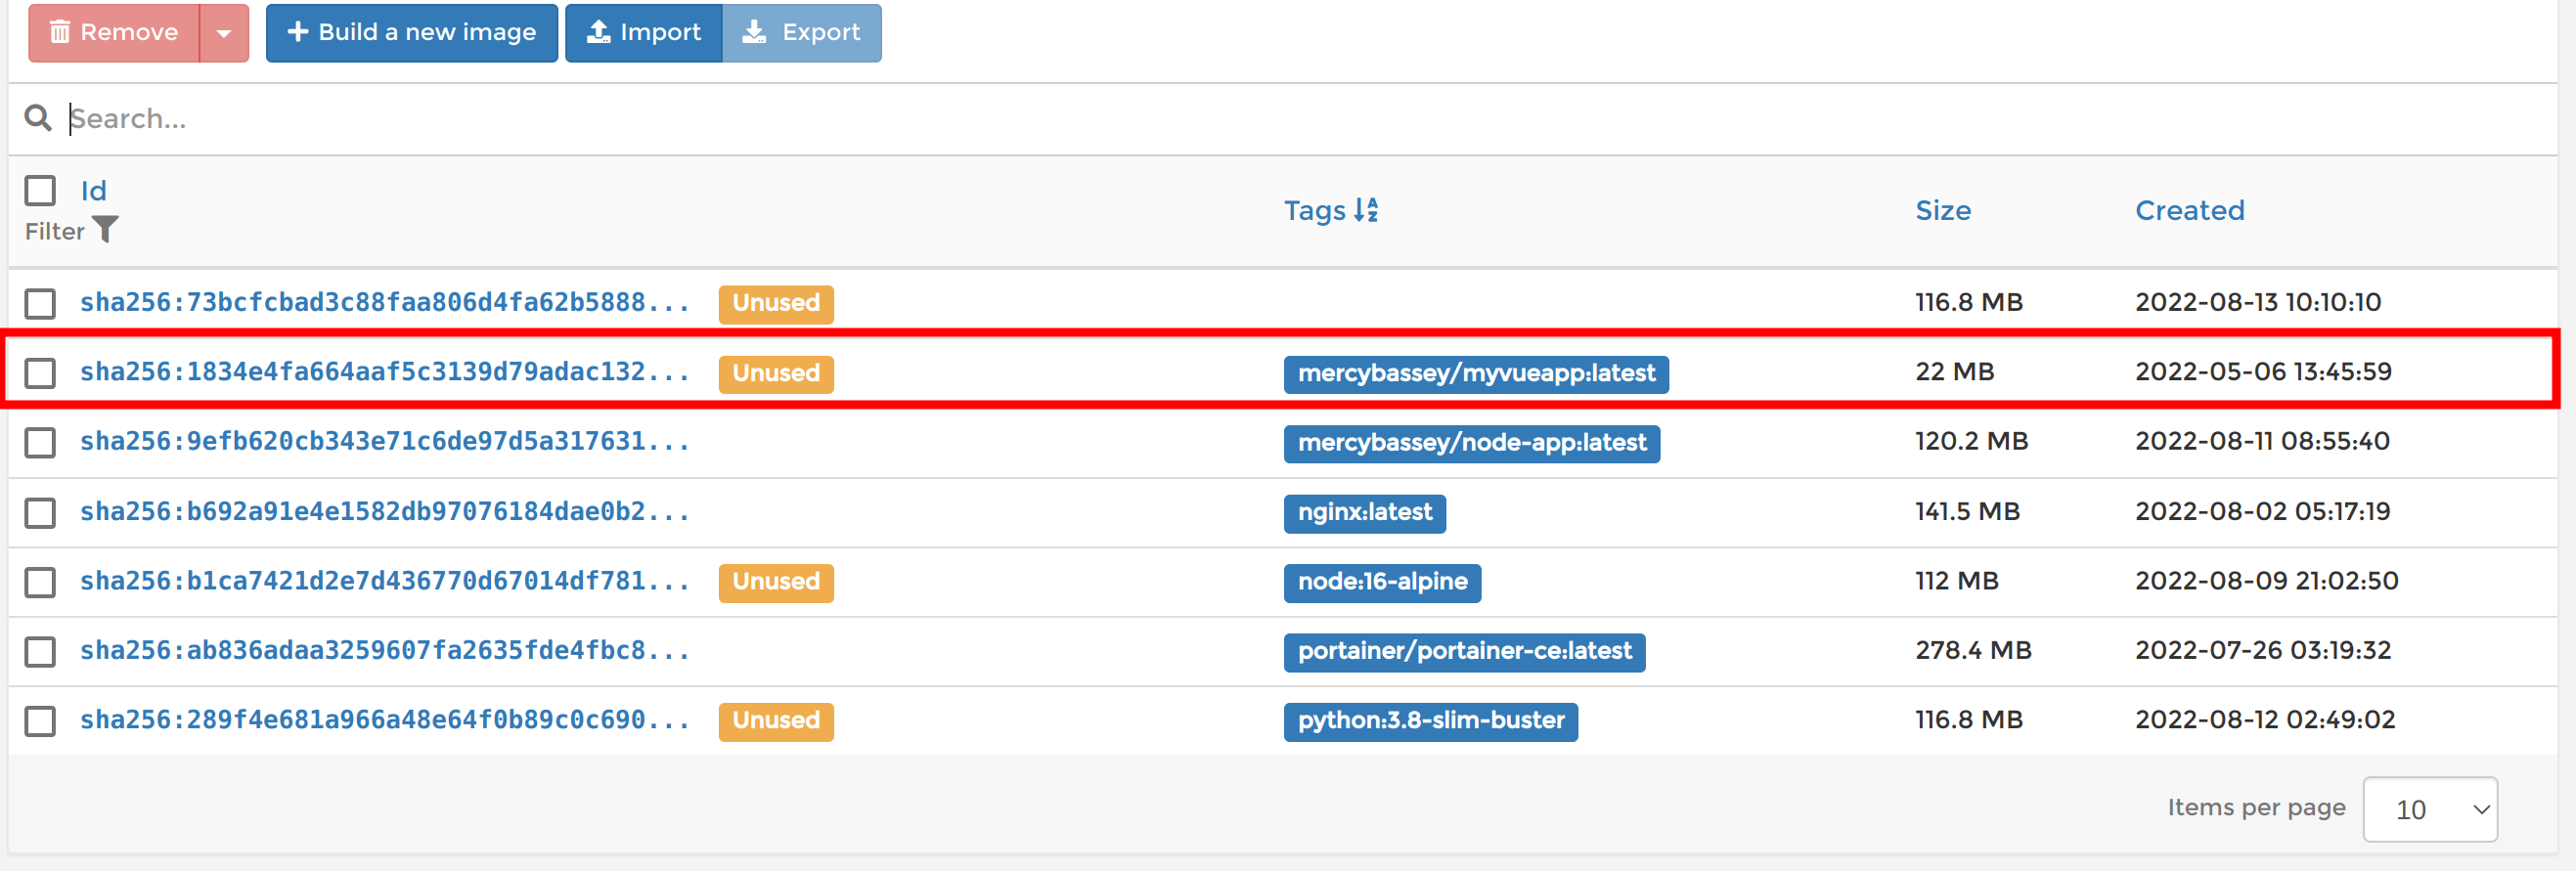
Viewing newly pulled docker image
Adding and Managing Portainer Environments
Portainer supports a number ways for creating, and managing environments. The portainer community edition supports Azure; for azure container instances (ACI), Local, and cloud Kubernetes clusters, docker standalone as well as docker swarm clusters.
To further explain this feature, Click on the environment option from the left panel to see the environment page. You should see your docker standalone environment as shown below:
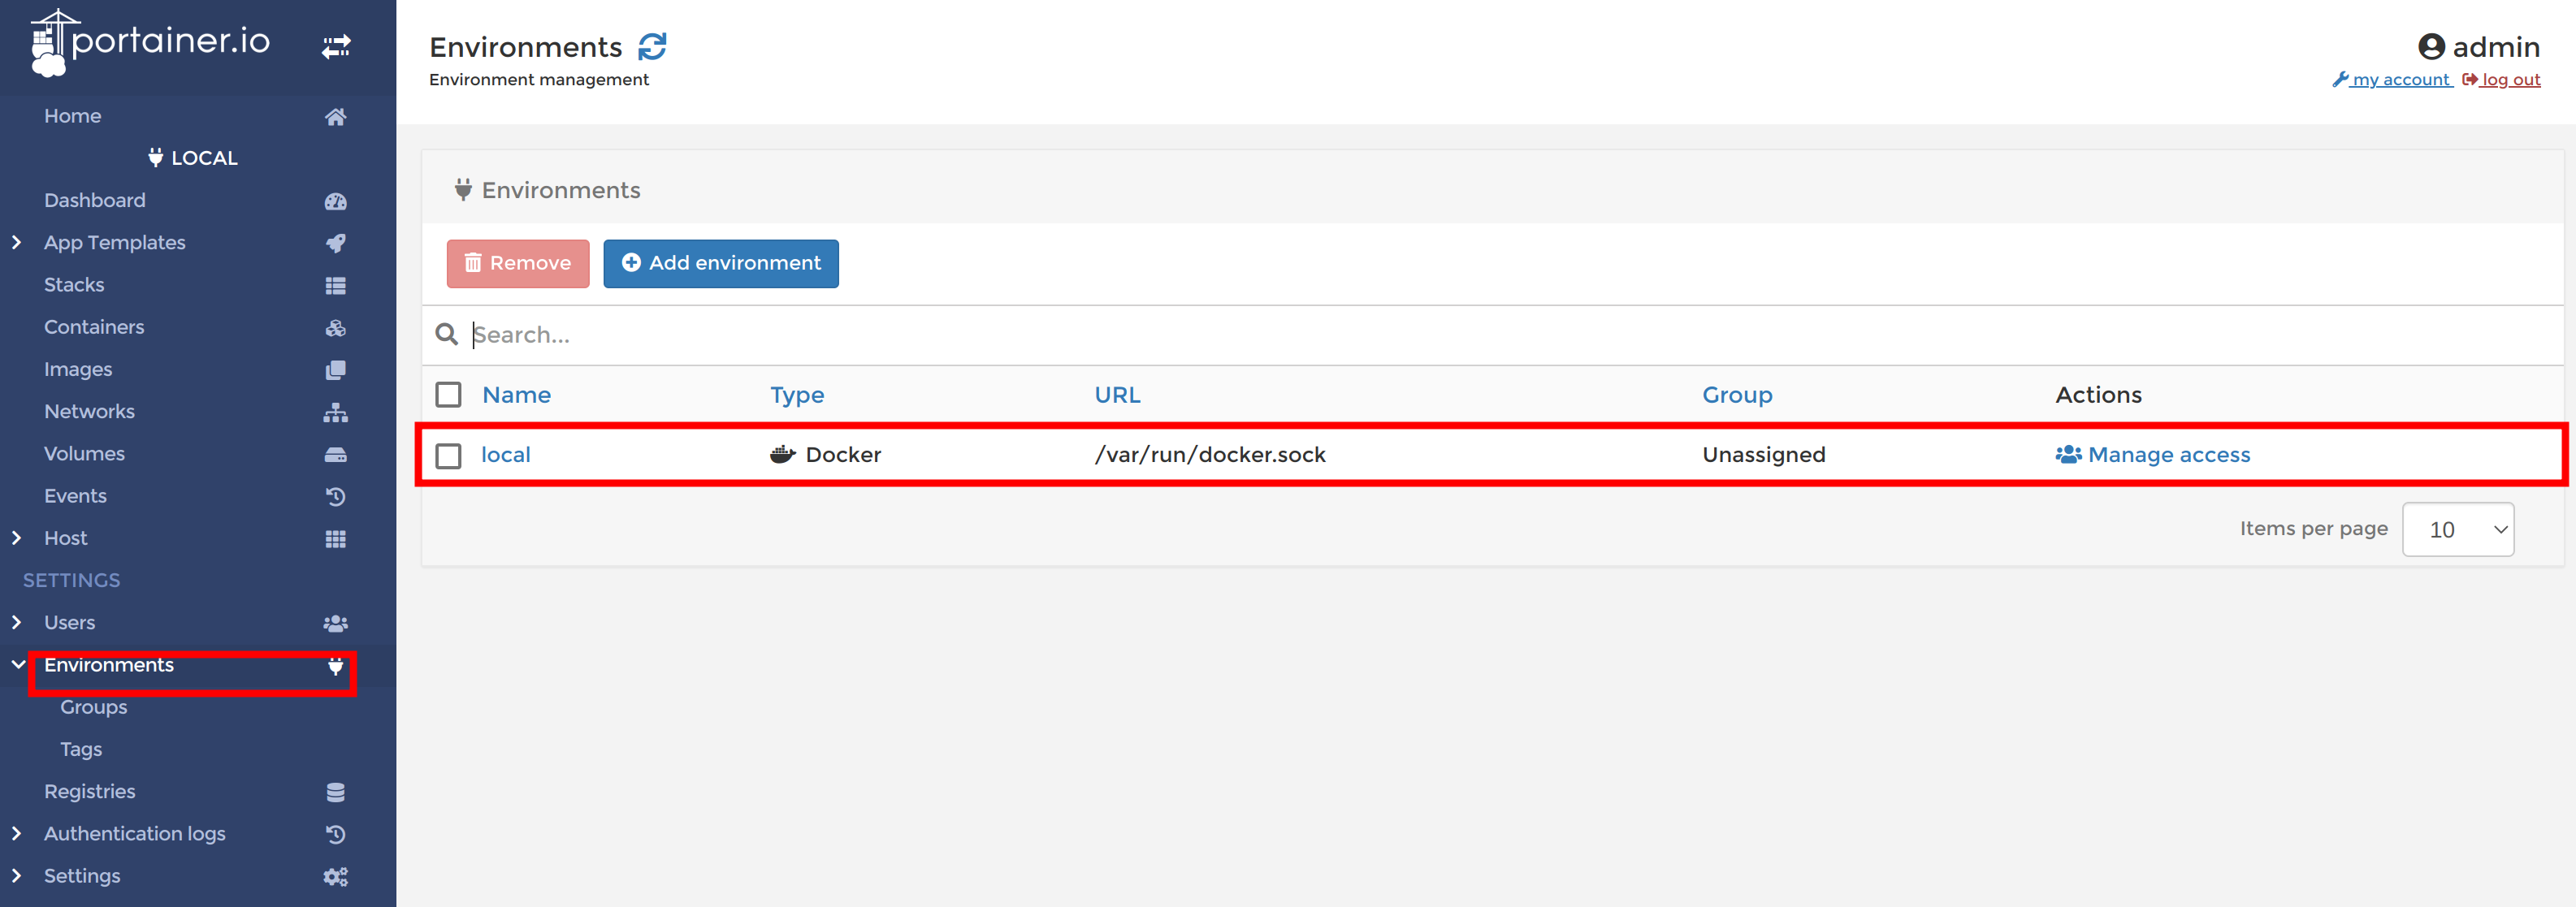
Viewing environment on portainer server
On the environment page, click on the Add environment button to add an environment.
You can see that portainer supports Docker, Kubernetes, and ACI environments. Go ahead and click on the Kubernetes box to a add and manage a Kubernetes environment and click on the start wizard button to continue.
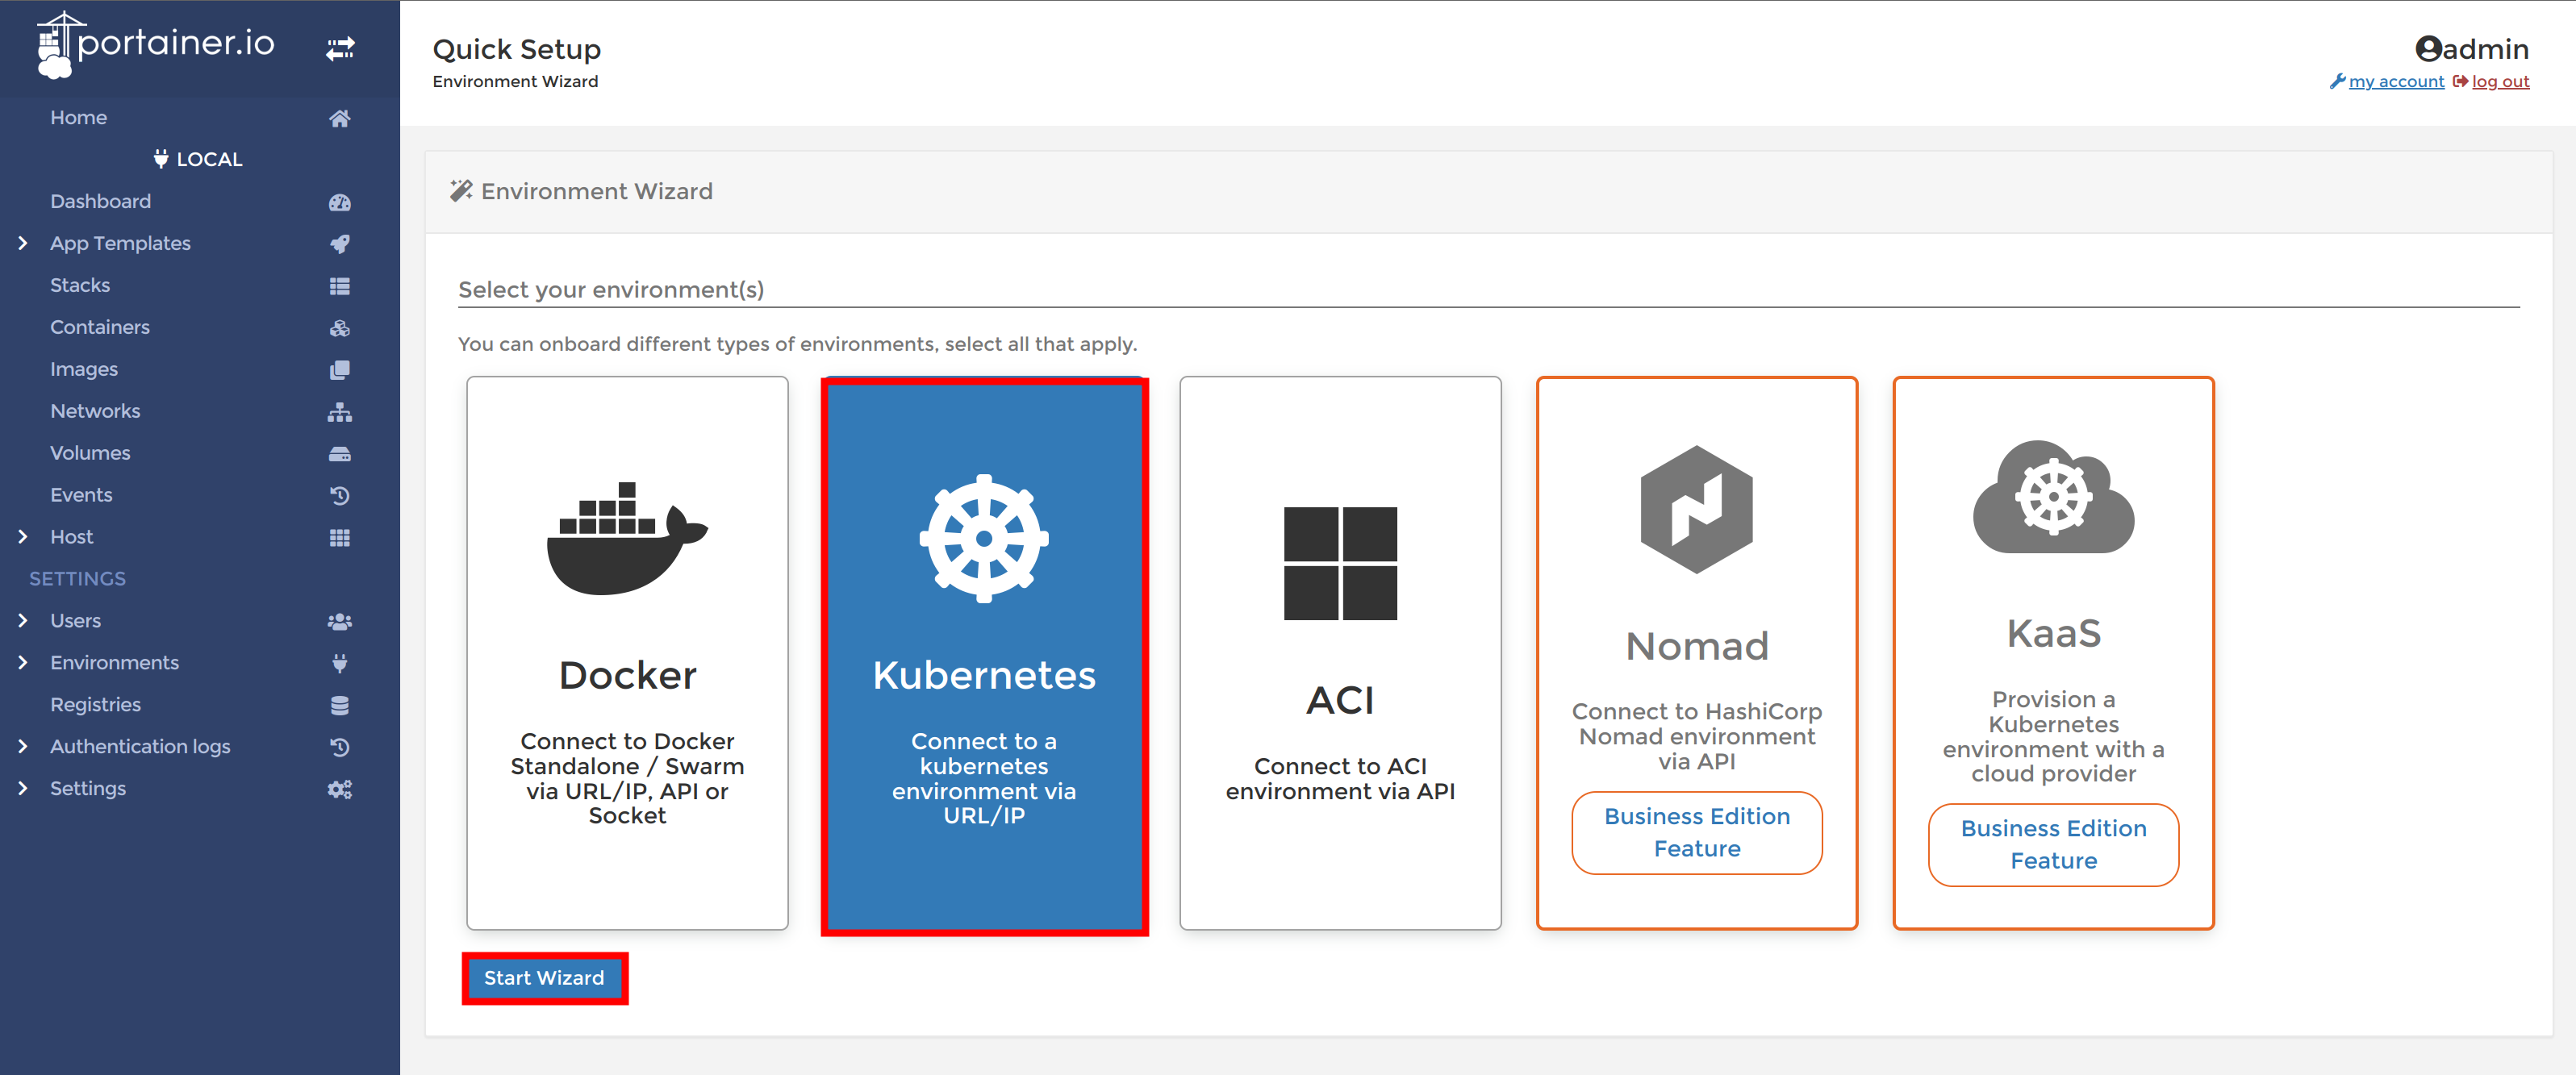
Adding Kubernetes environment
A new screen with other configuration settings will be shown to you:
Configuring Kubernetes environment
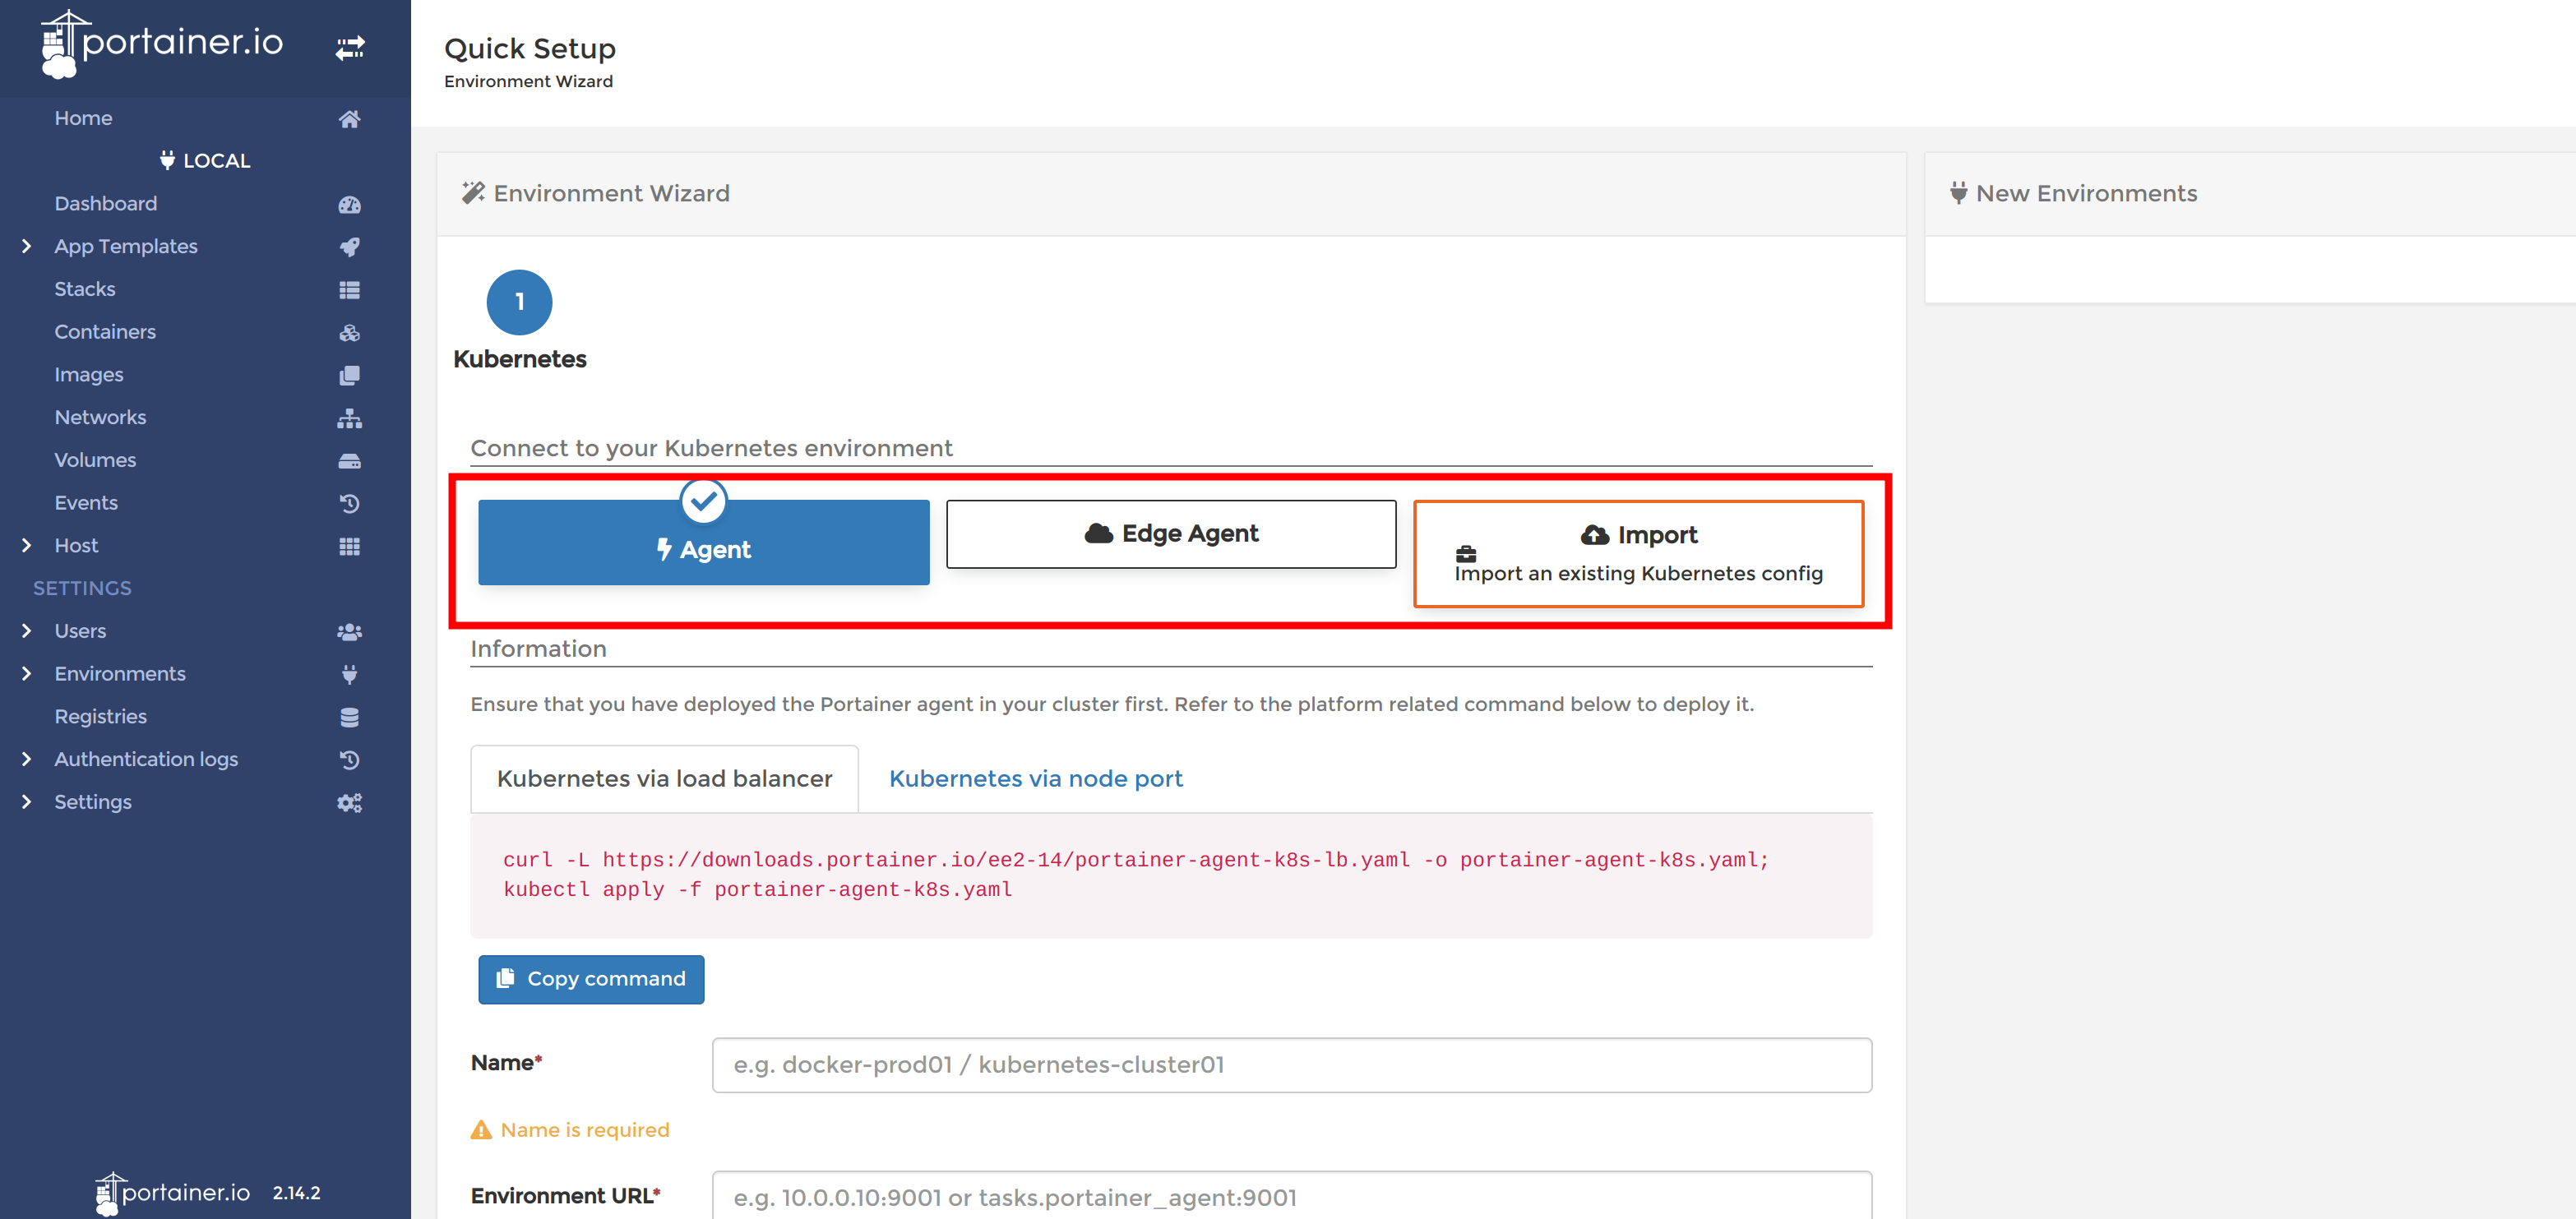
While connecting to Kubernetes clusters, portainer provides three different options. Connecting through a default agent, an edge agent or import an existing kubernetes config.
The default agent is used to communicate and manage local Kubernetes cluster resources. while the edge agent is used for connecting production or cloud based Kubernetes environments on public networks which is done via an encrypted TLS tunnel to prevent the edge agent from being public. This applies to local and cloud based Docker swarm clusters and Azure container instances (ACI) as well.
For connecting Kubernetes clusters (either local or cloud environments) a portainer agent is required to be deployed on the Kubernetes cluster via node port and load balancer. Here, all you need to do is copy the command highlighted to install the portainer agent. This agent serves and a means of communication between the Kubernetes environment and the portainer server.
This Kubernetes environment can either be running on your local machine or a virtual machine other than the host (the linux server or your local machine) the portainer server is running on.

Viewing portainer agents for both Kubernetes via load balancer and Kubernetes via node port
Conclusion
Portainer is a super handy tool for managing your Docker apps. You’ve now got the basics down on creating Docker containers and images, plus adding other environments to your Portainer server. But remember, this is just the beginning! Maybe dive into Role-Based Access next. There’s a lot more to explore with Portainer.
And if you’re enjoying Docker with Portainer, you’ll love optimizing your builds with Earthly. It’s another tool that can significantly enhance your Docker experience. So, don’t hesitate to have a look! Stay curious and keep exploring!
Turn your engineering standards into automated guardrails that provide feedback directly in pull requests, with 100+ guardrails included out of the box and support for the tools and CI/CD systems you already have.