Implementing an Image Upload System to Cloudinary in Golang
Table of Contents
Integrate Golang with Cloudinary for efficient image uploading in this article. Earthly provides reproducible builds that enhance reliability and efficiency. Learn more about Earthly.
Golang enables you to build efficient applications with a focus on simplicity. That important when developing modern web applications. Uploading various types of files,images, videos, and documents, is a crucial aspect of modern web applications. An outdated and ineffective method of handling file uploads involves storing them in the application database. Unfortunately, this approach is very inefficient and can impact application performance in several ways. With the advent of content delivery networks (CDNs) and cloud storage services, managing file uploads in applications has become easier and more optimized. These solutions provide a secure way to store files in the cloud and assign unique URLs to uploaded files for convenient access and download. Examples of such solutions include Cloudinary, Amazon S3, Upload.io, and more. In this tutorial, you’ll learn how to upload images to Cloudinary in a Golang web application by creating a simple REST API with an image upload feature.
What Is Cloudinary?

Cloudinary is a powerful media management platform that provides global content delivery and real-time optimizations. It also offers SDKs and APIs for seamless integration with web technologies. Storing media in Cloudinary brings advantages like improved performance, scalability, cost-effectiveness, and advanced media management features. With Cloudinary, you store only the Cloudinary-assigned URL in your database, making it a smarter choice for handling media files. To implement an image upload system in Golang, you need the following prerequisites:
- Basic understanding of REST APIs in Golang
- Cloudinary account
- Go installation in a local environment. The code used in this tutorial can be found on my GitHub repository, in case you’d like to use it as a reference as you follow along. Let’s get started!
Setting Up Access Credentials for Cloudinary
To use Cloudinary’s SDK, you need an API key and a secret key for authentication. Sign up on Cloudinary if you haven’t yet and get your cloud name, API key, and secret key from your dashboard like the screenshot below:
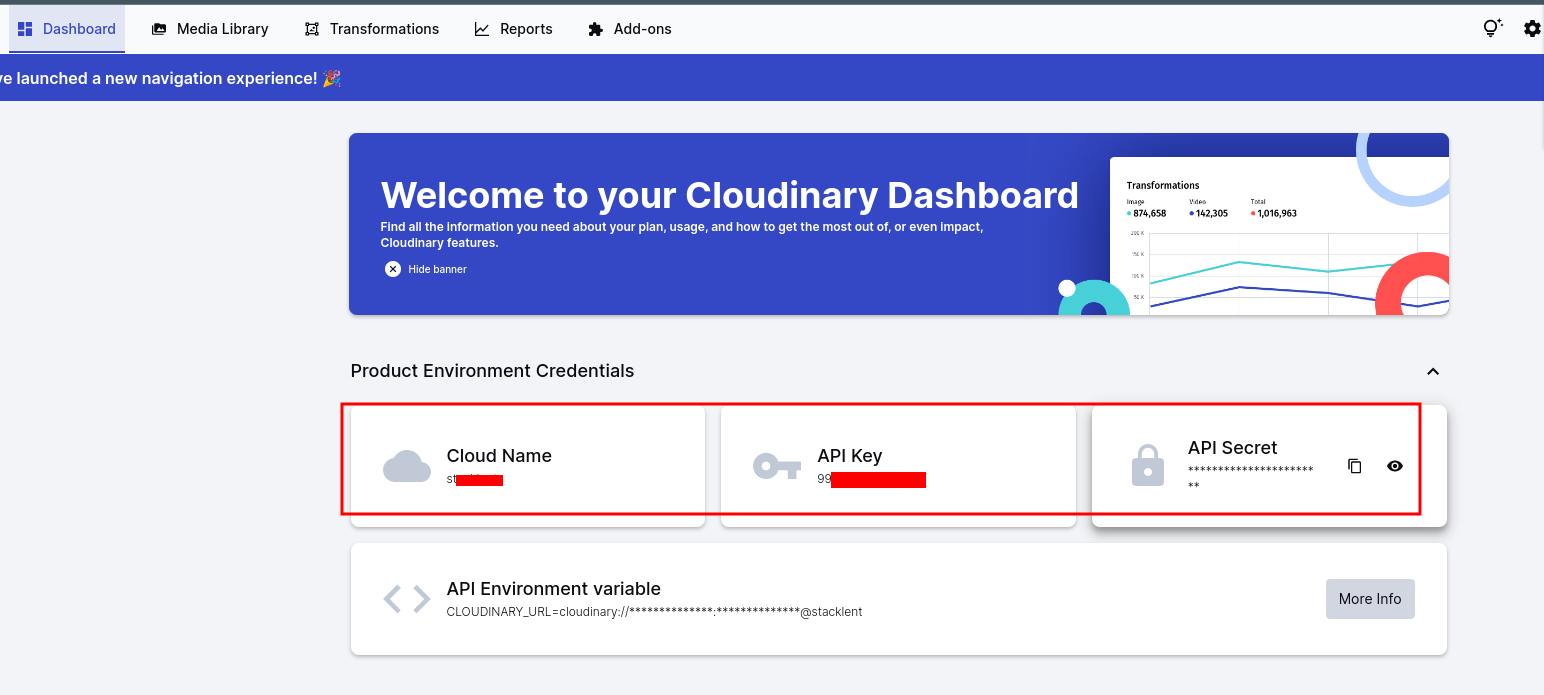
Implementing a Golang REST API
Before we get started on the image upload system, let’s develop a simple REST API with Gin, which is a popular web framework for building APIs in Go. With Gin, we can manage HTTP requests, read and return JSON data, and create different endpoints. Launch your terminal and run the following commands which create a new folder go-image-uploader, navigate to it, and initialize a new Go project inside it, all in the given order.
mkdir go-image-uploader
cd go-image-uploader
go mod init go-image-uploader
It makes sense to define a directory structure early on before we start building. Go ahead and create the following files and folders according to the application structure for the API:
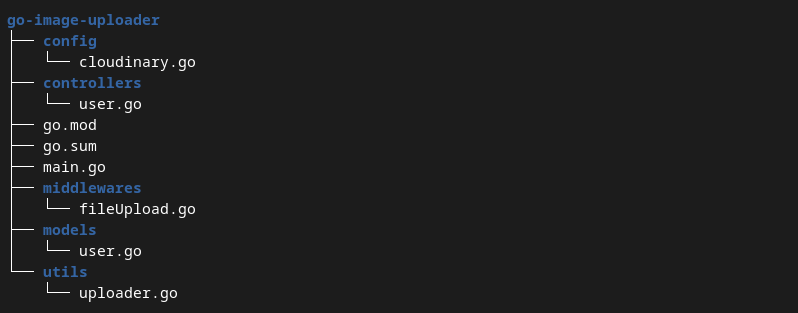
We also need to install the Gin framework to use it to build the REST API. You can use the go get command to install Gin, just execute the following command in your terminal.
go get github.com/gin-gonic/ginWe will create an API where a user can create a profile, and upload a picture. We will use a data structure to define the user data with just four properties: ID, email, password, and image URL. The models folder is the directory for managing data structures and models. Go to the user.go file in the models folder and define the user data structure like this:
package models

type User struct {
    ID int `json:"id"`
    Email string `json:"username"`
    Password string `json:"password"`
    ImageUrl string `json:"image_url"`
}
In this tutorial, we’ll use a map as an in-memory database user. This is a simplified alternative to using a real database system like MongoDB. The map will use user IDs as keys and user objects as values. To implement the database functionality, we need to allocate memory to the map when the application starts. Add the following code to the user model file to achieve this.
var users map[int]User

// function to allocate memory when the app starts
func NewUserDB() {
    users = make(map[int]User)
}
We require functions to manipulate data in the temporary database. The user creation function adds a new user by generating a unique ID. It calculates the ID by incrementing the current database length by 1. This helps it emulate a real database. Below is the implementation:
func CreateUser(u *User) {
    id := len(users) + 1
    u.ID = id
    users[id] = *u
}
Next is the function to update a user’s data. This is only needed to add the image URL property when the user uploads their picture. Add it to your model also like this:
func (u *User) UpdateUser(id int, update map[string]string) User {
    user := users[id]
    for key, value := range update {
        switch key {
        case "email":
            user.Email = value
        case "password":
            user.Password = value
        case "image_url":
            user.ImageUrl = value
        }
    }

    users[id] = user
    return users[id]
}
The model is now complete and we can now create controllers to handle requests. Navigate to the controllers folder and open the user.go file. We need two controllers in this article, one to create a new user, and another to upload images to Cloudinary. The CreateUser handler gets the request body and binds the JSON data to the user object so that every property will have its value populated accordingly. It then calls models.CreateUser to save the data in the database before returning a JSON response with HTTP status 201.
Define the CreateUser handler as shown here:
package controllers

import (
    "github.com/gin-gonic/gin"
    "go-image-uploader/models"
    "net/http"
)

func CreateUser(c *gin.Context) {
    var user models.User
    c.BindJSON(&user)
    models.CreateUser(&user)

    c.JSON(http.StatusCreated, user)
}
The REST API is almost ready, and the remaining step is to define routes and create the application server. Open your main.go file and import Gin with your models and controller packages.
package main

import (
  "github.com/gin-gonic/gin"
  "go-image-uploader/models"
  "go-image-uploader/controllers"
)
The models package is needed to call the NewUserDB function to initialize our database, Gin is needed to create a router and start the server, while controllers will enable us to access our handler functions. The main function initializes the database, creates a new router, and registers the CreateUser endpoint. It then starts the application on port 5000. Here is what the main function looks like:
func main() {
  models.NewUserDB()
    router := gin.Default()
    router.POST("/user", controllers.CreateUser)
    router.Run(":5000") // start server
}
The router directs every HTTP POST request sent to the /user endpoint to the CreateUser handler so that it adds a new user to the database.
The REST API is now set up and we can check to see that everything works by starting the application and running test requests in Postman. Start the application by running the command below in the root directory.
go run main.goThe output looks like the screenshot below:

We can now run a test request to create a new user. The response should look like the following:
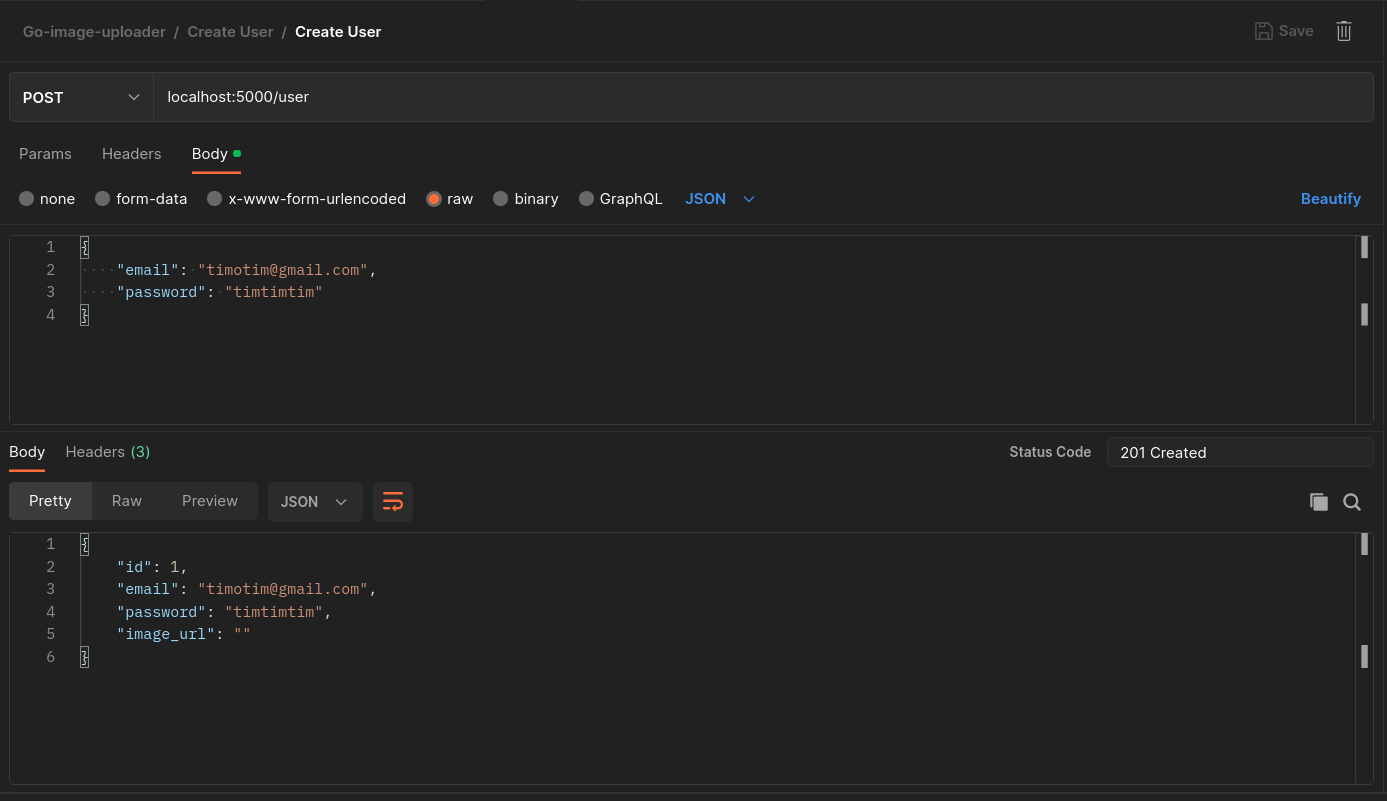
Note: This REST API is a minimalist implementation, and it lacks essential components like password hashing, error handling, and authentication, which are crucial in real-world projects.
Implementing Image Uploads To Cloudinary
To enable image uploads to Cloudinary, we’ll use the Cloudinary Golang SDK. It offers a straightforward interface for managing media files on Cloudinary. Before proceeding, we need to install the Cloudinary Golang SDK. Run the following command to install it:
go get -u github.com/cloudinary/cloudinary-go/v2You need to initialize the Cloudinary client using the API credentials that you got from the dashboard earlier. Cloudinary SDK allows us to initialize a client using the NewFromParams function. Open the config folder’s cloudinary.go file, import the Cloudinary package, and implement the SetupCloudinary function as shown here:
package config

import (
    "github.com/cloudinary/cloudinary-go/v2"
)

func SetupCloudinary() (*cloudinary.Cloudinary, error) {
    cldSecret := "YOUR_CLOUDINARY_API_SECRET"
    cldName := "YOUR_CLOUDINARY_CLOUD_NAME"
    cldKey := "YOUR_CLOUDINARY_API_KEY"

    cld, err := cloudinary.NewFromParams(cldName, cldKey, cldSecret)
    if err != nil {
        return nil, err
    }

    return cld, nil
}
Next, in the utils folder, open uploader.go to implement the file upload helper function. We start by importing the necessary packages for the function: context for background context, Cloudinary’s uploader for defining upload parameters, config for the SetupCloudinary function, and multipart for file parsing.
package utils

import (
    "context"
    "github.com/cloudinary/cloudinary-go/v2/api/uploader"
    "go-image-uploader/config"
    "mime/multipart"
)
Next, we proceed to implement the function by defining it and initializing Cloudinary.
func UploadToCloudinary(file multipart.File, filePath string) (string, error) {
    ctx := context.Background()
    cld, err := config.SetupCloudinary()
    if err != nil {
        return "", err
    }
}
Then, we set the properties of the file using upload parameters. Although there are other parameters that could be set like Folder, ResourceType, and others, only PublicID(file name) is set here. ResourceType is set to auto by default, so it detects the file type on request, and we don’t need the files to store in any folder on Cloudinary, so we can omit the field too.
    uploadParams := uploader.UploadParams{
        PublicID: filePath,
    }
Check out the Cloudinary Go docs for all upload parameters and their functions. The remaining parts of the UploadToCloudinary function upload the image to Cloudinary and return its URL. We use Upload.Upload to handle the upload process. The function takes in context, file, and upload parameters. It then uploads the image and returns an object with the uploaded image properties from which we get the image’s URL(SecureURL).
Complete UploadToCloudinary with the following code.
result, err := cld.Upload.Upload(ctx, file, uploadParams)
if err != nil {
    return "", err
}

imageUrl := result.SecureURL
return imageUrl, nil
The next step is to implement the HTTP request handler for the image upload endpoint, but we need to reduce the amount of work this handler will perform to avoid performance issues caused by file processing. An effective way to handle this is to create a middleware that processes the file and passes it to the handler for uploading.
Note: A middleware is a function that is executed before the main request handler, allowing you to perform certain operations on the request.
Go into fileUpload.go inside the middlewares directory to implement the middleware that gets the opened file from the request using Gin’s Request.FormFile function. It also gets its filename from the request header and adds these two data to the Gin context using Set. It then passes control to the controller which performs the upload.
package middlewares

import (
    "fmt"
    "github.com/gin-gonic/gin"
    "net/http"
)

func FileUploadMiddleware() gin.HandlerFunc {
    return func(c *gin.Context) {
        file, header, err := c.Request.FormFile("file")
        if err != nil {
            c.AbortWithStatusJSON(http.StatusBadRequest, gin.H{
                "error": "Bad request",
            })
            return
        }
        defer file.Close() // close file properly

        c.Set("filePath", header.Filename)
        c.Set("file", file)

        c.Next()
    }
}
The system is almost complete, and we can now implement the request handler. Return to your user controllers file (user.go) to add the image upload controller. The controller uploads the image using the UploadToCloudinary utility function, and it saves the image URL in the database.
We need to import the following packages into the file as we’ll be using functions from them in the upload controller:
"go-image-uploader/utils"
"mime/multipart"
"strconv"
We also need the user ID from the URL parameters to identify the user, and the opened file with its name, which the middleware would have added to context by the time control reaches the handler. Define the UploadImage controller and use Gin to get the ID, file, and filename as the following code shows:
func UploadImage(c *gin.Context) {
    id := c.Params.ByName("id")
    filename, ok := c.Get("filePath")
    if !ok {
        c.JSON(http.StatusBadRequest, gin.H{"error": "filename not found"})
    }

    file, ok := c.Get("file")
    if !ok {
        c.JSON(http.StatusBadRequest, gin.H{"error": "file not found"})
        return
    }
}
The function makes sure both file and filePath exist before going on to do anything else. The next step is to upload the image to Cloudinary and get its URL. The code below calls UploadToCloudinary, and passes the file and filePath to it as parameters. Add it to the UploadImage code.
imageUrl, err := utils.UploadToCloudinary(file.(multipart.File), \
filename.(string))
if err != nil {
    c.JSON(http.StatusInternalServerError, gin.H{"error": err.Error()})
    return
}
Notice the use of type assertion while passing parameters to utils.UploadToCloudinary. This ensures that the values are of the right types because, values stored in the Gin context are stored as interfaces, and interfaces can be of any kind. So the assertion is important to avoid errors.
Next, add the image URL to the user’s data in the database and return a response to the client. Add the following code to convert the user ID gotten from the URL from string to integer using strconv.Atoi, then set the user’s ImageURL to the uploaded image URL.
var user models.User
userId, _ := strconv.Atoi(id)
update := map[string]string{
    "image_url": imageUrl,
}
updatedUser := user.UpdateUser(userId, update)
c.JSON(http.StatusOK, gin.H{"data": updatedUser})
return
The last step is to add an upload route to the API. This route has a different structure compared to the CreateUser route. It first executes the FileUploadMiddleware for file processing and then calls the handler. Return to the main function and add the route as follows:
router.POST("/user/:id/uploadImage", \
middlewares.FileUploadMiddleware(), controllers.UploadImage)
The image upload system is now complete, and we can run the application and test it in Postman. Start the application again by running go run main.go in the terminal, and create a new POST request in Postman.
Since the database is in-memory, the previously created user no longer exists after restarting the application. Therefore, you need to create a new user again for testing the image upload endpoint. Follow the steps below to test the endpoint.
Add the request URL. The ID should be 1 if you have just one user in the database.

Enter request URL Select the Body tab and choose form-data,

Select form-data as body type Then in the key field, switch its type from text to file, then select the image you want to upload in value.
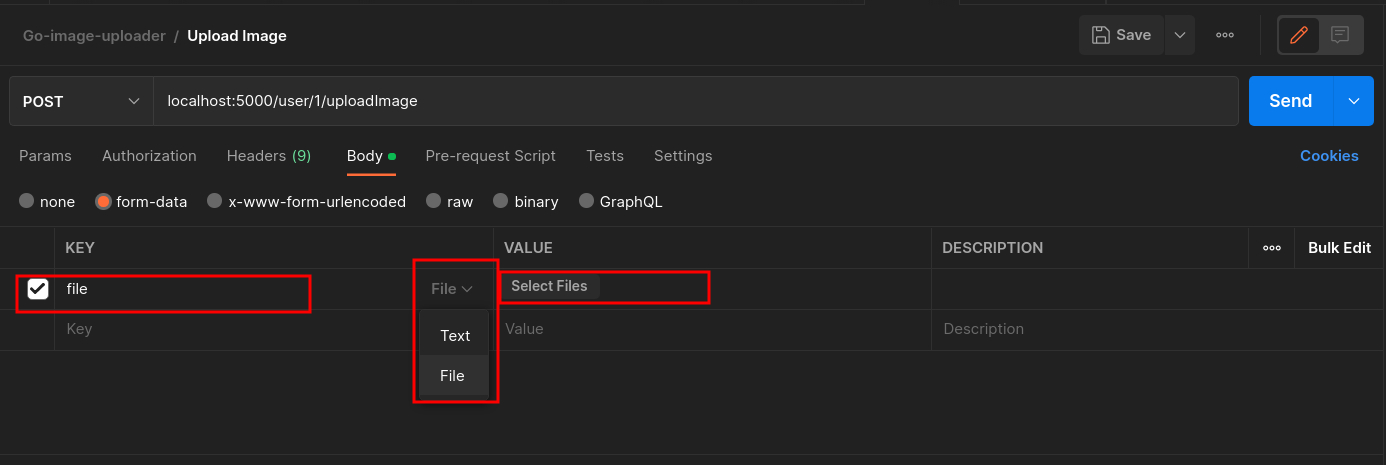
Select file to upload
When you send the request, your file will be uploaded and the response should return the updated user data containing the image_url property.
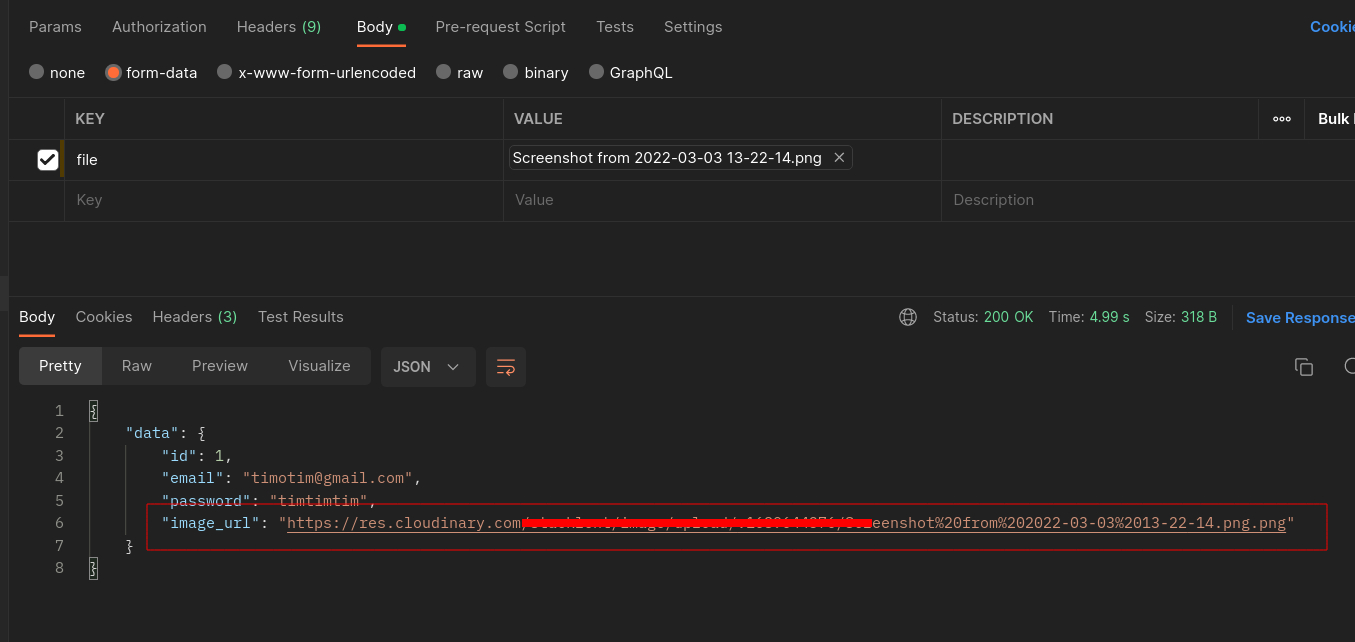
Congratulations, you have successfully built a REST API with an image upload feature in Golang using Cloudinary.
Conclusion
In this article, you have learned how uploading media files to your server can be costly and why cloud services like Cloudinary are the perfect solution for you. This step-by-step guide to implementing a REST API with an image upload feature to upload images to Cloudinary has shown you how to get your API credentials from Cloudinary, install the Go SDK, and upload images efficiently to your Cloudinary storage.
Thank you for reading up to this point, I hope you learned something new in this article. Interested in more insightful tutorials? You can find more articles like this right here on Earthly.dev.
Earthly Lunar: Monitoring for your SDLC
Achieve Engineering Excellence with universal SDLC monitoring that works with every tech stack, microservice, and CI pipeline.


