Securing Kubernetes With Network Policies

Table of Contents
This article discusses the role of Kubernetes network policies in managing and securing network traffic within Kubernetes clusters. It briefly explains how these policies enable selective traffic flow to enhance cluster security.
Kubernetes Network Policy is a set of rules that define how network traffic flows within a Kubernetes cluster. It is used to control and secure communication between pods and services in a Kubernetes cluster.
Network policies allow administrators to define rules based on the source and destination pods, IP addresses, ports, and protocols. These rules can be used to allow or block traffic between different pods or services based on their labels, namespaces, or other attributes.
To use network policies in Kubernetes, you must have a network plugin that supports the NetworkPolicy API. Network policies in Kubernetes are implemented by the network plugin, and creating a NetworkPolicy resource will not have any effect if there is no controller that implements it.
In this article, you’ll understand the need to implement security policies in a Kubernetes cluster and how they affect the network flow within the cluster. You will also learn how to apply a network policy in a Kubernetes cluster and control traffic based on namespaces. In addition, you’ll get to learn Kubernetes network concepts like Ingress, Egress, and Container Network Plugin (CNI).
Why You Should Use Network Policy in Kubernetes
There are several reasons why you should use network policies in Kubernetes:
- Improved security: Network policies provide an additional layer of security by allowing you to restrict network traffic between pods in a Kubernetes cluster. With network policies, you can ensure that only authorized pods are allowed to communicate with each other and that traffic is limited to specific ports and protocols.
- Compliance: Network policies can help you meet compliance requirements by providing a way to control traffic flow within your cluster. For example, you can use network policies to ensure that sensitive data is only accessible by authorized pods, which can help you meet regulatory requirements for data privacy.
- Resource optimization: Network policies can help you optimize resource usage within your cluster by controlling the flow of network traffic. By limiting traffic between pods, you can reduce network congestion and improve the performance of your cluster.
- Troubleshooting: Network policies can also be useful for troubleshooting network-related issues within your cluster. By restricting traffic flow between pods, you can isolate issues and identify the root cause of problems more quickly.
Next we will get a closer look on the key features of Kubernetes network policies.
What Are the Features of Kubernetes Network Policy?
Here are some of the features that are supported by Kubernetes network policy:
- Namespaced resources: Network policies are defined as Kubernetes objects and are applied to a specific namespace. This allows you to control traffic flow between pods in different namespaces.
- Additive: In Kubernetes, network policies are additive. This means that if you create multiple policies that select the same pod, all the rules specified in each policy will be combined and applied to the pod.
- Label-based traffic selection: Kubernetes network policies allow you to select traffic based on pod labels. This provides a flexible way to control traffic flow within your cluster.
- Protocol and port selection: You can use network policies to specify which protocols (TCP-UDP-SCTP) and ports are allowed for incoming and outgoing traffic. This helps to ensure that only authorized traffic is allowed between pods.
- Integration with network plugins: Kubernetes network policies are implemented by network plugins. This allows you to use the network plugin of your choice and take advantage of its features and capabilities.
Overall, Kubernetes network policies provide a powerful tool for managing network traffic within a Kubernetes cluster. They provide an additional layer of security to your cluster and your traffic flow.
Network Concepts You Need To Know
Before going through a demo, it is important to know about the below network concepts:
Ingress
As a concept, it is the act of entering. As an implementation in Kubernetes Network Policy, It is a policy type and it provides a way to manage incoming network traffic to your cluster and your pods.
Egress
As a concept, it is the act of going out or leaving. As an implementation in Kubernetes Network Policy, It is a policy type and it provides a way to manage outgoing network traffic from your cluster and your pods.
Container Network Interface (CNI)
Container Network Interface (CNI) is a standard for configuring networking for container runtime platforms, including Kubernetes. CNI provides a set of plugins that allow different networking solutions to integrate with Kubernetes. A CNI plugin is responsible for setting up the networking for each Kubernetes pod. When a pod is created, Kubernetes calls the CNI plugin to allocate an IP address and set up the necessary network interfaces and routes. CNI plugins can be used to implement network connectivity between workloads and network policies. Some examples of CNI plugins that can be used in Kubernetes include Calico and Cilium.
Next, you will work on a demo to apply different network policies to a Kubernetes cluster and you will see how the above concepts will be used.
Applying Network Policies to Control Traffic Between Namespaces (Demo)
Now let’s proceed with a demo to apply network policies to a Kubernetes cluster. We will limit traffic from/to pods in different namespaces using namespace and pod selectors.
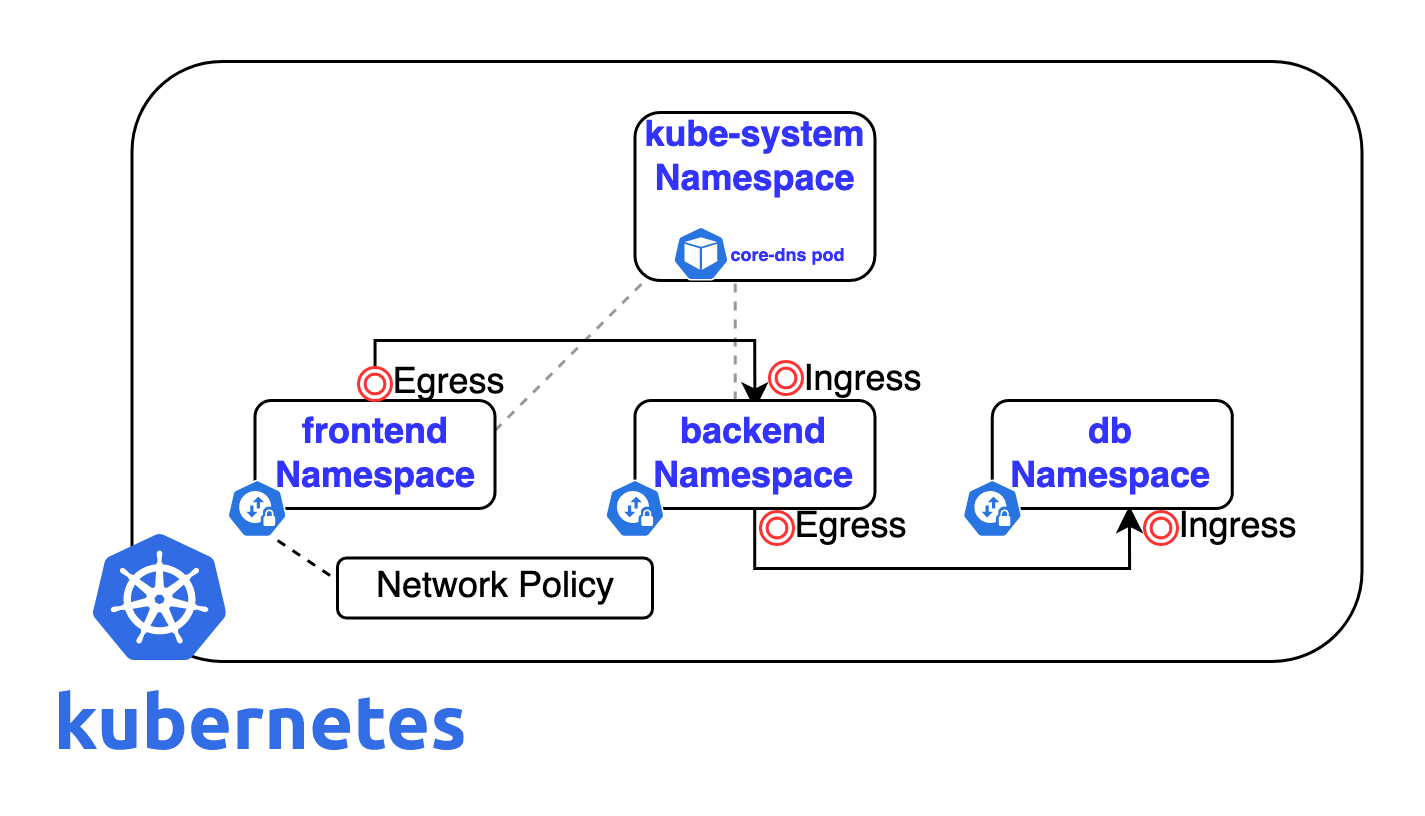
The above diagram shows an overview of Kubernetes components that will be created during the demo. You will create three namespaces (frontend, backend, and db) and attach a network policy to each namespace to control the incoming (Ingress) and outgoing (Egress) traffic.
To proceed, you should have the following prerequisites:
- Up and running Kubernetes cluster with CNI plugin enabled.
- Installation of Kubectl.
In case you run the demo on EKS, then the Amazon VPC CNI plugin will be installed by default to Kubernetes cluster. In case of AKS, then kubenet CNI plugin will be installed by default.
Pods Communication Across Different Namespaces
Our goal in this section is to check the default connectivity between pods in different namespaces before applying any network policies. Let’s create 3 namespaces (frontend, backend, and db) and label these namespaces as below:
$ kubectl create ns frontend
$ kubectl label namespace frontend ns=frontend
$ kubectl create ns backend
$ kubectl label namespace backend ns=backend
$ kubectl create ns db
$ kubectl label namespace db ns=db
These labels will be used later in our network policies to specify a namespace to filter traffic based on its label.
Also you need to label kube-system namespace which contains the core components of the Kubernetes cluster, as this label will be used later in a network policy to allow communication to coredns pod in kube-system namespace which acts as the DNS in the Kubernetes cluster.
$ kubectl label namespace kube-system contains=corednsFor ease, we will run nginx pods in each namespace. This is to have a simple application running and curl these applications endpoints and test the connectivity. Feel free to run whatever app you want to run across different namespaces.
$ kubectl run frontend --image=nginx -n frontend
$ kubectl run backend --image=nginx -n backend
$ kubectl run db --image=nginx -n db
Make sure the pods are up and running in each namespace. Note that each pod is created with a default label which will be used later to select these pods.
$ kubectl get pods -n frontend --show-labels
$ kubectl get pods -n backend --show-labels
$ kubectl get pods -n db --show-labels
Then, we will expose each pod internally through a service resource as below.
$ kubectl expose pod frontend --name=frontend-svc -n frontend --port=80
$ kubectl expose pod backend --name=backend-svc -n backend --port=80
$ kubectl expose pod db --name=db-svc -n db --port=80
Communication with the applications running on pods is facilitated by Kubernetes services. Because in real-world applications, pods are not communicating directly but through service resources.
Also check that service has been applied as expected:
$ kubectl get svc -n frontend
$ kubectl get svc -n backend
$ kubectl get svc -n db
After applying the above commands, you will be able to communicate with nginx applications through frontend-svc, backend-svc, and db-svc services.
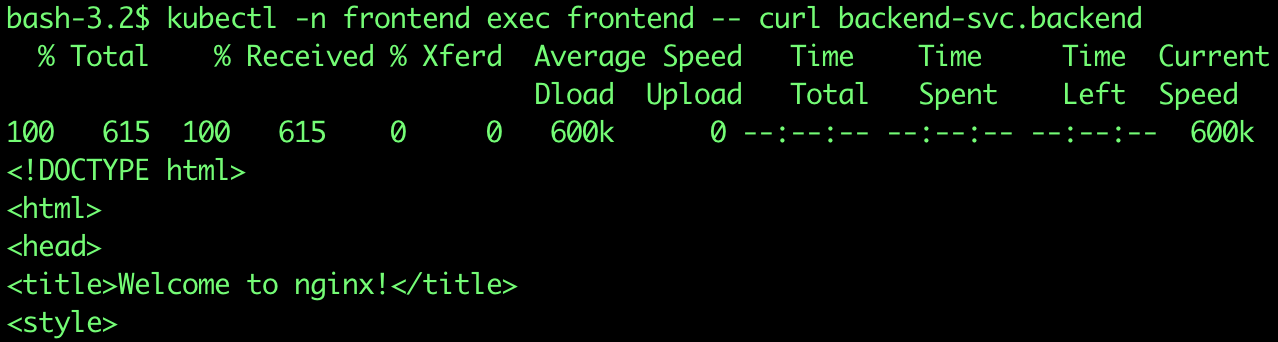
Now let’s try to test the connectivity to the backend application inside the backend namespace from the frontend application inside the frontend namespace.
$ kubectl -n frontend exec frontend -- curl backend-svc.backendThe above command is following this pattern:
kubectl -n <SOURCE_NAMESPACE> exec <SOURCE_POD_NAME> -- curl <TARGET_SERVICE_NAME>.<TARGET_NAMESPACE>
For more information about pod and service DNS, you can check this article.
You should be able to see that it is a successful connection. Which means that access is allowed by default between pods in different namespaces.
Applying Network Policy to Deny All Traffic Across Namespaces
So far, we have created 3 namespaces, deployed an application on each namespace and exposed these applications internally via Kubernetes services.
In this section, we will deny all traffic between namespaces, which is one the security best practices in Kubernetes. While in the next section, we will allow outgoing (Egress) and incoming (Ingress) traffic only for certain services based on specific labels.
Network policies will be created in YAML files then applied via kubectl commands. Next you will create and apply a network policy to deny all traffic between pods in different namespaces.
Create a new file deny_all.yaml and place the following YAML content inside:
apiVersion: networking.k8s.io/v1
kind: NetworkPolicy
metadata:
 name: deny
 namespace: frontend
spec:
 podSelector: {}
 policyTypes:
 - Egress
 - Ingress
 ingress:
 - from:
   - podSelector: {}
 egress:
 - to:
   - podSelector: {}
---
apiVersion: networking.k8s.io/v1
kind: NetworkPolicy
metadata:
 name: deny
 namespace: backend
spec:
 podSelector: {}
 policyTypes:
 - Egress
 - Ingress
 ingress:
 - from:
   - podSelector: {}
 egress:
 - to:
   - podSelector: {}
---
apiVersion: networking.k8s.io/v1
kind: NetworkPolicy
metadata:
 name: deny
 namespace: db
spec:
 podSelector: {}
 policyTypes:
 - Egress
 - Ingress
 ingress:
 - from:
   - podSelector: {}
 egress:
 - to:
   - podSelector: {}
This is a YAML definition for a network policy which will be applied to frontend, backend, and db namespaces, to block all incoming and outgoing traffic from the namespace.
Let’s go through each section of this YAML file:
apiVersion: This specifies the version of the Kubernetes networking API that the network policy is using. In our demo, we’re usingnetworking.k8s.io/v1.kind: This specifies the kind of Kubernetes object that we’re creating. In our demo, we’re creating a NetworkPolicy.metadata: This section provides metadata about the network policy, such as its name and the namespace that this resource will be applied to.spec: This section contains the actual network policy rules.podSelector: This specifies which pods the policy applies to. In our demo, we’re applying the policy to all pods. That’s why we didn’t mention any pod selectors inspec/podSelectorsection.policyTypes: This specifies the types of traffic that the policy applies to. In our demo, we want to controlIngress(incoming) andEgress(outgoing) traffic.ingress: This section defines the rules for incoming traffic.from: This specifies the source of the incoming traffic. In our case, thepodSelectoris empty which means denying all incoming traffic.egress: This section defines the rules for outgoing traffic.to: This specifies the destination of the outgoing traffic. In our case, thepodSelectoris empty which means denying all outgoing traffic.
A network policy with these configurations will deny all traffic between pods in frontend, backend, and db namespaces. Let’s apply then test these configurations.
To apply the above network policies, you can use the below command:
$ kubectl apply -f deny_all.yamlThen let’s rerun the same kubectl exec command to test the connectivity between pods in frontend and backend namespaces:
$ kubectl -n frontend exec frontend -- curl backend-svc.backend
As you see, it doesn’t work this time because we applied a network policy to deny all outgoing traffic from the frontend namespace. So the frontend pod is not able to communicate with coredns pod in kube-system namespace to resolve the backend service DNS record. In the next section, we will apply another network policy to allow incoming and outgoing traffic between certain pods and certain namespaces based on labels. Let’s do it.
Allowing Ingress and Egress Traffic Between Pods Across Different Namespaces
In this section, you will apply another network policy to allow traffic from frontend namespace to backend namespace and from backend namespace to db namespace.
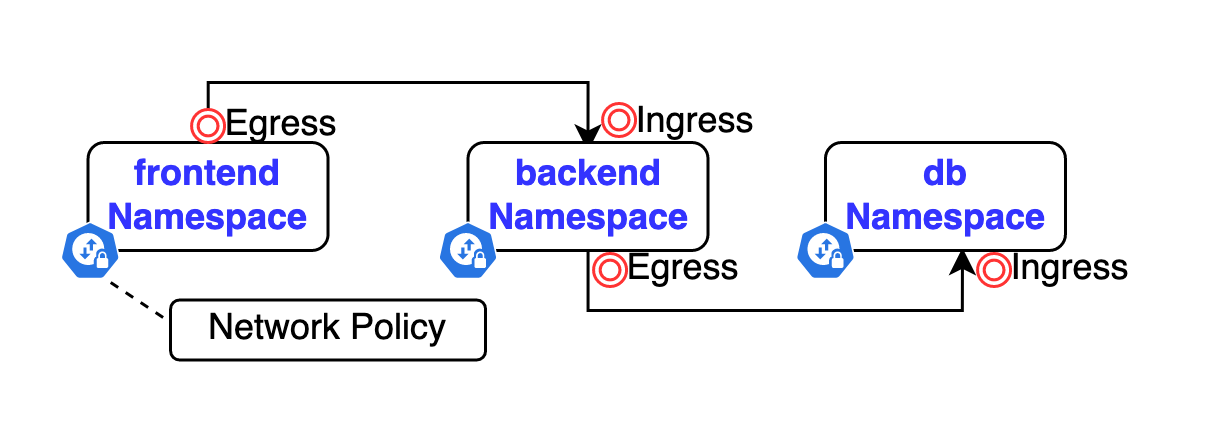
As mentioned in the above diagram, we need to apply Egress network policy in frontend namespace, Ingress and Egress network policies in backend namespace and Ingress network policy in db namespace.
Our goal in this section is to allow traffic from frontend namespace only to backend namespace, and from backend namespace only to db namespace. So pods in frontend namespace can’t communicate with pods in db namespace and this is how we limit the traffic between namespaces.
Allowing frontend Namespace Egress Traffic
Create a new file allow_frontend_egress.yaml and place the following YAML content inside:
apiVersion: networking.k8s.io/v1
kind: NetworkPolicy
metadata:
  name: frontend
  namespace: frontend
spec:
  podSelector:
    matchLabels:
      run: frontend
  policyTypes:
  - Egress
  egress:
  - to:
    - namespaceSelector:
        matchLabels:
          ns: backend
    - podSelector:
        matchLabels:
          run: backend
So the above network policy will be applied in the frontend namespace to the pods with labels run=frontend as mentioned in spec/podSelection section. It will apply an Egress policy to allow outgoing traffic to running pods in backend namespace labelled with run=backend
Apply the network policy with the below command:
$ kubectl apply -f allow_frontend_egress.yamlThen you create another YAML file for the network policy which will be applied to the backend namespace.
Allowing backend Namespace Ingress and Egress Traffic
Create a new file allow_backend_ingress_egress.yaml and place the following YAML content inside:
apiVersion: networking.k8s.io/v1
kind: NetworkPolicy
metadata:
  name: backend
  namespace: backend
spec:
  podSelector:
    matchLabels:
      run: backend
  policyTypes:
  - Ingress
  - Egress
  ingress:
  - from:
    - namespaceSelector:
        matchLabels:
          ns: frontend
    - podSelector:
        matchLabels:
          run: frontend
  egress:
  - to:
    - namespaceSelector:
        matchLabels:
          ns: db
    - podSelector:
        matchLabels:
          run: db
This policy will be applied in the backend namespace to pods with label run=backend as mentioned in spec/podSelector section. It will allow ingress traffic from pods with label run=frontend in frontend namespace. And will allow egress traffic to pods with label run=db in db namespace
Apply the network policy with the below command:
$ kubectl apply -f allow_backend_ingress_egress.yamlNext you will allow ingress (incoming) traffic to the db pod from backend pods, which can be applied through the below network policy.
Allowing Ingress Traffic to db Namespace
Create a new file allow_db_ingress.yaml and place the following YAML content inside:
apiVersion: networking.k8s.io/v1
kind: NetworkPolicy
metadata:
  name: db
  namespace: db
spec:
  podSelector:
    matchLabels:
      run: db
  policyTypes:
  - Ingress
  ingress:
  - from:
    - namespaceSelector:
        matchLabels:
          ns: backend
    - podSelector:
        matchLabels:
          run: backend
This policy will be applied in db namespace to pods with label run=db as mentioned in spec/podSelector section. It will allow ingress traffic from pods with label run=backend in backend namespace.
Apply the network policy with the below command:
$ kubectl apply -f allow_db_ingress.yamlFinal step in this section is to allow frontend pods and backend pods to communicate with coredns pod in kube-system namespace, to be able to resolve services’ DNS names.
Create a new file allow_frontend_backend_egress_dns.yaml and place the following YAML content inside:
kind: NetworkPolicy
apiVersion: networking.k8s.io/v1
metadata:
  name: all-pods-egress-allow-dns
  namespace: frontend
spec:
  podSelector: {}
  policyTypes:
  - Egress
  egress:
    - to:
      - namespaceSelector:
          matchLabels:
            contains: coredns
        podSelector:
          matchLabels:
            k8s-app: kube-dns
---
kind: NetworkPolicy
apiVersion: networking.k8s.io/v1
metadata:
  name: all-pods-egress-allow-dns
  namespace: backend
spec:
  podSelector: {}
  policyTypes:
  - Egress
  egress:
    - to:
      - namespaceSelector:
          matchLabels:
            contains: coredns
        podSelector:
          matchLabels:
            k8s-app: kube-dns
Apply the network policy with the below command
$ kubectl apply -f allow_frontend_backend_egress_dns.yamlNow let’s execute different commands to make sure the network policies are working as expected:
- Let’s check access between frontend and backend namespaces.
$ kubectl exec frontend -n frontend -- curl backend-svc.backend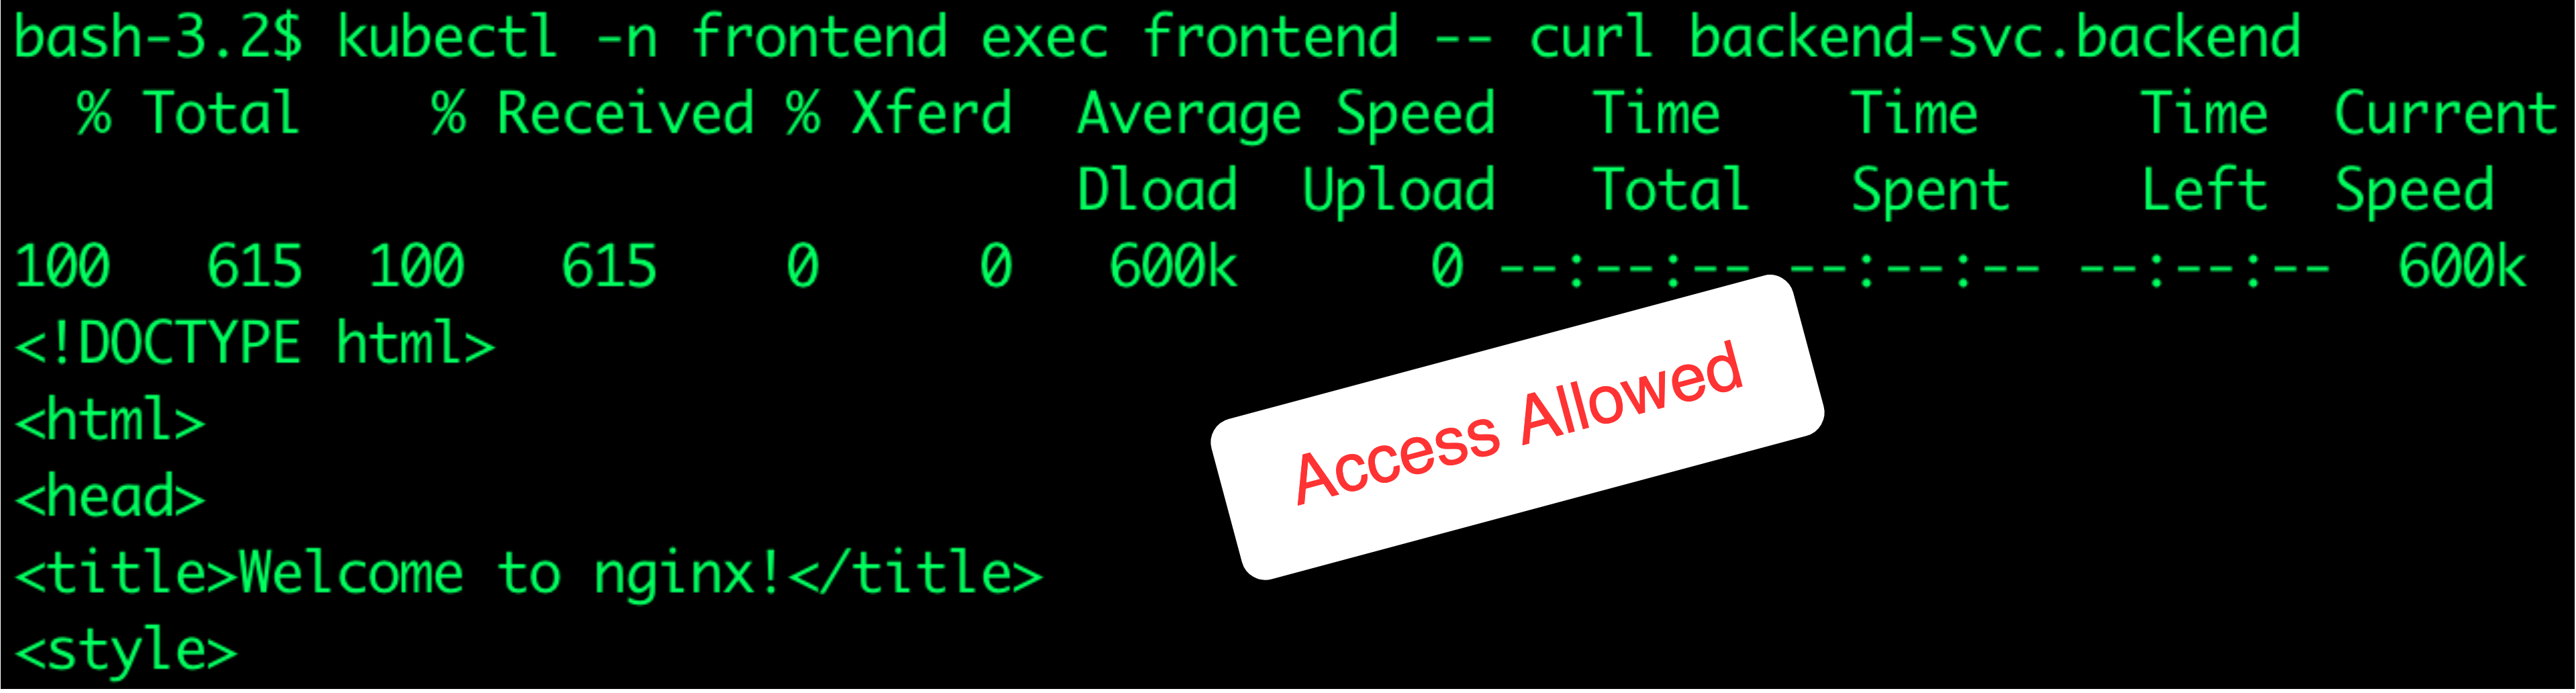
- Access between frontend and db namespaces.
$ kubectl exec frontend -n frontend -- curl db-svc.db
- Access between backend and db namespaces.

As you see, traffic is now moving between pods across namespaces as we configured. You can apply more tests through the below additional commands:
$ kubectl -n backend exec backend -- curl frontend-svc.frontend ## denied
$ kubectl -n db exec db  -- curl backend-svc.backend ##denied
Conclusion
In a nutshell, using network policies can beef up your Kubernetes workload security, but their implementation needs careful thought and testing. This post walked you through the basics of Kubernetes network policies and key concepts like Ingress, Egress, and CNI. Plus, you learned the ropes on setting up multiple policies for different needs.
For some extra knowledge boost, have a look at other Kubernetes features like Security Context and Mutual TLS over Kubernetes Nginx Ingress Controller.
And if you’re looking to further optimize your Kubernetes builds, you might want to give Earthly a spin. It’s a tool that can help streamline your build process and make it more efficient.
Turn your engineering standards into automated guardrails that provide feedback directly in pull requests, with 100+ guardrails included out of the box and support for the tools and CI/CD systems you already have.