Building a Concurrent Mail Server API with Goroutines and Gmail Integration

Table of Contents
Harnessing the power of multicore processors is a breeze with Go. In this tutorial, we’ll explore concurrency in Go by setting up an efficient mail server. You’ll quickly see why concurrency transforms the way we send emails. Let’s get started!
Overview of Concurrent Mail Server
This tutorial guides you through setting up a concurrent mail server for more efficient email sending. You’ll also see the perks of using concurrency. Additionally, you’ll design an interface where subscribers input details, and users upload documents to send. Before we dive in, let’s get a grip on concurrency and goroutines.
Concurrency and Its Importance
Concurrency allows multiple tasks to be handled at once, boosting performance and minimizing delays. This means:
- Optimized performance
- Efficient use of resources
- Faster server responses
- Greater fault tolerance
In the next sections, I’ll clarify the differences and similarities between concurrency and parallelism to clear any confusion.
Concurrency and Parallelism
Concurrency simplifies Synchronization; Concurrency enables Parallelism. Concurrency means dealing with multiple things at once while Parallelism means doing multiple things at the same time.
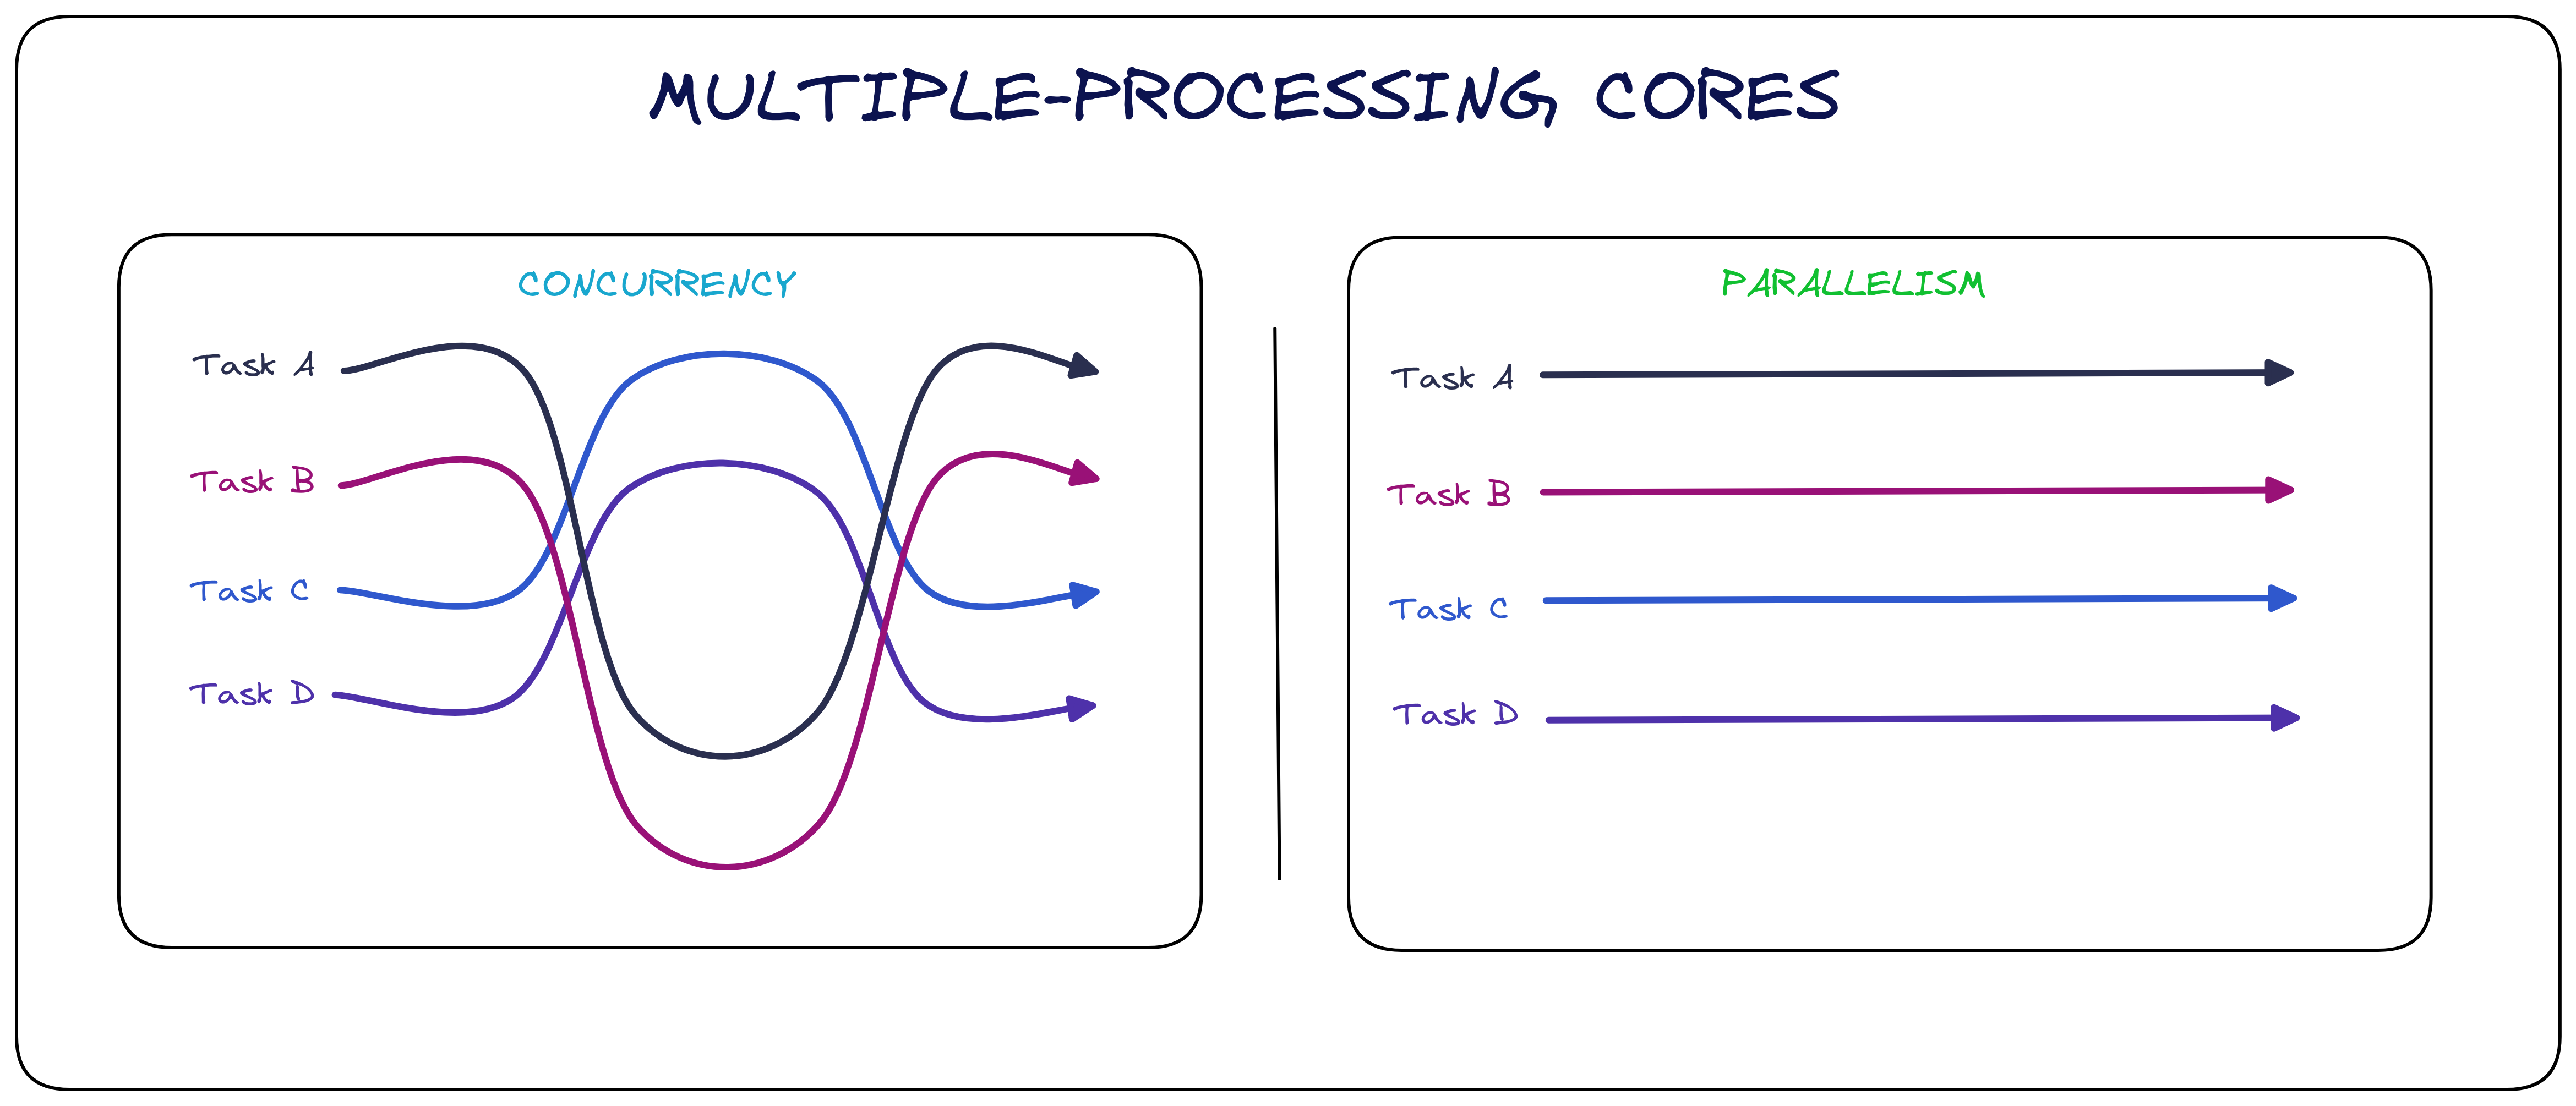
Concurrency and parallelism, though often used interchangeably, have distinct concepts. Both relate to multiple processes, but their approaches differ.
Concurrency is about managing multiple tasks so they seem to run simultaneously, often achieved through mechanisms like multithreading or multiprocessing. Parallelism, in contrast, is the true simultaneous execution of tasks, possible with hardware like multi-core CPUs.
Grasping these nuances is crucial for effective software design.
Goroutine and Its Basic Building Block
Goroutines achieve concurrency in Go, lightweight threads and the fundamental organisation unit in Go. Goroutines are more cost-effective than traditional threading and execute within the same address space, leveraging multiple dynamic OS threads.
In Go,Goroutines can be simple functions, anonymous functions, or methods. They run concurrently with other tasks, and even the main function is a Goroutine.
To get the most out of Goroutines, you should understand these key components:
- Channels
- Select statement
- Waitgroup
- Mutexes
Channels
Channels allow safe communication between goroutines. There are two types: buffered, which have a set capacity, and unbuffered, which don’t.
Here’s an example:
package main

import (
"fmt"
"time"
)


func main() {
// Declare a buffered channel of integers with a capacity of 2.
bufferedChan := make(chan int, 2)

// Unbuffered channel with no capacity
unbufferedChan := make(chan string)
In the main program, a variable is declared as a Buffered channel with a specific capacity, whereas the Unbuffered channels do not have a set capacity.
// Send two integers to the channel.
bufferedChan <- 10
bufferedChan <- 20

// Start a goroutine to receive data from the unbuffered channel.
go func() {
data := <-unbufferedChan
fmt.Println("Received from unbuffered channel:", data)
}()

// Wait for a short period before sending and receiving more data.

time.Sleep(time.Second)
Values 10 and 20 are sent to a buffered channel using the <- syntax. Meanwhile, an unbuffered channel uses a goroutine to assign received values to a data variable. A brief delay, added via the time package, ensures the goroutine completes before the main function ends:
// Send some data to the unbuffered channel.
unbufferedChan <- "Hello, Gophers."

// Receive some data from the buffered channel.
data1 := <-bufferedChan
data2 := <-bufferedChan

// Print out the received data.
fmt.Println("Received from buffered channel:", data1, data2)

}
A string is sent to an unbuffered channel, which requires immediate reception. On the other hand, buffered channels store data in variables (data1 & data2). However, if they exceed their capacity, it results in errors and a potential deadlock.
Here’s the full thing:
package main
import "fmt"
func main() {
// Declare a buffered channel of integers with a capacity of 2.
bufferedChan := make(chan int, 2)
// Unbuffered channel with no capacity
unbufferedChan := make(chan string)
// Send two integers to the channel.
bufferedChan <- 10
bufferedChan <- 20
// Start a goroutine to receive data from the unbuffered channel.
go func() {
data := <-unbufferedChan
fmt.Println("Received from unbuffered channel:", data)
}()
// Wait for a short time before sending and receiving more data.
time.Sleep(time.Second)
// Send more data to the buffered channel.
bufferedChan <- 30
// Send some data to the unbuffered channel.
unbufferedChan <- "Hello, Gophers."
// Receive some data from the buffered channel.
data1 := <-bufferedChan
data2 := <-bufferedChan
// Print out the received data.
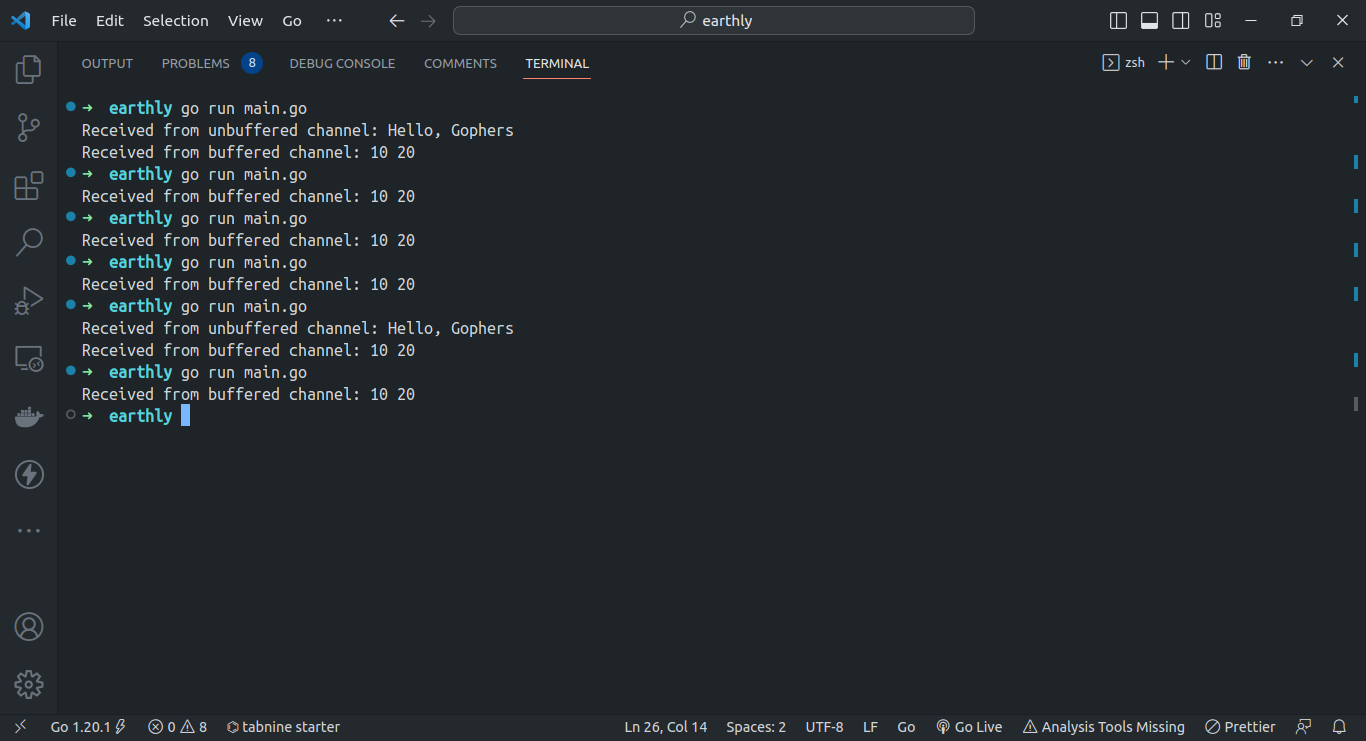
fmt.Println("Received from buffered channel:", data1, data2)
}Output:
Select Statement
Go’s select statement, akin to the `switch`` statement, lets you handle channel data while simultaneously reading from or writing to different goroutines.
Here’s an example:
package main

import (
"fmt"
"time"
)

func main() {
// Declare an unbuffered channel of integer and string
intChan := make(chan int)
stringChan := make(chan string)

}
You create two-channel variables, one with the type “int” and the other with the type “string”, both unbuffered.
// Send an integer to the channel.
go func() {
intChan <- 299
}()

// Send a string to the channel.
go func() {
stringChan <- "Hello, Gophers."
}()
Goroutines create and use channels to send data, like int and string, simultaneously.
// Receive from the channels in a separate goroutine.
go func() {
select {
case i := <-intChan:
fmt.Println("Received an integer:", i)
case s := <-stringChan:
fmt.Println("Received a string:", s)
}
}()

// Wait for 1 second before ending the program.
time.Sleep(1 * time.Second)
A goroutine waits for data sent through channels. It then executes a case based on which goroutine gets the data first. This goroutine runs with a delay, right before the main program finishes.
Here’s the full thing:
package main
import (
"fmt"
"time"
)
func main() {
// Declare an unbuffered channel of integers.
intChan := make(chan int)
stringChan := make(chan string)
// Send an integer to the channel.
go func() {
intChan <- 299
}()
// Send a string to the channel.
go func() {
stringChan <- "Hello, Gophers."
}()
// Receive from the channels in a separate goroutine.
go func() {
select {
case i := <-intChan:
fmt.Println("Received an integer:", i)
case s := <-stringChan:
fmt.Println("Received a string:", s)
}
}()
// Wait for 1 second before ending the program.
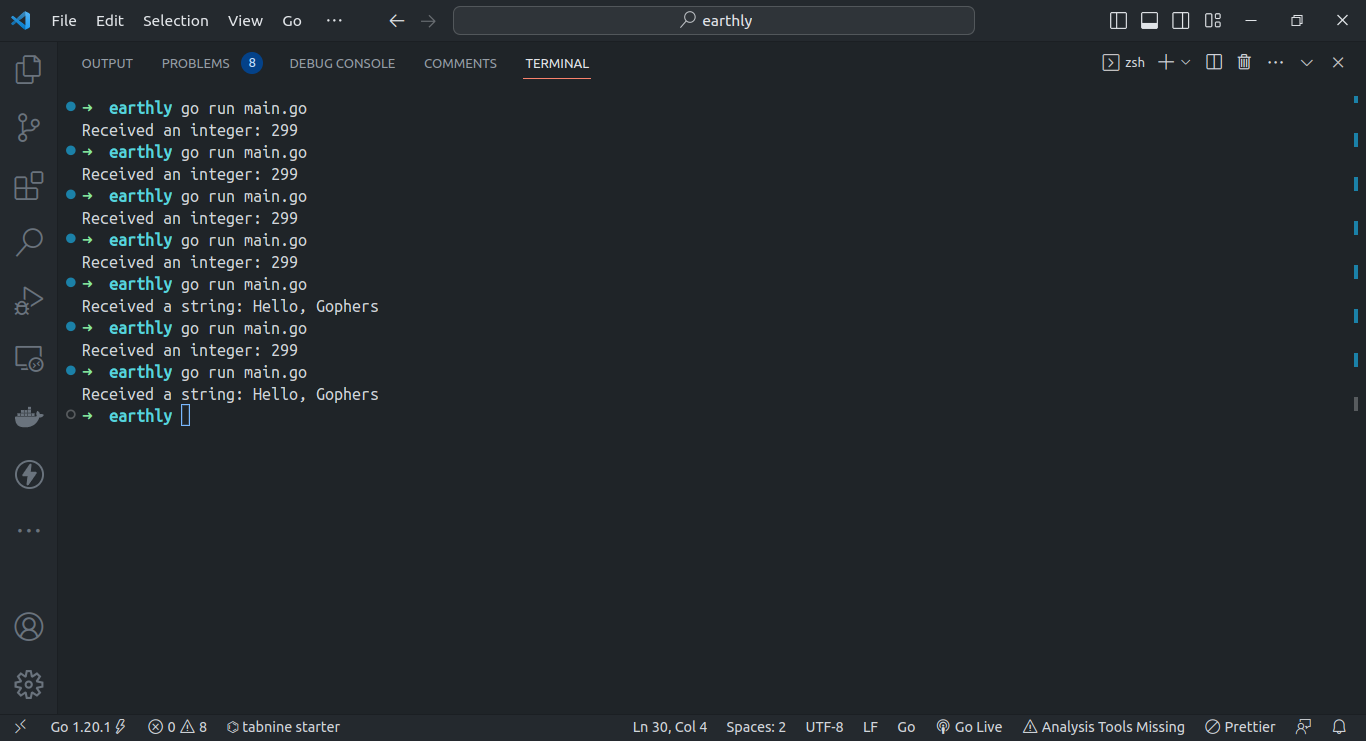
time.Sleep(1 * time.Second)
}Here some sample runs:
For a deeper understanding of concurrency, Goroutines, and their building blocks, refer to this resource.
Communicating Sequential Processes(CSP): The Model of Concurrency
Goroutines are built on the theoretical model of CSP

CSP offers a framework to describe patterns in systems with complex messaging. In Go, concurrency follows CSP principles, emphasizing safety, efficiency, and ease of use with Goroutines. If you want to navigate the challenges of concurrent systems smoothly, CSP is your guide. Up next, we’ll draw a surprising connection: relating concurrency and goroutines to the rhythms of the earth and the broader universe.
Explanation using the Universe: Planet Earth and Human
Think of the universe. It’s filled with planets, stars, and moons, all operating at the same time. Take Earth, for instance. Here, countless events like weather patterns, ocean currents, and even our day-to-day activities happen all at once, influencing each other.
Humans are masters of concurrency. We juggle thoughts, feelings, and tasks every day. You might be reading this, thinking about its content, and maybe even listening to music — all at the same time. Our brains effortlessly handle these simultaneous processes.
In the world of software, concurrency means a program doing multiple things at once, boosting productivity. Just like how our brain multitasks, software benefits from running several tasks simultaneously, getting more done in less time.
Benefits of Using Goroutines and Gmail Integration
Now that you’re up to speed with goroutines, let’s dive into their advantages when paired with Gmail Integration for sending newsletter emails.
Benefits of using Goroutines with Gmail Integration:
- Asynchronous, offering great scalability.
- Efficient multitasking during email dispatch.
- Quicker email processing.
- Enhanced experience for users and customers.
Ready to harness the power of goroutines for more tasks? Let’s set up your workspace next.
Setting Up the Environment
Find all the code for this tutorial on this GitHub repository.
Prerequisite Knowledge
Before starting:
- Ensure you have the Go compiler installed. The latest version is Go v1.20.5. If you don’t have it, download it from Go.dev. Then we will use these dependencies:
Essential Packages
Install the go-mongodb-driver. For interaction with MongoDB cloud database and storing user details
Install gomail. For sending emails via an SMTP server for account notifications and communication.
Install chi. For building HTTP services, initializes middleware, manages request paths, and serves static files.
Install godotenv. Loads environment variables from a .env file.
Install docconv. Converts .docx and .doc files to plain text.
But before you install any of these packages, create a new folder and run go mod init:
go mod init github.com/akinbyte/mailappAfter go mod init command, the project folder will contain go.mod file. Add your dependencies to go.mod.
Creating A Gmail Account and Enabling API Access
I’m sure you already have a Gmail account, but you have two options for this project. You can either create a new account and connect it to this project or use your existing one.
To save time, let’s assume you’ve already set up your Gmail account. Now, you need to configure it by enabling 2-Step Verification and allowing access to less secure apps, which is crucial.
When you create a Gmail account, by default, access by third parties is disabled. You’ll need to follow specific procedures and configurations to enable access to other third-party apps, like the one you’re going to build. It is essential to configure and set up your account correctly. Please follow the below steps to allow Third-party access to your Gmail account.
- Sign in to your Gmail account, go to the top right corner, and click on your profile. Then, select “Manage your Google Account”.
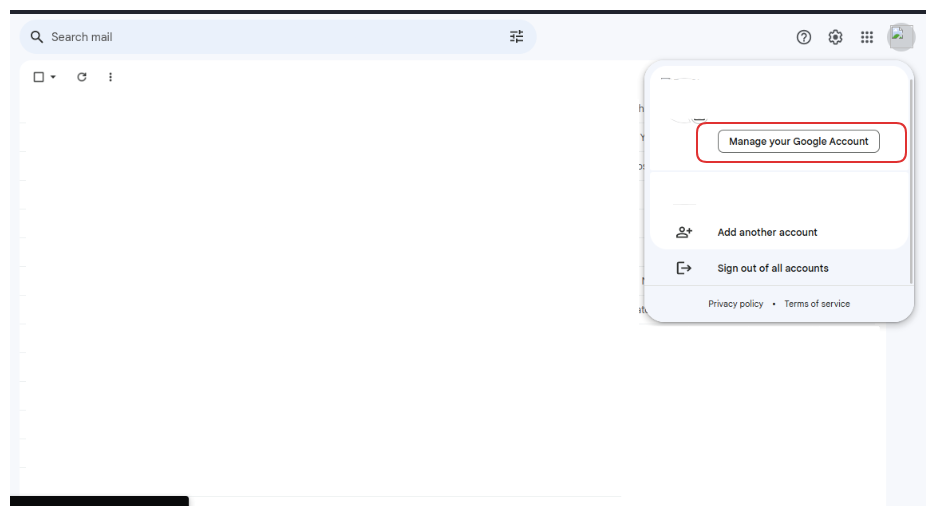
manage-gmail - Once you’ve accessed your account page, you can modify settings and make configuration changes. Follow these steps:
- On the left menu, click on the “Security” section.
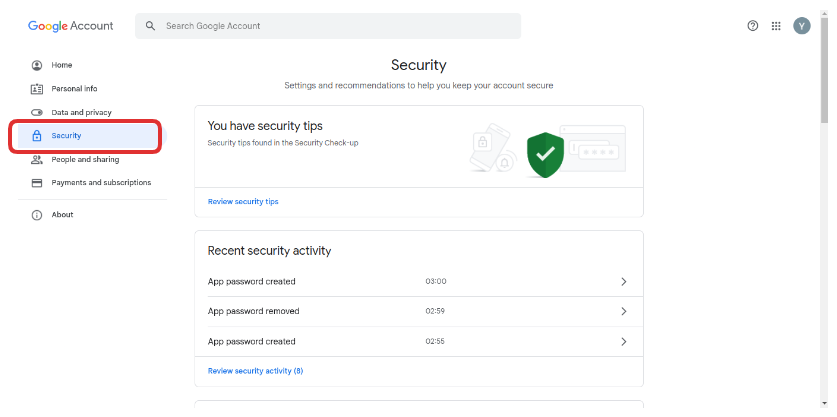
- Scroll down to the bottom and click “Less secure app.” You can find additional information about less secure apps if needed.

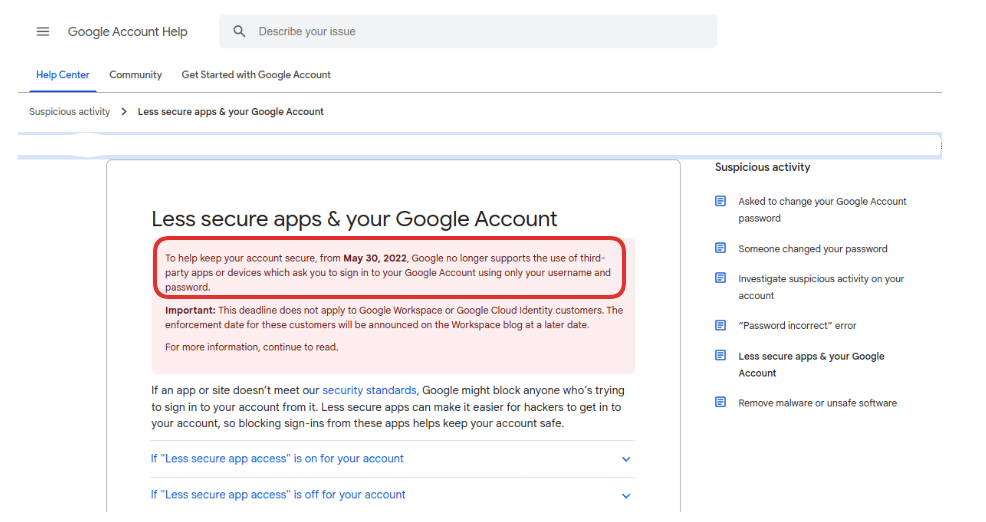
- To enable access for third-party applications like this project, set up 2-Step Verification in the Security section. Make sure to link your devices for verification and choose the appropriate prompts.
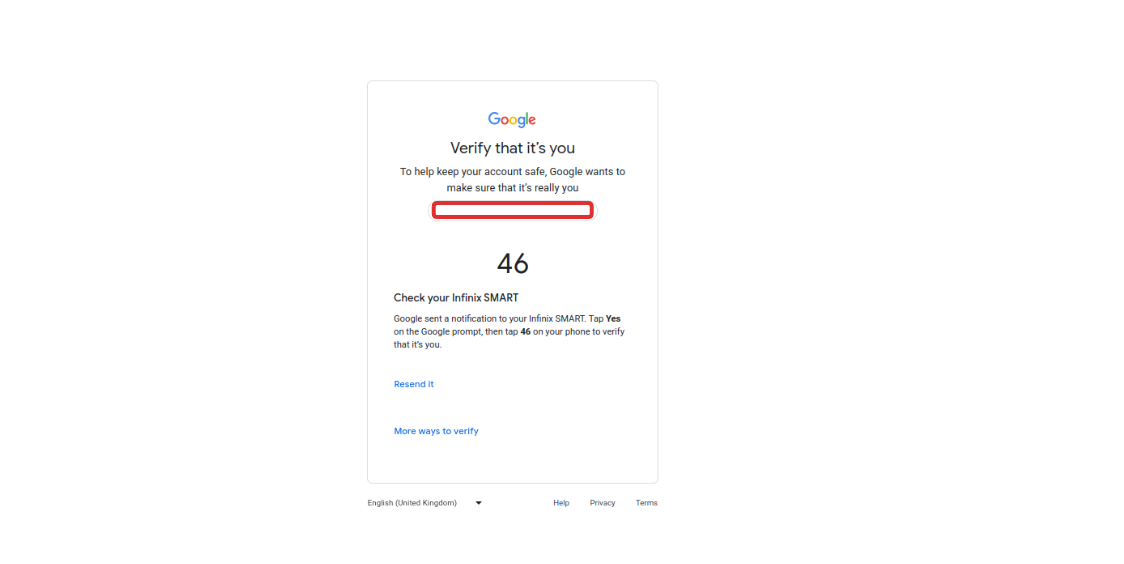
verify-code - Turn on 2-Step Verification by clicking the corresponding option.
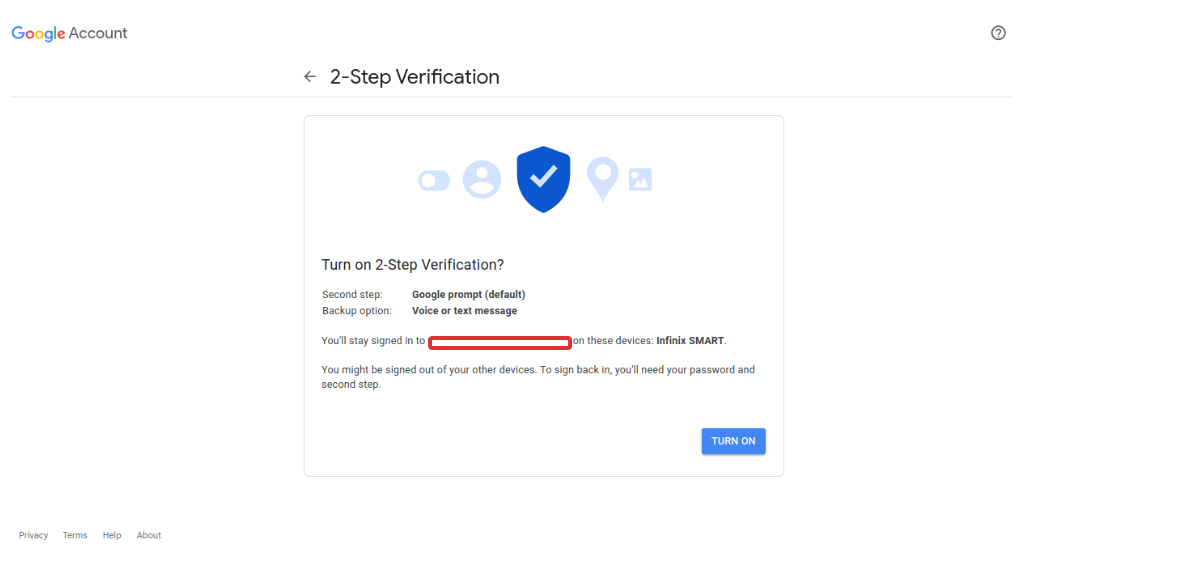
2-step-turn-on 
turn-on
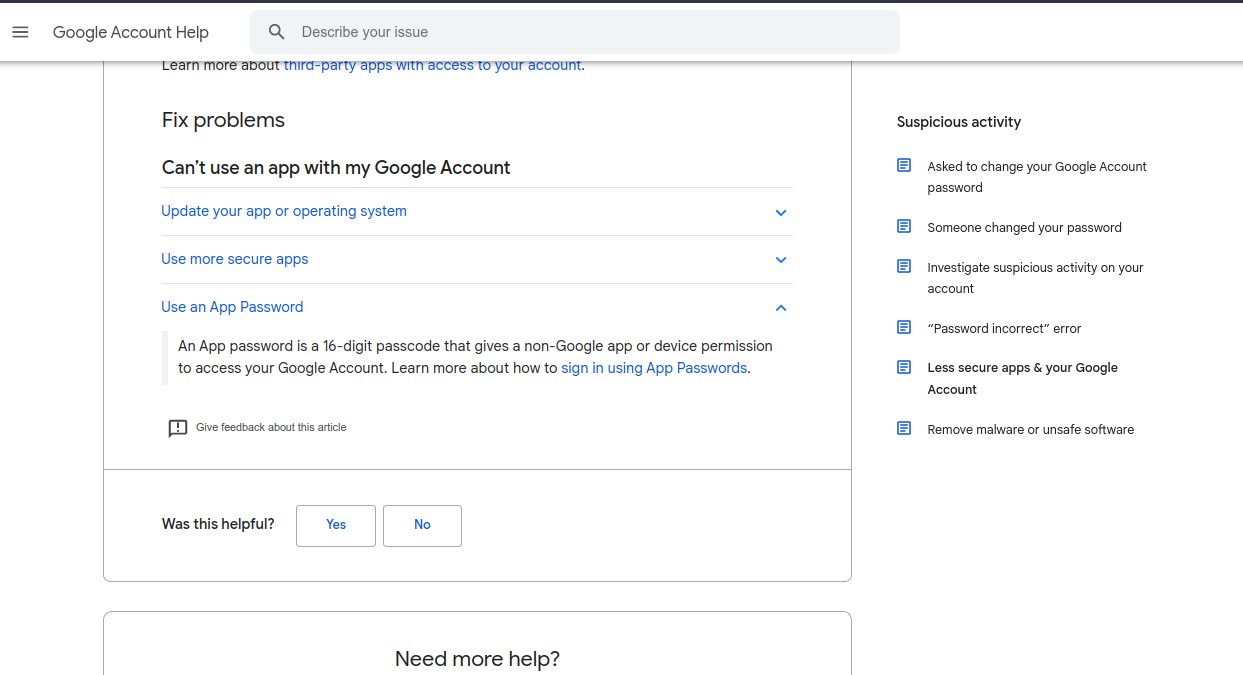
- Once you have enabled the 2-Step Verification, add an App Password.
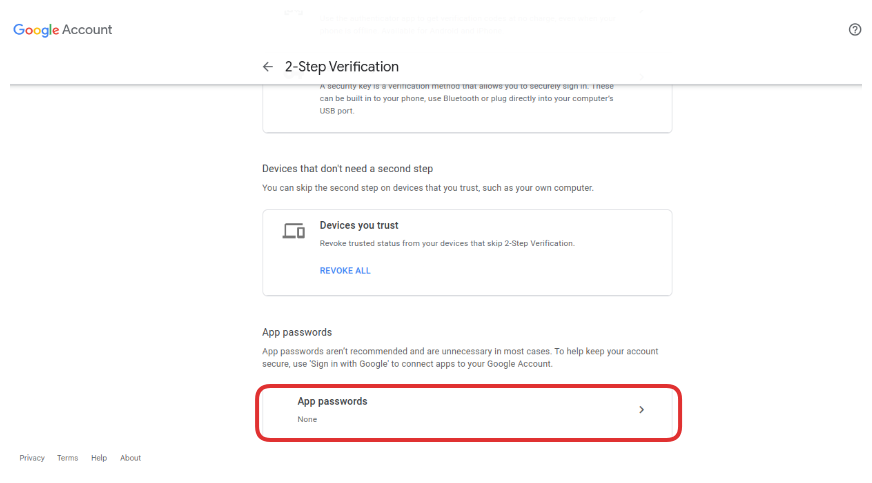
choose-create-app-password
- Choose an app name and device from the dropdown menu, or create a custom name as shown in the image below:
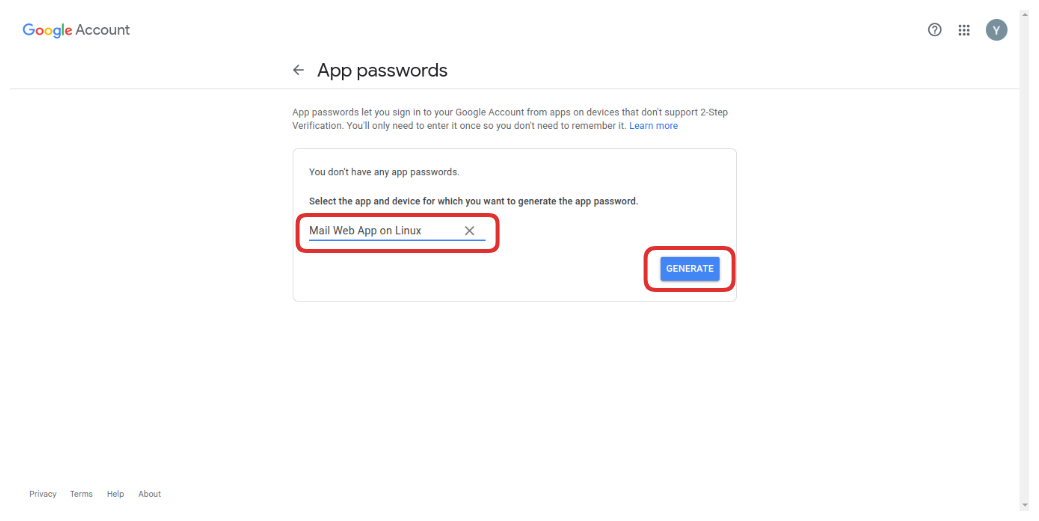
- Click on the “Generate” button to create the App password.

generate-app-password - Remember to write down or copy the generated App password for future use, as it will only be accessible once generated.
Once you have generated an App password, you can enable API access from other applications. In the next section, you will learn about using environment variables in the application.
Configuring Credentials and Environment Variables
To ensure the security of your Gmail account integration into the project, you can grant access to less secure apps using the generated App password. Storing sensitive credentials such as the generated App password and other relevant details, in the .env file is recommended. This will help you to minimize security vulnerabilities by keeping credentials in a secure location and using the keys for referencing.
This approach will make it easy to configure and debug your codebase, enhance security, and prevent errors or mistakes during development. Below are the key-value pairs of the environment variable credentials stored in the .env file for this project:
GMAIL_ACC=YOUR_GMAIL_ACCOUNT

APP_PASSWORD=YOUR_APP_PASSWORD

USER_NAME=YOUR_USERNAME
As you progress, you can continue modifying the .env file by adding new key-value variables required for your application.
Building the Mail Server API
This section teaches you to build a solid and reliable server-side mail application. But before you proceed, I’ll explain the application’s structure in the next section for better comprehension.
Designing the API Architecture
The application structure you will be working with here relies on a diagrammatic representation below, illustrating the application’s architecture.
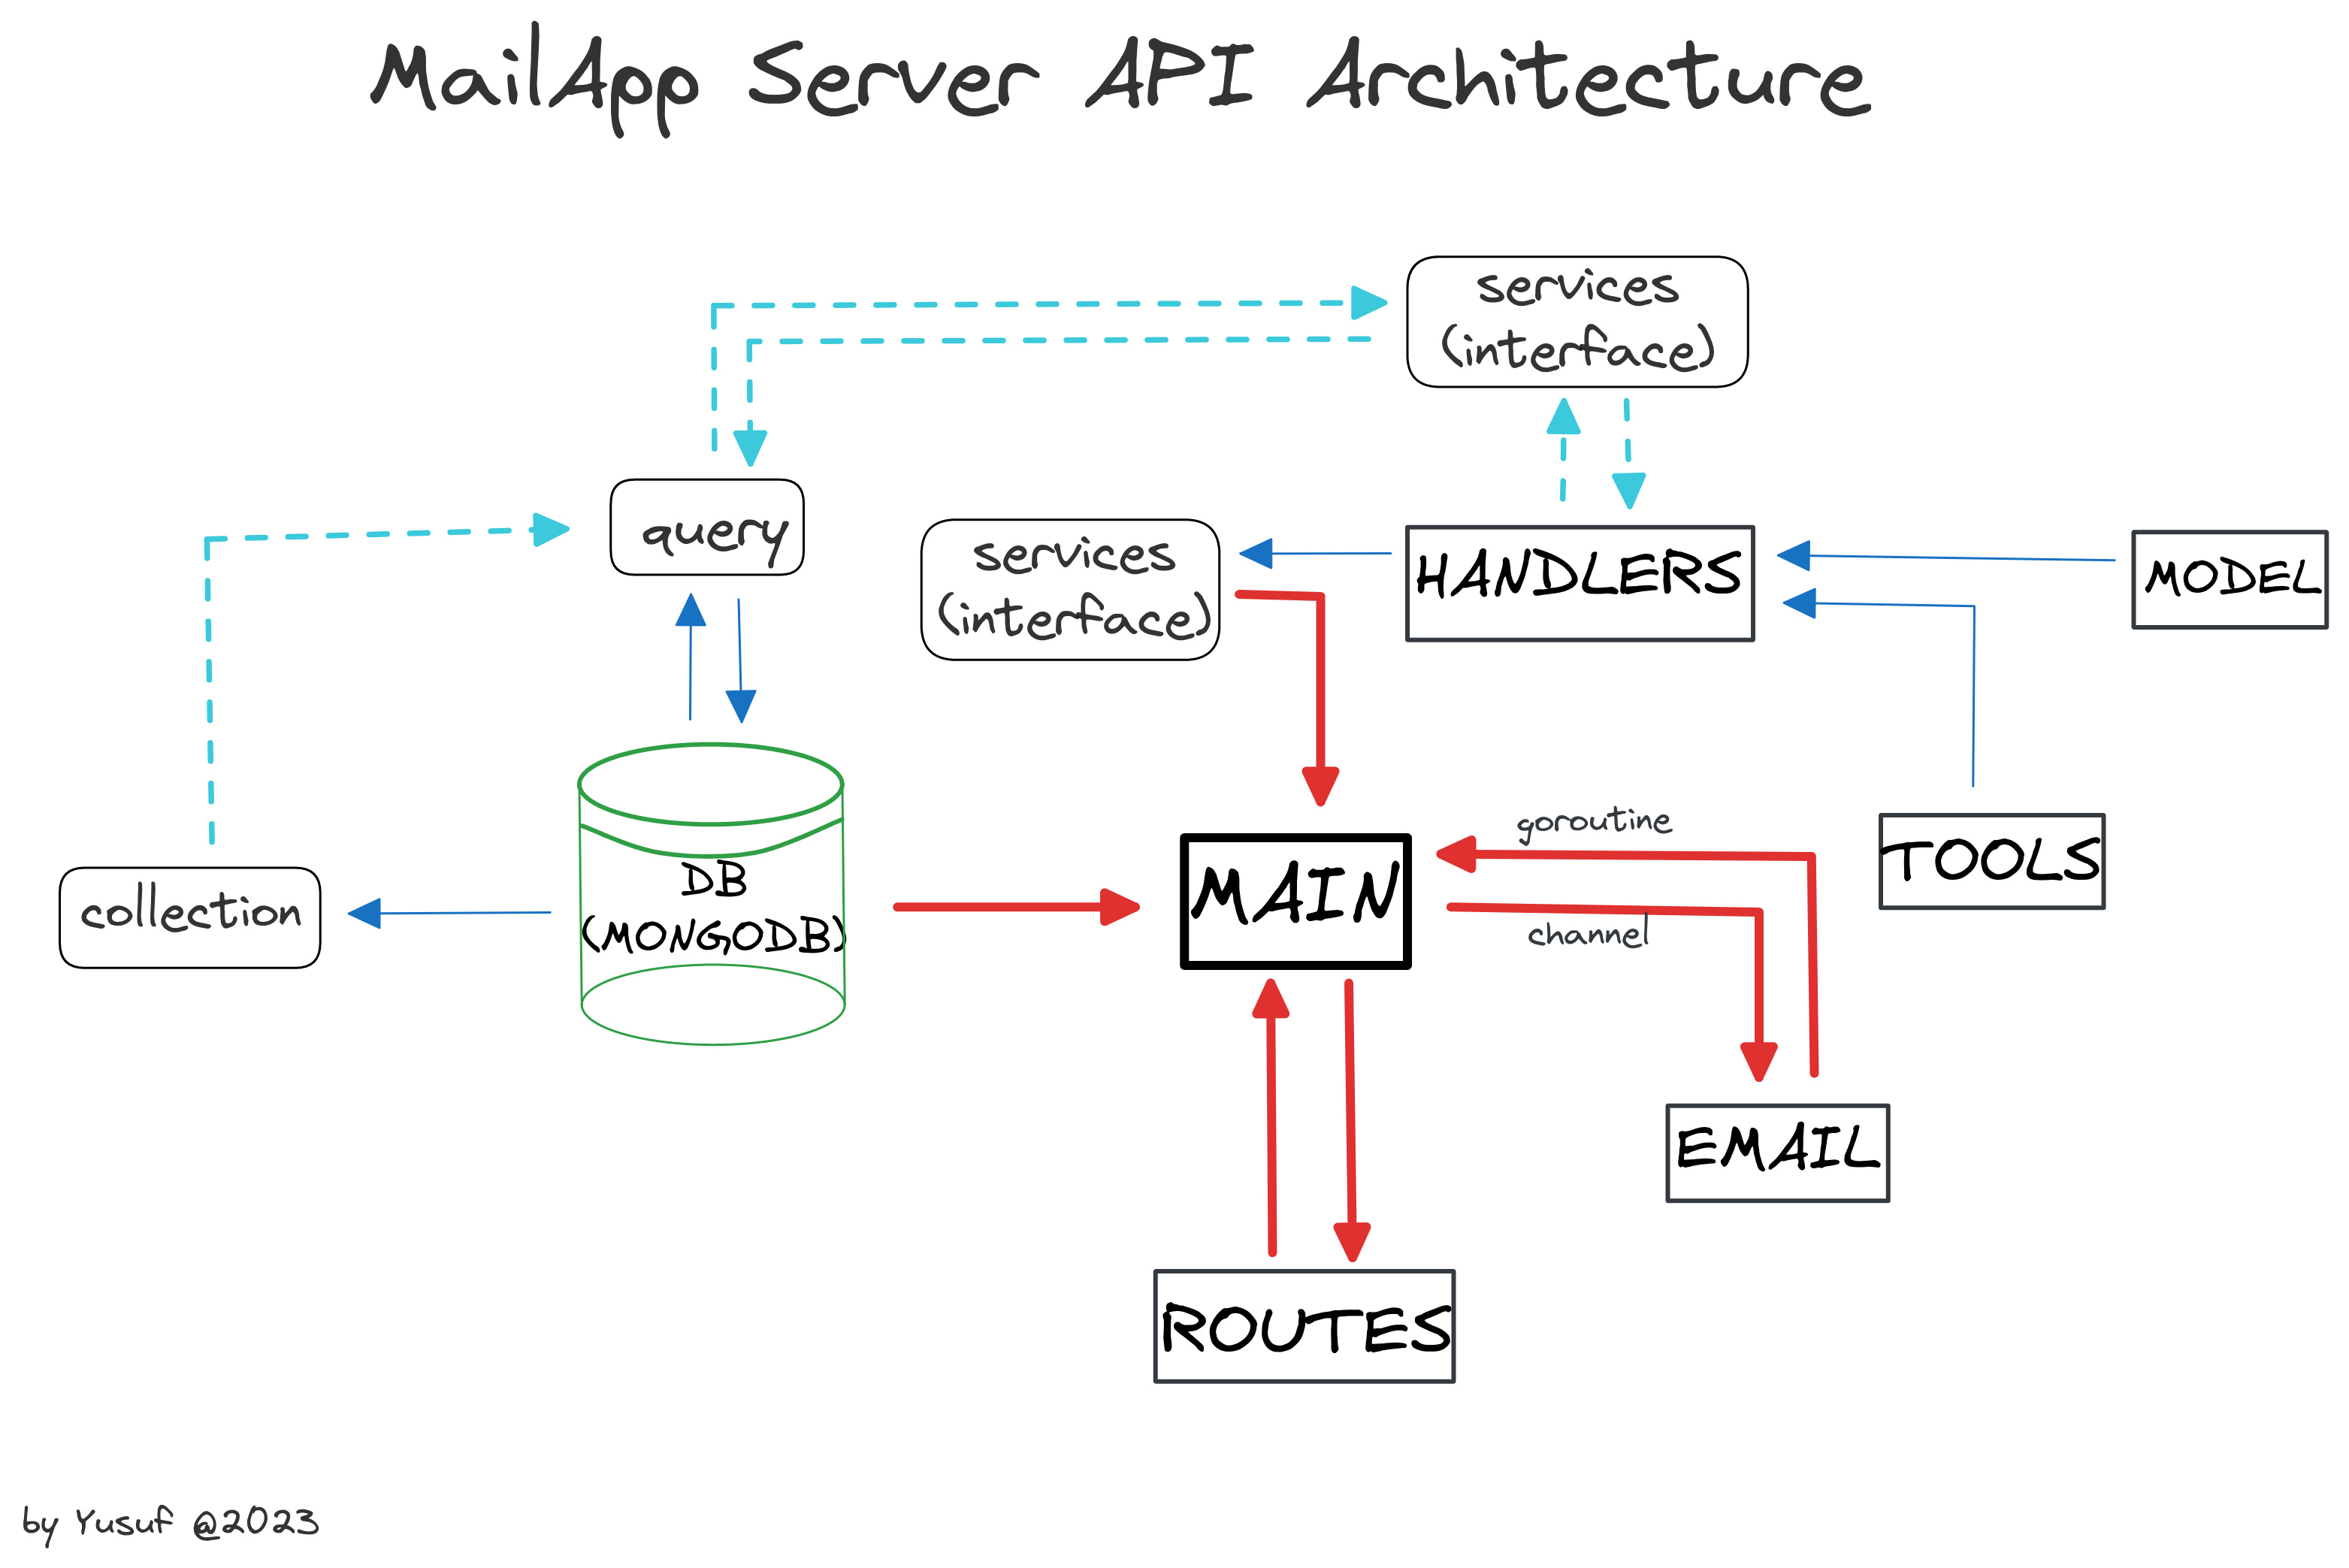
Soon, you’ll grasp the application’s structure implemented using Package Oriented Design. Let’s begin.
To structure the application for this project, you’ll create the following directories (packages) and files. You’ll learn about their features and usage.
_Main and routes_: These are the leading root files of the project that use the main package for compilation._db_: The db package manages interactions with the MongoDB database, including reading and writing queries._handlers_: The handlers package contains methods to process user requests._tools_: The tools package consists of predefined reusable functions that facilitate user requests._email_: The email package is the project’s main focus. It includes a function that receives emails through channels using goroutines and another function that sets up the SMTP server to send emails._model_: The model package contains structs that hold the payload or details received while processing requests.
It’s important to note that the output method of the query from the db package to the handlers package implements an interface in the service.go file in the db package, which is the same as the one used in the handlers package to make handlers methods available in the main package.
Now that you know the basics of each package’s functionality, let’s integrate the MongoDB database to store user information and send emails.
Before you proceed, here’s a quick explanation of the application’s model.
Understanding the Application Model
The model package includes the Subscriber struct, which holds various fields of type string to store the details and struct tags of the subscribers when they submit their information.
package model

import "time"

// Subscriber: information or details from subscribers
type Subscriber struct {
 FirstName string `bson:"first_name" json:"first_name"`
 LastName  string `bson:"last_name" json:"last_name"`
 Email     string `bson:"email" json:"email"`
 Interest  string `bson:"interest" json:"interest"`
}
The MailUpload struct stores the document uploaded by the user along with their corresponding types and struct tags.
// MailUpload - holds the uploaded content and details for the mail
type MailUpload struct {
 DocxName    string    `bson:"docx_name" json:"docx_name"`
 DocxContent string    `bson:"docx" json:"docx"`
 Date        time.Time `bson:"date" json:"date"`
}
The Mail struct will be filled with information and seamlessly routed to subscribers via channels.
// Mail: contains the field of what the mail entails
type Mail struct {
 Source      string
 Destination string
 Message     string
 Subject     string
 Name        string
}
Code Snippet for the model Package
package model

import "time"

// Subscriber: information or details from subscribers
type Subscriber struct {
 FirstName string `bson:"first_name" json:"first_name"`
 LastName  string `bson:"last_name" json:"last_name"`
 Email     string `bson:"email" json:"email"`
 Interest  string `bson:"interest" json:"interest"`
}

// Mail: contains the field of what the mail entails
type Mail struct {
 Source      string
 Destination string
 Message     string
 Subject     string
 Name        string
}

// MailUpload - holds the uploaded content and details for the mail
type MailUpload struct {
 DocxName    string    `bson:"docx_name" json:"docx_name"`
 DocxContent string    `bson:"docx" json:"docx"`
 Date        time.Time `bson:"date" json:"date"`
}
Once you understand this model for this application, you can begin implementing and setting up the MongoDB database.
Integrating MongoDB Database
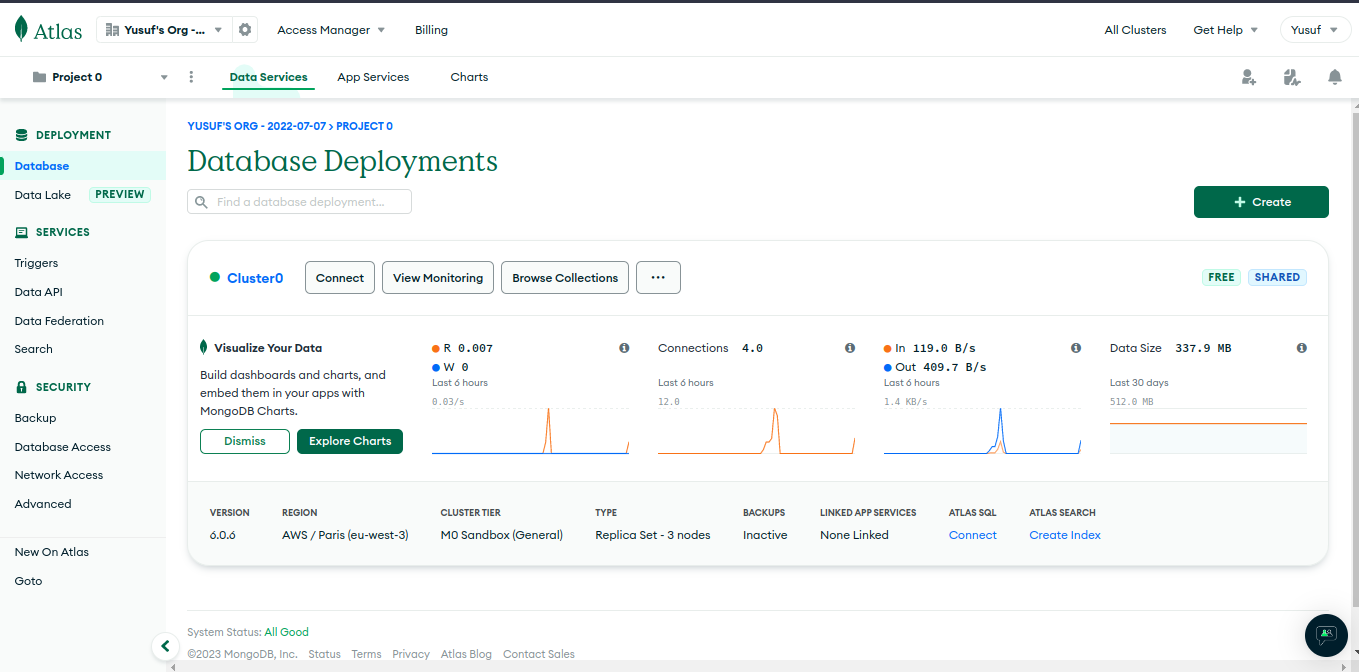
As you work on this project, you will be integrating the MongoDB database using MongoDB Atlas, a user-friendly cloud database. Check this link for setup instructions in the Get Started with Atlas section, and remember to configure for easy access by changing the IP Address.
You can follow the steps below to set up your database and get the connection string:
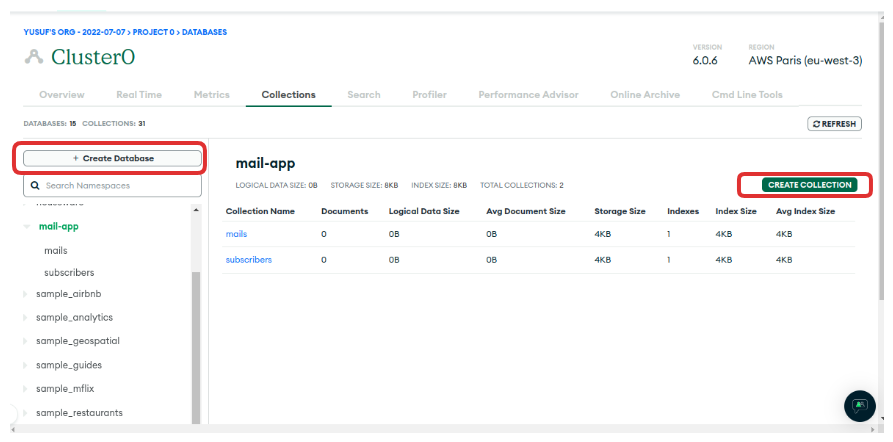
- Click on Database in the left menu and select Browse Collection to create a database for the application.
- Click Create Database to add a new database named mail-app and include two collections: mails (stores sent mail) and subscribers (stores registered subscribers).
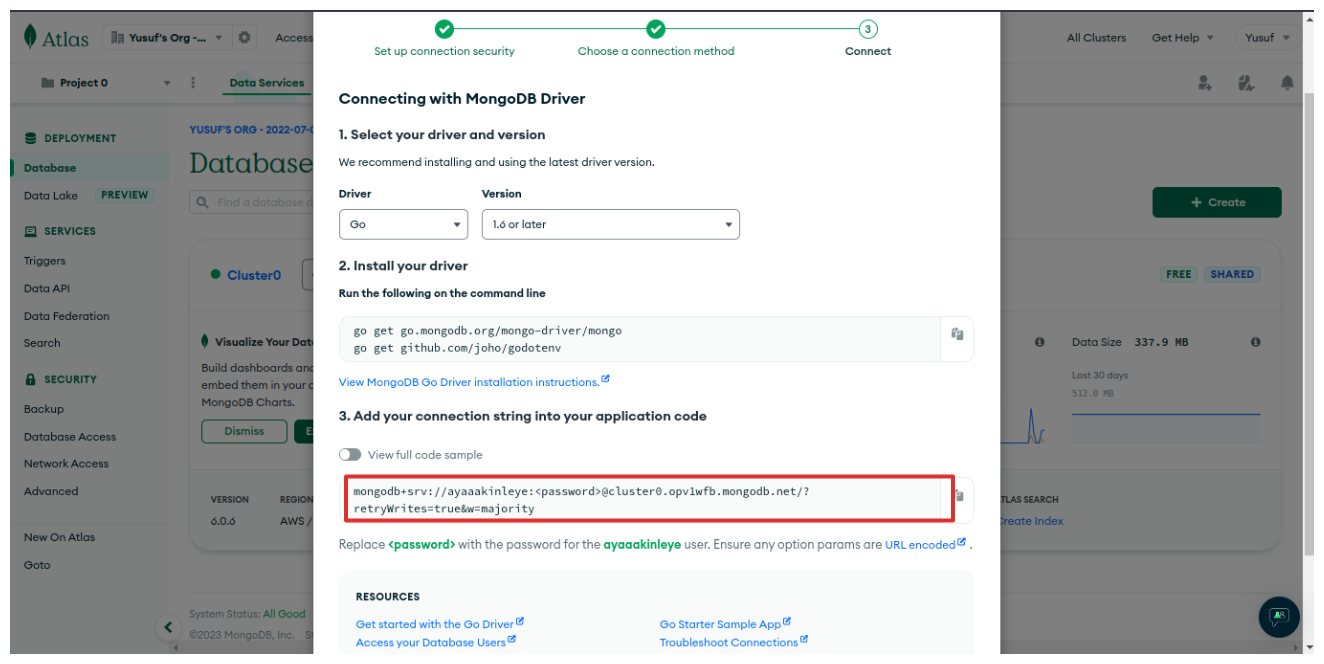
- Next, click “Connect” to choose a connection method.
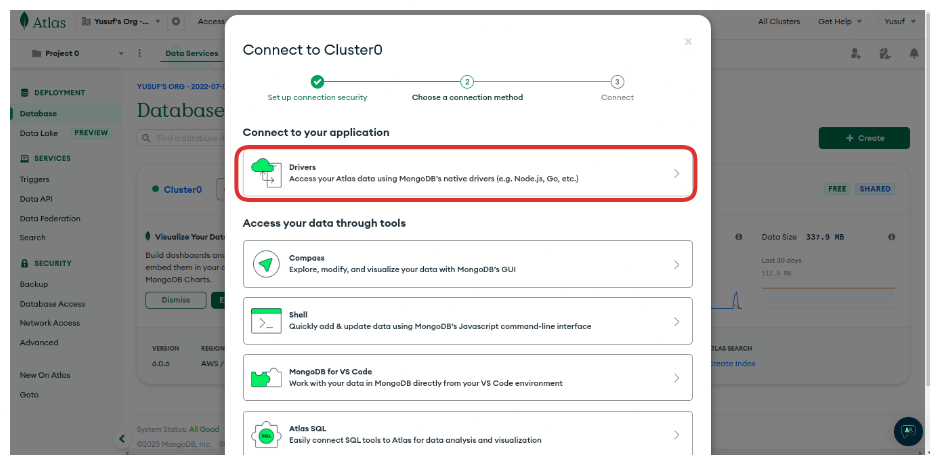
- Select the required MongoDB Driver for Go and copy the connection string. Update it with your username and password.
mongodb+srv://<username>:<password>@cluster0.opv1wfb.mongodb.net/?retryWrites=true&w=majority
- Update the .env file with the URI connection string:
APP_PASSWORD=YOUR_APP_PASSWORD

GMAIL_ACC=YOUR_GMAIL_ACCOUNT

USER_NAME=YOUR_USERNAME

# hint: URI start with `mongodb+srv://`
URI=<MONGODB_URI>
Now you can connect to the mail-app database using the provided URI and have it integrated into your code.
Setting Up the Database Connection
In this section, you will learn how to connect to the mail-app database using the’ URI’ connection string. This will help to establish a secure and standardized method of accessing and interacting with the database. Let’s begin!
Create these Go files: db.go, query.go, collection.go, and service.go in the db package. In this section and the subsequent one, I will explain the implementation process in each file.
In db.go, import the necessary packages and set up the cloud database connection with the SetConnect function.
package db

import (
"context"
"log"
"os"
"time"

"go.mongodb.org/mongo-driver/mongo"
"go.mongodb.org/mongo-driver/mongo/options"
)

func SetConnect(uri string) (*mongo.Client, error) {}
The SetConnect function sets a context timeout with a deadline and cancellation signal, ensuring the database connection process finishes within a specified time limit.
dbCtx, dbCancelCtx := context.WithTimeout(context.Background(), 100*time.Second)
defer dbCancelCtx()
Connect the database using the dbCtx context and the URI string. Check for connection errors.
client, err := mongo.Connect(dbCtx, options.Client().ApplyURI(uri))
if err != nil {
log.Panicln("Error while connecting to database: ", err)
}
Pinging the database verifies the connection, and the code returns the database client.
if err := client.Ping(dbCtx, nil); err != nil {
log.Fatalln("cannot ping the database: ", err)
}

return client, nil
In the db.go file, the OpenConnect function keeps the database connection open to avoid program failure. It returns a *mongo.Client pointer, initialises count to zero, and sets up an infinite for loop.
func OpenConnect() *mongo.Client {
 uri := os.Getenv("URI")
 count := 0
 log.Println("....... Setting up Connection to MongoDB .......")
 for{}
}
The infinite loop invokes SetConnect with the environment variable key URI using the os package. If there’s a connection error, it logs the message for database disconnection and increments count. Otherwise, it confirms the database connection and returns the client.
client, err := SetConnect(uri)
if err != nil {
 log.Println("Mail App Database not Connected")
 count++
 } else {
  log.Println("Mail App Database is Connected")
  return client
 }
In the loop, the code checks the value of count. If it exceeds the limit, it logs the error and returns nothing. If the count is less than 5, it logs retry information, pauses the program, and continues the connection process.
if count >= 5 {
 log.Println(err)
 return nil
}

log.Println("Wait:.... Mail App Database Retrying to Connect ....")
time.Sleep(10 * time.Second)
continue
Please note that the main function of the program will invoke the OpenConnect function to retrieve the *mongo.Client. Afterwards, you will learn to access and work with the mail-app database and its collections.
Default Collection Function
The collection.go file contains a Default function. It takes a client parameter of type *mongo.Client and a collectionName parameter of type string. This function returns a pointer to *mongo.Collection for accessing the specific mail-app database.
package db

import "go.mongodb.org/mongo-driver/mongo"

func Default(client *mongo.Client, collectionName string)*mongo.Collection{
 return client.Database("mail-app").Collection(collectionName)
}
To interact with and access the mail-app database collections (mails & subscribers) by using this function to write queries for the application.
Database Queries
You will incorporate the necessary query methods into this section’s query.go file. These methods must effectively communicate with the mail-app database and its collections utilizing the Mongo struct.
Import the necessary packages and create a Mongo struct type with a MailDB field (a *mongo.Client pointer type).
Lastly, a NewMongo constructor function is defined. It takes a client database pointer as a parameter and returns a DataStore interface for implementing the queries.
package db

import (
"context"
"fmt"
"log"
"time"

"github.com/akinbyte/mailapp/model"
"go.mongodb.org/mongo-driver/bson"
"go.mongodb.org/mongo-driver/bson/primitive"
"go.mongodb.org/mongo-driver/mongo"
)

type Mongo struct {
MailDB *mongo.Client
}

func NewMongo(client *mongo.Client) DataStore {
return &Mongo{MailDB: client}
}
The application utilises three query methods to interact with the mail-app database:
AddSubscriber: Adds and stores new subscriber details.AddMail: Stores the sent mail.FindSubscribers: Retrieves all registered subscribers.
Below, you will delve into each of these query methods used to interact with the mail-app database by examining each defined method in detail. These methods work together to ensure efficient and effective management of data within the mail-app database.
Let’s begin with the AddSubscriber query. This method requires the subs argument of type model.Subscriber and returns bool, string, and error.
func (mg *Mongo) AddSubscriber(subs model.Subscriber) (bool, string, error) {}AddSuscriber method above sets a timeout in the context for query processing to enable the addition and storage of new subscriber details. The subscriber’s email is used to check for their existence in the subscribers collection of the database while also verifying for errors.
ctx, cancelCtx := context.WithTimeout(context.Background(), 10*time.Second)
defer cancelCtx()

var res bson.M
filter :=  bson.D{{Key: "email", Value: subs.Email}}
err := Default(mg.MailDB, "subscribers").FindOne(ctx, filter).Decode(&res)
If the error mongo.ErrNoDocuments occurs during error checking, indicating no matching document with the email filter, the subscriber details are added to the subscribers collection using the insertOne method of mongo.Collection type with the previously defined Default function.
Errors are checked and returned with relevant information. New subscribers are added to the subscribers collection without errors, while the function returns that the subscriber is registered already for existing subscribers.
if err != nil {
 if err == mongo.ErrNoDocuments {
  _, err := Default(mg.MailDB, "subscribers").InsertOne(ctx, subs)
  if err != nil {
   return false, "", fmt.Errorf("AddSubscriber: cannot registered this account : %v", err)
  }
 return true, fmt.Sprintf("New Subscriber Added"), nil
 }
 log.Fatalln("AddSubscriber: cannot query database", err.Error())
}
return true, "", nil
The AddMail method stores mail details and content. It takes a parameter mu of type model.MailUpload and returns a string and error. This method facilitates efficient mail storage.
func (mg *Mongo) AddMail(mu model.MailUpload) (string, error) {}As it is important for you to set the timeout within the context for a database query to establish a duration within which queries are expected to be completed
It is important, you set the timeout within the context for a database query to establish a duration within which queries are expected to be completed. The mailUpload struct saves the sent mail and its details in the mails collection of the mail-app database. When the mail details are successfully added, it returns a nil error. However, it returns an error message if there are any issues.
ctx, cancelCtx := context.WithTimeout(context.Background(), 10*time.Second)
defer cancelCtx()
//All the uploaded mail to the database
_, err := Default(mg.MailDB, "mails").InsertOne(ctx, mu)
if err != nil {
 return "", fmt.Errorf("AddMail: unable to add new mail, %v", err)
}
return "New mail successfully added", nil
Finally, the FindSubscribers method below retrieves subscriber details without any parameters. It returns a slice of type Primitive.M, an alias for map[string]interface{}, along with a possible error.
func (mg *Mongo) FindSubscribers() ([]primitive.M, error) {}A context timeout is added to process the query within a specified time. The Find() method queries the subscribers collection without any filter argument passed to it to obtain a Cursor that encompasses all the documents in the collection. The result of all the documents is decoded or wrapped in a variable called res of type []bson.M. Finally, the Cursor is closed using the defer Cursor.Close(ctx). Handled the errors and returned the outcomes of all subscriber’s documents.
ctx, cancelCtx := context.WithTimeout(context.Background(), 5*time.Second)
defer cancelCtx()

var res []bson.M
//Get all subscriber's data
cursor, err := Default(mg.MailDB, "subscribers").Find(ctx, bson.D)
if err != nil {
 return []bson.M{}, err
}
//decode the result in `res`
if err = cursor.All(ctx, &res); err != nil {
 return []bson.M{}, fmt.Errorf("FindMail: Cannot get all mail: %v", err)
}
defer cursor.Close(ctx)

if err = cursor.Err(); err != nil {
 return []bson.M{}, fmt.Errorf("FindMail: Cursor Error : %v", err)
}
return res, nil
After completing this step, you’ve implemented all the required queries for this application. Next, You should have these methods added to an interface.
Interface Implementation
In this section, your focus is to enhance the security, accessibility and prevent vulnerability of the application by implementing a DataStore interface in the service.go file created in the db package.
This level of abstraction you will be adding, not only improves the maintainability and scalability of the application but also facilitate seamless interaction with the database.
Below, you will have the Mongo struct type created in the section above will implicitly implement the DataStore interface by providing implementations for all the methods defined in the interface.
package db

import (
"github.com/akinbyte/mailapp/model"
"go.mongodb.org/mongo-driver/bson/primitive"
)

type DataStore interface {
 AddSubscriber(subs model.Subscriber) (bool, string, error)
 AddMail(mu model.MailUpload) (string, error)
 FindSubscribers() ([]primitive.M, error)
}
After importing the necessary packages, the DataStore interface is defined, that includes the AddSubscriber method for adding new users to the database, the AddMail method to store uploaded emails in the database, and the FindSubscribers method to retrieve all subscriber details through a database query.
By creating this interface, it is crucial as it will allow you to establish a clear and structured contract that defines the necessary methods or functions for interacting with the underlying database.
You have completed all the tasks to implement in the db package. Now, let’s create the API endpoints and learn how to handle requests.
Creating API Endpoints and Handling Requests
Now that you understand integrating the database, it’s time to create the API endpoints for handling user requests. Before proceeding, examining the contents in the tools package is crucial, as the functions defined within it play a critical role in handling and processing each request.
The following explains the functionalities of the functions within the package:
Implementing Functions in the Tools Package
First, import all the packages and built-ins needed here.
package tools

import (
 "bufio"
 "encoding/json"
 "fmt"
 "html/template"
 "log"
 "net/http"
 "path/filepath"
 "strings"
 "time"

 "code.sajari.com/docconv"
 "github.com/akinbyte/mailapp/model"
)
The ReadForm function below ensures that the subscriber’s request body is read safely and efficiently using http.ParseForm() to get the request body parameters. If any error comes up while parsing the form, the function prints out the error and returns an empty struct value with the error.
The subs of struct type of model.Subscribers fields are populated using the rq.Form.Get("key") to get the value associated with the given keys.
If successful, The function returns the filled subs struct and a nil error message.
// ReadForm: This is a reusable function to help read the information or details submitted.
func ReadForm(rq *http.Request, subs model.Subscriber) (model.Subscriber, error) {
 if err := rq.ParseForm; err != nil {
 log.Println(err)
 return model.Subscriber{}, err }
 subs = model.Subscriber{
  FirstName: rq.Form.Get("first_name"),
  LastName:  rq.Form.Get("last_name"),
  Email:     rq.Form.Get("email"),
  Interest:  rq.Form.Get("interest"),
 }

 return subs, nil
}
It would help to use the JSONWriter function to write to the server. This function constructs an HTTP response using the parameters wr and interface. It also takes msg as the message to be sent with the response, statusCode as the response’s status code, and returns an error.
This function sets the HTTP response header to JSON format and adds the status code. It encodes the msg value into JSON using json.Marshal. Finally, it writes the encoded data to the output response using the Write method of http.ResponseWriter. Throughout the process, it checks for errors.
// JSONWriter: this will help send json response to the client page of this application
func JSONWriter(wr http.ResponseWriter, msg string, statusCode int) error {
  wr.Header().Set("Content-Type", "application/json")
  wr.WriteHeader(statusCode)

  b, err := json.Marshal(msg)
  if err != nil {
   return err
  }
  _, err = wr.Write(b)
  if err != nil {
   return err
  }
  return nil
}
The ReadMultiForm function reads and processes a multipart form submitted via an HTTP request. It accepts three parameters: wr http.ResponseWriter, rq *http.Request, and mail model.MailUpload. The function returns a model.MailUpload object and an error, if any, for further processing.
func ReadMultiForm(wr http.ResponseWriter, rq *http.Request, \
mail model.MailUpload) (model.MailUpload, error) {}
The function starts by parsing the multipart form data from the HTTP request using the rq.ParseMultipartForm(10 << 20) method, which can handle up to 10 megabytes (10MB) of data to ensure correct extraction of the form data. If there are any issues during the parsing process, the code logs the error and terminates the program.
if err := rq.ParseMultipartForm(10 << 20); err != nil {
 log.Fatal(err)
}
Then the function parses the form data and retrieves the MultipartForm from the request using the rq.MultipartForm property to access the form’s fields and files.
form := rq.MultipartFormNext, the function assigns the form’s docx_name field value to the mail.DocxName variable, capturing the uploaded document’s name from the submitted form.
mail.DocxName = form.Value["docx_name"][0]The function sets the mail.Date field to the current time using time.Now() to record the timestamp of the form submission.
mail.Date = time.Now()Using form.File["docx"], the function checks for the existence of the docx file within the form, and if it cannot find the file, it returns an error indicating the inability to retrieve the uploaded document.
file, ok := form.File["docx"]
if !ok {
 return model.MailUpload{}, fmt.Errorf("unable to get uploaded document")
}
If the file is present, the function verifies the file’s extension using filepath.Ext(file[0].Filename). The valid file extension is to access to read using file[0].Open(). If any error occurs during the opening, it returns an error indicating the inability to open the document, and the defer function closes up the file once it finishes reading.
if file[0].Filename != "" {
fileExtension := filepath.Ext(file[0].Filename)

f, err := file[0].Open()
if err != nil {
 return model.MailUpload{}, fmt.Errorf("unable to open uploaded document")
}
defer f.Close()
}
The switch-case statement checks if the uploaded file extension matches the allowed extensions like “.doc”, “docx”, or “.txt”.
switch fileExtension {}For case ".txt", the function utilises the bufio.Scanner function to process the content of the opened file. It reads the file line by line, formats each string with an HTML line break (<br>), and appends it to the mail.DocxContent variable.
scanner := bufio.NewScanner(f)

for scanner.Scan() {
  line := fmt.Sprintf("%s<br>", scanner.Text())
  mail.DocxContent += line
}

if err := scanner.Err(); err != nil {
 log.Fatal(err)
}
The code reads all the lines and checks for scanning errors using scanner.Err(). Logs and stops the program if an error occurs.
While for that of case ".docx", ".doc", the function utilises a docconv.ConvertDocx function to convert an MS Word docx or doc file to text for easy readability. It reads the file line by line, formats each line with an HTML line break (<br>), appends it to the content variable, and then assigns its value to mail.DocxContent.
// process .docx or .doc uploaded files
case ".docx", ".doc":
  res, _, err := docconv.ConvertDocx(f)
  if err != nil {
   log.Fatal(err)
  }

  lines := strings.Split(res, "\n")
  var content string
  // Add line breaks to each line
  for _, line := range lines {
   content += line + "<br>"
  }
  mail.DocxContent = content
If the file extension is not allowed, the function returns an error message stating that only specific file extensions (like “.doc”, “docx”, or “.txt”) are permitted using the default condition.
default:
  return model.MailUpload{}, fmt.Errorf("upload document not allow; try .txt .docx or .doc")
Finally, the function returns the mail object containing the extracted form information. It also bears a nil error value to indicate the successful process.
return mail, nilThe HTMLRender function takes three parameters: wr http.ResponseWriter, rq http.Request, and dt any (alias for interface). It parses an HTML template file using template.ParseFiles and executes it with wr and dt using the tmp.Execute method. If an error occurs while parsing or during execution, the function returns an error message, and a nil value indicates successful rendering.
func HTMLRender(wr http.ResponseWriter, rq *http.Request, dt any) error {
  filePath := "./index.html"

  tmp, err := template.ParseFiles(filePath)
  if err != nil {
   return fmt.Errorf("HTMLRender Error: failed to parse file: %v", err)
  }

  err = tmp.Execute(wr, dt)
  if err != nil {
   return fmt.Errorf("HTMLRender Error: failed to execute template: %v", err)
  }

  return nil
}
Now that you’ve understood the functionality implemented in the tools package, let’s create the methods for handling HTTP requests.
Creating Handler Method to Process HTTP
Using the handlers package is recommended to handle requests and create endpoints. Implementing the handler methods in the package’s handlers.go file allows for organized and structured handling and processing of incoming HTTP requests.
Defining an interface in the service.go file that encompasses all the handler methods for HTTP requests provides a clear contract for handling these requests. This approach enhances maintainability and scalability, making adding new endpoints or modifying existing ones in the application easier.
Open the handlers.go file located in ./mailapp/handlers/handlers.go and import all the necessary packages to the file.
package handlers

import (
"fmt"
"log"
"net/http"
"time"
"os"

"github.com/akinbyte/mailapp/db"
"github.com/akinbyte/mailapp/model"
"github.com/akinbyte/mailapp/tools"

"go.mongodb.org/mongo-driver/mongo"
)
The MailApp struct contains two fields: MailDB of type db.DataStore, an interface implementing query methods in the db package, and MailChan of type chan model.Mail channel to hold mail details to be sent to subscribers.
type MailApp struct {
 MailDB db.DataStore
 MailChan chan model.Mail
}
The NewMailApp function below accepts client *mongo.Client and mailchan chan model.Mail as parameters and returns a Logic interface implementing all the handler methods. It serves as a constructor function, enabling modularisation, dependency injection, and asynchronous communication for building the application.
func NewMailApp(client *mongo.Client, mailchan chan model.Mail) Logic {
 return &MailApp{
  MailDB: db.NewMongo(client),
  MailChan: mailchan,
 }
}
The MailApp struct has a Home method that returns an anonymous function, http.HandlerFunc. This function takes wr http.ResponseWriter and rq *http.Request as parameters. It generates an HTML response for the route using tools.HTMLRender() from the tools package. While rendering, any error is logged.
func (ma *MailApp) Home() http.HandlerFunc {
 return func(wr http.ResponseWriter, rq *http.Request) {
  err := tools.HTMLRender(wr, rq, nil)
  if err != nil {
   log.Println(err)
   return
  }
 }
}
The following implemented method is GetSubscriber. This method handled the registration process of the subscribers after their details had been submitted through a form in a JSON format, and have their details stored in the database.
func (ma *MailApp) GetSubscriber() http.HandlerFunc {
 return func(wr http.ResponseWriter, rq *http.Request) {}
}
Declare a variable named subs of type model.Subscriber. Call the tools.ReadForm function from the tools package to read the HTTP request by passing wr, rq, and subs as arguments. Respond to an error with http.Error, including the specified status code and error message.
var subs model.Subscriber
subscriber, err := tools.ReadForm(rq, subs)
if err != nil {
 http.Error(wr, fmt.Sprintf("failed to read json : ",err), http.StatusBadRequest)
 return
}
The AddSubscriber method injects dependency through the db.DataStore interface. It receives the result of the ReadForm function as an argument. The AddSubscriber function returns three outputs: ok (to verify the successful addition of the subscriber), “msg” (a message to include in the HTTP response), and err (to indicate any errors encountered).
ok, msg, err := ma.MailDB.AddSubscriber(subscriber)
if err != nil {
 http.Error(wr, msg, http.StatusInternalServerError)
 return
}
The switch-case statement utilises the tools.JSONWriter to generate an HTTP response by providing reasonable arguments for verifying subscriber registration.
switch ok {
 case msg == "":
 tools.JSONWriter(wr, "You have already registered", http.StatusOK)
 case msg != "":
 tools.JSONWriter(wr, msg, http.StatusOK)
}
The SendMail method is the primary handler for processing the HTTP request to send mail to all registered subscribers. I will explain the implementation of this handler step by step.
func (ma *MailApp) SendMail() http.HandlerFunc {
 return func(wr http.ResponseWriter, rq *http.Request) {}
}
To retrieve input details and the uploaded document containing the mail to send, the tools.ReadMultiForm function accepts a mailUpload variable of type model.MailUpload as an argument, along with wr and rq. http.Error to obtain the corresponding HTTP response message and http.StatusBadRequest (400) status code.
var mailUpload model.MailUpload
upload, err := tools.ReadMultiForm(wr, rq, mailUpload)
if err != nil {
 http.Error(wr, err.Error(), http.StatusBadRequest)
 return
}
The tools.ReadMultiForm function returns a value of type model.MailUpload and is then passed as an argument to the AddMail method, which is part of the db.DataStore interface. The purpose is to store the mail intended for subscribers in the database. Following this, an HTTP response with a status code of http.StatusInternalServerError (500), accompanied by an appropriate message.
msg, err := ma.MailDB.AddMail(upload)
if err != nil {
http.Error(wr, msg, http.StatusInternalServerError)
return
}
The program logs information, notifies the following process, and pauses for a few milliseconds using the time package.
log.Println(msg)
log.Println("........ preparing to send mail to subscribers ........ ")
time.Sleep(time.Millisecond)
log.Println("........ Accessing the subscribers Database ........ ")
The next process calls the FindSubscribers method, which returns all registered subscribers in the form of a []primitive.M slice of map[string]interface{} named res. The process also checks for any return error.
res, err := ma.MailDB.FindSubscribers()
if err != nil {
 http.Error(wr, fmt.Sprintf("failed query: %v", err), http.StatusInternalServerError)
 return
}
Iterate through res to access each map[string]interface{} containing the database document of registered subscribers.
Assign subscriber details to variables subEmail, firstName, and lastName by extracting them using their respective keys. Fill in the fields of model.Mail struct with their corresponding values and assign it to the mail variable. Send mail through the MailChan channel field in the MailApp struct to a receiving Goroutine.
for _, s := range res {
 subEmail := s["email"].(string)
 firstName := s["first_name"].(string)
 lastName := s["last_name"].(string)

 subName := fmt.Sprintf("%s %s", firstName, lastName)
 mail := model.Mail{
  Source: os.Getenv("GMAIL_ACC"),
  Destination: subEmail,
  Name: subName,
  Message: upload.DocxContent,
  Subject: upload.DocxName,
 }
 ma.MailChan <- mail
}
After successfully sending the mail to the subscriber through an efficient performance channel for processing, the tool.JSONWriter generates an HTTP response to the server with the status code http.StatusOK (200), confirming the successful delivery of the mail.
err = tools.JSONWriter(wr, fmt.Sprintf("Mail Sent %v subscribers", len(res)), http.StatusOK)
if err != nil {
 http.Error(wr, err.Error(), http.StatusInternalServerError)
 return
}
Now that you have made significant progress by implementing the handlers method for handling HTTP requests, which includes rendering the home page, registering new subscribers, and sending emails to subscribers.
The next step involves creating a Logic interface encompassing all the methods defined in the handlers package. And can be achieved by adding the appropriate methods to the Logic interface, which will be done in the subsequent section to aid in better understanding.
Implementing an Interface for Handler Methods
An interface is required to promote code reusability, modularity, and easy maintenance. It allows for interactions of different parts of your program and enables flexibility and interchangeable code usage.
For you to create the interface, open the service.go file and implement the Logic interface to add all the defined handler methods.
package handlers

import "net/http"

type Logic interface {
 Home() http.HandlerFunc
 GetSubscriber() http.HandlerFunc
 SendMail() http.HandlerFunc
}
Next, let’s create endpoints for these handlers.
Creating Routes Endpoints (URL)
You can now create endpoints(URL) that typically correspond to a specific function or method in the backend code that handles the request and returns the appropriate response.
The Routes function takes in the parameter of lg handlers.Logic to access all the handler methods in the Logic interface and returns *chi.Mux from the chi package.
A new HTTP multiplexer mux is initialized, which implements the Router interface of the chi package, then the Logger function from the chi middleware logs the start and end of each request call and then recovers from panics logs the panic (and a backtrace) using the Recoverer function.
package main
import (
 "github.com/go-chi/chi/v5"
 "github.com/go-chi/chi/v5/middleware"
 "github.com/yusuf/mailapp/handlers"
)

func Routes(lg handlers.Logic) *chi.Mux {
 mux := chi.NewRouter()
 mux.Use(middleware.Logger)
 mux.Use(middleware.Recoverer)
}
Then, the HTTP method GET execute the lg.Home HandlerFunc attached with the URL / route pattern to render the homepage.
Also, there are the POST methods with the route pattern of /api/submit and /api/send to carry out the request for the Subscriber to register and for the user to send mail to their subscribers, respectively.
mux.Get("/", lg.Home())
mux.Post("/api/submit", lg.GetSubscriber())
mux.Post("/api/send", lg.SendMail())
The server should serve and handle the static files (CSS and images) required by the application’s client side.
To achieve that, http.Dir allows access to the static directory path ./static at the root level. This directory is passed as an argument to the http.FileServer function, which returns an http.Handler assigned to the fileServer variable. This fileServer serves HTTP requests with the contents of the directory.
fileServer := http.FileServer(http.Dir("./static"))The Handle method is invoked to execute the fileServer http.Handler by stripping off the prefix /static of the pattern /static/* with the http.StripPrefix function. mux Pointer to chi.Mux is returned to be passed as an argument to the http.Server.
mux.Handle("/static/*", http.StripPrefix("/static", fileServer))
return mux
The application router to execute all the HTTP requests is now correctly done. It would help if you looked into the next section that shows how the mail server is setup up to receive data from a channel.
Integrating Gmail API for Sending and Receiving Emails
Using Goroutines to achieve concurrency in sending mail to various people all at once to achieve utmost performance and efficiency is the target goal of this application.
You will learn how to integrate Google Gmail API in this program in sending mail, utilising the advantage of goroutine using channels in retrieving data. To get this done, let’s get to it.
You can proceed with following the next steps:
Create an email.go file in the email package. If done, first import the packages needed to implement the functionality of this package.
package email

import (
 "log"
 "os"

 "github.com/akinbyte/mailapp/model"
 "gopkg.in/gomail.v2"
)
Create a MailServer function with a parameter of the mailChan model.Mail is the receiving channel object when the user requests to send mail.
func MailServer(mailChan model.Mail) {}The gomail package initialises a new SMTP Dialer to connect to the SMTP Server. It uses smtp.gmail.com as the host and 465 as the port and passes the credentials stored in the .env file as arguments to the gomail.NewDialer function.
The dial function returns a value that authenticates the user’s access to the SMTP Server. It assigns this value to variables s and err for further processing. Next, it performs error checking, and if any errors are detected, the program panics.
d := gomail.NewDialer("smtp.gmail.com", 465, os.Getenv("GMAIL_ACC"), os.Getenv("APP_PASSWORD"))
s, err := d.Dial()
if err != nil {
 log.Panicf("Error connecting to the Mail Server: ", err)
}
After the Dial function opens a connection to the server, a newly constructed message is now assigned to msg utilising the available methods such as SetHeader, SetBody and SetAddressHeader that gomail.Message struct implements
msg := gomail.NewMessage()
msg.SetAddressHeader("From", mailChan.Source, os.Getenv("USER_NAME"))
msg.SetHeader("To", mailChan.Destination)
msg.SetHeader("Subject", mailChan.Subject)
msg.SetBody("text/html", mailChan.Message)
After connecting to the SMTP server and composing the message, the user’s authentication access s and the composed msg are passed as arguments to the Send function, delivering the message to the subscriber. The program logs any errors that occur during the sending of the mail. The Reset method maintains the message settings for future messages.
if err := gomail.Send(s, msg); err != nil {
 log.Printf("Mail Sever : %s %v\n", mailChan.Destination, err)
}
msg.Reset()
The mail server, which helps send the mail to the respective subscriber, is now set up. Let’s move on to the function where the mail server will receive the sent mail through a buffered channel.
Implementing Goroutines and Channels for Concurrency
This application aims to utilise the power of concurrency using goroutines to deliver mail messages to multiple people to enhance efficiency and performance seamlessly.
There are various approaches to achieving synchronisations, using the sync or the atomic package to accomplish this application’s goal: handle mail delivery by processing the mail objects received through the channel.
You will use the custom implementation with the Buffered channel, and I will provide a detailed explanation below.
The function MailDelivery uses two parameters, mailChan and worker, to receive a channel object and determine the number of goroutines (gophers) to generate.
func MailDelivery(mailChan chan model.Mail, worker int) {}The function starts by creating a buffered channel called completionChan of a boolean type with a capacity equal to the value of the worker parameter. This channel enables non-blocking data transmission when the buffer is not complete.
completionChan := make(chan bool, worker)A for loop generates goroutines (gophers) within the range of the specified number of workers. For each of the goroutines, a defined anonymous function helps in processing the mail message received from the mailChan that is continuously received using a range loop until the channel closes.
Remember that defer works in LIFO; It schedules the complete execution of the goroutine for processing the mail message and sends the completion signal to the completeChan when the goroutine finishes execution.
for x := 0; x < worker; x += 1 {
  go func() {
   // Signal completion
   defer func() {
    completionChan <- true
   }()
   for m := range mailChan {
    MailServer(m)
    }
   }()
}
The program executes another for loop with the worker variable. This loop receives and discards completion signals from the completeChan channel using <-completeChan. The defer anonymous function manages this process. This loop effectively blocks the main goroutine, ensuring it waits for the completion signal from the completeChan channel until all the generated goroutines have finished processing.
for x := 0; x < worker; x += 1 {
 <-completionChan
}
This function guarantees the completion of all worker goroutines’ tasks before returning. The primary function, specifically the main goroutine, calls and executes it.
Initializing the Application Server in the Main Function
All this while, you must be wondering what the primary function entails or what it does. The package main function is the gateway function that helps execute all the code you have implemented. It is the only program recognised by the Go compiler.
The Mail Server API representation of the application server shows that the packages created and the code in each lead back to the main.
We will cover that next but before we do, update the .env file with the PORT address or the number of 8080 on which the HTTP server will listen and respond.
PORT=8080

APP_PASSWORD=YOUR_APP_PASSWORD

GMAIL_ACC=YOUR_GMAIL_ACCOUNT

USER_NAME=YOUR_USERNAME

# hint: URI starts with `mongodb+srv://`
URI=<MONGODB_URI>
In the main package, import all the needed builtins packages alongside the customs-created packages in the application.
package main

import (
 "context"
 "log"
 "net/http"

 "github.com/akinbyte/mailapp/db"
 "github.com/akinbyte/mailapp/email"
 "github.com/akinbyte/mailapp/handlers"
 "github.com/akinbyte/mailapp/model"
 "github.com/joho/godotenv"
)
Three essential variables are employed: MailChan, a channel of type chan model.Mail for transmitting mail data between the main goroutine and other goroutines; The BufferSize variable specifies the capacity of the buffered channel, and the Worker variable handles the number of goroutines to create.
var (
 MailChan   chan model.Mail
 BufferSize int
 Worker    int
)
In the main function, MailChan is assigned, allocated, and initialised an object of type chan model.Mail with BufferSize a buffer capacity using the make built-in function. The Worker variable is assigned a value of 5.
MailChan = make(chan model.Mail, BufferSize)
Worker = 5
The godotenv.Load() is used to read and access the value of the environment variable in the .env files using the key, and if an error occurs, the program panic logs the error. Logs to show the database is about to connect.
err := godotenv.Load()
if err != nil {
 log.Fatal(err)
}

log.Println("Starting the Mail App Server")

log.Println("Preparing Database Connection")
The application server establishes the database connection by calling the OpenConnect function before it starts. The defer function closes the link to the database after executing the main goroutine.
client := db.OpenConnect()
defer func(ctx context.Context) {
 err := client.Disconnect(ctx)
 if err != nil {
  return
 }
}(context.TODO())
The MailChan and Worker is passed as an argument to the MailDelivery function from the email package to generate the goroutines, and the MailChan is closed once the main goroutine finishes executing.
go email.MailDelivery(MailChan, Worker)
defer close(MailChan)
The NewMailApp function in the handlers package initialises the MailApp struct by accepting the client and MailChan as arguments. The app variable receives the assignment of the resulting instance.
app := handlers.NewMailApp(client, MailChan)The Routes function from the handlers package receives the app variable as an argument. It returns a value of type *chi.Mux, which you assign to the handle variable. The ‘handle’ variable initialises the application server on the port address 8080 .
handle := Routes(app)

srv := http.Server{
Addr: fmt.Sprintf(":%s", os.Getenv("PORT")),
Handler: handle,
}
The application server is started and listens on the port address of 8080; if an error occurs, the program panics and logs the error.
if err := srv.ListenAndServe(); err != http.ErrServerClosed {
log.Fatalf("Shutting Down the Mail App Server ")
}
If the server shuts down using CRTL + C, the main function completes execution, and the program exits. The implementation and building of a concurrent mail server API has ended and is now ready to be tested.
Testing the Application API
As you have finished building the mail server API, it is time to test the application. In order to do that, you will need a REST Client API tool such as Postman, Insomnia, or Thunder Client Extension in Vscode. I will be using the ThunderClient extension.
To follow along, make sure you have Thunder Client extension or Postman installed and set up the API as described below:
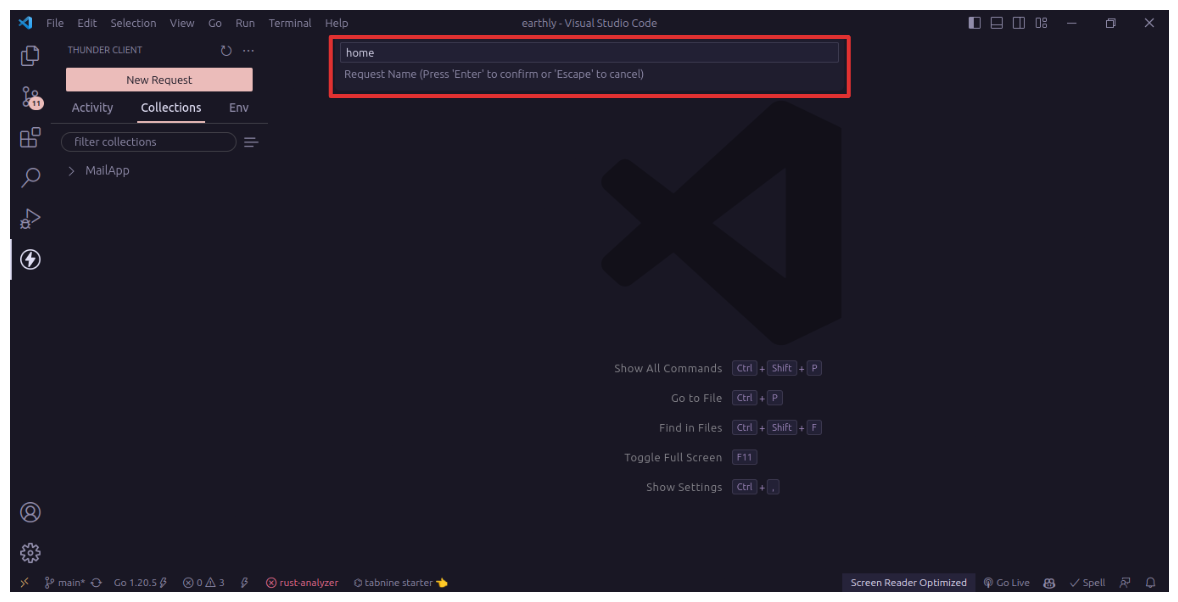
- Create an API collection named MailAPP, then add a new request as shown below

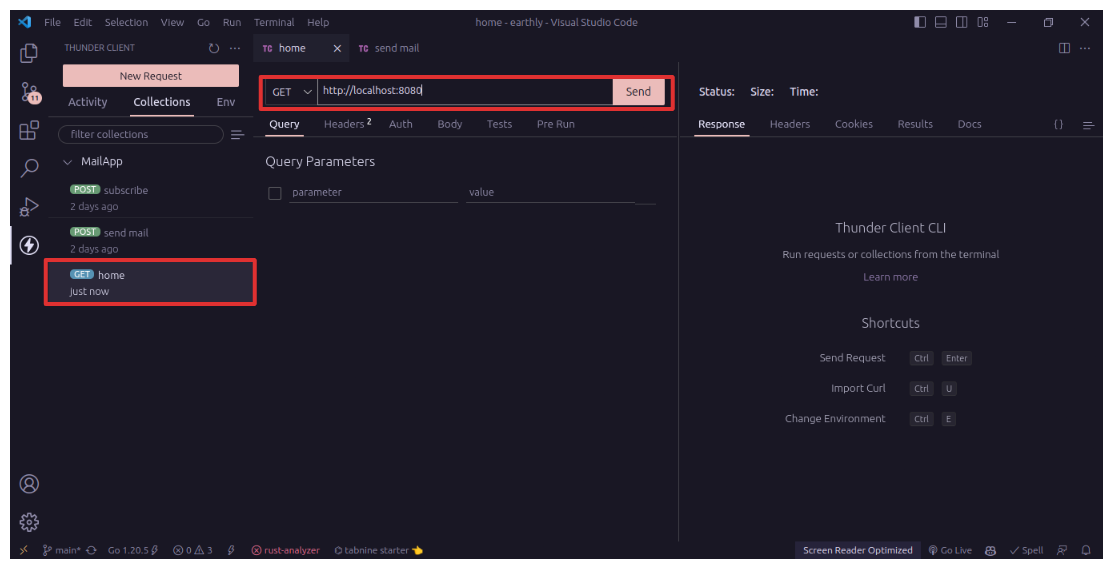
- Add a new request for the home page, which you will use to render the application interface later.
- Add the HTTP GET request method and configure it with the correct URL.
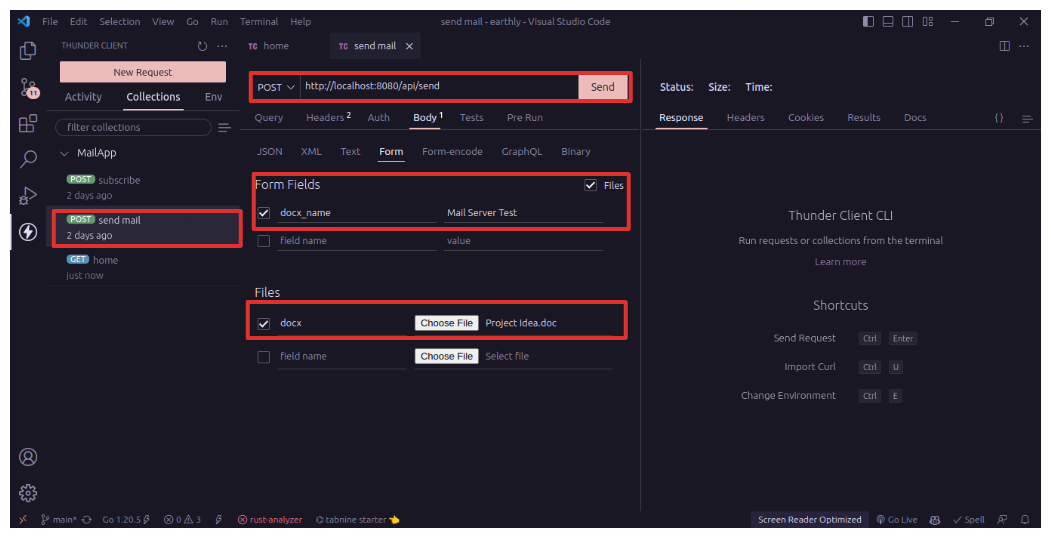
- Create and configure new HTTP POST requests for subscribers to subscribe with their details and send mail content of the uploaded document with their URLs.

Now that you’ve made configurations for the API. Let’s move on to build and run the application to start the local server.
Starting the API Server
To start the API server, Open your terminal or command prompt and ensure you are in the mail app project directory.
Execute this command below to build the application and start up the server.
For Linux or MacOS users (using the wildcard syntax):
go run *.goFor Windows users:
go run main.go routes.goTesting the Functionalities of the API
In this section, you will test the API’s main functions, which include registering new subscribers and sending emails to them. Ensure that the API server is operational and connected to the database. And test each previously created HTTP request individually.
To test each request, click the send button to initialize the process. Start by requesting for the subscriber to submit their details.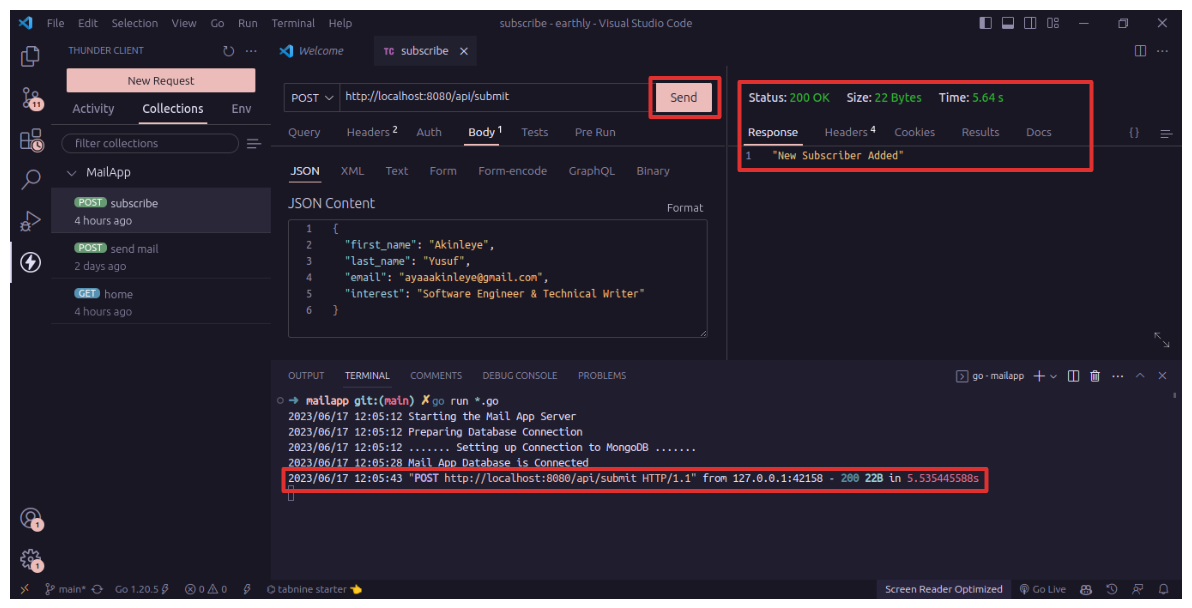

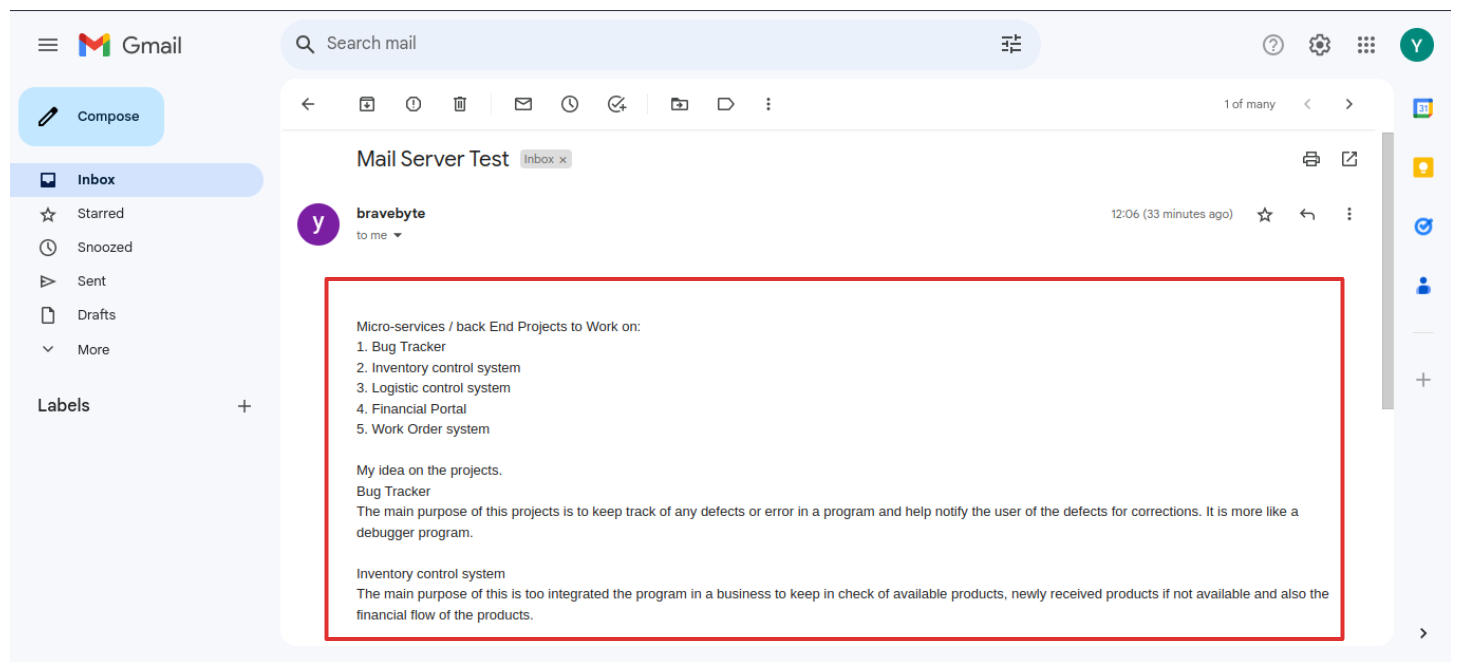
The email sent to all registered subscribers without problems or mistakes indicates success.
To confirm that the registered subscriber received the message, check the email account’s inbox below.

Building User and Subscriber Interface for Mail Sending
Now that it is confirmed that the API is working as expected. You can now build an interface using HTML & CSS and integrate it with the Mail Server API.
Creating a Mail Details Form and Uploading a Document
Now that you have tested out the functionalities of the API to ensure that it works as intended, meets the requirements, and delivers the expected results, validating its reliability, functionality as well as it performance.
The next step is to make it accessible to users and ensure a seamless user experience. By designing an intuitive interface and making it easy for people to interact. Building a user interface incorporating form inputs for users and subscribers will enable smooth interaction and enhance their overall experience.
It’s described below how to create form inputs for the email title and its document, setting the form method to post and the encoding method to multipart/form-data to handle and process the uploaded document of the mail content by the API and the **submit** button to be clicked to submit the form to the URL /api/send which triggers an alert message.
<!-- Form for a user to upload the mail document to sent -->
      <form action="/api/send" method="post" enctype="multipart/form-data">
        <label for="">Title</label>
        <div class="user-input">
          <input type="text" name="docx_name" id="name" />
        </div>
        <label for="">Document</label>
        <div class="user-input">
          <input type="file" name="docx" id="" />
        </div>
        <button type="submit" value="" onclick="sendMailAlert()">Send</button>
      </form>
Creating a Form for Subscriber Details
Here is a form created for the subscriber to submit their details in the input fields named first_name, last_name, email, and interest and have it stored in the database by the API. Also, the **submit** button triggers an ‘alert’ message when clicked to submit the form to this endpoint /api/submit.
<form action="/api/submit" method="post">
          <label for="">First Name</label>
          <div class="user-input">
            <input type="text" name="first_name" id="first_name" />
          </div>
          <label for="">Last Name</label>
          <div class="user-input">
            <input type="text" name="last_name" id="last_name" />
          </div>
          <label for="">Email</label>
          <div class="user-input">
            <input type="email" name="email" id="email" />
          </div>
          <label for="">Interest</label>
          <div class="user-input">
            <input type="text" name="interest" id="interest" />
          </div>
          <button type="submit" onclick="submitAlert()">Subscribe</button>
        </form>
You can check the full HTML design template and the CSS file.
Conclusion
And that’s a wrap! In this tutorial, we went on quite a journey building a concurrent mail server from start to finish.
We covered a ton of ground, from grasping concurrency models and Goroutines to creating a MongoDB database and implementing handlers. Then we integrated the Gmail API for seamless email sending and added forms to let users easily upload documents and subscribe.
While there’s always room for improvement, this mail server already performs way better than a synchronous alternative. Concurrency works its magic, allowing us to send emails to multiple subscribers simultaneously with Goroutines and channels.
Overall, building this mail server showcased Go’s concurrency strengths. Goroutines make easy work of tasks that would be tedious threaded in other languages. And channels provide a clean way to share data between goroutines.
This project lays a solid foundation for a production-ready mail service. Some next steps could be adding email templates, implementing a frontend, and beefing up security. But for now, we have a working concurrent mail server with Goroutines and Gmail integration!
Turn your engineering standards into automated guardrails that provide feedback directly in pull requests, with 100+ guardrails included out of the box and support for the tools and CI/CD systems you already have.