How to Create a Python Virtual Environment with Miniconda
Table of Contents
Managing multiple Python versions and dependencies across different projects can be challenging. Virtual environments solve this problem by allowing developers to isolate project dependencies. With virtual environments, you can create sandboxed systems where you can install project-specific dependencies without affecting the entire system-wide Python installation.
In Python, virtual environments can help you avoid dependency conflicts, install different packages or library versions, and test new features. In this article, you’ll learn a little more about virtual environments and how to create and use them in Python with Miniconda.
What Is a Virtual Environment?
A virtual environment is an isolated space that houses a specific Python interpreter and its associated libraries and dependencies. This isolation ensures that any changes made within a virtual environment, such as installing or upgrading packages, are contained within that environment and do not affect the global Python environment or other virtual environments.
Overall, virtual environments offer reproducibility, portability, and maintainability by providing a clean and encapsulated workspace for development and experimentation.
What Is Miniconda?
Miniconda is a lightweight version of the Anaconda Python distribution, a popular platform for data science and machine learning projects. Unlike traditional Python virtual environment managers like venv or virtualenv, Miniconda comes with a package manager called conda that simplifies the installation and management of packages and dependencies across environments.
Miniconda provides a robust package management system that allows you to install, update, and remove packages effortlessly. It also supports both Python and non-Python packages, making it suitable for a wide range of development tasks.
To create and manage virtual environments, all you need are a few simple Miniconda commands. This makes it straightforward for developers to work on multiple projects and change between environments quickly.
Miniconda is compatible with all popular operating systems, including Windows, macOS, and Linux.
How to Use Virtual Environments With Miniconda
To start this tutorial, you need to install Miniconda. The Miniconda installation guide covers everything you need to know about installing it.
If you’re using Linux, you can install Miniconda using the following shell commands:
mkdir -p ~/miniconda3
wget https://repo.anaconda.com/miniconda/Miniconda3-latest-Linux-x86_64.sh \
-O ~/miniconda3/miniconda.sh
bash ~/miniconda3/miniconda.sh -b -u -p ~/miniconda3
rm -rf ~/miniconda3/miniconda.sh
These commands create a directory for the installation files, retrieve the installer from the Miniconda repo, run it, and clean the system after installation.
macOS users can run the following commands to install Miniconda:
mkdir -p ~/miniconda3
curl https://repo.anaconda.com/miniconda/Miniconda3-latest-MacOSX-arm64.sh \
-o ~/miniconda3/miniconda.sh
bash ~/miniconda3/miniconda.sh -b -u -p ~/miniconda3
rm -rf ~/miniconda3/miniconda.sh
If you’re on Windows, you can use the following commands to install Miniconda:
curl https://repo.anaconda.com/miniconda/Miniconda3-latest-Windows-x86_64.exe \
-o miniconda.exe
start /wait "" miniconda.exe /S
del miniconda.exe
Once Miniconda is installed, you need to initialize it for your shell. Here’s how to do that for bash and zsh:
~/miniconda3/bin/conda init bash
~/miniconda3/bin/conda init zsh
For the changes to take effect, make sure you close your terminal session and start a new one. Once you’ve started a new terminal session, verify that the Miniconda installation was successful using conda --version:
conda --version
conda 24.4.0
Create a Project
Once Miniconda is installed on your machine, you need to create a simple Python project that you’ll run later inside an isolated Miniconda environment. You can use any Python project of your choice, but for convenience, this guide provides a simple web application that you can use as a demo project.
You can get a version of the demo app from this GitHub repository:
git clone https://github.com/rubaiat-hossain/miniconda-demo-appOnce you’ve cloned the application, navigate to the project directory with this command:
cd miniconda-demo-appSet Up an Environment
Now that you have a basic web app you can run, it’s time to set up a dedicated environment for this application using Miniconda.
The Miniconda environment you’ll create isolates the application’s dependencies and allows you to test new application features or library packages without affecting the system-wide Python installation.
An environment is a directory that has all the specific versions of packages you installed for your project. For example, you can create an environment with the latest version of a package and its dependencies and another environment with an old version of that package whose dependencies may vary.
You can then activate or deactivate these environments as needed. Sharing these environments with other developers is easy since all you need to do is share an environment.yaml file.
Create and Activate a Miniconda Environment
To create an environment to house your application, you need to open your terminal, navigate to the project directory, and run the following command:
conda create --name server_env python=3.9This command creates a new virtual environment with Python 3.9 installed. It also installs all the necessary dependencies, so you’ll need to confirm this using the interactive prompt:
Channels:
 - defaults
Platform: linux-64
Collecting package metadata (repodata.json): done
Solving environment: done

## Package Plan ##

  environment location: /home/rubaiat/miniconda3/envs/server_env
  added / updated specs:
    - python=3.9
    -
The following packages will be downloaded:

    package                    |            build
    ---------------------------|-----------------
    pip-24.0                   |   py39h06a4308_0         2.6 MB
    python-3.9.19              |       h955ad1f_1        25.1 MB
    setuptools-69.5.1          |   py39h06a4308_0        1003 KB
    ------------------------------------------------------------
                                           Total:        28.7 MB

---Text Output Truncated for Brevity---
Once you’ve created the environment, you need to activate it. Run the following command to activate the server_env environment:
conda activate server_envOnce activated, your terminal prompt will change to indicate that you’re now working within the server_env environment.
Install Packages in the Environment
Once the environment is activated, you need to install the necessary packages for your server app. For example, to install Flask, you can run pip install Flask:
pip install Flask
Collecting Flask
  Using cached flask-3.0.3-py3-none-any.whl.metadata (3.2 kB)
Collecting Werkzeug>=3.0.0 (from Flask)
  Downloading werkzeug-3.0.3-py3-none-any.whl.metadata (3.7 kB)
Collecting Jinja2>=3.1.2 (from Flask)
  Downloading jinja2-3.1.4-py3-none-any.whl.metadata (2.6 kB)
Collecting itsdangerous>=2.1.2 (from Flask)
  Using cached itsdangerous-2.2.0-py3-none-any.whl.metadata (1.9 kB)
Collecting click>=8.1.3 (from Flask)
  Using cached click-8.1.7-py3-none-any.whl.metadata (3.0 kB)
Collecting blinker>=1.6.2 (from Flask)
  ---Text Output Truncated for Brevity---
Test Your Web App
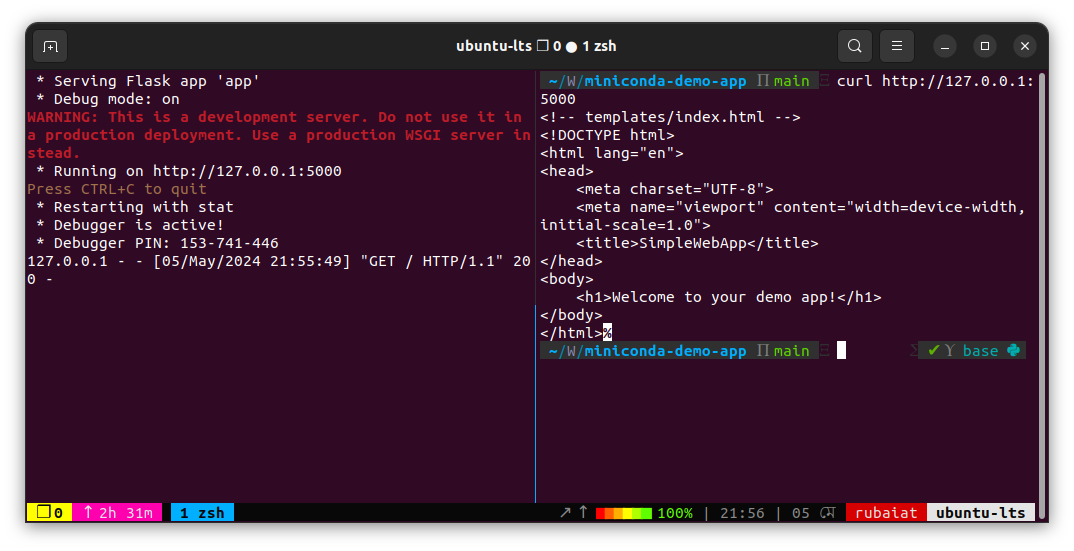
Once you’ve installed Flask, it’s time to test your web app. Simply start the server using the following command, then send a curl request to http://localhost:5000:
python app.pyYou can also verify the app by visiting this URL in your browser:

As you can see in the terminal output, the web server is running as expected. You can now add some additional functionality to your demo app.
First, let’s add a simple load test to the app using the Locust framework for Python. You can install Locust using both pip and conda.
To install Locust using conda, use the following command:
conda install conda-forge::locustOnce Locust is installed, you need to create a basic load testing script. Open a code editor and copy the following code to a file called locust.py:
from locust import HttpUser, between, task

class MyUser(HttpUser):
    wait_time = between(5, 10)

    @task
    def index_page(self):
        self.client.get("/")
Save and close the file. Then, run the following command to run the load test using Locust:
locust -f locust.py --headless -u 100 -r 10 -t 5m --html \
report.html --host http://localhost:5000
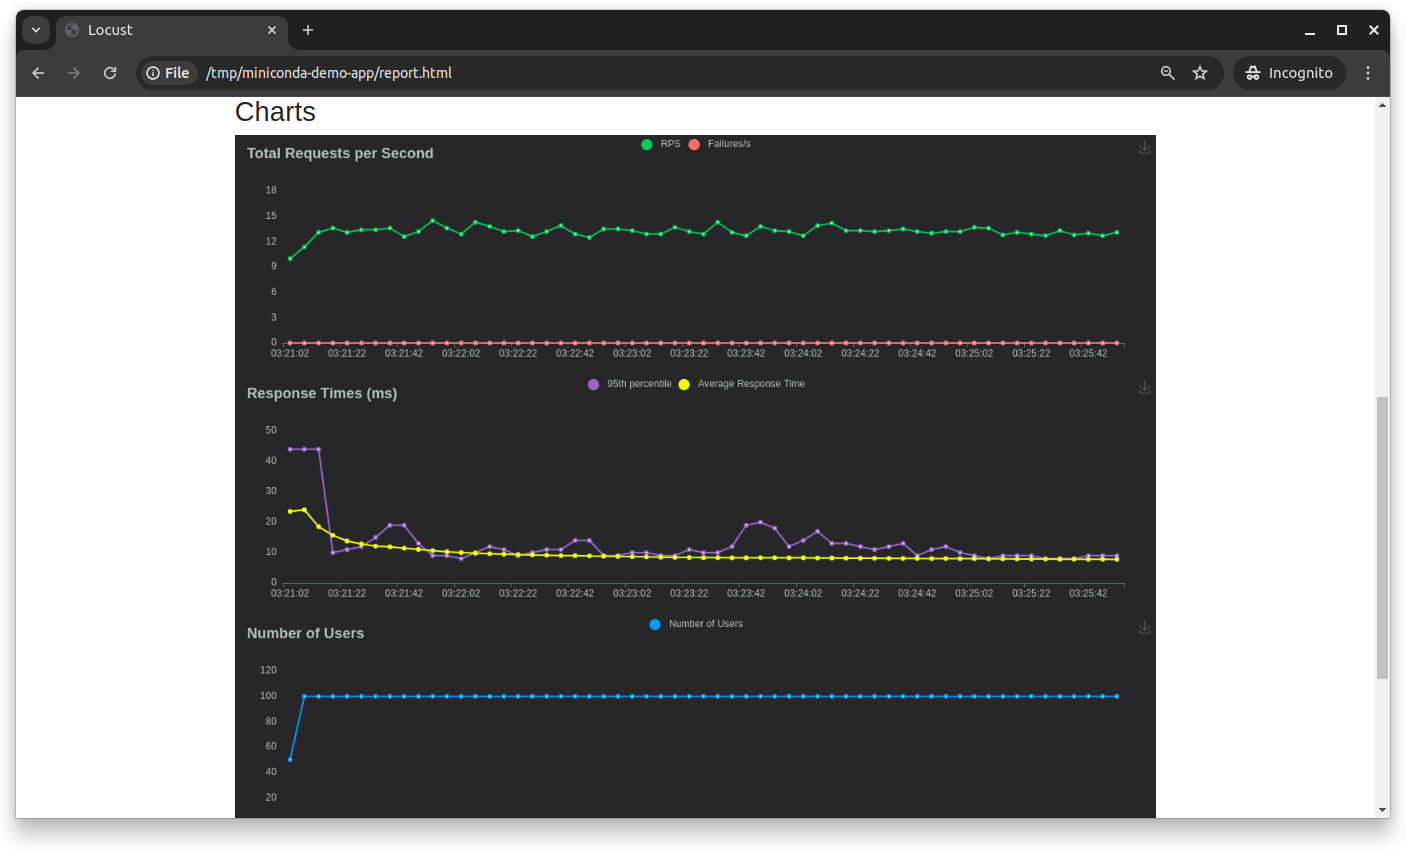
This command starts Locust in headless mode and simulates 100 concurrent user requests to the demo app for five minutes. It also creates a statistics report and saves it as report.html. You can open this file to get a graphical view of your demo app’s performance under load:

Remove the Environment
Once you’re done experimenting, you can remove the virtual environment, but you first need to deactivate it. Run the following command to do so:
conda deactivateThen, run the following command to delete the server_env Miniconda environment, along with all the installed packages and their dependencies:
conda remove --name server_env --all

Remove all packages in environment /home/rubaiat/miniconda3/envs/server_env:

## Package Plan ##

  environment location: /home/rubaiat/miniconda3/envs/server_env

The following packages will be REMOVED:

  _libgcc_mutex-0.1-main
  _openmp_mutex-5.1-1_gnu
  ca-certificates-2024.3.11-h06a4308_0
  ld_impl_linux-64-2.38-h1181459_1
  libffi-3.4.4-h6a678d5_1
  libgcc-ng-11.2.0-h1234567_1
  libgomp-11.2.0-h1234567_1
---Text Output Truncated for Brevity---
As you can see, it’s easy to work with virtual environments using Miniconda.
Limitations of Miniconda
While Miniconda has its merits when it comes to managing Python dependencies and environments, it’s limited when it comes to handling system-level dependencies that are not Python-specific. For example, in cases where Miniconda does not have a package for a specific system-level dependency, you may find it challenging to manage and resolve these dependencies within the Miniconda environment yourself.
An alternative approach to addressing these system-level dependencies is sandboxing them. Tools like Earthly provide a solution for managing system-level dependencies alongside Python dependencies in a containerized environment. Earthly simplifies defining and managing build processes for both Python and non-Python dependencies in a self-contained, repeatable, and portable manner.
Creating your own Earthfiles according to your needs is effortless. Plus, the syntax is familiar if you’ve used Docker before, and the tool is fast. Check out Earthly’s guide on better dependency management in Python if you want to learn more about using Earthly to manage your Python dependencies.
Conclusion
Virtual environments in Python make managing project-specific dependencies easier for developers. Miniconda, the lightweight core of the Anaconda distribution, provides a simple way to create and manage isolated virtual environments that can house individual apps with their specific packages and dependencies without creating system-wide dependency conflicts.
This tutorial showed you how to use Miniconda to create and manage Python virtual environments to avoid dependency conflicts among packages. You also learned about some of Miniconda’s limitations and how sandboxing tools like Earthly can help mitigate these limitations.
Earthly Lunar: Monitoring for your SDLC
Achieve Engineering Excellence with universal SDLC monitoring that works with every tech stack, microservice, and CI pipeline.


