Building Pong in Your Terminal: Part One
In this Series
Table of Contents
This article explains how to create Pong using Golang. Earthly provides consistent builds for projects like this. Check it out.
But Why?
I’ve been trying to learn Golang lately. Previously, I wrote an article where I built an app for storing contacts that ran in the terminal using the tview package. This was a great first project to get me used to working with Go. After I was done, a colleague sent me a link to a list of terminal games, which got me interested in trying to build one myself. I’m no game designer, so I decided to try to rebuild something that would be relatively simple to figure out and reproduce, but still give me a chance to deepen my Golang knowledge. That landed me on Pong.
Pong is simple. There are only three sprites on screen, the level is always the same, and the game logic is pretty easy to code. This also seemed like a great project to help me start to wrap my head around Go routines and Channels, concepts that were completely new to me coming from Ruby and Python.
What We’ll Learn
I barely know Golang and I don’t know anything about game development or design. I built this to learn! If you want a project to learn more about concurrency in Golang, building terminal UIs, or stumble through the very basics of creating a game, then you are in the right place! Over the next few articles, we’ll build a version of Pong that we can play in our terminal.
In this first article we will learn how to:
- Start working with the tcell package
- Write text to the terminal
- Make text move
- Create a ball that “bounces” when it reaches the edge of the screen
The complete code for part one.
Tcell vs Tview for Terminal Games
Originally I thought I would be able to use the tview package I’d used for my last terminal project. It has a grid system that I figured I could take advantage of to act as my game world, but that didn’t turn out to be the case. I wanted to be able to access and update the exact x and y coordinates of elements in the terminal, and as far as I could tell, that wasn’t easily possible in tview.
Depending on what kind of game you want to make, Tview could still be a great choice. You can check out this multiplayer chess game or dominoes game, both written with tview. What these games don’t have, as far as I can tell, is any moving or animated objects.
Tview is built on top of another Golang package called tcell. Tcell provides a cell based view for text terminals. Basically, tcell is going to allow us to interact with the terminal using Go code in a much more fine grained way than tview could.
Hello Game World
First, import tcell.
import "github.com/gdamore/tcell/v2"To get started, we create a tcell Screen. This represents the physical terminal screen. Tcell is set up to detect what type of terminal you are using and claims to have support for many types of terminals on Linux, Mac, and Windows, so you shouldn’t need to configure it after creation.
func main() {

    screen, err := tcell.NewScreen()

    if err != nil {
        log.Fatalf("%+v", err)
    }
    if err := screen.Init(); err != nil {
        log.Fatalf("%+v", err)
    }
}
Next, we can set a default style for our screen. This will set the foreground and background colors. It is possible to define colors as RGB values, hex values, or by using tcell’s color constants. We can have some fun with this later, but for now, we’ll use the constant ColorReset which just sets the tcell Screen defaults to whatever the terminal defaults are.
defStyle := tcell.StyleDefault.Background(tcell.ColorBlack)
    .Foreground(tcell.ColorBlack)
screen.SetStyle(defStyle)
Now, to write to the screen, we can use the SetContent function. This takes a number of arguments. First, it’s going to need the X and Y values of each character you want to place on the screen, then the character itself. We can only pass one Rune at a time to SetContent, so to write “Hi!” we’ll need three lines of code. (If you’re curious, the fourth argument in SetContent is for any combining characters).
    screen.SetContent(0, 0, 'H', nil, defStyle)
    screen.SetContent(1, 0, 'i', nil, defStyle)
    screen.SetContent(2, 0, '!', nil, defStyle)
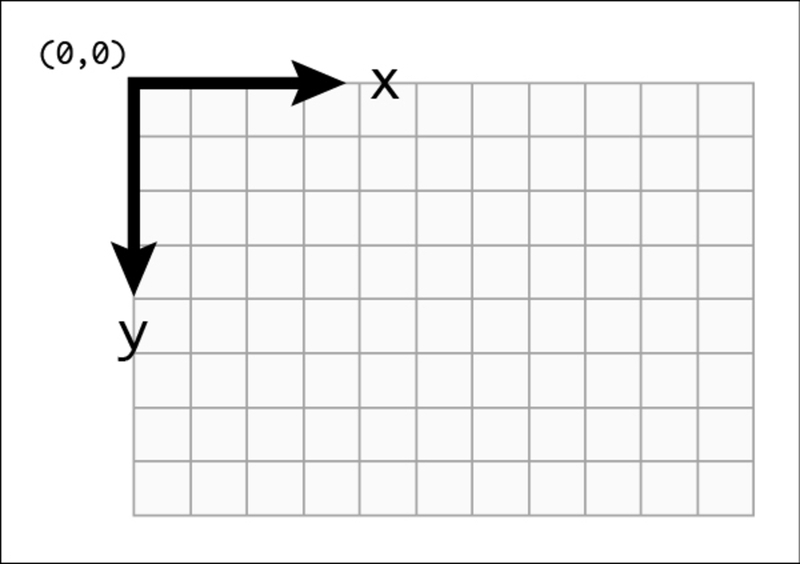
Imagine a Graph

If you’re not used to thinking about your screen as a graph with an X axis and a Y axis, you’ll need to start. You may be used to graphs that start with (0,0) in the lower left hand corner. But Screens put (0,0) in the upper left. So the code from the last section should put the text at the top left corner of the screen.
Ok, but if we run this code, it appears as though nothing happens. That’s because nothing we set up in SetContent get’s displayed until we call Show().
screen.Show()Now if we run the code…still nothing. The program did write ‘Hi!’ to the screen, but it then immediately exited. Depending on your terminal settings, you may be able to scroll up and see the ‘Hi!’, but it doesn’t matter. This is not what we want.
In order to fix this, we’ll use an infinite loop.
    for {

        screen.SetContent(0, 0, 'H', nil, defStyle)
        screen.SetContent(1, 0, 'i', nil, defStyle)
        screen.SetContent(2, 0, '!', nil, defStyle)

        screen.Show()
    }
Now if you run this you’ll see “Hi!” written in your terminal. The loop is keeping our program running so it doesn’t exit. It’s also repeatedly writing “Hi!” to the screen. We can’t tell because it’s just overlapping itself, but “Hi!” is getting written over and over on top of itself. This is important to note for the next section.
Ok, press escape or Ctrl + C to exit.
Go ahead, press it.
You’re not pressing it right.
Oh wait…
The Ability to Rage Quit
One of the most important features of any video game is the ability to get upset at it and then pound on your keyboard until it goes away. We can’t quit our game yet because we need to set up some code that can read user input and react. For now, you can “quit” your program by closing your terminal window and opening a new one.
Tcell makes polling for events straight forward and simple. Make sure to put the following code below what we’ve written so far.
    switch event := s.PollEvent().(type) {
    case *tcell.EventResize:
        s.Sync()
    case *tcell.EventKey:
        if event.Key() == tcell.KeyEscape || event.Key() == tcell.KeyCtrlC {
            screen.Fini()
            os.Exit(0)
        }
    }
We set up a case for any key press event. Within this case, we can set up another case to react to certain keys, or, in this instance, we just use an if statement. Fini() tells our tcell screen to stop and close, and then we can gracefully exit our program. Don’t forget to add os to your imports.
Also noticed we’ve added a case for EventResize that calls the Sync function if the window get’s resized. Sync works similar to Show, however, Show will try to update the screen in “the most efficient way possible”, and Sync takes a more tear-everything-down-and-redraw-it approach. Basically, with Show, you’re not likely to notice it updating, which is why we use it in most cases. But when the screen is resized we need to completely redraw everything.
Movement
Well now we have a program that says “Hi!” until you press escape. For the loneliest among us, that may be enough. But we came here to build a game, so we’ll need some kind of animation. Let’s see if we can get that “Hi!” to travel across the screen. The basic idea here is that, instead of setting a fixed value for our x position, we can set it to a variable. Then, each time through our infinite loop, we can increment that variable. This will cause tcell to redraw “Hi!” at the new position at every iteration, making it appear to move across the screen. I’ve also changed the y coordinates to be 10, just to put “Hi!” in the middle and make it a little easier to see.
    x := 0
    for {

        screen.SetContent(x, 10, 'H', nil, defStyle)
        screen.SetContent(x+1, 10, 'i', nil, defStyle)
        screen.SetContent(x+2, 10, '!', nil, defStyle)

        screen.Show()
        x++

        switch event := screen.PollEvent().(type) {
Run this and you’ll be disappointed to see that we do not have a moving “Hi!”. The problem here is our PollEvent. This function stops and waits for input, which means it’s blocking us from getting to the next iteration of the loop. You can try to resize your window (which will pass the resize event to PollEvent) over and over, and you’ll see the “Hi!” move, but obviously we do not want that.
We can fix this by wrapping our logic in a function and then using a Go routine. This way we can have the “Game” off on its own, running in one loop, and then the main function can sit and wait for event input. Eventually we’ll use a channel to pass information back and forth between the two.
Our function will need its own event loop, since it will spin off to run alongside our main function. Then we can pass it the screen and the defaultStyle:
func Run( screen tcell.Screen, defStyle tcell.Style) {
    x := 0
    for {

        screen.SetContent(x, 10, 'H', nil, defStyle)
        screen.SetContent(x+1, 10, 'i', nil, defStyle)
        screen.SetContent(x+2, 10, '!', nil, defStyle)

        screen.Show()

        x++
    }
}
And then call it in the main:
    go Run(screen, defStyle)

    for {

        switch event := game.Screen.PollEvent().(type) {
        case *tcell.EventResize:
            game.Screen.Sync()
        case *tcell.EventKey:
            if event.Key() == tcell.KeyEscape || event.Key() == tcell.KeyCtrlC {
                game.Screen.Fini()
                os.Exit(0)
            }
        }
    }
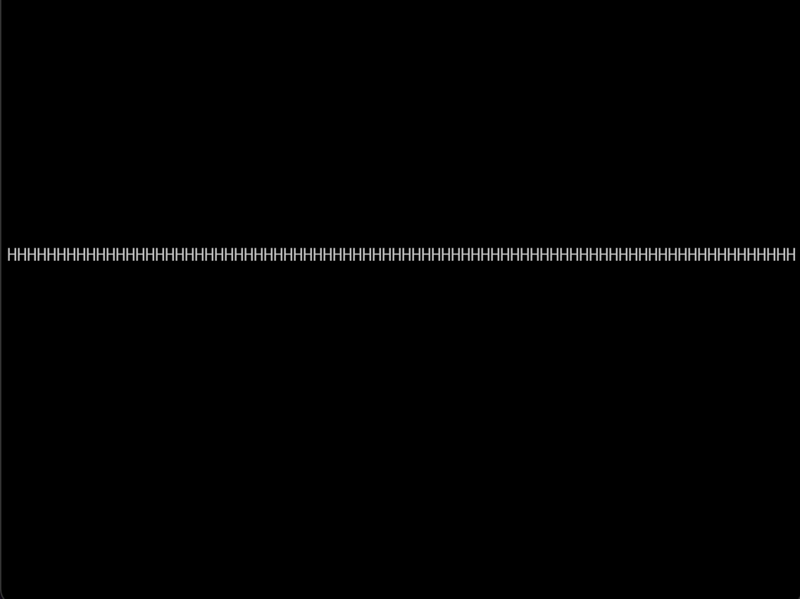
We are so close but if we run this, we’ll just get a bunch of H’s across the middle of our screen.

To fix this we need to understand what’s happening. Each time through the loop we are writing “Hi!” to the screen at a new position. What we are not doing is deleting it from the old position. That’s really all the movement effect is. An object being drawn to a position, then deleted and redrawn to another position right next to the old position. And then this process is repeated over and over again. This is easy to fix, but I wanted to show what happens if we don’t delete the previously drawn character, as this is an important concept to understand.
So what we are missing is the delete from the old position part, which we can add by calling screen.Clear() at the beginning of every iteration.
    for {
          screen.Clear()
          screen.SetContent(x, 10, 'H', nil, defStyle)
That will get rid of all the extra H’s. But if we run this, now we’ll just see a blank screen, which brings us to the other issue: Computers are way to fast for the naked eye. The program did what we wanted it to do, but the “Hi!” flew across the screen before we could even see it. To fix this, we need to add some kind of delay between when we draw to the screen and when we clear it for the next frame of animation. We can easily do that by importing the time package.
So here is our completed function:
func Run(screen tcell.Screen, defStyle tcell.Style) {
    x := 0
    for {
        screen.Clear()
        screen.SetContent(x, 10, 'H', nil, defStyle)
        screen.SetContent(x+1, 10, 'i', nil, defStyle)
        screen.SetContent(x+2, 10, '!', nil, defStyle)

        screen.Show()
        x++

        time.Sleep(40 * time.Millisecond)

    }
}
I chose 40 milliseconds for no other reason than that seemed to look good. I just played around until I liked what I saw.
Success!
A Bouncing Ball
Ok, so we took a long time to get here, but a lot of these concepts, the screen is a graph, clearing and redrawing during an event loop, and reacting to input, will be used over and over as we develop the game from here.
Now we can start thinking about our code in terms of a game of Pong. We can start to break the game down into objects that we can set up via structs. For now, we can think of the game as three parts.
The Game will be the wrapper for all the game objects. In this article we will only add the game world (screen) and the ball, but it will eventually hold the score, the player info, the game state etc.
The Ball bounces around. It needs to hold the X and Y value of the ball and it needs to define some behavior for the ball. What happens when it reaches the edge of the screen? What should it look like?
The Main Function is where we will bring everything together and actually run our game. It’s where we will listen for events and react to them.
I decided to break these out into three different files, game.go ,ball.go, and main.go.
The Game
Start by creating a Game struct. For now, all it needs is a screen. We could also think about this as the game world, but since we’ve been calling it a screen up until this point, we’ll stick with screen.
type Game struct {
    Screen tcell.Screen
}
Then, we are going to create a function to run our game. We’ll move everything from our previous Run function in here. I’ve also moved the defStyle in here.
func (g *Game) Run() {

    defStyle := tcell.StyleDefault.Background(tcell.ColorDefault).Foreground(tcell.ColorDefault)
    g.screen.SetStyle(defStyle)

    x := 0
    for {
        g.screen.Clear()
        g.screen.SetContent(x, 10, 'H', nil, defStyle)
        g.screen.SetContent(x+1, 10, 'i', nil, defStyle)
        g.screen.SetContent(x+2, 10, '!', nil, defStyle)

        g.screen.Show()
        x++

        time.Sleep(40 * time.Millisecond)

    }

}
Now, in our main function, we can update it to look like this:
func main() {

    screen, err := tcell.NewScreen()

    if err != nil {
        log.Fatalf("%+v", err)
    }

    if err := screen.Init(); err != nil {
        log.Fatalf("%+v", err)
    }

    game := Game{
        screen: screen,
    }

    go game.Run()

    for {
        switch event := screen.PollEvent().(type) {
        case *tcell.EventResize:
            game.Screen.Sync()
        case *tcell.EventKey:
            if event.Key() == tcell.KeyEscape || event.Key() == tcell.KeyCtrlC {
                screen.Fini()
                os.Exit(0)
            }
        }
    }

}
This should run exactly as it did before. All we’ve done is plan ahead a little and refactor.
The Ball
Create a ball:
type Ball struct {
    X      int
    Y      int
}
And then we’ll need a function to display our ball. In this case I’m using the unicode for a white dot that kind of looks like the ball from pong.
func (b *Ball) Display() string {
    return "\u25CF"
}
Moving the Ball
Before, we were causing our “Hi!” to move across the screen by adding to its X coordinate over and over in our loop. We want this behavior to be part of our ball. We also want to give it the ability to move along the Y axis as well. So we need a variable that we can increment by over and over. We can call this the balls “Speed”. First, add variables for both Xspeed and Yspeed.
type Ball struct {
    X      int
    Y      int
    Xspeed int
    Yspeed int
}
Then, add a function that updates the ball’s position:
func (b *Ball) Update() {
    b.X += b.Xspeed
    b.Y += b.Yspeed
}
Now we can make a quick trip over to our game to add a Ball to the struct:
type Game struct {
    Screen tcell.Screen
    Ball   Ball
}
And then in our main function:
    ball := Ball{
        X:      1,
        Y:      1,
        Xspeed: 1,
        Yspeed: 1,
    }

     game := Game{
        Screen: screen,
        Ball:   ball,
     }
Lastly, we can update the for loop in our Run function to use the ball:
    for {

        g.screen.Clear()

        g.Ball.Update()

        g.screen.SetContent(g.Ball.X, g.Ball.Y, g.Ball.Display(), nil, defStyle)

        time.Sleep(40 * time.Millisecond)
        g.screen.Show()
    }
Run this and you’ll see the ball flying across the screen at an angle! Until it reaches the edge and vanishes forever.
The reason we lose the ball is, when we update the X and Y of the Ball, we just keeping adding to it. The ball doesn’t know it’s reached the edge of the screen, it just keeps going. We need to add logic to our ball so that it will “bounce” whenever it reaches the edge of the terminal window.
We can tell if the ball has reached an edge when its position is either less than zero, or more than the maxHeight or maxWidth of the window. When its position is greater than the max, we want to start subtracting, to send it back in the other direction. When the position is less than zero, we want to start adding to it again. Tcell can provide us with the max width and height of the terminal window, so we can write a function like this:
func (b *Ball) CheckEdges(maxWidth int, maxHeight int) {
    if b.X <= 0 || b.X >= maxWidth {
        b.Xspeed *= -1
    }

    if b.Y <= 0 || b.Y >= maxHeight {
        b.Yspeed *= -1
    }
}
A quick way to switch between adding and subtracting is to change the speed variable from positive to negative.
With this in place we can call this function in Run.
// inside the for loop in the Run function
    width, height := screen.Size()
    g.Ball.CheckEdges(width, height)
And that should be it. We finally have our bouncing ball. Feel free to replace the ball with the DVD logo. Or, you can wait until our next post when we’ll add paddles, a score, players and try to get this thing looking like a game. Here is the code for part one if you want to play around with it.
Earthly Lunar: Monitoring for your SDLC
Achieve Engineering Excellence with universal SDLC monitoring that works with every tech stack, microservice, and CI pipeline.


