How to get started with PyMongo

Table of Contents
In this article, you will learn about MongoDB and how to use it with Python. Specifically, you will learn how to set up a remote MongoDB database using a tool called Atlas and how to connect with that database using PyMongo, the official MongoDB driver for Python. The article explains the MongoDB document model and how to perform CRUD operations on the database. Finally, the article also discusses relationships using document embeddings and foreign keys.
What Is MongoDB?
MongoDB is a NoSQL document-oriented database that is extremely fast and easy to use. It stores data in JSON-like documents called BSON. MongoDB provides a full suite of developer-friendly tools such as MongoDB Compass, MongoDB Shell, and many more. It is highly scalable and performant and can be used for hobby projects as well as enterprise-grade projects.
The main features of MongoDB are
- High Performance: Since MongoDB is a NoSQL database, data operations are quick and simple. Data can be quickly stored, manipulated, and retrieved while maintaining data integrity.
- Scalability: MongoDB’s scalability allows it to handle increasing volumes of data. When data increases in size, MongoDB uses sharding to scale it horizontally across numerous servers.
- Availability: MongoDB creates several copies of the same data and distributes them across multiple servers, making data highly available. When one server fails, data can be recovered from another server immediately.
- Flexibility: Because of the document-oriented structure, the MongoDB schema is highly flexible, and various types of data can be easily stored and manipulated.
MongoDB Cluster
MongoDB Cluster is an abstraction on top of a database. These clusters refer to two different architectures:
- Replica Sets: A MongoDB replica set is a collection of one or more servers containing an exact copy of the data. A primary node handles read and write operations for your application, while the secondary nodes hold the copy of the data.
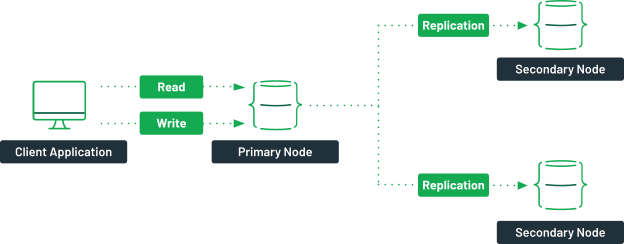
If the primary node somehow becomes faulty, an election process will be used to select a new primary node. When the defective server becomes healthy, it syncs with the primary node and starts serving as a secondary node. This minimizes downtime and provides higher availability to your application. 2. Sharded Cluster: A sharded cluster distributes your data over multiple replica sets to scale it horizontally. When a read or write operation is done on a collection, the client sends a request to the router. The router will then utilize the configuration server to determine which shard the data is stored on. The requests are then sent to the relevant cluster.
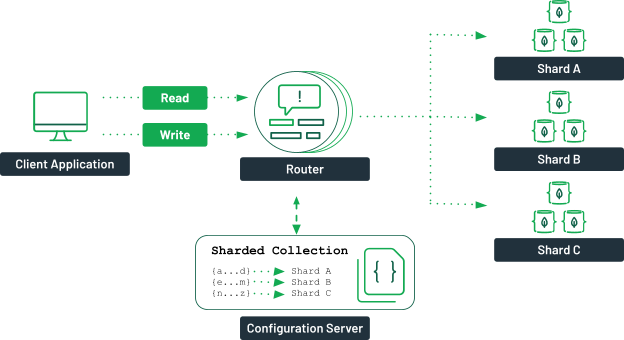
Each shard has its own set of replicas. You should have more than one configuration server or router to ensure high availability.
MongoDB Document Model
As you have guessed by now, MongoDB is different from a traditional database such as MySQL. Unlike RDBMS which stores data in a structured form like a table, MongoDB stores unstructured data in a JSON-like format. This JSON-like format is known as BSON (Binary JavaScript Object Notation). You can learn more about BSON and the types it can store.
MongoDB contains databases. A database is made up of collections, and a collection is made up of documents. The documents store all of your data and records. If you relate it to a SQL database, the collections are like tables and the documents are like the rows in those tables.
A typical MongoDB document looks like the below:
{
    name: "Ashutosh Krishna",
    roll_no: 1,
    subjects: ["English", "Maths"],
    creation_date: Date()
}
The below image depicts what a MongoDB document model looks like: 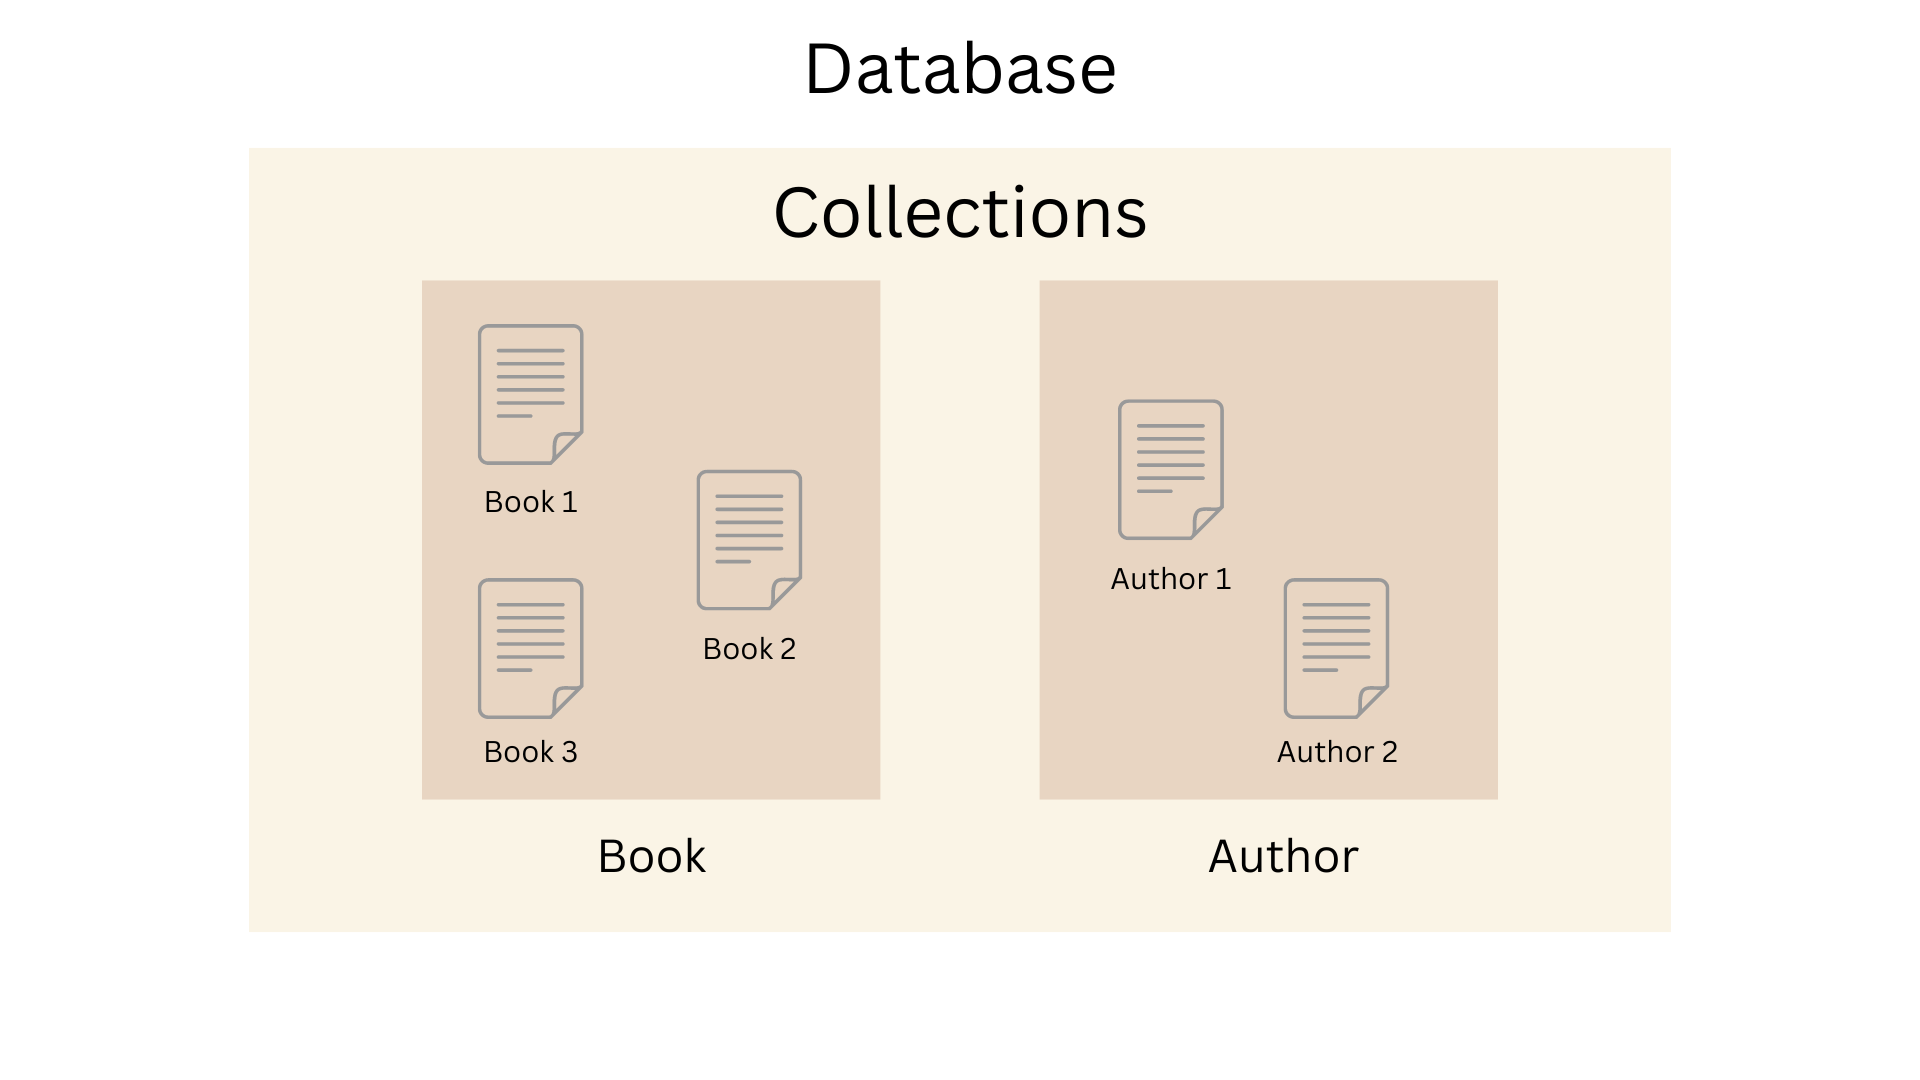
For example, if you’re building a library database, you can create your collections for a Book and an Author. Within these collections, you’ll store the data in documents. Thus, in the above illustration, Book 1, Book 2, and Book 3 are the documents stored in your Book collection, and Author 1 and Author 2 are the documents stored in your Author collection.
Setting Up MongoDB Atlas
Now that you have a basic knowledge of MongoDB, you can follow along and create your first MongoDB database. MongoDB is free to use with a basic configuration and can be hosted in the cloud or locally.
In this section, you will set up a remote database hosted on a fully-managed cloud database called MongoDB Atlas.
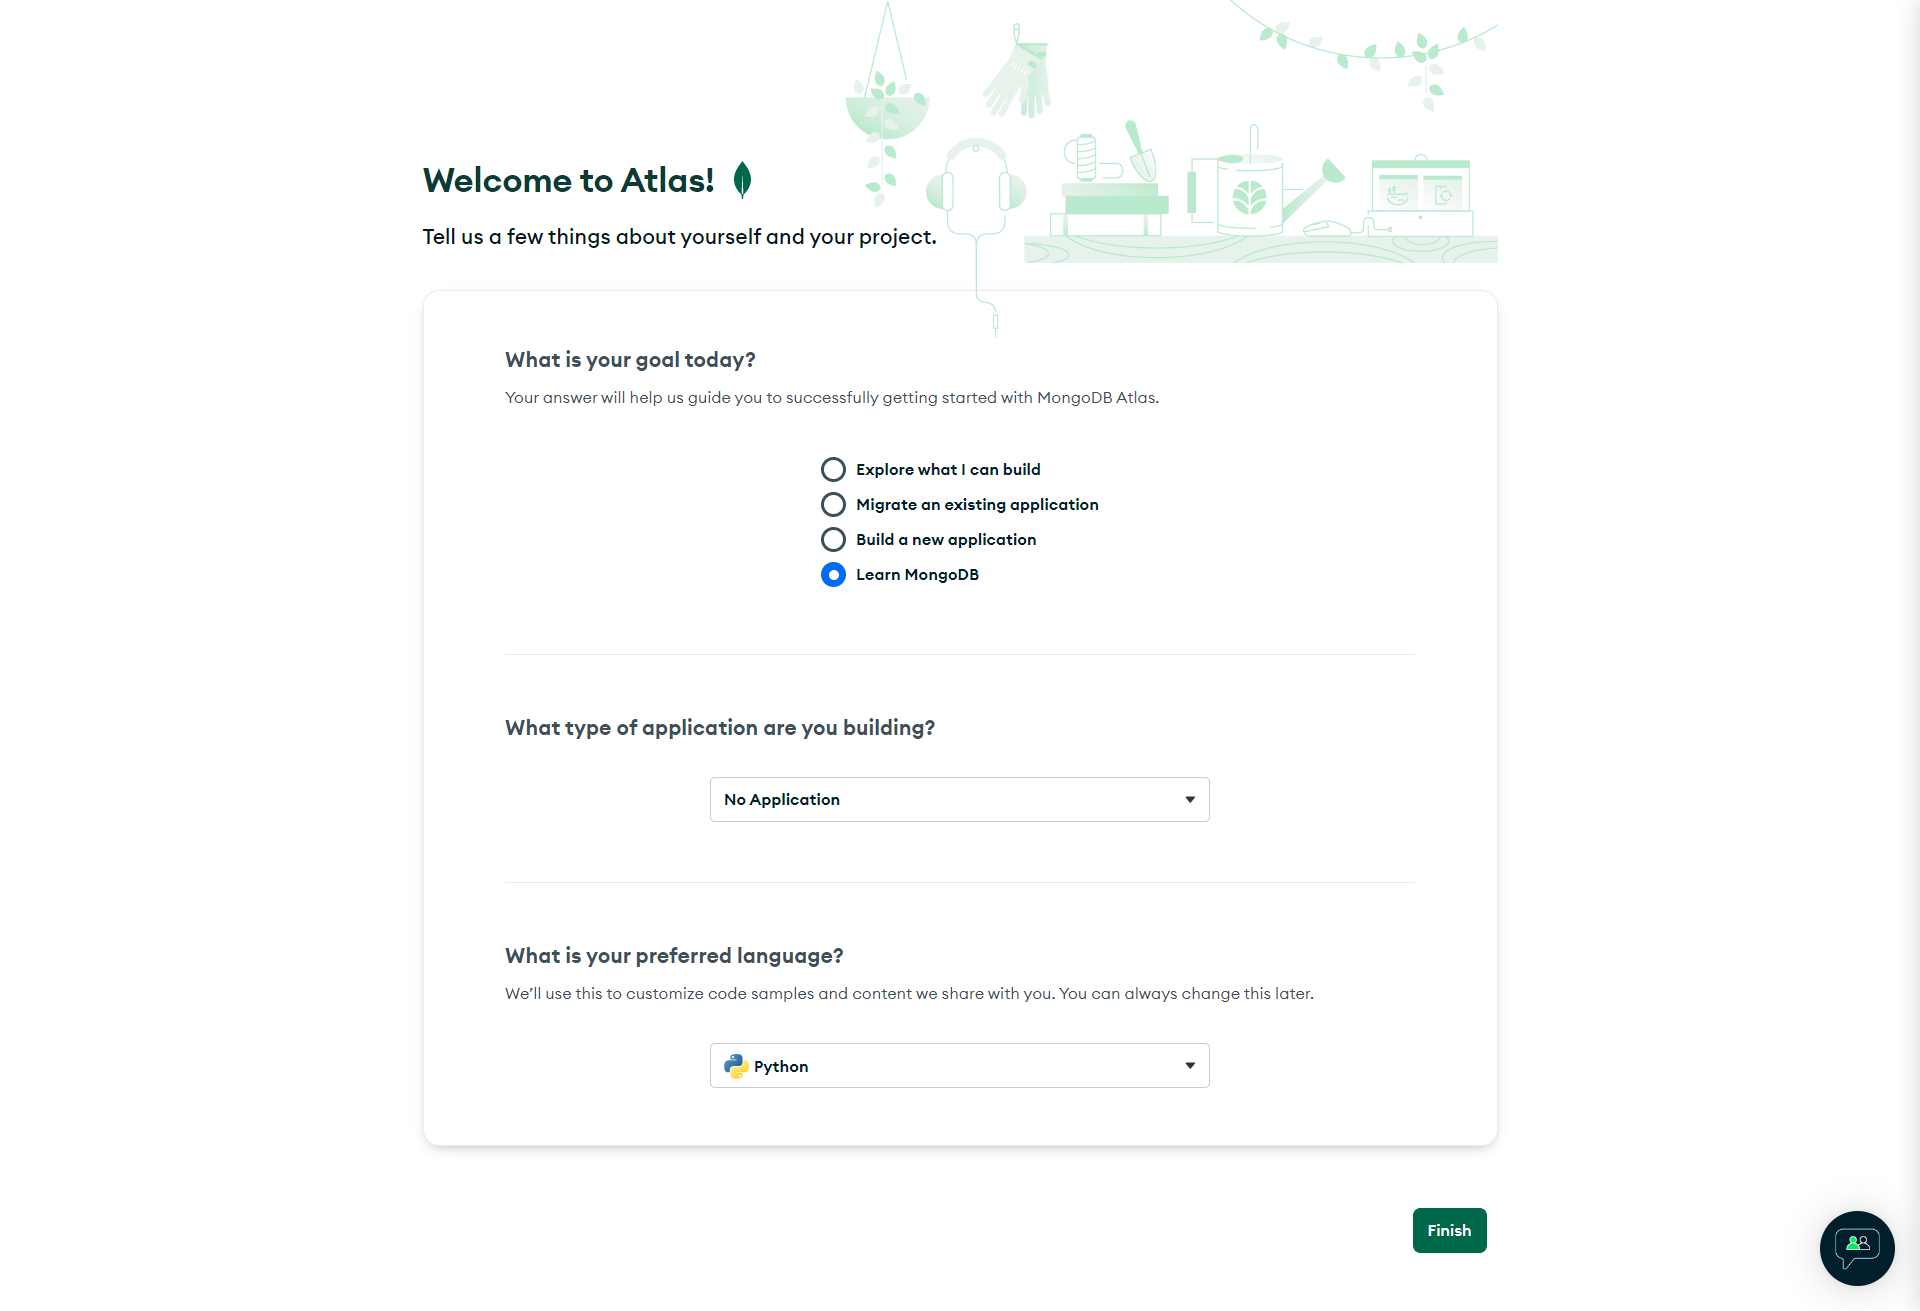
To get started, you need to sign in or click on Try Free on this website. Once you sign up for a free account, fill in the required additional information about yourself and your project and click on Finish:
Next, select the Free plan for the time being, and later you can change it as per your requirement. Once you select the plan, you need to create a shared cluster as below:
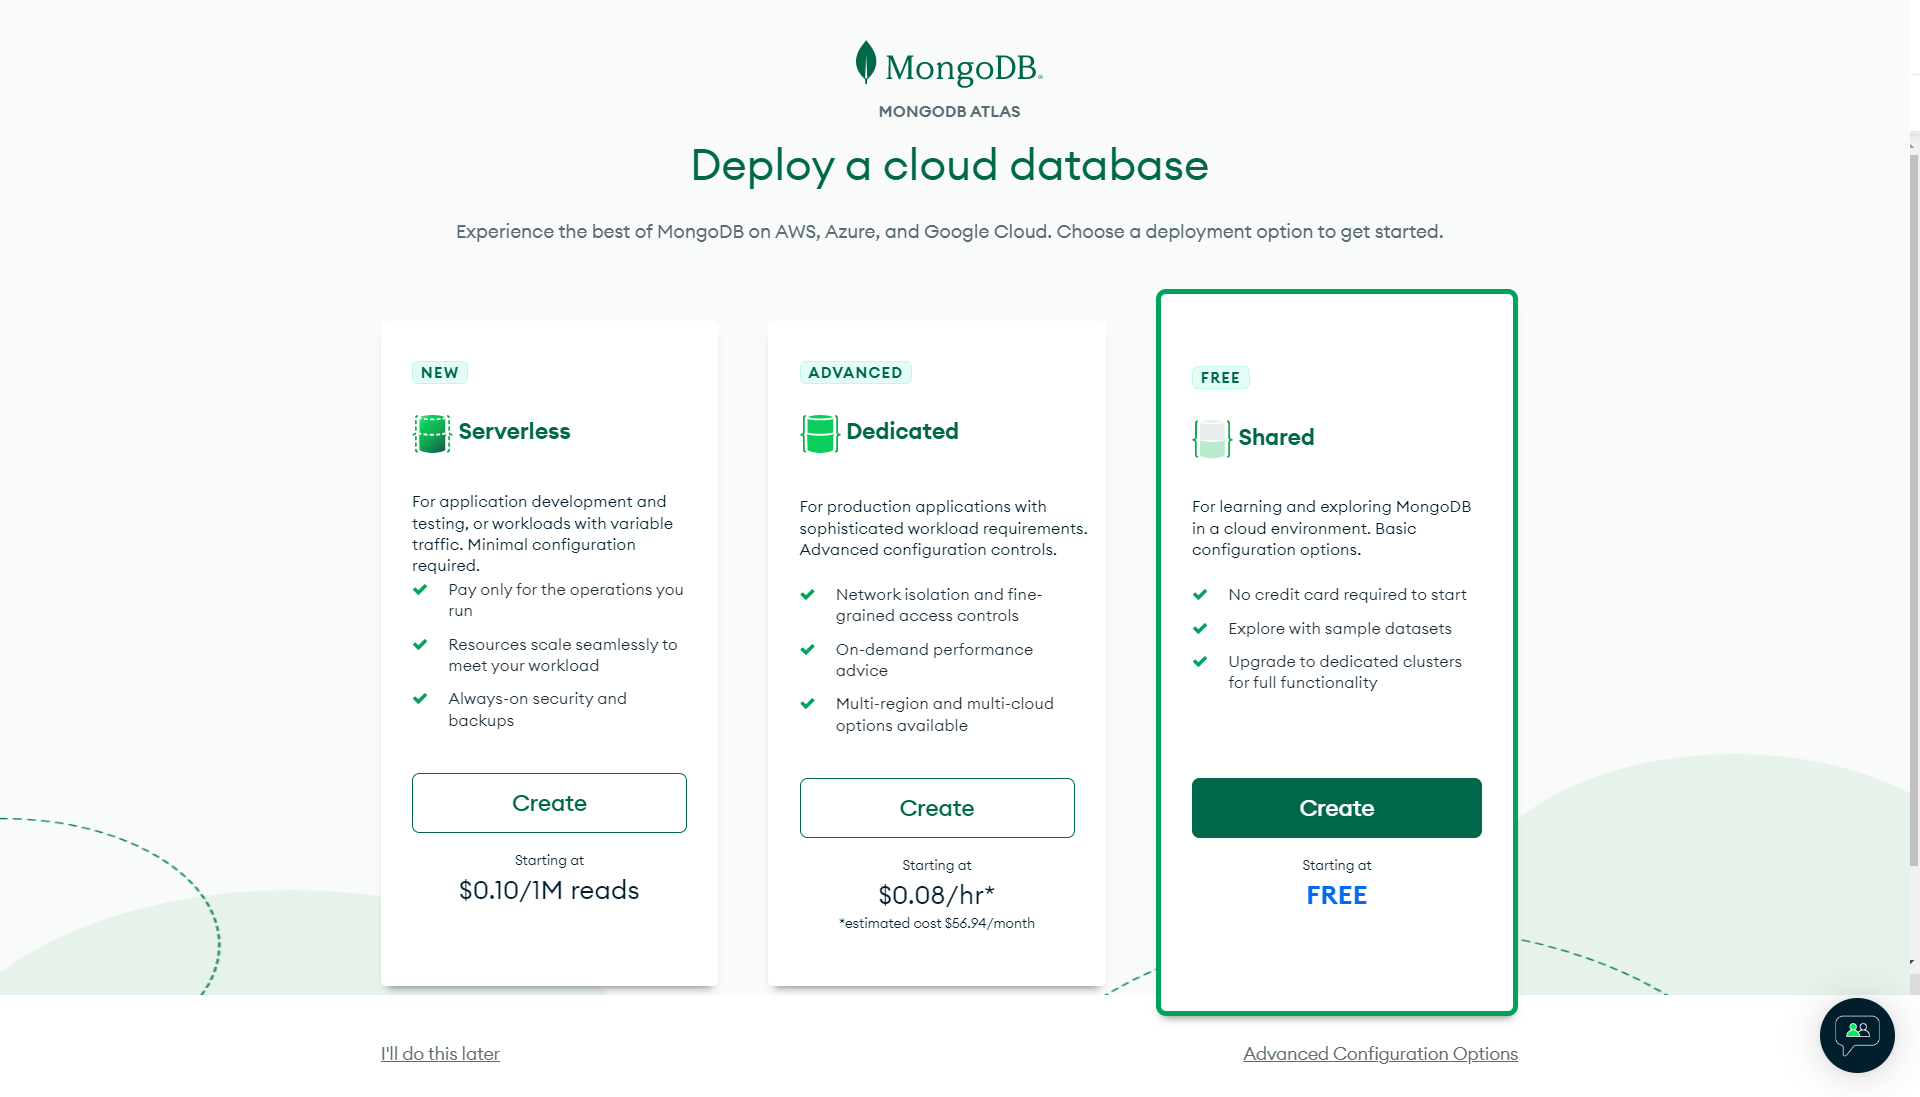
Create a free shared cluster on the next page as below:
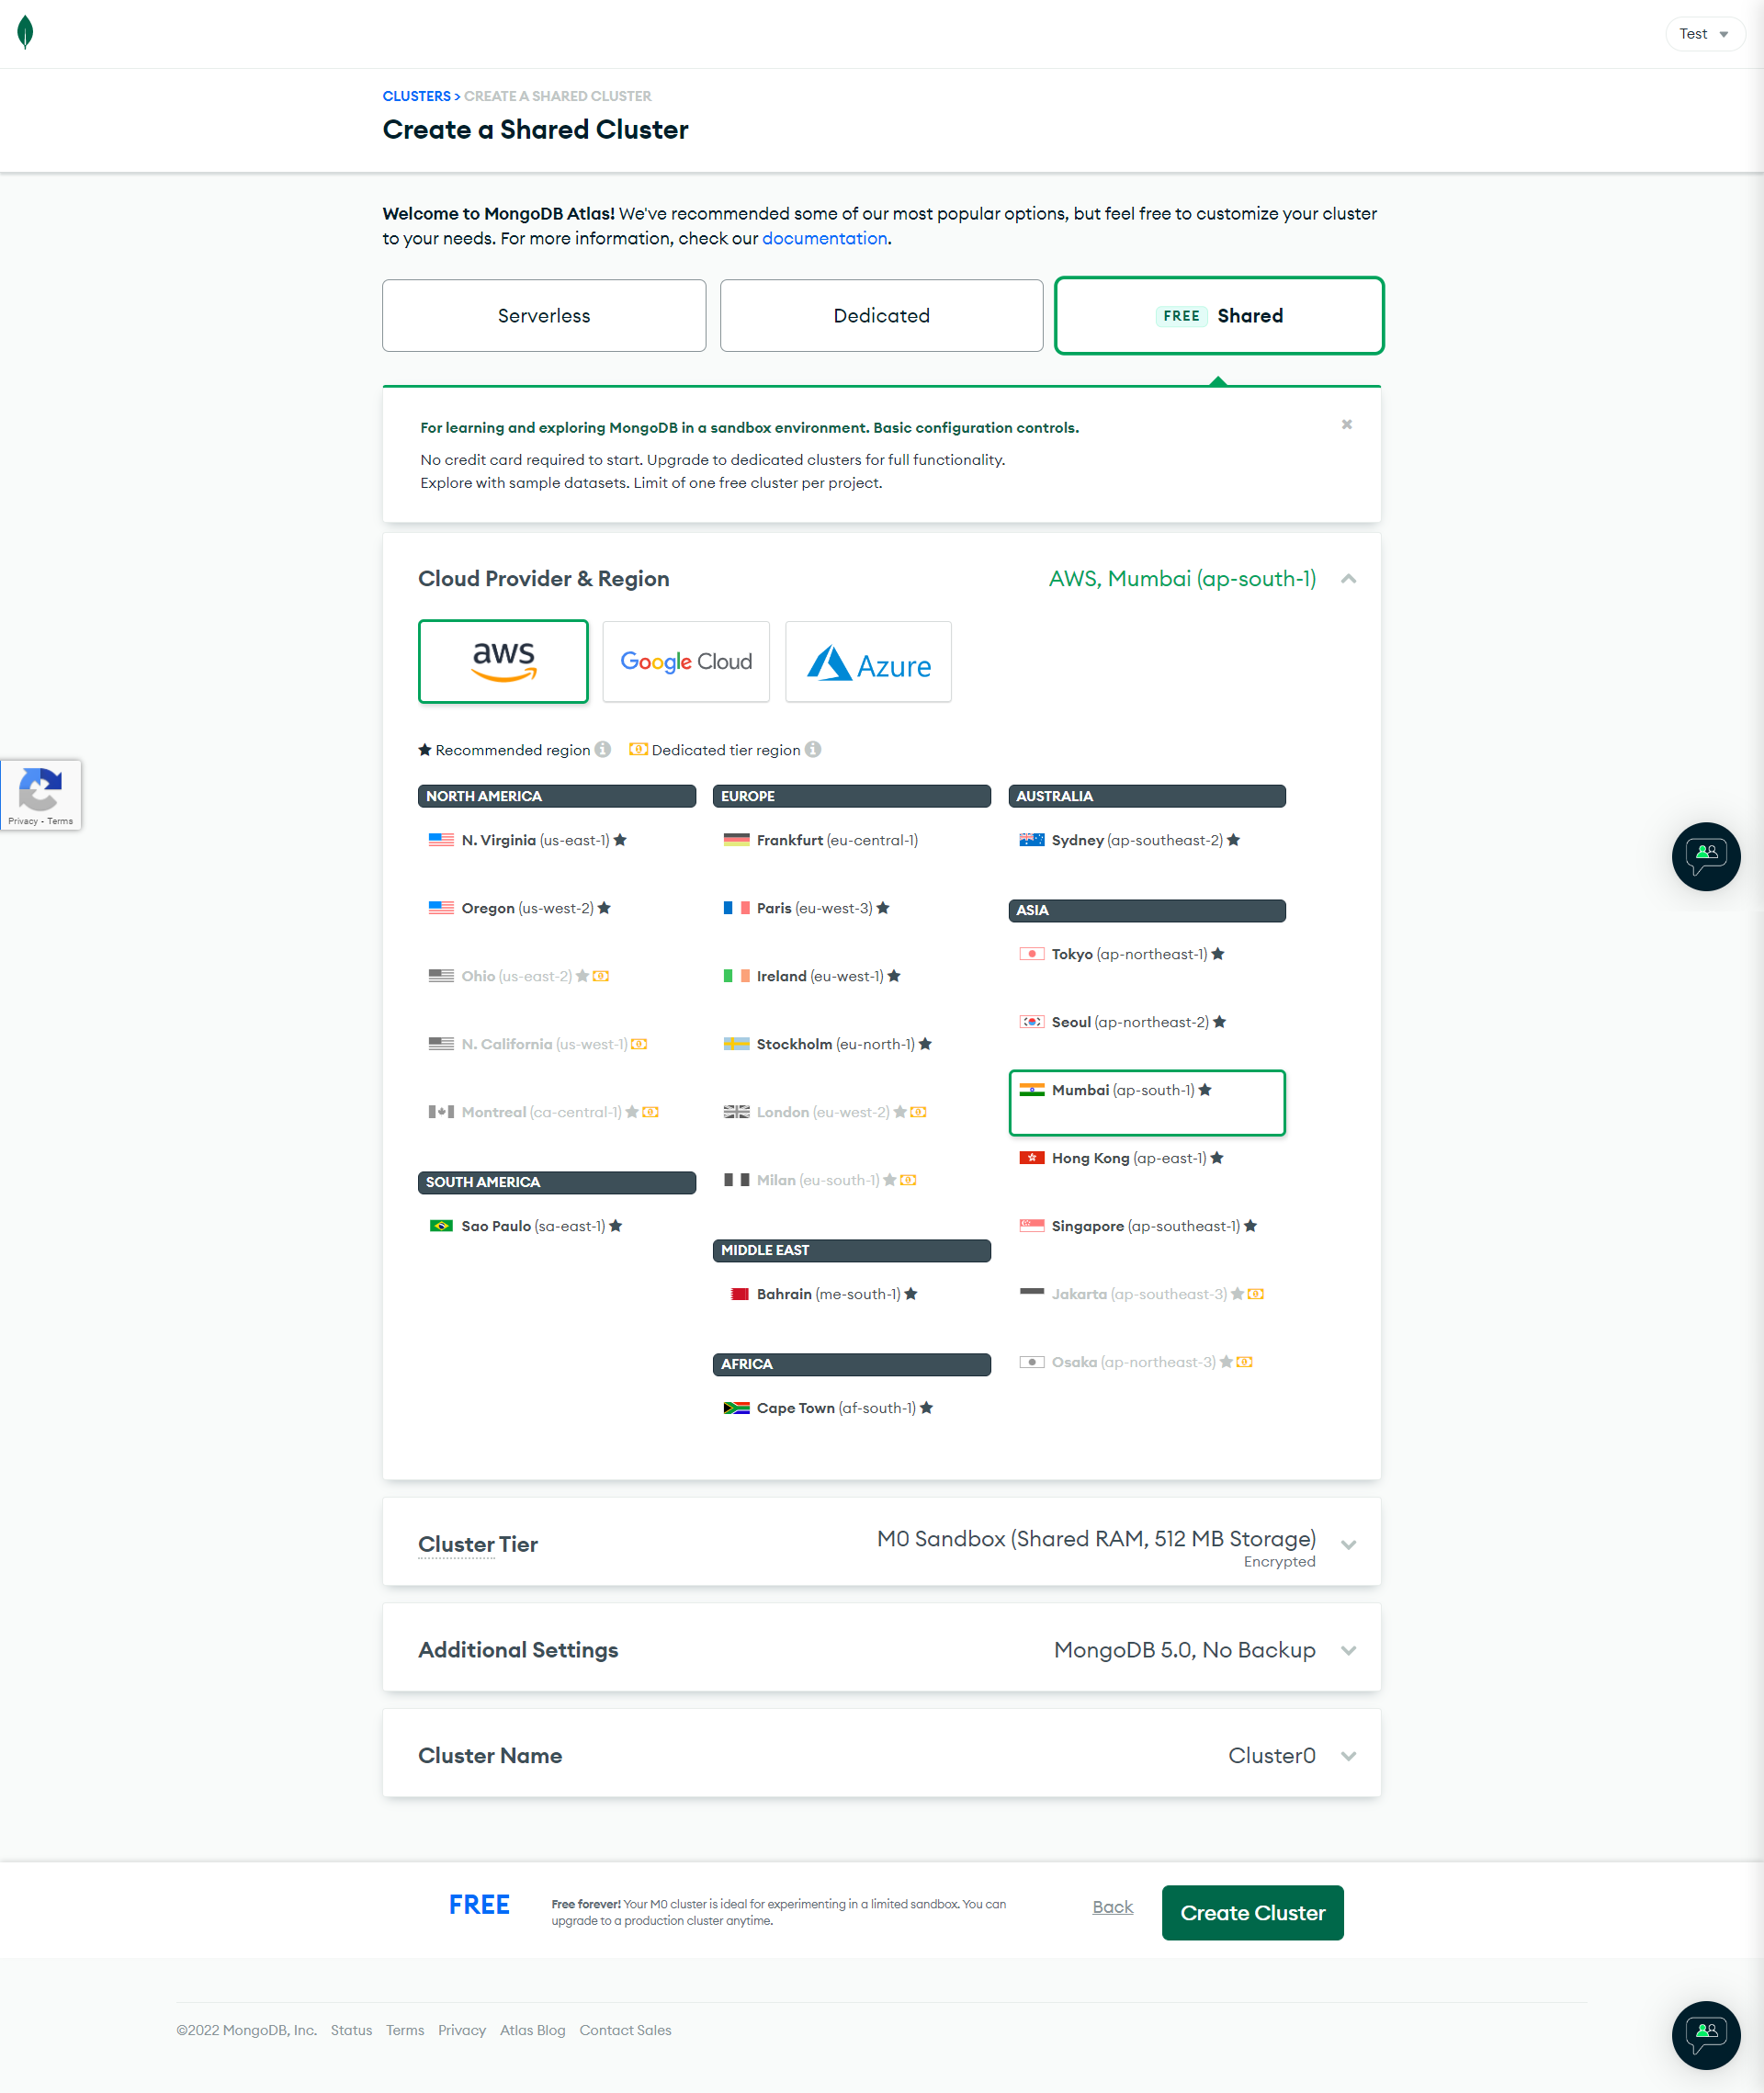
The choice of cloud provider and location affects network latency for clients accessing your database deployment and the cost of running the database deployment. For clusters, this choice also impacts the configuration options for the available cluster tiers. For now, just proceed with AWS as the cloud provider. Select the region that is closest to you, but make sure you don’t select any region with the little money symbol beside it. You don’t need to change a lot to be in the free tier, so just click on Create Cluster.In the next step, you will need to set up a username and password to access and connect to your database.
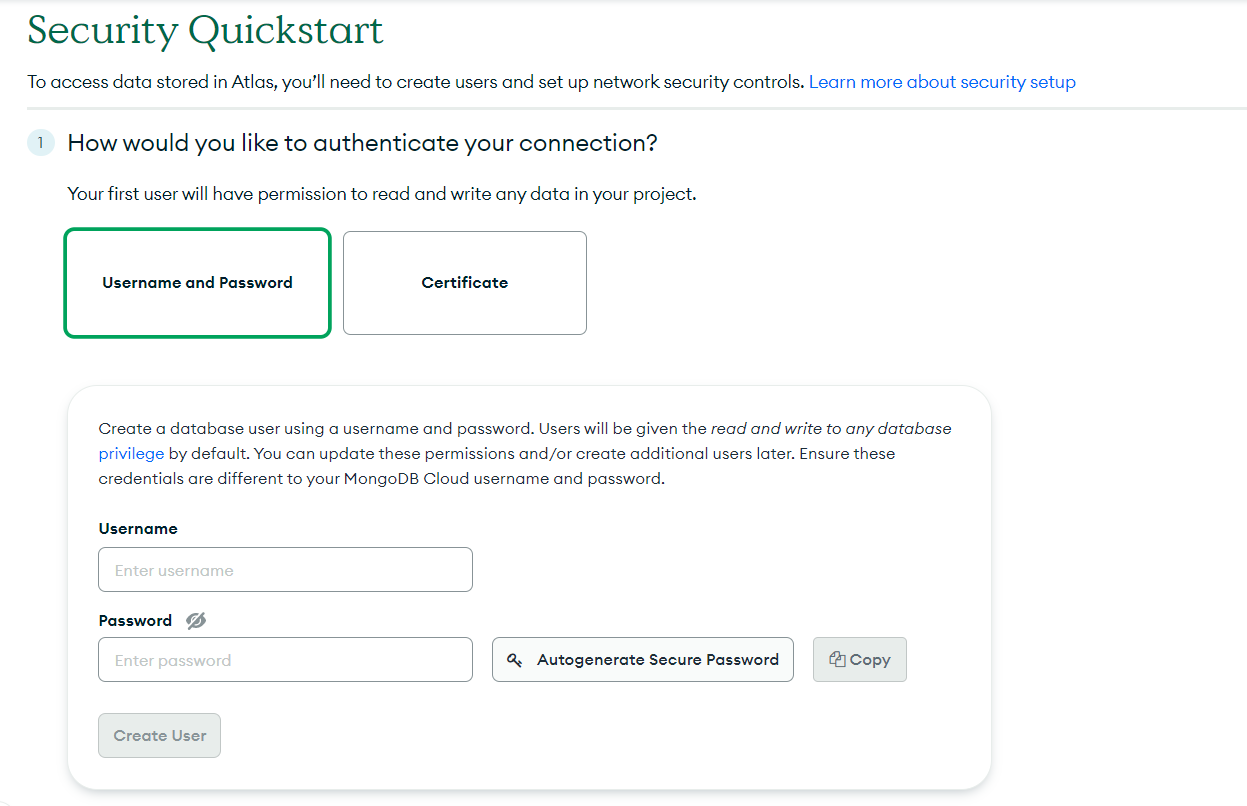
Just enter your username and password and click on Create User to create the user.You will also need to mention where you want to access the database from.
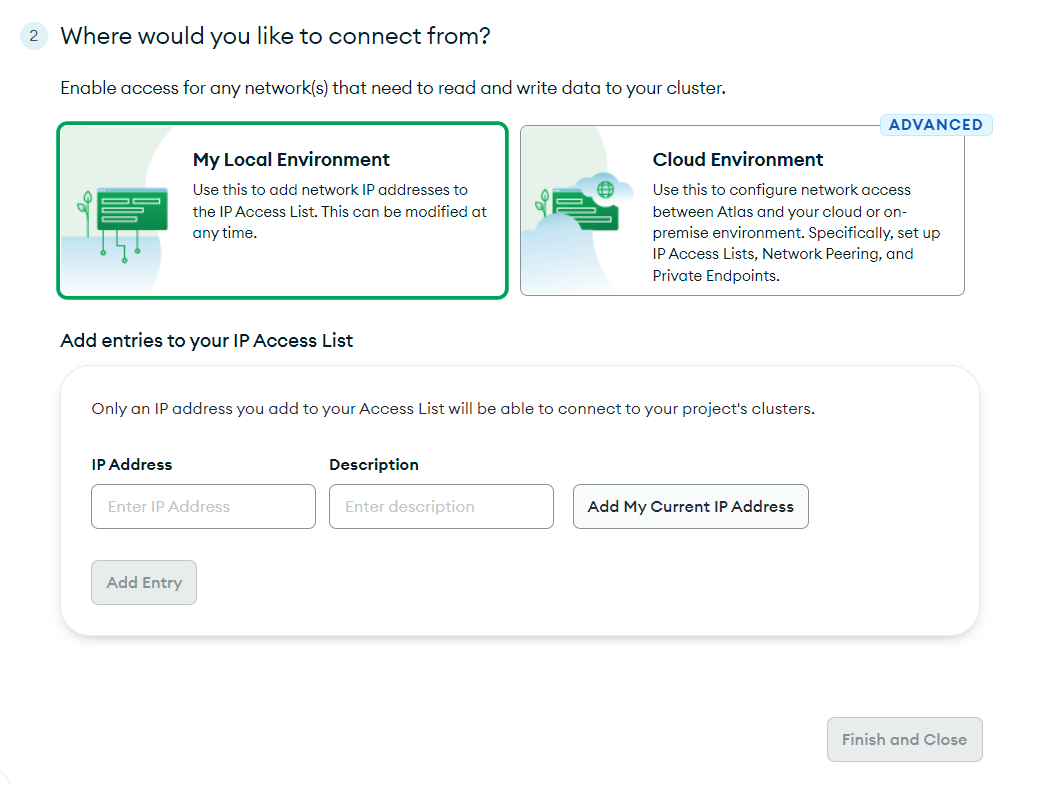
Since you’re going to connect locally, for now, you can go ahead with My Local Environment and click on Add My Current IP Address. However, if you’re going to configure network access between Atlas and your cloud or on-premise environment, you need to select Cloud Environment. Click on Finish and Close to finally complete the setup process.
Once the setup is complete, you will be redirected to a page where you can see your clusters. Note that it might take some time to build your cluster. Once built, it looks like the below: 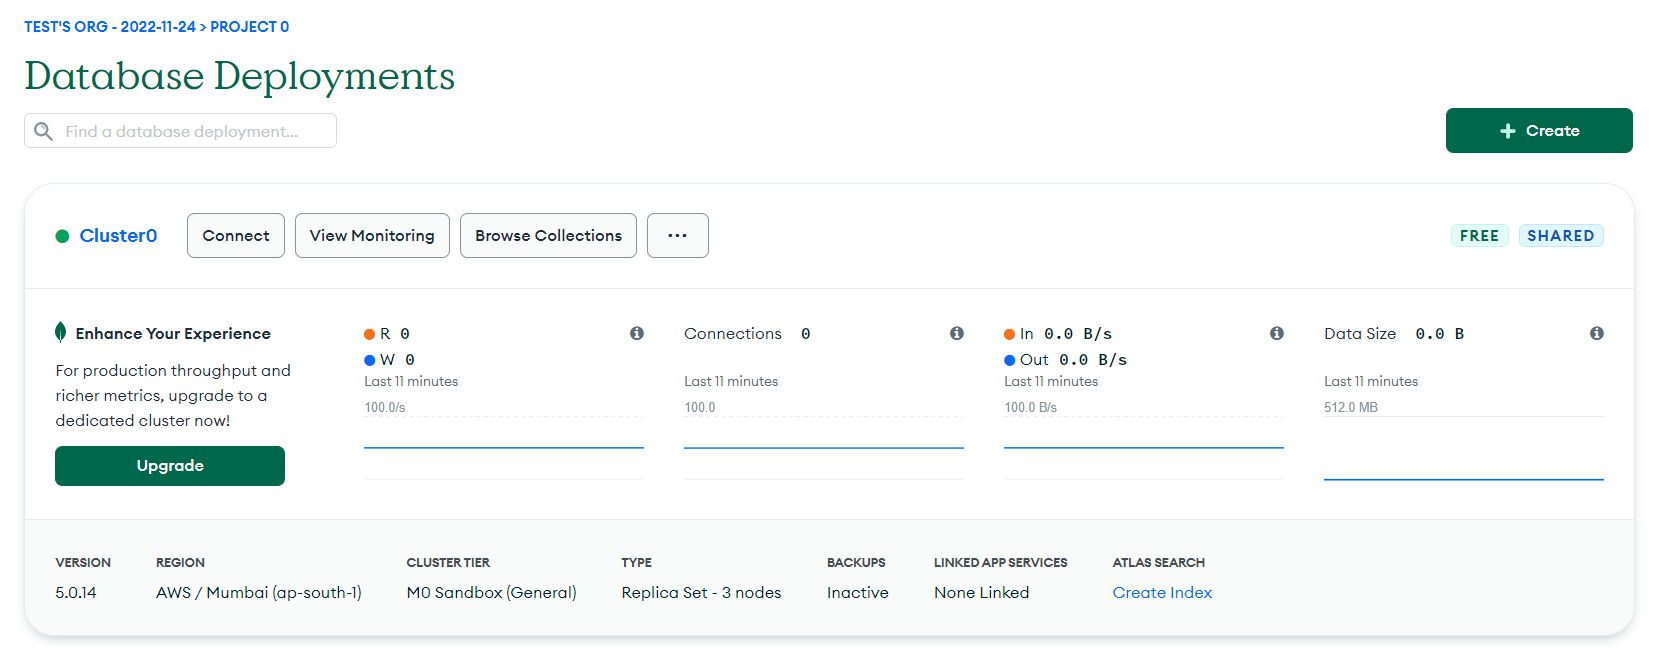
Now that you are aware of MongoDB Clusters, you can see that the type of cluster is Replica Set with three nodes.
Setting Up PyMongo
Now that you have created a MongoDB cluster, you’re ready to connect with the cluster locally using PyMongo. Click on the Connect button, which will give you the below options to select: 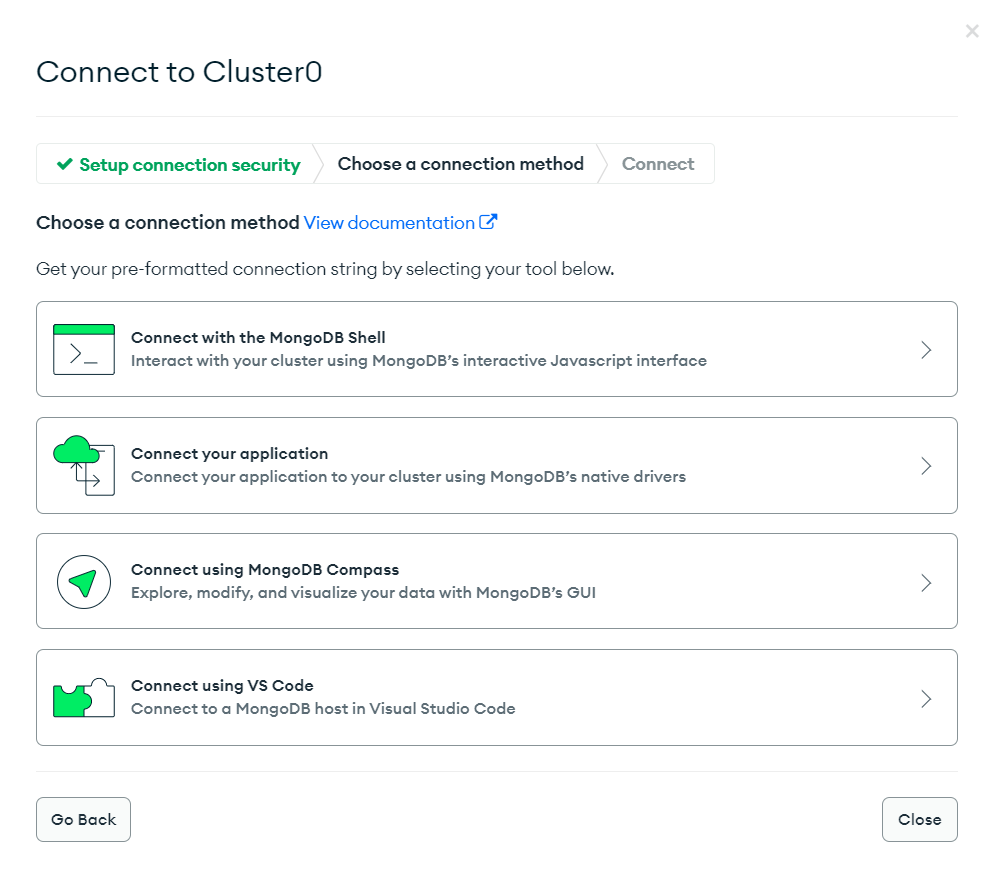
You have different options to connect to your cluster using tools like MongoDB Shell and MongoDB Compass. You also get an option to connect directly using a VS Code extension. But, for now, you will use the Connect your application option to set up PyMongo.
Next, choose the appropriate connection method. Since it’s a Python tutorial, choose Python as the driver and the Python version as per your local system, and then copy the connection string. 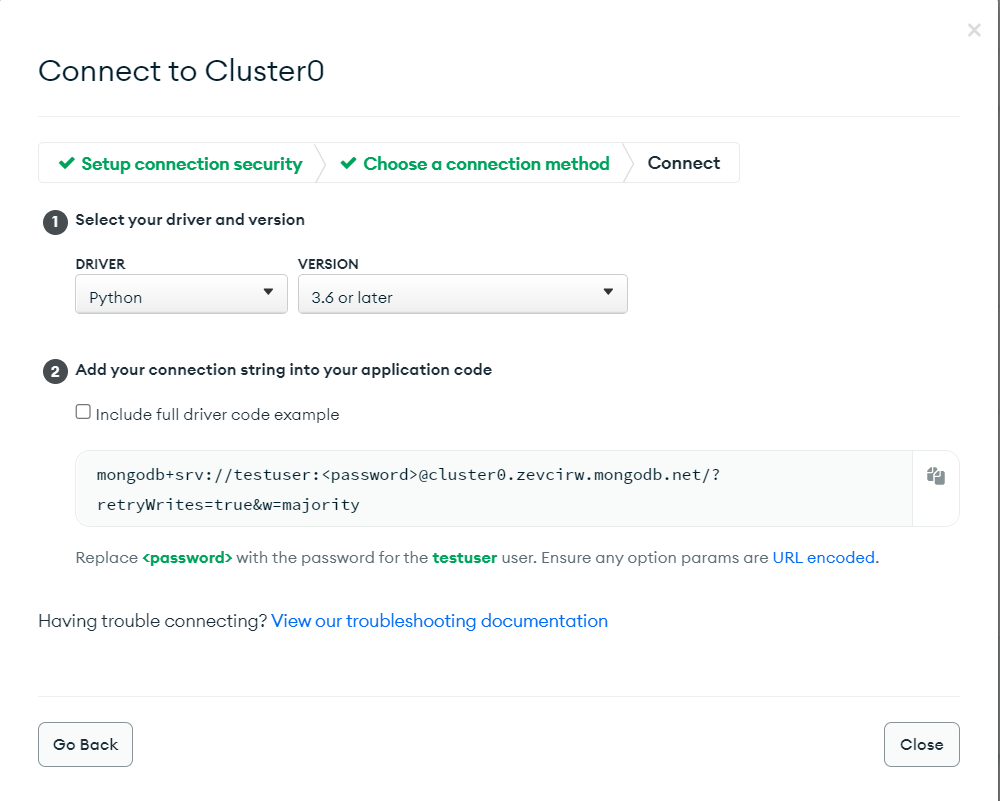
The connection string includes your username and the password for that user.
Now, open your favorite code editor (VS Code is used here). The first thing you’re going to require is a Python library called PyMongo. PyMongo is a MongoDB driver containing tools for interacting with MongoDB databases. You can install the library using the pip command:
pip install pymongoYou will be storing the MongoDB credentials in a .env file. To make accessing it easier, you’re going to install one more library called python-decouple which lets you use environment variables from the .env file.
pip install python-decoupleNow create a .env file to store your credentials such as username and password. The .env file will have the following contents:
MONGODB_USERNAME="mongouser"
MONGODB_PASSWORD="mongopassword"
Make sure you change the values of the variables with your correct values. Now, create a Python file (say, main.py) in the same directory as the .env file. To use the environment variables stored in your .env file, you’ll need to use the config object from the python-decouple library as below:
from decouple import config

# Fetching environment variables
USERNAME = config('MONGODB_USERNAME')
PASSWORD = config('MONGODB_PASSWORD')

connection_string = f"mongodb+srv://{USERNAME}:\
{PASSWORD}@cluster0.zevcirw.mongodb.net/?retryWrites=true&w=majority"
If you try to print the connection_string variable, you will see the username and password being populated correctly. Now that you have the connection_string, you are ready to create your connection and first MongoDB client.
To create the client, import the MongoClient class from the pymongo library. The MongoClient class takes the connection_string as a parameter.
from decouple import config
from pymongo import MongoClient

# Fetching environment variables
USERNAME = config('MONGODB_USERNAME')
PASSWORD = config('MONGODB_PASSWORD')

connection_string = f"mongodb+srv://{USERNAME}:\
{PASSWORD}@cluster0.zevcirw.mongodb.net/?retryWrites=true&w=majority"

# Creating a connection to MongoDB
client = MongoClient(connection_string)
If you run the above script and don’t see any error on the console, you’re good to go. However, if you see any error, make sure you have followed each step correctly.
Listing Databases and Collections
Now that you have PyMongo set up on your local system, let’s perform some common steps to list databases and collections.
To list all the databases in a cluster, you can use the following syntax:
databases = client.list_database_names()
print(databases)
The MongoClient class contains a method called list_database_names() to get the list of all the database names in a cluster. If you run the above script, you will get the following output:
['admin', 'local']Since you haven’t created any database of your own until now, the above two are the default databases you get with a cluster.
Next, if you want to list all the collections in a database, MongoClient provides you with an easy method called list_collection_names() too. But, this method can only be called upon by a database. Hence you need to access a database first, and call the method afterward as shown below:
 # accessing the database called 'local'
local_db = client.local
# accessing the collections in the 'local' database
local_db_collections = local_db.list_collection_names()
print(local_db_collections)
To create a database, you just have to use the below script:
library_db = client.library_dbNext, if you want to create a collection inside a database, you can use the following string:
book_collection = library_db.booksHowever, the database and the collection are not created until you add some content to them. So, even if you run the above code, you won’t see any change in your cluster. You can verify the same in your Cluster or using the list_database_names() method.
databases = client.list_database_names()
print(databases)
Output:
['admin', 'local']Performing CRUD Operations Using PyMongo
Inserting Documents
Now that you’ve created a fresh database and a new collection, let’s fill it with data.
Inserting a Single Document
Because this is a library database, let’s use the insert_one() method to insert some book data. The method inserts one document at a time and returns an object of the class ‘InsertOneResult’. You can retrieve the unique _id of the newly created record using the inserted_id attribute.
# Inserting a new document
book_data = {
    "author": "Chinua Achebe",
    "country": "Nigeria",
    "imageLink": "images/things-fall-apart.jpg",
    "language": "English",
    "link": "https://en.wikipedia.org/wiki/Things_Fall_Apart\n",
    "pages": 209,
    "title": "Things Fall Apart",
    "year": 1958
}

book = book_collection.insert_one(book_data)
print(book.inserted_id)
Output:
6383b4be86cae589aefcd1b6If you go to your MongoDB Cluster, you will see your newly created database and collection populated with the above data. 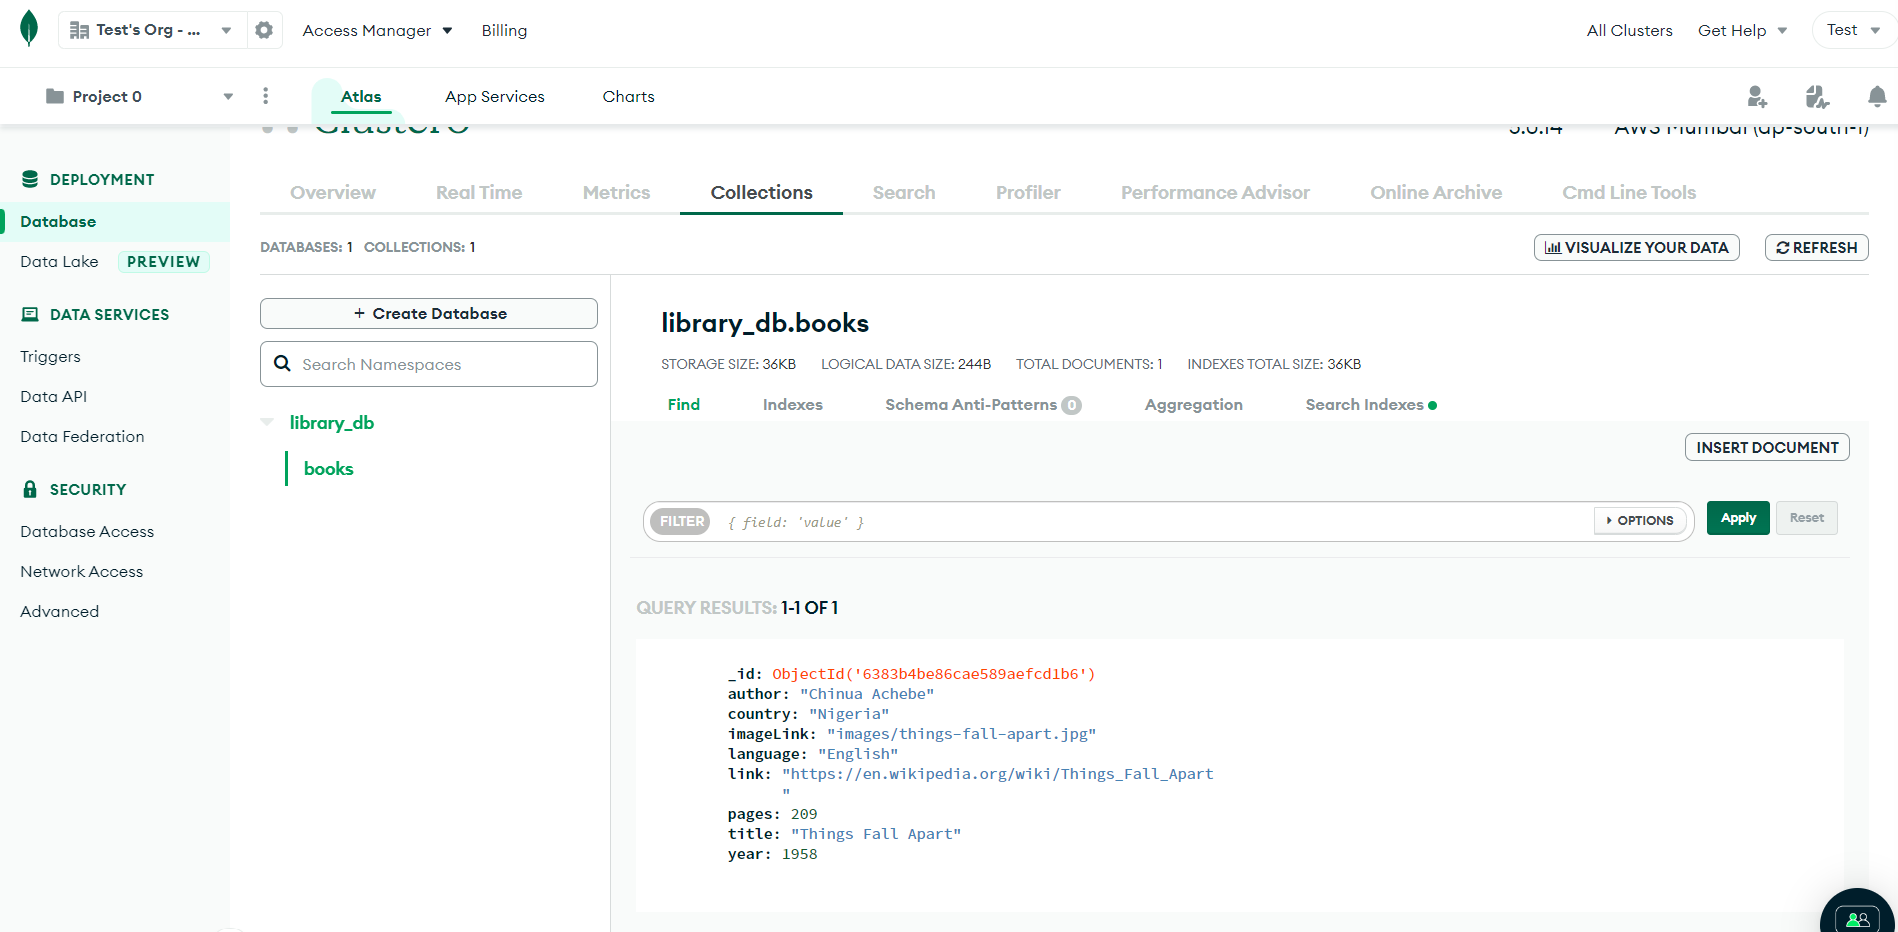
Inserting a Multiple Documents
If you want to insert more than one document at a time, PyMongo has another method named insert_many(). The method accepts an iterable as an argument and returns an object of the ‘InsertManyResult’ class. You can then retrieve the unique ids of the inserted records.
books_data = [
    {
        "author": "Hans Christian Andersen",
        "country": "Denmark",
        "imageLink": "images/fairy-tales.jpg",
        "language": "Danish",
        "link": "https://en.wikipedia.org/wiki/Fairy_Tales_Told_for_Children._First_Collection.\n",
        "pages": 784,
        "title": "Fairy tales",
        "year": 1836
    },
    {
        "author": "Dante Alighieri",
        "country": "Italy",
        "imageLink": "images/the-divine-comedy.jpg",
        "language": "Italian",
        "link": "https://en.wikipedia.org/wiki/Divine_Comedy\n",
        "pages": 928,
        "title": "The Divine Comedy",
        "year": 1315
    },
    {
        "author": "Unknown",
        "country": "Sumer and Akkadian Empire",
        "imageLink": "images/the-epic-of-gilgamesh.jpg",
        "language": "Akkadian",
        "link": "https://en.wikipedia.org/wiki/Epic_of_Gilgamesh\n",
        "pages": 160,
        "title": "The Epic Of Gilgamesh",
        "year": -1700
    },
    {
        "author": "Unknown",
        "country": "Achaemenid Empire",
        "imageLink": "images/the-book-of-job.jpg",
        "language": "Hebrew",
        "link": "https://en.wikipedia.org/wiki/Book_of_Job\n",
        "pages": 176,
        "title": "The Book Of Job",
        "year": -600
    }
]

books = book_collection.insert_many(books_data)
print(books.inserted_ids)
Output:
[ObjectId('63933e054fac1f2a7949f2a3'), \
ObjectId('63933e054fac1f2a7949f2a4'), \
ObjectId('63933e054fac1f2a7949f2a5'), \
ObjectId('63933e054fac1f2a7949f2a6')]
You can refresh the cluster to see your new records.
Reading Documents
PyMongo provides you with different methods to read documents from a collection.
Reading All Documents
We can read all the documents in the collection by using the find() method.
books = book_collection.find()
for book in books:
    print(book)
Output:
{'_id': ObjectId('6383b4be86cae589aefcd1b6'), 'author': 'Chinua Achebe', 'country': 'Nigeria', 'imageLink': 'images/things-fall-apart.jpg', 'language': 'English', 'link': 'https://en.wikipedia.org/wiki/Things_Fall_Apart\n', 'pages': 209, 'title': 'Things Fall Apart', 'year': 1958}\
{'_id': ObjectId('63933e054fac1f2a7949f2a3'), 'author': 'Hans Christian Andersen', 'country': 'Denmark', 'imageLink': 'images/fairy-tales.jpg', 'language': 'Danish', 'link': 'https://en.wikipedia.org/wiki/Fairy_Tales_Told_for_Children._First_Collection.\n', 'pages': 784, 'title': 'Fairy tales', 'year': 1836}\
{'_id': ObjectId('63933e054fac1f2a7949f2a4'), 'author': 'Dante Alighieri', 'country': 'Italy', 'imageLink': 'images/the-divine-comedy.jpg', 'language': 'Italian', 'link': 'https://en.wikipedia.org/wiki/Divine_Comedy\n', 'pages': 928, 'title': 'The Divine Comedy', 'year': 1315}\
{'_id': ObjectId('63933e054fac1f2a7949f2a5'), 'author': 'Unknown', 'country': 'Sumer and Akkadian Empire', 'imageLink': 'images/the-epic-of-gilgamesh.jpg', 'language': 'Akkadian', 'link': 'https://en.wikipedia.org/wiki/Epic_of_Gilgamesh\n', 'pages': 160, 'title': 'The Epic Of Gilgamesh', 'year': -1700}\
{'_id': ObjectId('63933e054fac1f2a7949f2a6'), 'author': 'Unknown', 'country': 'Achaemenid Empire', 'imageLink': 'images/the-book-of-job.jpg', 'language': 'Hebrew', 'link': 'https://en.wikipedia.org/wiki/Book_of_Job\n', 'pages': 176, 'title': 'The Book Of Job', 'year': -600}
The find() method returns a MongoDB cursor which is a pointer to the collection of documents returned. Hence, you iterate over it to print all the results. You can also convert the cursor into a list using list(books).
Reading a Single Document
You can also look for a specific document matching a specific field value using the find_one() method.
book = book_collection.find_one(filter={"author": "Dante Alighieri"})
print(book)
Output:
{'_id': ObjectId('63933e054fac1f2a7949f2a4'), 'author': 'Dante Alighieri', 'country': 'Italy', 'imageLink': 'images/the-divine-comedy.jpg', 'language': 'Italian', 'link': 'https://en.wikipedia.org/wiki/Divine_Comedy\n', 'pages': 928, 'title': 'The Divine Comedy', 'year': 1315}In the above example, the filter parameter is used to filter documents based on the author.
Reading a Document by _id
In some cases, you’ll be required to fetch a record matching a specific id. You can use the find_one() method in this case too, but the only difference is that you cannot pass the id as a string. You’ll need to convert the id into a BSON type called Object Id.
from bson.objectid import ObjectId

book_id = ObjectId("'63933e054fac1f2a7949f2a6'")
book = book_collection.find_one(filter={"_id": book_id})
print(book)
Output:
{'_id': ObjectId('63933e054fac1f2a7949f2a6'), 'author': 'Unknown', 'country': 'Achaemenid Empire', 'imageLink': 'images/the-book-of-job.jpg', 'language': 'Hebrew', 'link': 'https://en.wikipedia.org/wiki/Book_of_Job\n', 'pages': 176, 'title': 'The Book Of Job', 'year': -600}Reading Only Specific Fields(projections)
You might want to read only specific fields of the records. For that purpose, you can pass a list that contains the field names to be included in the query result.
projection = ["author", "language", "title"]
books = book_collection.find(filter={}, projection=projection)
print(list(books))
Output:
[{'_id': ObjectId('6383b4be86cae589aefcd1b6'), 'author': 'Chinua Achebe', 'language': 'English', 'title': 'Things Fall Apart'},\
{'_id': ObjectId('63933e054fac1f2a7949f2a3'), 'author': 'Hans Christian Andersen', 'language': 'Danish', 'title': 'Fairy tales'},\
{'_id': ObjectId('63933e054fac1f2a7949f2a4'), 'author': 'Dante Alighieri', 'language': 'Italian', 'title': 'The Divine Comedy'},\
{'_id': ObjectId('63933e054fac1f2a7949f2a5'), 'author': 'Unknown', 'language': 'Akkadian', 'title': 'The Epic Of Gilgamesh'},\
{'_id': ObjectId('63933e054fac1f2a7949f2a6'), 'author': 'Unknown', 'language': 'Hebrew', 'title': 'The Book Of Job'}]
Counting Documents
You can count the total number of documents in a collection very easily using the count_documents() method as below:
total_books = book_collection.count_documents(filter={})
print(total_books)
Output:
5In the above example, you can see that you can also pass filters to count the number of documents matching a specific condition.
Updating Documents
If you want to update a document by its id, you can use the update_one() method as below:
book_id = ObjectId("6383ba5c7c58adf893a71694")
updates = {
    "$set": {
        "author": "Unknown Author"
    }
}
book_collection.update_one( filter={"_id": book_id}, update=updates)
Notice the
$setoperator used in theupdatesdictionary. The operator is used to set the value of a field in MongoDB. You can learn more about Operators here. If you want to update more than one document at a time, you can use theupdate_many()method as below:
book_collection.update_many(filter={}, update={"$set": {"author": "Unknown Author"}})The empty filter dictionary means you want to delete all the documents in the collection. Once you run the script, you will see all the updated documents in the MongoDB cluster.
Deleting Documents
You can delete documents very easily using the delete_one() and delete_many() methods. These are very similar to reading documents. If you want to delete a document by its id, you can use the delete_one() method as below:
from bson.objectid import ObjectId

book_id = ObjectId("6383ba5c7c58adf893a71694")
book_collection.delete_one(filter={"_id": book_id})
However, if you want to delete more than one document in a collection, you can use the delete_many() method as below:
book_collection.delete_many(filter={})The empty filter dictionary means you want to delete all the documents in the collection.
Conclusion
In this tutorial, we covered MongoDB fundamentals and cluster setup, including PyMongo installation and basic CRUD operations on MongoDB collections. To delve deeper, explore Schema Validation, Advanced Queries, and full-text search in MongoDB.
And if you’re building Python applications, you might want to streamline your build process. Check out Earthly, a tool that can significantly enhance your productivity and make your builds more efficient.
Turn your engineering standards into automated guardrails that provide feedback directly in pull requests, with 100+ guardrails included out of the box and support for the tools and CI/CD systems you already have.