Building Developer Portals with Backstage
Table of Contents
This article provides a step-by-step process for setting up Backstage. Earthly guarantees reproducible builds. A great tool to pair with Backstage. Learn more about Earthly.
Medium to large companies typically use several different components and services for operations, including apps developed in-house, third-party services such as Google Cloud Provider (GCP) or Amazon Web Services (AWS), and third-party APIs. Managing all these services can become a complex task, which is why Backstage, an open source project, helps companies create developer portals that consolidate all their services, configurations, and secrets into one place. With Backstage, the portal that you create gives you a place to document each of your services and provides an overview of the services in use, their locations, and interdependencies.
In this article, you’ll learn how to create a developer portal with Backstage.
What Is Backstage?
Picture this: you’re a developer at a growing company with a popular app. One day, you get a complaint from a customer that they’re not receiving emails from the app. You put your debugging glasses on and realize that the app uses a third-party service for sending emails. However, you have no idea what service is being used. You ask around, and it turns out that the developer who set up this integration has left the company. After an entire week of brainstorming, you finally succeed in replacing the component responsible for emails with a shiny new component. But now you realize that some other crucial functionality of the app is broken because you had no idea it depended on the old mailing system.
This is a familiar story in many organizations. As you add more and more software, services, and APIs to your tech stack, keeping track of them becomes increasingly challenging.
Backstage was created because Spotify ran into this same issue. Spotify needed a place to collect and document all its services in one place, and Backstage allowed it to do just that and eventually grow and become the company it is today.
In 2020, Spotify donated Backstage to the Cloud Native Computing Foundation (CNCF), where it received the love and support of the open source community and was developed into a community-driven effort aimed at simplifying development.
The Benefits of Backstage
At its core, Backstage is a developer portal. A developer portal works as the heart of development and allows developers to quickly find what they need.
The following are a few of the reasons Backstage is a great developer portal:
- Backstage comes with a robust Software Catalog, a centralized system that consolidates and tracks ownership and metadata for all the software in your tech stack (services, websites, libraries, data pipelines, and so on). It works as a single source of truth by providing you with information about the software and letting you explore the dependencies between components.
- Backstage’s TechDocs feature lets you create a central documentation hub right inside the developer portal. Developers write code that lives with the components, and Backstage can pull this documentation into a centralized system.
- Backstage Search helps you quickly find the information you need.
- Backstage’s predefined templates help you easily create components inside Backstage.
- Backstage can be integrated with various third-party services with little effort.
- By using existing plugins or creating your own, you can customize Backstage to fit your needs.
Additionally, as previously stated, Backstage is open source, which means you can modify it to your heart’s content and host it in your own architecture.
If some of these features interest you, read on! In the next section, you’ll get a quick hands-on tutorial on how to set up Backstage and use its Software Catalog.
Building a Developer Portal with Backstage
Before you begin this tutorial, you’ll need the latest version of Node.js installed as well as Yarn Classic installed and set up.
Note that you can upgrade to the latest version of Yarn later on, but to create the Backstage instance, you’ll need Yarn Classic.
You’ll also need to install and set up PostgreSQL on your computer.
Setting Up a Backstage Instance
To begin, you need to create a Backstage instance by running the following command:
npx @backstage/create-app@latestWhen you’re prompted, enter the name of the directory where you want to set up the instance (eg backstage).
Once the setup is complete, your output will look like this:
// Some output omitted

 Moving to final location:
  moving        backstage ✔
  init          git repository ◜
 Installing dependencies:
  init          git repository ✔
  determining   yarn version ✔
  executing     yarn install ✔
  executing     yarn tsc ✔

🥇  Successfully created backstage


 All set! Now you might want to:
  Run the app: cd backstage && yarn dev
  Set up the software catalog: https://backstage.io/docs/features/software-catalog/configuration
  Add authentication: https://backstage.io/docs/auth/
Navigate to the backstage directory and install the dependencies by running npm install.
Then, start the Backstage server with the following command:
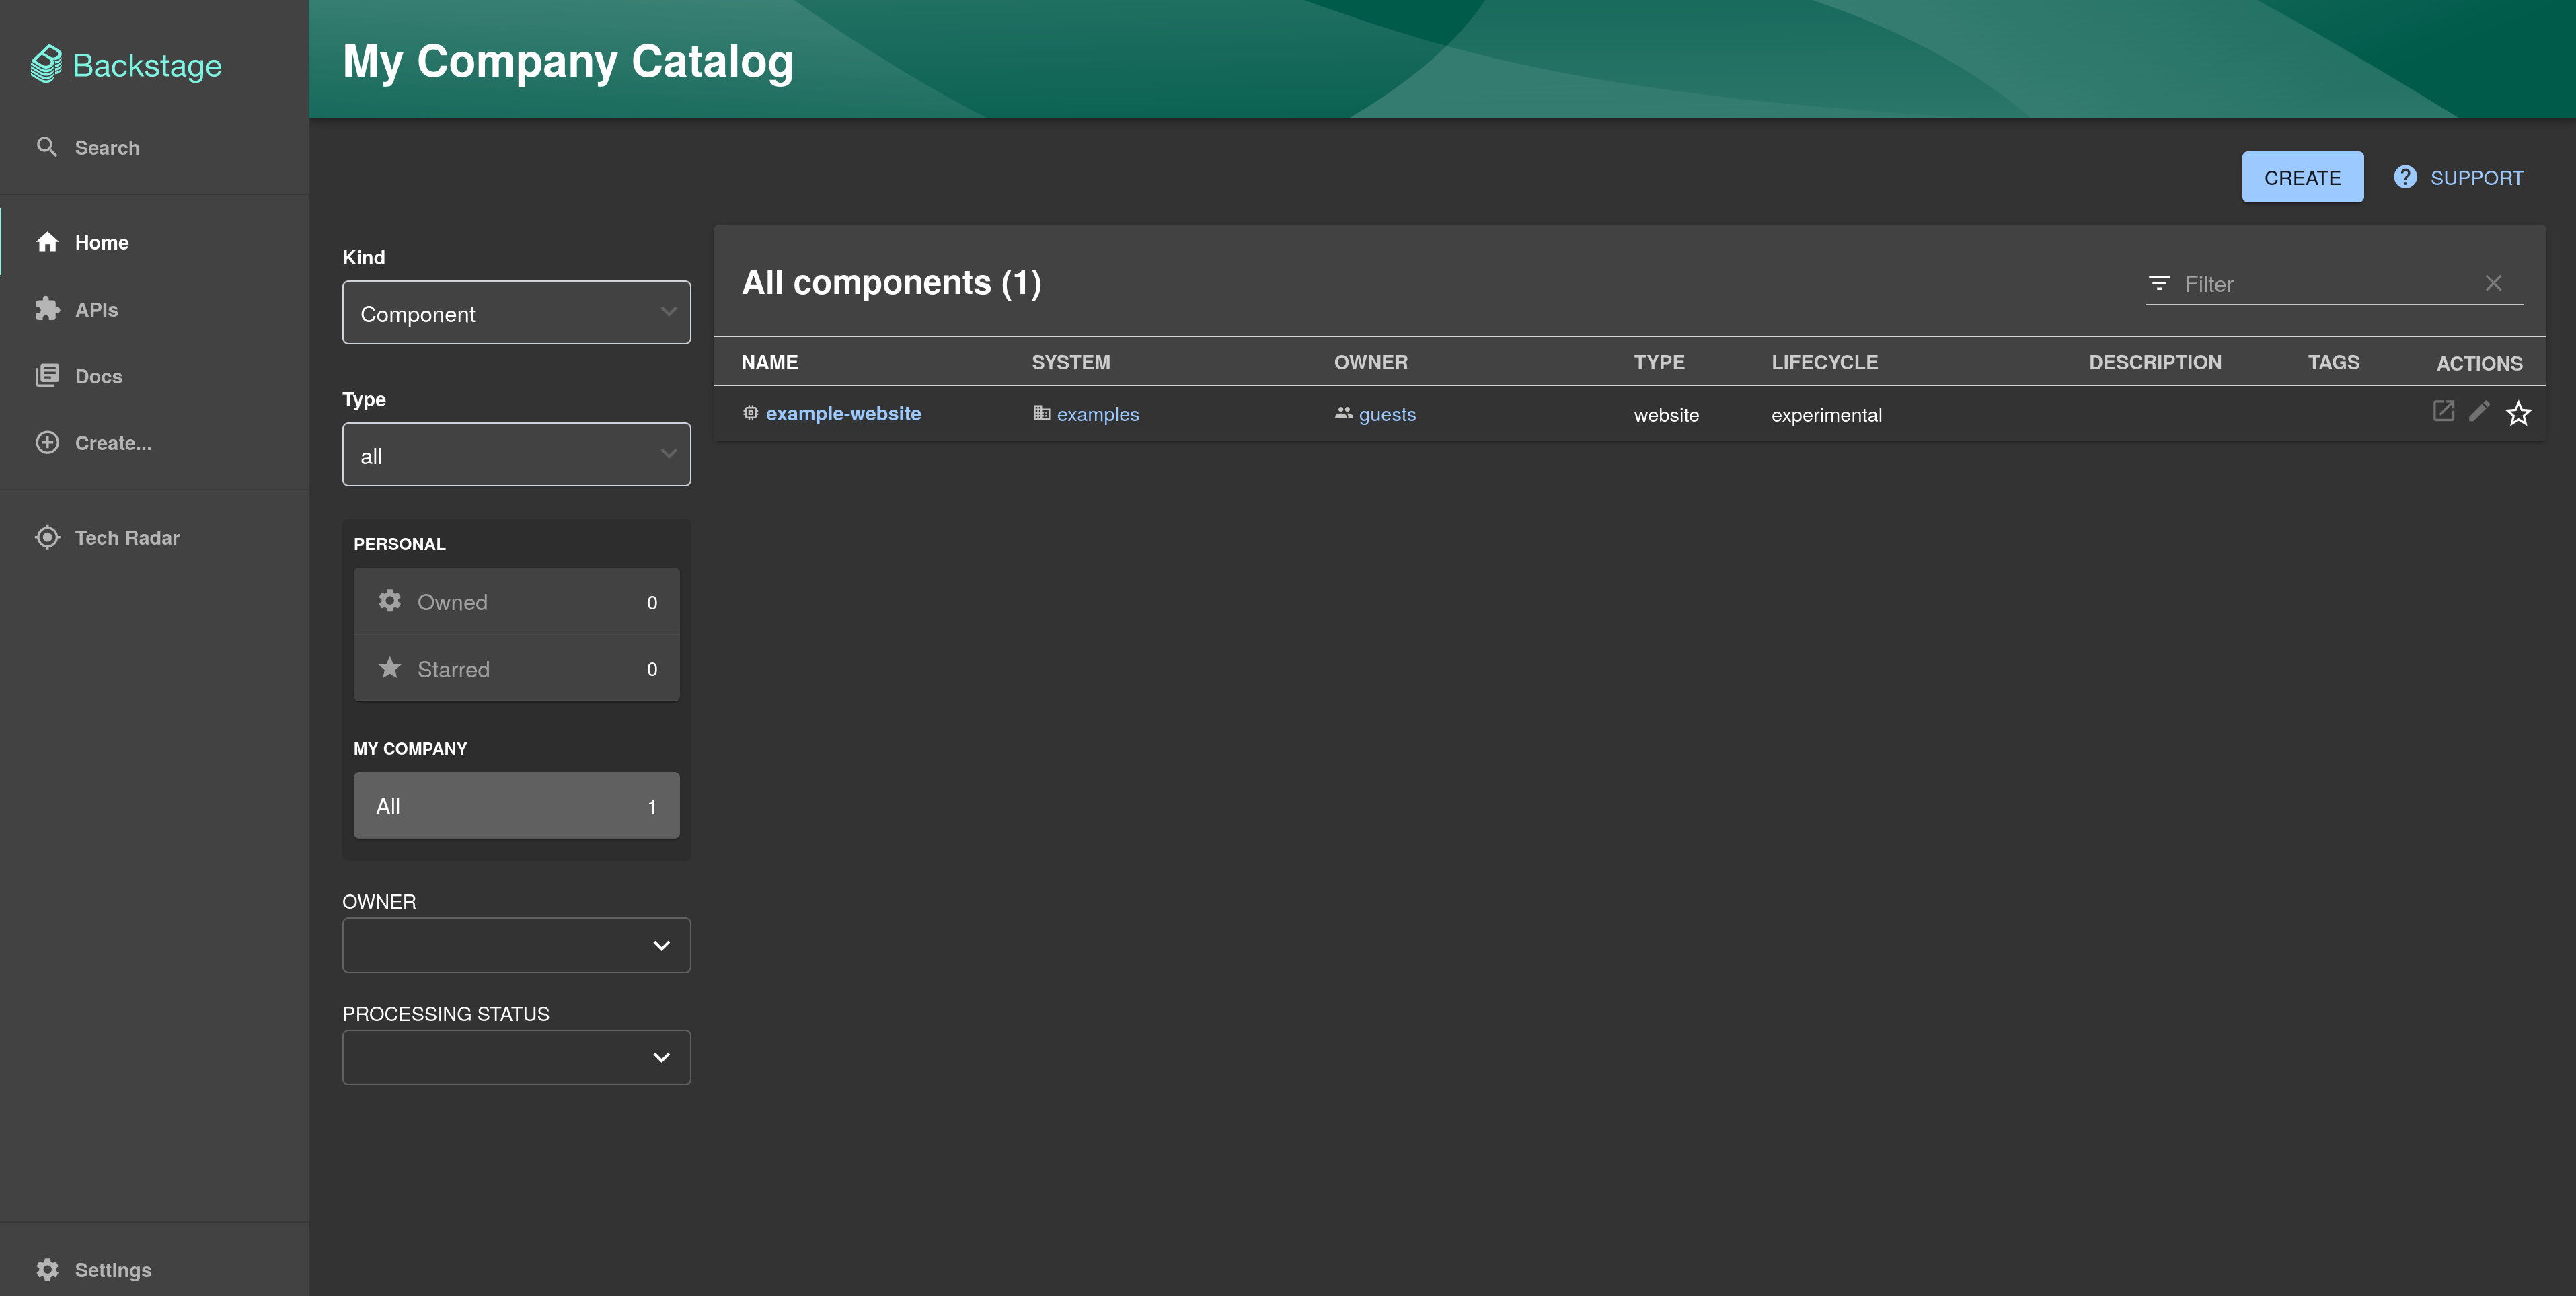
yarn devThis launches a Backstage instance at http://localhost:3000 and opens a browser window where you’ll be greeted with the default Backstage instance:
Before you proceed with the rest of the article, you’ll need to configure Backstage to use PostgreSQL as the database. By default, Backstage works with an in-memory database, which means any changes you make will be lost when you restart the server. To prevent that, a database such as PostgreSQL is needed where Backstage can store the data.
To configure PostgreSQL, install the pg library by running the following command:
yarn add -cwd packages/backend pgOpen the app-config.yaml file where the configuration for Backstage is stored. You’ll find a database key that looks like this:
database:
    client: better-sqlite3
    connection: ':memory:'
By default, this sets Backstage up to use an in-memory database. You could edit this file to set up the PostgreSQL connection, but that’s not a secure approach because the configuration contains sensitive information, such as the database URL and password. The app-config.yaml file is checked into version control, which means anyone who has access to your company’s version control system can read it.
It’s better to use app-config.local.yaml for sensitive configurations. This file is not checked into version control, and any configuration in this file overrides the same from app-config.yaml. So, open app-config.local.yaml and add the following:
# Backstage override configuration for your local development environment
backend:
  database:
    client: pg
    connection:
      host: 127.0.0.1
      port: 5432
      user: USER
      password: PASSWORD
Replace USER with the PostgreSQL user and PASSWORD with the password.
Restart the Backstage server and look for a line like this:
Performing database migrationThis means the database connection is successful.
Setting Up GitHub Authentication
The default Backstage instance doesn’t perform any authentication, and anyone who can access the URL can access the Backstage instance. It’s a good idea to set up authentication for security purposes. With just a few lines of code, you can set up a GitHub login page using OAuth.
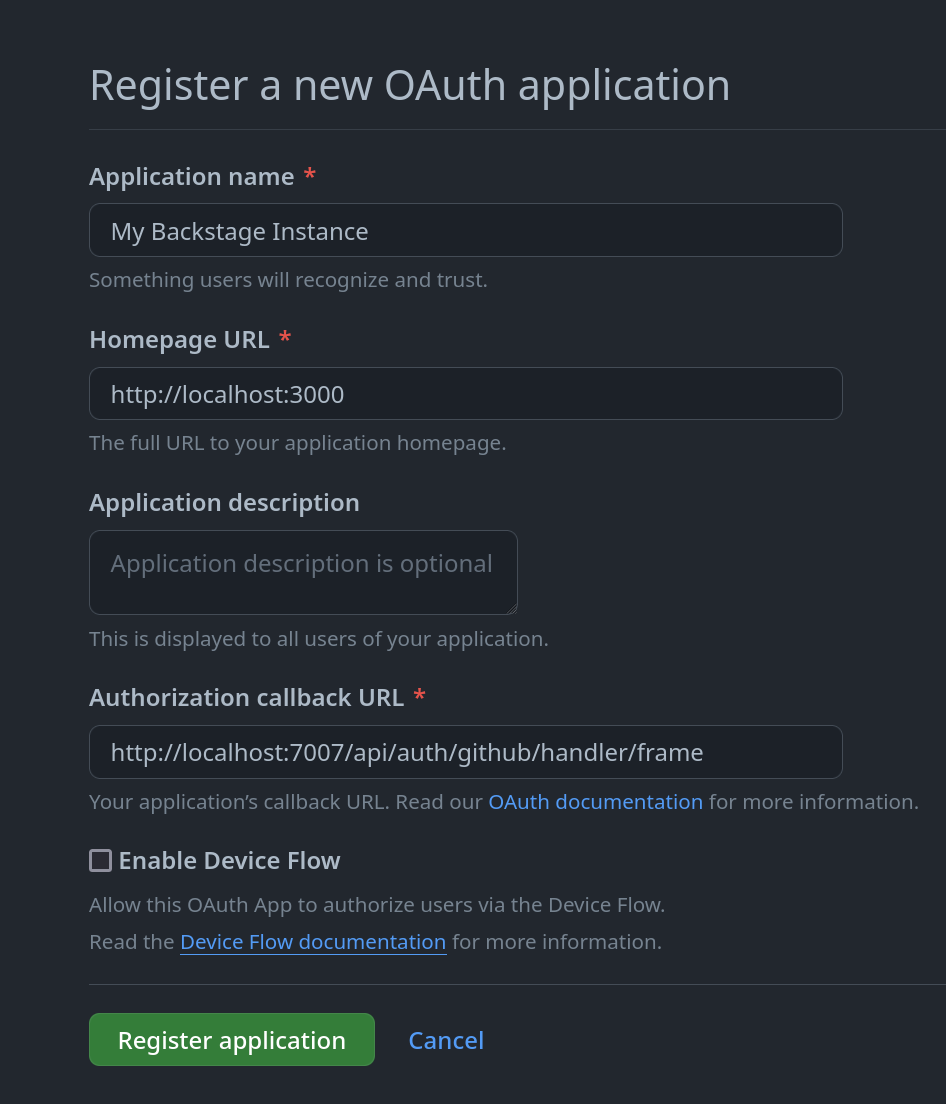
First, go to https://github.com/settings/applications/new and create a new OAuth app. Enter http://localhost:3000 in the Homepage URL field and http://localhost:7007/api/auth/github/handler/frame as the Authorization callback URL. Give the app a name and click Register application:
On the next page, you’ll be shown a client ID that you’ll need to copy. Click the Generate a new client secret button and copy the generated client secret:

Open the app-config.local.yaml file and paste the following YAML code into it:
auth:
  # See https://backstage.io/docs/auth/ to learn about auth providers
  environment: development
  providers:
    github:
      development:
        clientId: YOUR_CLIENT_ID
        clientSecret: YOUR_CLIENT_SECRET
Replace YOUR_CLIENT_ID and YOUR_CLIENT_SECRET with the client ID and client secret you acquired.
Open packages/app/src/App.tsx and add the following imports:
import { githubAuthApiRef } from '@backstage/core-plugin-api';
import { SignInPage } from '@backstage/core-components';
Search for const app = createApp({, and below apis, add the following:
components: {
  SignInPage: props => (
    <SignInPage
      {...props}
      auto
      provider={ {
        id: 'github-auth-provider',
        title: 'GitHub',
        message: 'Sign in using GitHub',
        apiRef: githubAuthApiRef,
      } }
    />
  ),
},
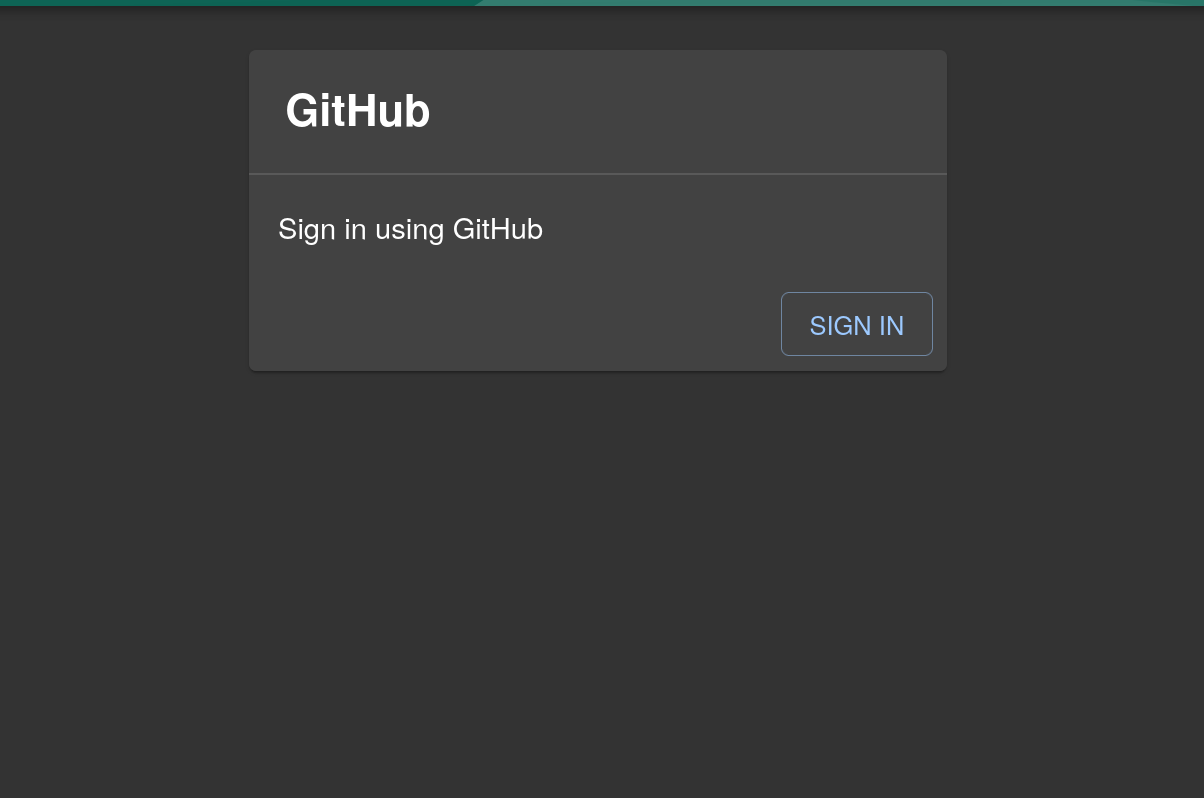
Restart the server, and you’ll be prompted with a login screen:
Once you log in with GitHub, navigate to Settings and verify that your name and email have been taken from GitHub:

Note: By default, Backstage comes with a guest sign-in resolver. With this resolver, all users share a single “guest” identity. You can read more about configuring user identities in the official docs.
Exploring the Software Catalog
To better understand some of the benefits of Backstage’s Software Catalog system, let’s imagine a scenario where your company has a product with a Node.js backend and a Python frontend client. You want to add them to Backstage’s Software Catalog.
The apps have already been created and hosted on GitHub to make your life easier. Here’s the Node.js backend and the Python client. You’ll be modifying the repos, so you must fork them to your GitHub account and clone them to your local computer. If you prefer to simply see the end result, both repos have a branch named final that contains the final code.
Note: It isn’t necessary to run the apps to register them in Backstage, but if you want to run them, you can find instructions in the README files in the repos.
To register components in Backstage, each component must have a catalog-info.yaml file. This file contains metadata about the project and acts as the single source of truth for the components. Here, you’ll add the catalog-info.yaml files to both repos.
To start, create a file named catalog-info.yaml in the root of the Node.js app with the following code:
apiVersion: backstage.io/v1alpha1
kind: Component
metadata:
  name: Blog-App
  description: This is a dummy Node.js app
  tags:
    - node

spec:
  type: service
  lifecycle: experimental
  owner: user:guest
In this code, the kind key sets the kind of entity. In this case, Component denotes that it’s a piece of software that you’re registering to Backstage. The metadata key records information related to the component, such as name, description, and annotations. Finally, in the spec key, you set the type, lifecycle, and owner of the component.
Commit this file and push the changes to your GitHub repo.
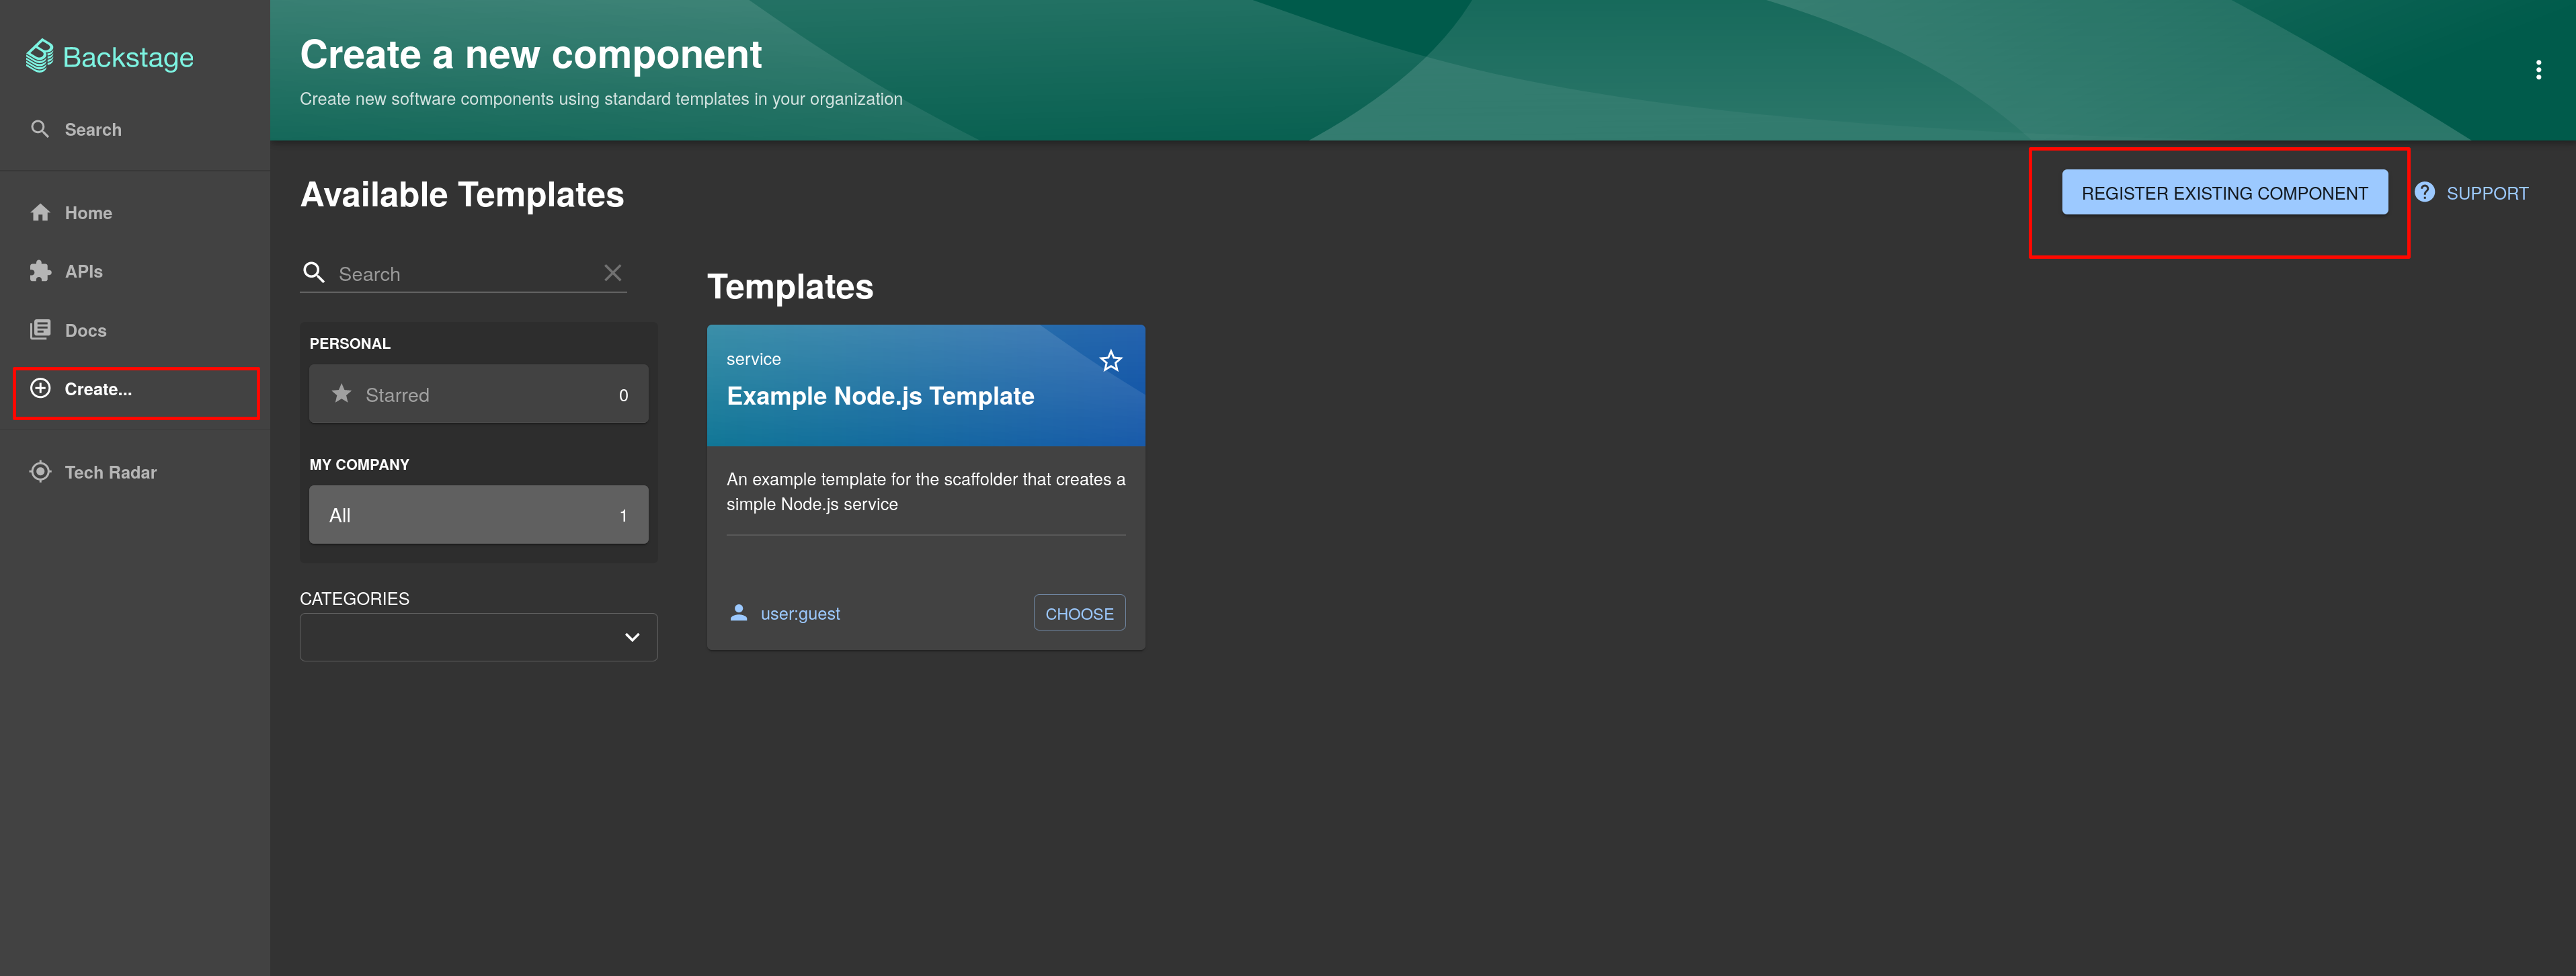
In the Backstage dashboard, click Create, and then click REGISTER EXISTING COMPONENT:
In the URL field, enter the URL to your repo’s catalog-info.yaml file. It should be something like https://github.com/<YOUR_GITHUB_USERNAME>/<YOUR_GITHUB_REPO_NAME>/blob/<BRANCH_NAME>/catalog-info.yaml. Replace <YOUR_GITHUB_USERNAME> with your GitHub username, <YOUR_GITHUB_REPO_NAME> with the name of the repo in your account, and <BRANCH_NAME> with the name of the branch you’re working on:
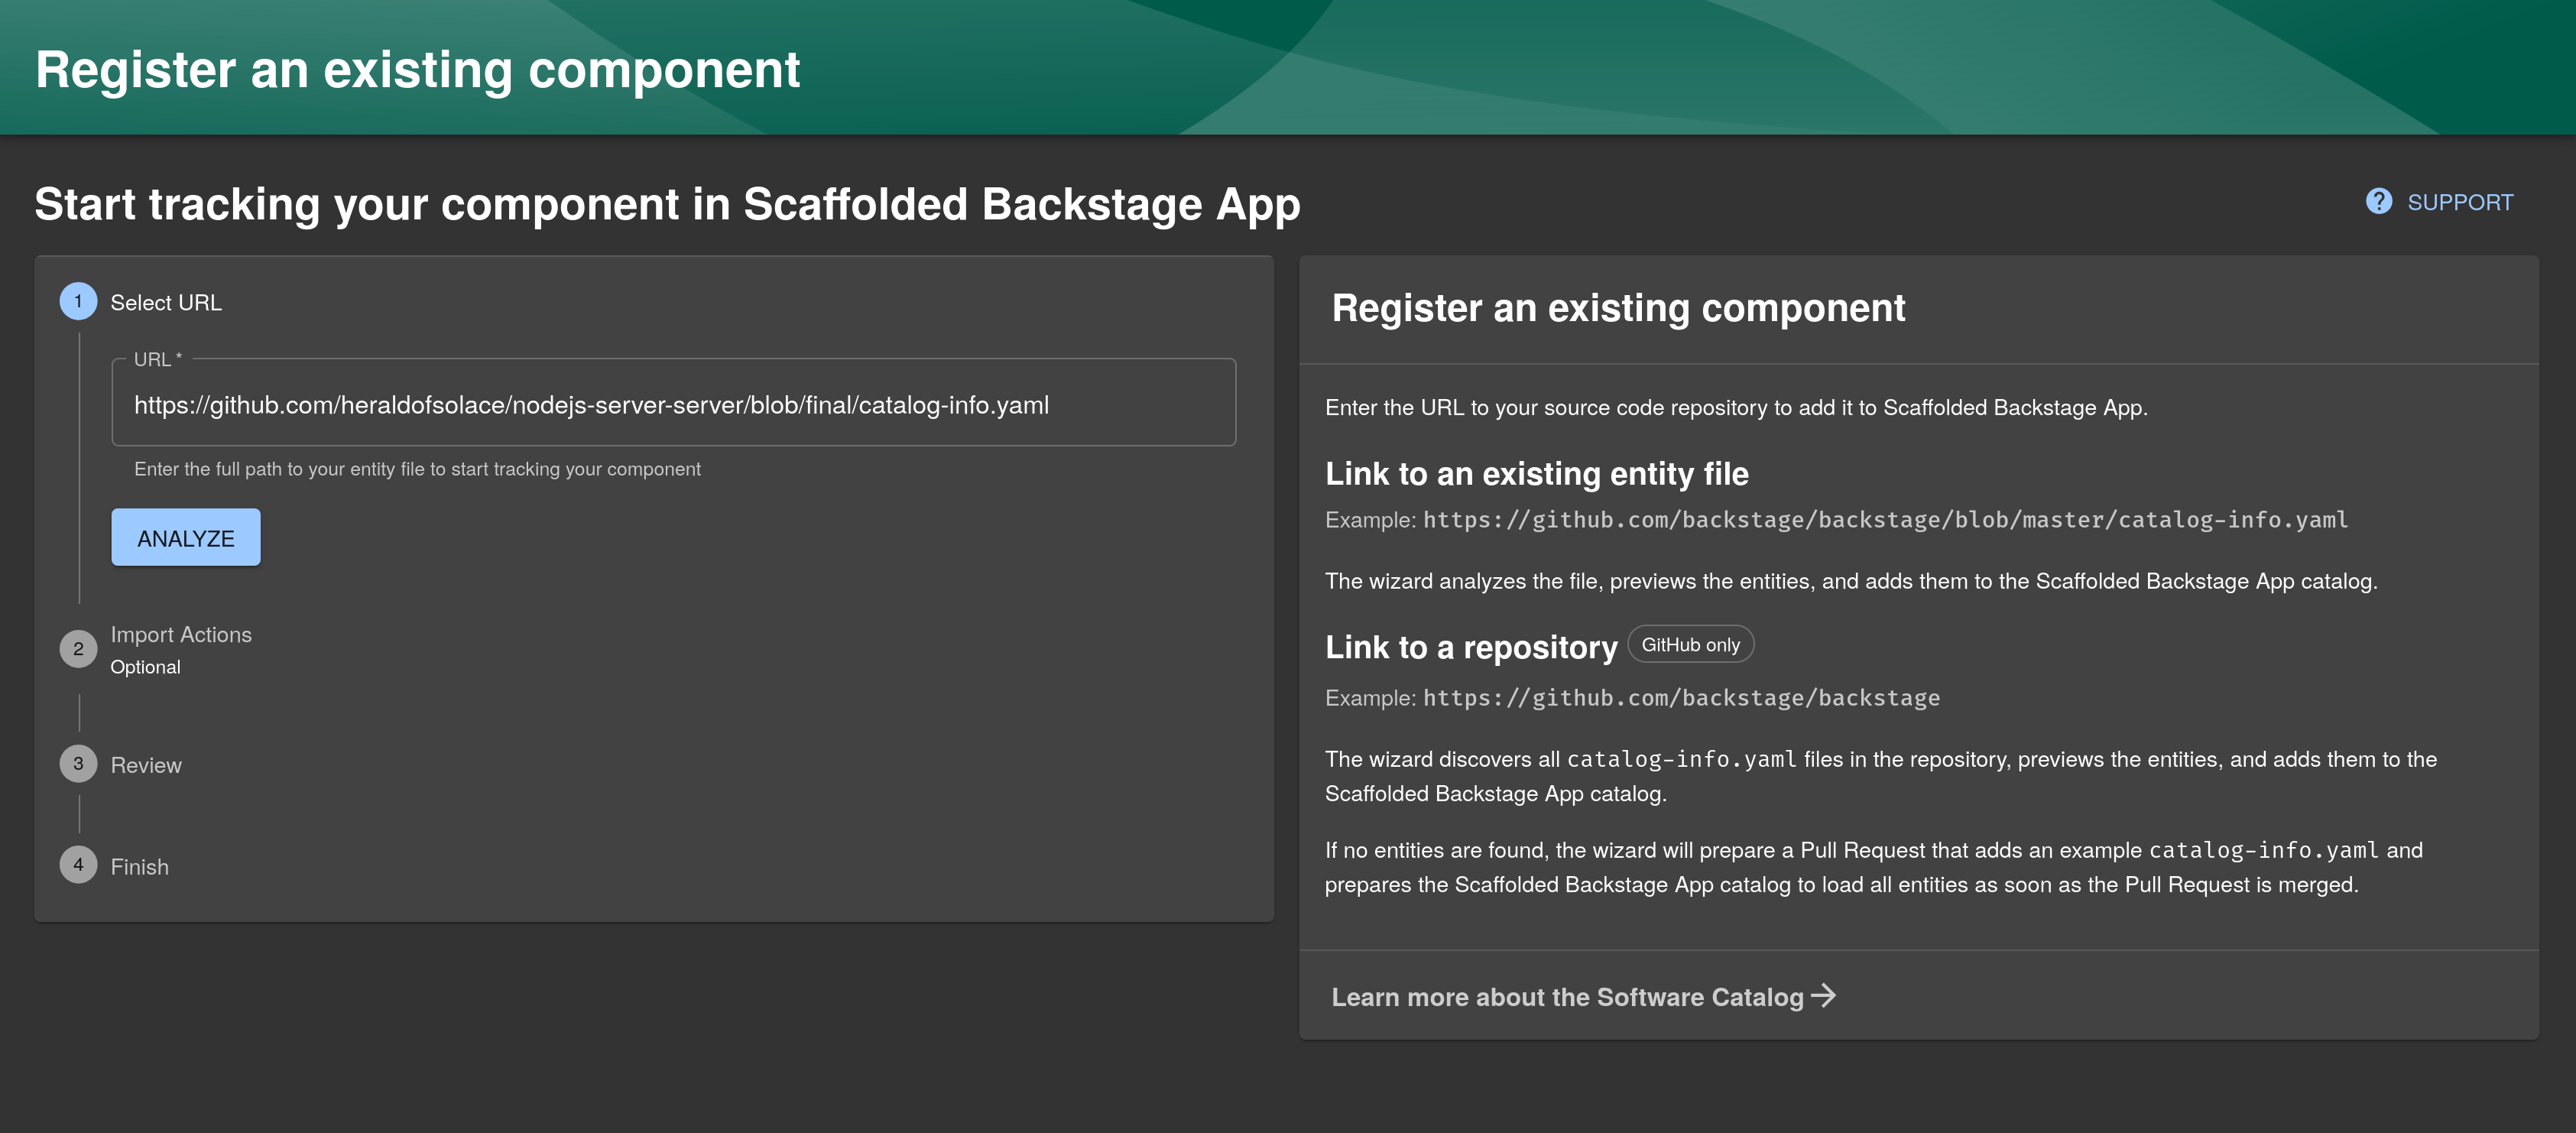
When you click ANALYZE, Backstage fetches the catalog-info.yaml file and extracts the entities from it:
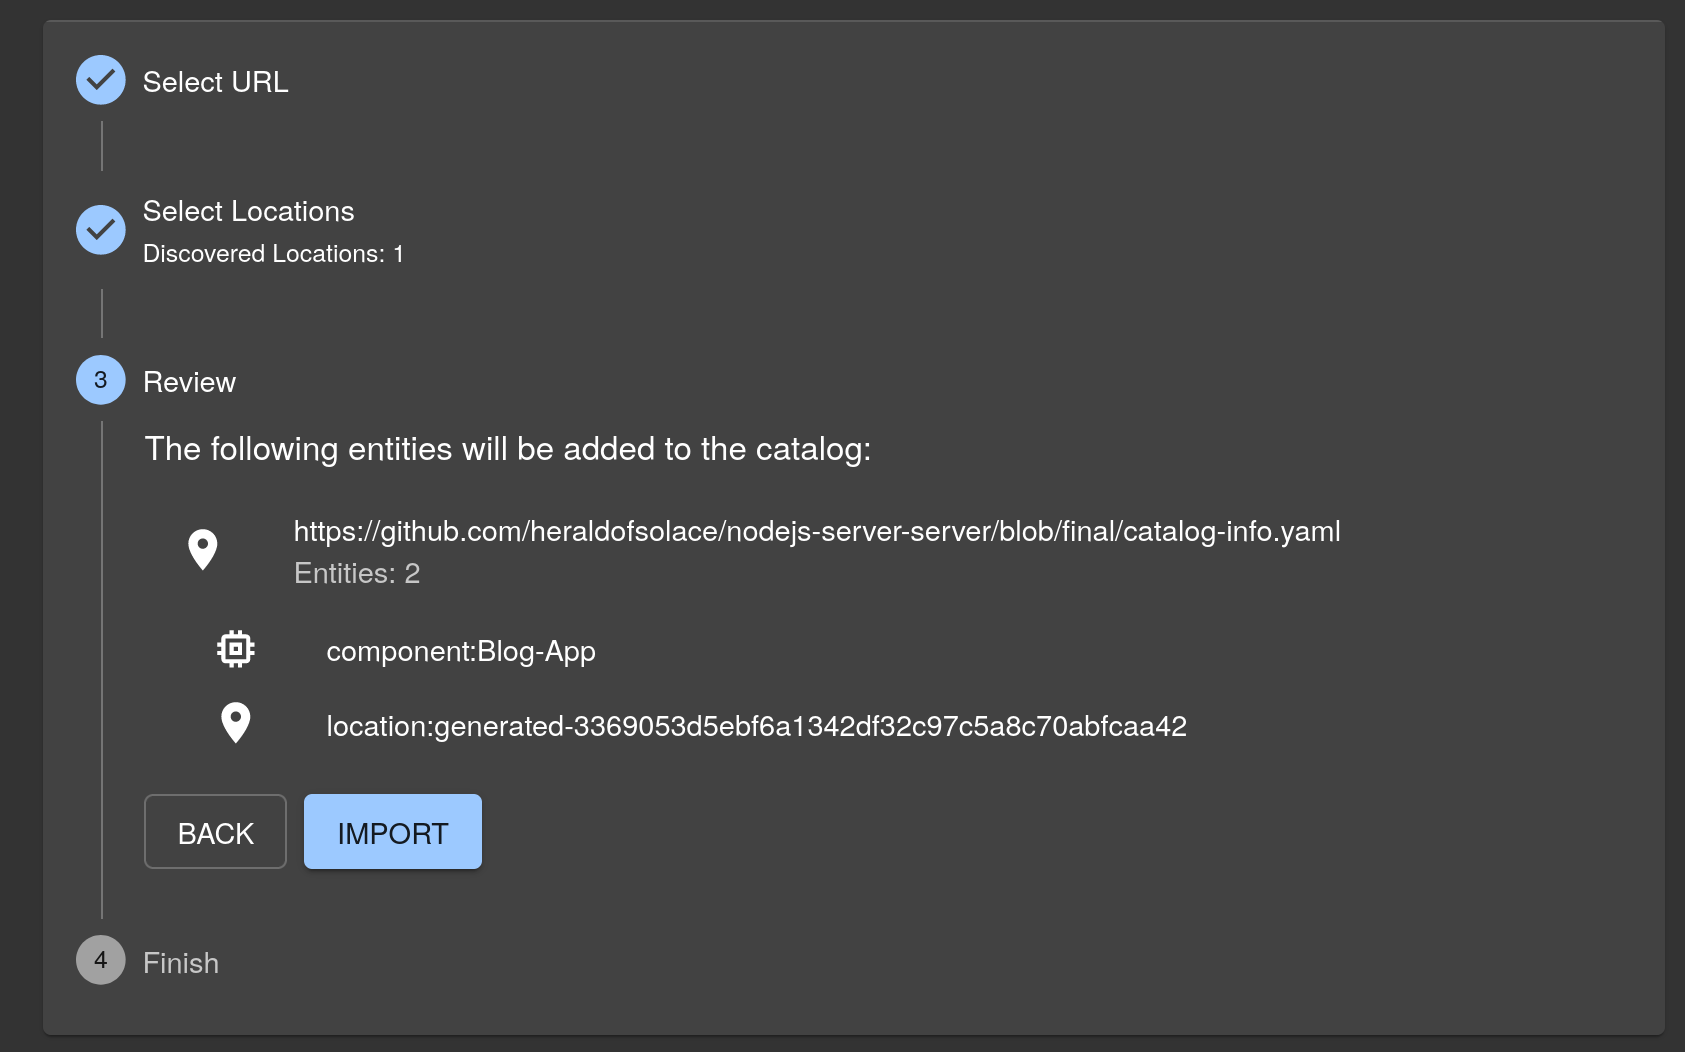
Click IMPORT, and after the component is registered, click View Component. You’ll be taken to the entity page:
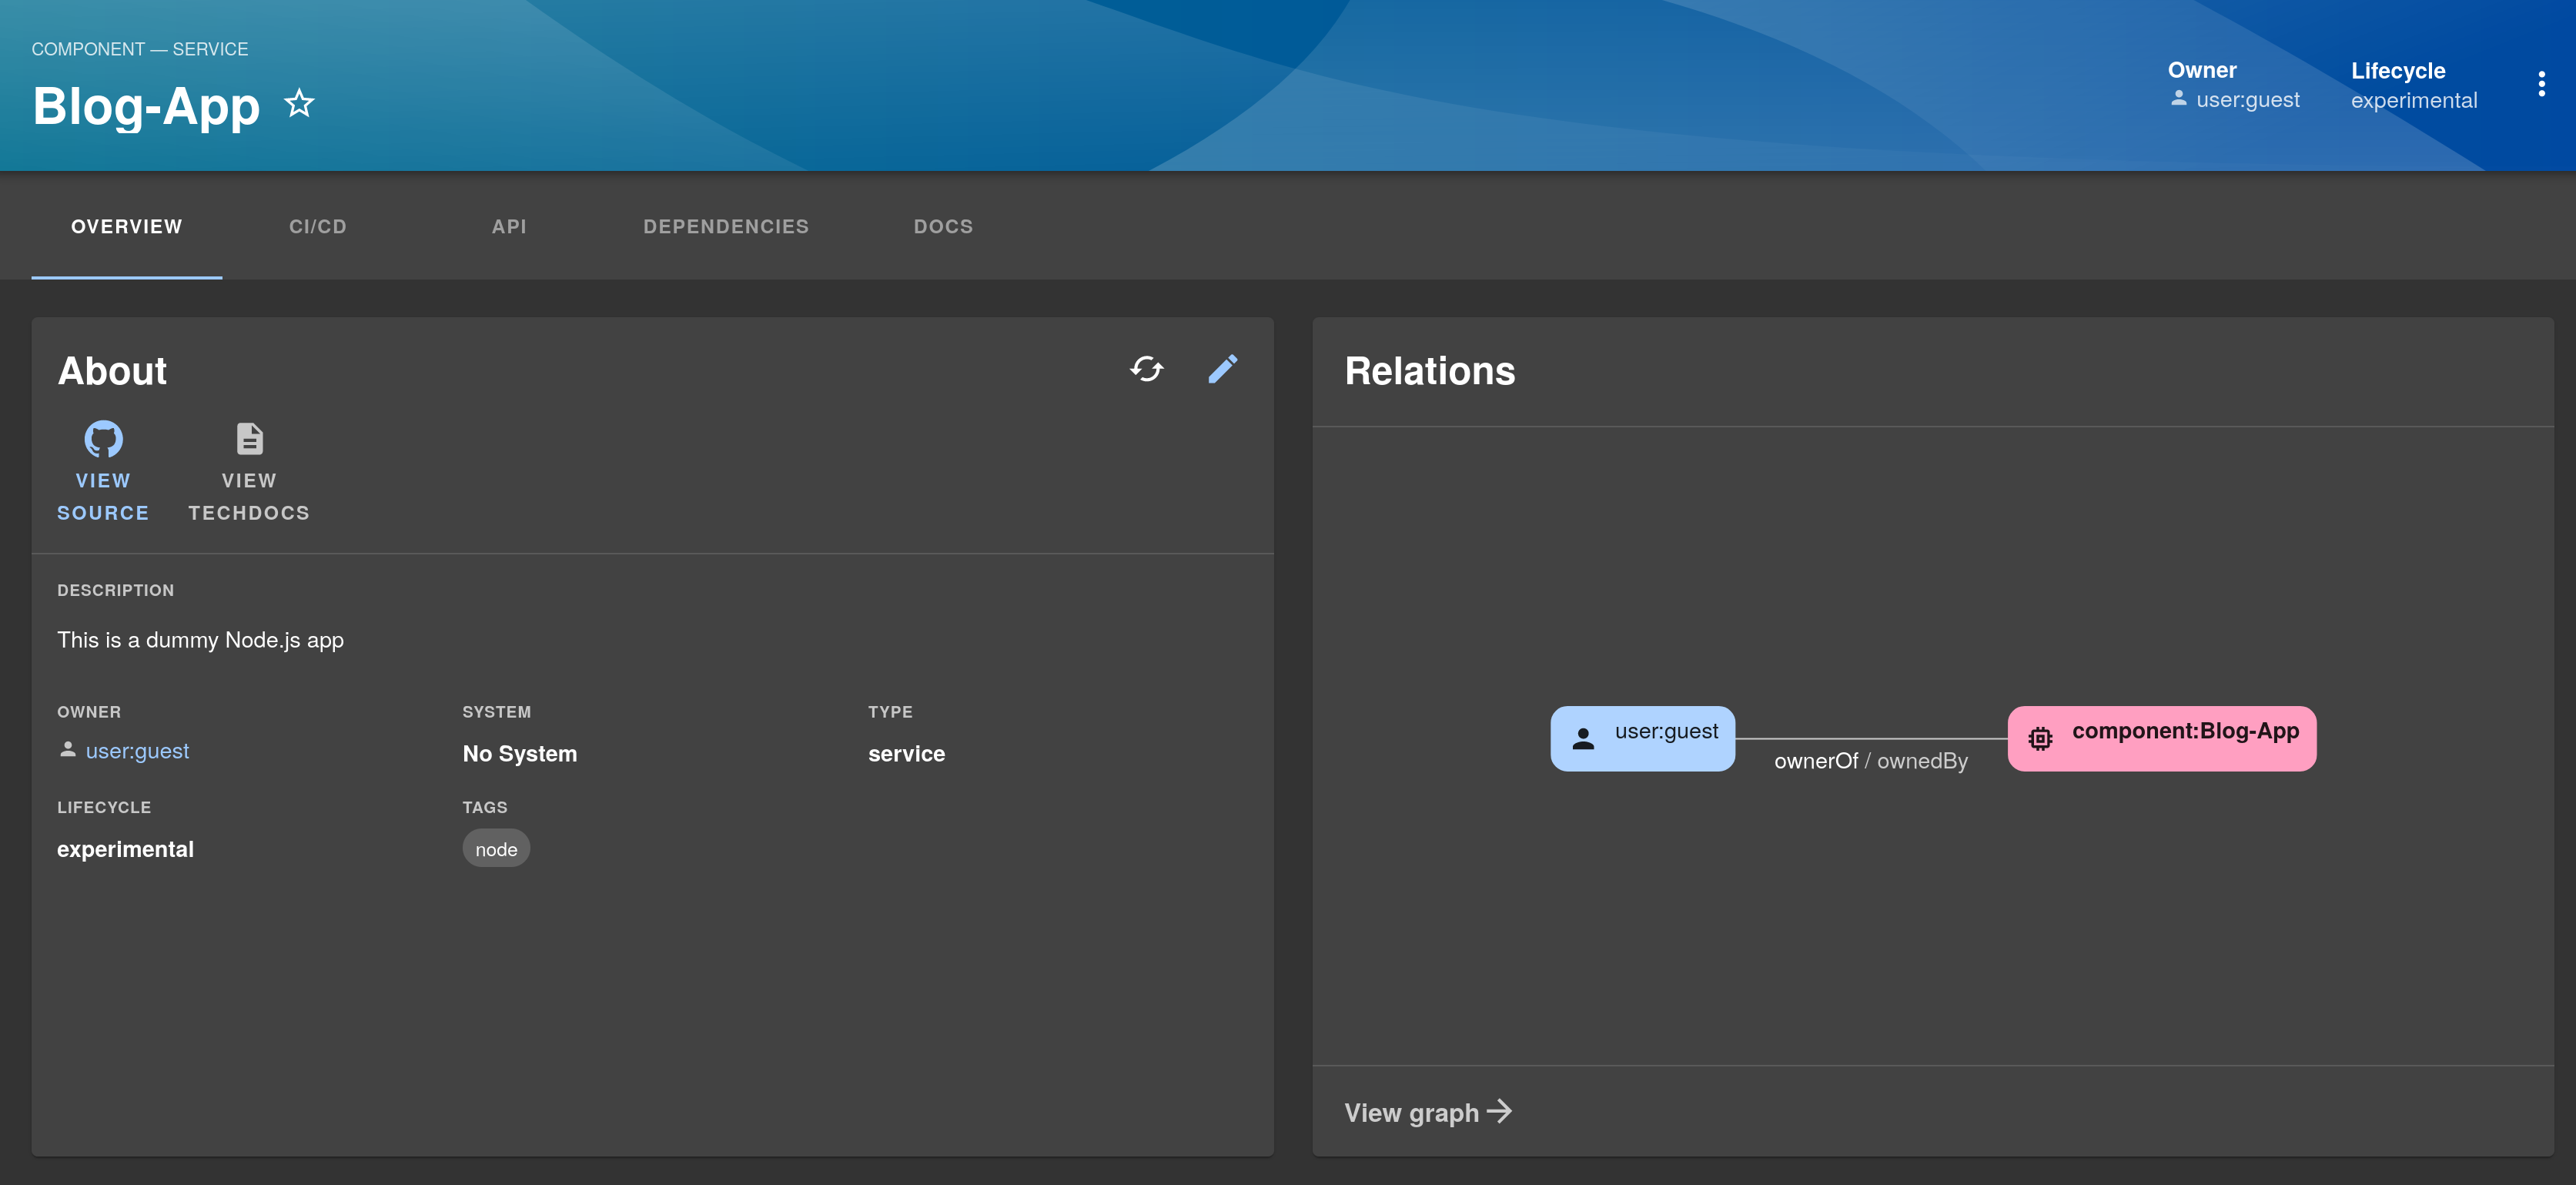
You can see that the name and description have been fetched from the catalog-info.yaml file. On the left side, you’ll find a VIEW SOURCE button that takes you straight to the GitHub repo of the app. On the right-hand side, you’ll find a relations graph that shows the relations of this entity with other entities.
Right now, you can see that the user:guest entity has an ownerOf/ownedBy relationship with this component.
Adding APIs to the Catalog
APIs are at the center of modern software development. Almost every piece of software either exposes an API for other software to communicate with or consumes an API to communicate with other software. The Blog-App component also exposes an API. With Backstage, you can also catalog the API in the Software Catalog.
Open the catalog-info.yaml file and add the following in the spec key:
providesApis:
  - blog-api
This tells Backstage that the Blog-App component provides an API named blog-api.
Now, let’s define the API. Add the code below at the end of the catalog-info.yaml file. As before, replace the GitHub-related parts with information specific to your repo:
---
apiVersion: backstage.io/v1alpha1
kind: API
metadata:
  name: blog-api
  description: The Blog API
spec:
  type: openapi
  lifecycle: experimental
  owner: user:guest
  definition:
    $text: https://github.com/<YOUR_GITHUB_USERNAME>/<YOUR_GITHUB_REPO_NAME>/blob/<BRANCH_NAME>/api/swagger.yaml
Notice that kind is set to API because this is an API entity, and the definition key refers to the api/swagger.yaml file in the repo. Backstage can generate a Swagger UI using the Swagger file.
The full catalog-info.yaml file looks like this:
apiVersion: backstage.io/v1alpha1
kind: Component
metadata:
  name: Blog-App
  description: This is a dummy Node.js app
  annotations:
    backstage.io/managed-by-location: https://github.com/<YOUR_GITHUB_USERNAME>/<YOUR_GITHUB_REPO_NAME>/blob/<BRANCH_NAME>/catalog-info.yaml
  tags:
    - node

spec:
  type: service
  lifecycle: experimental
  owner: user:guest
  providesApis:
    - blog-api

---
apiVersion: backstage.io/v1alpha1
kind: API
metadata:
  name: blog-api
  description: The Blog API
spec:
  type: openapi
  lifecycle: experimental
  owner: user:guest
  definition:
    $text: https://github.com/<YOUR_GITHUB_USERNAME>/<YOUR_GITHUB_REPO_NAME>/blob/<BRANCH_NAME>/api/swagger.yaml
Commit and push the changes.
Once Backstage registers a component, it periodically refreshes the catalog-info.yaml file by re-fetching it. That means once you push your changes, you should see them reflected automatically after a few minutes.
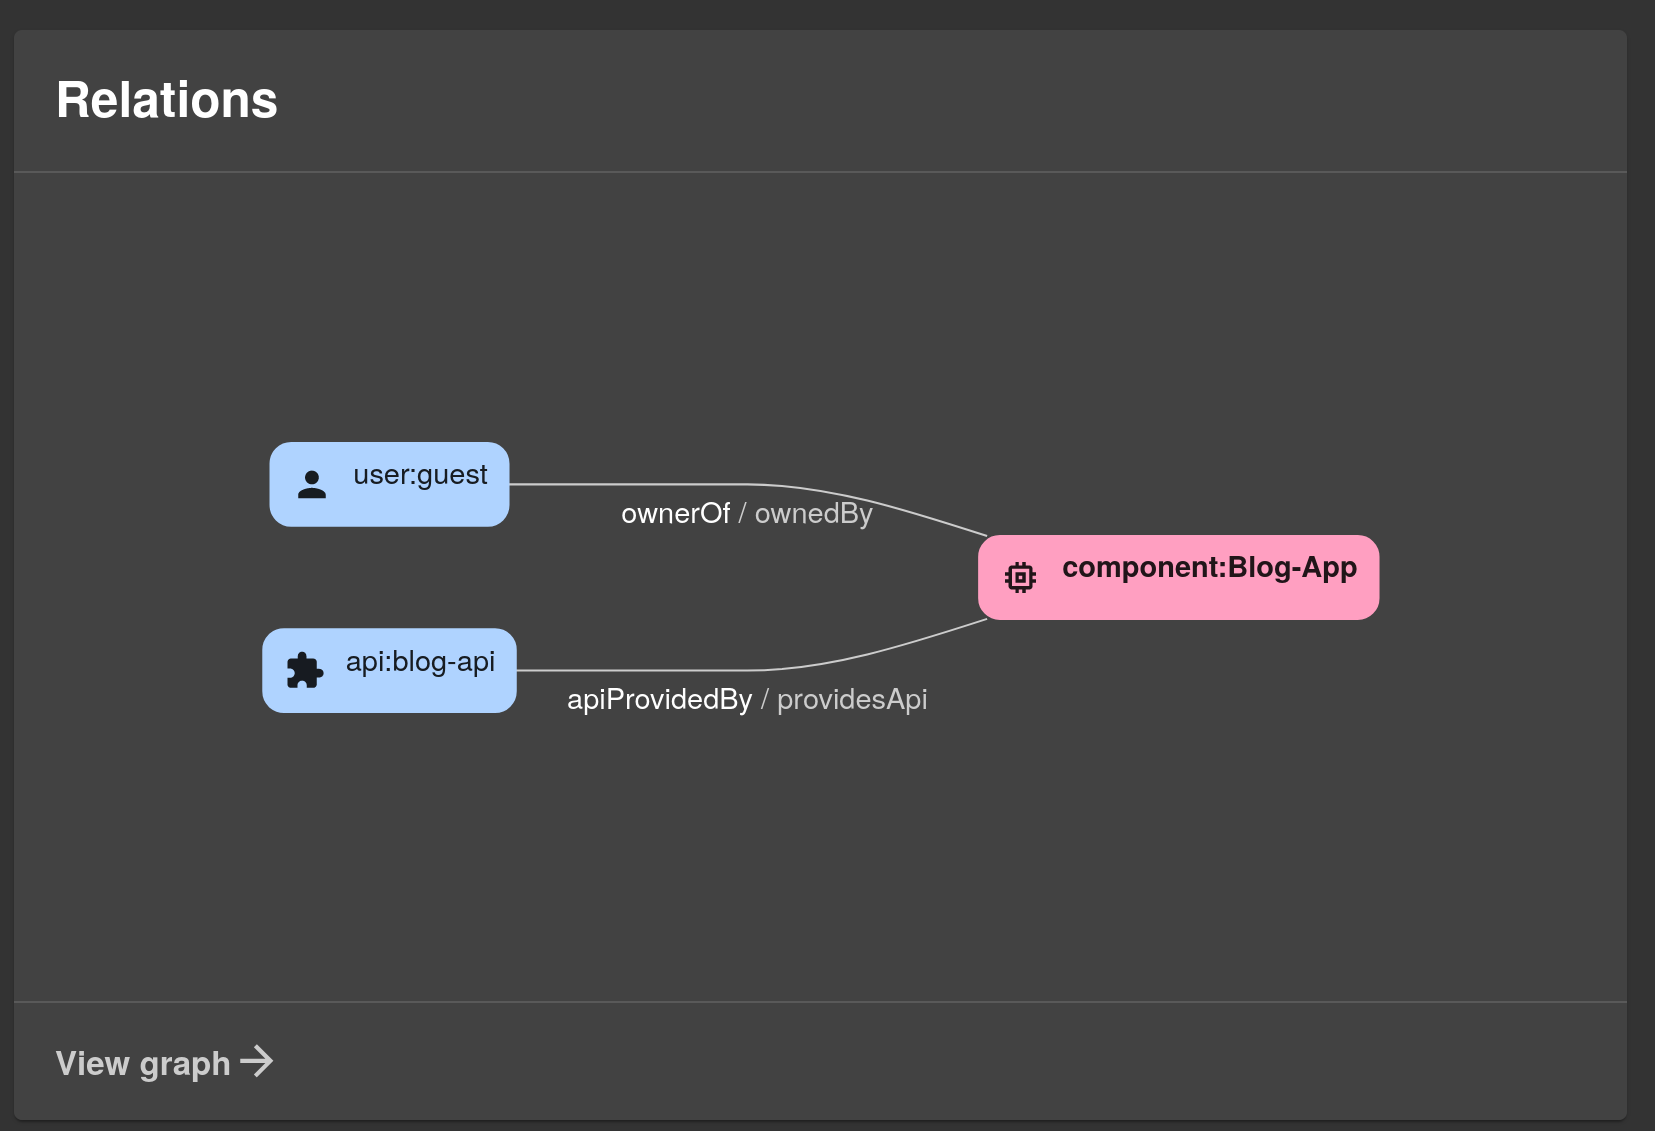
Once the component is refreshed, you’ll see a new entity has been added to the relations graph. The api:blog-api entity has an apiProvidedBy/providesApi relationship with the Blog-App component:
If you go to the API tab, you’ll see blog-api listed under Provided APIs:

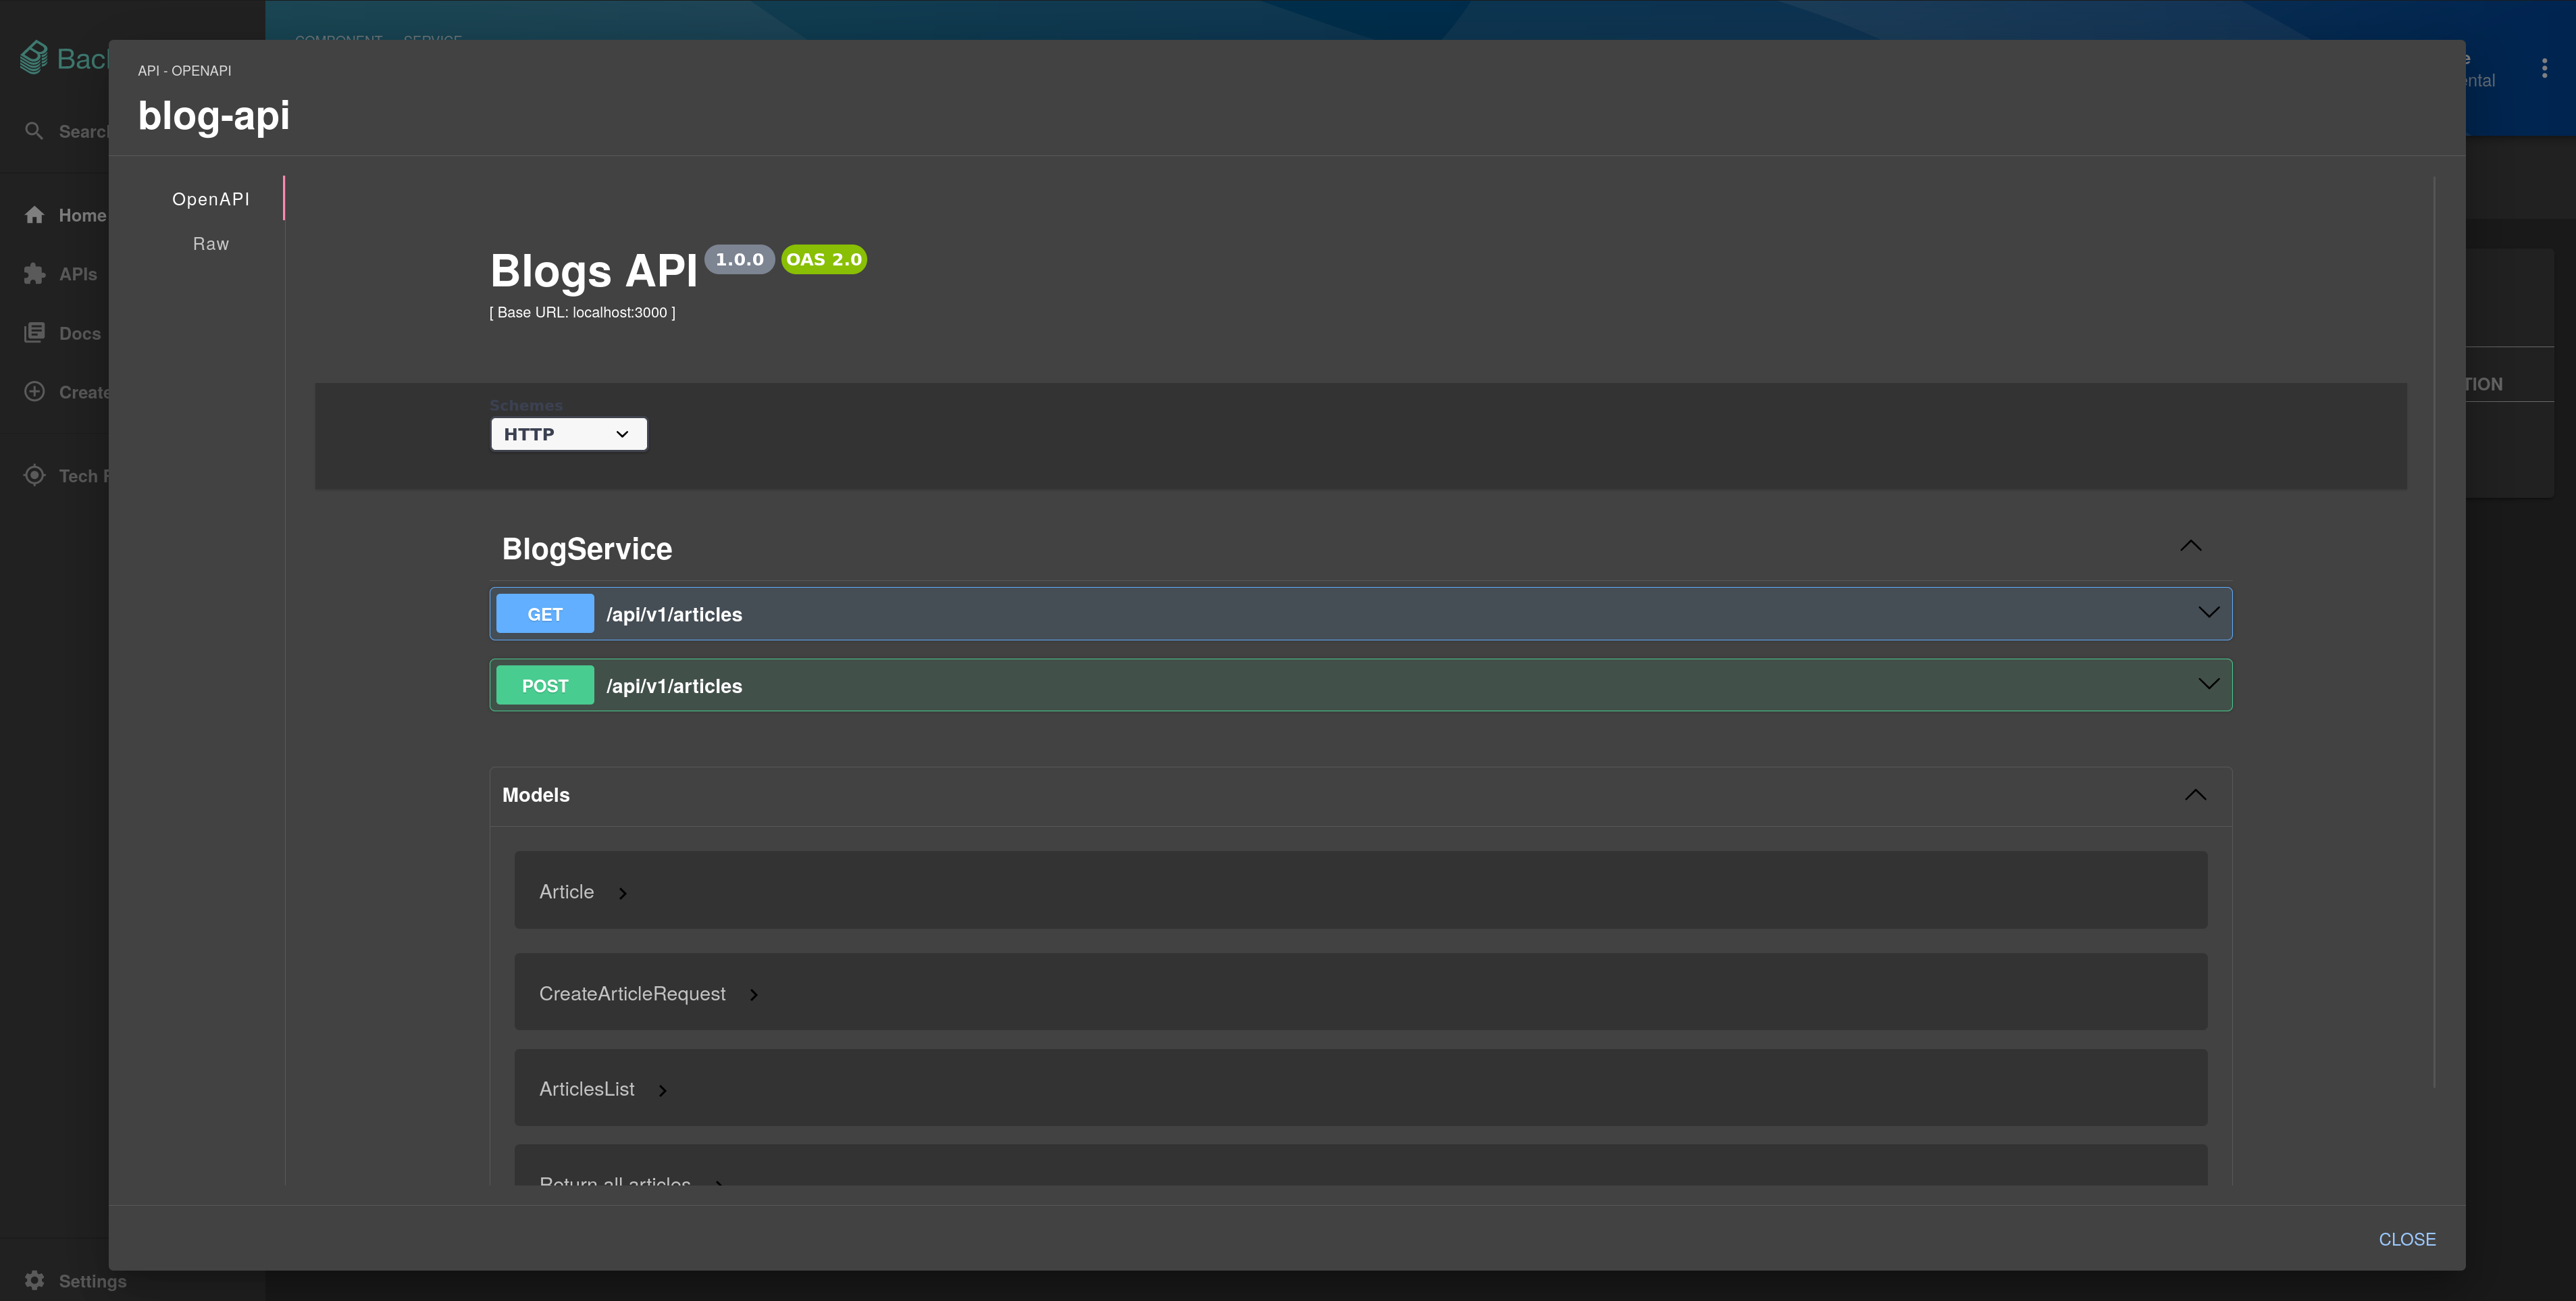
Click blog-api, and you’ll see that a Swagger UI has been generated from the Swagger file:
Adding Dependencies to the Catalog
In a real-world project, components often depend on other components. With Backstage’s robust Software Catalog, you can record the dependencies between components.
In this section, you’ll focus on the Python client, which depends on the Blog-App component and consumes the blog-api API.
Add a catalog-info.yaml file in the repo for the Python client:
apiVersion: backstage.io/v1alpha1
kind: Component
metadata:
  name: Python-Client
  description: This is a dummy Python app
  tags:
    - python
    - web
spec:
  type: website
  lifecycle: experimental
  owner: user:guest
  consumesApis:
    - api:blog-api
  dependsOn:
    - component:Blog-App
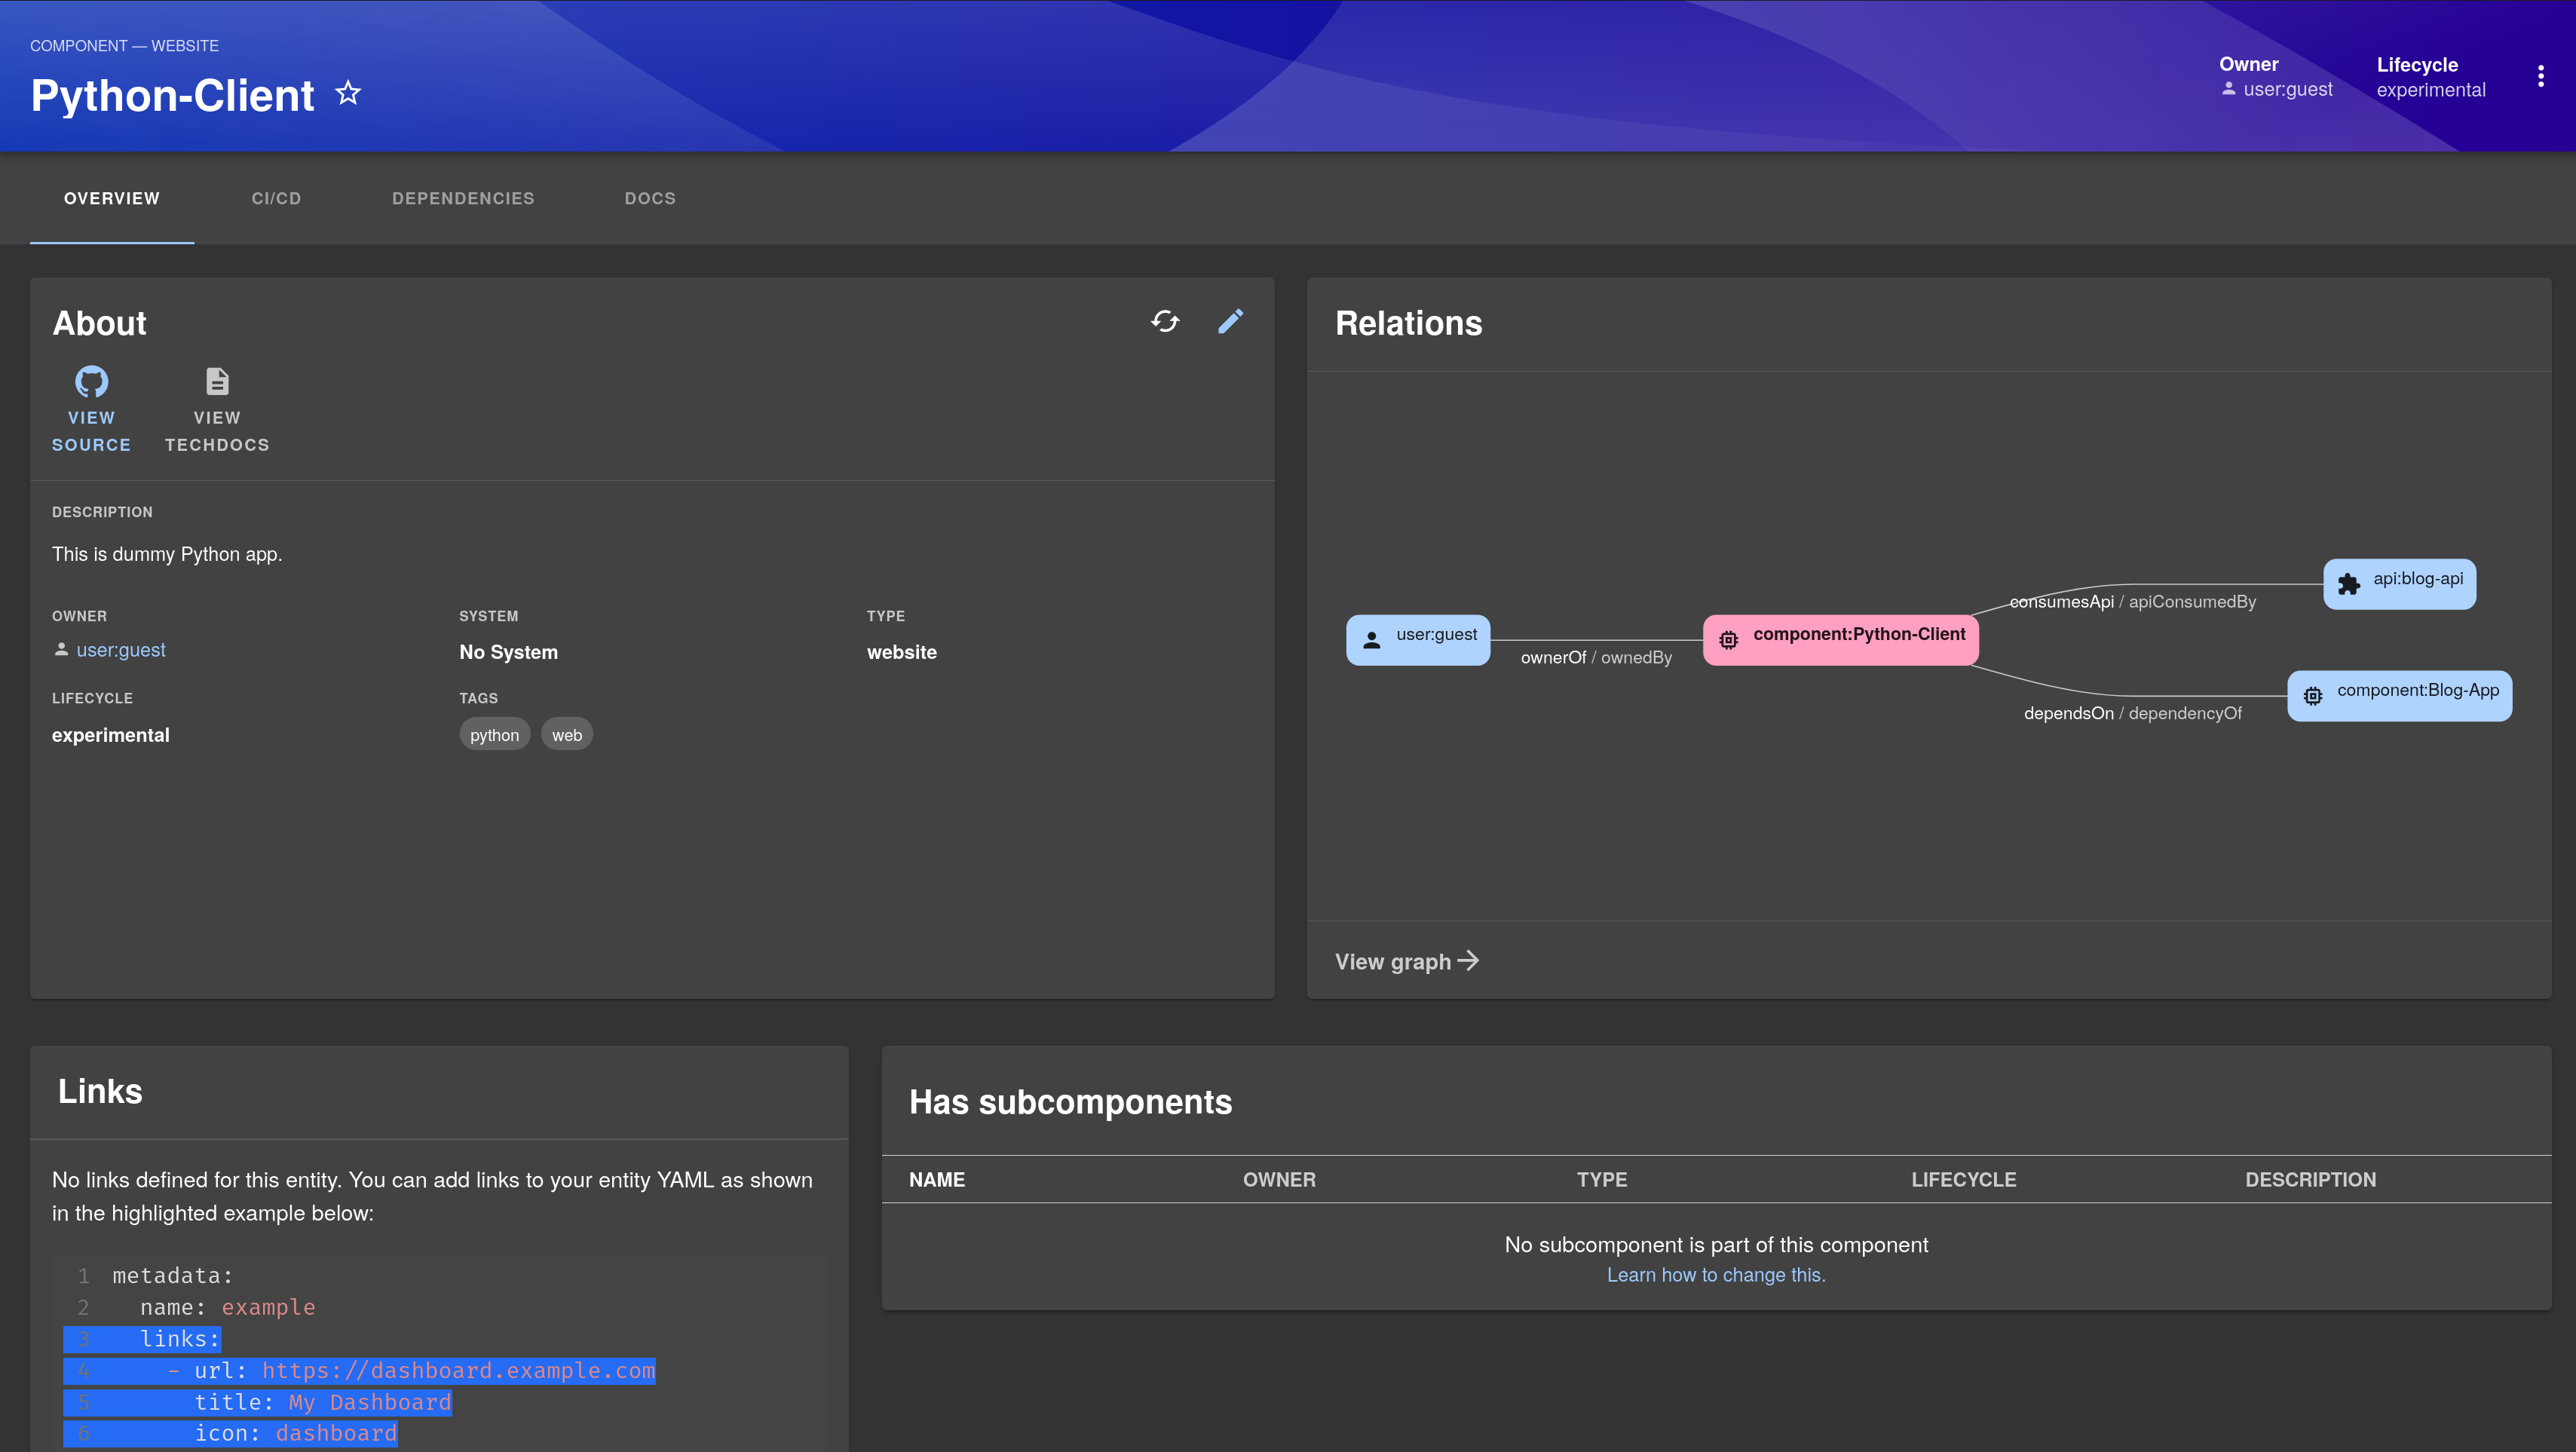
This is very similar to the metadata for Blog-App. The consumesApis key tells Backstage that this component consumes the blog-api API, and the dependsOn key tells Backstage that this component is dependent on the Blog-App component.
As before, commit and push this code and register the component. You’ll notice that the relations graph shows how the Python-Client component is related to the blog-api API and the Blog-App component:
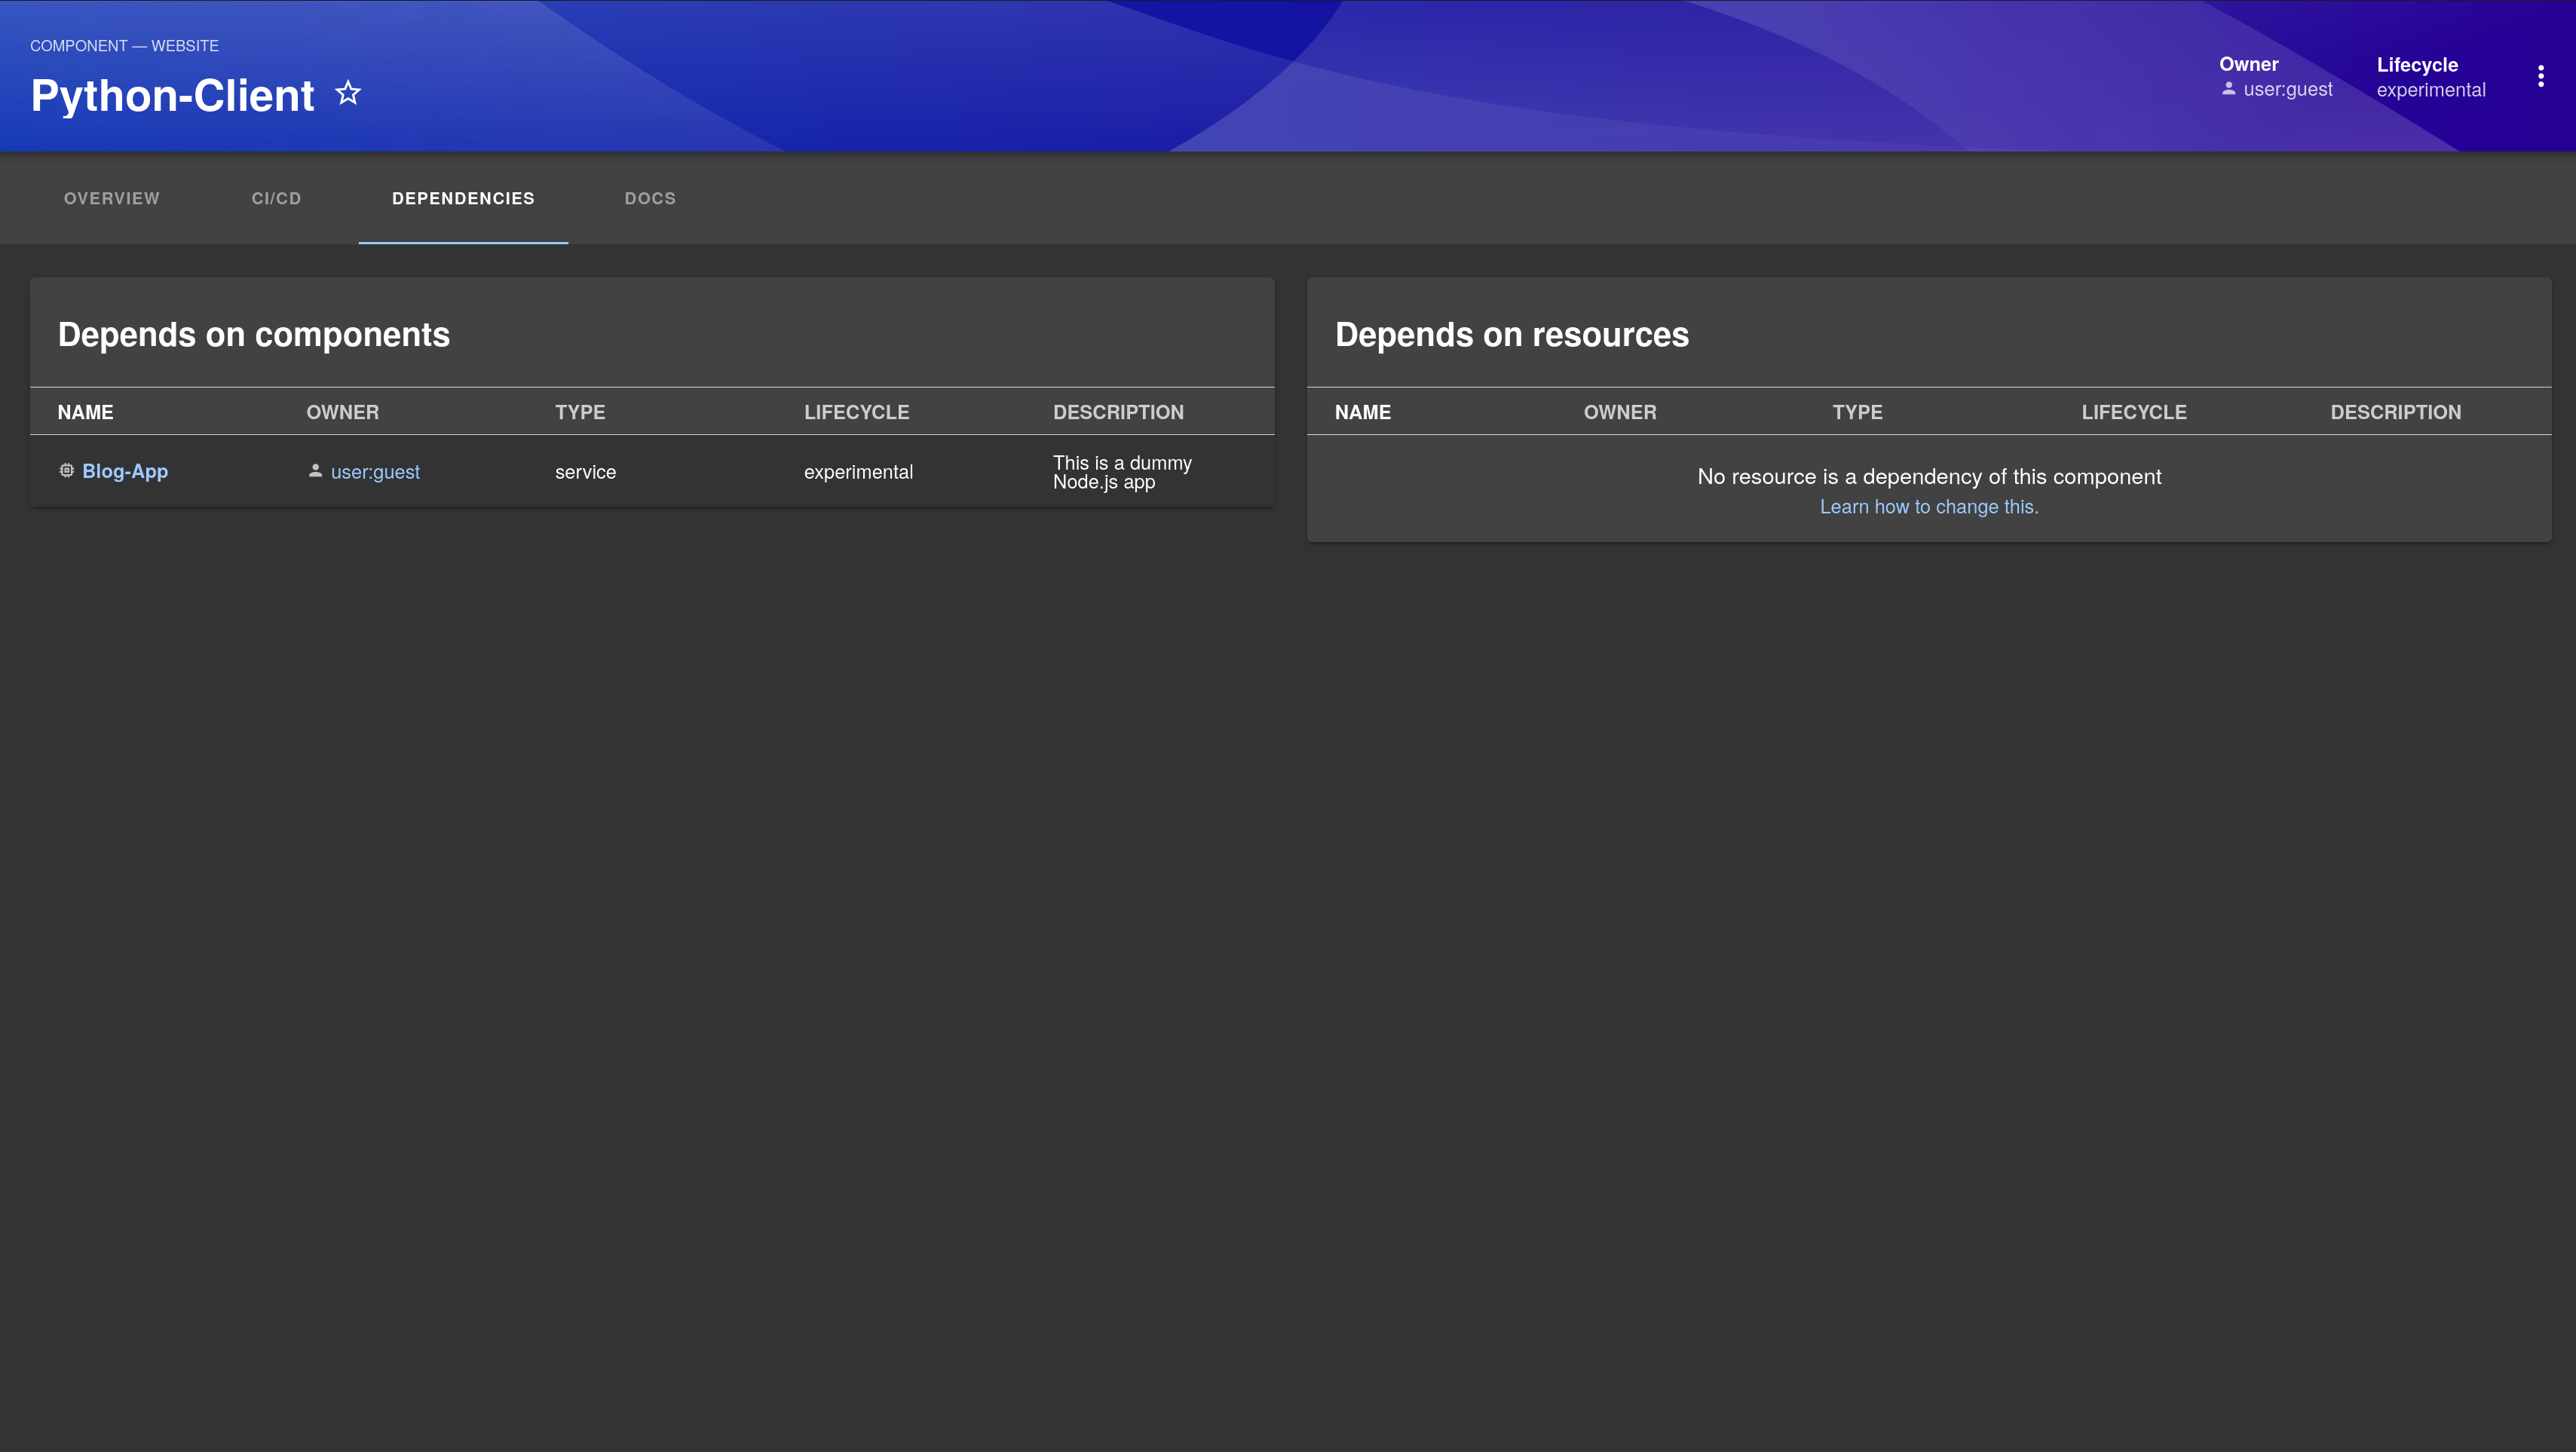
If you go to the DEPENDENCIES tab, you’ll see that the Blog-App component shows up as a dependency:
Click Blog-App to be taken to its overview page, where you’ll see the relations graph has been updated to include the new Python-Client component:
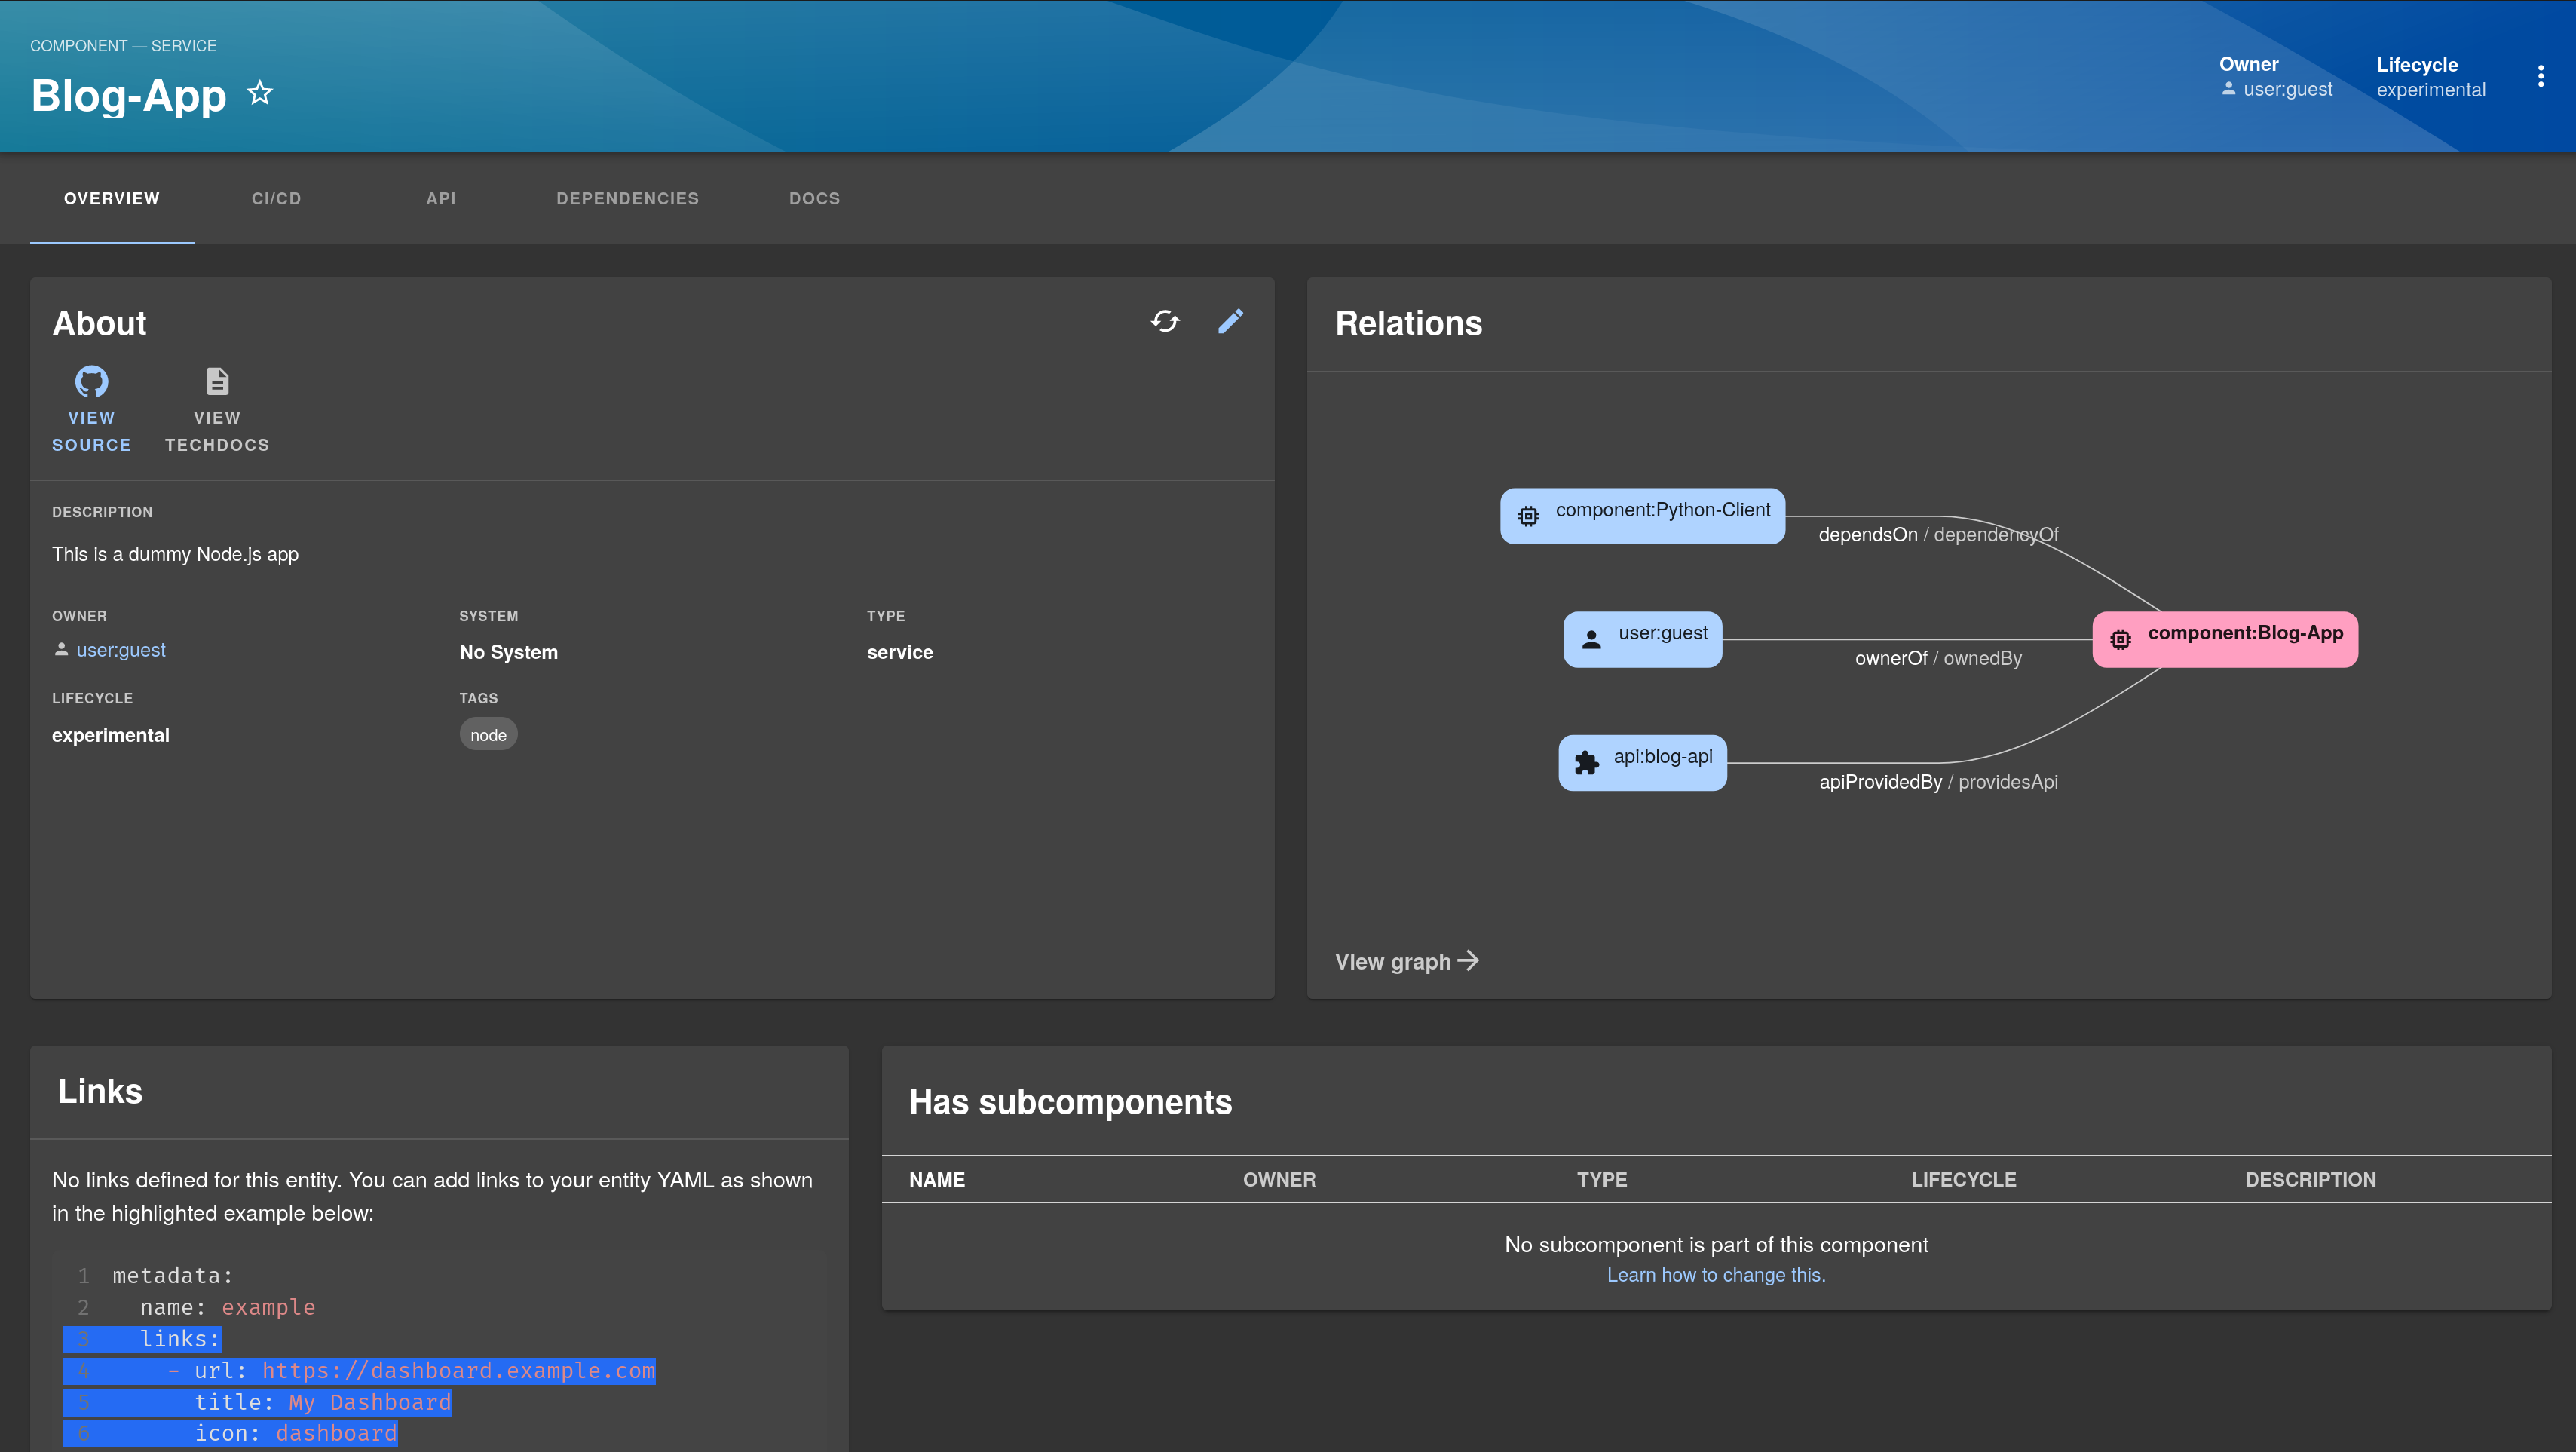
Congratulations! Now you not only have a catalog of your components, but you also have a clear understanding of how they’re related to each other.
Conclusion
Developer portals are a must for any company that uses a lot of services and components in its ecosystem. With a developer portal, you can consolidate all your components in one place, which increases developer productivity and provides a bird’s-eye view of the entire ecosystem.
Backstage helps you build a powerful developer portal with features like a Software Catalog, TechDocs, and Templates. In this article, you learned all about these features as well as how to set up a Backstage instance and register components in the Software Catalog. You also learned how to add APIs and dependencies among components.
Earthly Lunar: Monitoring for your SDLC
Achieve Engineering Excellence with universal SDLC monitoring that works with every tech stack, microservice, and CI pipeline.


