Using Docker Init in Go

Table of Contents
If your main job is writing Dockerfiles, you probably spend too much time creating and editing Dockerfiles and Docker Compose configurations. Maybe you’ve already created some template files to save some time, but in the end, it doesn’t help much because plain files have static content, and no project is the same.
The docker init command, which was introduced with Docker Desktop 4.18, promises to be a faster and more flexible way of setting up a new Dockerfile. If successful, it could become the new standard way of initializing a container-based project.
With docker init, generating files for Docker and Docker Compose only takes a few seconds. Even if you have complex configuration requirements, docker init lets you start with a useful default configuration.
In this article, you’ll learn all about docker init and how to use it to speed up Dockerizing a Go app.
Prerequisites
This tutorial assumes that you have basic knowledge of Go, Docker, Dockerfiles, and Docker Compose. If you want to follow along, make sure you have the following tools installed:
- A Go toolchain
- Docker Desktop 4.18 or later
Docker Init: A Versatile Container Configuration Generator
Before Docker Init came into existence, turning a Go project into a containerized application was fraught with repetitive tasks: create a Dockerfile, list the standard steps, create a Docker Compose configuration, and so on.
For a quick test setup, you could get away with writing a basic Dockerfile, like so:
ARG GO_VERSION=1.21.3
FROM golang:${GO_VERSION}
WORKDIR /src

COPY . .

RUN go mod download -x

RUN CGO_ENABLED=0 go build -o /bin/server.

EXPOSE 7890

ENTRYPOINT [ "/bin/server" ]
Even though this is a super minimal Dockerfile, it’s boring and repetitive to have to write the same type of file over and over again.
Moreover, this Dockerfile leaves a lot to be desired:
- The final image contains the complete Go toolchain and the project’s source code.
- The
golangDocker image might use an OS image that you don’t want or need in the final image. (A $64 question: what OS image is thegolangimage based on?) - The Dockerfile does not take care of basic setup tasks such as installing up-to-date TLS certificates.
- The Dockerfile doesn’t create a nonprivileged user to run the app under. You wouldn’t want to run your app as
rooteven inside a container, right?
Taking all of these requirements into account, the Dockerfile would be extensive and would take a long time to write. There would also be plenty of occasions to introduce subtle bugs that might be hard to spot, let alone track down.
Let Docker Init Do the Tedious Work
With Docker Init, everything changes. Docker Init is a language-aware Dockerfile and Docker Compose configuration generator that can inspect your project to determine the proper settings for the Dockerfile to be generated.
If you run docker init with no parameters, it goes into interactive mode and asks you to enter or select a few language-specific details. It automatically determines suitable default settings from your app, such as the language of your project (Go), the installed Go version, and even details like the HTTP port your app uses. You can choose to overwrite the suggested values, but the default values are usually adequate.
From your input, Docker Init generates the following:
- A multistage Dockerfile that builds and runs your app
- A
compose.yamlfile for Docker Compose - A
.dockerignorefile with an extensive list of files to ignore
Generating these files instead of writing them from scratch not only saves time but also provides you with a stable container configuration out of the box.
The current version of Docker Init always runs in interactive mode. The only available command line parameters are --help and --version. The focus is definitely on ease of use.
Docker Init currently knows five languages: Go, Python, Node.js, Rust, and ASP.NET. If you want a Dockerfile for a different language, Docker Init can still generate a Dockerfile and a compose.yaml file with decent defaults.
How to Use Docker Init with Go
Now that you know a little more about Docker Init, it’s time to walk through the process of turning a Go web server project into a containerized app.
Imagine that it’s Friday afternoon, and your task this week has been to write a sophisticated web app.
To do so, you create a new Go project in an empty folder by calling the following:
go mod init mywebappThen, you create a main.go file with the following content:
package main

import (
    "fmt"
    "log"
    "net/http"
)

func main() {
    http.HandleFunc("/", func(w http.ResponseWriter, r *http.Request) {
        fmt.Fprintf(w, `<h1>Hello, World! <span style="color:#55D7E5">ʕ◔ϖ◔ʔ</span></h1>`)
    })

    log.Println("Listening on http://localhost:7890")
    log.Println(http.ListenAndServe(":7890", nil))
}
To make sure all your dependencies are up to date, you run this:
go mod tidyAs you’ll see later, the generated Dockerfile creates bind mounts to go.mod and go.sum. However, the Go toolchain does not generate a go.sum file if it’s not necessary. Therefore, you need to create an empty go.mod file to make the Dockerfile succeed, like this:
touch go.sumYou implement a test run of the app:
go run .Then, you point your browser to http://localhost:7890 and see a “Hello, World!” message.
You’ve just finished the test when a salesperson enters the room and asks, “Is the web app ready? Our client just dropped by and wants to get a quick demo.”
The demo environment requires a containerized app, but you know that with docker init you’ll only need a minute to create the necessary container files.
Run Docker Init
To containerize the app, all you need to do is cd into the project directory and ensure that everything is there:
$ cd webapp
$ ls
go.mod     go.sum     main.go
Then, type the following command:
$ docker initThis command starts docker init in interactive mode and presents a list of application platforms to choose from:
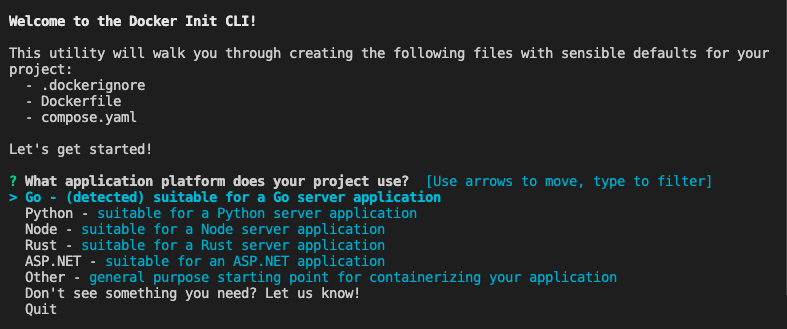
Select Go and hit Enter.
Then, Docker Init will ask you which Go version to use:
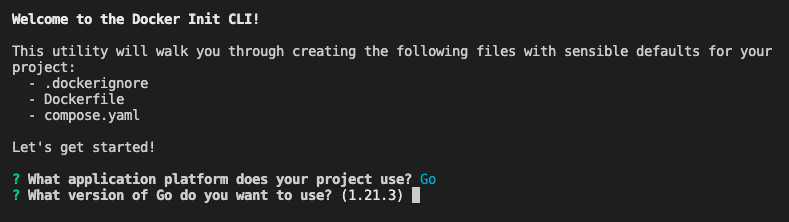
Specify the Go version as 1.M.m, where M is the major version and m is the minor version (eg Go 1.21.3). If you create the Dockerfile for testing, you can also use the string latest instead of the version number. Docker will then use the latest golang image at the time the Dockerfile is processed.
Please note: The version string should not contain a leading v, such as v1.21.3. The format with a v prefix is used by the Go toolchain, whereas the Go version you enter here specifies the version of the golang image. Therefore, you need to follow the Docker version syntax.
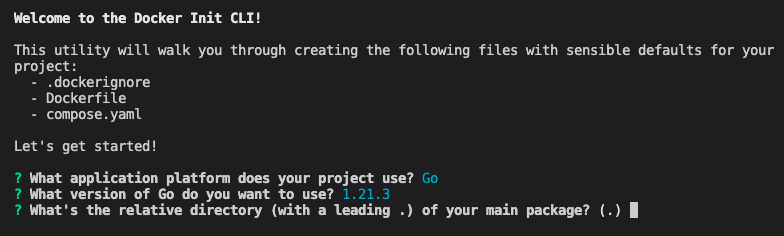
Next, specify the path of your main package relative to the current directory where you invoked docker init:
Finally, specify the port your server listens on:
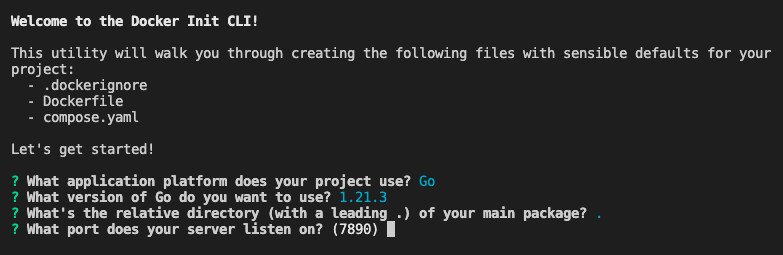
Note that the provided port number is the one that the web app code uses. docker init searches the app’s source code for data like the Go version or a port number to present this data as suitable default values. This is not only convenient but also removes a possible source of errors.
After all the settings are confirmed, docker init creates a Dockerfile, a compose.yaml file, and a .dockerignore file, and provides instructions on how to run the app:
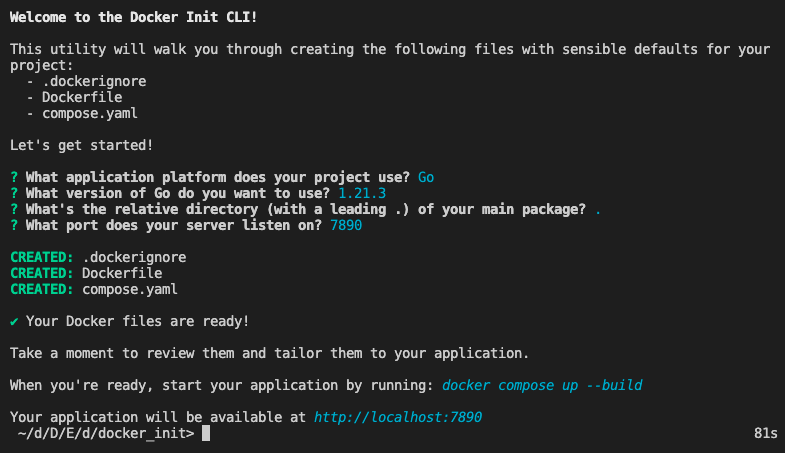
Now, start the app with docker compose up --build, and your browser will show the “Hello, World!” message again at https://localhost:7890.
Move the Docker image to the demo environment, and you’ll make the salesperson incredibly grateful. Your weekend plans are safe.
A Brief Look at the Generated Files
As mentioned above, Docker Init generates three files: a Dockerfile, a compose.yaml file, and a .dockerignore file. Depending on the project, you might need to go through the files to adjust or amend settings, so it’s a good idea to get familiar with the details of the files as docker init generates them.
The Dockerfile
The generated Dockerfile contains two stages: build and final.
In the build stage, Docker uses the golang image to download all dependencies and build the app binary. In the final stage, Docker:
- Sets up an Alpine Linux image
- Downloads TLS certificates
- Creates a non-root user
- Copies the app binary over from the
buildstage - Sets the exposed port and the entry point for your app
In addition, docker init generously adds comments to all the steps and actions so that even Docker newcomers can quickly navigate their way through the build steps:
# syntax=docker/dockerfile:1

# Comments are provided throughout this file to help you get started.
# If you need more help, visit the Dockerfile reference guide at
# https://docs.docker.com/engine/reference/builder/

################################################################################
# Create a stage for building the application.
ARG GO_VERSION=1.21.3
FROM golang:${GO_VERSION} AS build
WORKDIR /src

# Download dependencies as a separate step to take advantage of Docker's caching.
# Leverage a cache mount to /go/pkg/mod/ to speed up subsequent builds.
# Leverage bind mounts to go.sum and go.mod to avoid having to copy them into
# the container.
RUN --mount=type=cache,target=/go/pkg/mod/ \
    --mount=type=bind,source=go.sum,target=go.sum \
    --mount=type=bind,source=go.mod,target=go.mod \
    go mod download -x

# Build the application.
# Leverage a cache mount to /go/pkg/mod/ to speed up subsequent builds.
# Leverage a bind mount to the current directory to avoid having to copy the
# source code into the container.
RUN --mount=type=cache,target=/go/pkg/mod/ \
    --mount=type=bind,target=. \
    CGO_ENABLED=0 go build -o /bin/server .

################################################################################
# Create a new stage for running the application that contains the minimal
# runtime dependencies for the application. This often uses a different base
# image from the build stage where the necessary files are copied from the build
# stage.
#
# The example below uses the alpine image as the foundation for running the app.
# By specifying the "latest" tag, it will also use whatever happens to be the
# most recent version of that image when you build your Dockerfile. If
# reproducibility is important, consider using a versioned tag
# (e.g., alpine:3.17.2) or SHA (e.g., alpine@sha256:c41ab5c992deb4fe7e5da09f67a8804a46bd0592bfdf0b1847dde0e0889d2bff).
FROM alpine:latest AS final

# Install any runtime dependencies that are needed to run your application.
# Leverage a cache mount to /var/cache/apk/ to speed up subsequent builds.
RUN --mount=type=cache,target=/var/cache/apk \
    apk --update add \
        ca-certificates \
        tzdata \
        && \
        update-ca-certificates

# Create a non-privileged user that the app will run under.
# See https://docs.docker.com/develop/develop-images/dockerfile_best-practices/#user
ARG UID=10001
RUN adduser \
    --disabled-password \
    --gecos "" \
    --home "/nonexistent" \
    --shell "/sbin/nologin" \
    --no-create-home \
    --uid "${UID}" \
    appuser
USER appuser

# Copy the executable from the "build" stage.
COPY --from=build /bin/server /bin/

# Expose the port that the application listens on.
EXPOSE 7890

# What the container should run when it is started.
ENTRYPOINT [ "/bin/server" ]
The Docker Compose File
Most containerized apps are composed of multiple components that live in separate containers. docker init generates a Docker Compose file that lets you easily add dependencies such as a database or a proxy server.
The default compose.yaml defines a single service: your app. Like the Dockerfile, the compose file contains extensive comments, including an example configuration for adding a PostgreSQL database, defining a volume, and setting secrets:
# Comments are provided throughout this file to help you get started.
# If you need more help, visit the Docker compose reference guide at
# https://docs.docker.com/compose/compose-file/

# Here the instructions define your application as a service called "server".
# This service is built from the Dockerfile in the current directory.
# You can add other services your application may depend on here, such as a
# database or a cache. For examples, see the Awesome Compose repository:
# https://github.com/docker/awesome-compose
services:
  server:
    build:
      context: .
      target: final
    ports:
      - 7890:7890

# The commented out section below is an example of how to define a PostgreSQL
# database that your application can use. `depends_on` tells Docker Compose to
# start the database before your application. The `db-data` volume persists the
# database data between container restarts. The `db-password` secret is used
# to set the database password. You must create `db/password.txt` and add
# a password of your choosing to it before running `docker compose up`.
#     depends_on:
#       db:
#         condition: service_healthy
#   db:
#     image: postgres
#     restart: always
#     user: postgres
#     secrets:
#       - db-password
#     volumes:
#       - db-data:/var/lib/postgresql/data
#     environment:
#       - POSTGRES_DB=example
#       - POSTGRES_PASSWORD_FILE=/run/secrets/db-password
#     expose:
#       - 5432
#     healthcheck:
#       test: [ "CMD", "pg_isready" ]
#       interval: 10s
#       timeout: 5s
#       retries: 5
# volumes:
#   db-data:
# secrets:
#   db-password:
#     file: db/password.txt
The .dockerignore File
The third file that docker init generates is a .dockerignore file with a sensible default list of files that should not be copied into the container image.
If your Go build process is more complex than a simple go build, you’ll want to review the output for artifacts that should stay out of the image and add them here:
# Include any files or directories that you don't want to be copied to your
# container here (e.g., local build artifacts, temporary files, etc.).
#
# For more help, visit the .dockerignore file reference guide at
# https://docs.docker.com/engine/reference/builder/#dockerignore-file

**/.DS_Store
**/.classpath
**/.dockerignore
**/.env
**/.git
**/.gitignore
**/.project
**/.settings
**/.toolstarget
**/.vs
**/.vscode
**/*.*proj.user
**/*.dbmdl
**/*.jfm
**/bin
**/charts
**/docker-compose*
**/compose*
**/Dockerfile*
**/node_modules
**/npm-debug.log
**/obj
**/secrets.dev.yaml
**/values.dev.yaml
LICENSE
README.md
Conclusion: A New Time Saver
In just a few steps, you’ve successfully containerized your Go web app, making it Docker Compose-ready for effortless deployment. Docker Init has streamlined the process, handling the initial grunt work for you. But why stop there? Take your container management to the next level with Earthly. This powerful tool can further enhance your build automation, ensuring that your builds are reproducible, portable, and efficient. Dive in and see how Earthly can complement your Docker setup and elevate your development workflow.
Turn your engineering standards into automated guardrails that provide feedback directly in pull requests, with 100+ guardrails included out of the box and support for the tools and CI/CD systems you already have.