Using Docker Init in Node.js

Table of Contents
Docker has revolutionized the way developers build, ship, and run applications. However, the initial setup can sometimes be daunting, especially for Node.js developers who are new to containerization. Thankfully, docker init can help.
The docker initcommand expedites the process of launching your Node.js application within a Docker container, guaranteeing that the configuration is fine-tuned for a Node.js environment. As part of the Docker CLI, this command simplifies the process of Dockerizing your project by automatically generating essential files like Dockerfile, .dockerignore, and compose.yaml. This means you spend less time wrestling with configurations and more time focusing on your application logic.
In this article, you’ll learn all about docker init in the context of a Node.js project. First, you’ll set up a project and use Dockerfile and docker-compose.yaml files to manually build and run your Docker containers. Then, you’ll learn about the syntax and application of docker init and how you can use it to simplify your containerization process.
Prerequisites
Before you begin this tutorial, make sure you have the following installed on your system:
- Node.js (v16 or later) to run the Node.js application
- Docker Desktop (v4.19 or later) to containerize the application
You can verify the installations by running node -v, npm -v, and docker --version in your terminal. The output should look something like this:
$ node -v
v16.15.1

$ npm -v
8.1.2

$ docker --version
Docker version 24.0.6, build ed223bc
This confirms that Node.js, npm, and Docker are correctly installed on your system.
Setting Up the Project
To set up the project, you need to clone a sample Node.js project and switch to the starter branch. To do so, open your terminal and run the following:
git clone https://github.com/Umoren/nodejs-sample-dockerinit.git
cd nodejs-sample-dockerinit
git checkout starter
For this project, index.js is the main entry point, and data.js handles data manipulation. For database interactions, db.js manages connections, and init.sql initializes the database schema. Security credentials for the database are stored in db/password.txt, and error.log captures any errors. This setup leverages Express for routing and PostgreSQL for data storage.
Writing Your Dockerfile and Docker Compose File Manually
Before the advent of docker init, you’d typically start your project on Docker by manually writing a Dockerfile and a docker-compose.yaml file. For instance, for this project, you’d create a file named Dockerfile in the root directory of your project and add the following content:
# Use the official Node.js image from Docker Hub
FROM node:16

# Set the working directory in the container
WORKDIR /usr/src/app

# Copy package.json and package-lock.json
COPY package.json package-lock.json ./

# Install npm packages
RUN npm install

# Copy the entire project
COPY . .

# Set the command to run your application
CMD ["node", "index.js"]
Then, you’d create a docker-compose.yaml file in the same directory with the following content:
version: '3'
services:
  web:
    build: .
    ports:
      - "5000:5000"
    depends_on:
      - db
  db:
    image: postgres:13
    environment:
      POSTGRES_USER: postgres
      POSTGRES_PASSWORD: password
      POSTGRES_DB: nodejssample
    volumes:
      - db-data:/var/lib/postgresql/data

volumes:
  db-data:
At this point, you could build and run your Docker container with these files, but if you frequently work on multiple Node.js projects, you’ll quickly realize that this process becomes repetitive and time-consuming. Each new project requires you to create a new Dockerfile and Docker Compose file. Even tiny mistakes — such as incorrect file paths, syntax errors, or misconfigured environment variables — can lead to issues such as failed builds, application errors, or security vulnerabilities.
This is where docker init comes into play. It automates this setup, ensuring a consistent and error-free environment across all your projects.
Understanding Docker Init
The docker init command is a utility that automates the initial setup of Dockerizing your application. When you run this command in your project directory, it scans the existing files and generates a set of Docker-related files tailored to your project’s needs. For Node.js projects, this means creating a Dockerfile optimized for a Node.js environment, a .dockerignore file to exclude unnecessary files, and a compose.yaml file for orchestrating your services.
Additionally, docker init can tailor your setup based on your project. For instance, if it detects a package.json file in your Node.js project, it will automatically include Node.js-specific commands in the Dockerfile. This ensures that your Docker container has all the necessary dependencies and configurations it needs out of the box.
Syntax and Application in Node.js
The syntax for using docker init is straightforward. When you navigate to your Node.js project directory and run docker init, the command generates Docker-related files, each filled with sensible defaults for a Node.js project. For example, the generated Dockerfile will use the Node.js image from Docker Hub, set the working directory in the container to /usr/src/app, and copy over the package.json and package-lock.json files before running npm install.
When to Use Docker Init
One of the key benefits of using docker init is that it generates a Dockerfile and a Docker Compose file that are stable and optimized for your specific Node.js project. This is particularly useful for complex projects that require databases like Postgres because you don’t have to configure these services manually.
The following are a few other use cases where you should use docker init:
- Rapid prototyping: If you’re in the early stages of development,
docker inithelps you get up and running quickly without worrying about setting up your environment. For more information on how Docker aids in rapid prototyping, check out Docker’s Get Started Guide. - Automated configuration:
docker inittakes the guesswork out of setting up your Docker environment by automatically generating configuration files tailored to your project. This is especially useful for complex projects that require specific dependencies, as it ensures you won’t miss any critical setup steps. - Streamlined CI/CD: With
Dockerfileandcompose.yamlfiles already set up, integrating your Node.js app into a CI/CD pipeline is easy. - Microservices management: If you’re building a microservices architecture,
docker initcan quickly generate Docker setups for each individual service. This makes it quicker to manage the deployment, scaling, and networking of these services in a unified manner.
How to Use Docker Init with Node.js
To help you better understand how to use docker init, you’ll work with a sample Node.js project that uses Express to handle HTTP requests and PostgreSQL for data storage. Functions for fetching and manipulating data are abstracted into a separate data.js file.
To get started with the tutorial, clone the project from the master branch of this GitHub repository.
Initialize the Project with Docker Init
Navigate to the root directory of the cloned project and run the following:
docker initYou’ll be prompted to choose the application platform your project uses (options include Node.js, Go, Python, Rust, and ASP.NET). The Docker Init CLI will automatically detect that you’re working with a Node.js project, the version of Node.js you’re using, the package manager, and the start script:

The CLI walks you through the rest of the options, which are straightforward thanks to docker init automatically detecting your project environment. When you’re done, your terminal will look like this:
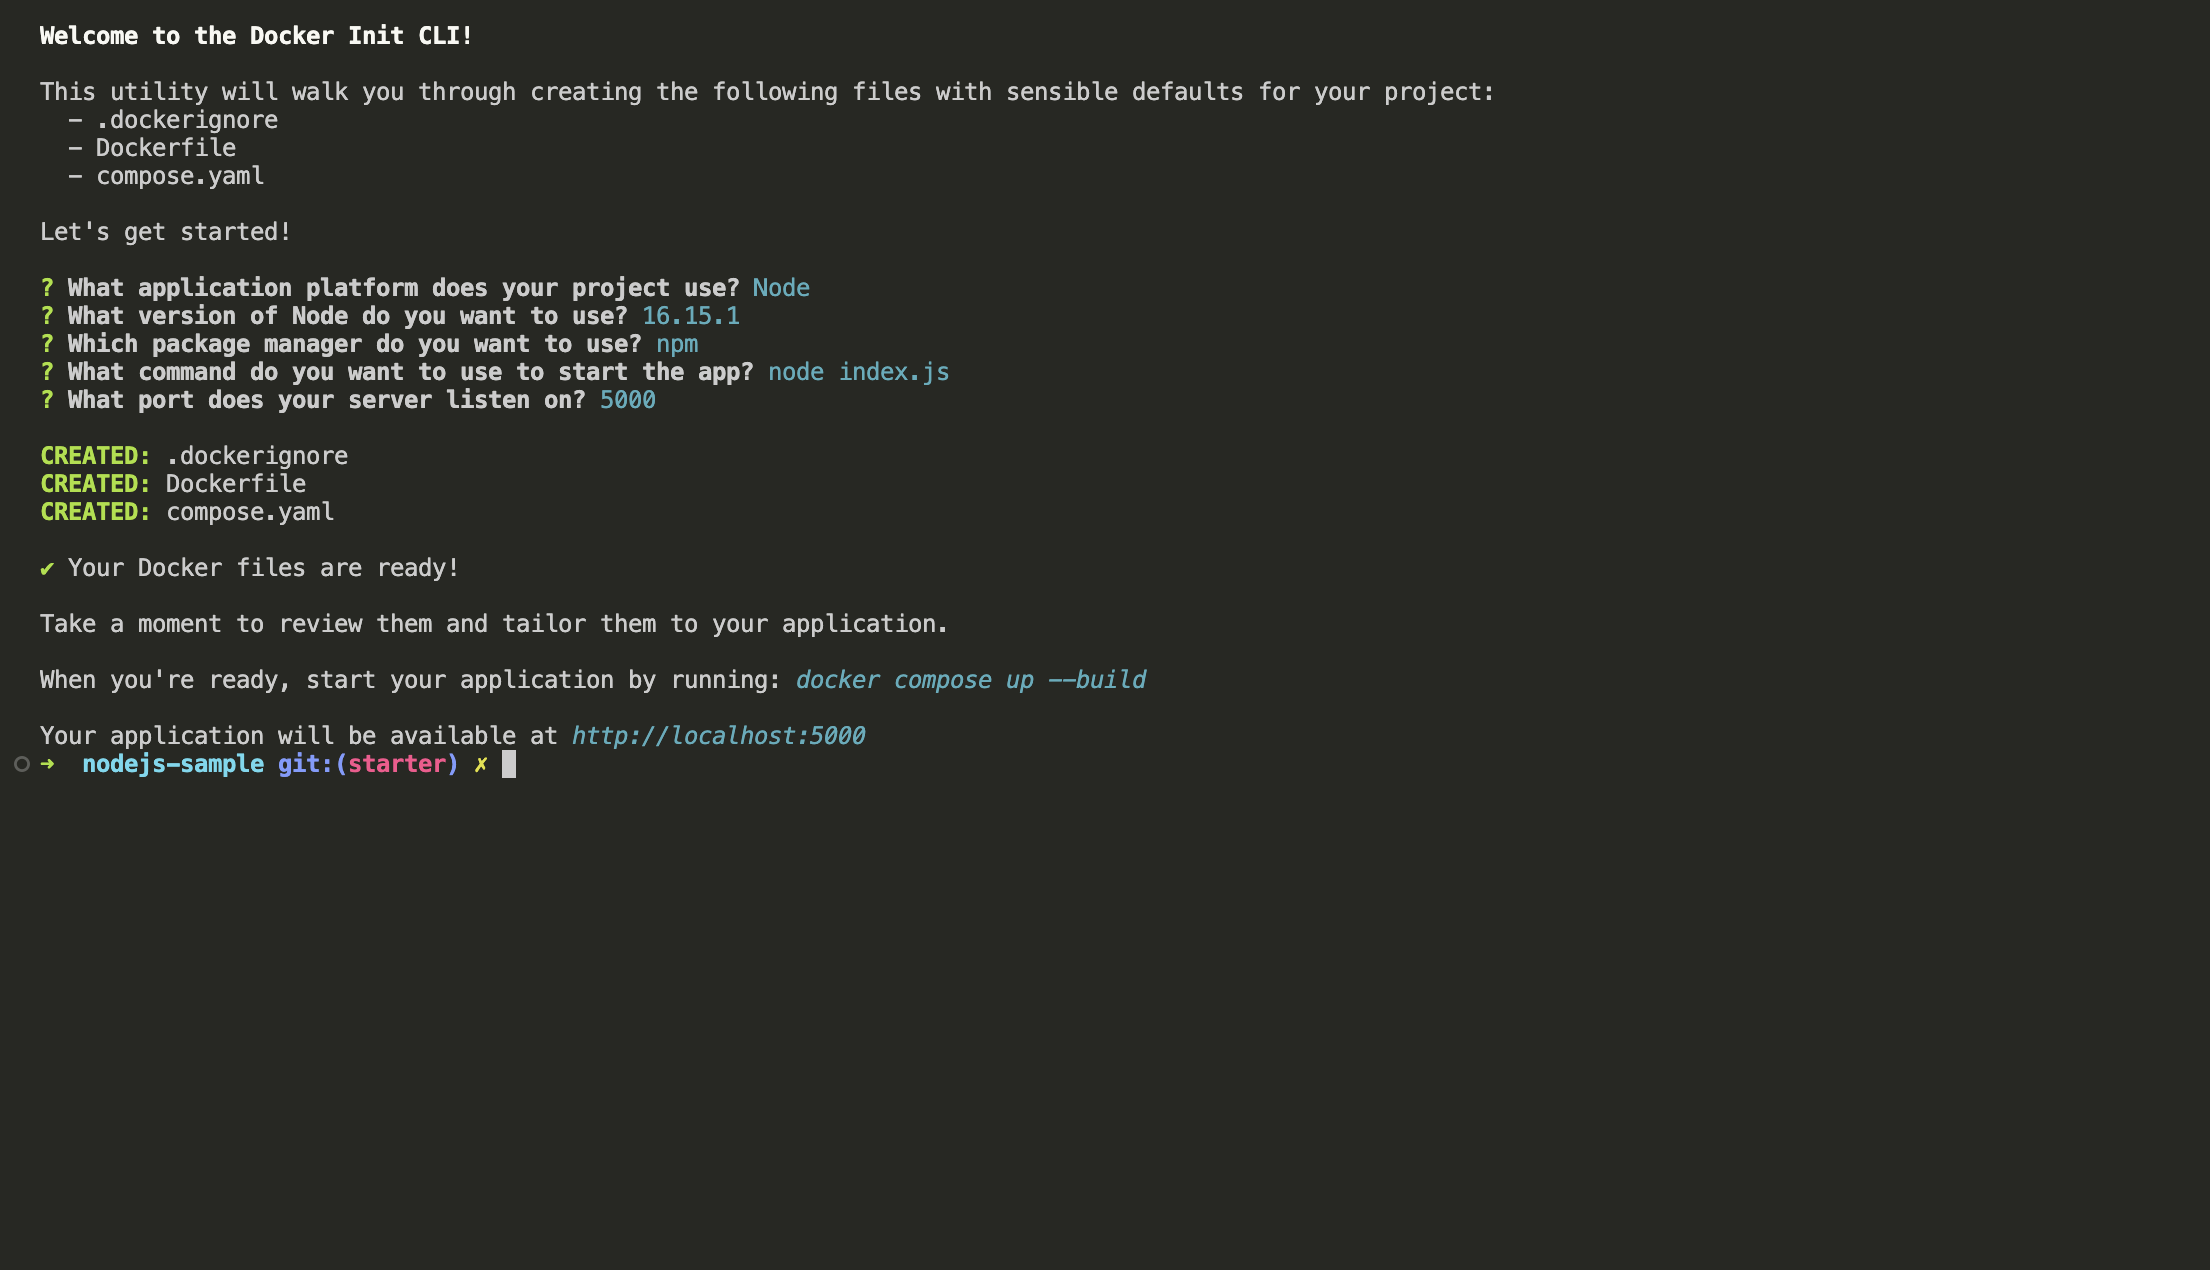
This process generates three files: .dockerignore, compose.yaml, and Dockerfile.
.dockerignore
.dockerignore specifies files to ignore when building the image, including:
**/.classpath
**/.dockerignore
**/.env
**/.git
**/.gitignore
**/.project
**/.settings
**/.toolstarget
**/.vs
**/.vscode
**/.next
**/.cache
**/*.*proj.user
**/*.dbmdl
**/*.jfm
**/charts
**/docker-compose*
**/compose*
**/Dockerfile*
**/node_modules
**/npm-debug.log
**/obj
**/secrets.dev.yaml
**/values.dev.yaml
**/build
**/dist
LICENSE
README.md
This is crucial for excluding sensitive files like environment variables or unnecessary files that can make the image bulky, such as node_modules, npm-debug.log, or /dist and .yaml configuration files.
compose.yaml
The compose.yaml file specifies the services to run in your project (ie the Node.js application and the PostgreSQL database):
services:
  server:
    build:
      context: .
    environment:
      NODE_ENV: production
    ports:
      - 5000:5000
It uses the Dockerfile in the current directory to build the image and sets the environment variable NODE_ENV to production. It also maps port 5000 inside the container to port 5000 on the host machine.
You have to modify this file to suit your application’s needs. To do so, modify compose.yaml to contain the following:
services:
  server:
    build:
      context: .
    environment:
      NODE_ENV: production
    ports:
      - 5000:5000

# You must create `db/password.txt` and add a password of your choosing
# to it before running `docker-compose up`.
    depends_on:
      db:
        condition: service_healthy
  db:
    image: postgres
    restart: always
    user: postgres
    secrets:
      - db-password
    volumes:
      - db-data:/var/lib/postgresql/data
      - ./init.sql:/docker-entrypoint-initdb.d/init.sql
    environment:
      - POSTGRES_DB=nodejssample
      - POSTGRES_PASSWORD_FILE=/run/secrets/db-password
    expose:
      - 5432
    healthcheck:
      test: [ "CMD", "pg_isready" ]
      interval: 10s
      timeout: 5s
      retries: 5
volumes:
  db-data:
secrets:
  db-password:
    file: db/password.txt
In this code, you introduce several fundamental changes to accommodate the PostgreSQL database alongside your Node.js application. First, you add a depends_on field under the server service, specifying that the database service (db) must be healthy before the server starts. This ensures a smooth startup sequence where the database is fully initialized before the application tries to connect to it.
Next, you introduce a new db service and specify its image as postgres, ensuring that Docker pulls the official PostgreSQL image. The restart: always line makes sure that if the database service fails, Docker will automatically try to restart it. You set the user as postgres to run the database with the default PostgreSQL user.
For security, you use Docker secrets to manage the database password specified under the secrets field. This is a more secure way of handling sensitive information than hard-coding it into the file.
You also define two volumes: one for persisting the database data and another for running an initialization SQL script. This ensures that your database is persistent and preconfigured upon startup. The environment field allows you to set necessary PostgreSQL environment variables, including the database’s name and the password file’s location.
Lastly, you add a healthcheck that uses PostgreSQL’s pg_isready command to ensure the database is healthy and ready to accept connections. This is crucial for the depends_on condition you set previously.
Dockerfile
The Dockerfile file specifies the base Node.js image to use, sets the working directory in the container, and defines the commands to run the application:
# syntax=docker/dockerfile:1

ARG NODE_VERSION=16.15.1

FROM node:${NODE_VERSION}-alpine

ENV NODE_ENV production

WORKDIR /usr/src/app

RUN --mount=type=bind,source=package.json,target=package.json \
    --mount=type=bind,source=package-lock.json,target=package-lock.json \
    --mount=type=cache,target=/root/.npm \
    npm ci --omit=dev

USER node

COPY . .

EXPOSE 5000

CMD node index.js
Run the App in a Docker Container
To build and run the application, execute the following:
docker-compose upYou should see the following in your terminal:
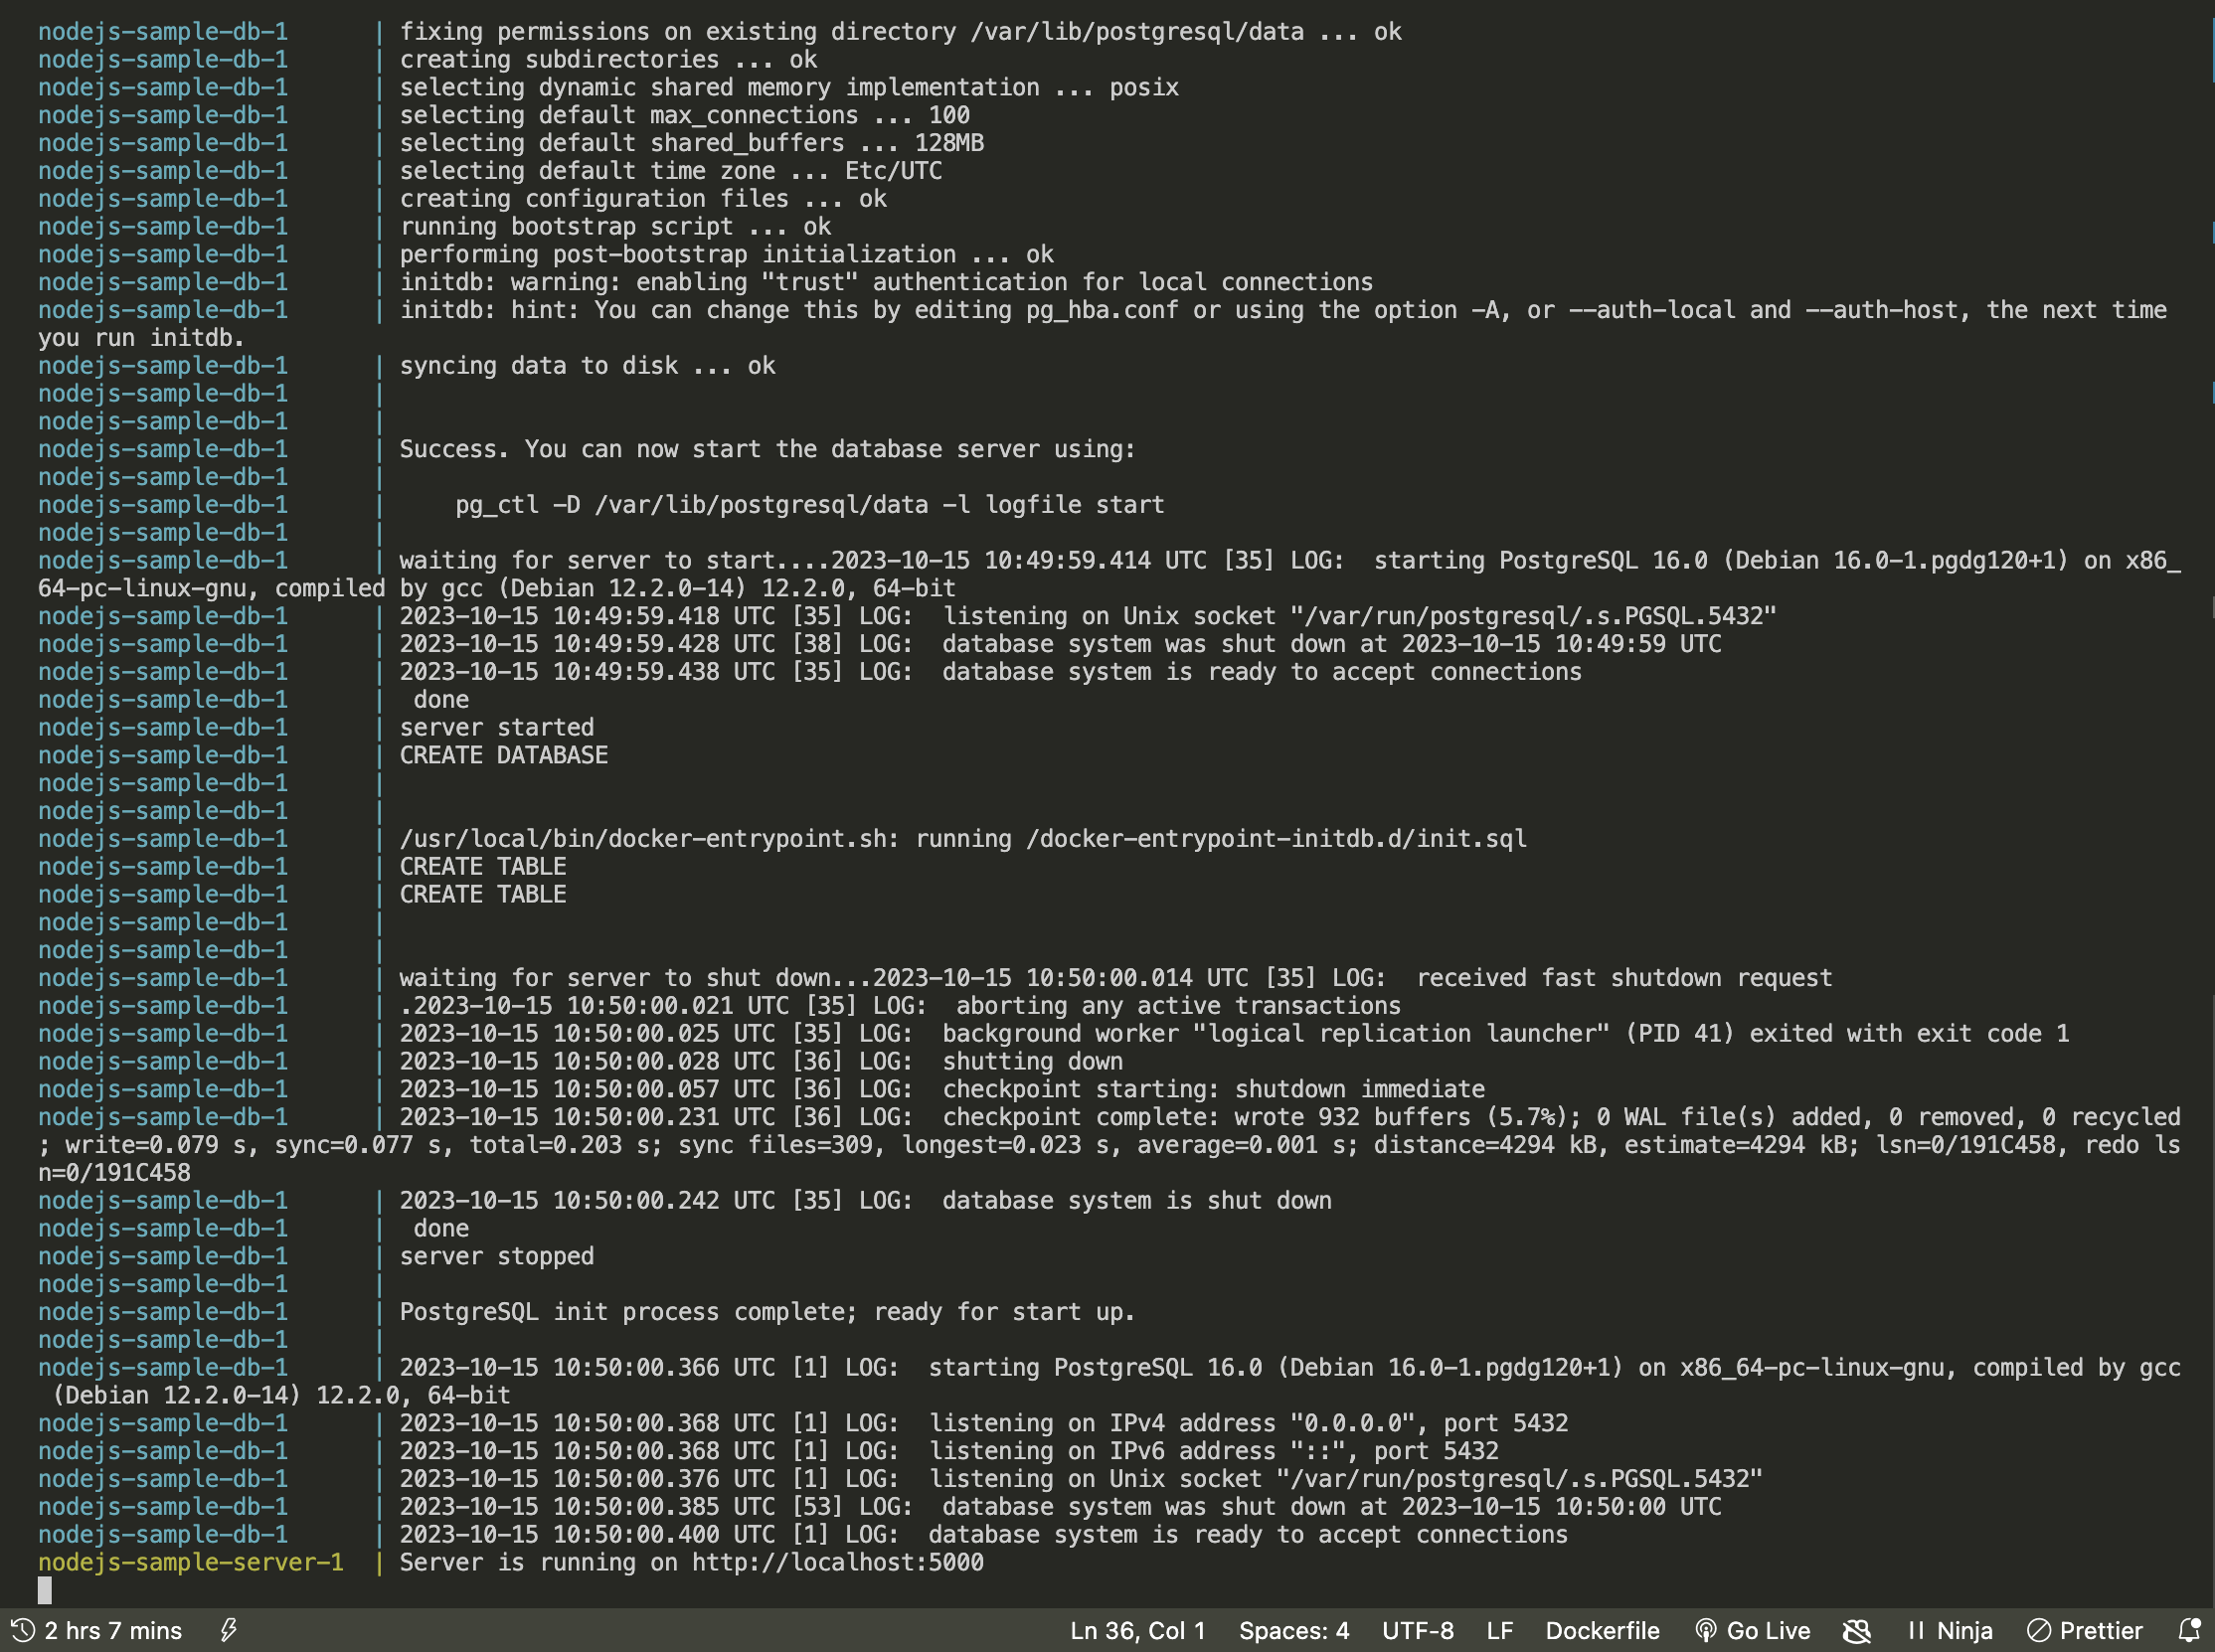
docker-compose up commandThis command builds the Docker image and runs the containers defined in compose.yaml. This lets you see your Node.js app in action within a Dockerized environment.
Conclusion
In this article, we’ve covered the docker init command and its benefits for Dockerizing Node.js projects. You’ve seen how it automates file creation, customizes to your project, and streamlines development workflows, making it a valuable asset for efficient and stable development.
To take your containerization skills even further, consider exploring Earthly. It’s a powerful tool that complements Docker by ensuring your builds are reproducible and consistent across different environments. With Earthly, you can define your build process in a clear and declarative manner, just as you’ve learned to define your Docker environment with docker init. Keep your Docker game strong and your builds reliable with Earthly.
Turn your engineering standards into automated guardrails that provide feedback directly in pull requests, with 100+ guardrails included out of the box and support for the tools and CI/CD systems you already have.