15 Essential Linux Terminal Commands
This article explores essential Linux productivity commands. Earthly ensures your builds are reproducible with precision. Check it out.
Linux, a powerful, free, stable, secure, and highly customizable operating system, is essential for any developer’s workflow. The Linux terminal interacts with the operating system for all basic and advanced tasks. Moreover, most web servers run Linux, and tools like Docker work by providing an additional layer of abstraction and automation on top of Linux.
While some distributions have GUI (graphical user interface), the GUI is limited with regard to functionality and customization. The terminal, or the shell, provides you with the power to customize and carry out tasks in seconds that would have been tedious, multi-click steps on a GUI. You can chain commands to run multiple commands together with an order of execution or simultaneously, which makes your workflow optimized and efficient.
In this post, you’ll learn about fifteen essential commands—commands that will help supercharge you as a Linux user. The commands in this post have been selected based on their popularity and usefulness.
Grep
Grep allows you to search a stream or file for a particular pattern of characters, then copies the line to any configured output stream.
Grep is especially useful for finding a specific entry in logs or going through large files to find specific patterns. When logs or files are enormous, scrolling through them isn’t efficient, and grep comes to your rescue.
It’s also useful if you find yourself wondering where you kept a specific entry in a directory. The GUI way to find the entry in a file requires you to go through all the files one by one. Grep allows you to pass more than one file as a parameter, sparing you the hassle of opening and searching through the files.
Syntax
grep [option...] [character pattern] [file1 file2...]When run, the above command will look like grep blue abcd.txt and will return all occurrences of “blue” in the file abcd.txt. Adding --count at the end of the command will count the number of occurrences of the searched word. The --color tag, which colorizes matching text, can also be used to make occurrences easier to read.
Below is a screenshot showing how to pipe grep:
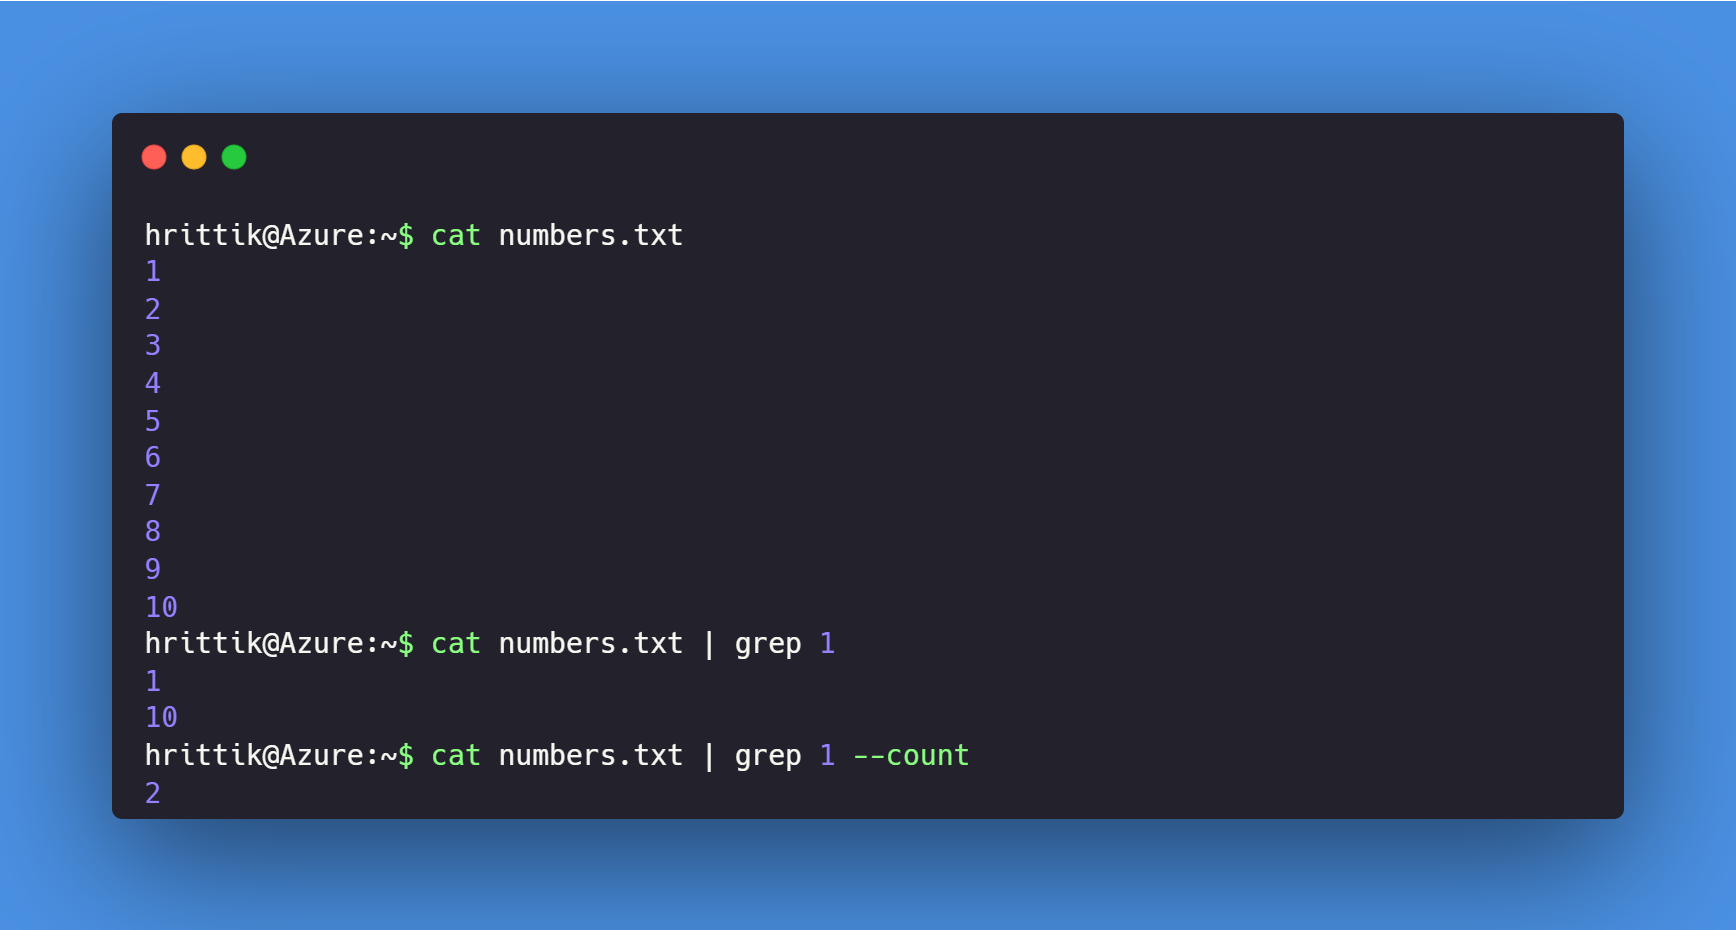
In the above example, you can see that the first cat command displays the content of the file in your terminal. When you use pipe, the output of the first command is piped as an input to the second command, which here is the grep command. We’ll look at the pipe in more detail later.
The output of ‘grep 1’ is all content with the number ‘1’ in it from the file numbers.txt; by using the --count flag, it counts the occurrence and shows the result in your terminal.
Curl
Curl, short for “client URL,” is used to transfer data accessed through URLs between servers and devices. Curl supports an impressive array of transfer protocols and is commonly used for things like downloading files.
Syntax
curl [option…] [URL]To download a file, you can use curl -O URL, which saves the file in your directory.

To make a POST request, you can use curl --request POST https://www.example.com/. The above code is a cURL command that makes a POST request to the https://www.example.com/ website.
Pipe
Suppose you want to find all occurrences of a given word on a website. One way to do this would be to download the file using curl and then grep the pattern to get your results.
Another way would be using pipe, represented as |, to retrieve all the occurrences. Using pipe, you can get these results in a single command instead of running multiple commands sequentially. The pipe command works by treating the output of the first command as the input for the second one.
Syntax
command1 | command2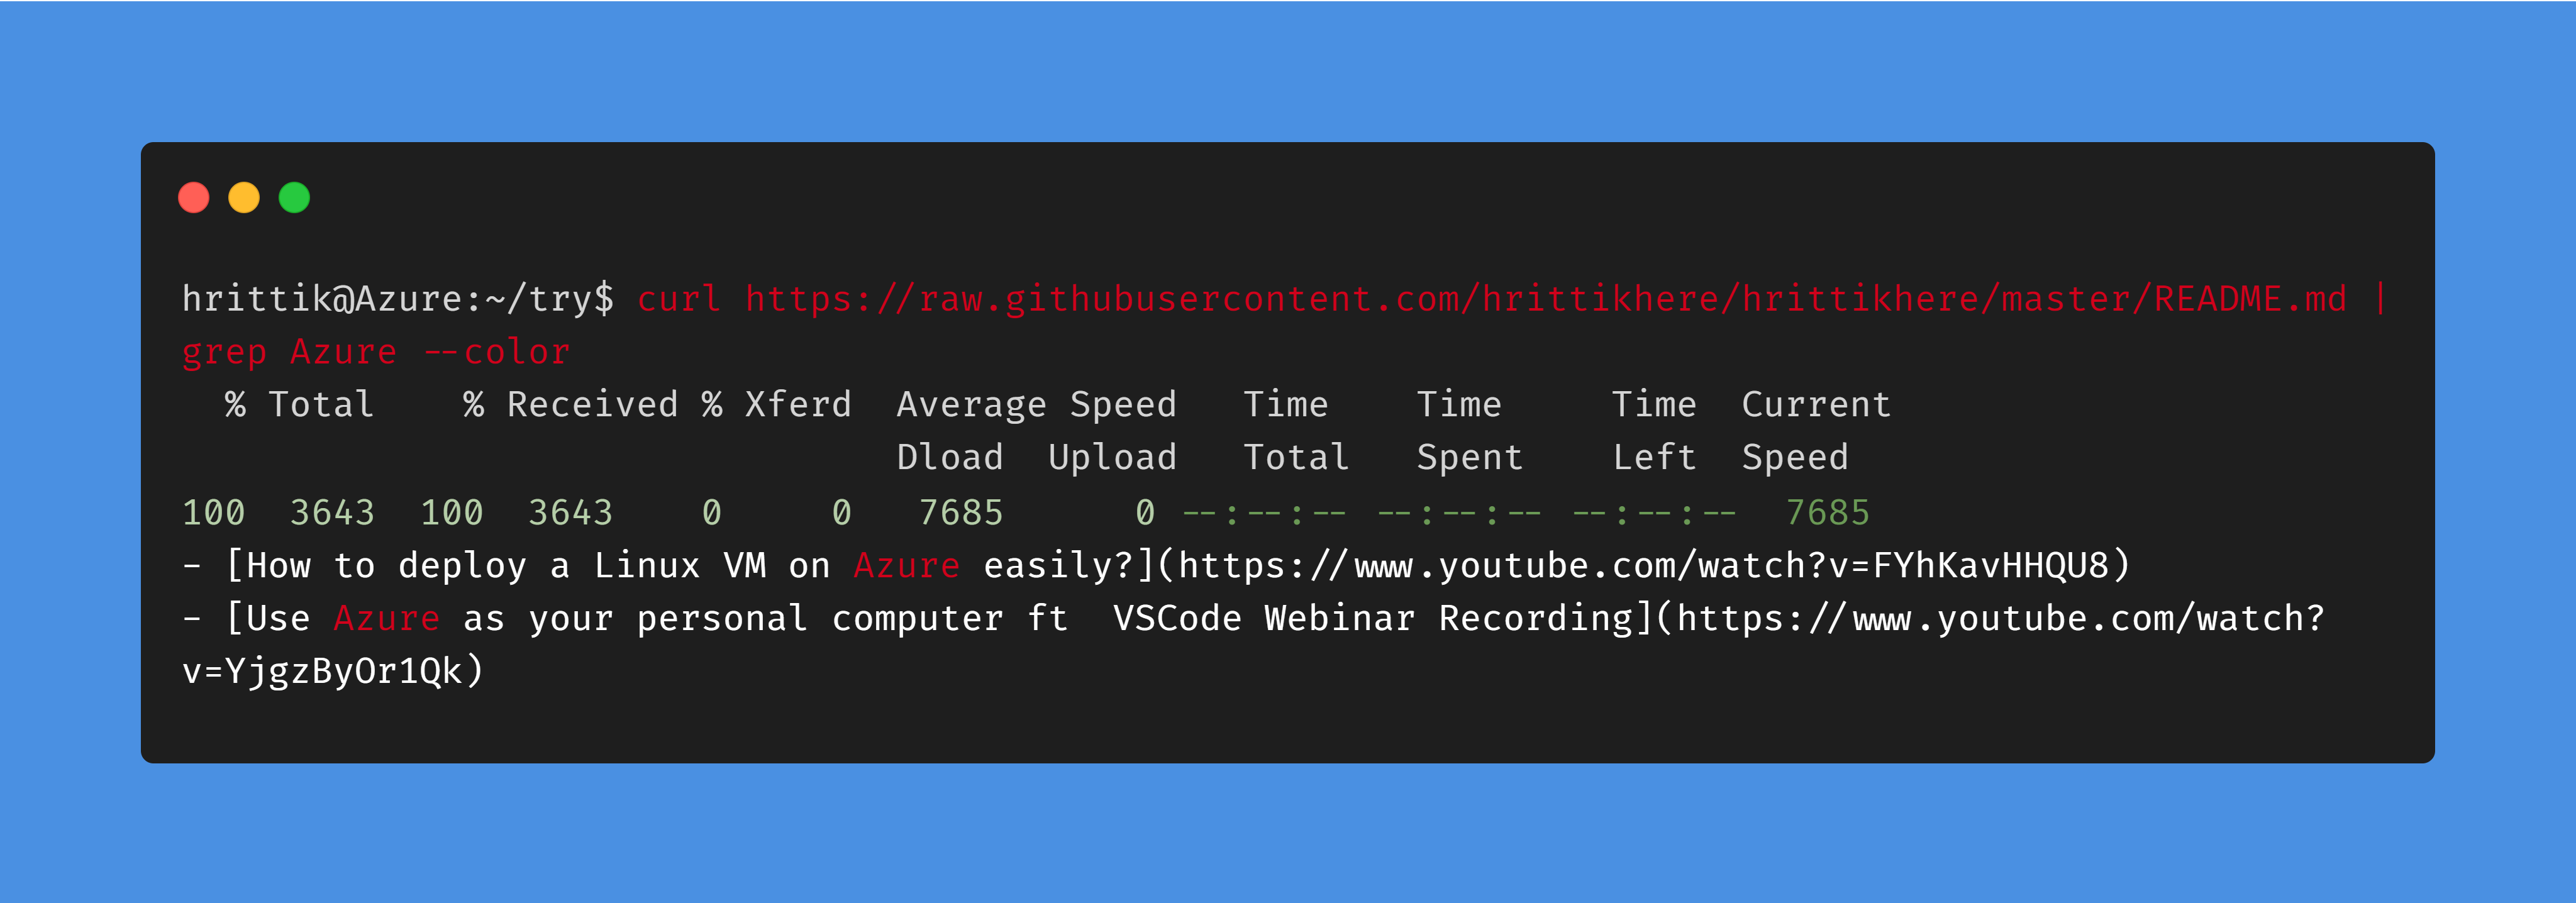
You can use the commands previously discussed in this article to create an example. If you’re curious about the number of times a pattern is mentioned in a document hosted online, you can use curl url | grep pattern --count to get the results.
Sed
Sed, a stream editor, enables you to operate on an input stream without needing to open it with a text editor. The instructions you give are carried out without opening the file, and the results can be found on the output stream.
While text replacement is the most-used functionality, you can also use sed to select text, add, or remove lines, and alter (or retain) an original file.
Syntax
sed OPTIONS... [SCRIPT] [INPUTFILE...]An easy way to see this in action is to pass a string to sed with replacement attributes set and wait for the results. You can give the string using a pipe or a file.
echo "Hello World!" | sed "s/World/Earth/" would pipe the string to sed, resulting in the output “Hello Earth!”

History
History allows you to see all the previously used commands in the terminal. The commands are stored in the history file in your root directory and show the commands in chronological order.
Syntax
history [options]Running history without any options will list all previously used commands, but for many purposes, that’s an overwhelming and impractical approach. You can narrow the history by replacing options with a number, such as history 10, which will return only the ten most recent commands on your terminal.
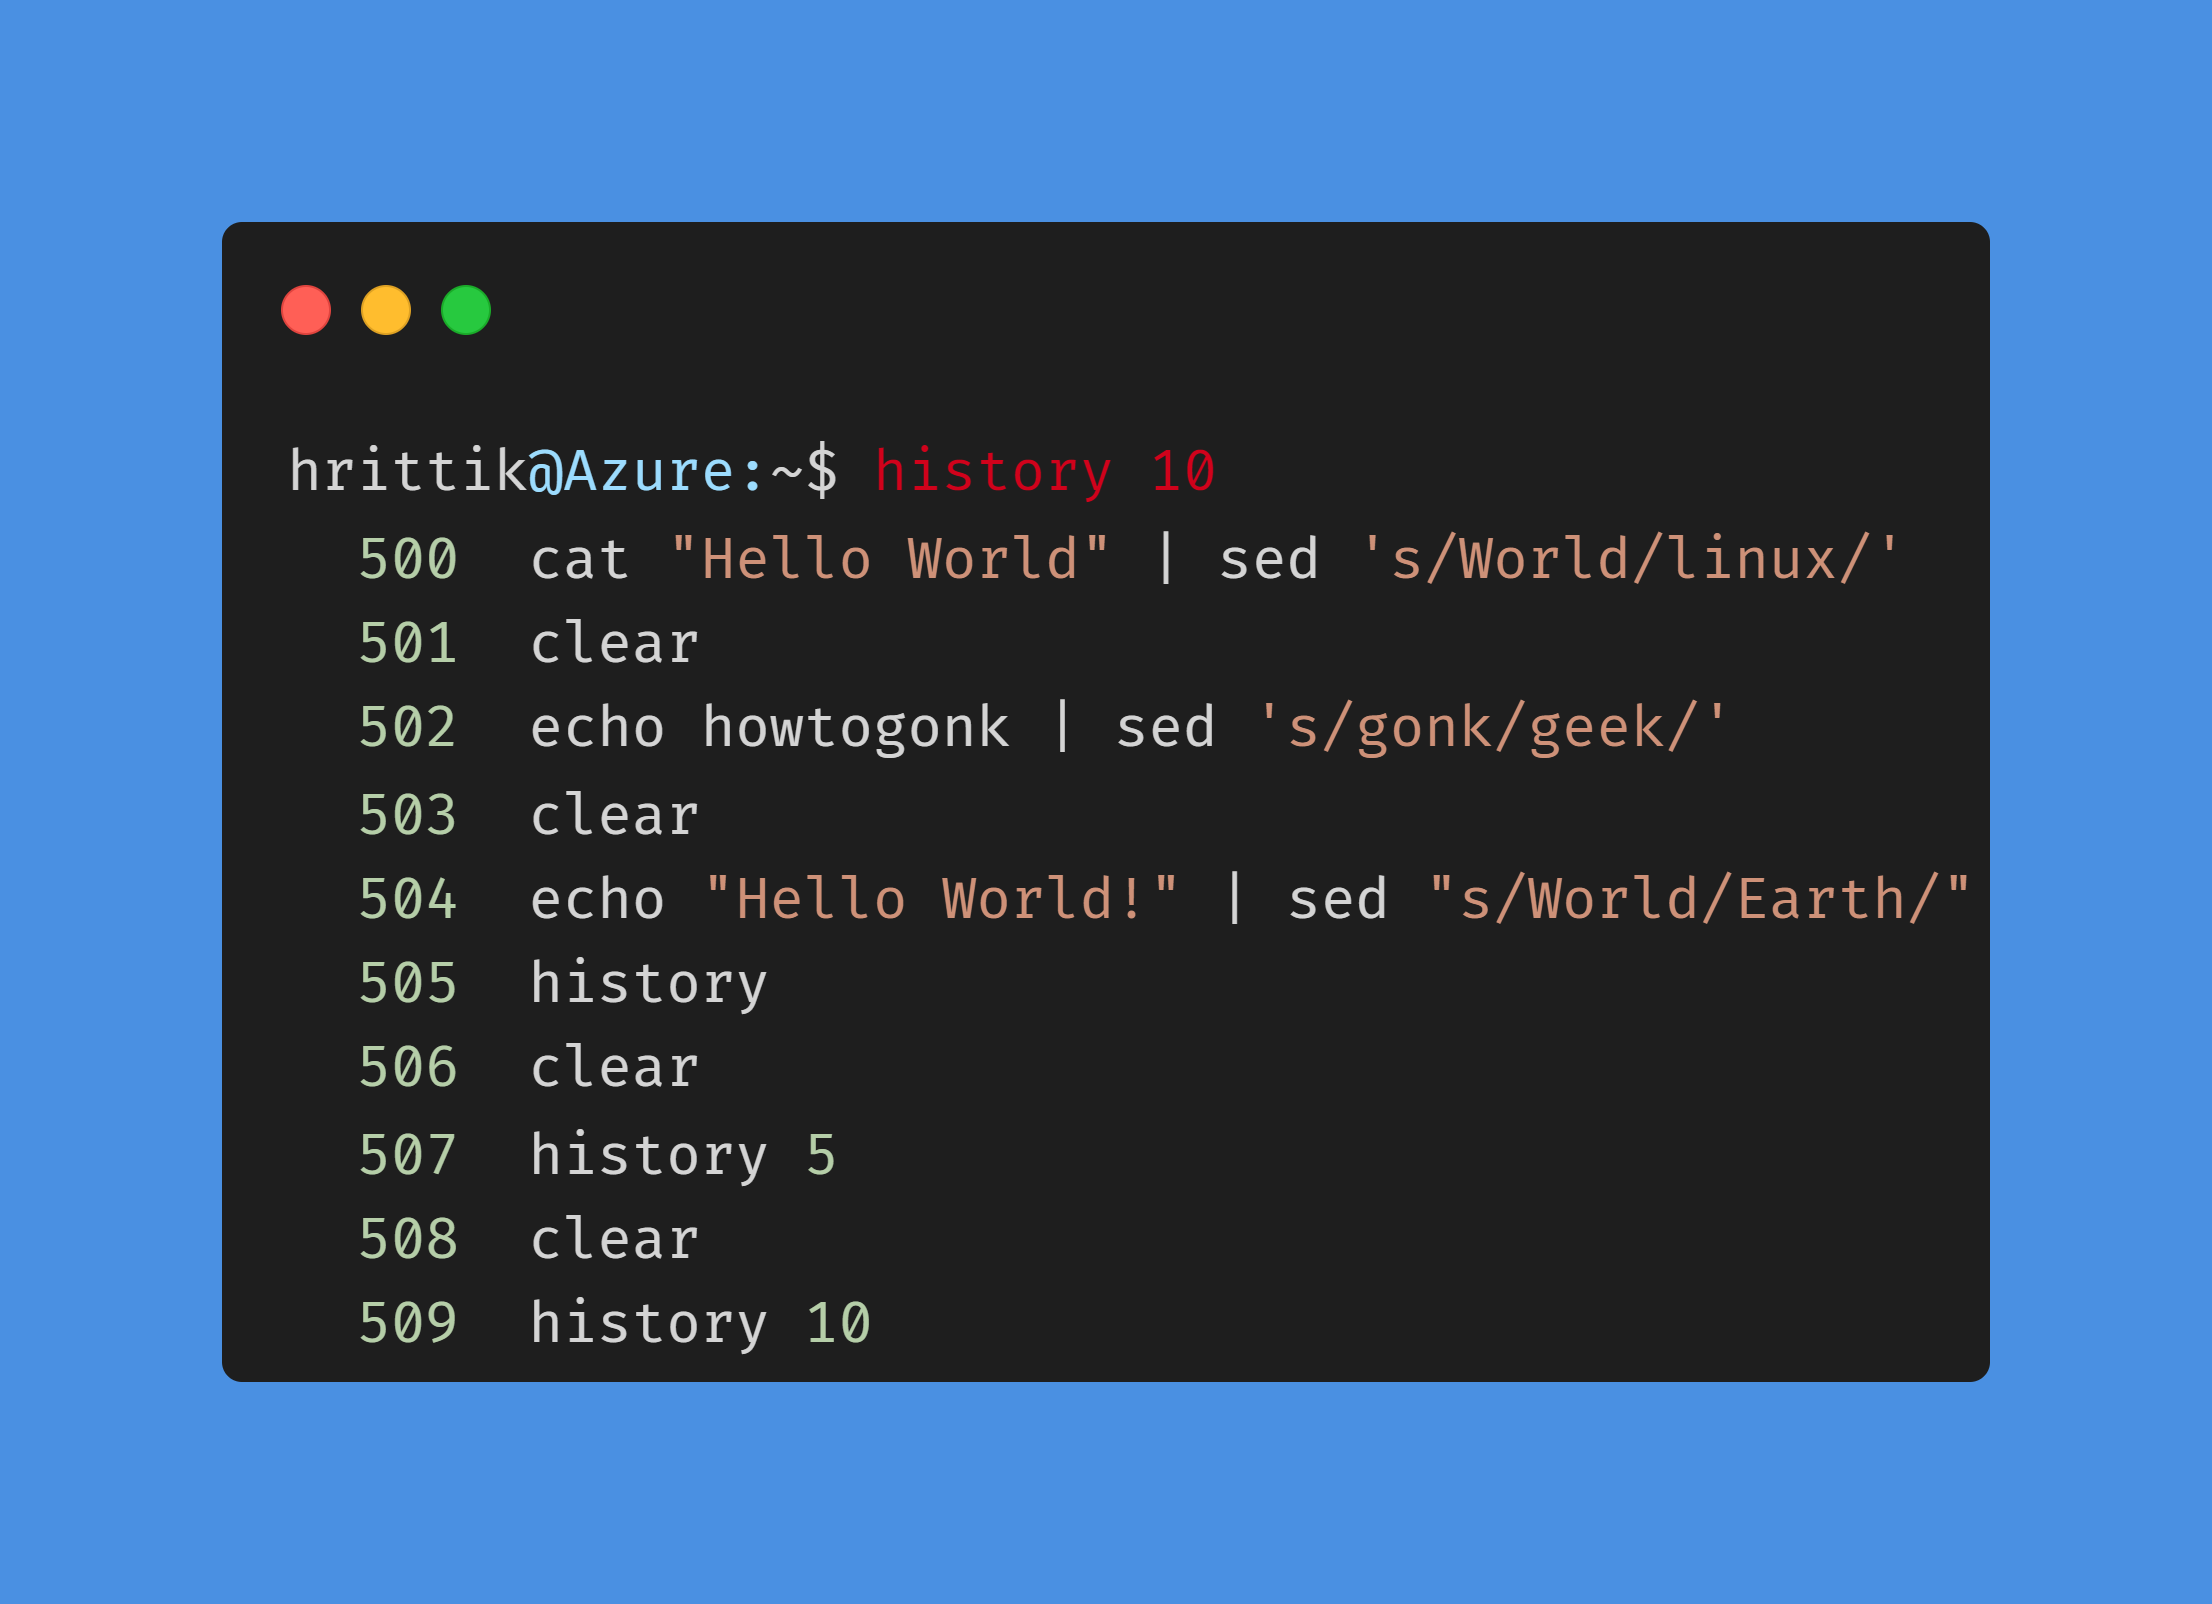
You can clear the history by using history -c.
mv
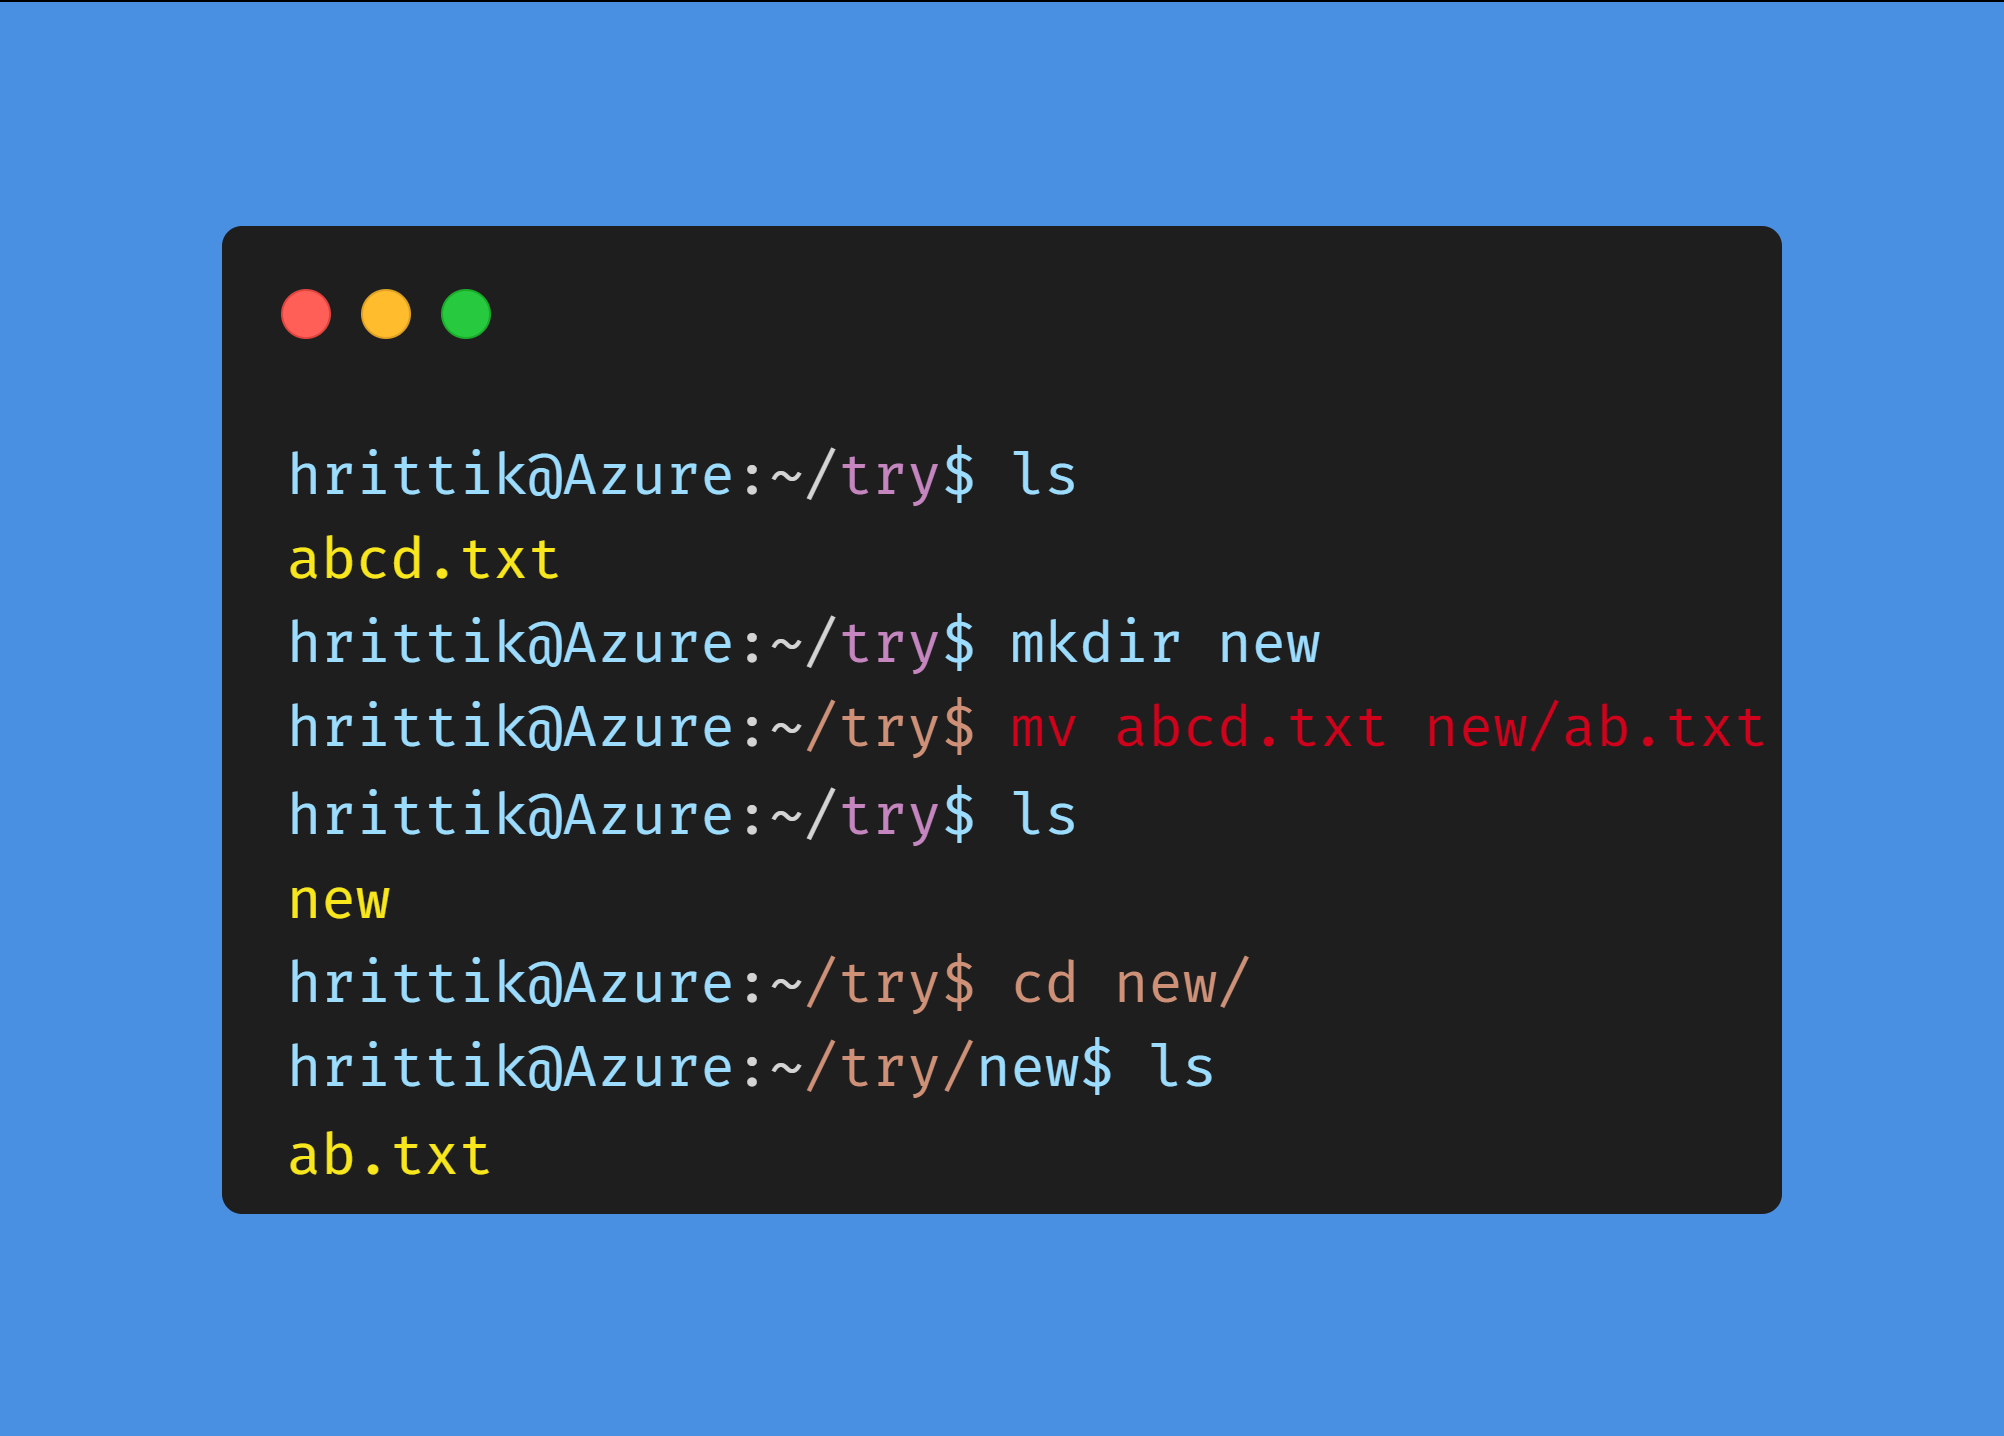
How do you move a folder or file to some other directory? The mv command helps you with this essential task. Its primary use is to move files, but it’s also used to rename files.
Syntax
mv [option] source destinationTo rename a file, you can use mv initialname.txt finalname.txt. The command converts the initialname.txt to finalname.txt very easily.
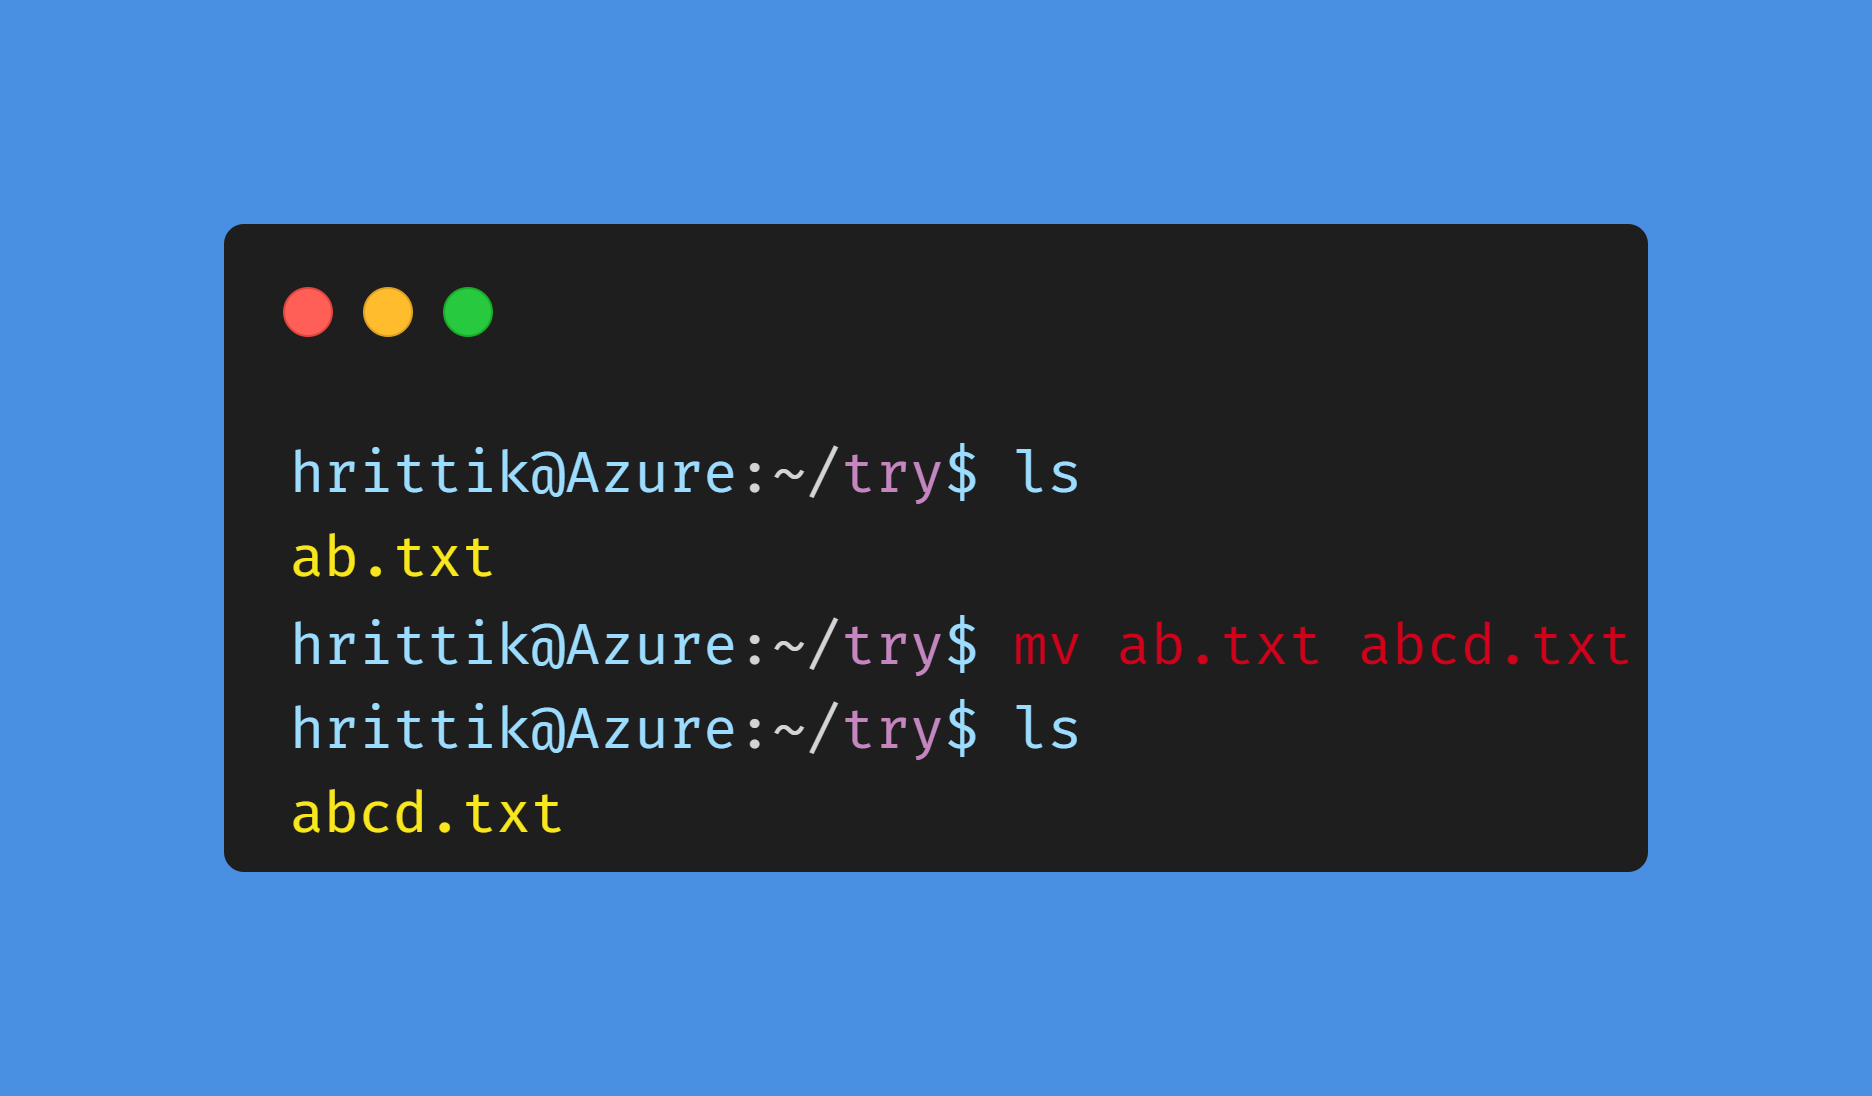
Now, whenever you want to move a file from one directory to another, you can use your current file path as your source and desired file path as your destination.
The other use of mv command is when you want to cut and paste all the content of one directory or folder to another. If you need to move all the files and folders from the directory 1 to 2, mv makes it easy.
├── 1
│   ├── first.txt
│   ├── folder1
│   │   └── file1.txt
│   └── second.txt
└── 2
Using mv PrimaryDestination/* FinalDestination/ will move the files and folders, where * signifies all the files and folders that aren’t hidden. For the above example, you can use the following command:
mv 1/* 2/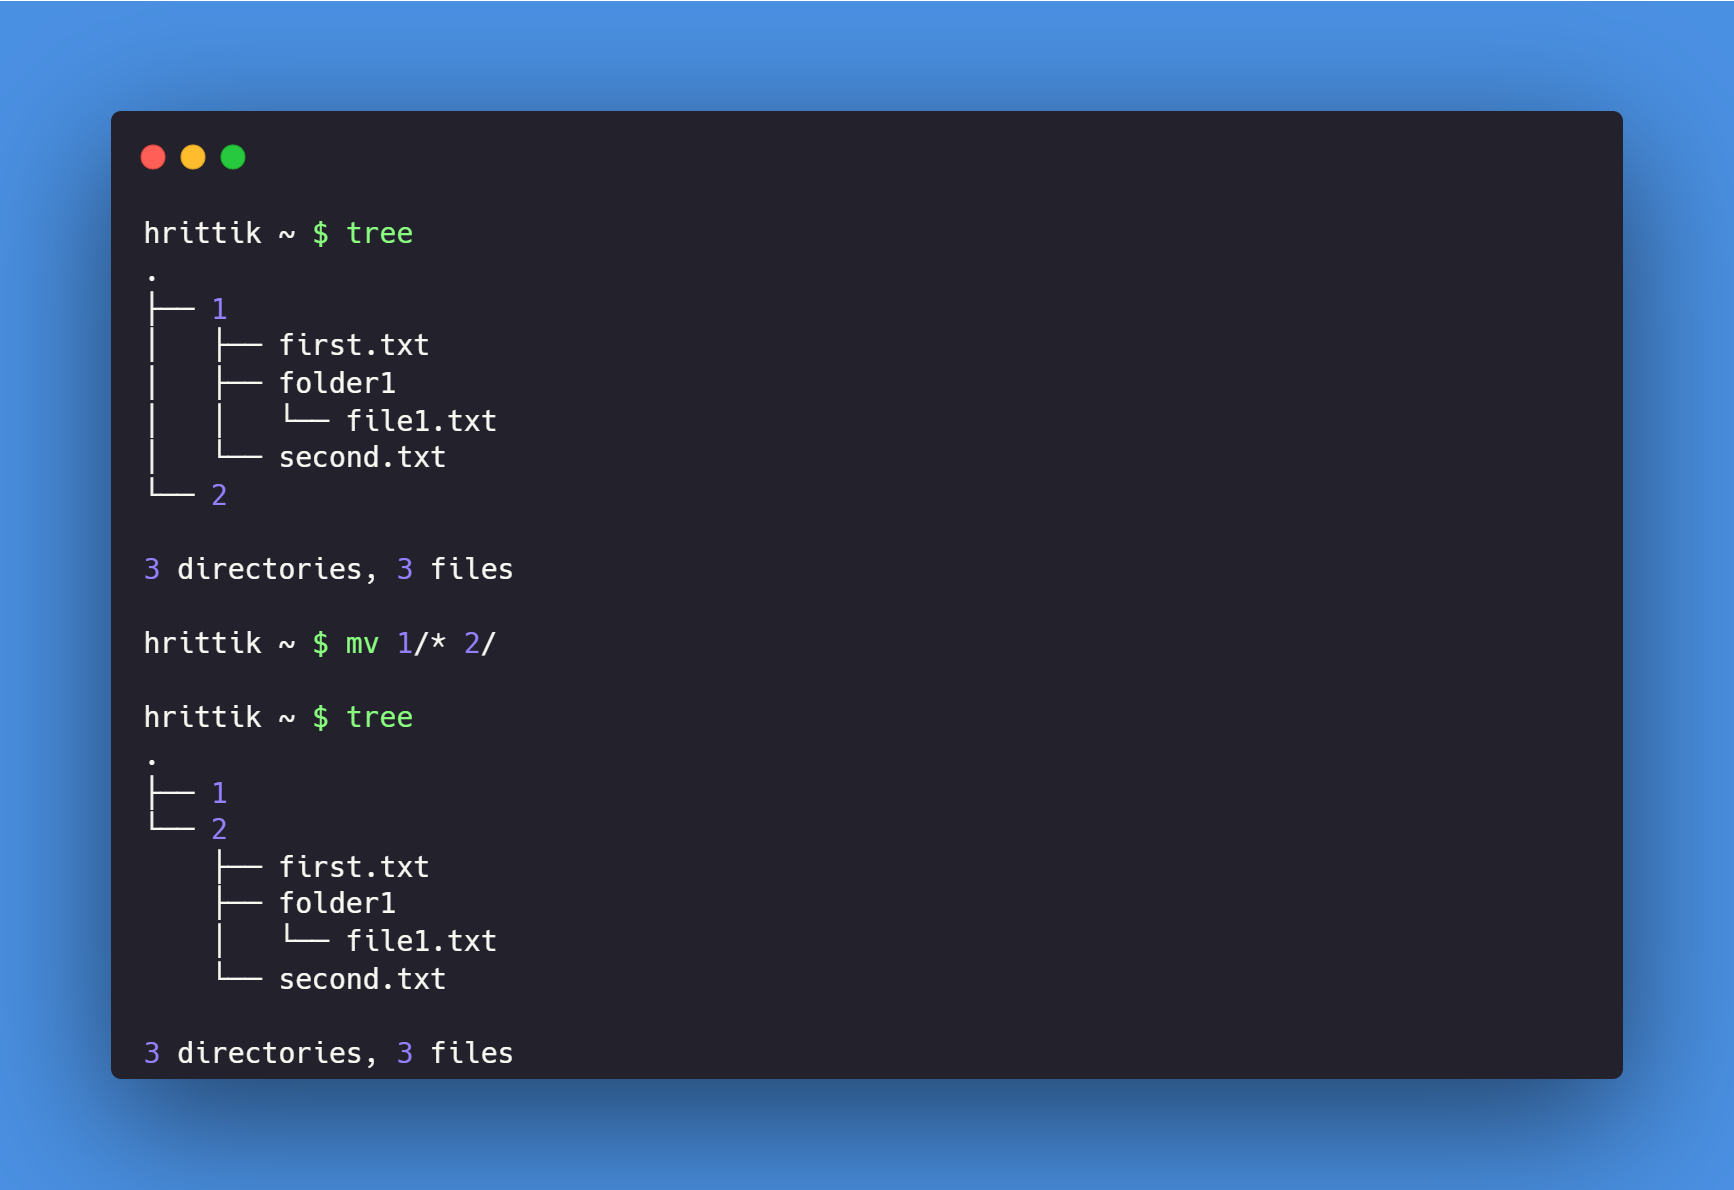
Note:
treeis a command used to visualize and list directories. You can learn more about it in the link.
Tar
Tar, short for “tape archive,” enables you to package a collection of files and directories into an archive file. This command’s most common use case is for compressing directories or files to transfer them across the internet to different machines or to archive them.
Syntax
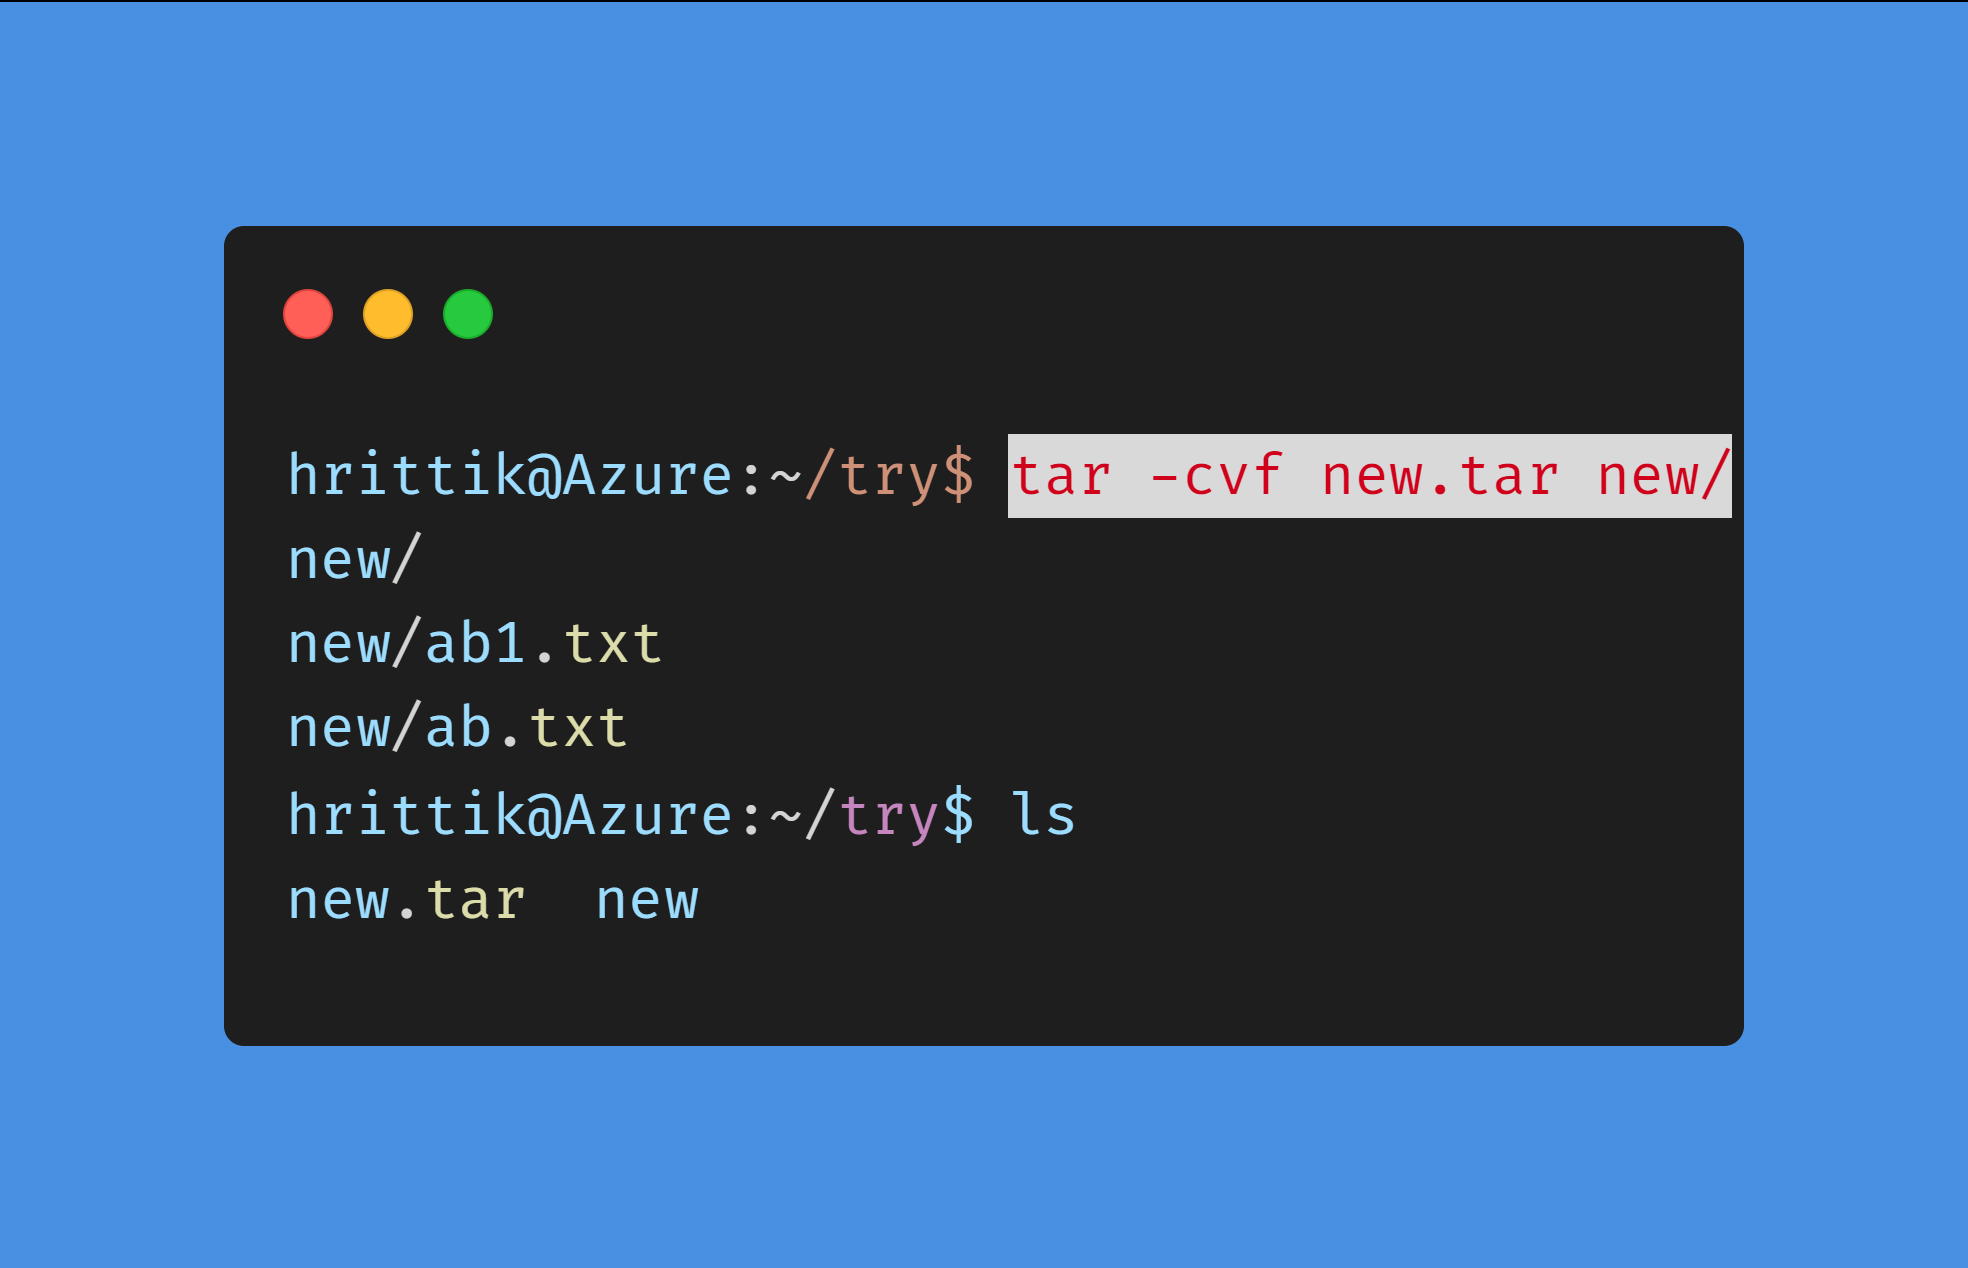
tar [options] [archive_name.tar] [files_to_archive]If you want to tar all the files in the directory, you can use the following command: tar -cvf new.tar new/.
Here, -c indicates that a new archive should be created, -v shows the process information, and -f specifies the archive format. The result of the command is a file called new.tar, which contains all the files in the specified directory.
APT
APT (advanced package tool) is a package manager that works with core libraries to handle the installation and removal of software on Debian and Debian-based Linux distributions, such as Ubuntu and MX Linux.
APT is used across Ubuntu as the primary package manager and provides functionalities, like installing, removing, and upgrading packages.
The package manager also allows you to update all your base packages with two simple commands:
apt update
apt upgrade
Make sure you have superuser permission before running this command, as the tool needs to interact with core libraries during package installation or removal.
Syntax
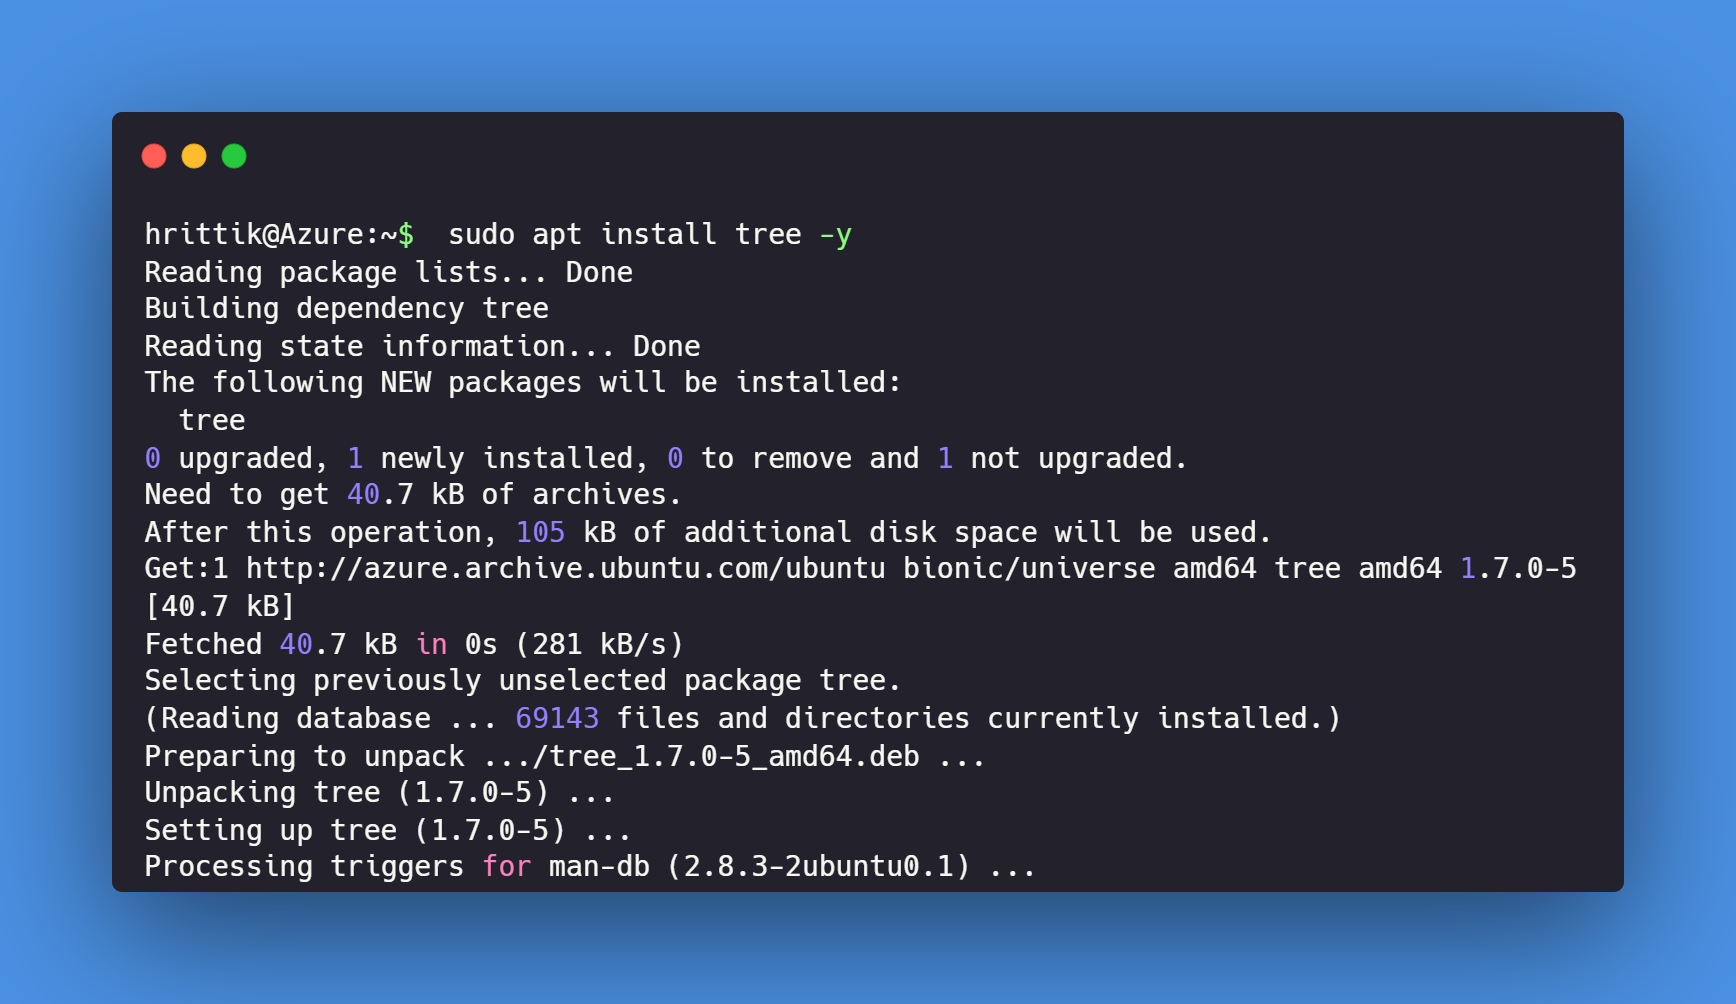
apt [...COMMANDS] [...PACKAGES]If you want to install a package, you can use apt install packagename:
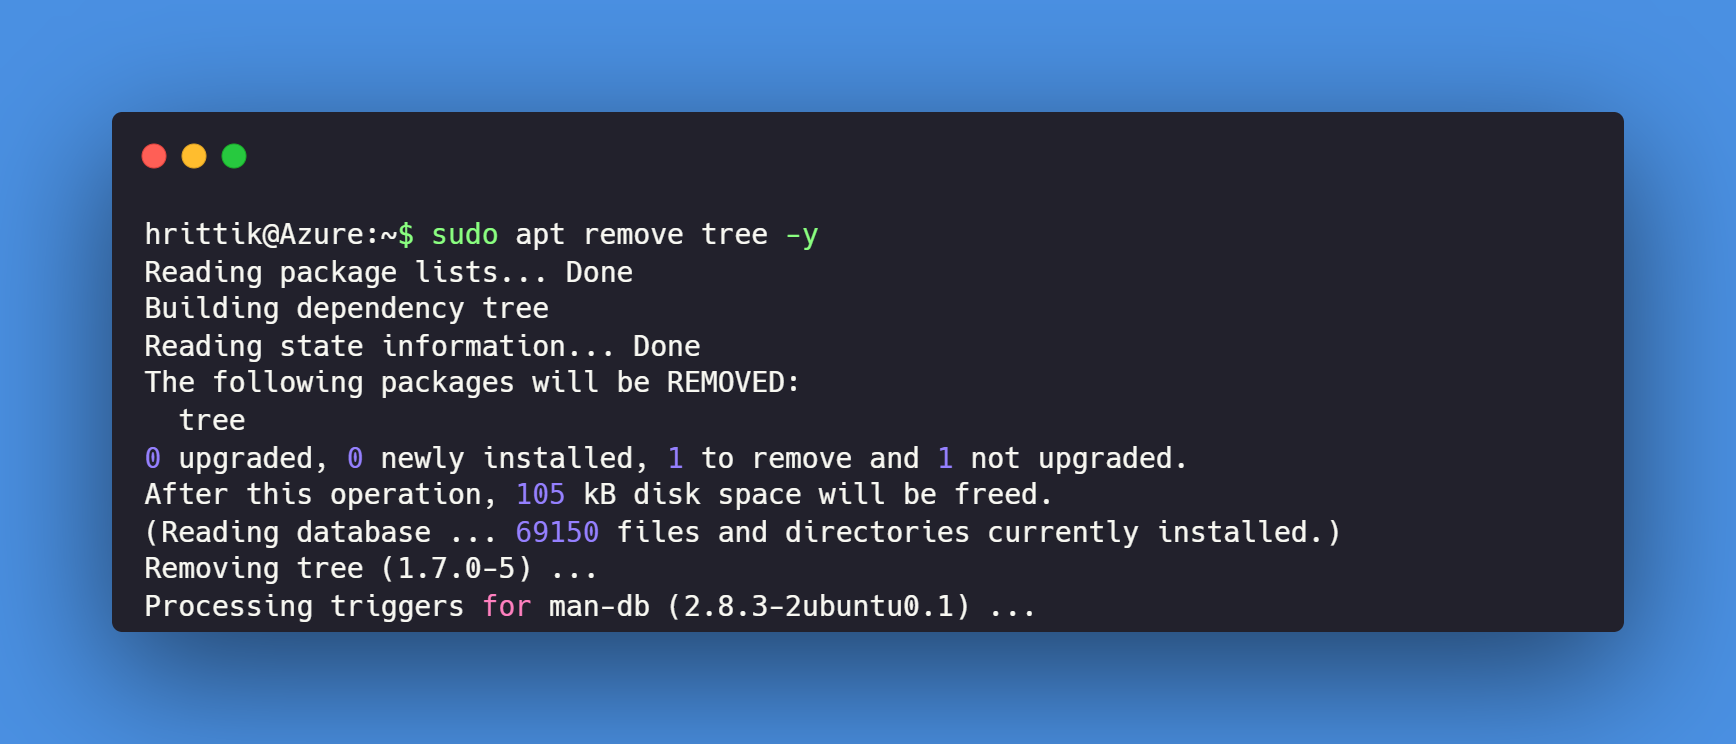
To remove the package, you can run apt remove packagename:
Note:
-yflag provides yes to all the dialogues
Tmux
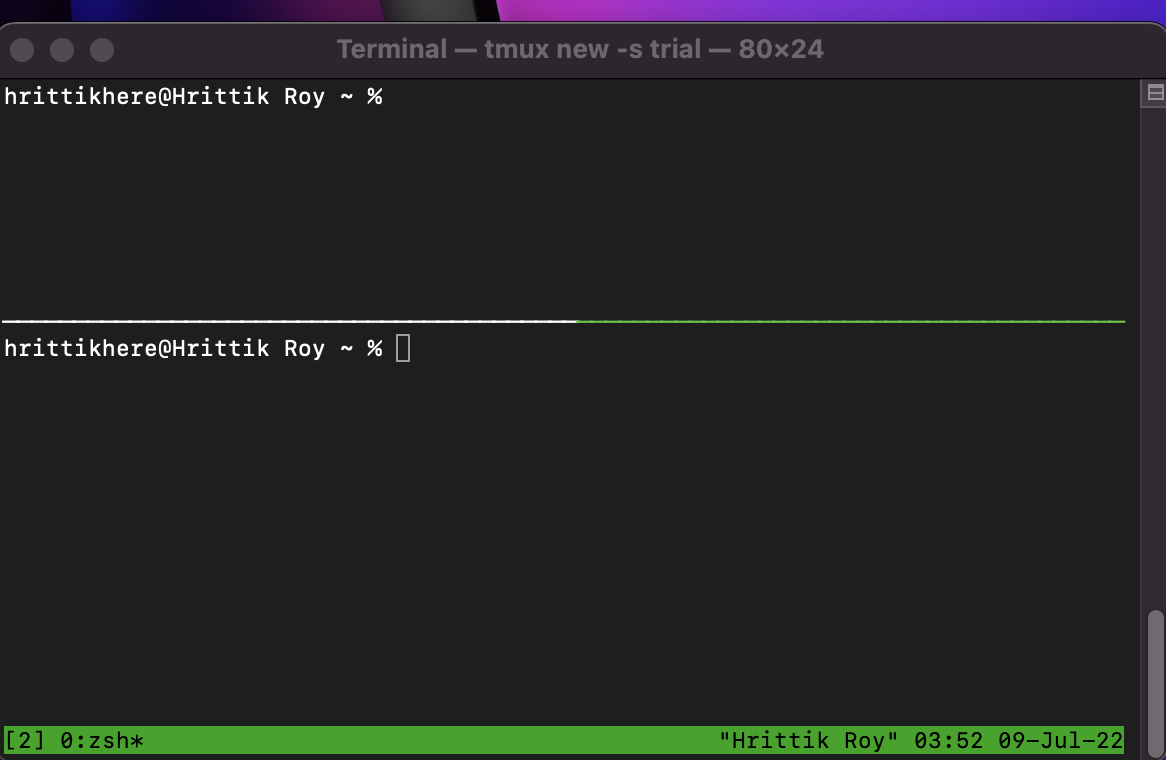
Normally, if you kill a terminal session during a running process, the process gets killed as well. Tmux, or “terminal multiplexer,” allows you to open multiple windows within the same terminal session and makes those windows persistent. If you lose your connection to the server or exit a session, which is known as detaching, tmux will keep those sessions running in the background, waiting for you to pick them back up. There’s no need to worry about closing tabs or killing the process, as this persistence helps you store data.
The multiplexer also helps you share your session over Secure Shell Protocol (SSH) with others for collaboration and is helpful when peer programming or troubleshooting.
Syntax
tmux [Command]Once you’ve initiated the session, you can split it into multiple rectangular panes, which can be resized or detached as desired.
If you want to manage two or more operations simultaneously, such as creating Kubernetes objects at one terminal while viewing their status at another, Tmux comes in very handy.
Kill
In the Windows operating system, you get a pop-up to close an unresponsive program, but that’s not the case with Linux. If a program is no longer responding, you need to terminate the process with the help of a command like kill. The kill command doesn’t actually end the process, but rather sends a signal to the process and requests that the process end. The process can choose to ignore the request, but most processes respond to the signal by terminating themselves.
Syntax
kill -signal <PID>To get the process IDs (PIDs), you can use ps -ux, and then use the PID with kill. For example, if you want to kill the ping process, you can list all the running processes to get the PID of ping, and then use the kill signal as shown below:
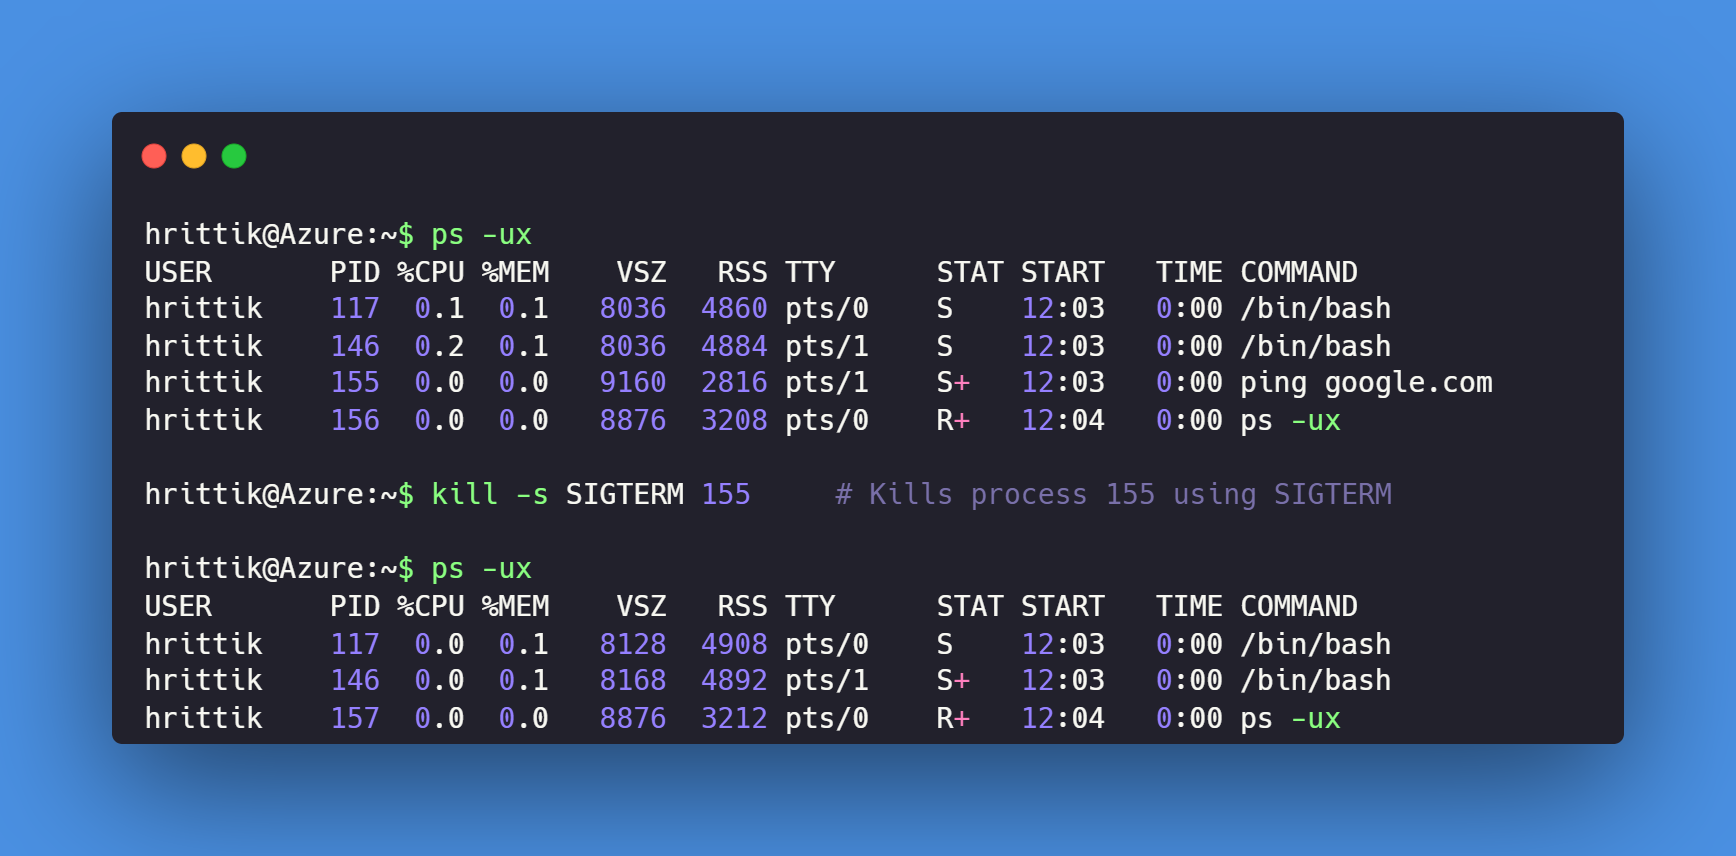
There are sixty-four signals you can use for -signal; kill -l returns a list of these signals. The default signal is SIGTERM (15), which allows the process to terminate gracefully, giving it time to save before it’s killed. If you want to use the default signal, then there’s no need to add the -s flag. Other signals, which do require the -s flag, include:
SIGINT: Tells a process to interrupt itself, usually by terminating.SIGHUP: Sent to a program when the controlling terminal closes. The program can ignore it, restart itself, or reload its configuration, among other behaviors.SIGKILL: Forces a process to terminate immediately.SIGUSR1: Triggers custom, user-defined behavior.SIGSTOP: Pauses a running process.SIGCONT: Resumes running a stopped process.
Ts
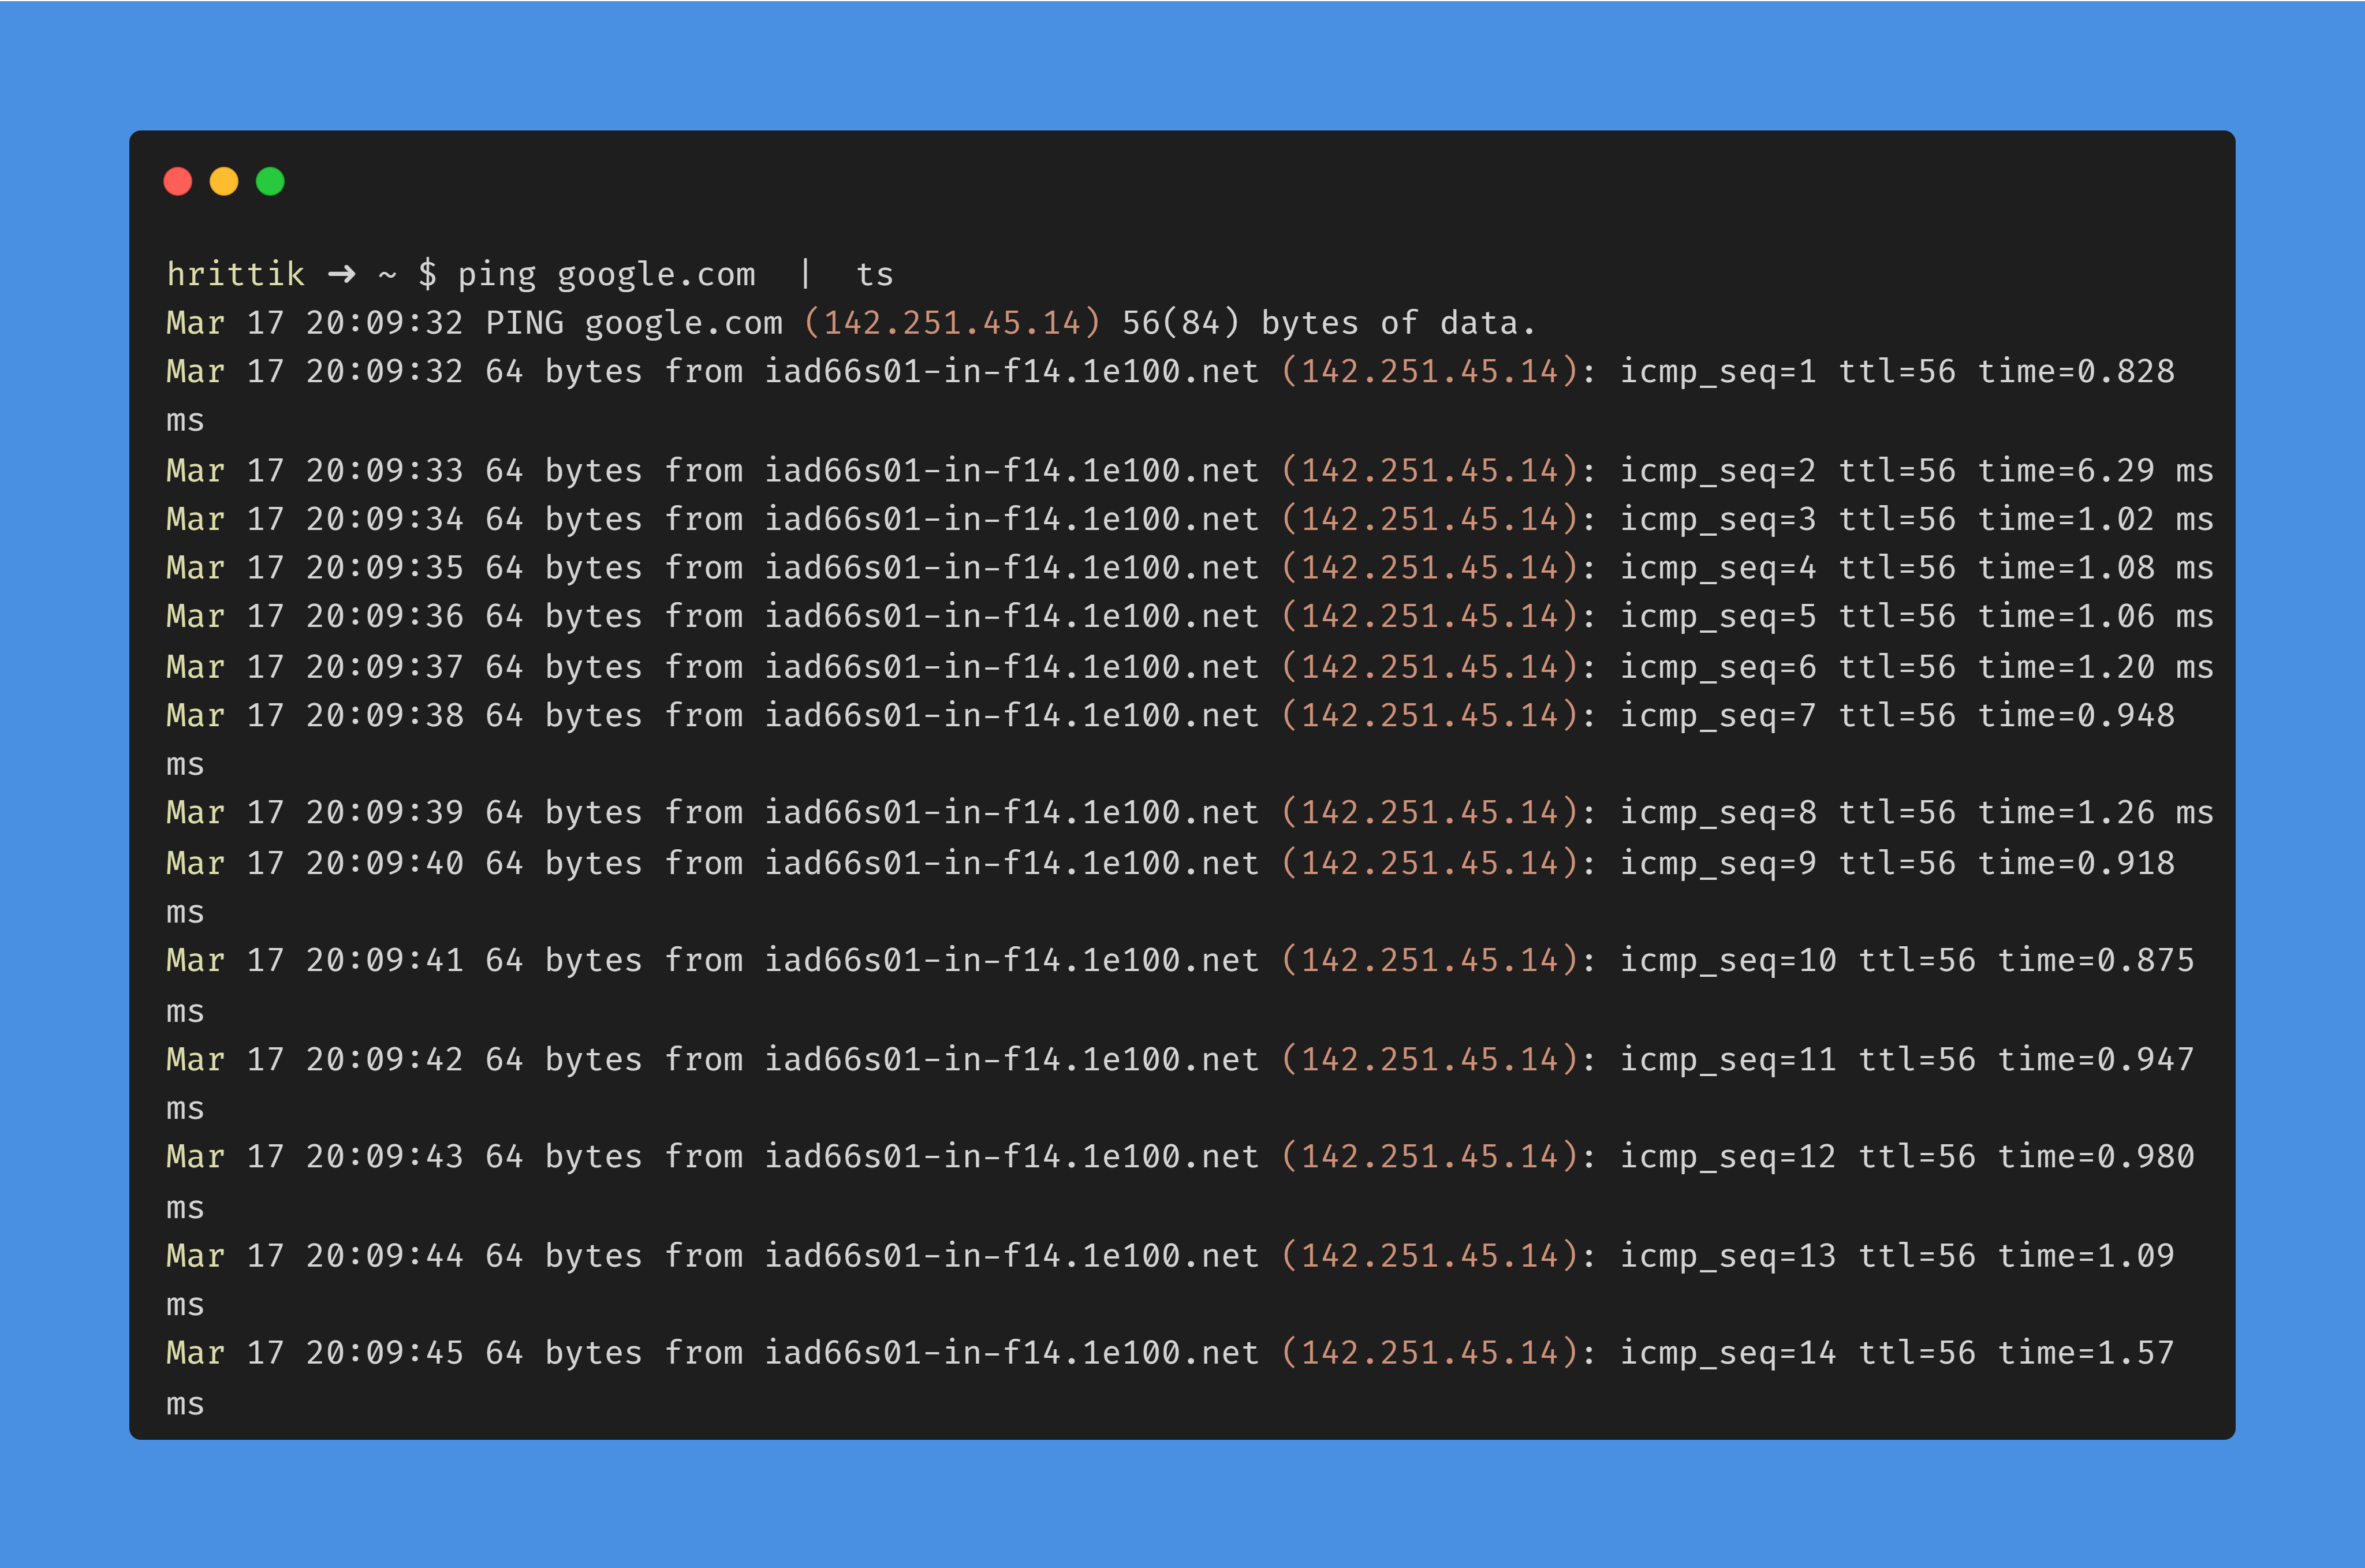
Ts will add a time stamp at the beginning of each line in your standard input. This is a useful command when you’re dealing with an input stream, like tracerouting or debugging, where storing time stamps helps the process.
A simple example is piping your ping command to ts, which will return time-stamped results to your standard output.
Syntax
ts [-r] [format]The -r flag provides relative time; without this flag, only time stamps are provided.
Sponge
The sponge command soaks up the standard input before opening the output stream. The standard redirection command, >, writes to the file as the input stream is read. When the input and output files are the same, this can cause errors and data loss.
One illustration of this is that you can’t run grep -v '^#' abcd.txt > abcd.txt. As the input and output files are the same, execution would fail, and you’d be left with a blank file for your troubles.
To accomplish this without sponge, you would have to create a temporary file to store data, then write it back to the source once it’s stored. Sponge prevents the problem entirely by writing only after the input has been completely read.
Syntax
sponge filename.txtTo see it in action, you can use a pipe with the above command, such as grep -v '^#' abcd.txt | sponge abcd.txt, allowing you to edit your file without thinking about the streams.
Vidir
The vidir command allows you to edit the contents of a directory in a text editor. The argument passed with the command is the directory that should be edited; if no arguments are given, the current directory is used.
While updating the contents in the editor, vidir creates newer directories as you edit the paths.
Syntax
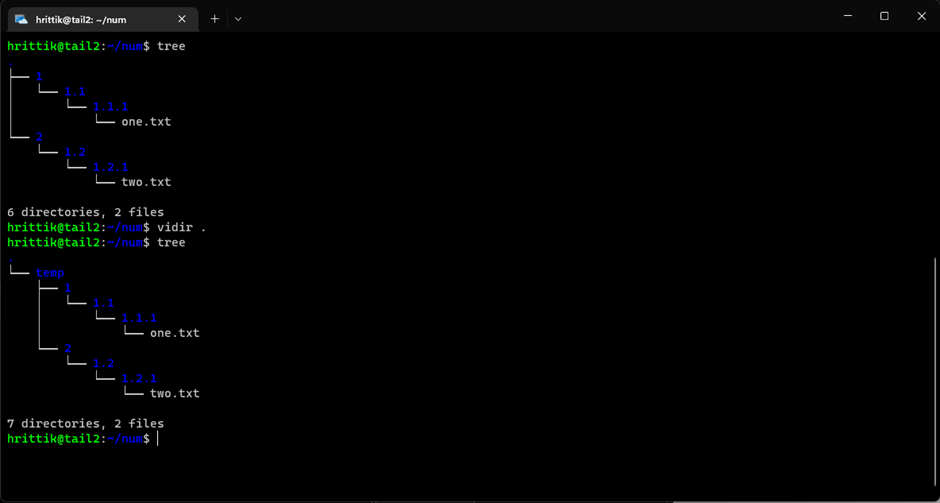
vidir [--verbose] [directory|file|-] ...The command opens up your default text editor, where you can edit your directories to suit your needs. For example, say you need to edit directories 1 and 2 to put them in a temp directory.

To get started, open the directory using vidir . in your text editor.
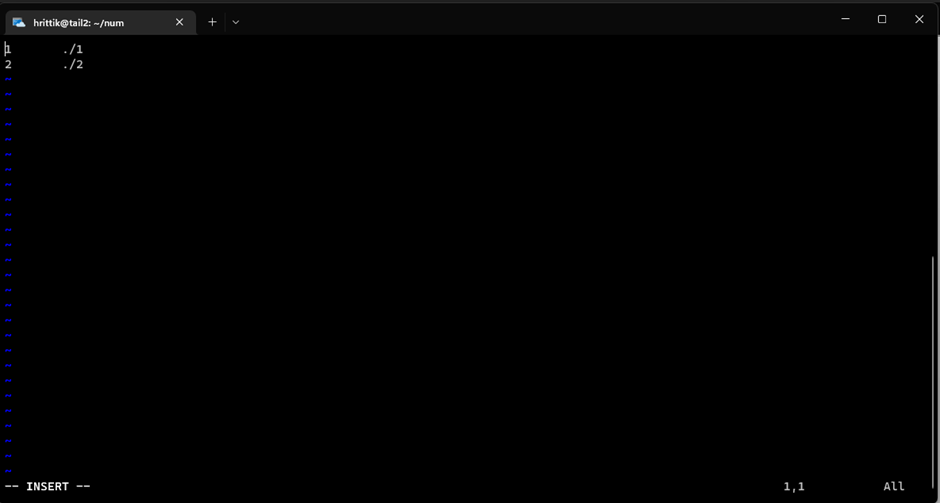
For this example you’ll move directories 1 and 2 and all of their content into a temp directory.
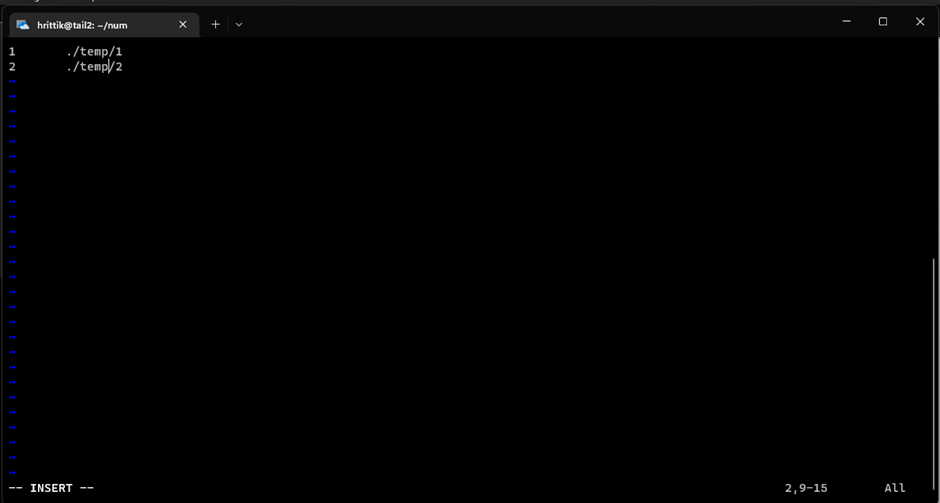
After you save the file, you can see the directories being edited as desired and moved into the temp folder.
Chmod
Chmod allows you to change the permissions of directories and files.
You can change read, write, and execute permissions through a reference file or via a symbolic or numeric mode.
Syntax
chmod [options] [permissions] [file_name]Permissions are assigned to three distinct entities: the owner of the file, the members of the group to which the file belongs, and people outside of that group, and the permissions are always listed in this order, regardless of what mode you’re using.
A file or directory can have one or more of three permission types: read (r), write (w), and execute (x). The read permission for a file or directory is denoted by the letter r. The letter w stands for the ability to write to a file or directory, while the letter x stands for the ability to execute a file or search in a directory.
Using chmod +[permission] [file_name] adds permissions to the file, and using the - operator removes permissions. To remove existing permissions and add new ones, the = operator can be used.
To remove all permissions from a file you can use chmod -rwx [file_name]
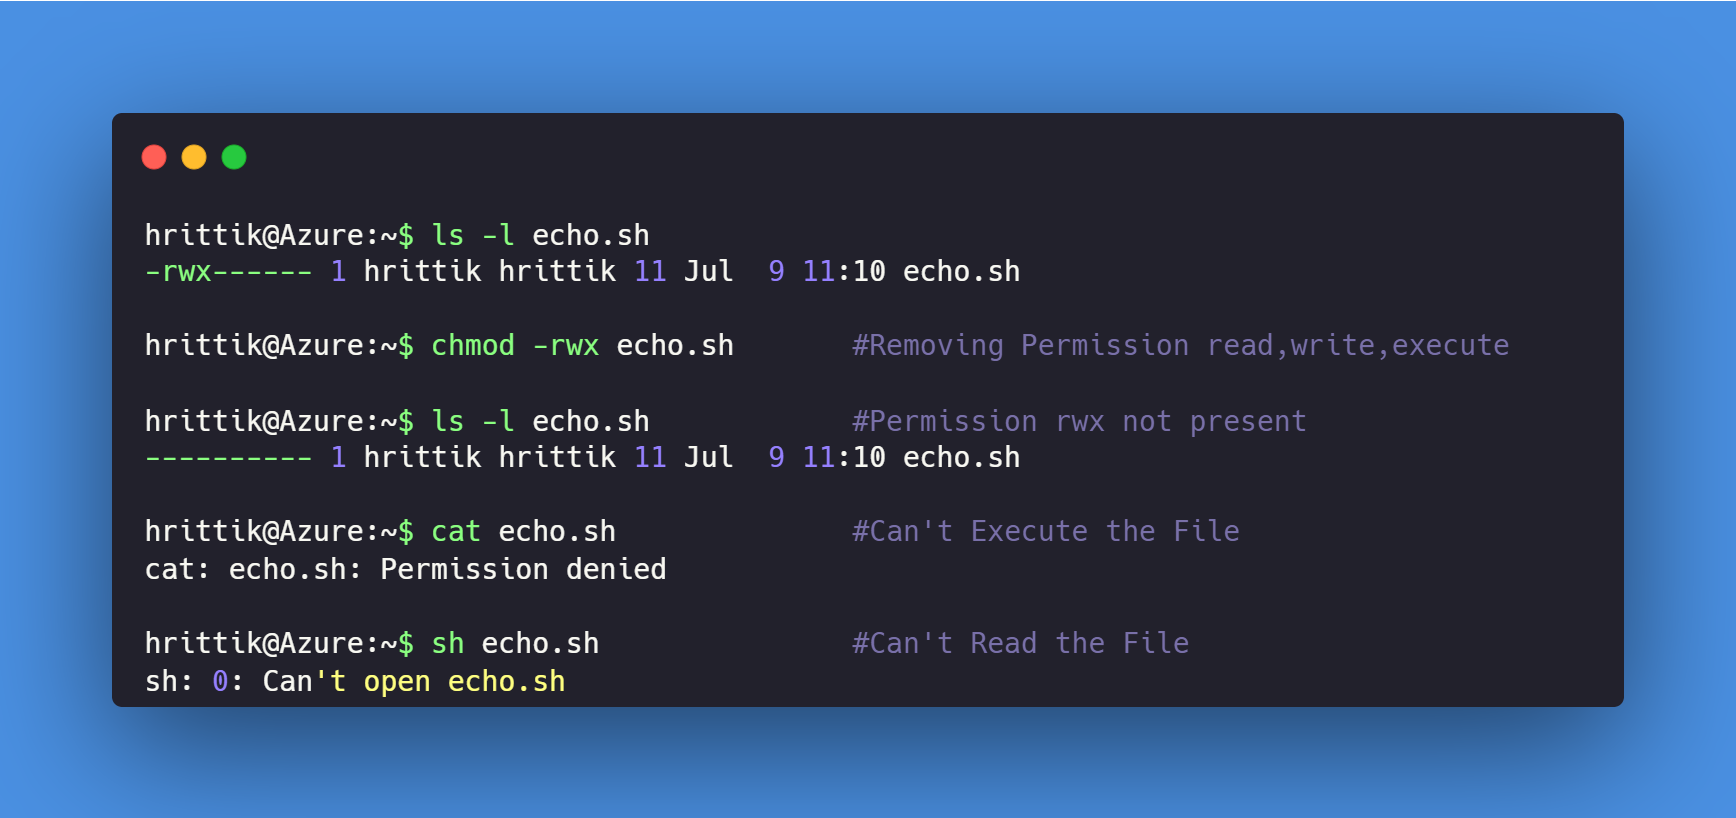
The permissions can also be represented by numbers. One, two, and four stand for execute, write, and read, respectively; three, five, six, and seven indicate more than one permission and are the sum of the permissions granted, as shown in the following table:
| Number | Permission Granted | Sum | Symbolic Equivalent |
|---|---|---|---|
| 0 | No permission | — | |
| 1 | Execute permission | –x | |
| 2 | Write permission | -w- | |
| 3 | Execute and write permission | 1 (execute) + 2 (write) = 3 | -wx |
| 4 | Read permission | r– | |
| 5 | Read and execute permission | 4 (read) + 1 (execute) = 5 | r-x |
| 6 | Read and write permission | 4 (read) + 2 (write) = 6 | rw- |
| 7 | All permissions | 4 (read) + 2 (write) + 1 (execute) = 7 | rwx |
Each entity, as described above, gets a single digit that describes their permissions. Using numeric representation, to give the file owner read, write, and execute permissions while denying all permissions to other users, you would use 700 as the chmod option. 7 for the owner, and 0, or no permission, for the group and for people outside the group.
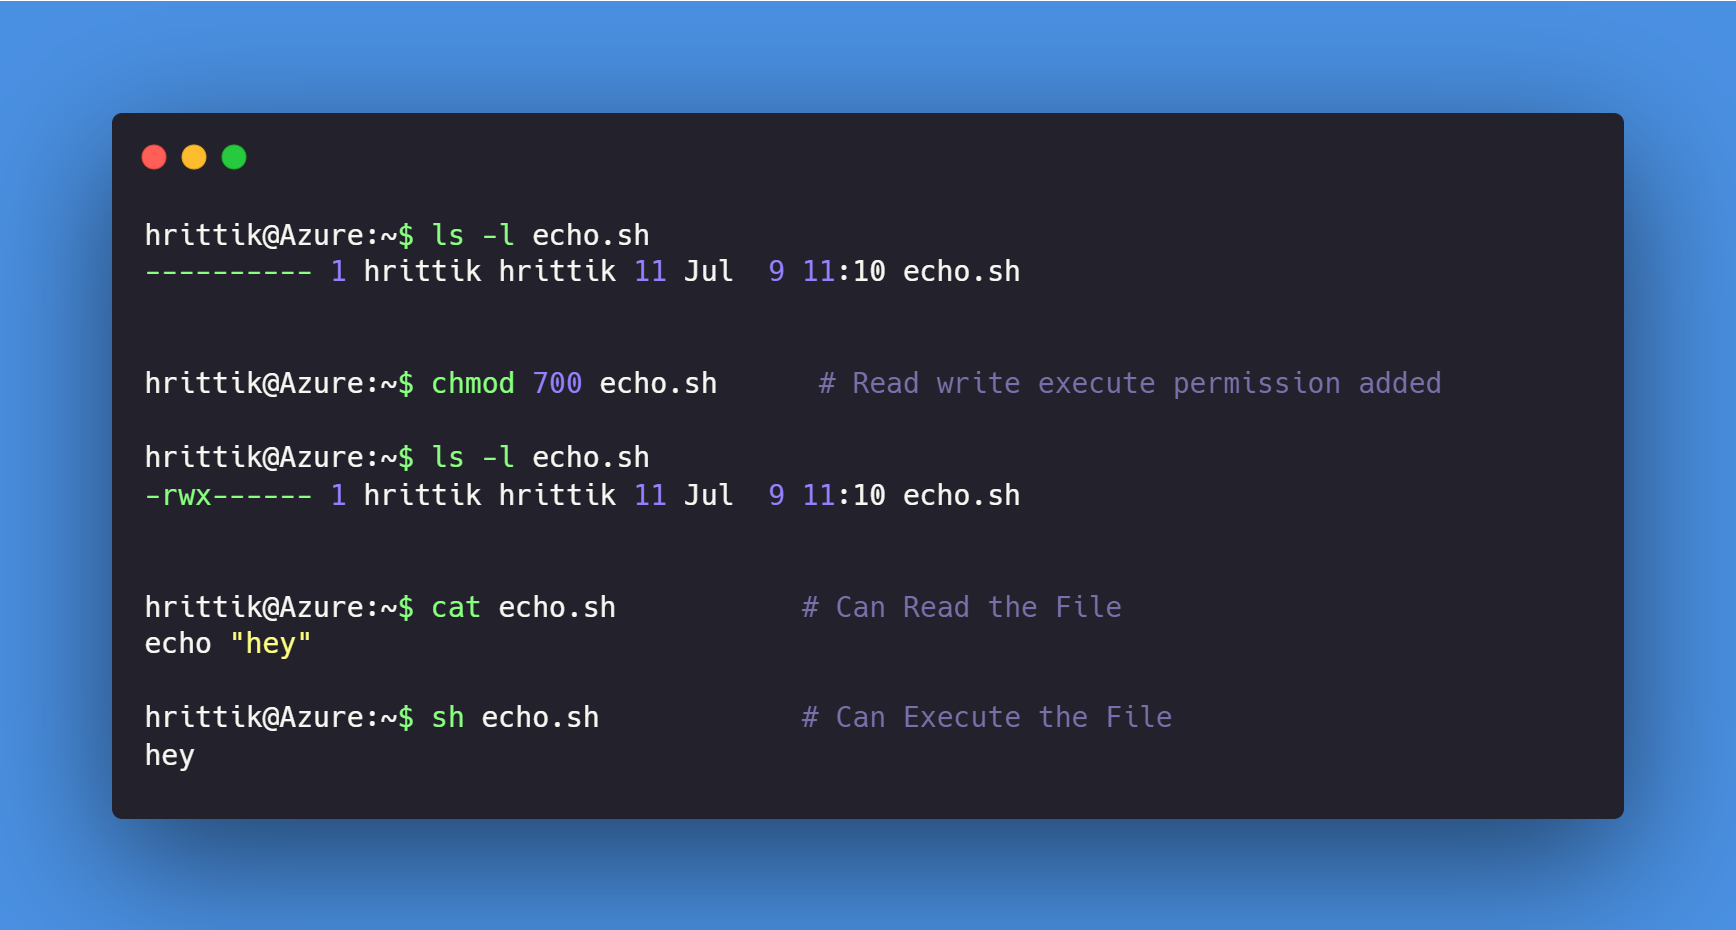
If you wish to provide permission to every group and user, you can do so by using the code 777, where the first 7 represents the user, the next 7 the group, and the last 7 the users outside the group, as shown below:

Other common examples are chmod 400 [filename], which prevents a file from being overwritten by allowing the owner to read it and disallowing all other permissions, and chmod 755 [filename], which restricts write access to the file’s creator, but allows anyone else to read and execute the file.
Crontab
Crontab, short for “cron table,” is a commonly used tool that runs a task at a user-designated interval. It can be used in various ways, like updating your system once a week or regularly pinging your server to check that it’s running.
Syntax
* * * * * CMDThe asterisks each hold a specific value, and the values are separated by a space. In order, the asterisks represent the minute, hour, day of the month, month, and day of the week. CMD is the command that will be run upon execution of the task.
Using a comma, such as 15,45, allows you to specify a list of values; if this value were in the minute field, for example, the task would be executed twice an hour at :15 and :45. A hyphen allows you to specify a range of values: 9-5 in the hour field would execute your task once an hour during working hours. Finally, a slash allows you to run tasks at an interval. */30 in the minute field will run the task every thirty minutes.
To open the configuration file for the current user, you can use the following command:
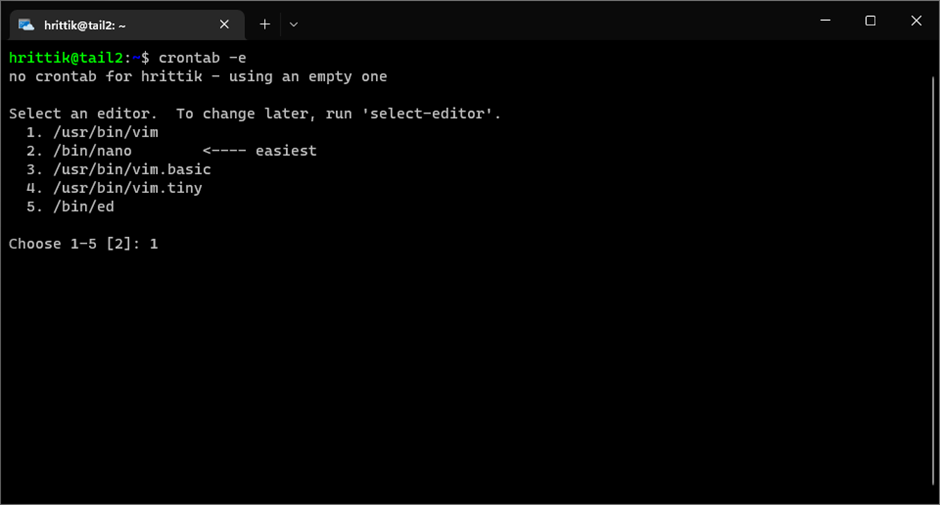
crontab -eThe first time you open cron, you can select the editor as per your preferences.
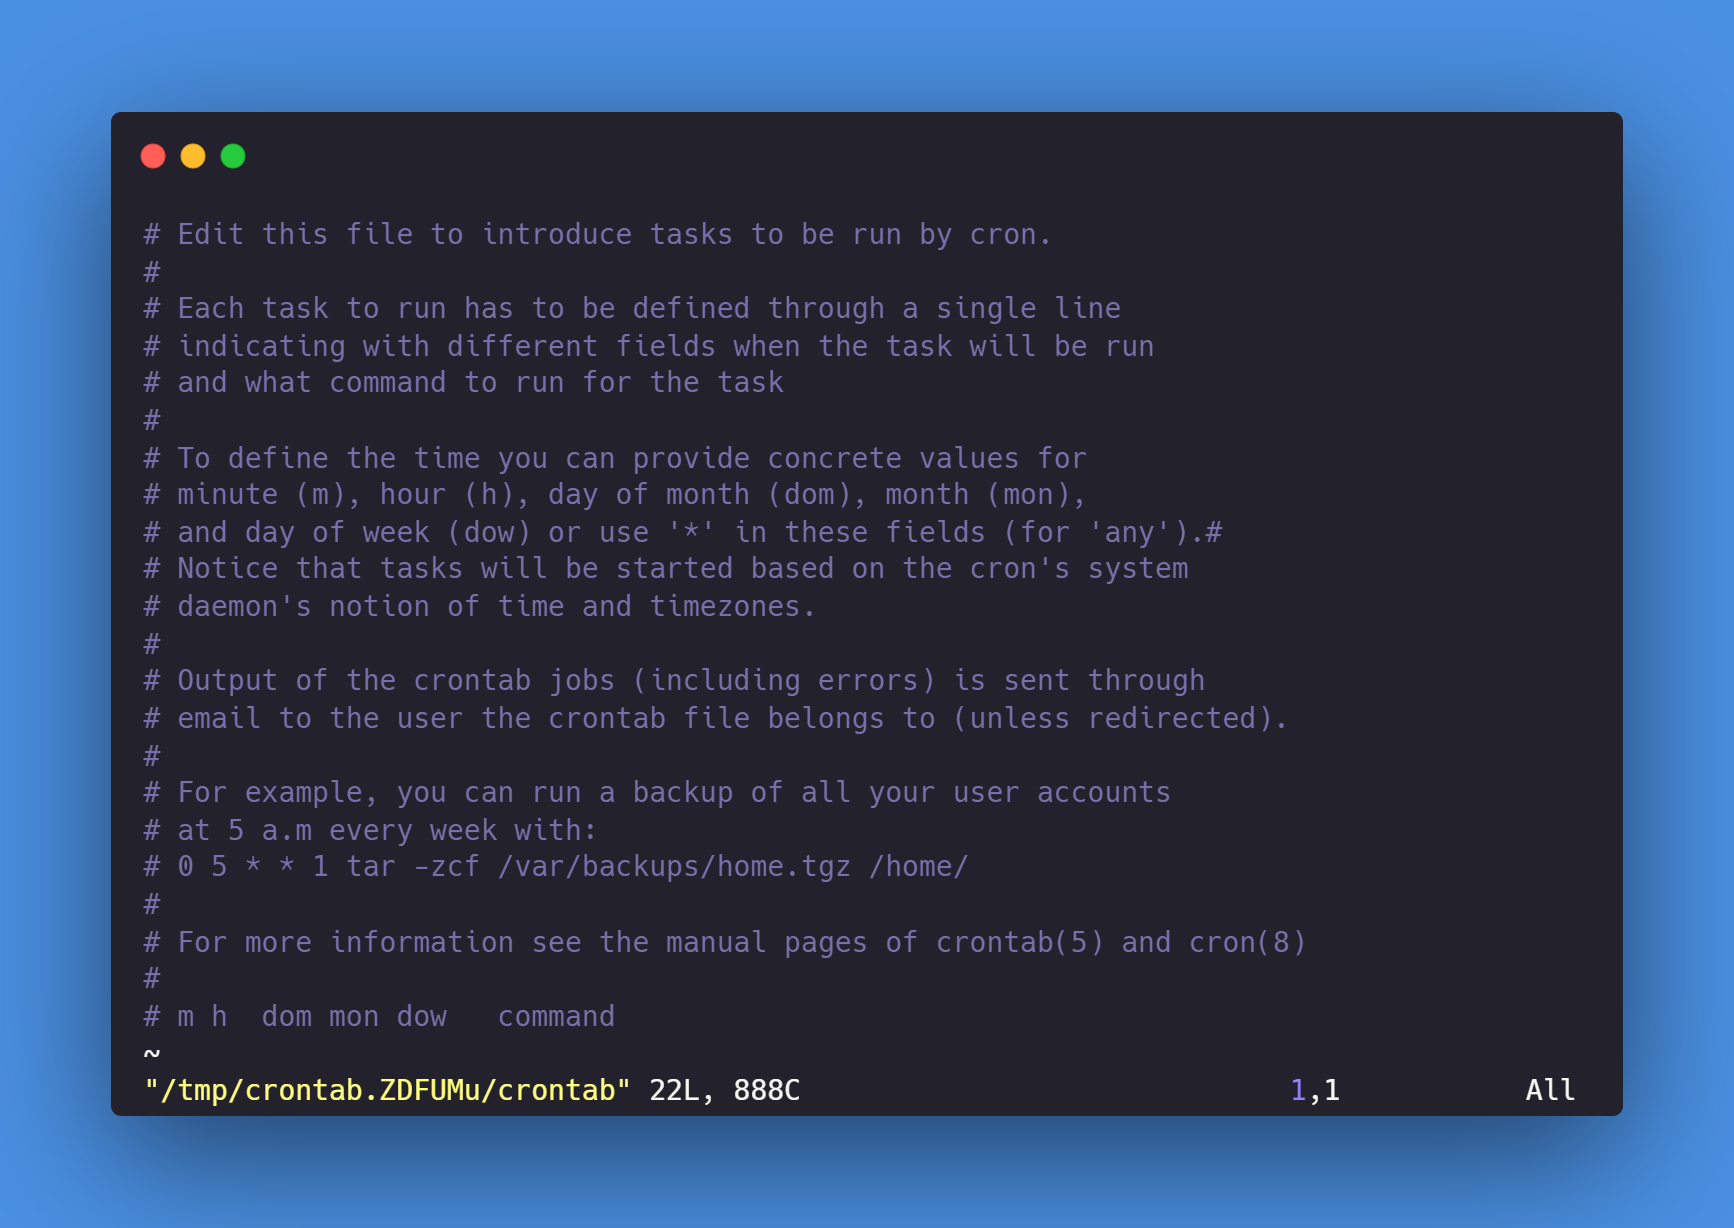
After selecting an editor, the configuration file opens in that editor, with usage instructions at the bottom:
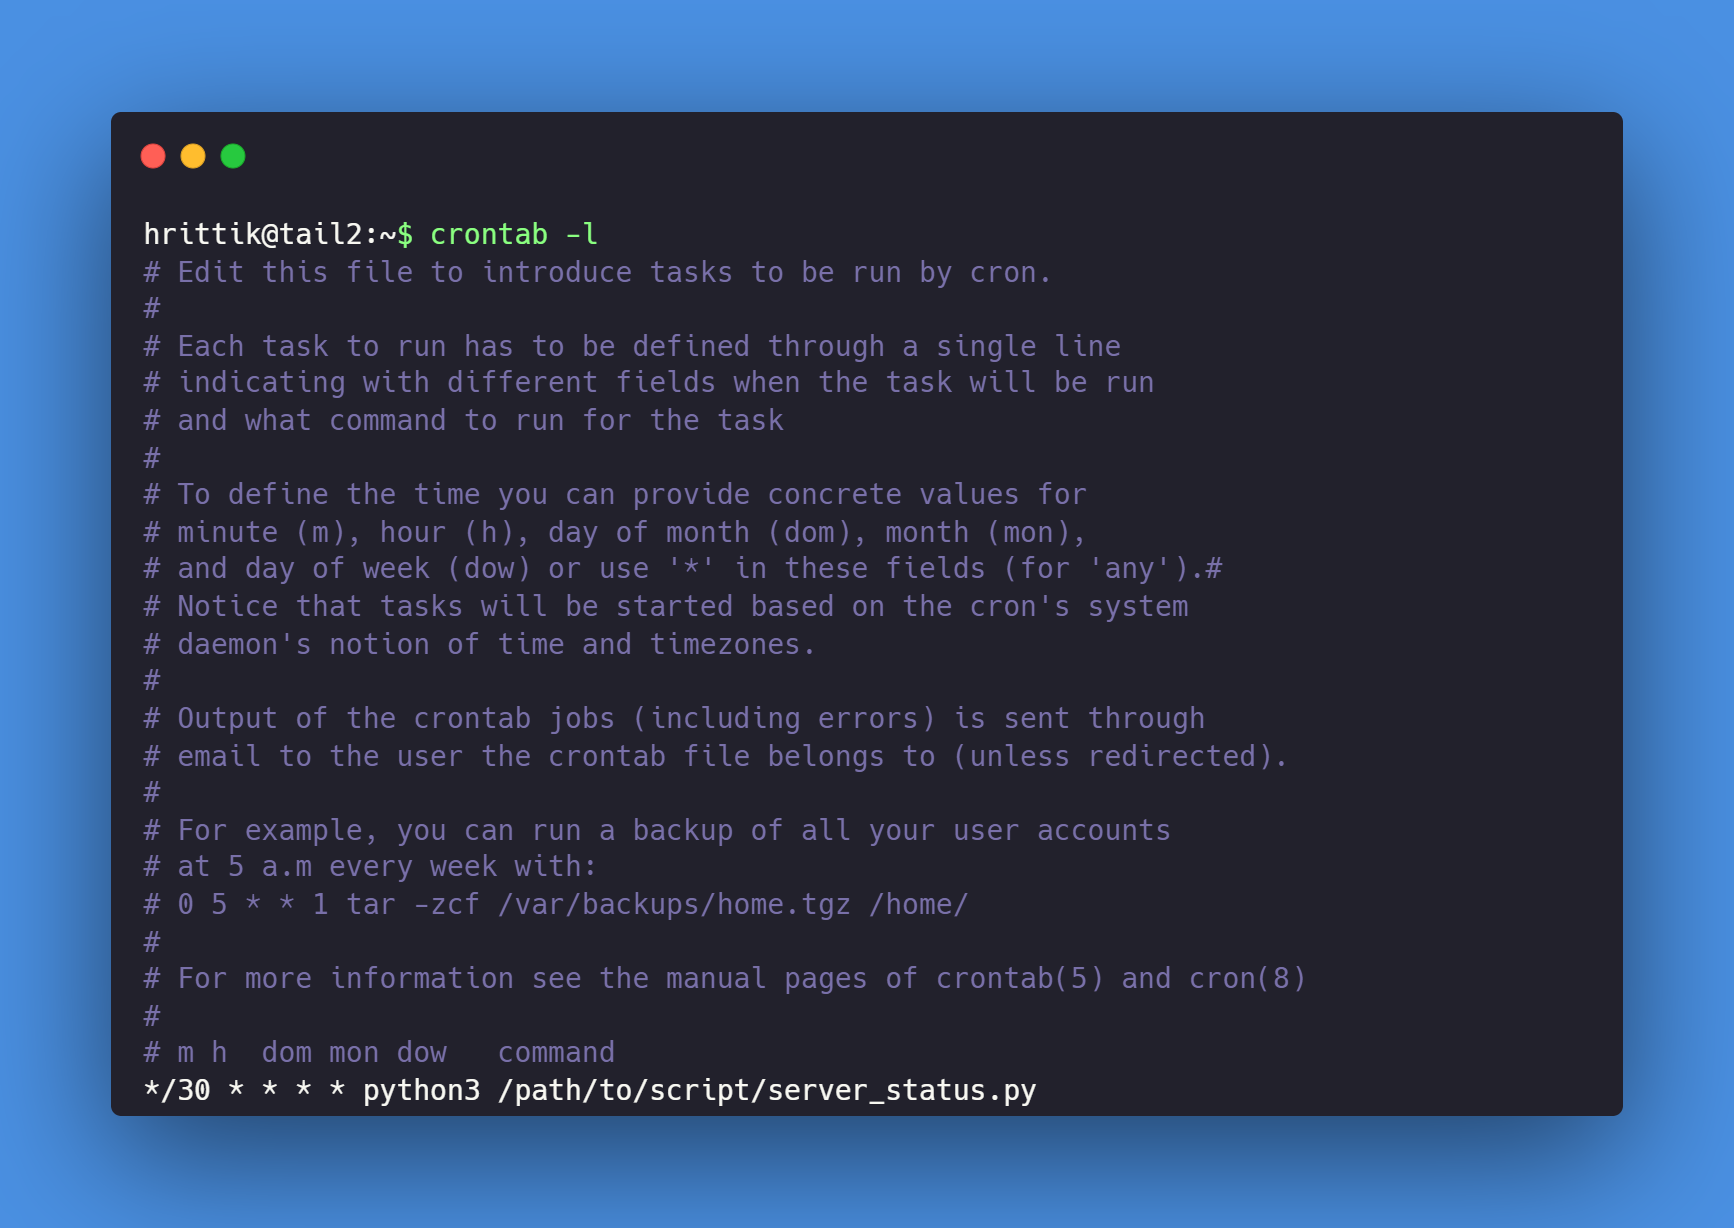
For example, if you want to check the status of your server periodically. In this case, you can use crontab to run a Python script every thirty minutes to check if a server is up:
*/30 * * * * python3 /path/to/script/server_status.pyThe crontab configuration is stored in your system, and you can view them all using crontab -l.
If you’re interested in a more complex expression, consider using something like crontab guru. Scheduling can be nuanced, so before diving in, take a look at more examples in this guide.
Conclusion
This post went through many popular, powerful commands, including some that will make everyday tasks faster and easier. Again, the best way to remember and get comfortable with the commands is to try them, so don’t be afraid—open up your terminal and test them out.
When you’re building an application, the best-practice approach is using a system to define your build. Earthly is a cacheable, Git-aware, parallelizable, and self-contained tool for defining build steps. It works with the tools you’re already using and ensures that your builds will run the same way, no matter what they’re running on.
Earthly Lunar: Monitoring for your SDLC
Achieve Engineering Excellence with universal SDLC monitoring that works with every tech stack, microservice, and CI pipeline.


