10 Advanced Git Commands

Table of Contents
For many developers, truly harnessing the power of Git can be a daunting task. Git can seem intimidating when you first start using it. This is one of the reasons most developers limit themselves to using the standard push, pull, and merge commands.
However, over the years, Git has emerged as the standard tool for version control because of how powerful it is. So if you’re using Git on a regular basis, then you can vastly improve your workflow by learning some of these advanced features.
In this article, I’ll discuss ten advanced Git commands every developer should know.

Git Rebase
If you wanted to merge all your commits in a feature branch to the main branch, what probably comes to mind is using the git merge command. This will take all of the changes in the featured branch and stuff it into one merge commit and then put that merge commit into the main branch. After those changes are combined into that merge commit, it looks scattered, especially when you have a bunch of people working on the featured branch and pushing changes almost every time.
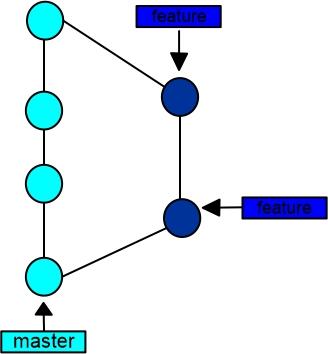
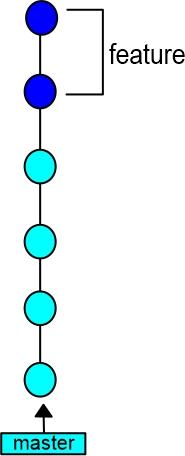
The git rebase command can solve that for us. It takes all of your commits from a featured branch and moves them on top of the main commit.
A great advantage is that it easily traces your commits inside the main branch.
git rebase <base>You should use the git rebase command to consolidate into a single branch when you have multiple private branches. And it will display the commit history in a linear form. In a linear history, it’s easy to see the progression of changes because they are all applied one after the other, without any branches or merge commits. This can make it easier to understand how the code evolved over time.
Additionally, a linear history can make it easier to track down bugs because you can more easily see when a particular change was introduced. It can also make it easier to revert changes since you can simply revert a single commit rather than dealing with the complexity of merging branches.
Searching a Git Repo
Have you ever wanted to search for a string in your repository history? Well, you can do that now with the grep command, which helps you search for a specific string inside all the commits (the entire history of the project).
Git Grep
git grep is a useful tool for quickly searching through the codebase of a Git repository to find specific information searches through the tracked files in the current branch of a Git repository and returns a list of lines that match the specified pattern. It can be used to search for code snippets, function calls, or specific strings of text.
To search through files in your working directory (current project state) you can make use git grep :
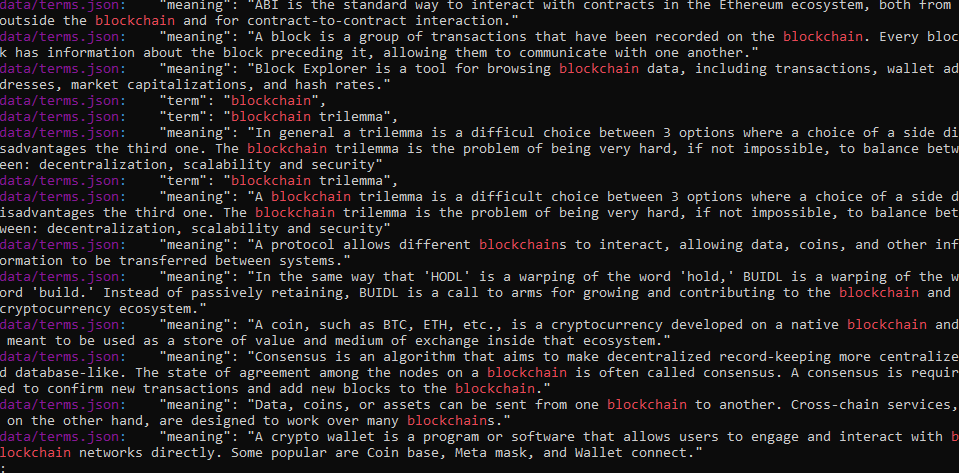
git grep STRINGHere’s an example of searching for the word “blockchain” in a web3 repository:
git grep blockchainHere’s the result:
Git Rev-List
You can also perform complex searches by adding the git rev-list. To understand how to do this, let’s take a brief look at the git rev-list
The git rev-list is a Git command used to list the revisions in a Git repository. It provides a list of all the commit objects in the repository, including the commit hash, author, date, and message, sorted in reverse chronological order. The output of the git rev-list command can be used to display the commit history, track the progression of a Git repository over time, or perform various operations on the commits.
git rev-list [OPTIONS] [<revision ranges>]Here,OPTIONS is a list of optional parameters that control the output of the git rev-list command, and <revision ranges> is a list of revisions that you want to list.
For example, to list all the revisions in the repository, you can run:
git rev-list --allTo list the revisions reachable from the current branch, you can run:
git rev-list HEADTo list the revisions between two branches, you can run:
git rev-list branch1..branch2You can use the git rev-list command in combination with other Git commands, such as xargs and git grep, to perform more complex searches.
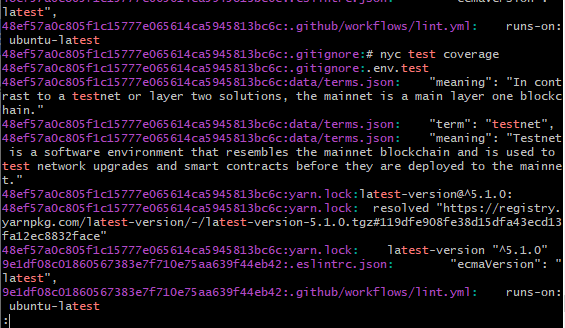
git rev-list –all | xargs git grep -F '<your string>'Using xargs is useful in this case because it takes the output of the git rev-list command, which is a list of all revisions in the Git repository, and passes each revision as an argument to the git grep command, so that the contents of each revision can be searched for the specified string.
You just have to replace the <your string> with the string you want to search for:
git rev-list --all | xargs git grep -F 'test'This will search for the word ‘test’ and display the results.
Here’s the result:
Git Log
The git log command is one of the most useful Git commands you should be familiar with. When you need to look at your commit history, you use the git log command. The git log command displays the most recent commits as well as the current state of the HEAD.
git logIn the images below, you can see a log or history of the commits made so far.
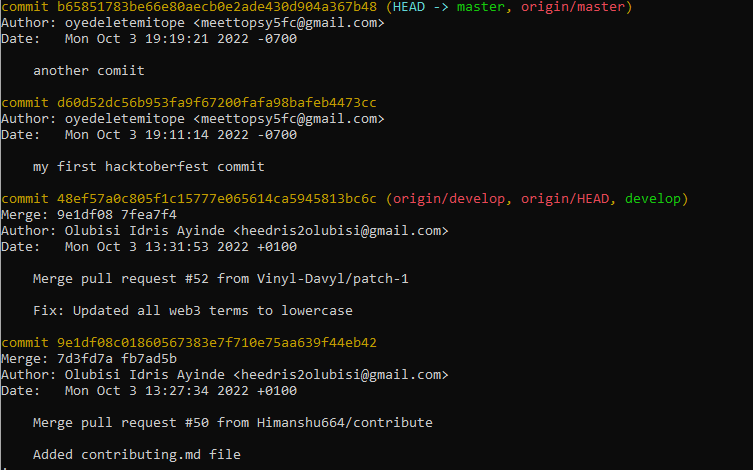
Notice that each commit includes a unique sha-id created by the SHA algorithm. It also includes the date, time, author, and other information.
You can scroll through your log history by pressing the k key to move up and the j key to move down. Press q to exit.
You can also view your logs as a graph just by adding the --graph option:
git log --graph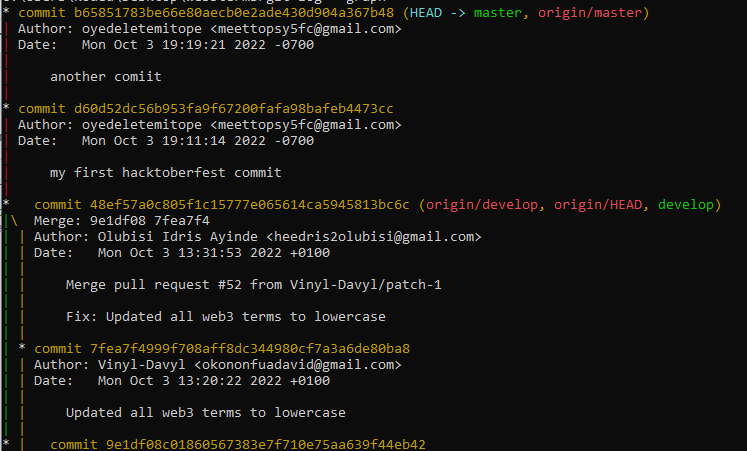
Git Diff
Comparing changes you made between two files or branches before committing or pushing is helpful as it allows you to review your changes and make sure they are ready to be shared with others. This can help you catch mistakes or unintended changes before they are committed to the repository, which can save time and reduce the risk of introducing problems.
Thankfully, with git diff, you can do that. It lets you see what has changed between two branches, commits, and files.
Git Diff to Compare Files
To check the working directory against the local repository:
git diff 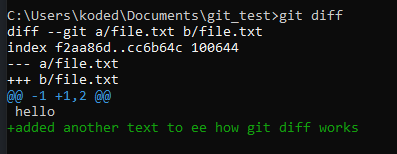
This will show the differences between the file you are currently working on and the version in the last commit. The output will show a list of changes, with added or modified lines highlighted in green.
Git Diff to Compare Branches
To see the differences between two branches:
git diff branch1 -- branch2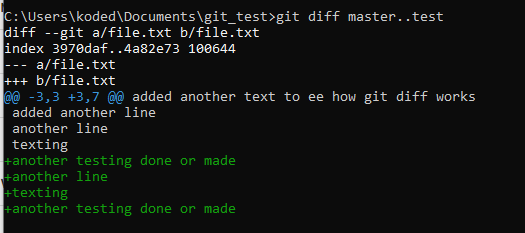
This will show the differences between the two specified branches. The output will show a list of changes for each file that has differences between the two branches, with added or modified lines highlighted in green.
Git Diff to Compare Commits
To see the differences between two specific commits:
git diff commit1 commit2
This will show the differences between commit1 and commit2. The output will show a list of changes for each file that has differences between the two commits, with lines that were added or modified highlighted in green.
Git Reflog
Reflog is another simple but useful command. The term reflog refers to reference logs.
Git Log vs Git Reflog
Unlike the git log command which provides a history of the changes to the contents of the repository, the git reflog command provides a history of all updates to the references in a Git repository.
This command displays the most recent commits, pulls, resets, pushes, and so on your local machine. It allows you to return to any commit, even if a branch or tag doesn’t reference it.
The reflog retains information about the previous status of branches and allows them to be restored if necessary. This is an excellent method for tracking down any issues like lost commits, debugging problems, e.t.c that may have arisen and determining what you did to cause those issues.
git reflog
Git Revert
The revert command allows you to undo changes made to a repository’s commit history on the current branch.
To use git revert, Simply give the commit you wish to reverse to the command, and it will undo all modifications made since that commit.
git revert <commit id>One thing to remember is that this only undoes changes from that specific commit. If you revert a month-old commit, it will not remove any modifications done since that point. It will only undo the changes made in that specific commit.
Another thing to remember is that using git revert does not truly erase the previous commit. Instead, it generates a new commit that undoes all of the modifications made in the previous commit. This is beneficial since it preserves the history of your repository.
You can also use this if you want to revert the latest commit:
git revert HEADGit Prune
git prune removes stale or dormant objects from a git repository. Stale object can be a branch or tag that is deleted, or a commit that is amended or rebased. In Git, a stale object becomes unreferenced and unreachable.
Git prune acts as a trash can for unused data in the git repository history. This function is an offspring of the garbage collection command and is not immediately executed. The git garbage collection command (gc) is in charge of keeping a repository alive. It clears out all the clutter in a repository and keeps it clean.
git prune < --dry-run>| <-v> | <--progress> \
|<--expire <time> |<-- > |<head>…--dry-run: doesn’t execute the prune but rather lists what it will remove-v (--verbose): displays the output of pruned data and actions--progress: displays output indicating the prune’s progress--expire <time>: specifies when the wasted objects will expire<head>…: specifies the options that are referenced from the commit’s head
Git Stash
git stash allows you to temporarily save changes that you have made to your working copy so that you can switch to a different branch, pull in upstream changes, and switch back to your original branch, at which point you can apply the saved changes.
It works by keeping or saving all of your uncommitted changes while also cleaning up your working tree. Stashing is helpful for you if you need to move away from what you are doing, say to fix an urgent bug, but aren’t quite ready to commit what you’ve done so far.
git stashThis simple command saves all your code modifications but does not commit them. Instead, it saves them locally on your computer. When you’re ready to continue, you can pull your changes from the stash with this command below:
git stash popGit Tag
Tags are references that point to specific commits. Tagging is generally used to capture a point in history that is used for a marked version release (i.e. v1.0.0). By default, tags are not transitive, meaning they don’t move when new commits are added. A Git tag is similar to a branch that won’t change, although, unlike branches, tags have no further history of commits after they are established.
git tag <tagname>For example, if you want to create a new tag named v1.0.0, you can use the following command:
git tag v1.0.0This will create a new tag at the current commit. If you want to create a tag for a specific commit, you can specify the commit hash:
git tag v1.0.0 <commit hash>You can also use the -a flag to annotate the tag with a message:
git tag -a v1.0.0 -m "Release version 1.0.0"To push the tags to a remote repository, you can use the git push command with the --tags flag:
git push --tagsThis will push all of your local tags to the remote repository. To view the list of tags you made in your repository:
git tag --list
Git Clean
You can use the git clean command to deal with untracked files. It functions differently from the git checkout and git reset, which work on files that have already been added to the Git tracking index. This command removes all untracked files from your working directory.
git cleanThe git clean command requires you to use either the -f or -n flag when running it. If you don’t use either of these flags, the command will fail with an error message similar to “no f’s given”. For example, if you try to run git clean without any flags, you might see an error message like this:

Let’s take a closer look at some of these flags used alongside git clean:
git clean -n
git clean -n: The -n flag is used to show a dry run of the command, which means it will display the files and directories that would be removed, but it won’t actually remove them.
Here’s an example, using the -n flag:
git clean -n
As we can see, it is displaying the file that would be removed.
git clean -f
git clean -f: This flag is used to force the removal of untracked files and directories from your Git repository.
Here’s an example, using the -f flag`:
git clean -fHere’s a screenshot of the result:

The command forcibly removes the text.txt file
git clean -f -d
git clean -f -d: This combination of flags will forcefully remove untracked directories from your Git repository, but it will not remove any untracked files.
Here’s an example, using the -f -d flag:
git clean -f -d
The command forcefully removes the untracked directories in our example.
Conclusion
Git is a powerful tool that boosts productivity and collaboration quality. Even with basic commands like push, pull, and merge, it’s highly effective. To take it a step further, explore more features such as Git aliases and git bisect.
If you’re working on a team with multiple repos, keeping development standards consistent — like commit conventions, branch policies, and code review checks — becomes its own challenge. Earthly Lunar helps teams enforce these standards directly in PRs.
Turn your engineering standards into automated guardrails that provide feedback directly in pull requests, with 100+ guardrails included out of the box and support for the tools and CI/CD systems you already have.