Working with GitHub Actions Environment Variables and Secrets
In this Series
Table of Contents
This article discusses managing secrets in GitHub Actions. Earthly streamlines your GitHub Actions build process. Check it out.
When you’re working with continuous integration, continuous delivery (CI/CD) platforms, you’ll work with environment variables and secrets, which are resources that help you conceal and reuse sensitive information, like keys and certificates, in your CI/CD processes. These environmental variables and secrets also make it easy for you to manage your application environments by maintaining configuration sets that you can swap and use when running in different environments. You can also utilize expanding functions (ie functions that substitute environment variable values at runtime) and dynamic string templates (ie a method to help create multiple strings out of a template literal with different sets of environment variable values) to reuse secrets and simplify your code.
In this article, you’ll learn how GitHub Actions work, when you should use them, and how to get started. To follow along, you’ll need a GitHub account to fork the repo and try out GitHub Actions. You’ll also need some familiarity with YAML, the standard language for writing and managing GitHub Actions configuration files.

What Are GitHub Actions Environment Variables and Secrets?
GitHub Actions’ environment variables and secrets are just like regular secrets. They help you hide and reuse sensitive information in your workflows. In most cases, you can define environment variables under an env node in your workflow configuration file.
While environment variables are simple dynamic values that are plugged in at runtime, secrets are more secure and are encrypted at rest. They’re usually managed by dedicated tools known as secrets managers to help create and view secrets while maintaining encryption. GitHub offers a built-in secrets manager tool in the form of Actions variables.
When to Use Environment Variables and Secrets
Before you start implementing environment variables and secrets, here’s a quick summary of when you should use each of these methods:
- Secrets are the most secure method of storing sensitive configuration data. It’s recommended that you use secrets to store any keys, certificates, or other sensitive information that control access to resources or permissions in your systems.
- Environment variables are beneficial when storing nonsensitive environment-specific data, like resource locators, domain information, and other environment details.
- Hardcoded information should only be opted for in cases where you’re not looking to secure and reuse a piece of information. However, this is usually rare in real-world projects that make use of multiple environments in the development process. If you have a small project that may not be used or changed much, you can consider hardcoding the information in it to save time and effort when building the app. However, you should not do this for a production-level application.
Implementing Environment Variables and Secrets with GitHub Actions
Now that you know when to use environment variables and secrets, the following will help you get started using them by showing you a few common GitHub Actions use cases.
Getting the Repo Ready
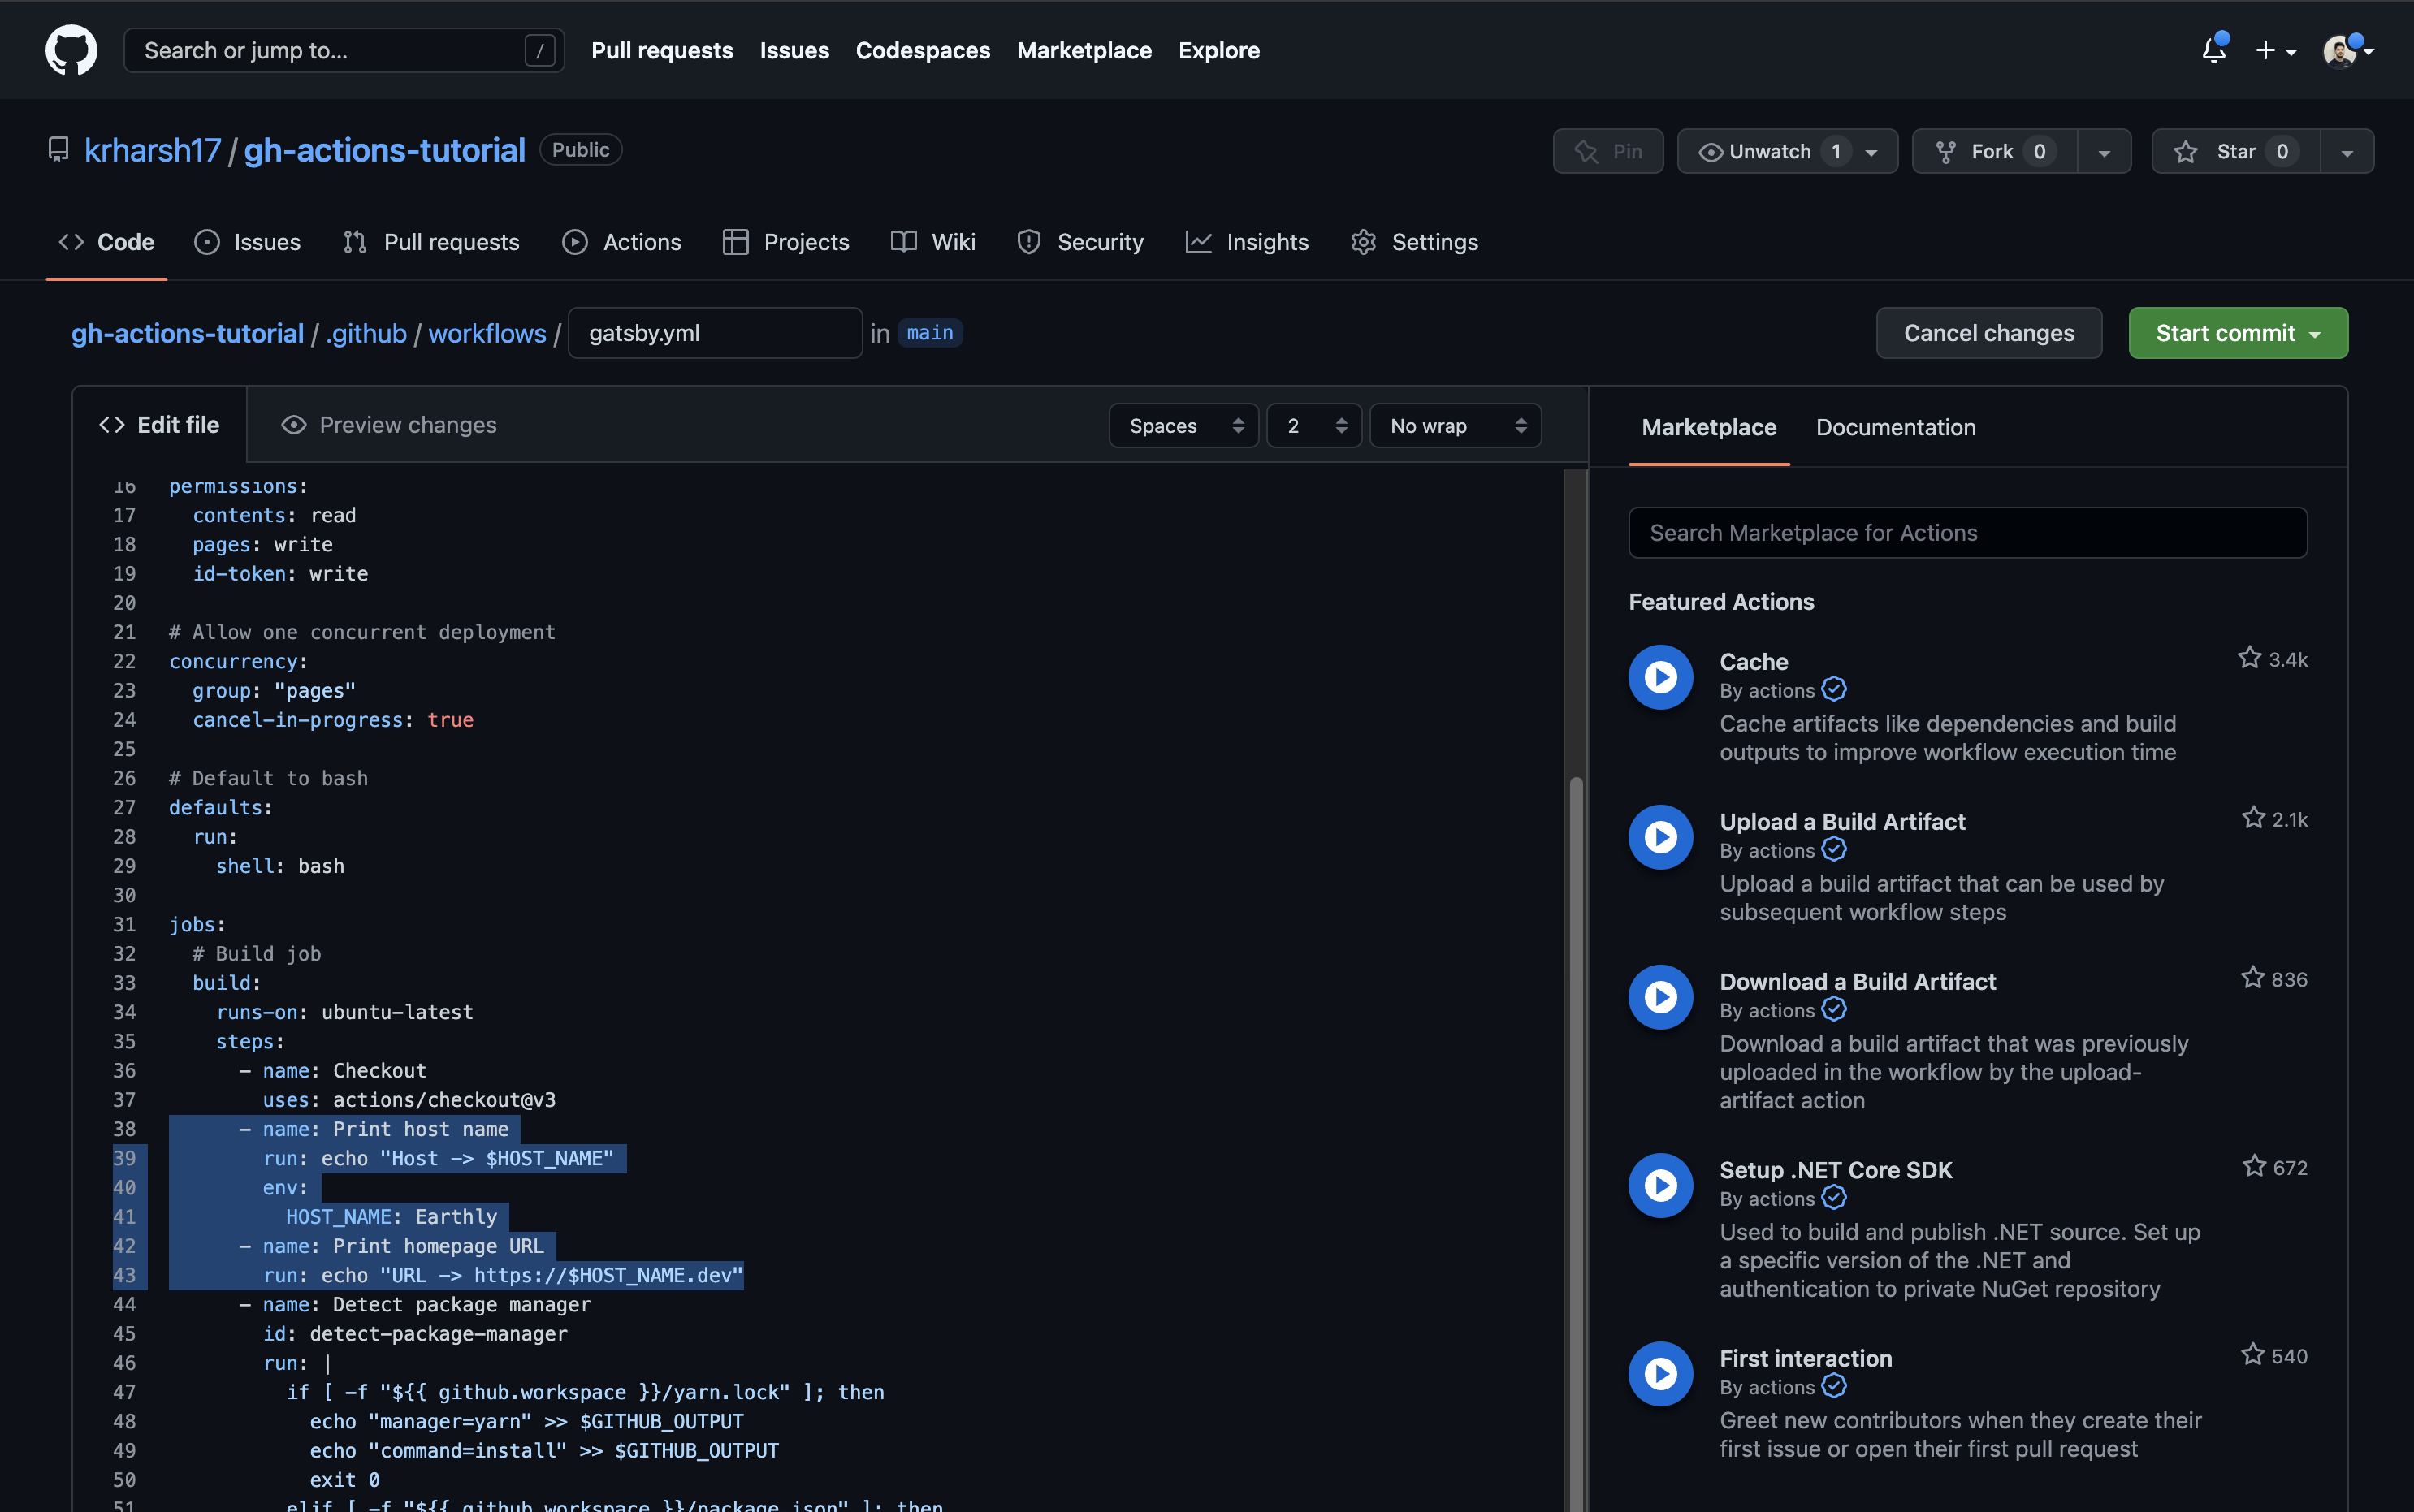
To make the tutorial easier, a GitHub repo with a Gatsby project has been created and hosted. You can get started by forking the repo to your own account.
Once you’ve forked the repo, set up a simple GitHub Actions workflow to build and deploy the app to GitHub Pages, a static file hosting service offered by GitHub.
To set up the workflow, you need to set up GitHub Pages. Go to the Settings tab, click on Pages from the left navigation pane, and click on the Source drop-down in the Build and deployment section:
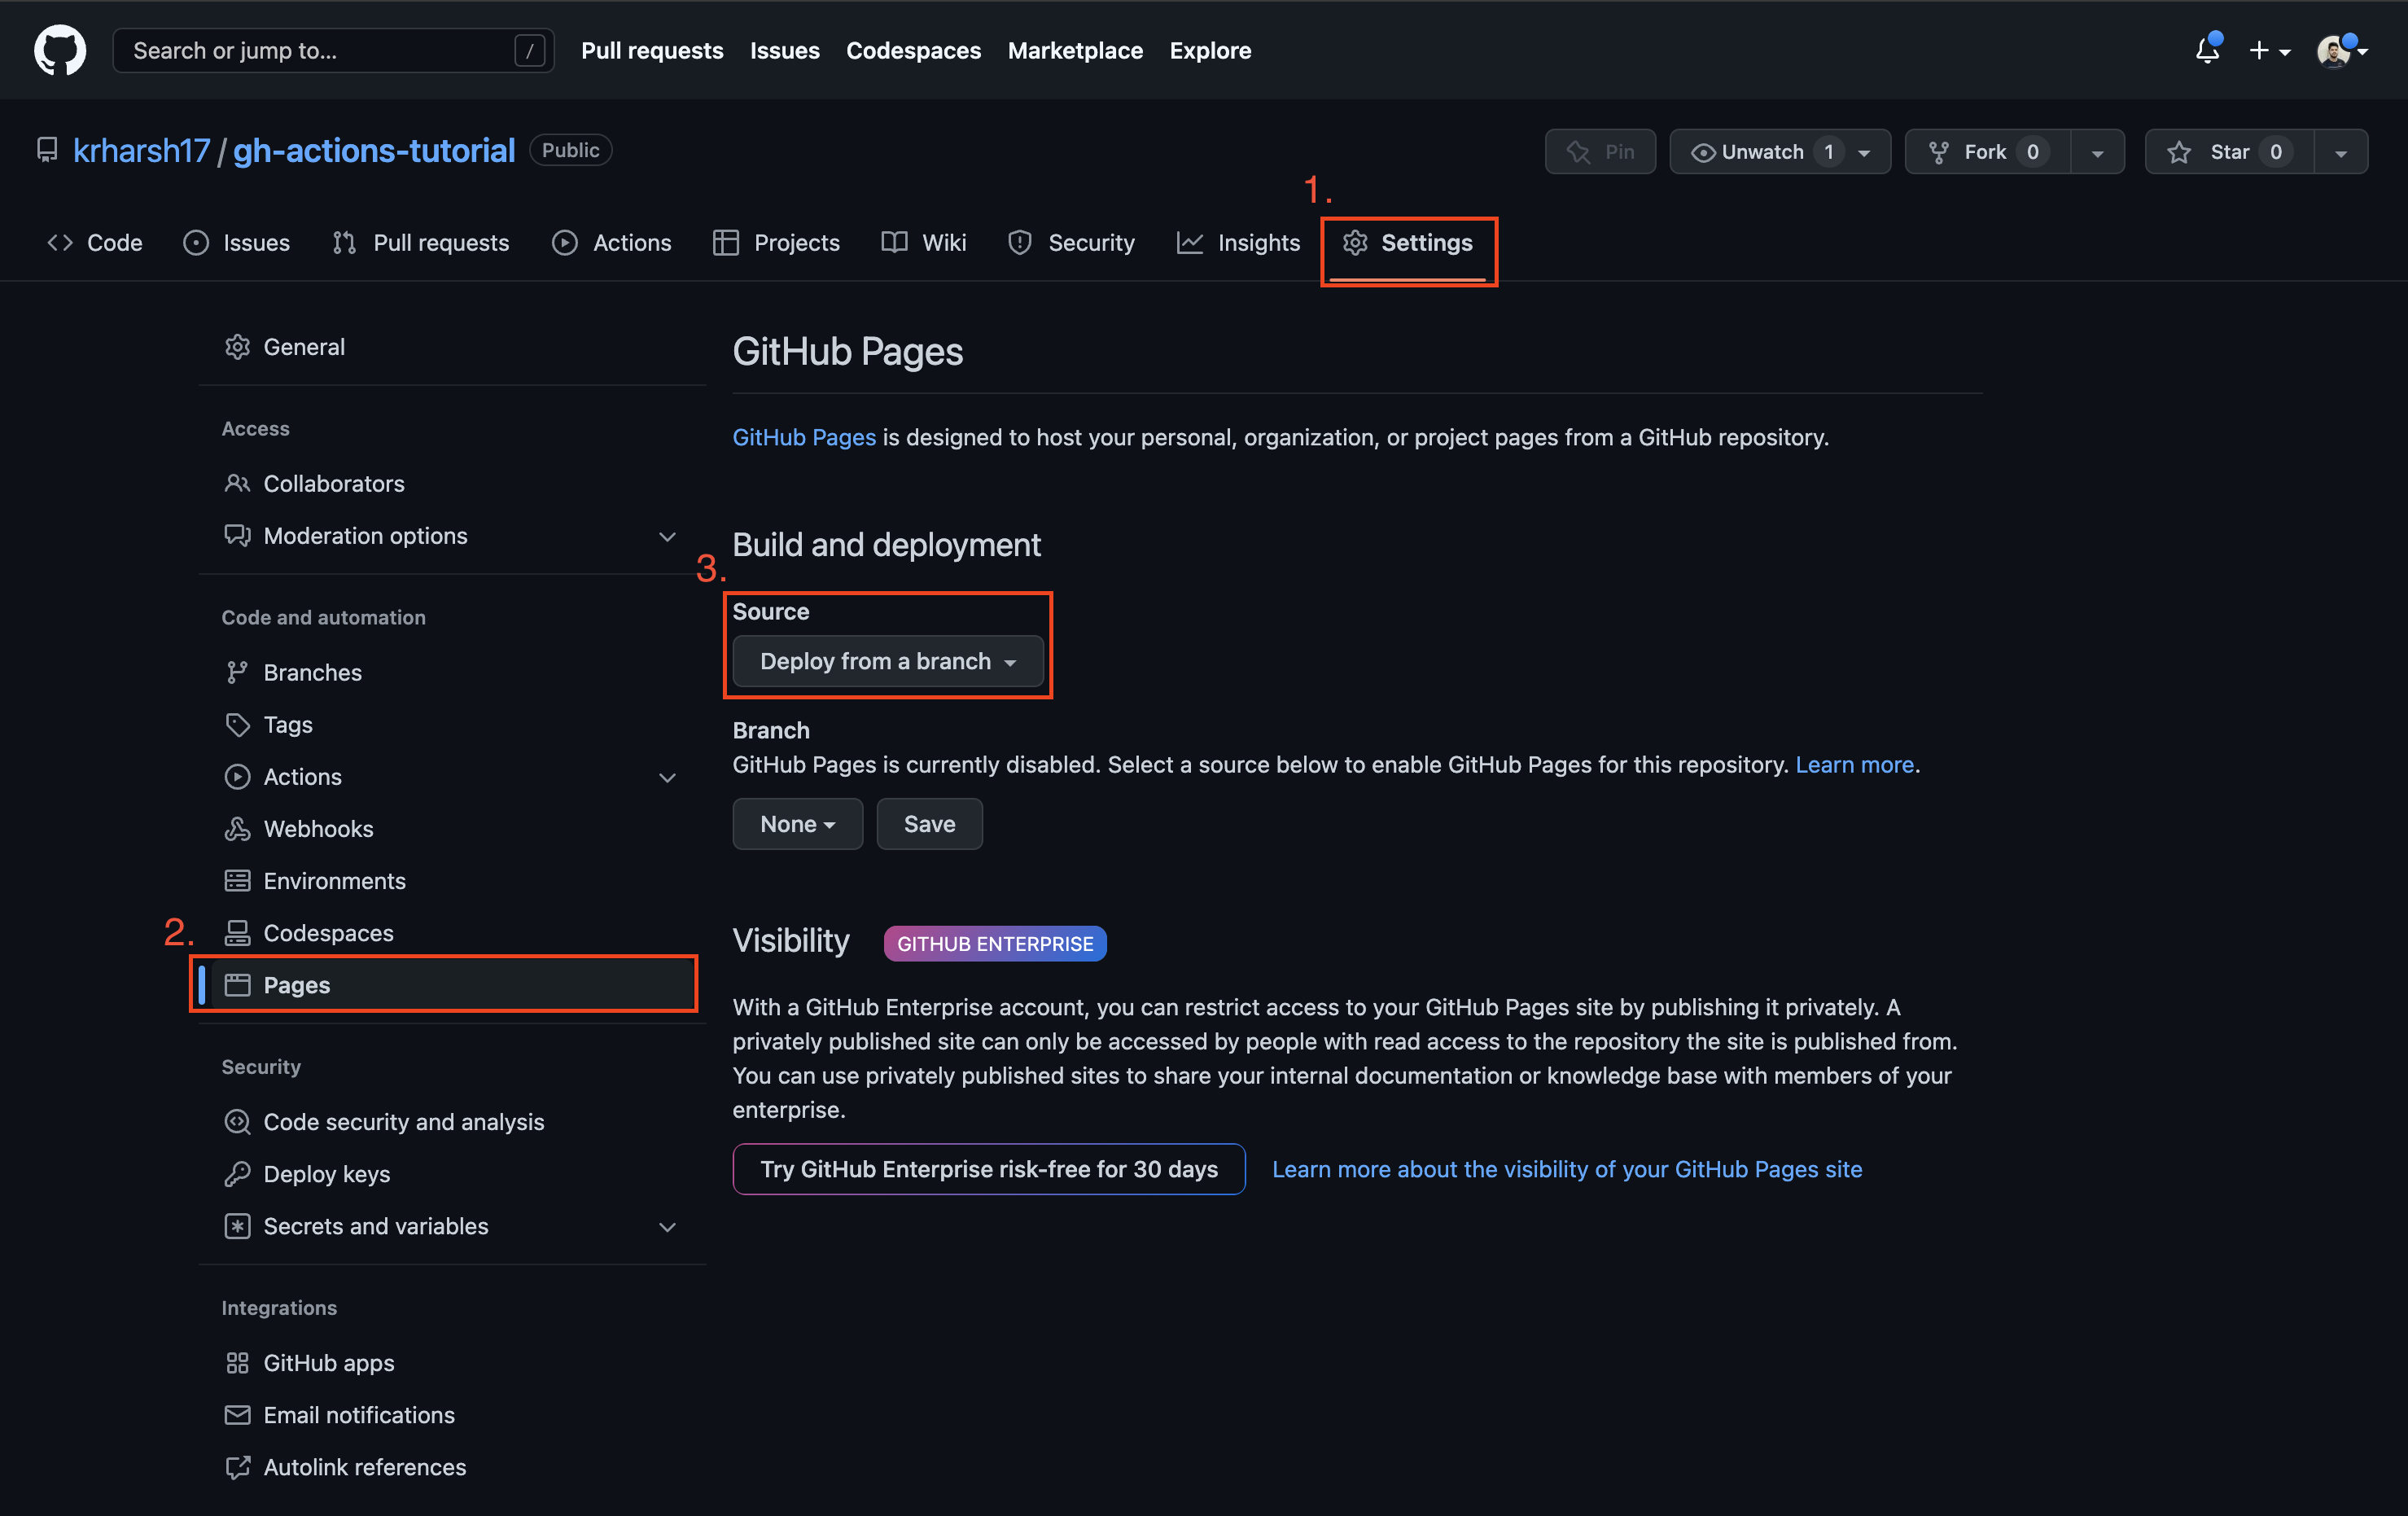
Choose GitHub Actions from the drop-down list to enable GitHub Actions to deploy to GitHub Pages. Then click on the Actions tab on the repo page:
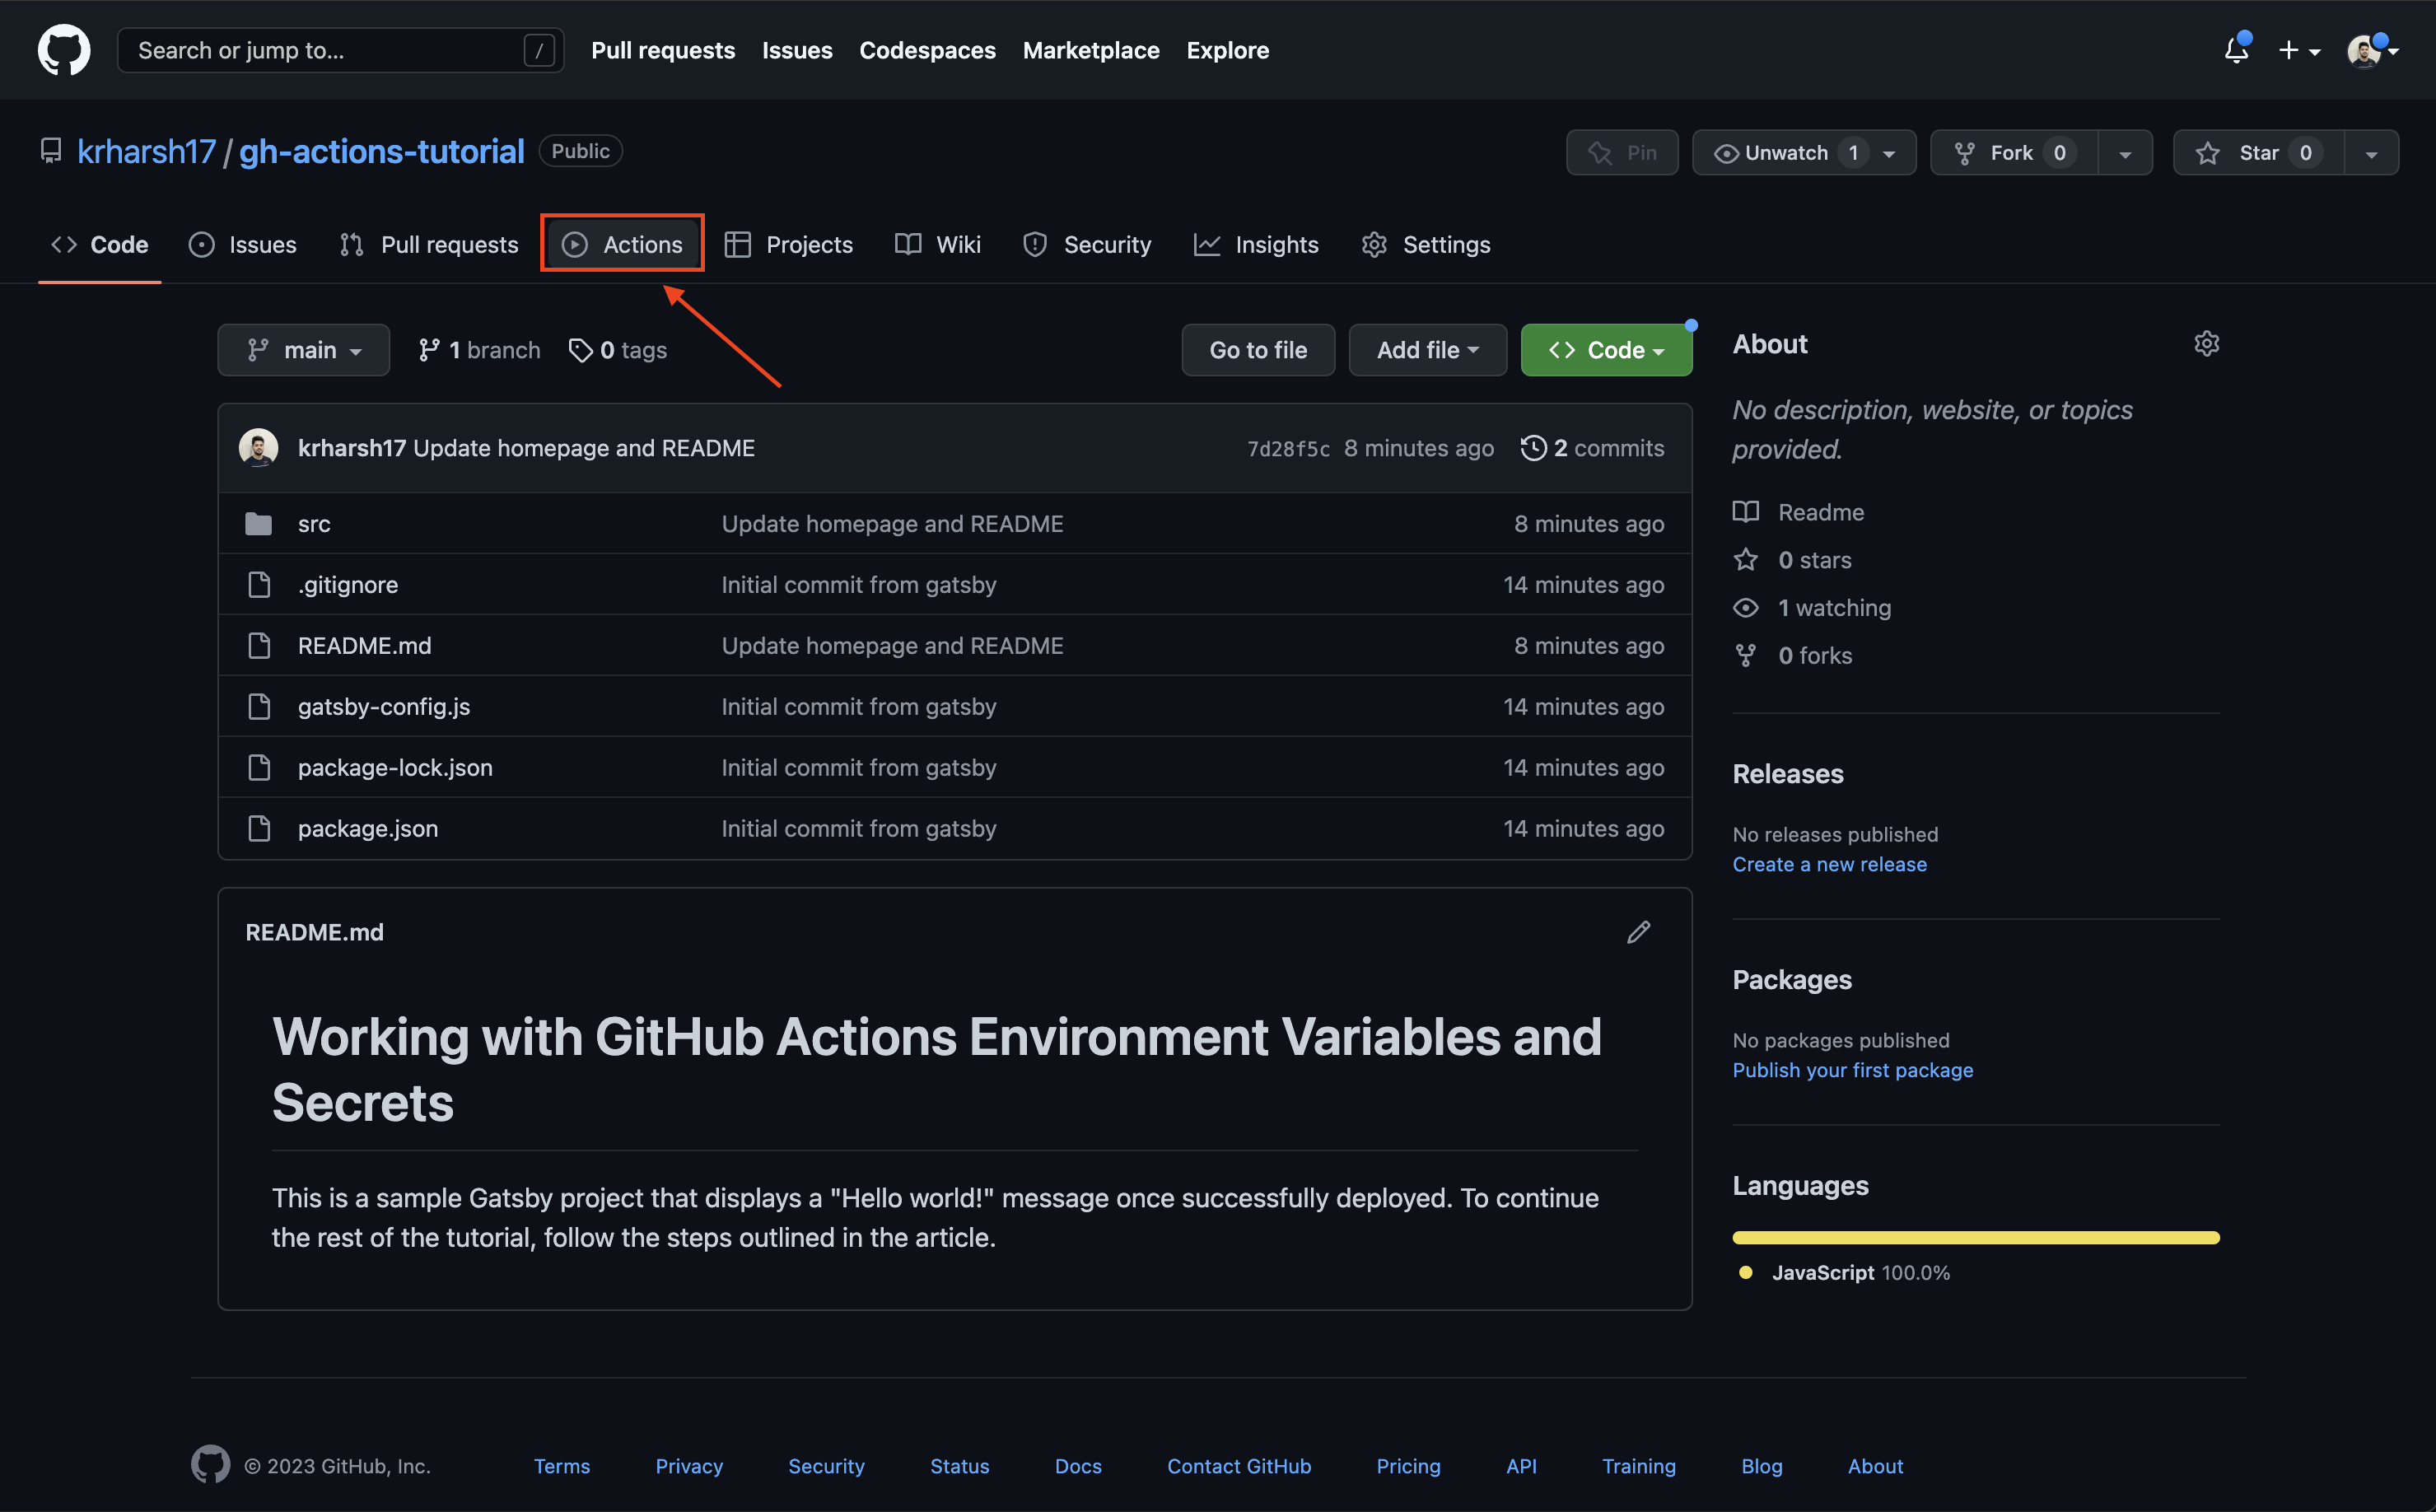
Next, search for Gatsby and click Configure on the workflow meant to package Gatsby sites:
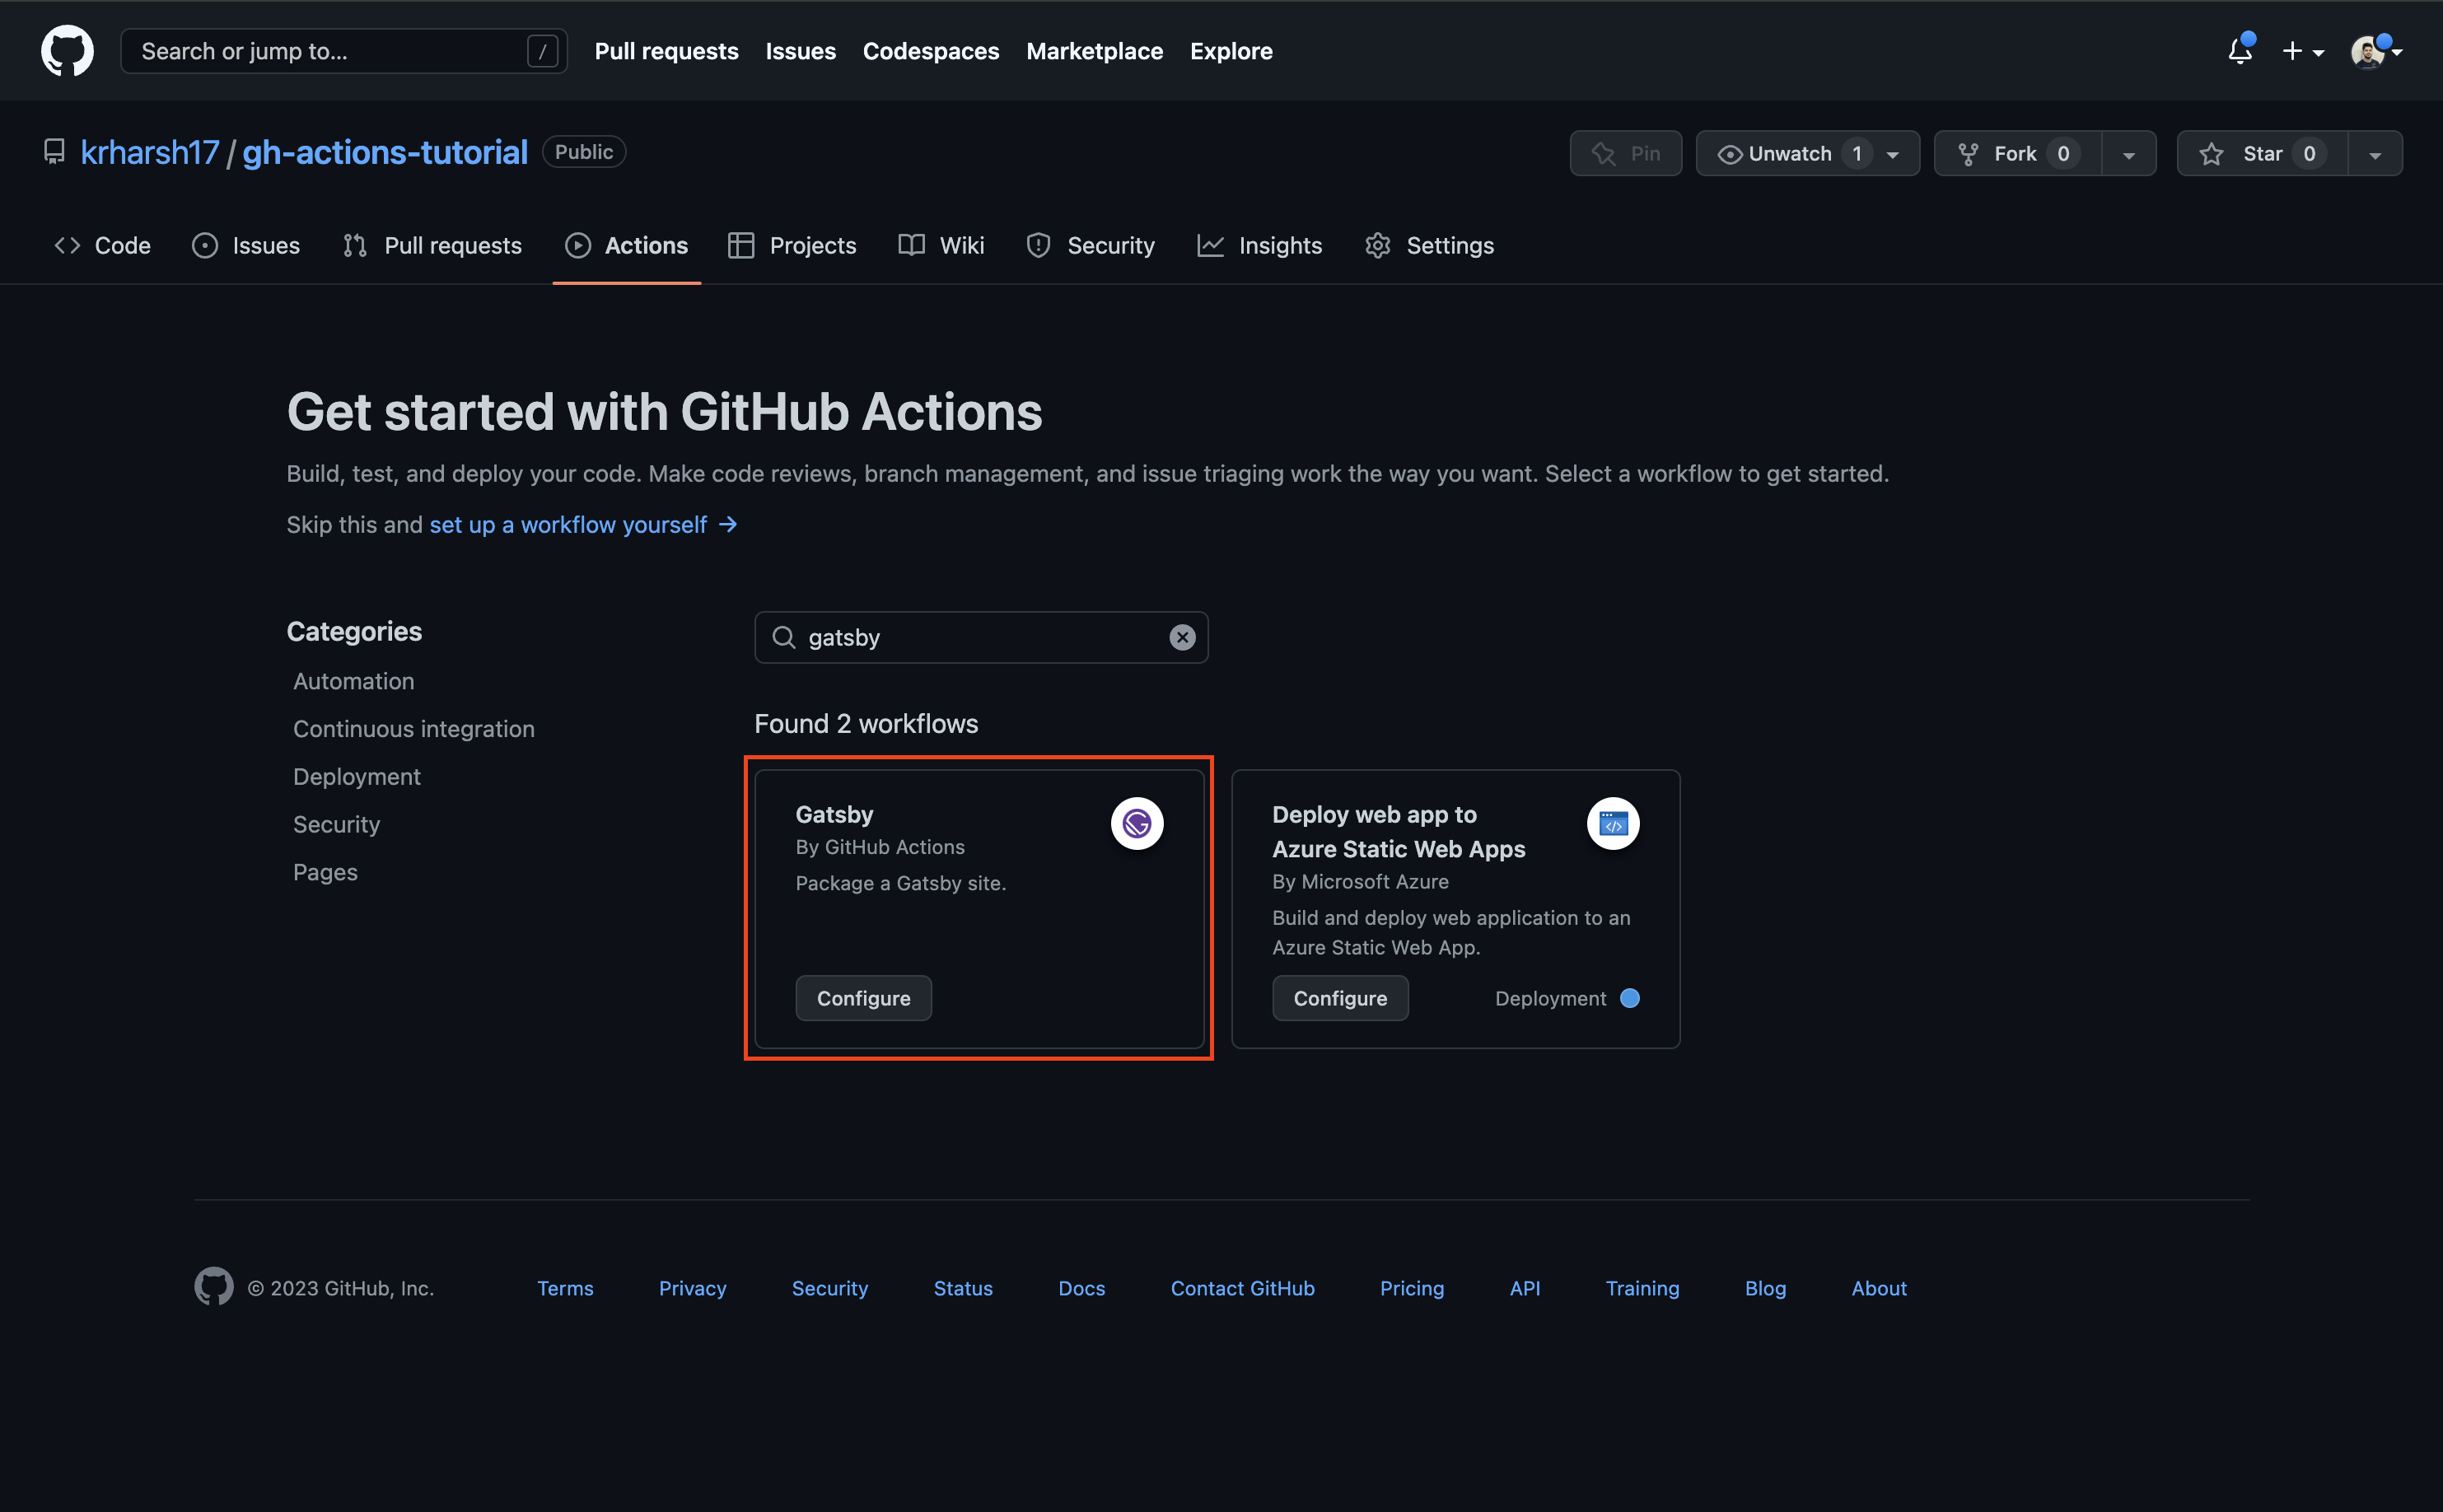
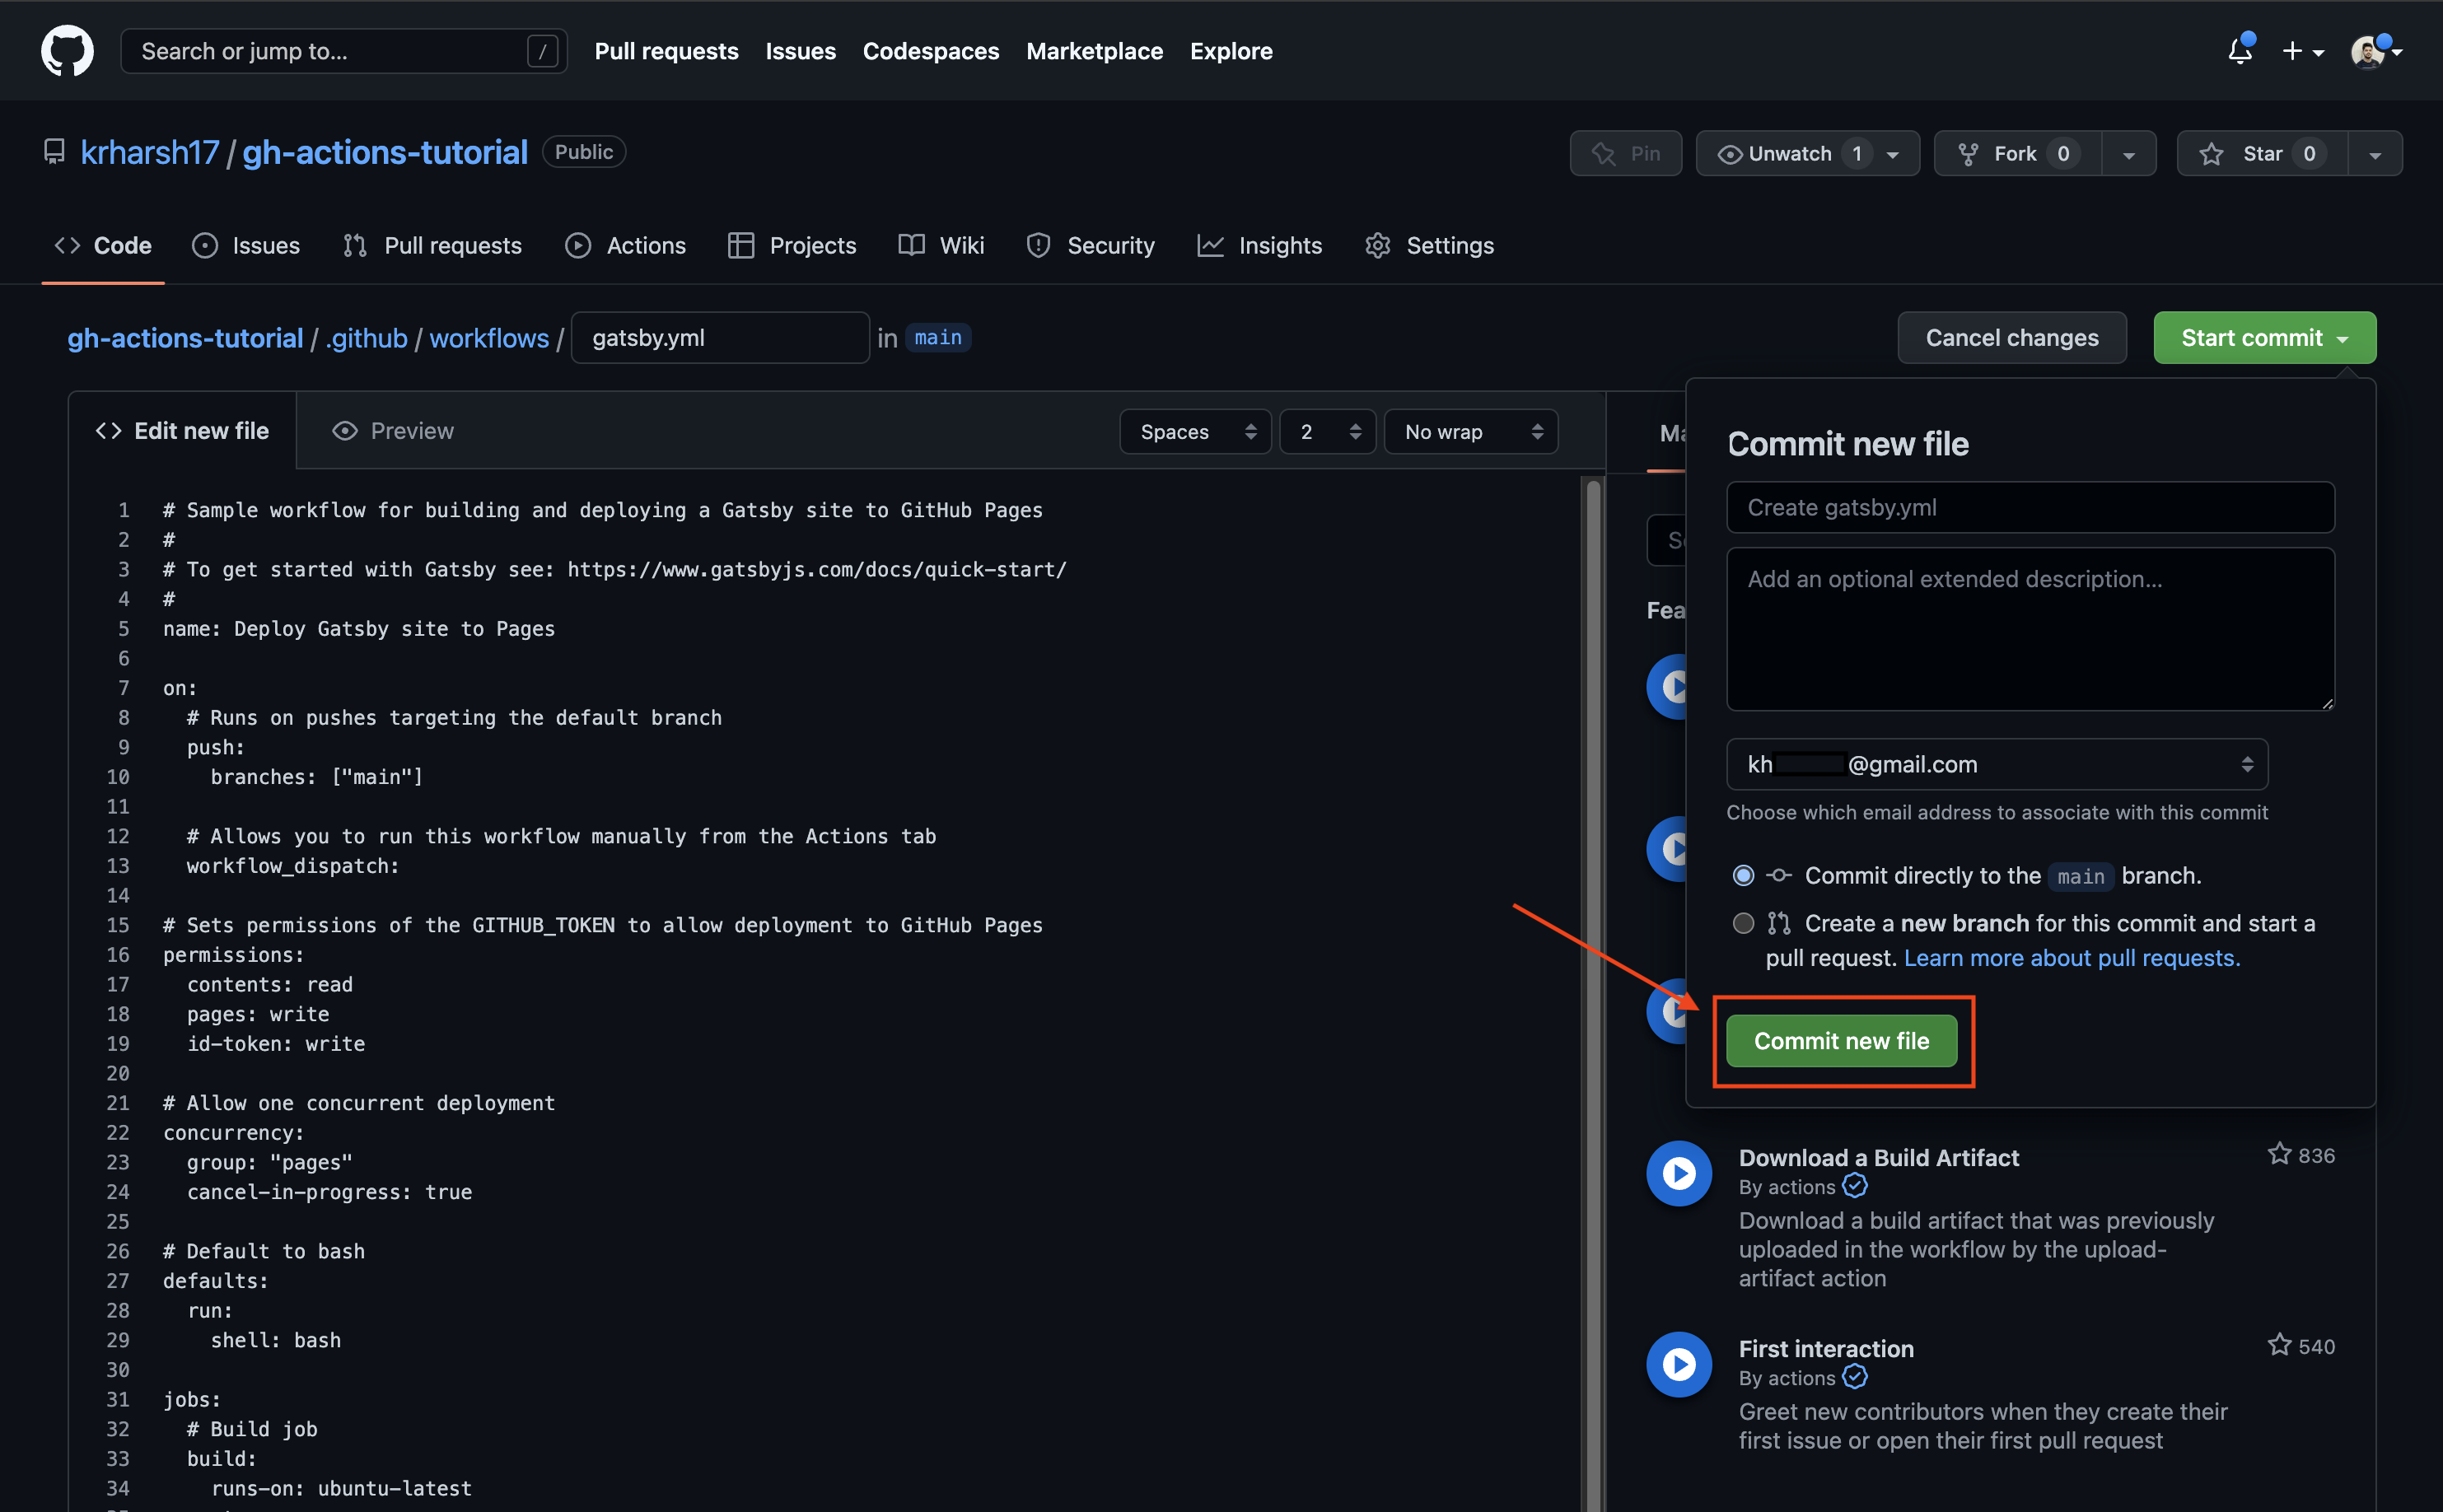
Now you should see the workflow YAML file in an editor where you can make changes to it before pushing it to your repo (and setting up the workflow in action). However, do not make any changes at this point. You’ll revisit this file later on in the tutorial. For now, click on Start commit > Commit new file:
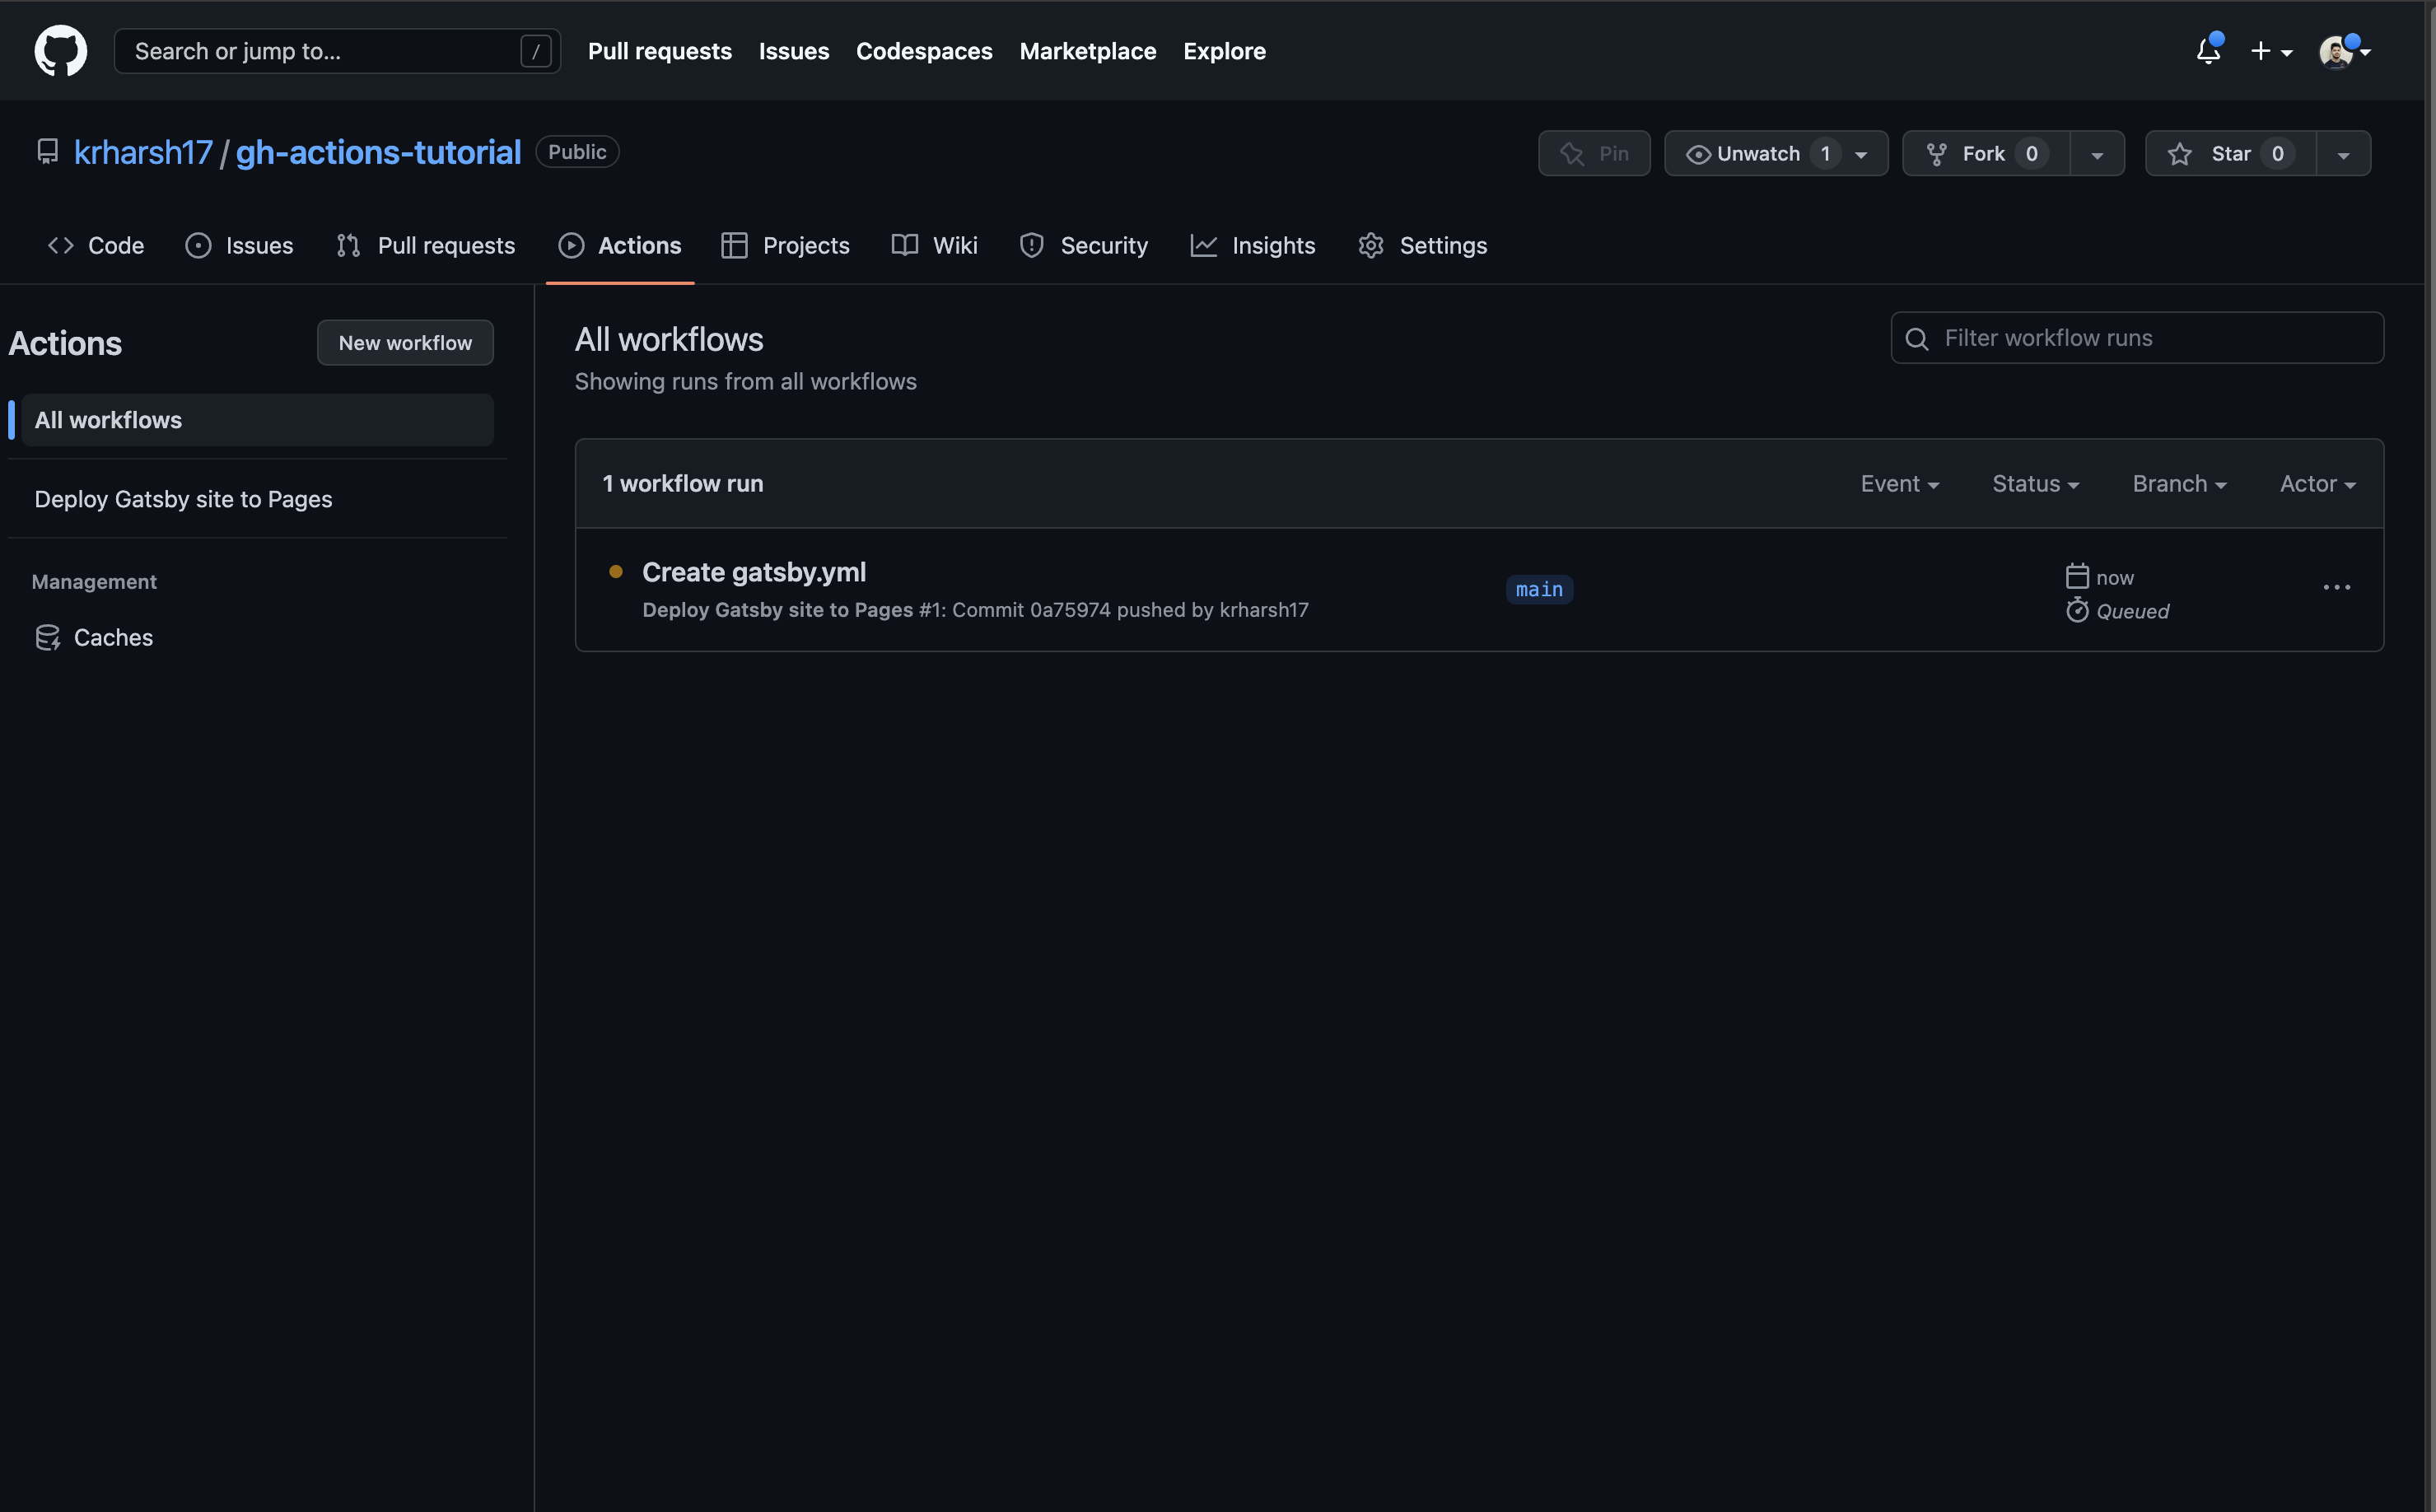
Click on the Actions tab again to view the details of your workflow runs. A new, active run for the Gatsby workflow you just created should be on the list:
Wait for the build to complete (this should take two to three minutes). If it succeeds, this means that you’ve successfully set up GitHub Pages and GitHub Actions for your repo. You can view the live site at https://<your GitHub username>.github.io/gh-actions-tutorial:

If the build failed, you’ll need to investigate the logs to see what went wrong. In most cases, it’s either a warning or error being thrown by your app when the build command is run, which causes a build failure in GitHub Actions. To fix the failure, you can make changes locally and push it to GitHub, which will automatically trigger another build.
You’ve now finished setting up the project. Next, you’ll learn how to set up environment variables and secrets in this project.
How to Define an Environment Variable for a Step
Defining an environment variable for one step is relatively simple. Open the .github/workflows/gatsby.yml file and add the following steps after the Checkout step:
- name: Print host name
  run: echo "Host $HOST_NAME"
  env:
    HOST_NAME: Earthly
- name: Print homepage URL
  run: echo "Host https://$HOST_NAME.dev"
This will add two steps to your Actions workflow. The first step defines a local env value that is used when running the echo command. The second step attempts to access the env value to use in a URL. This is what it will look like once you’ve added these steps:
To keep things simple, the environment variables have been statically defined in the workflow configuration file. For increased security via encryption, you can also use the GitHub repo environment variables (or secrets) to pull in the values of these variables from the GitHub repo variables when the workflow is triggered. More on this toward the end of the tutorial.
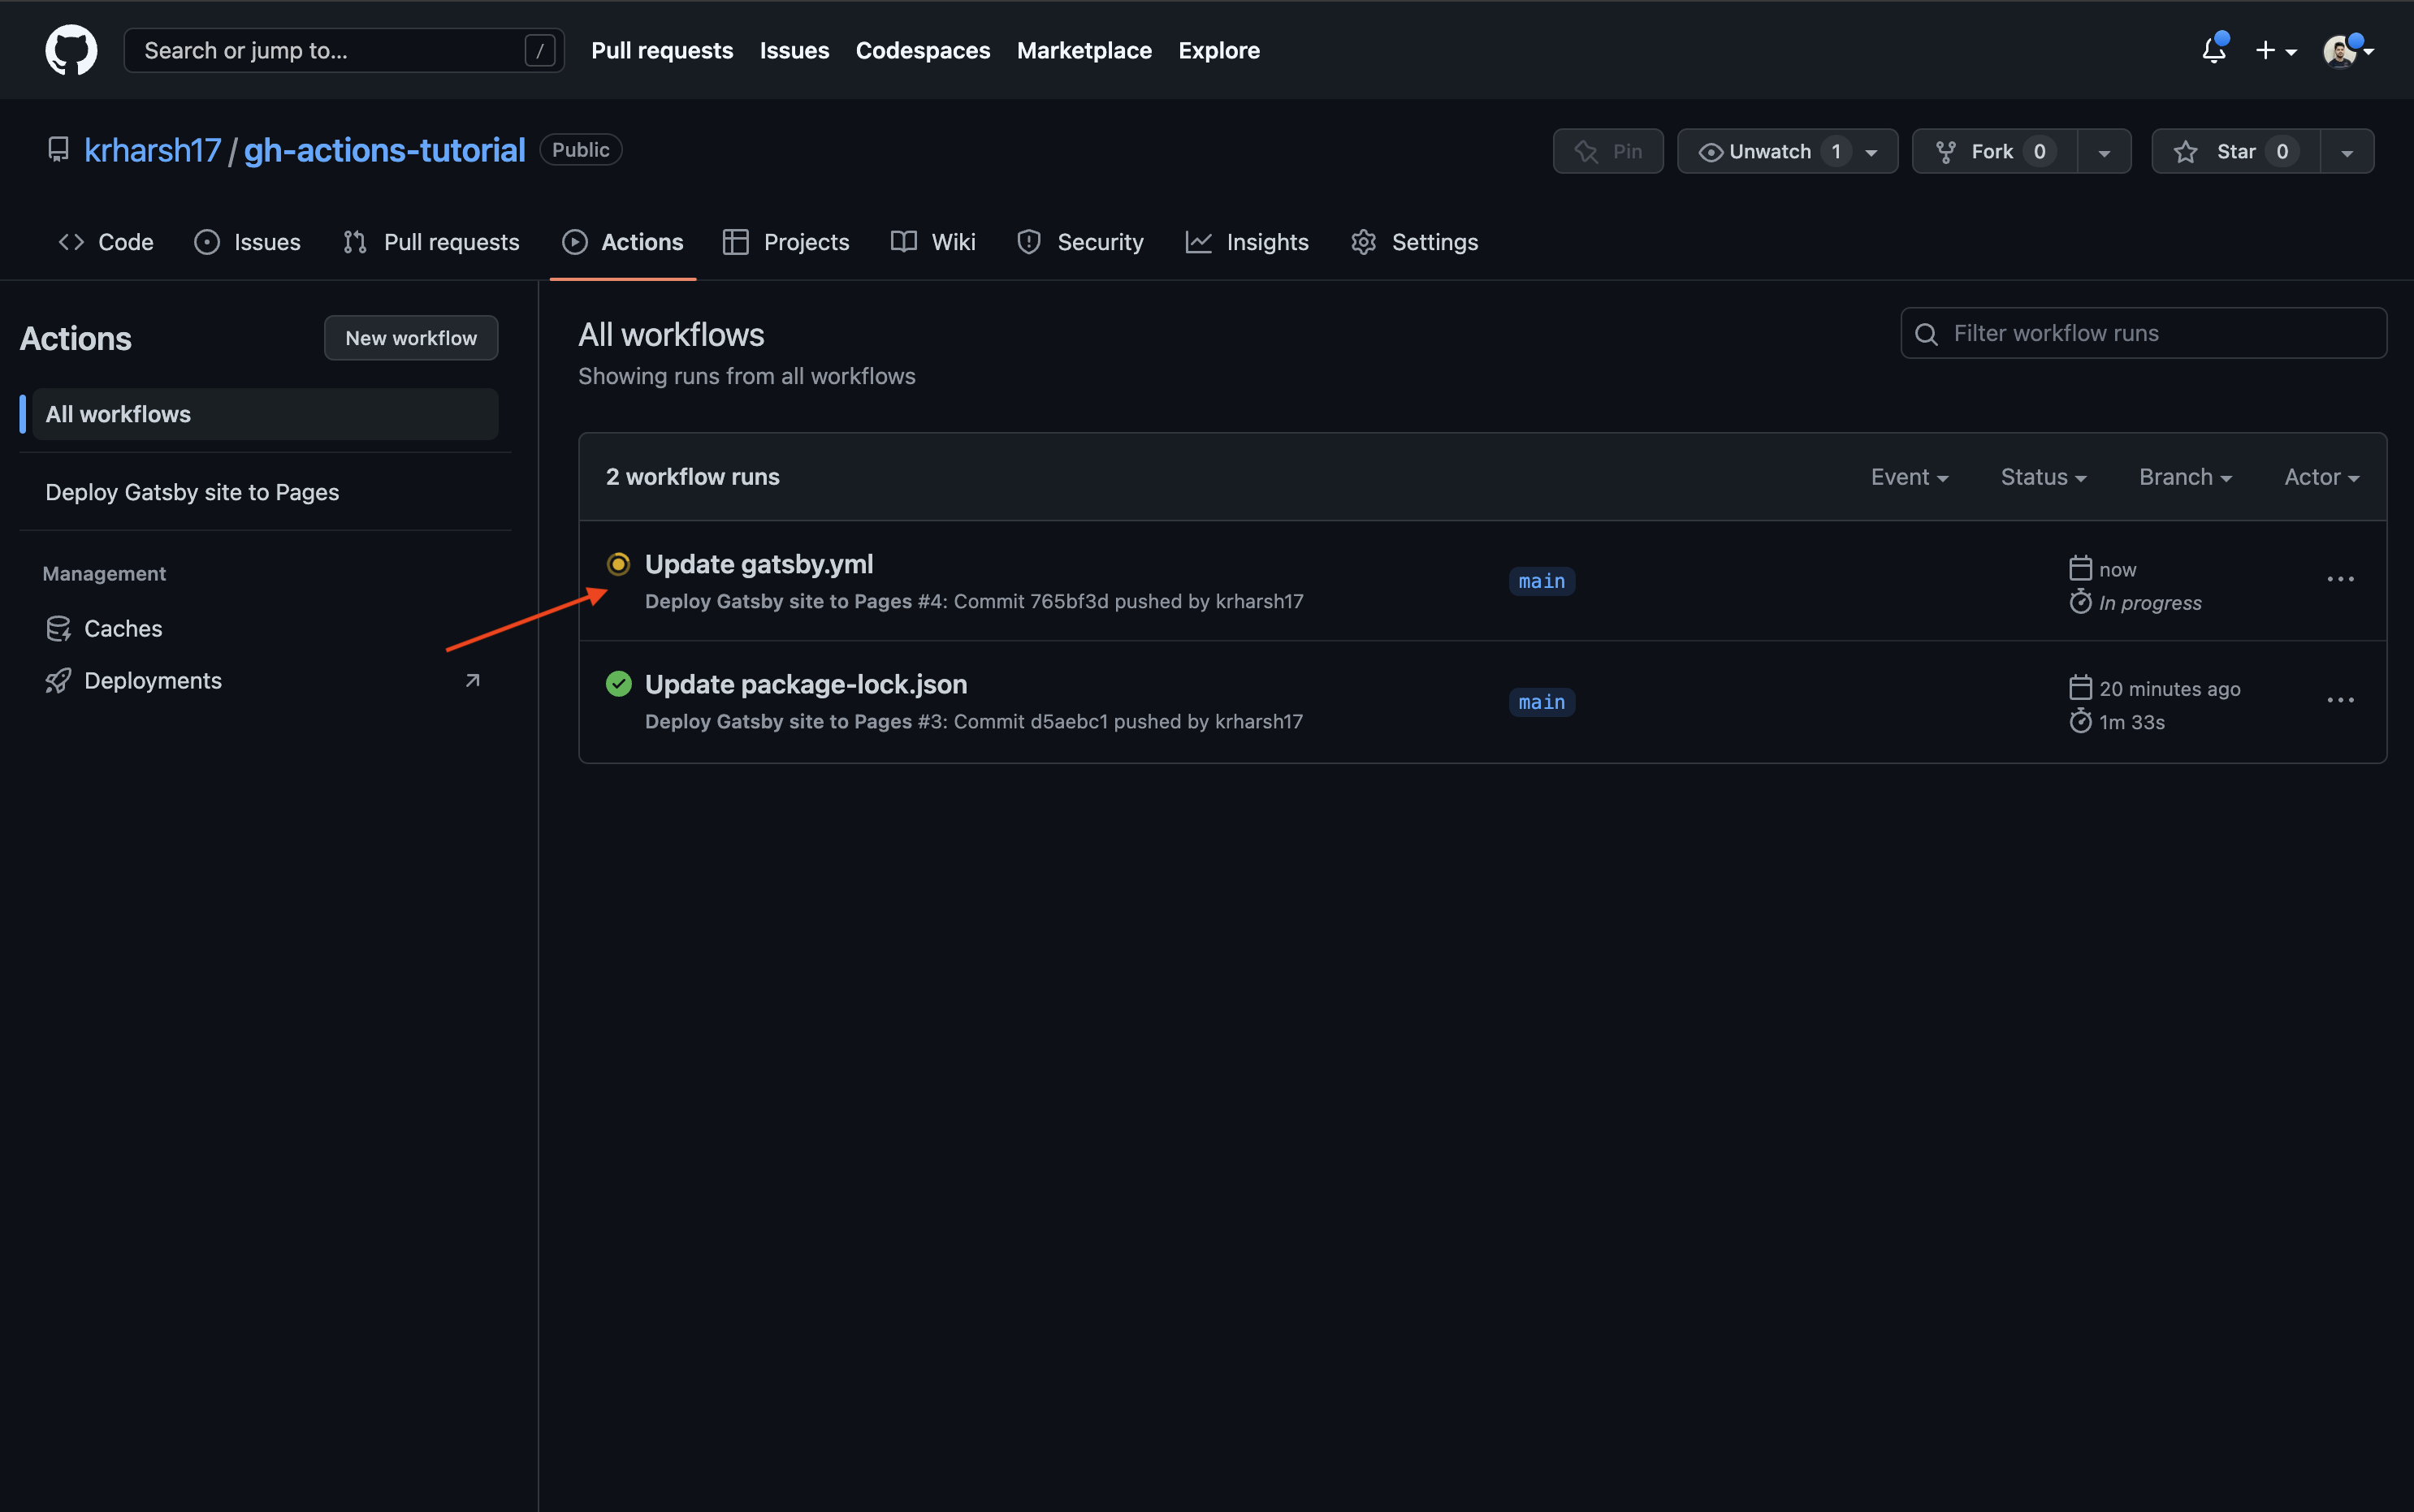
When you’ve finished adding the steps, click on Start commit > Commit changes (just like you did previously). Now, if you go back to the Actions tab, you’ll notice another run has popped up:
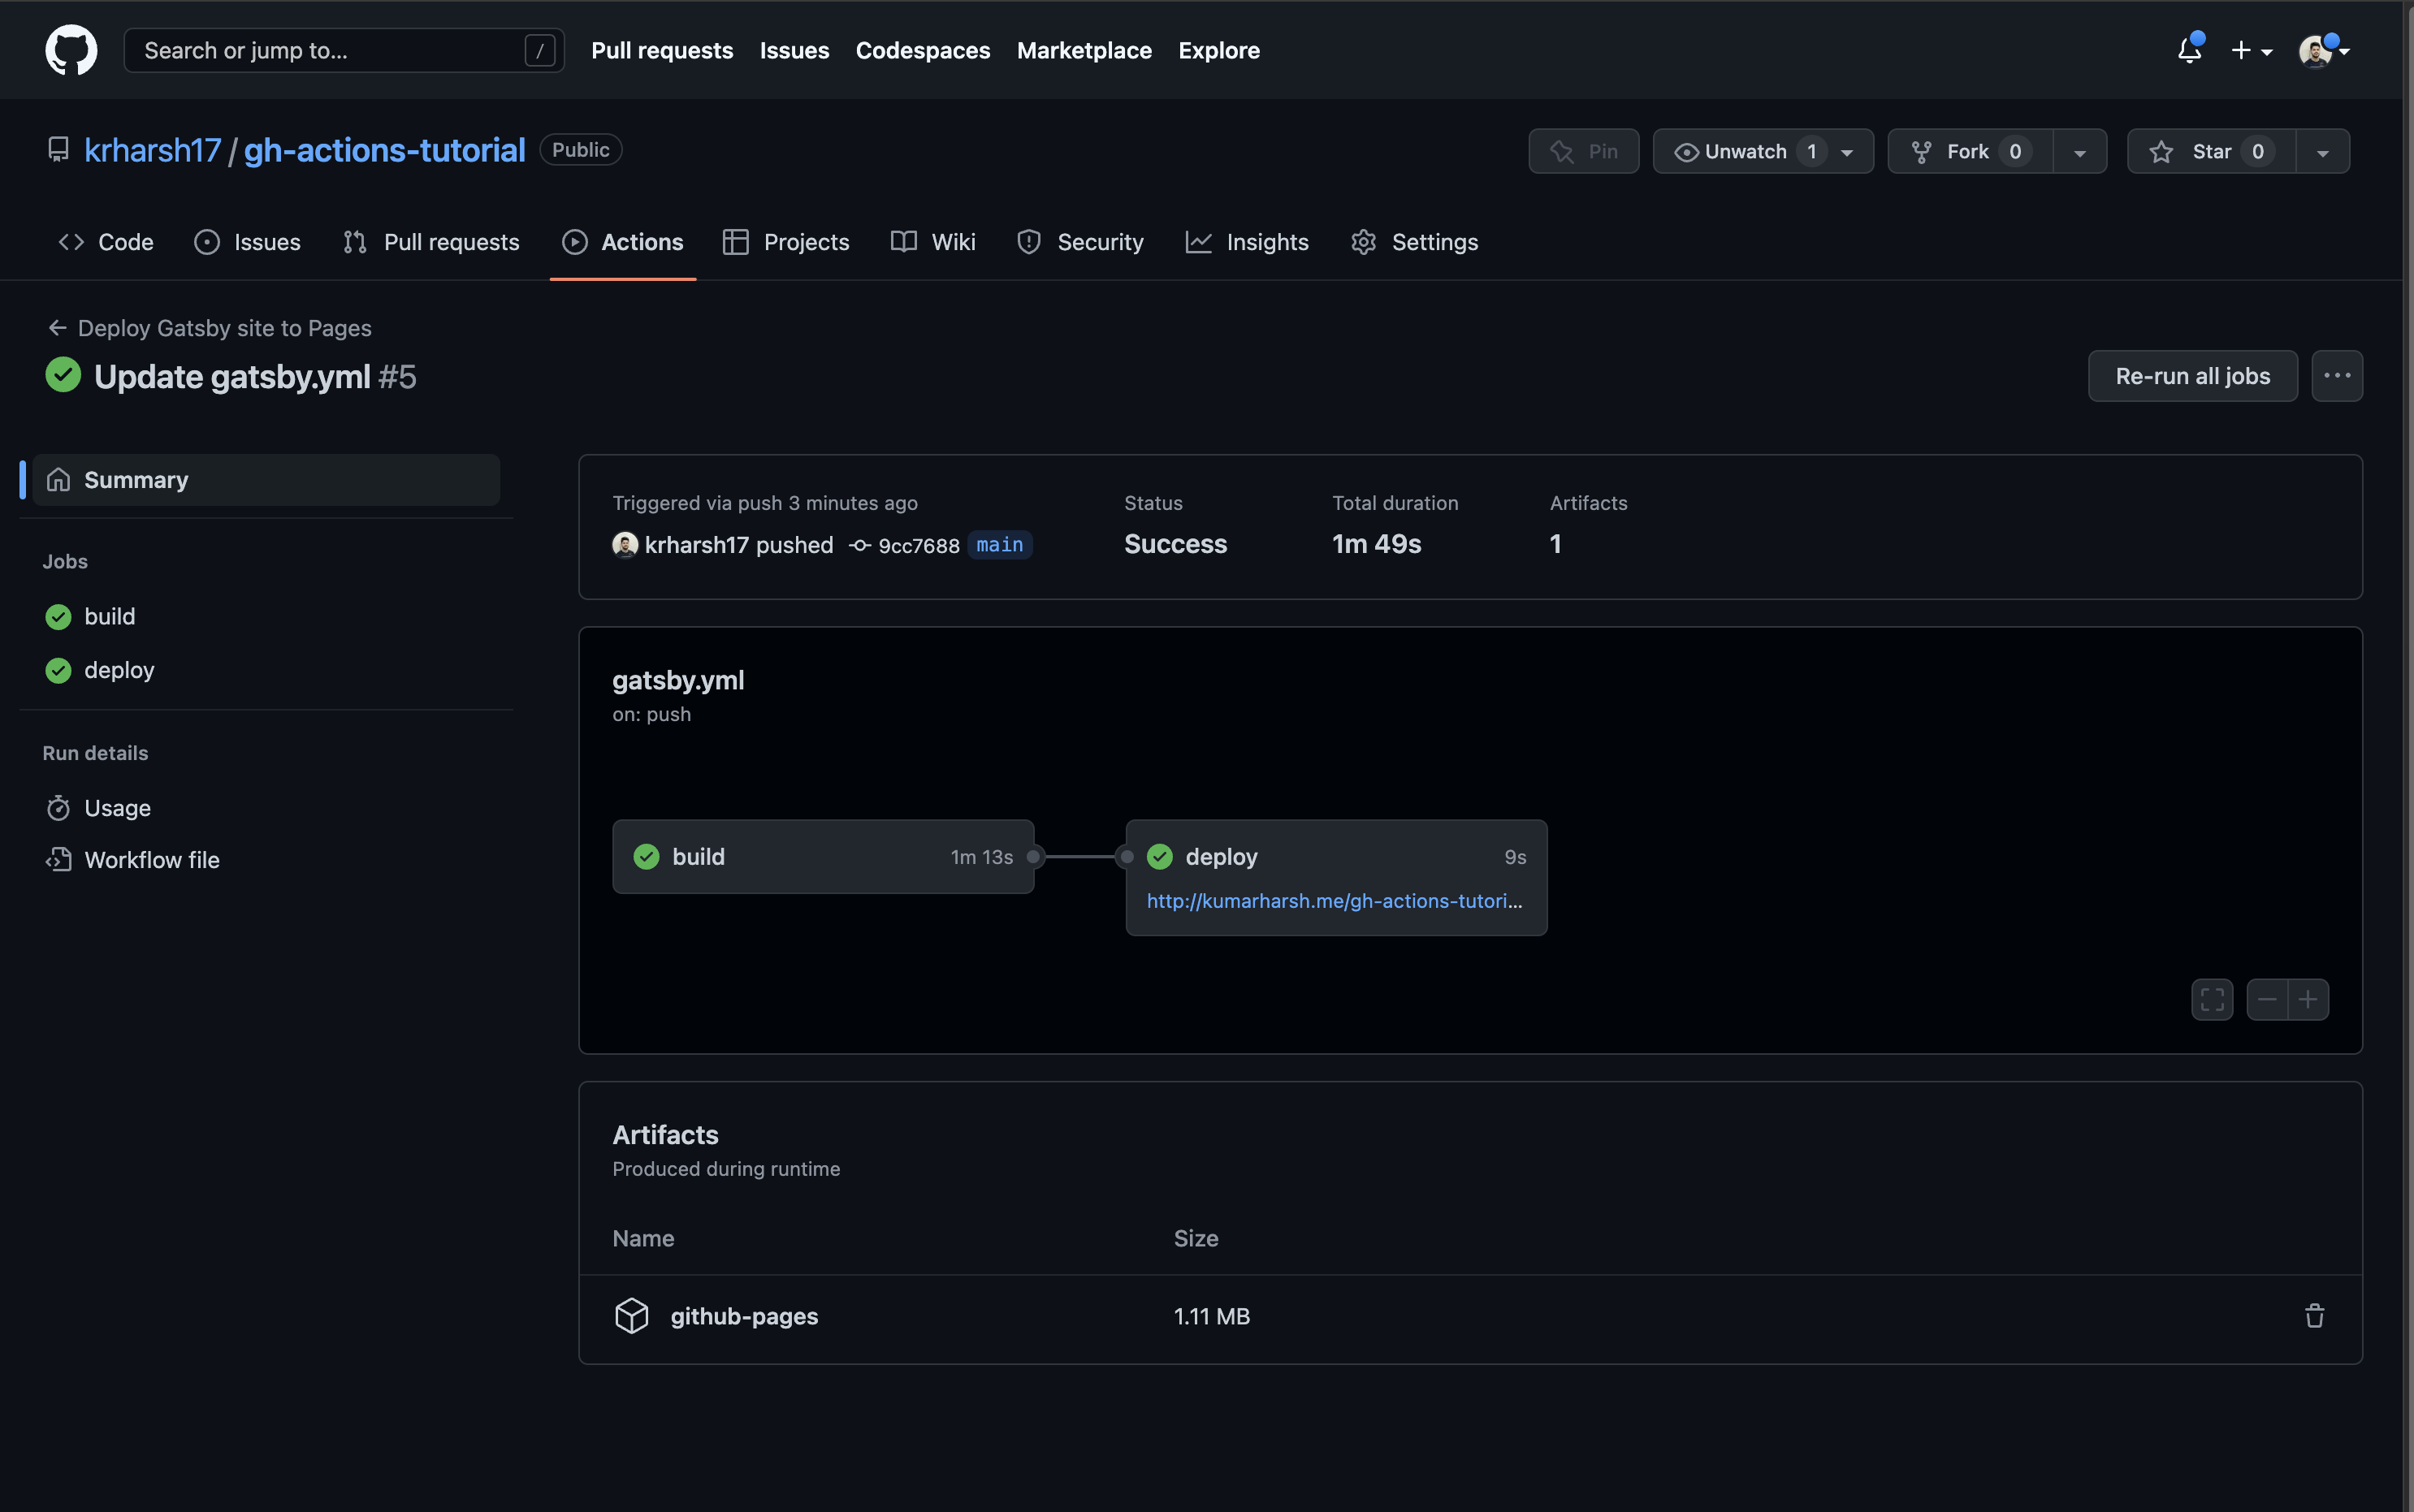
When you click on it, you’ll see more details and find two jobs—build and deploy:
At this point, you’ve added the two print steps to the build job, so click on the build job to see the output logs of its execution. You’ll find your new steps at the third and fourth positions on the list. Click on the right-pointing arrows beside them to expand these steps and view their details:
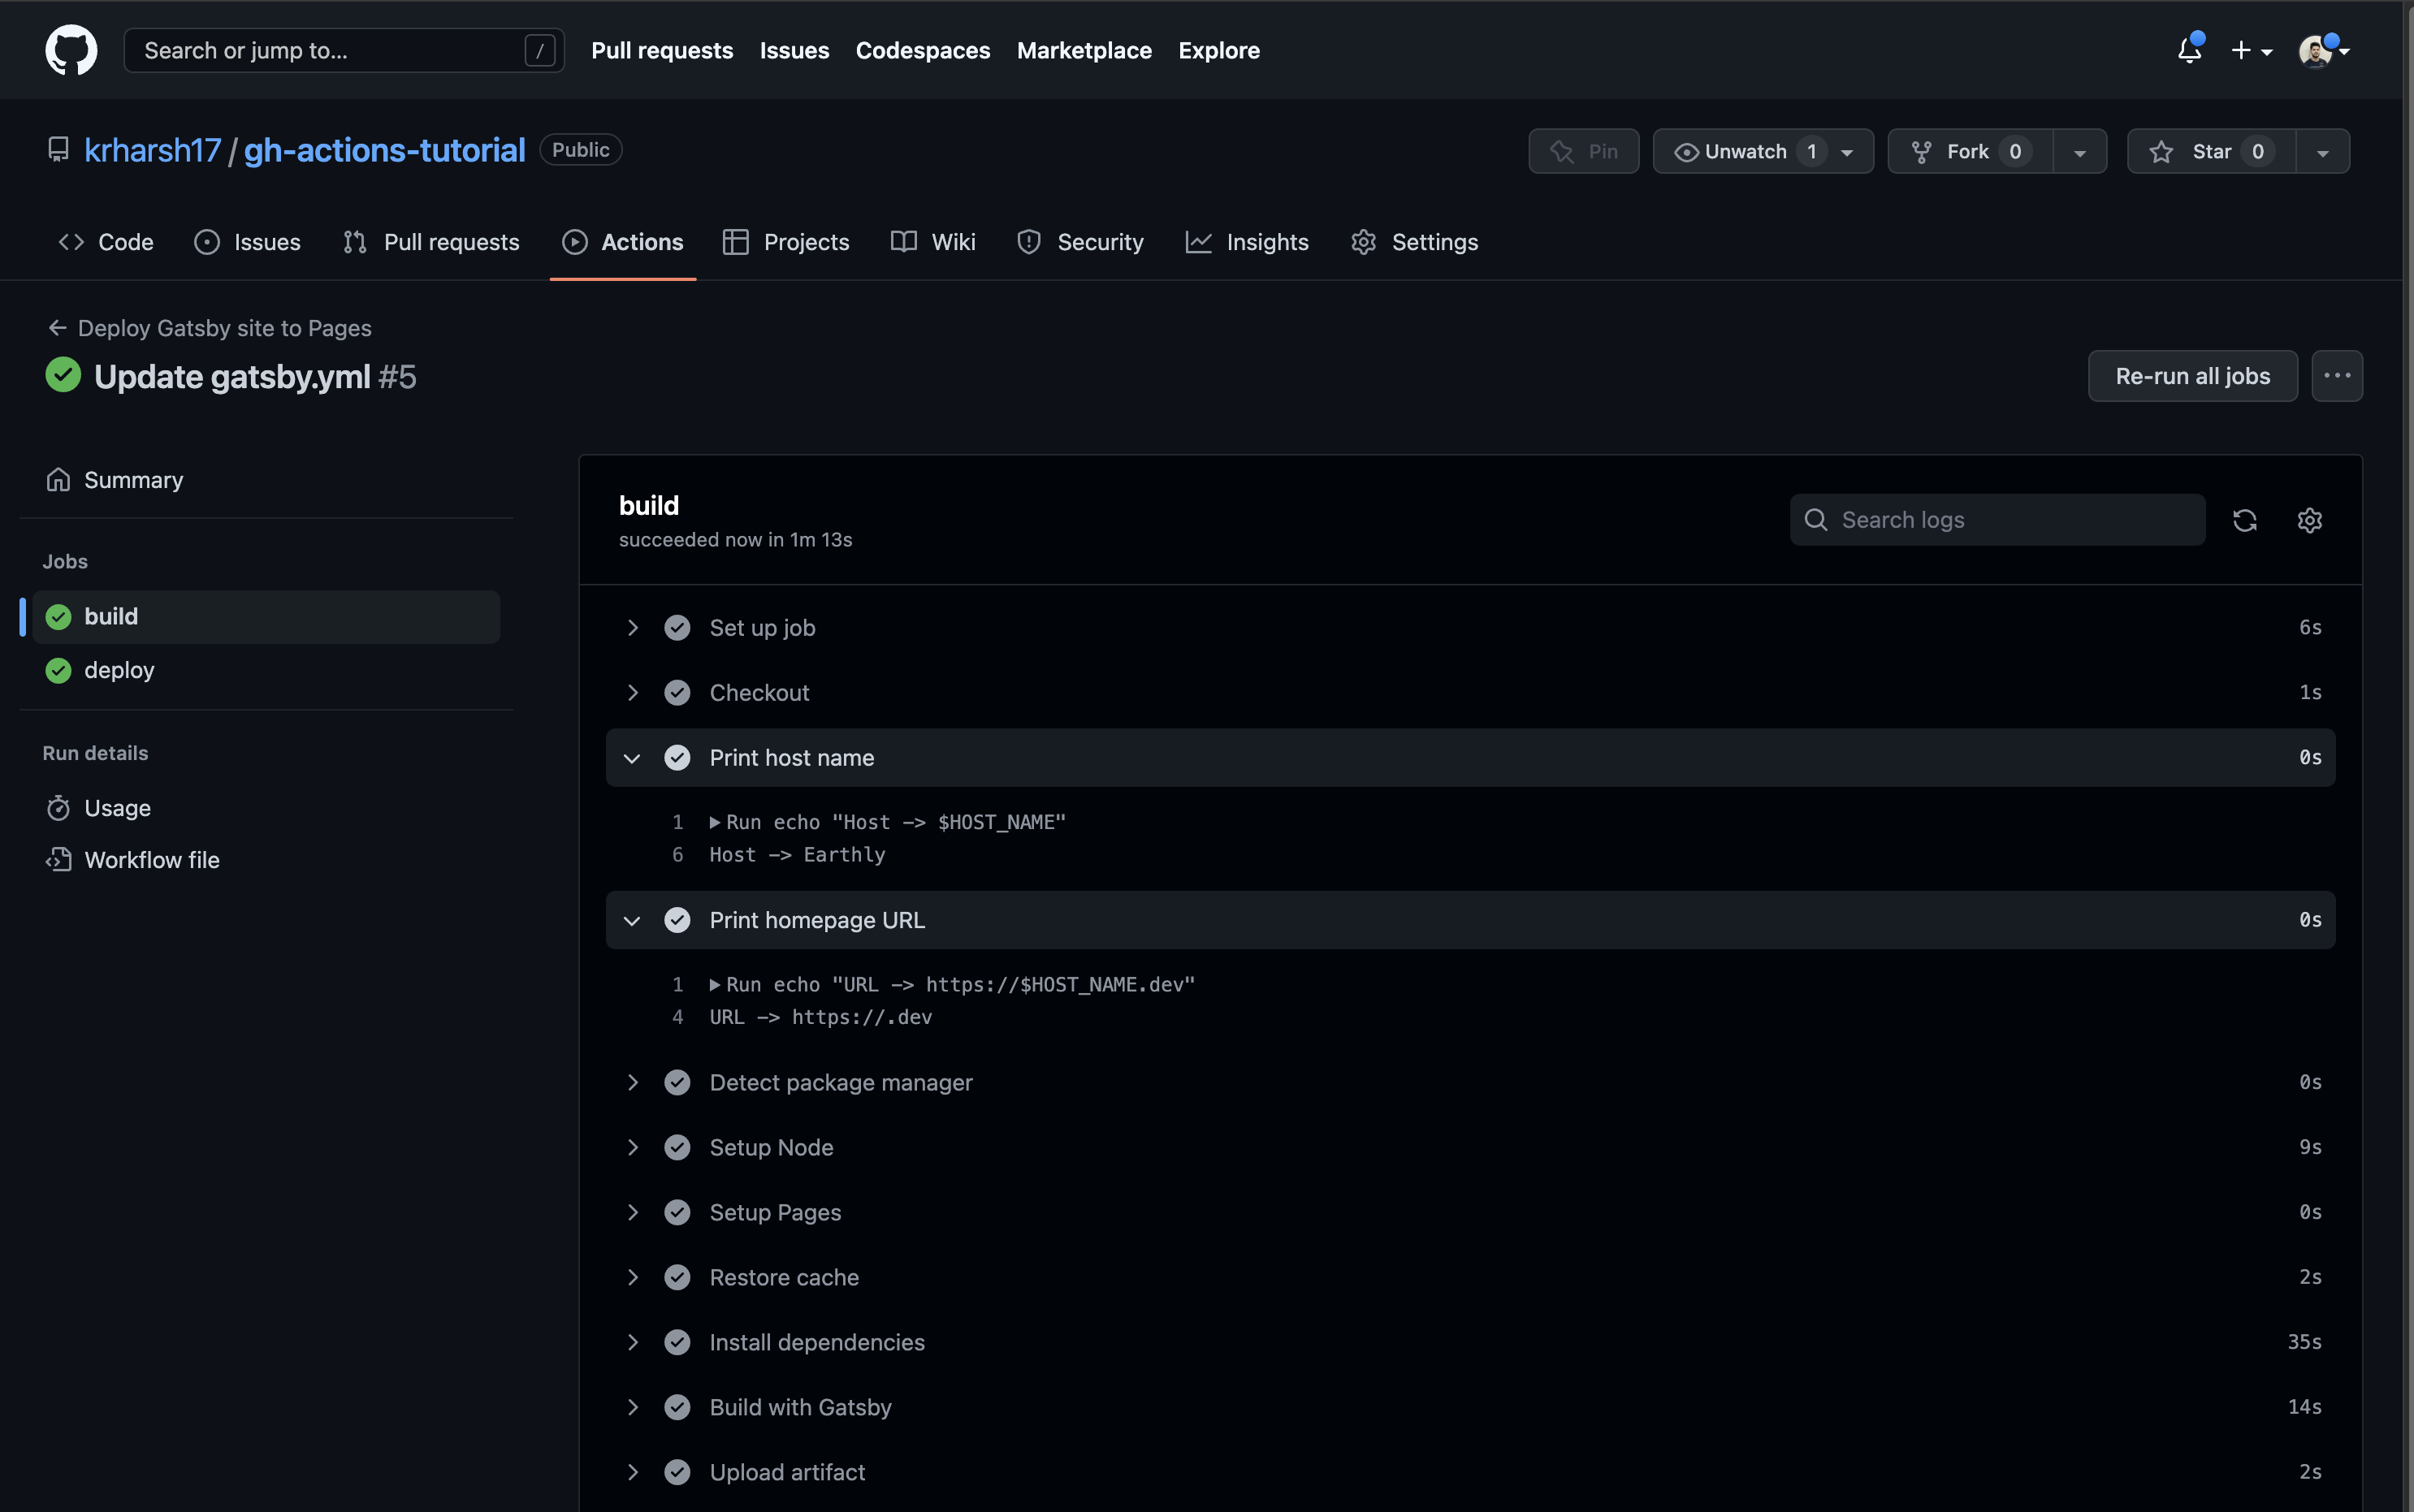
You should see that the Print host name step was able to print the value of the HOST_NAME variable since it was defined locally in the step. In comparison, the Print homepage URL step could not print anything for the HOST_NAME variable since the variable wasn’t available in its scope.
In the next step, you’ll see how to define variables that can be used across all steps in a job.
How to Define an Environment Variable Across a Job
To define an environment variable across a job, update the .github/workflows/gatsby.yml file to move the env description from the Print host name step to its parent (ie the build job):
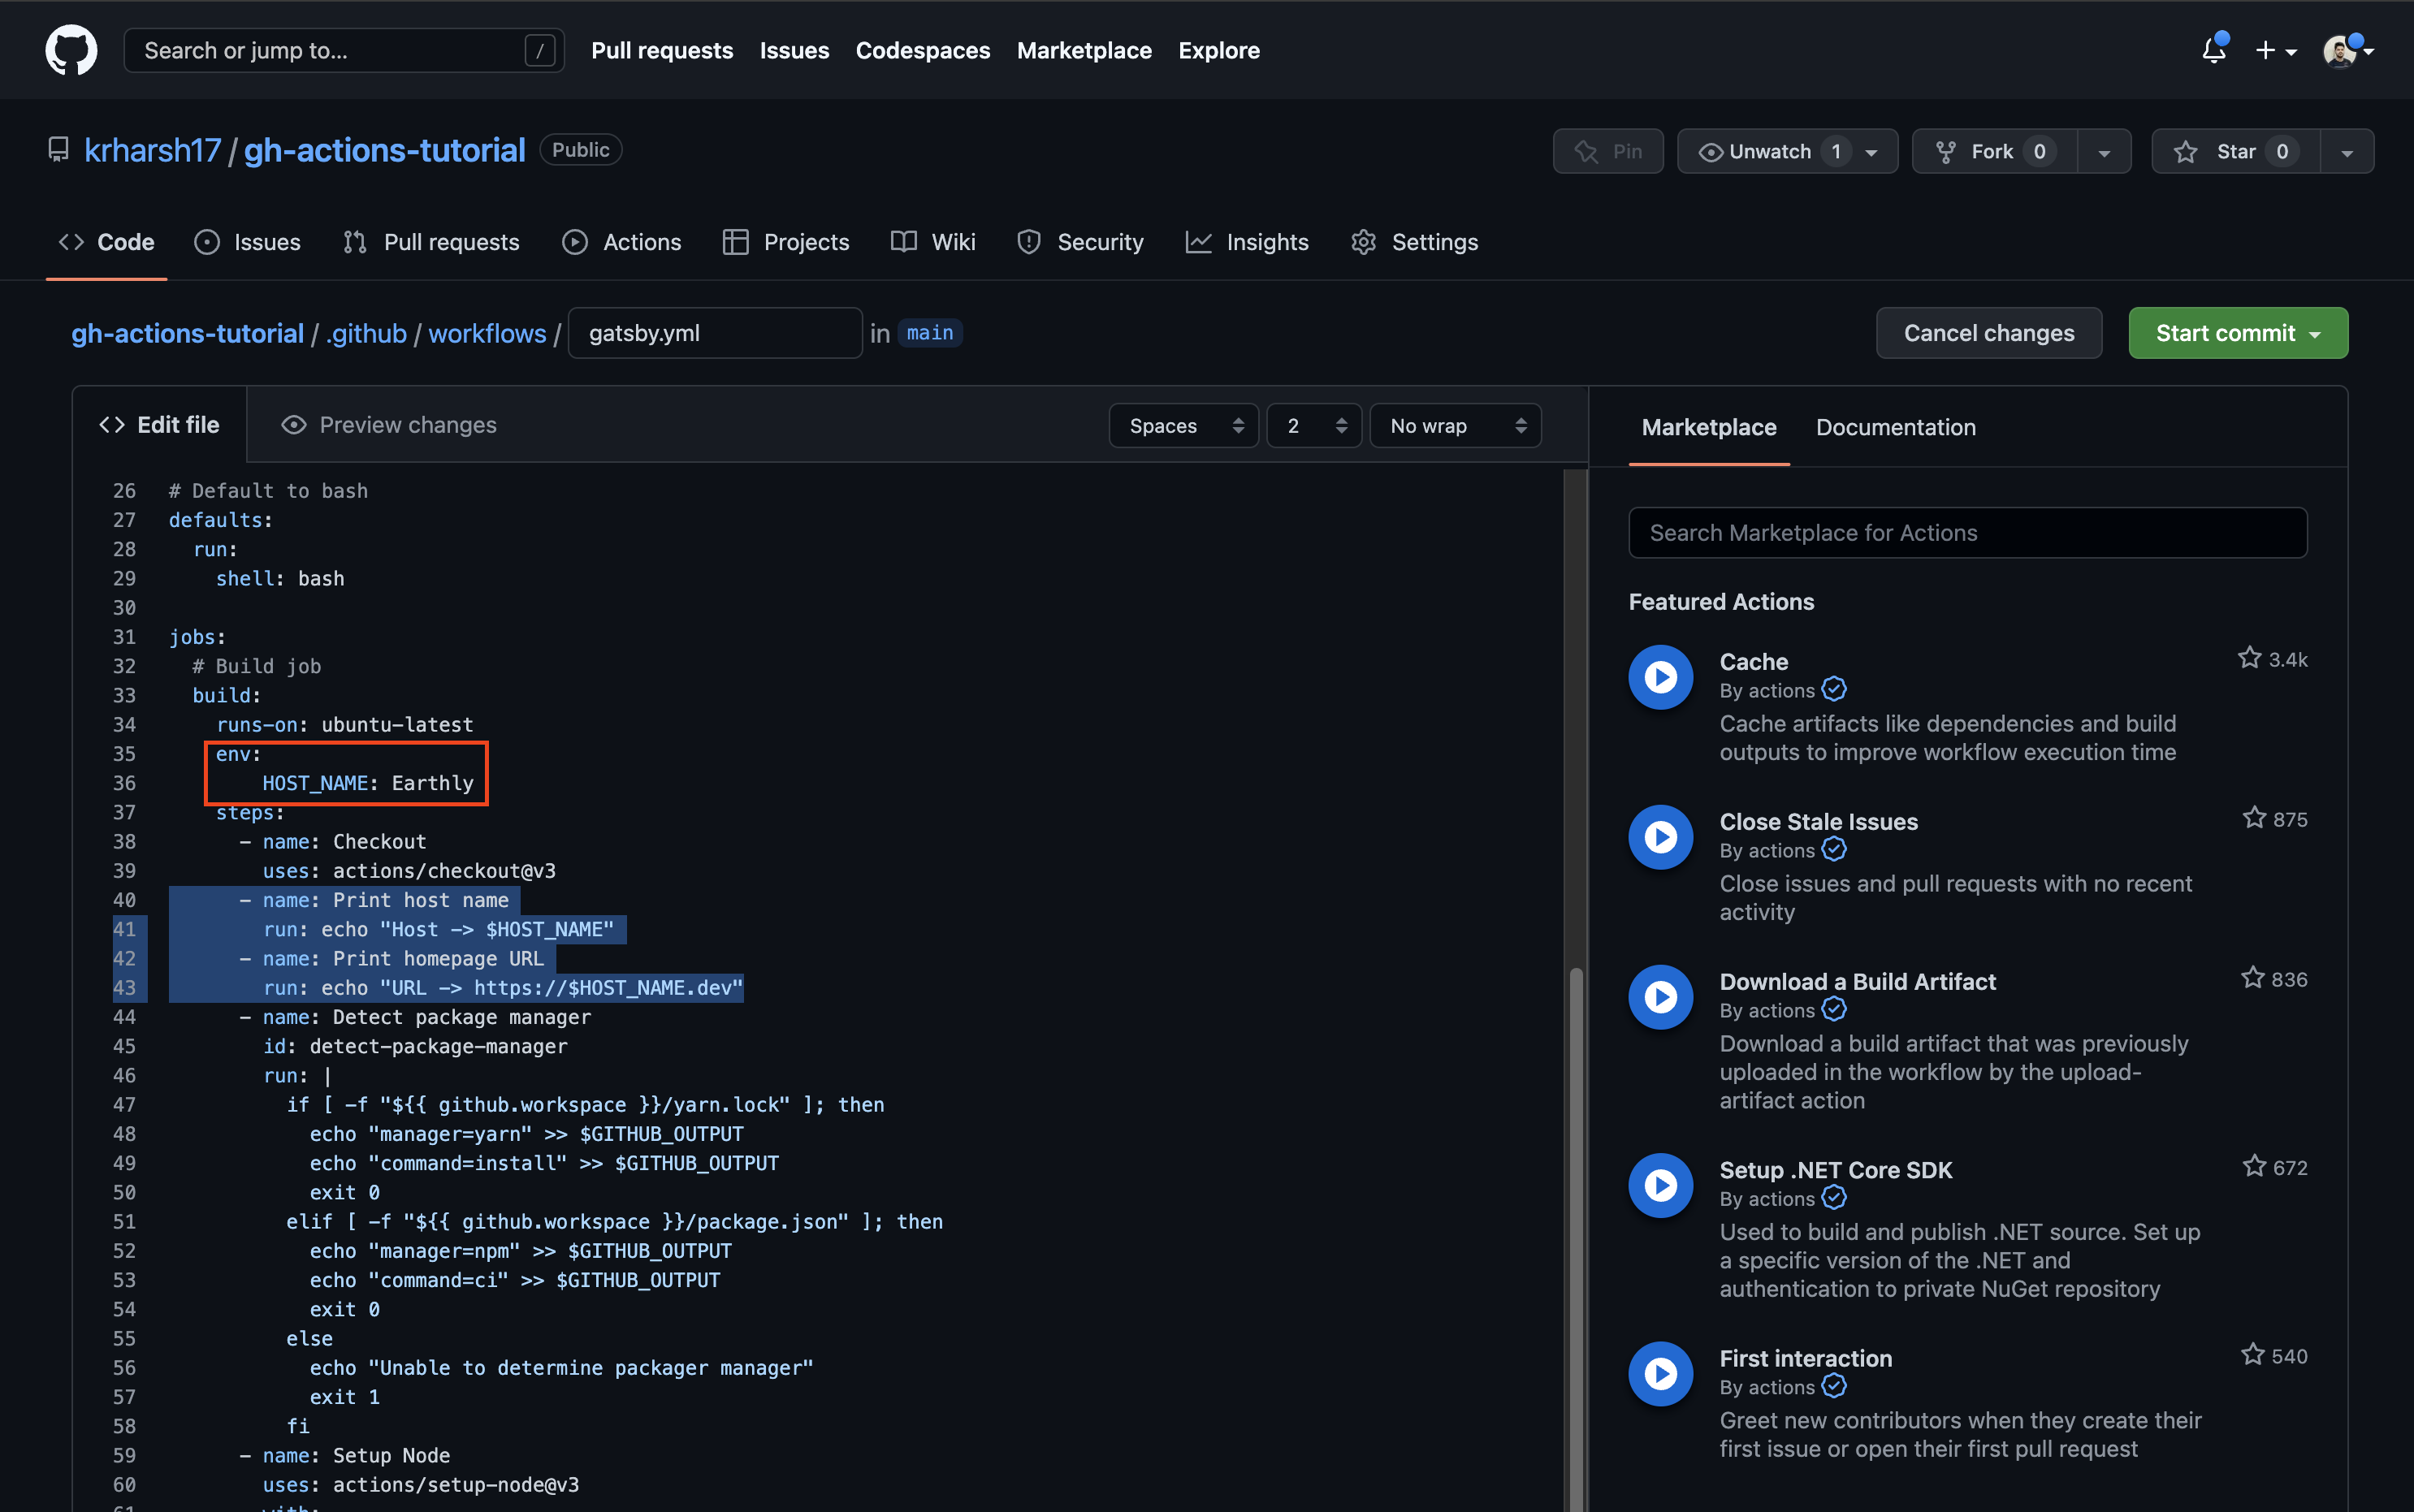
gatsby.yml # Build job
build:
runs-on: ubuntu-latest
+ env:
+ HOST_NAME: Earthly
steps:
- name: Checkout
uses: actions/checkout@v3
- name: Print host name
run: echo "Host -> $HOST_NAME"
- env:
- HOST_NAME: Earthly
- name: Print homepage URL
run: echo "URL -> https://$HOST_NAME.dev"
- name: Detect package managerCommit the file and head over to the run details to view the output of the job:
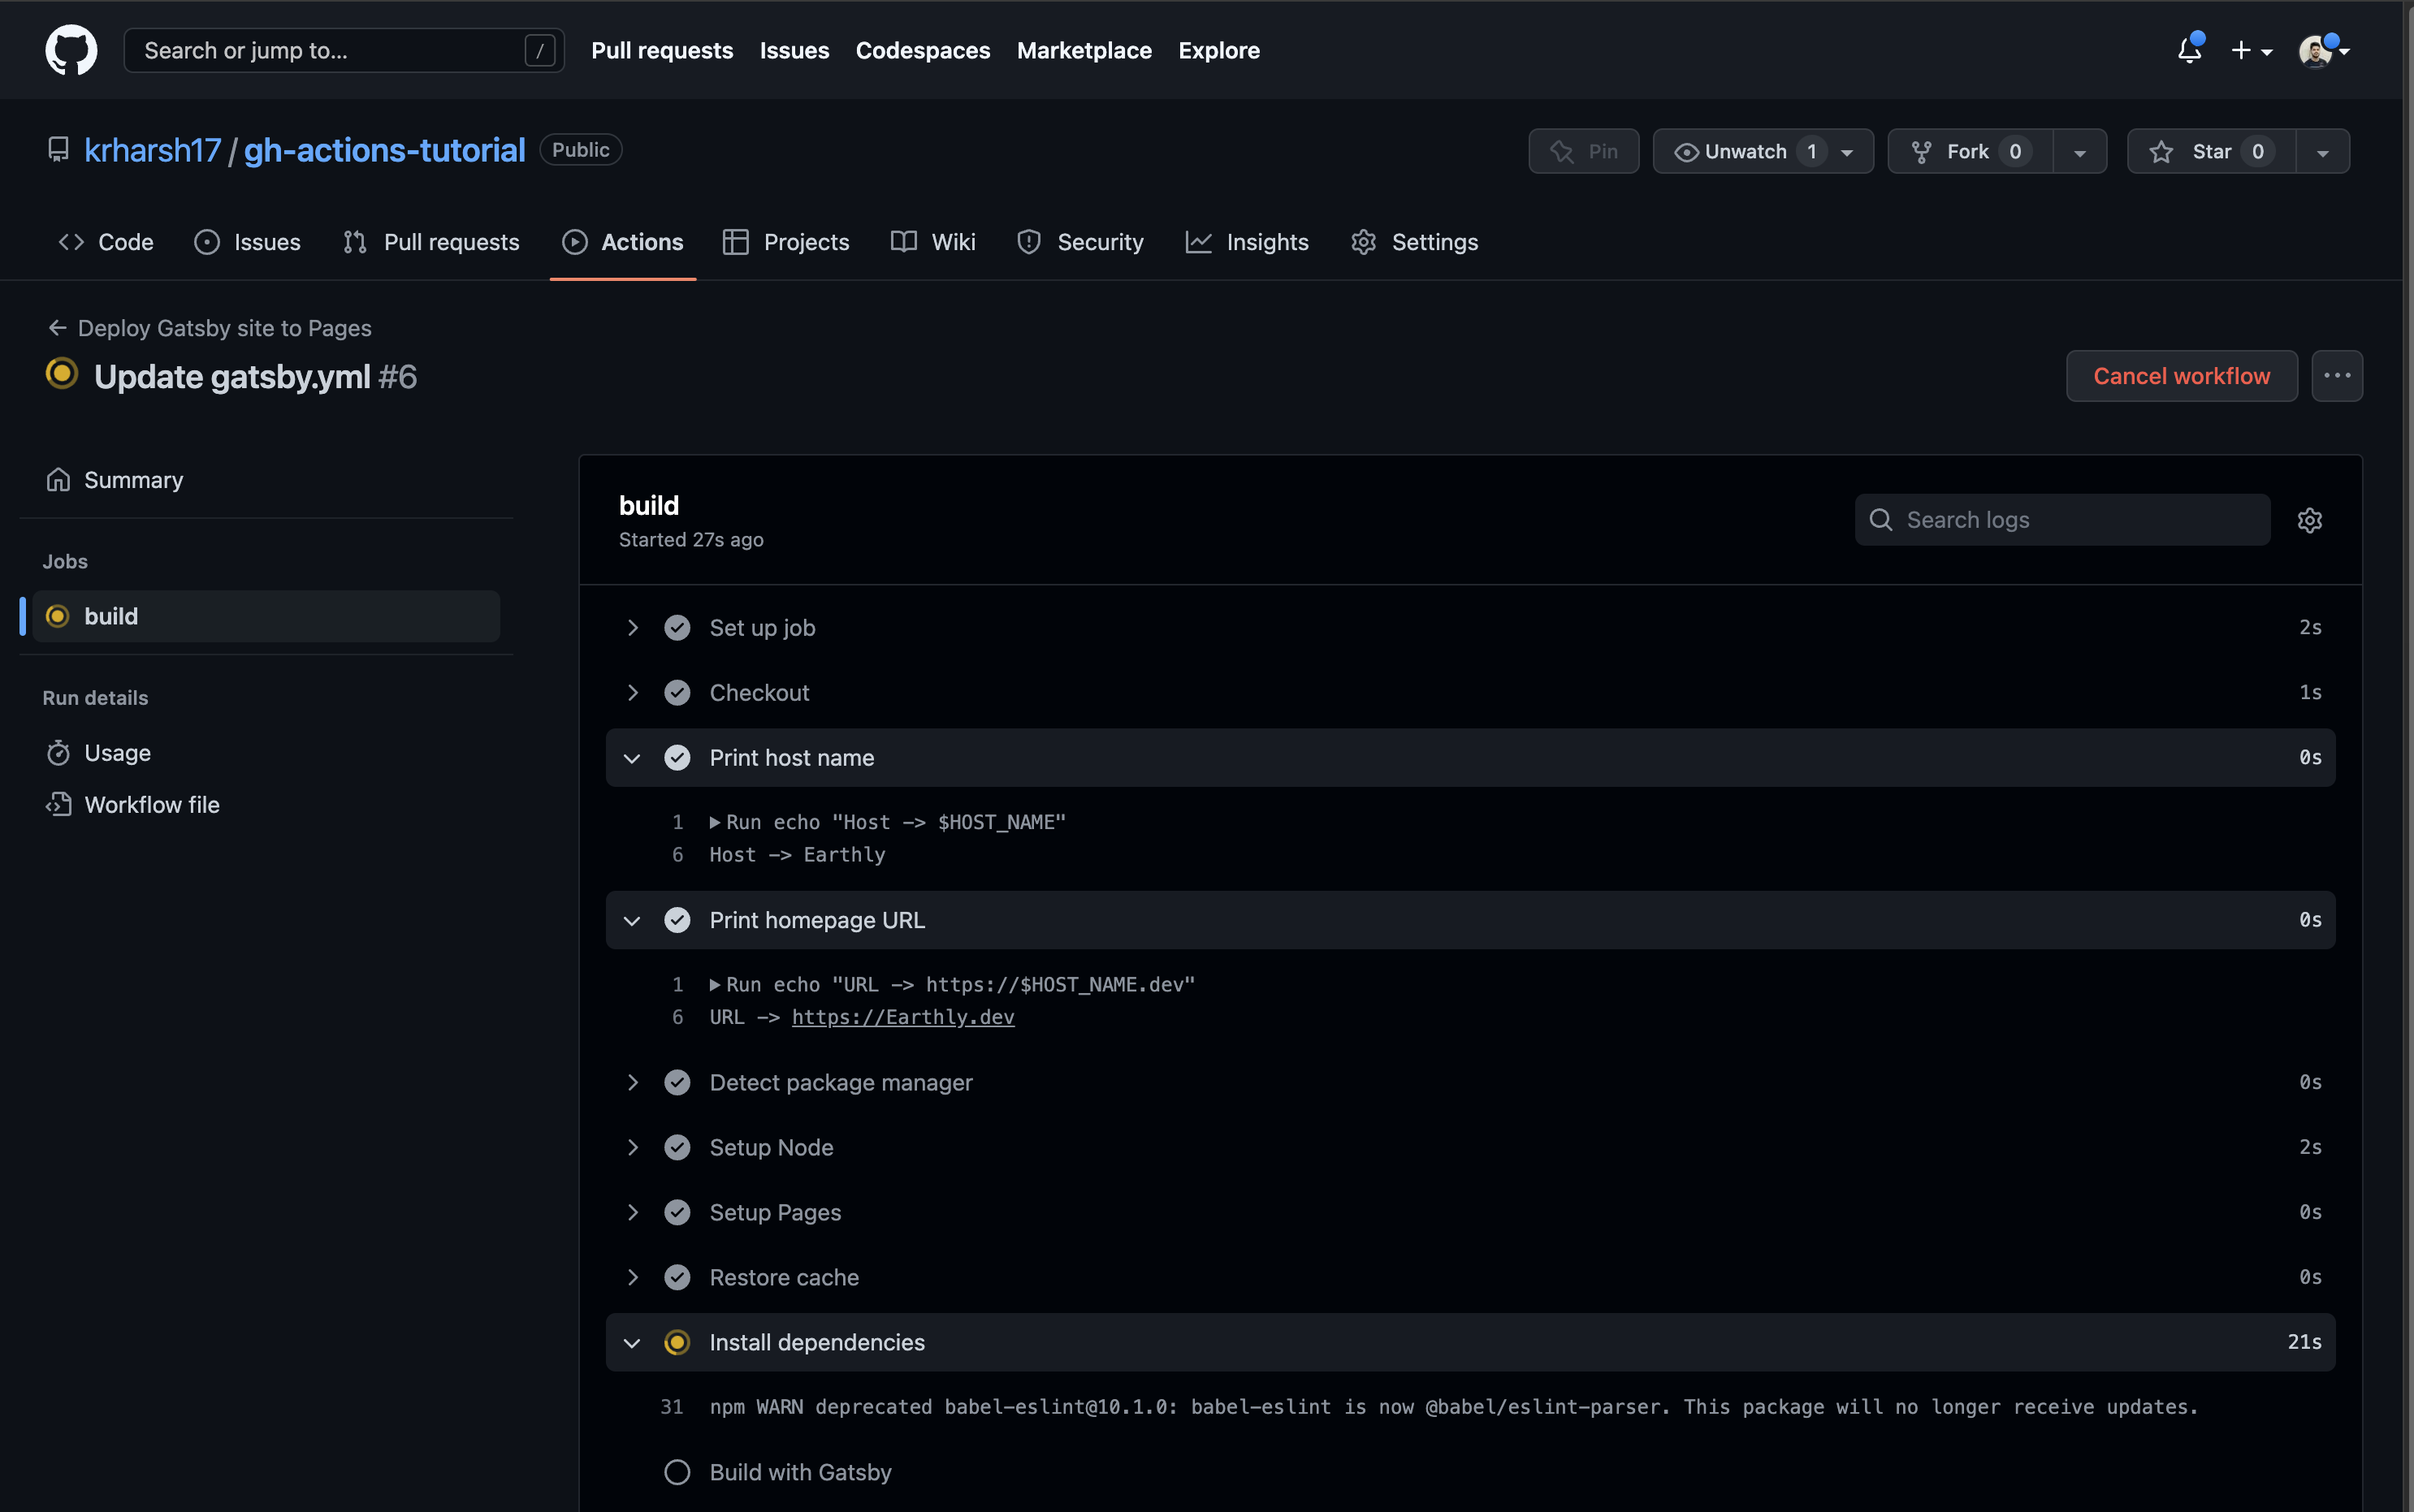
You’ll notice that both steps can now access the value of the HOST_NAME variable and print the expected outputs. However, the HOST_NAME variable can currently only be accessed in the steps defined in the build job, and not in other jobs or the rest of the workflow. You’ll learn how to define variables that are available to the entire workflow in the next section.
How to Define an Environment Variable Across a Workflow
You can also define environment variables in the scope of the entire workflow to be used by all jobs. To do that, move the env description from the build job to higher up in the workflow YAML, right after the defaults key:
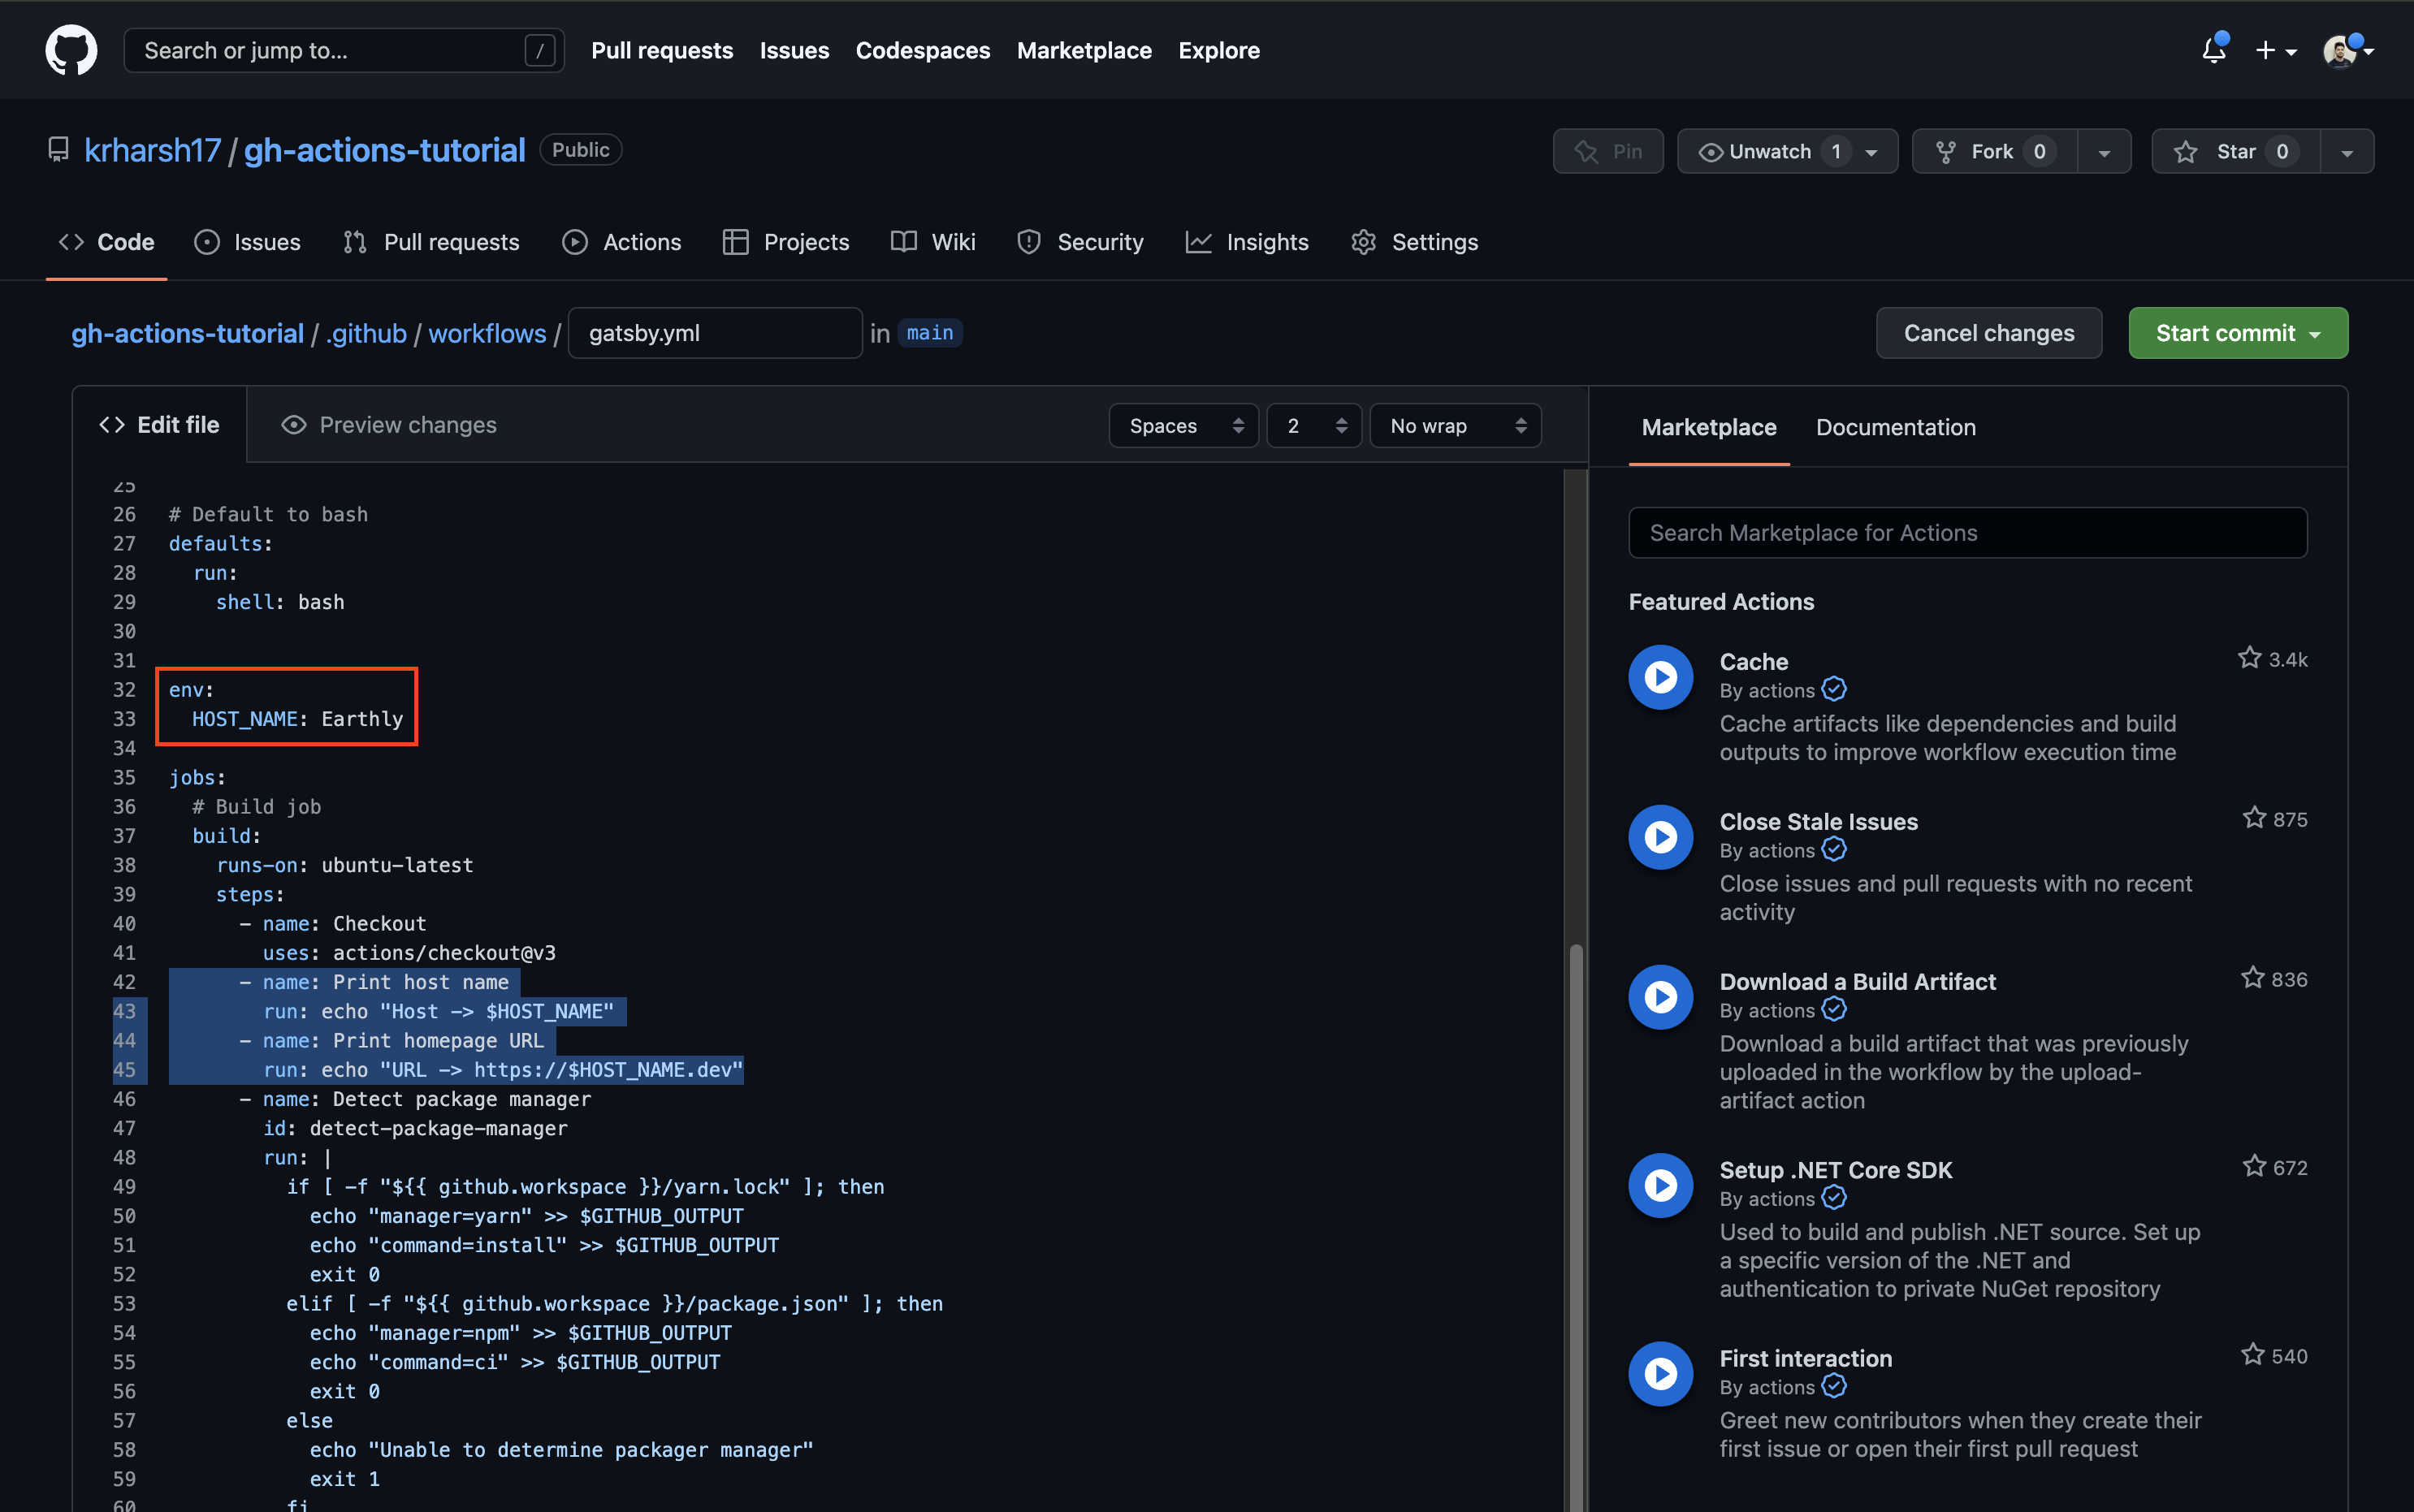
  defaults:
    run:
      shell: bash
+
+ env:
+   HOST_NAME: Earthly

  jobs:
    # Build job
    build:
      runs-on: ubuntu-latest
-     env:
- HOST_NAME: EarthlyTo test whether the other job can access this variable, you’ll need to add a step to the deploy job that prints the value of the same variable. Copy the Print host name step to the deploy job’s steps before the Deploy to GitHub Pages step:
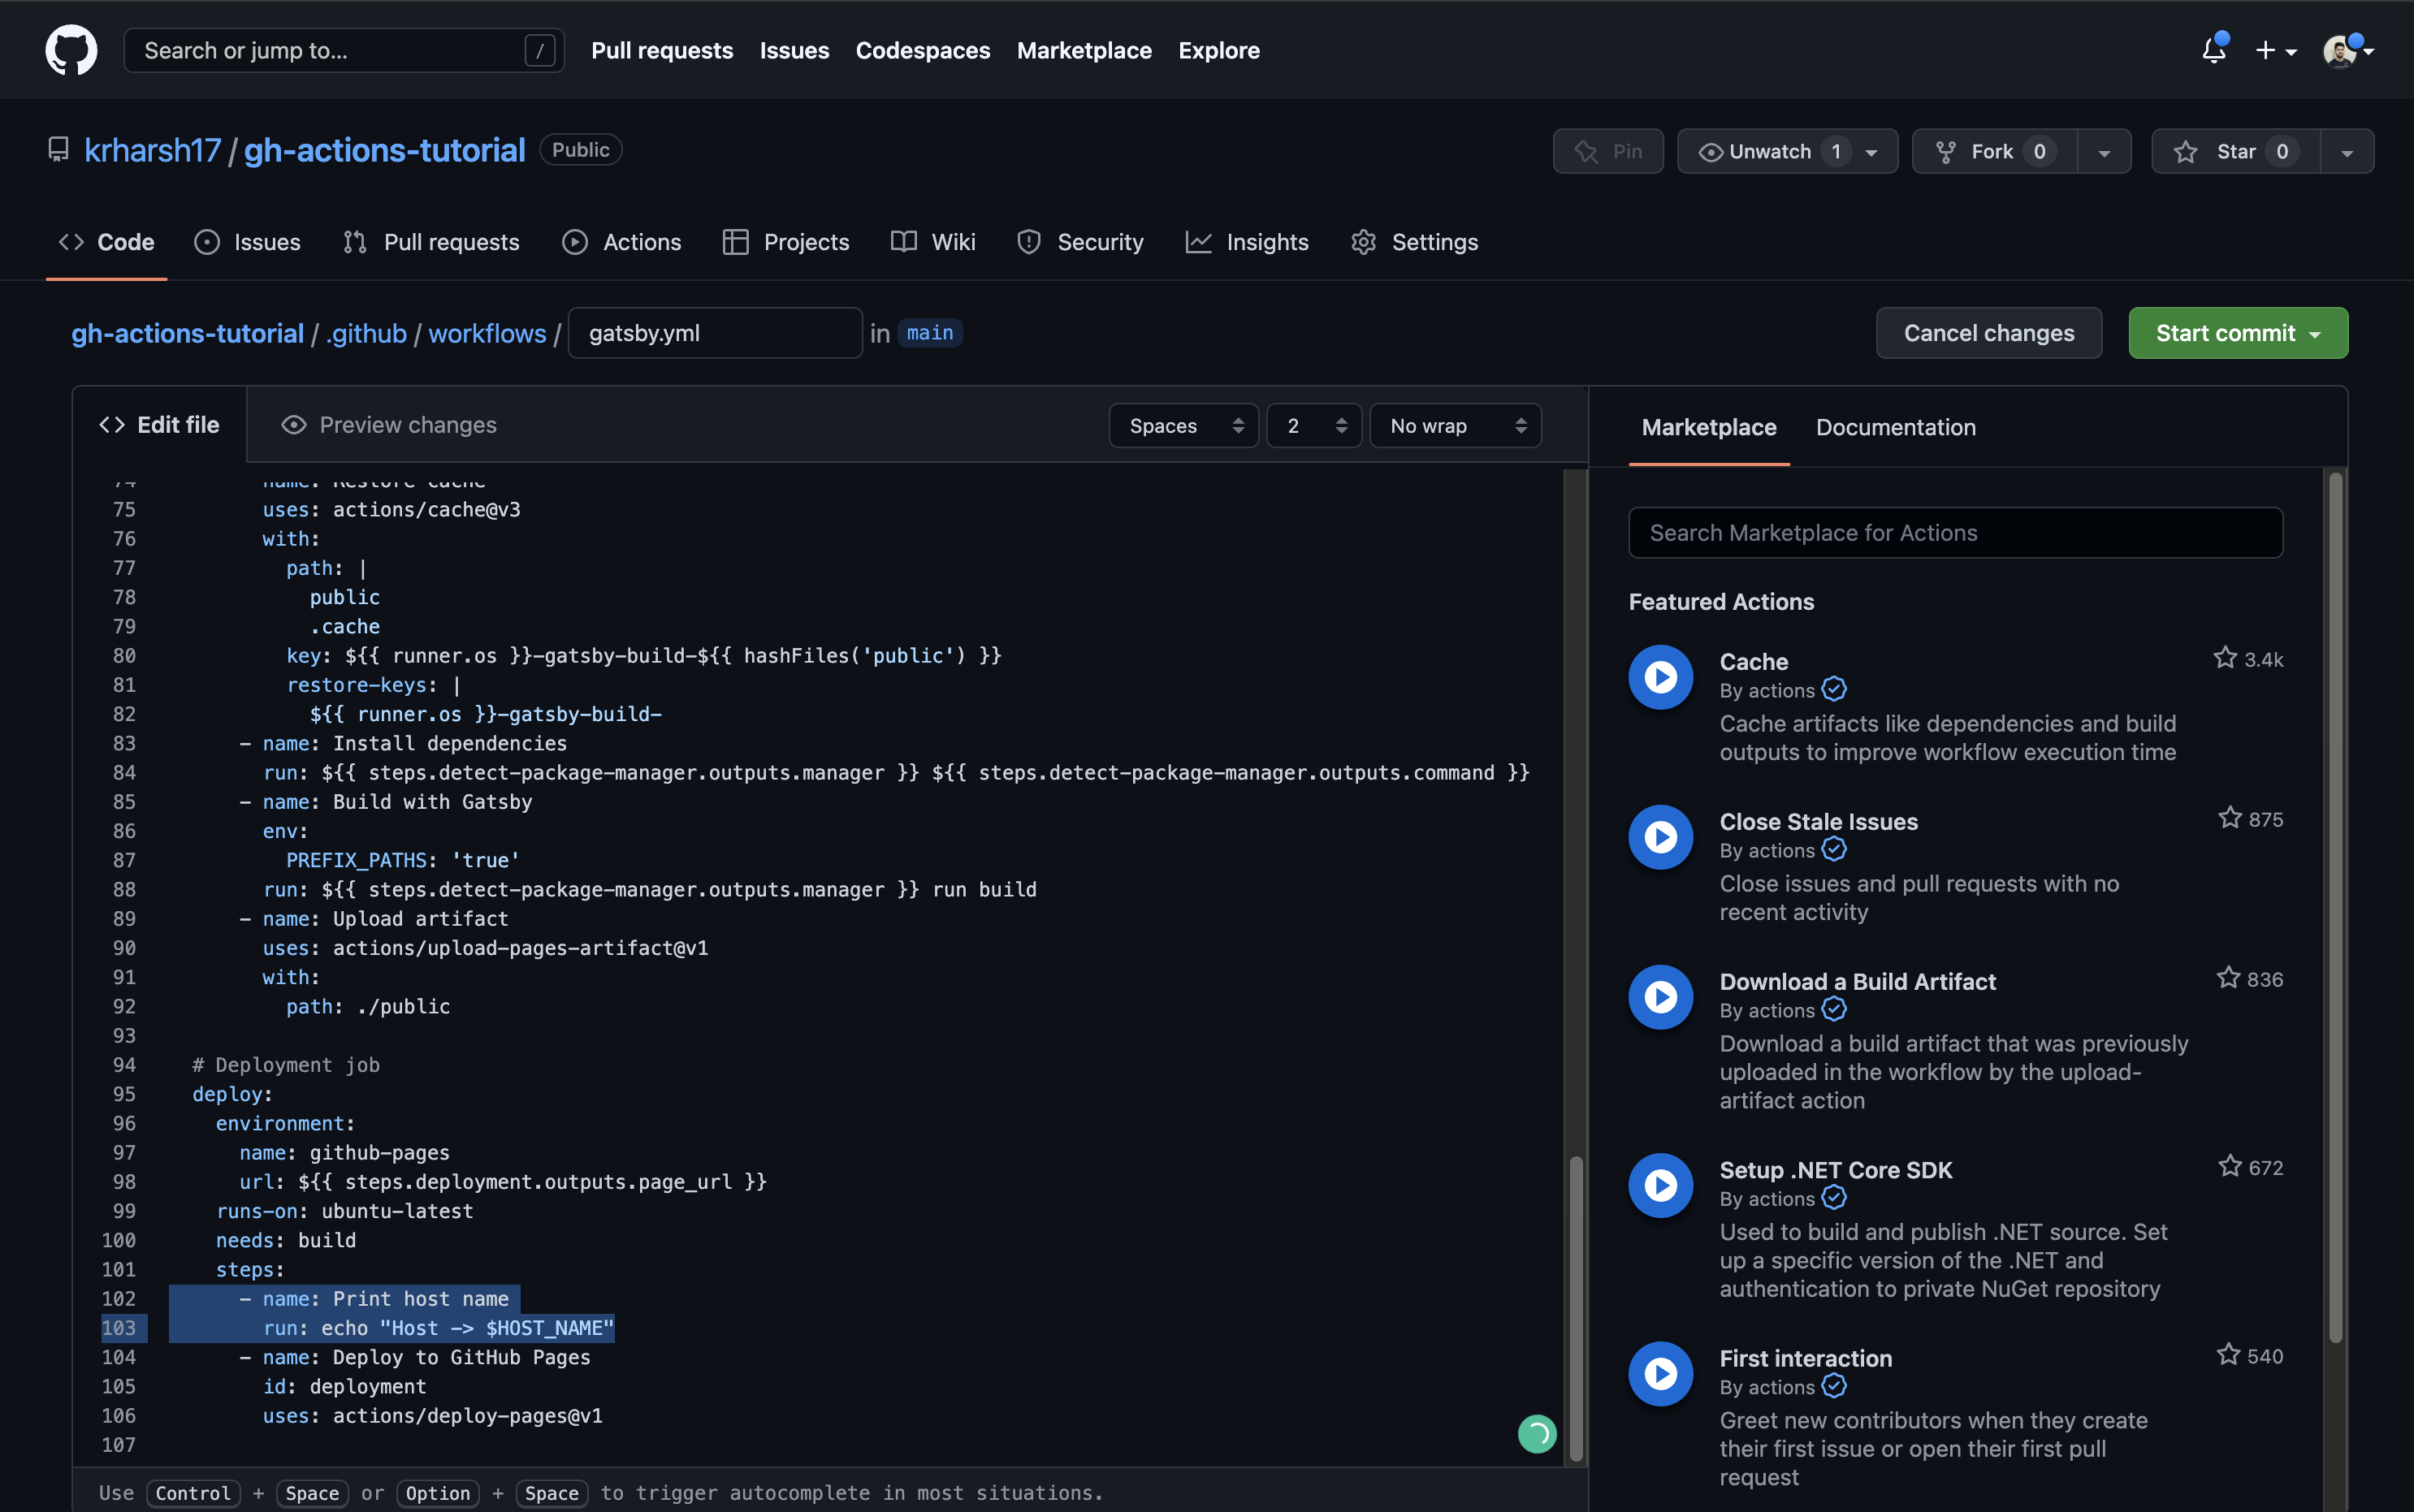
Commit the file and go to the run details to see the output of these two jobs. As you can see, the build job works perfectly. It’s able to pull in the value of the HOST_NAME variable from the workflow’s scope:
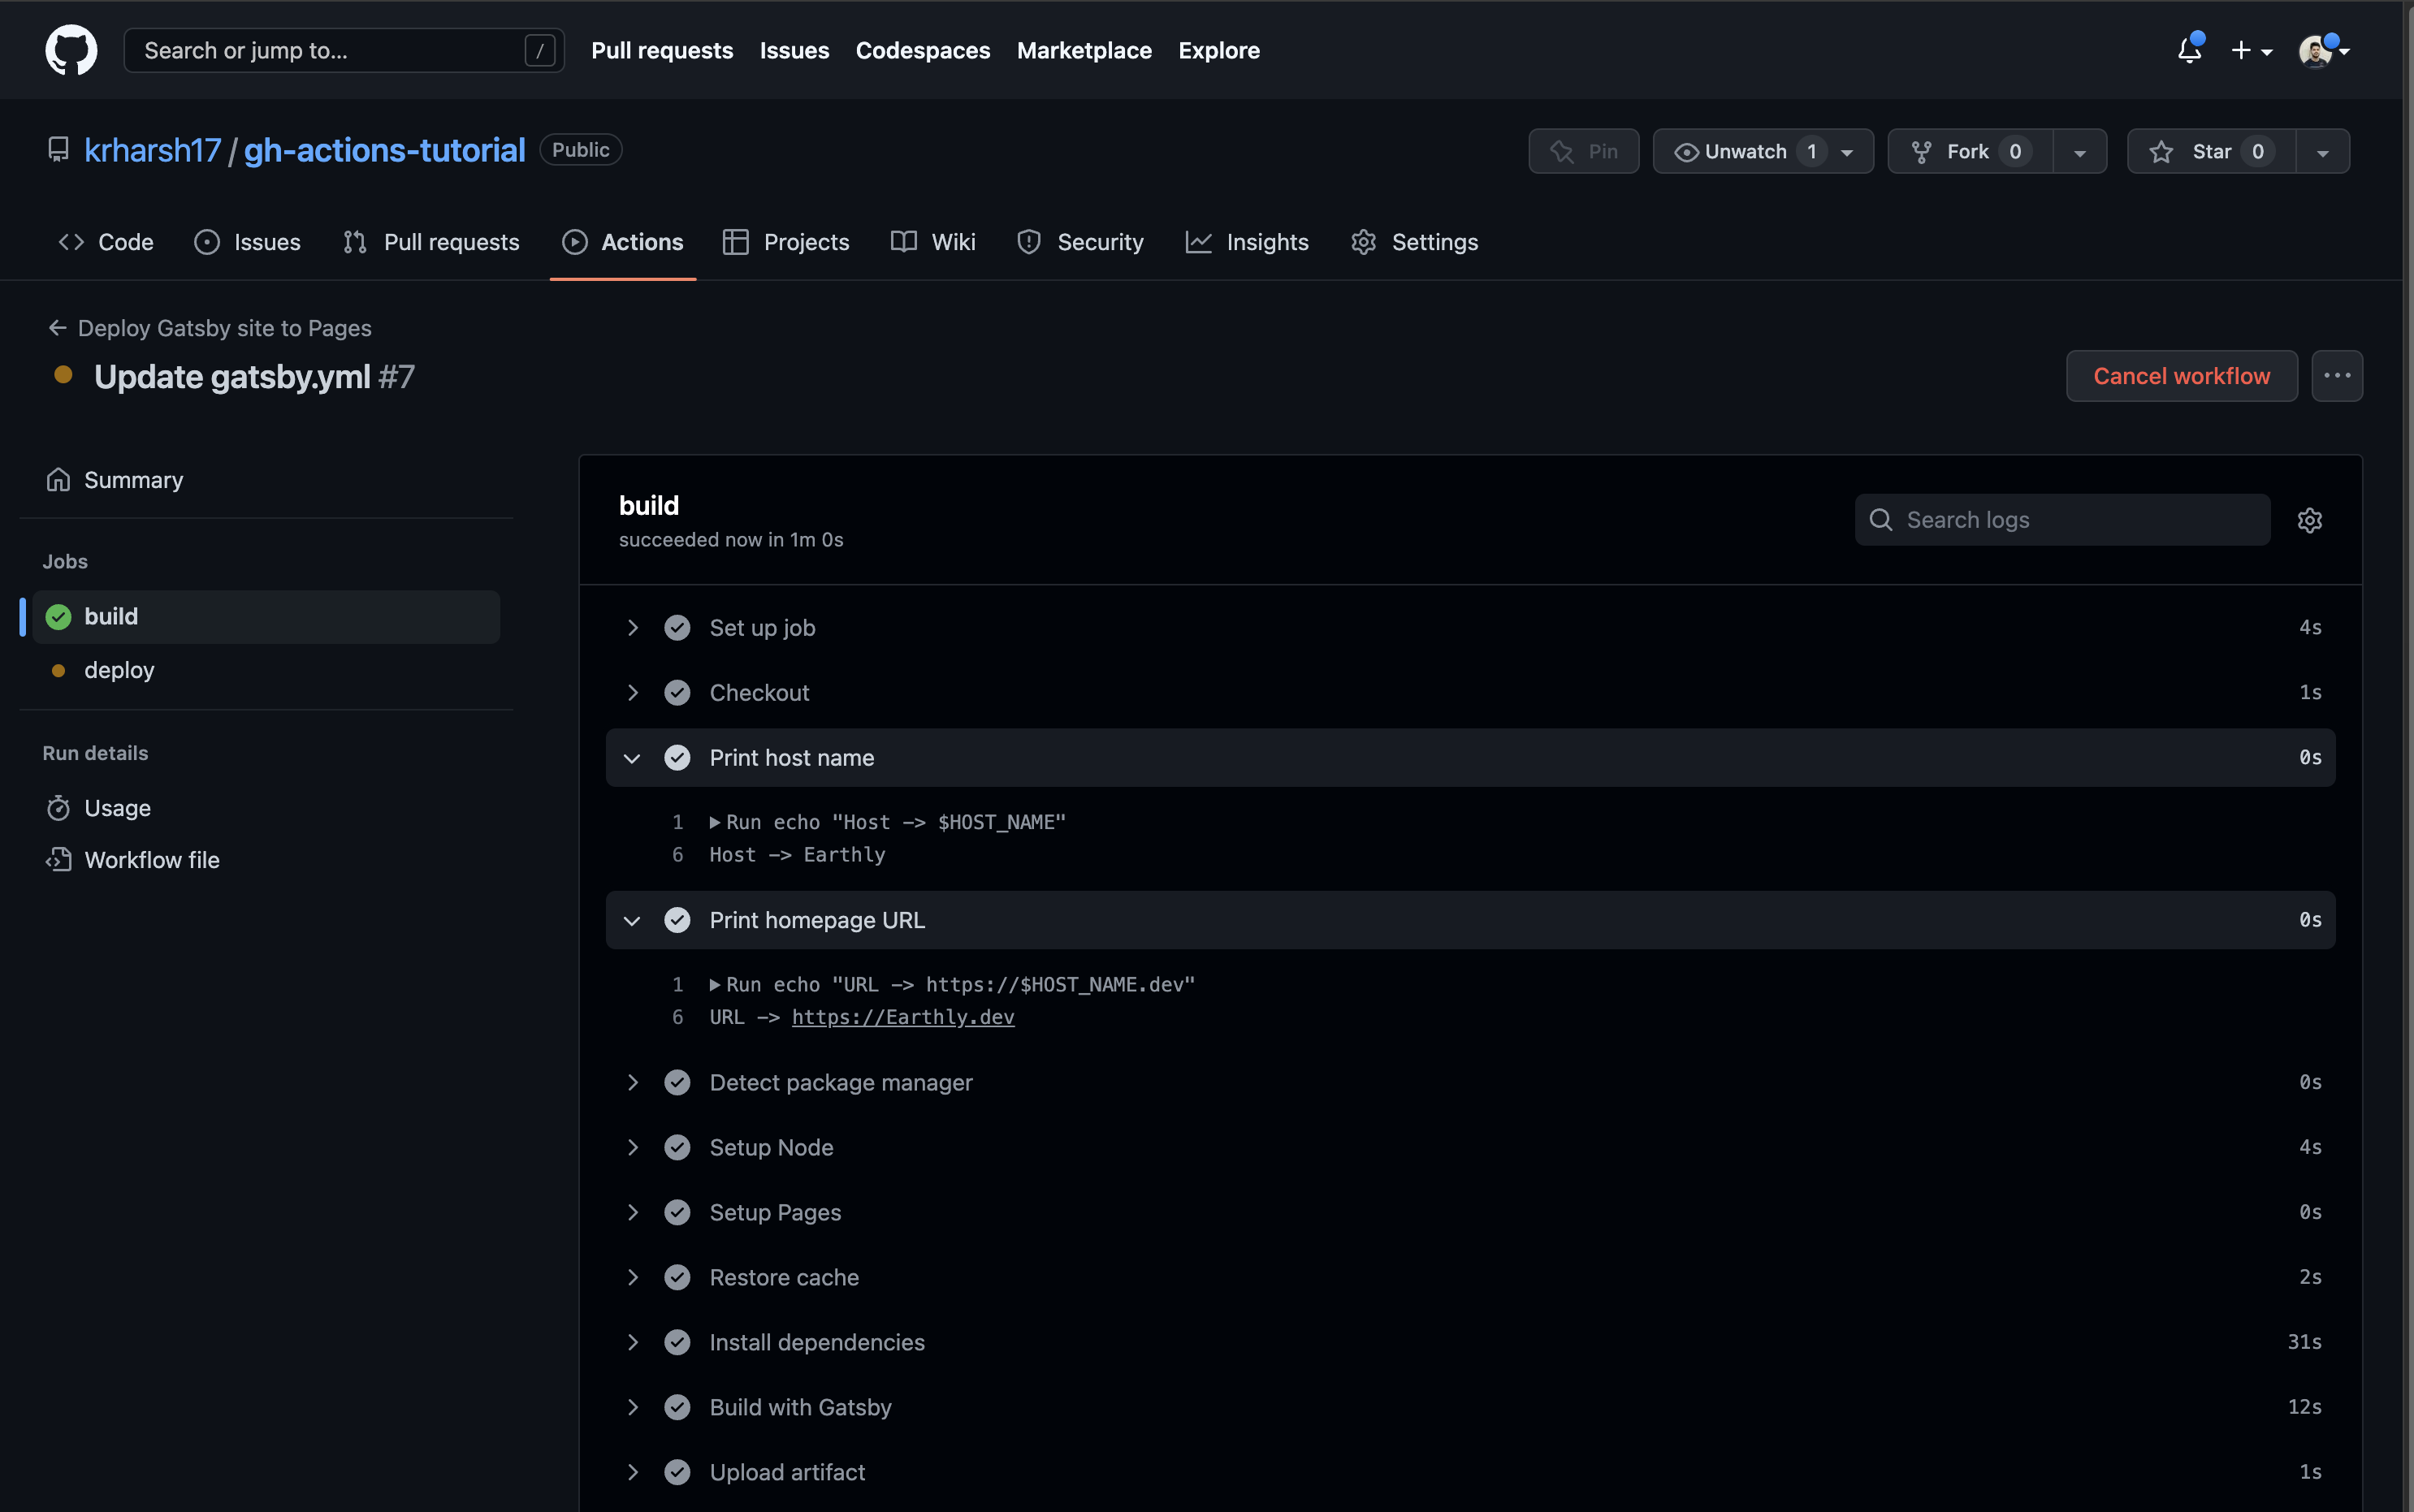
build job execution logsThe deploy job can also do this:
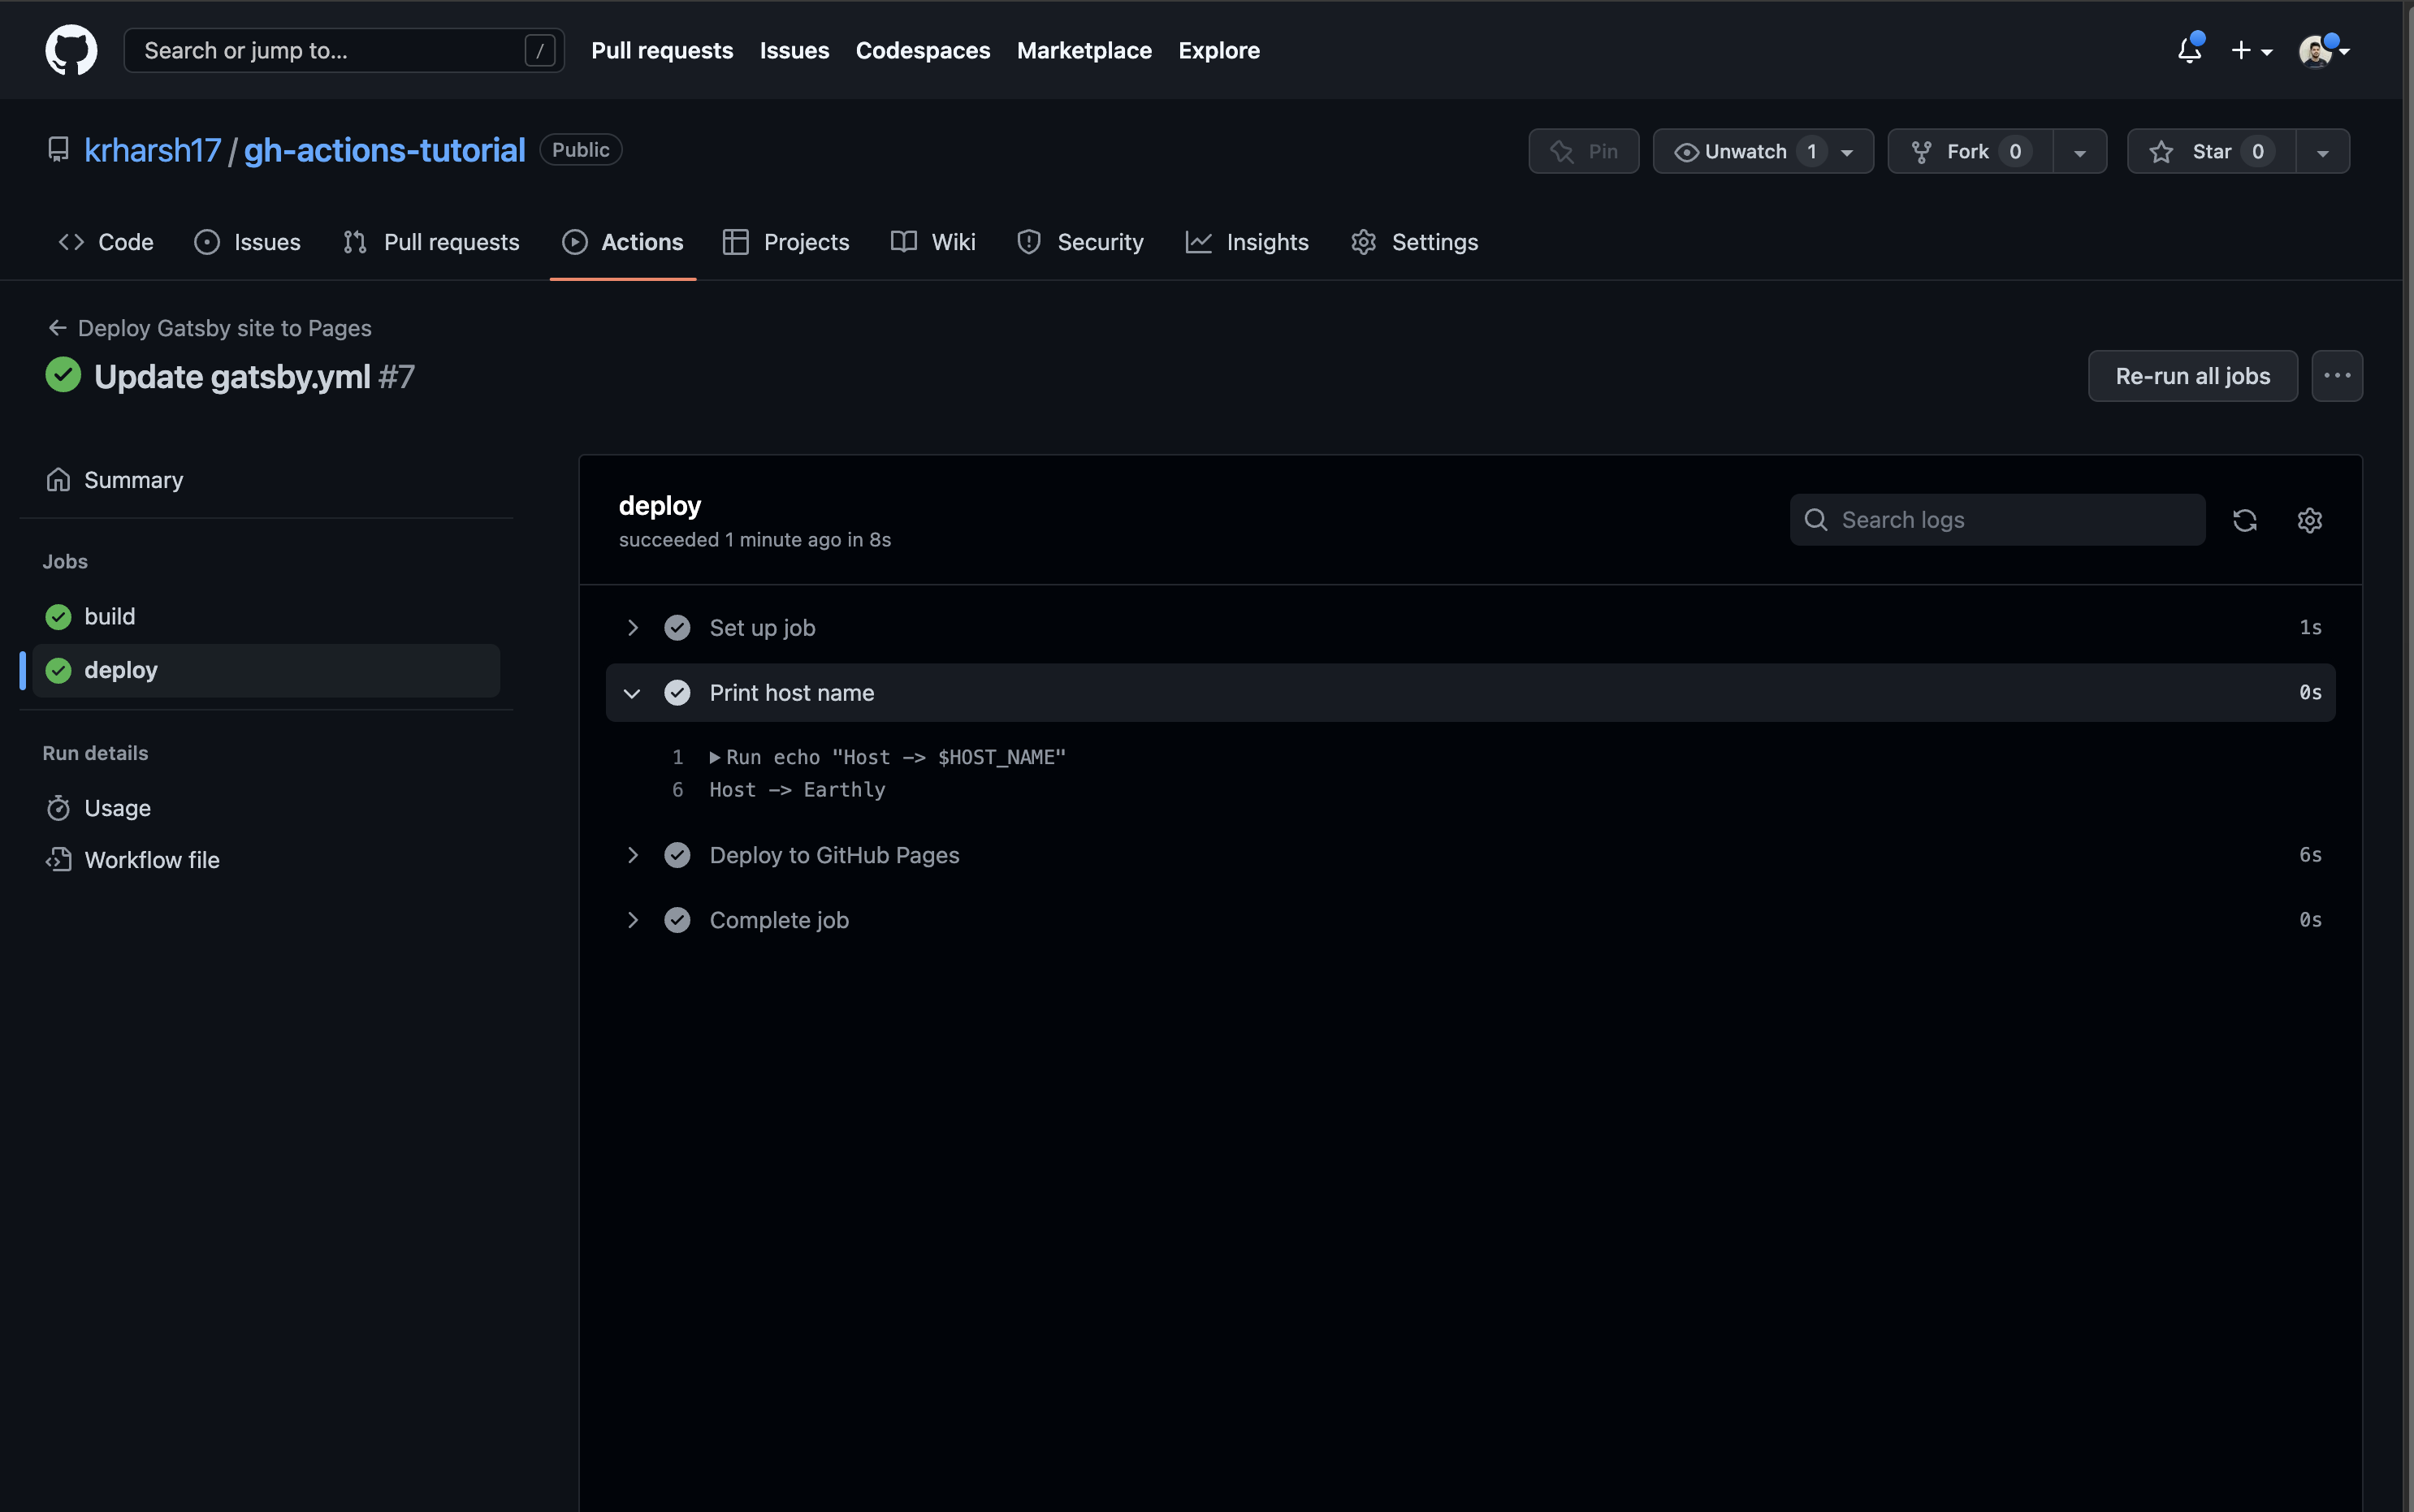
deploy job execution logsThis indicates that the variable has been set up correctly in the workflow’s scope. Next, you’ll see how to store sensitive and/or long pieces of information, like SSL/TLS certificates, in your GitHub Actions workflows.
How to Store a Certificate in GitHub Actions
You might encounter use cases where you need your GitHub Actions workflows to be able to access certificates to sign builds or attach SSL certificates/keys to your builds. These keys/certificates are highly sensitive, and you don’t want to expose them in your build logs. This means you need to hide them behind GitHub repo environment variables instead of defining them in the workflow config file itself.
You also need to encode them to ensure that special (non-alphanumeric) characters may not be misinterpreted by the build environment when fetching the value from the repo env variables.
Encode and Decode Secrets
To encode and decode secrets, let’s use the following self-signed certificate sample (taken from the IBM docs and shortened):
Certificate:
    Data:
        Version: 3 (0x2)
        Serial Number:
            da:50:cb:99:52:41:22:88
    Signature Algorithm: sha256WithRSAEncryption
        Issuer: CN=OsaIccTLSServer
        Validity
            Not Before: Jan 29 16:51:44 2016 GMT
            Not After : Jan 28 16:51:44 2019 GMT
        Subject: CN=OsaIccTLSServer
        Subject Public Key Info:
            Public Key Algorithm: rsaEncryption
                Public-Key: (2048 bit)
                Modulus:
                    00:c1:bb:47:cb:de:77:22:59:51:5b:3e:4e:f1:db:
                    9b:14:5a:b7:42:ef:51:78:e2:b4:c5:73:1a:c7:93:
                    46:16:c8:cf:39:da:10:0c:d8:70:14:db:6f:52:c3:
                    89:7c:09:51:6b:20:ed:1a:b8:54:43:f4:ce:82:7e:
                    a9:5b
                Exponent: 65537 (0x10001)
        X509v3 extensions:
            X509v3 Subject Key Identifier:
                4E:9E:53:8E:2E:0F:2B:04:CC:C4:EB:B4:41:FC:B0:67:5C:E0:6E:B8
            X509v3 Authority Key Identifier:
                keyid:4E:9E:53:8E:2E:0F:2B:04:CC:C4:EB:B4:41:FC:B0:67:5C:E0\
                :6E:B8
                X509v3 Basic Constraints:
                CA:TRUE
Signature Algorithm: sha256WithRSAEncryption
         23:ee:f7:02:fe:48:92:0e:8f:df:36:bc:c2:16:e6:b2:e4:a4:
         75:67:d5:f5:74:c9:eb:91:76:d7:d0:b0:44:f6:58:ac:1b:a8:
         40:6b:34:31:8b:75:a5:cb:75:ae:1b:4b:e9:ee:80:54:8b:57:
         16:7c:53:69:92:07:67:ab:5d:9c:59:bd:47:02:55:2c:f0:18:
         69:c3:14:21
To store this in a GitHub repo environment variable, you’ll need to encode it using the Base64 encoding scheme. Base64 is a good option for this job since it’s one of the most popular lossless encoding schemes for ASCII data and can be easily decoded using one of the many utility libraries available across various languages and frameworks.
To encode it, you can use a CLI tool like openssl on macOS or certutil on Windows. You can also use an online tool like Base64 Encode to encode data on the fly. Here’s what the encoded string would look like:
Q2VydGlmaWNhdGU6CiAgICBEYXRhOgogICAgICAgIFZlcnNpb246IDMgKDB4MikKICAgI
CAgICBTZXJpYWwgTnVtYmVyOgogICAgICAgICAgICBkYTo1MDpjYjo5OTo1Mjo0MToyMj
o4OAogICAgU2lnbmF0dXJlIEFsZ29yaXRobTogc2hhMjU2V2l0aFJTQUVuY3J5cHRpb24KICAg
ICAgICBJc3N1ZXI6IENOPU9zYUljY1RMU1NlcnZlcgogICAgICAgIFZhbGlkaXR5CiAgIC
AgICAgICAgIE5vdCBCZWZvcmU6IEphbiAyOSAxNjo1MTo0NCAyMDE2IEdNVAog
ICAgICAgICAgICBOb3QgQWZ0ZXIgOiBKYW4gMjggMTY6NTE6NDQgMjAxOSBHTVQKICAgICAg
ICBTdWJqZWN0OiBDTj1Pc2FJY2NUTFNTZXJ2ZXIKICAgICAgICBTdWJqZWN0IFB1YmxpYyBL
ZXkgSW5mbzoKICAgICAgICAgICAgUHVibGljIEtleSBBbGdvcml0aG06IHJzYUVuY3J5cHRp
b24KICAgICAgICAgICAgICAgIFB1YmxpYy1LZXk6ICgyMDQ4IGJpdCkKICAgICAgICAgICAgICAg
IE1vZHVsdXM6CiAgICAgICAgICAgICAgICAgICAgMDA6YzE6YmI6NDc6Y2I6ZGU6Nzc6MjI6NT
k6NTE6NWI6M2U6NGU6ZjE6ZGI6CiAgICAgICAgICAgICAgICAgICAgOWI6MTQ6NWE6Yjc6NDI6
ZWY6NTE6Nzg6ZTI6YjQ6YzU6NzM6MWE6Yzc6OTM6CiAgICAgICAgICAgICAgICAgICAgNDY6M
TY6Yzg6Y2Y6Mzk6ZGE6MTA6MGM6ZDg6NzA6MTQ6ZGI6NmY6NTI6YzM6CiAgICAgICAgICAgIC
AgICAgICAgODk6N2M6MDk6NTE6NmI6MjA6ZWQ6MWE6Yjg6NTQ6NDM6ZjQ6Y2U6ODI6N2U6CiAg
ICAgICAgICAgICAgICAgICAgYTk6NWIKICAgICAgICAgICAgICAgIEV4cG9uZW50OiA2NTUzNy
AoMHgxMDAwMSkKICAgICAgICBYNTA5djMgZXh0ZW5zaW9uczoKICAgICAgICAgICAgWDUwOXYzI
FN1YmplY3QgS2V5IElkZW50aWZpZXI6CiAgICAgICAgICAgICAgICA0RTo5RTo1Mzo4RToyRTow
RjoyQjowNDpDQzpDNDpFQjpCNDo0MTpGQzpCMDo2Nzo1QzpFMDo2RTpCOAogICAgICAgICAgICBY
NTA5djMgQXV0aG9yaXR5IEtleSBJZGVudGlmaWVyOgogICAgICAgICAgICAgICAga2V5aWQ6NE
U6OUU6NTM6OEU6MkU6MEY6MkI6MDQ6Q0M6QzQ6RUI6QjQ6NDE6RkM6QjA6Njc6NUM6RTA6NkU6Q
jgKICAgICAgICAgICAgICAgIFg1MDl2MyBCYXNpYyBDb25zdHJhaW50czoKICAgICAgICAgICAgI
CAgIENBOlRSVUUKU2lnbmF0dXJlIEFsZ29yaXRobTogc2hhMjU2V2l0aFJTQUVuY3J5cHRpb24K
ICAgICAgICAgMjM6ZWU6Zjc6MDI6ZmU6NDg6OTI6MGU6OGY6ZGY6MzY6YmM6YzI6MTY6ZTY6YjI
6ZTQ6YTQ6CiAgICAgICAgIDc1OjY3OmQ1OmY1Ojc0OmM5OmViOjkxOjc2OmQ3OmQwOmIwOjQ0Om
Y2OjU4OmFjOjFiOmE4OgogICAgICAgICA0MDo2YjozNDozMTo4Yjo3NTphNTpjYjo3NTphZTox
Yjo0YjplOTplZTo4MDo1NDo4Yjo1NzoKICAgICAgICAgMTY6N2M6NTM6Njk6OTI6MDc6Njc6YW
I6NWQ6OWM6NTk6YmQ6NDc6MDI6NTU6MmM6ZjA6MTg6CiAgICAgICAgIDY5OmMzOjE0OjIx
You can now use this in a GitHub repo environment variable.
Add Encoded Secrets to GitHub Actions
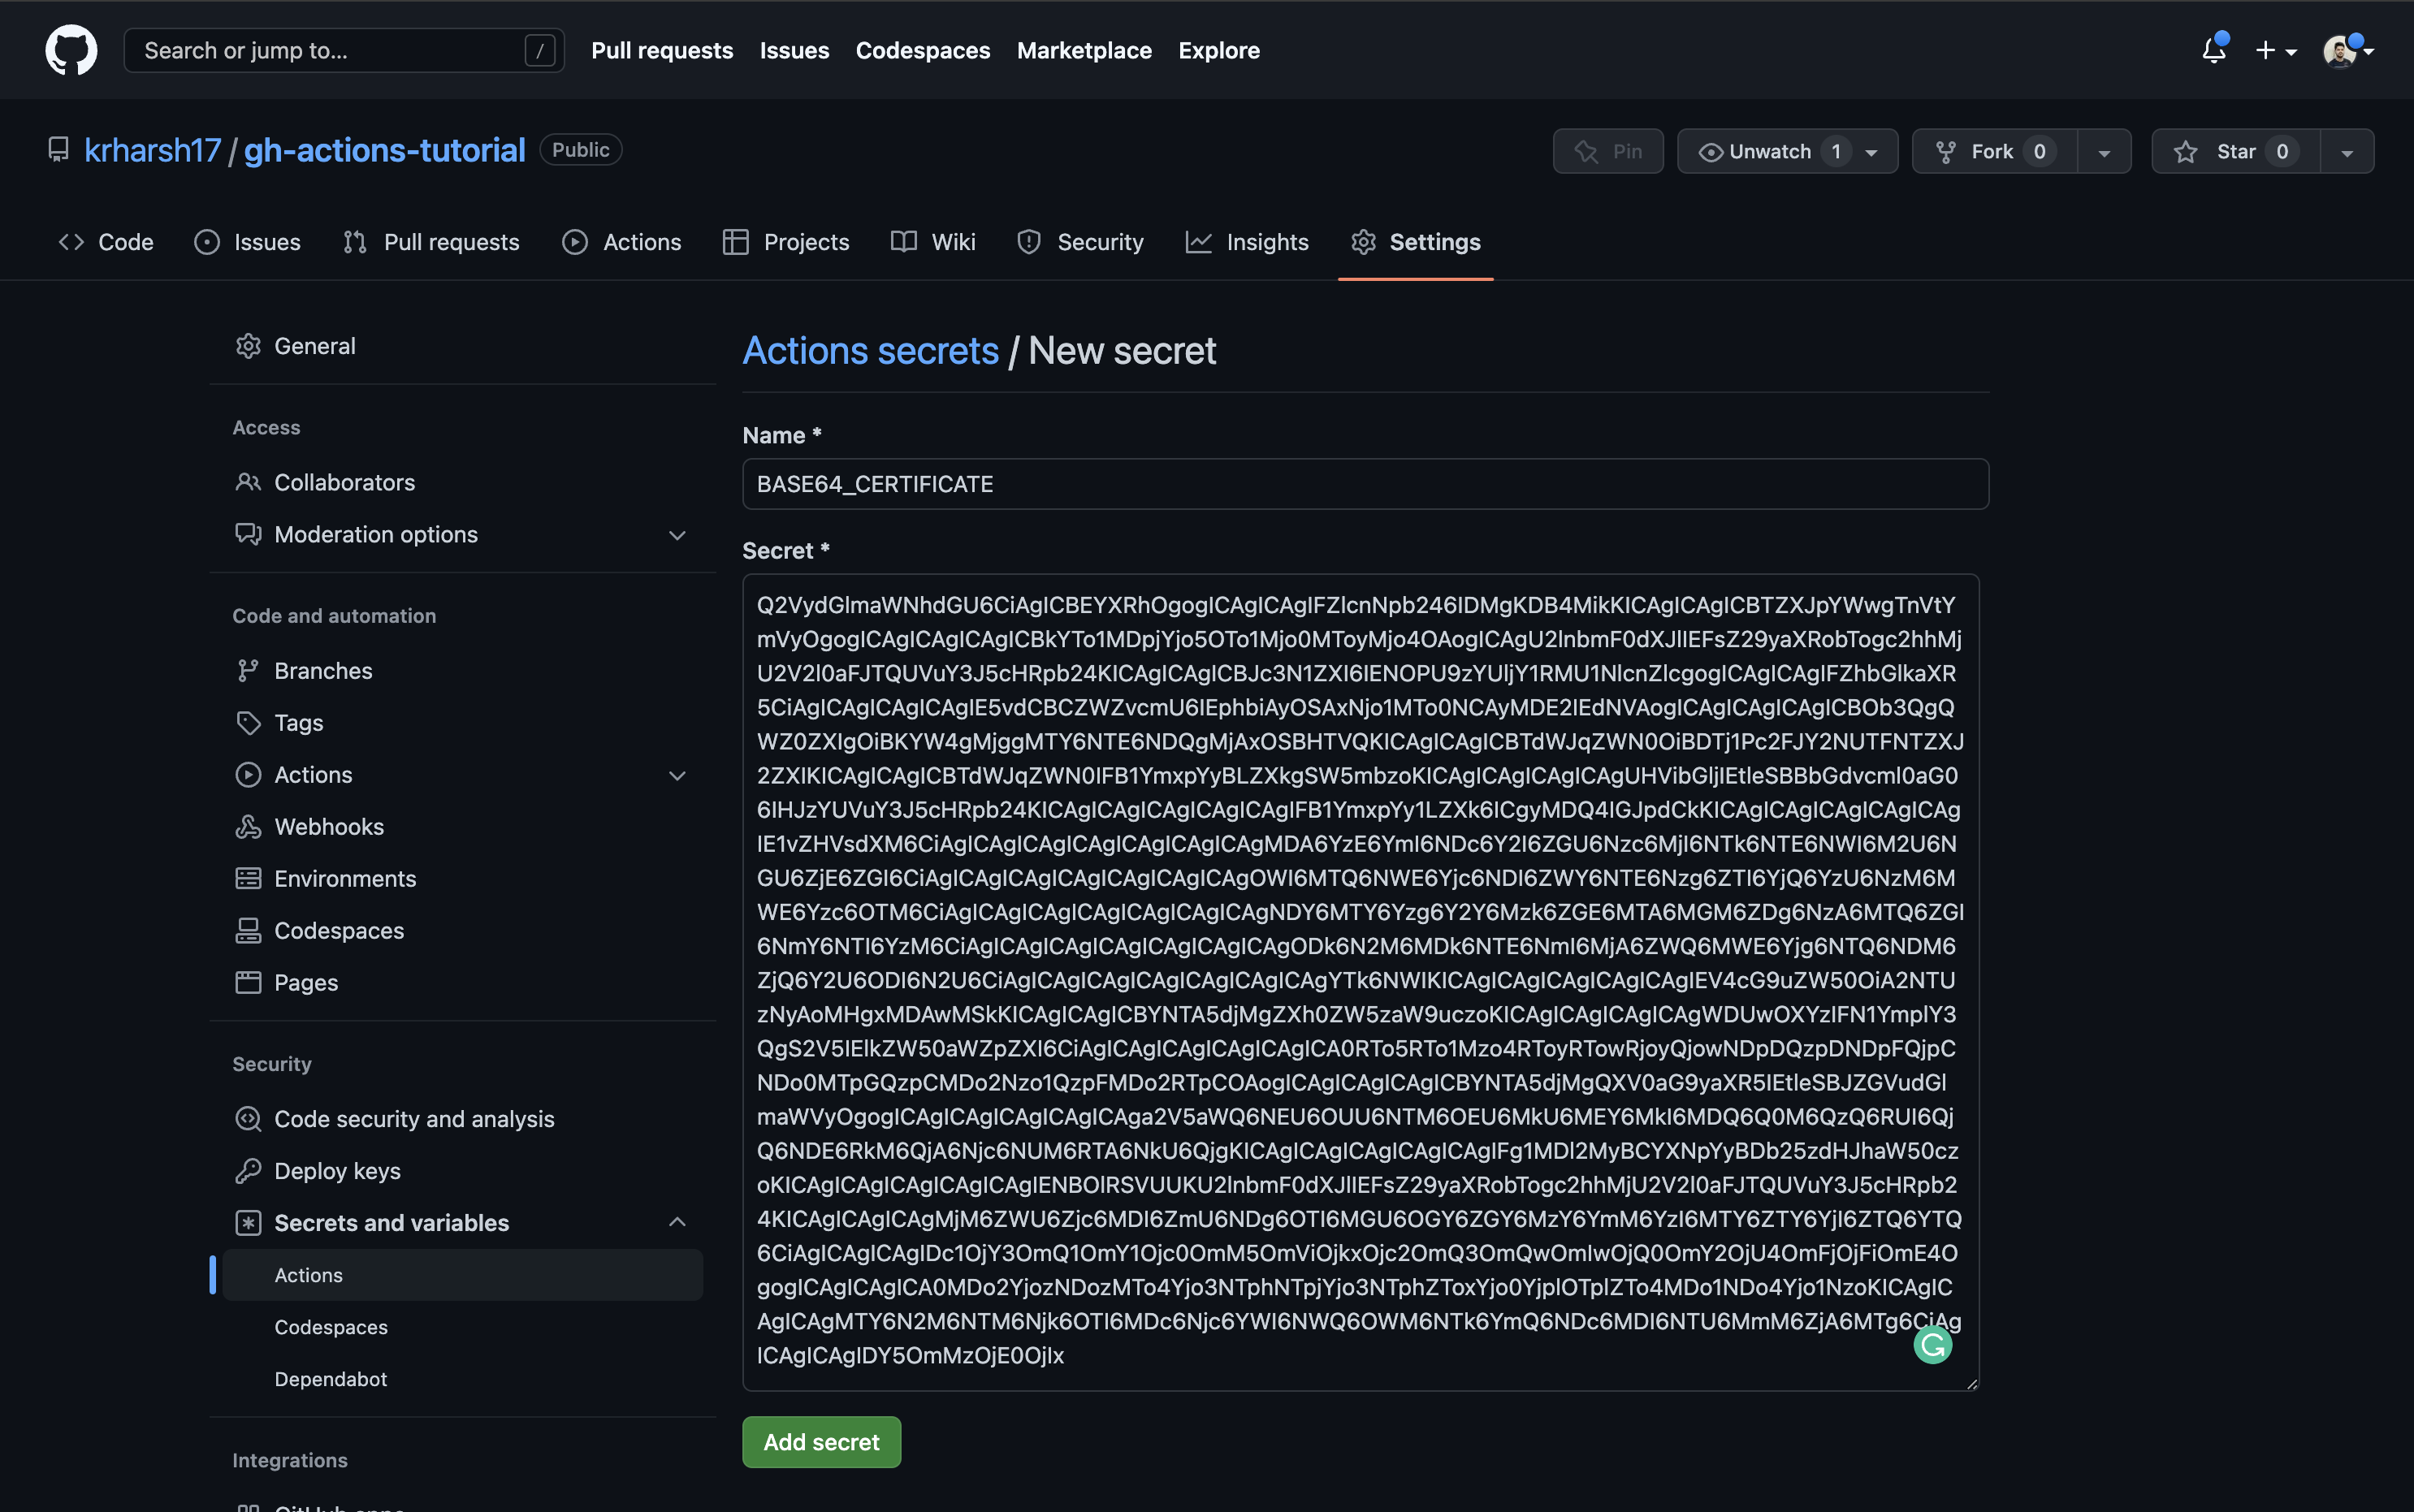
Head over to the Settings tab on your repo’s page and click on Secrets and variables > Actions from the left navigation pane. Click on the New repository secret button to create a new repo environment variable:
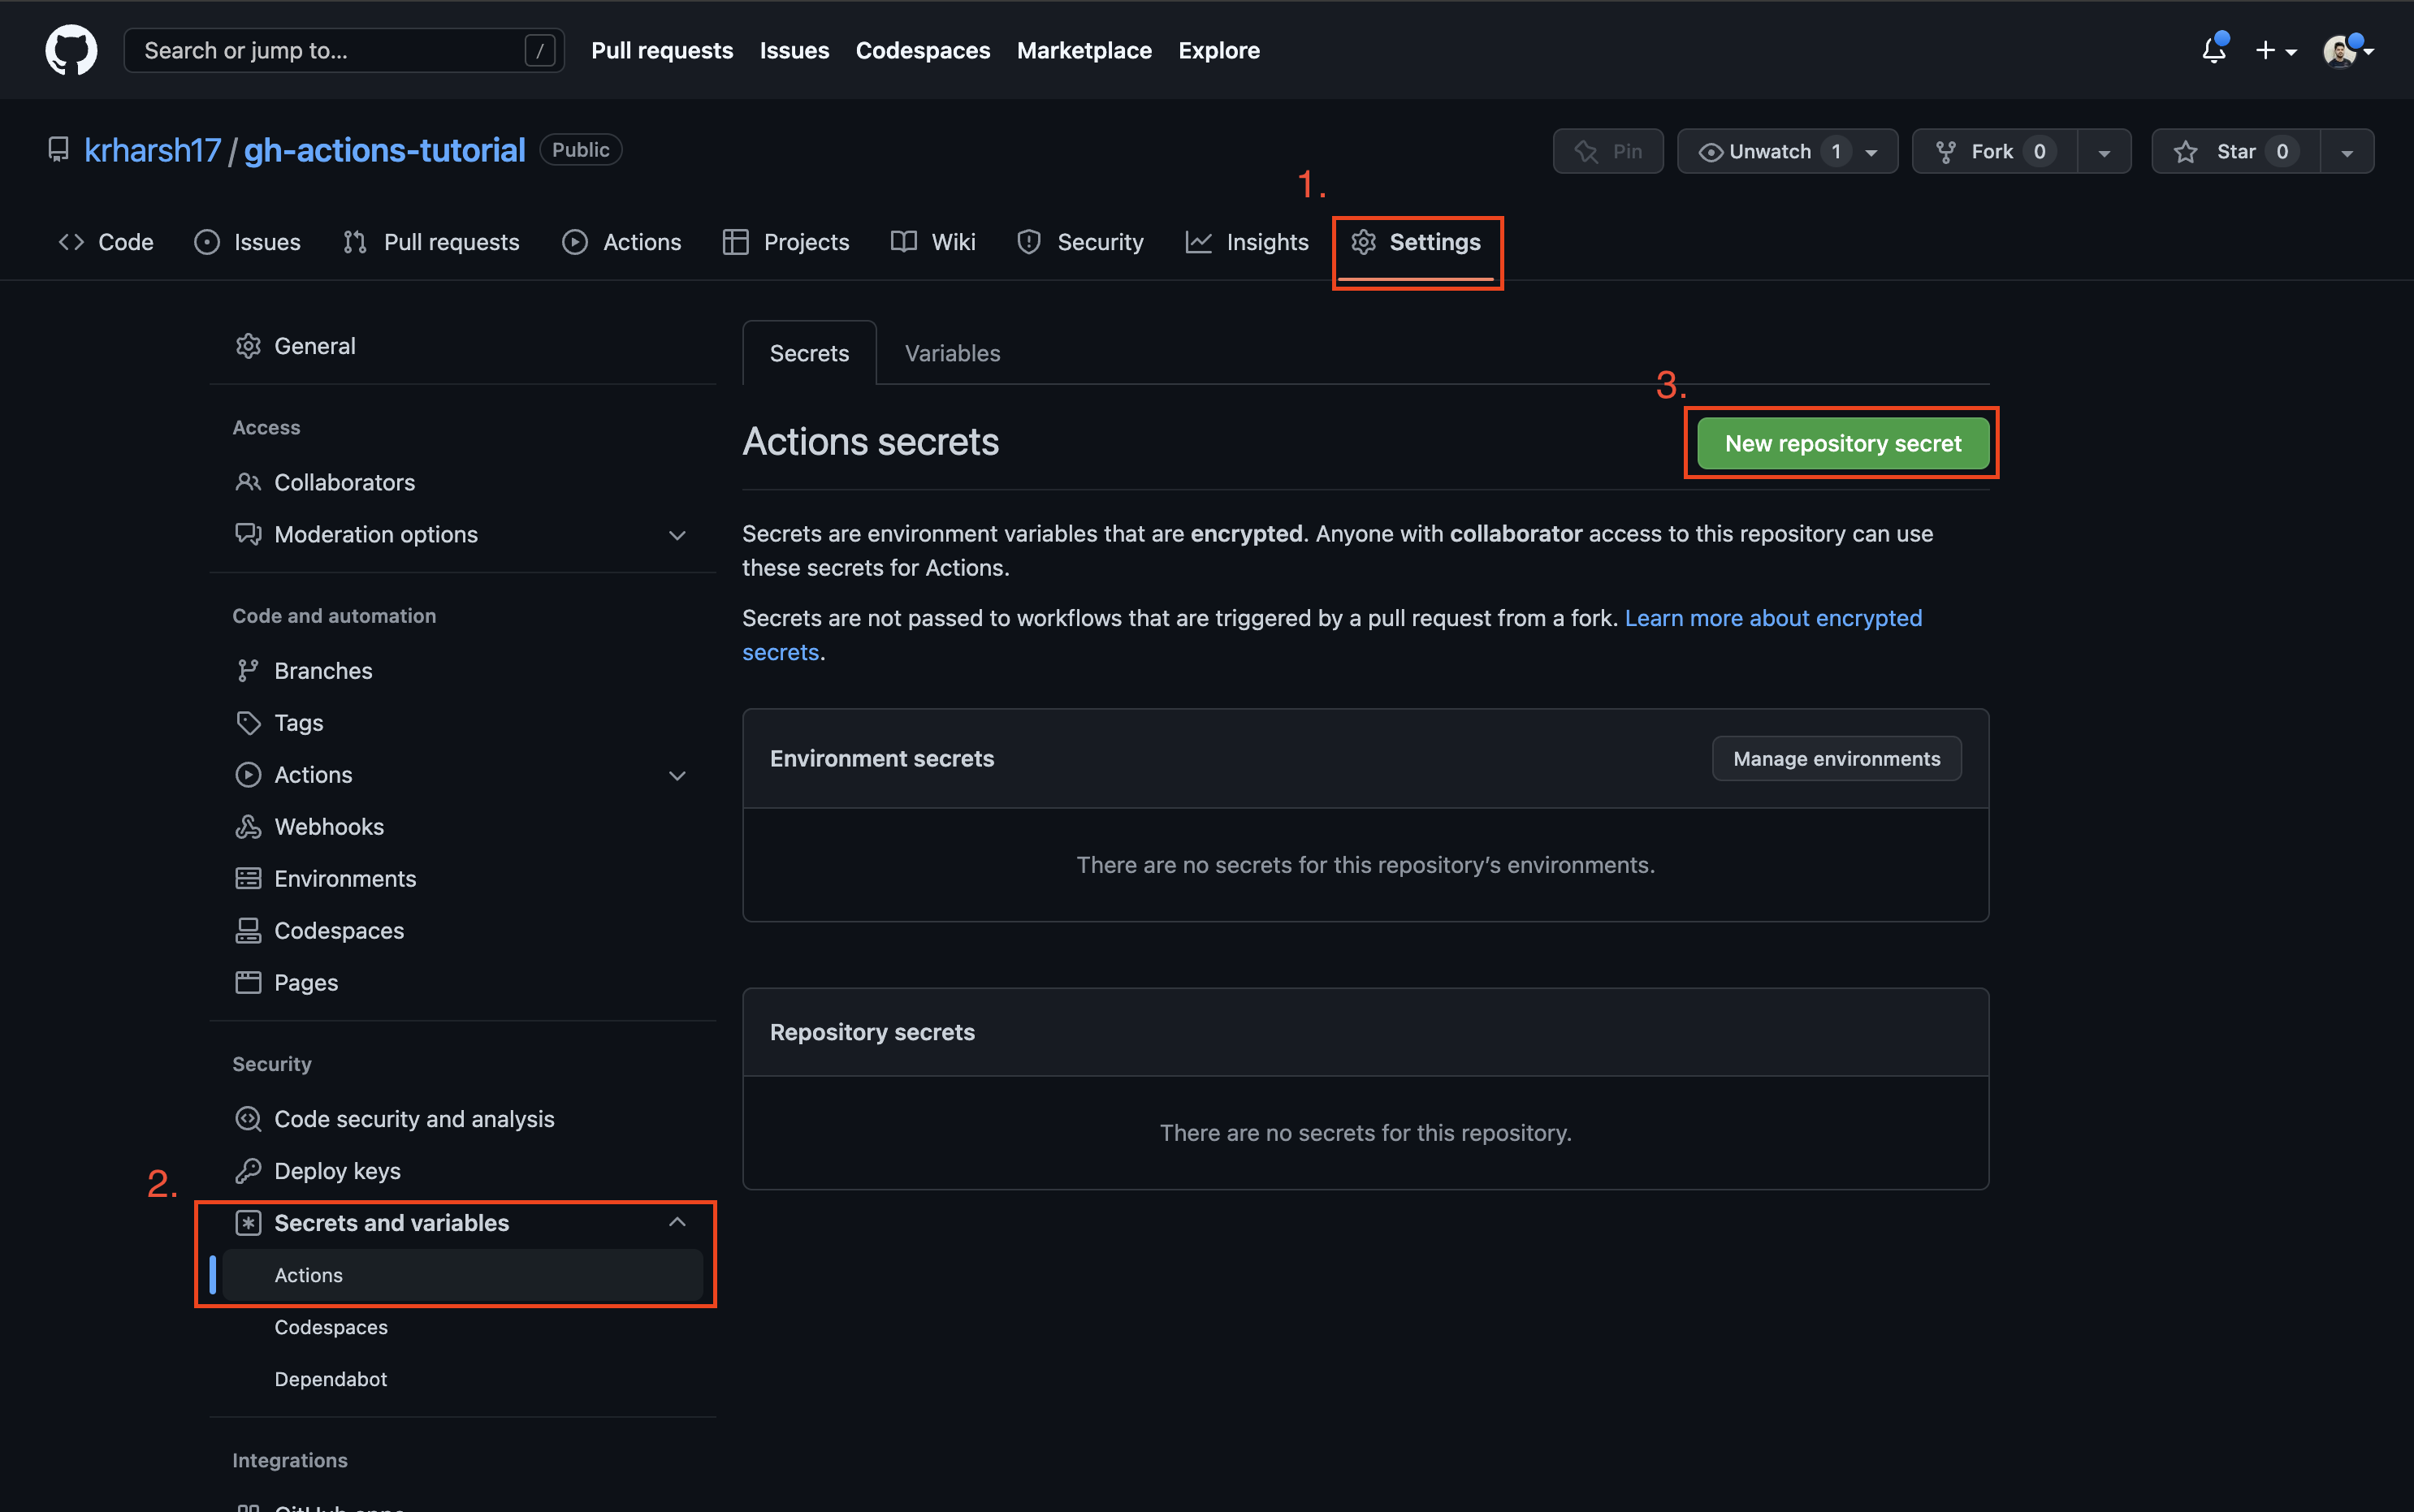
Set a name for your secret and paste the Base64 encoded string. Once done, click on the Add secret button:
Next, add a step in the build job of your .github/workflows/gatsby.yml workflow to decode and print the value of this environment variable:
- name: Print certificate
  run: echo "$ {{ secrets.BASE64_CERTIFICATE }}  " | base64 --decode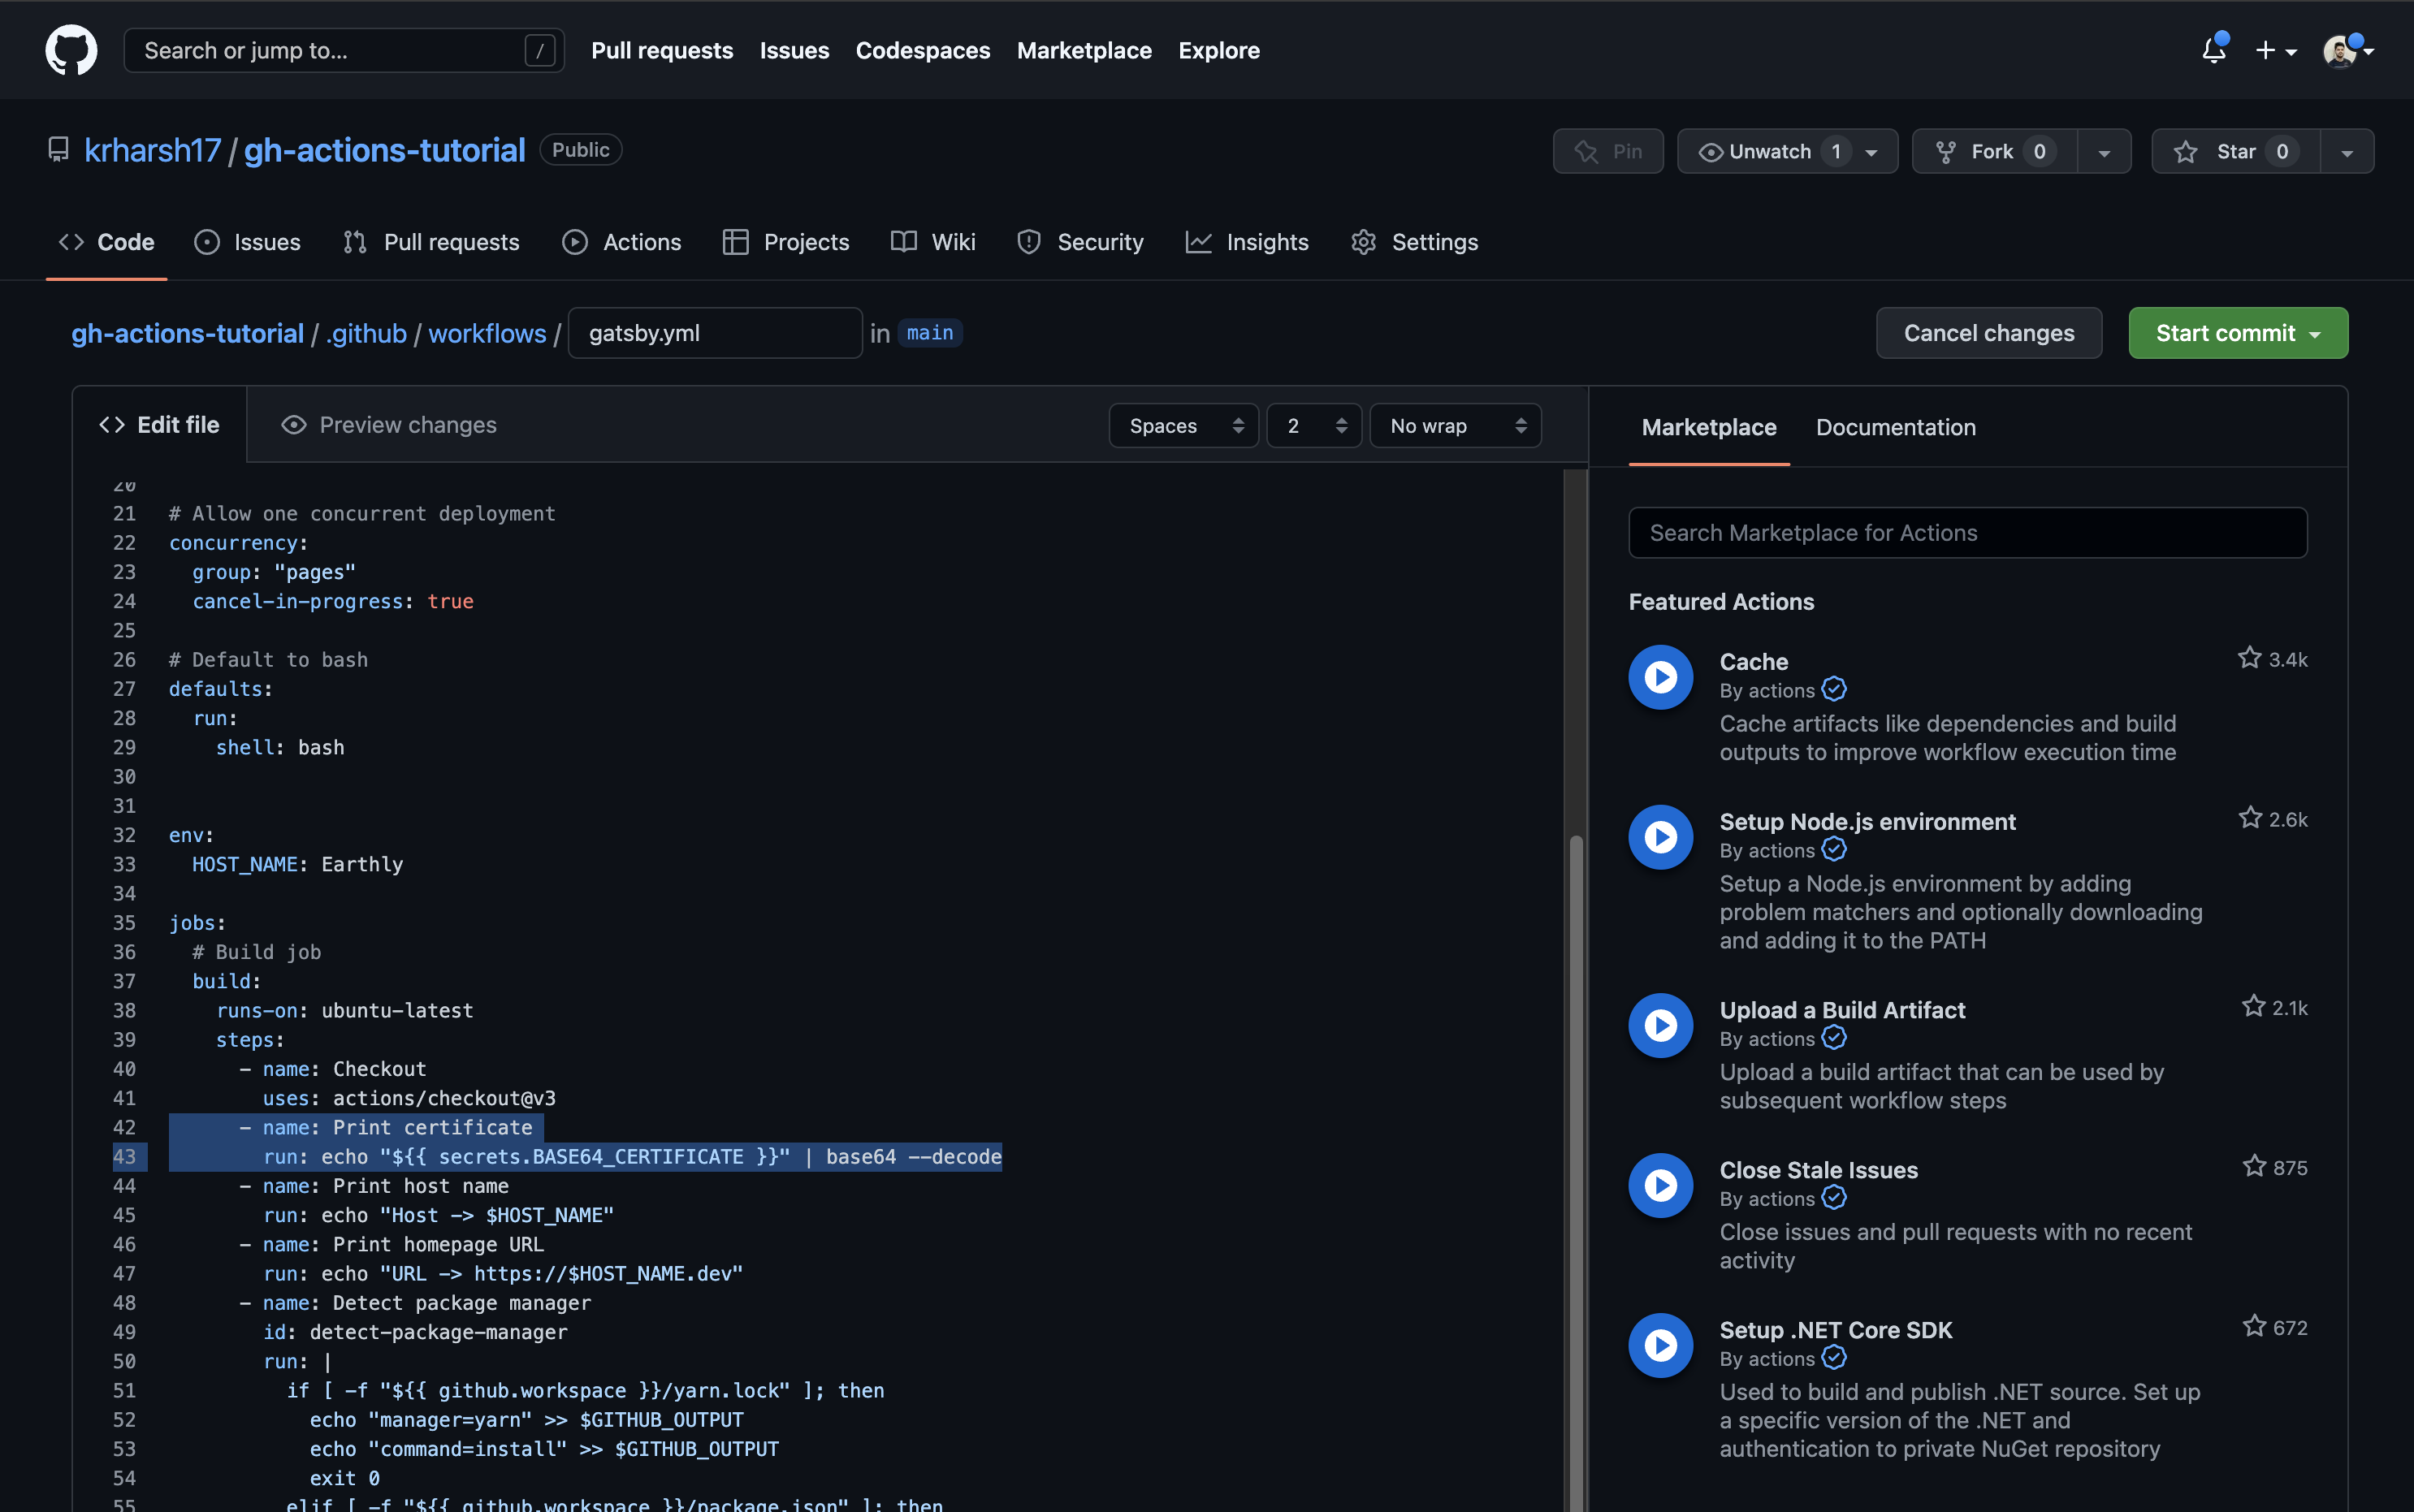
Commit the file and head over to the build execution logs to see this step in action:
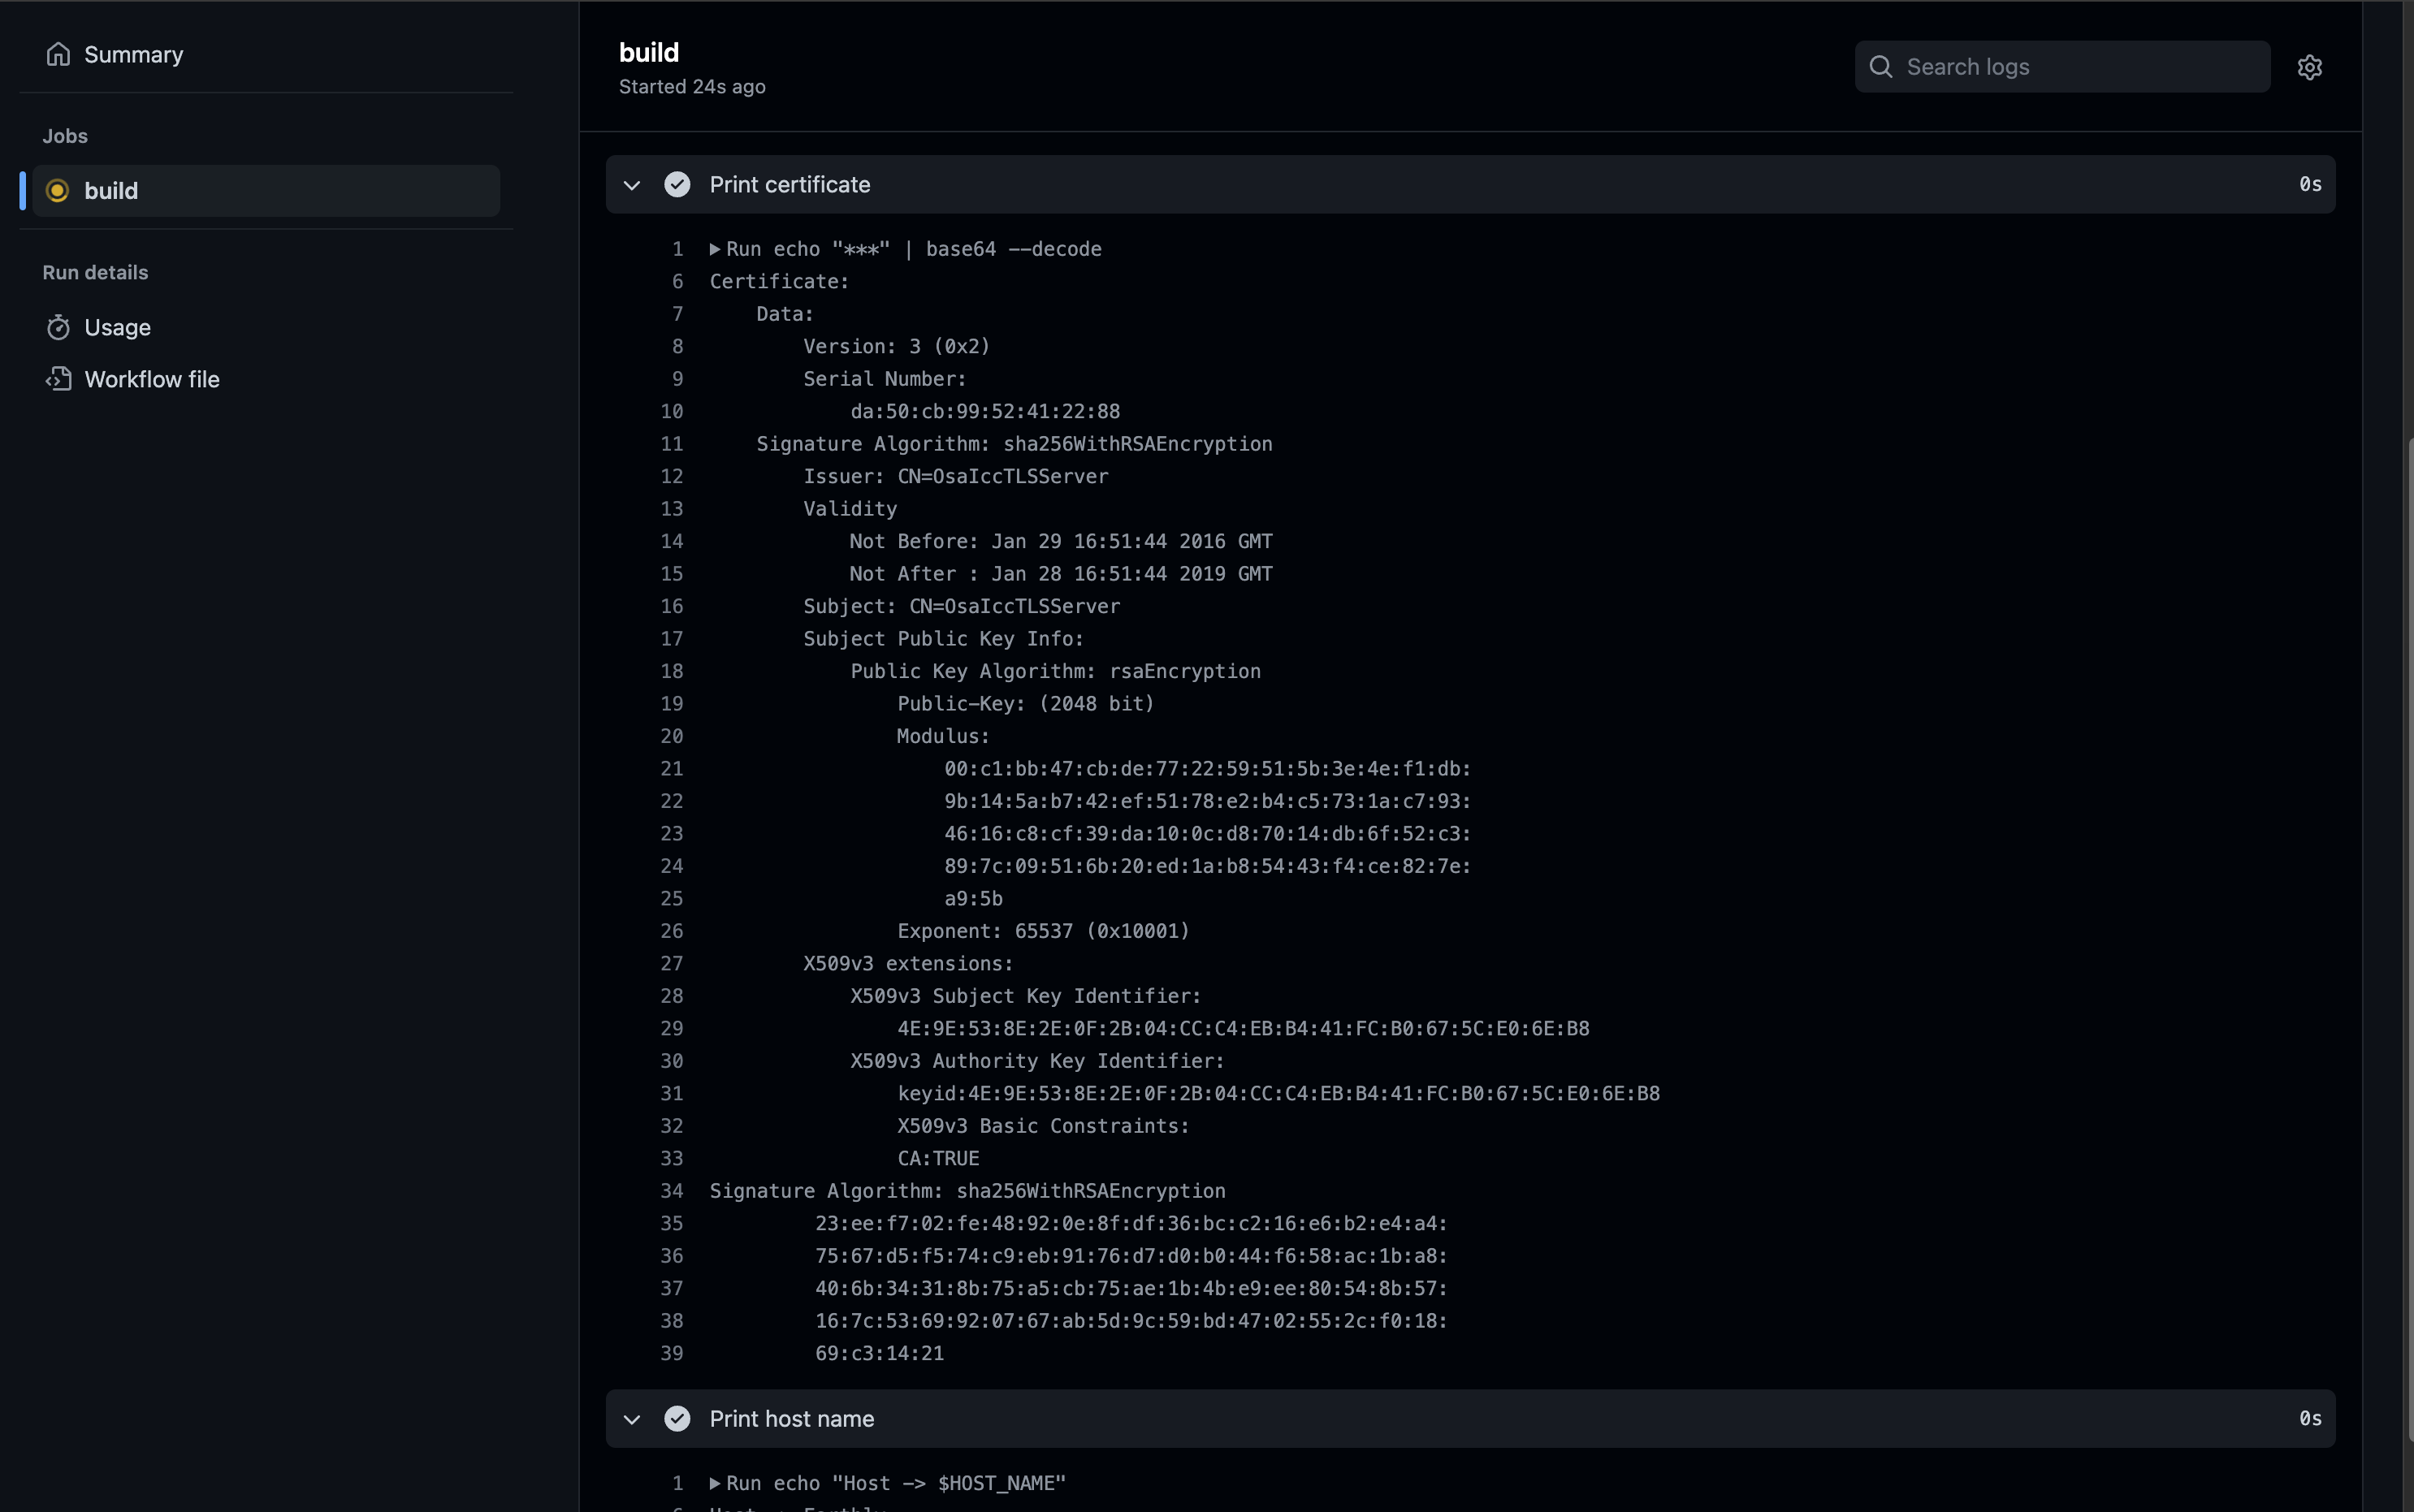
Please note that the secret’s details were printed to the logs in this part of the tutorial only for ease of demonstration. In real-world applications, this is highly discouraged and can lead to security breaches. Instead of printing the secret to the logs, you should store the output of the
decodecommand in a temporary file and use it during the build process.
Local Secrets and ENVs
One of the challenges when working with environmental variables and secrets is being able to debug the build process with these in scope. In fact, making changes to GitHub Actions in general can be a slow process once your build begins to take several minutes.
Using Earthly within GitHub Actions is a great way around these problems. We can convert our Gatsby build to an Earthfile and call earthly in our CI.
The Earthfile would look like this:
VERSION 0.7
FROM alpine:latest
WORKDIR /app

deps:
    FROM alpine:latest
    RUN apk add --update nodejs npm
    RUN npm install
    COPY README.md .
    COPY log.txt .
    COPY package-lock.json .
    COPY package.json .
    COPY gatsby-config.js .
    COPY data/ data/
    COPY src/ src/

build:
    FROM +deps
    RUN npm run build
    RUN echo "Host -> $host"
    RUN echo "URL -> https://$host.dev"
    RUN --secret cert echo "$cert" | base64 --decode
    SAVE ARTIFACT ./public AS LOCAL public
And in GitHubActions, and on our local dev machine, or in any other CI we could run the build like this earthly +build --host=bla --secret cert, passing in the args and secrets we need.
Args are available to any step after they have been declared, similar to GitHub Actions above. But secrets must always be scoped explicitly to a specific run step, preventing any potential code inject attacks from occurring outside that line.
build:
    FROM +deps
    RUN npm run build
    RUN echo "Host -> $host"
    RUN echo "URL -> https://$host.dev"
+   RUN --secret cert echo "$cert" | base64 --decode
SAVE ARTIFACT ./public AS LOCAL publiccert is only accessible on the line where it’s explicitly made in scope
Extra Tip: Read .env File From GitHub Actions
An .env file is a plain text file used to store configuration variables and sensitive information as key-value pairs. Usually you wouldn’t have it in your git repository because you’d not want to commit potentially sensitive information to git. But workflows differ and so if you want GitHub Actions to load Environmental Variables from an .env file, then you can do so very easily using the dotenv-actions action:
API_KEY=your_api_key
DB_PASSWORD=your_db_password
- name: Load environment variables
uses: dotenv-actions/setup-dotenv@v2
with:
dotenv_path: .env
run: echo "Host -> $API_KEY"Default Environment Variables
Every workflow in GitHub Actions has certain environmental variables already set. Here are the most commonly used ones:
Here’s a shorter list of 10 important GitHub Actions environment variables:
GITHUB_WORKSPACE- The default working directory for steps and location of your repo.GITHUB_ACTOR- The name of the person or app that initiated the workflow.GITHUB_REPOSITORY- The owner and repository name.GITHUB_EVENT_NAME- The name of the event that triggered the workflow.GITHUB_SHA- The commit SHA that triggered the workflow.GITHUB_REF- The branch or tag ref that triggered the workflow.GITHUB_JOB- The ID of the current job.GITHUB_RUN_NUMBER- A unique number for each run of a workflow.
GITHUB_WORKFLOW- The name of the workflow.RUNNER_OS- The OS of the runner executing the job (Linux, Windows, macOS).
Conclusion
In this article, you learned when to use environment variables and secrets, as well as how to scope environment variables across workflows, jobs, and steps. You also learned how to store sensitive information like certificates with GitHub’s repository secrets. If you’re looking for a simpler experience managing environment variables and secrets, check out Earthly, an build tool that can run everywhere. Including in GitHub Actions.
Earthly + GitHub Actions
GitHub Actions are better with Earthly. Get faster build speeds, improved consistency, and local testing along with an easy-to-use syntax – no YAML – and better monorepo support.


