Kubernetes GitOps with FluxCD

Table of Contents
Kubernetes has become the go-to tool for application deployment. However, it does not offer features for continuous integration and delivery. Continuous delivery can be particularly helpful for larger teams that host and update deployments frequently. One approach to maintaining continuous delivery for Kubernetes is GitOps.
GitOps is a software development practice that relies on a Git repository as its single source of truth. Descriptive configurations are committed to Git and then used to create continuous delivery environments. All aspects of the environment are defined via the Git repository; there are no standalone scripts or manual setups.
In this guide, you’ll learn how to configure a continuous delivery pipeline with Flux for your Kubernetes cluster. You’ll set up this pipeline imperatively by deploying the Flux Prometheus and Grafana monitoring stacks, and declaratively by deploying a ‘2048 game application’ to your Kubernetes cluster.
Let’s get started!
What Is FluxCD?
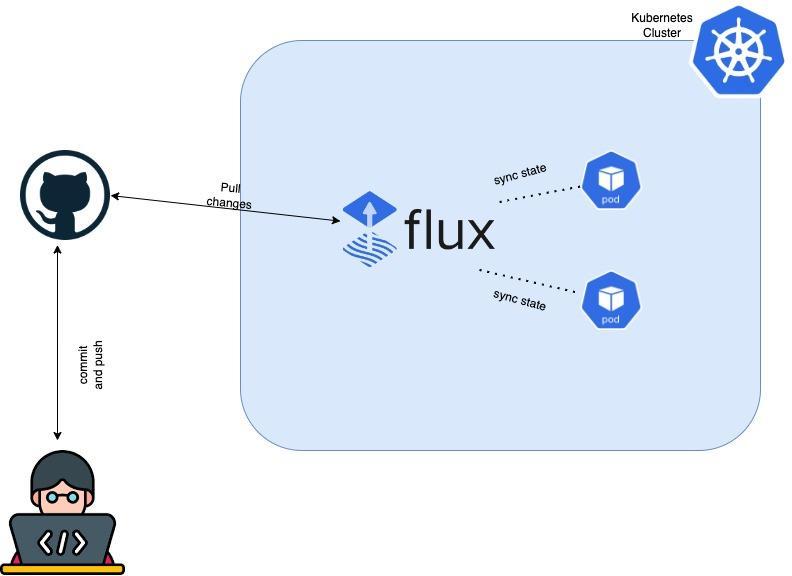
Flux is an open-source tool for automating application delivery pipelines to Kubernetes clusters based on GitOps principles. Flux makes use of source control platforms such as Git to allow users to describe their desired application state. It was originally created by Weaveworks but has recently been open-sourced.
Flux is quickly gaining popularity because it integrates with Kubernetes and is simple to set up. Flux, like Terraform, allows DevOps engineers to deploy solutions to Kubernetes via a declarative configuration file that is simple to read and update.
Prerequisites
To follow along with this step-by-step tutorial, you should have the following:
- Local installation of Kubernetes and kubectl
- A GitHub account and GitHub CLI
- Local installations of Git and Chocolatey
Installing Flux CLI
As a first step, you need to install FluxCD CLI on your local machine or a machine with access to your Kubernetes cluster. Flux CLI is a binary executable for all major platforms that implement the Flux architecture. It’ll be used to bootstrap the FluxCD toolkit into your cluster.
If you’re using a Windows machine, run the command below to install Flux:
choco install fluxRun the command below if you’re on a Mac:
brew install fluxcd/tap/fluxIf you’re using a Linux machine, run this command to install Flux:
curl -s https://fluxcd.io/install.sh | sudo bashYou now have Flux installed on your machine; you can verify the installation with the flux --version command.
FluxCD Prerequisites Check
The next step is to run FluxCD prerequisites check. It is important to verify FluxCD’s compatibility with your cluster before bootstrapping FluxCD toolkits into it. To do so, run the following command:
flux check --pre
Bootstrapping FluxCD Toolkit Components

After the prerequisite check, the next step is to configure Github credentials and bootstrap Flux Toolkit into your cluster. Flux will use these components of the toolkits to add a CD pipeline on top of your existing Kubernetes cluster.
During the bootstrapping process, Flux creates a Git repository at a specified provider and initializes it with a default configuration. To do so, Flux requires your GitHub username and a personal access token.
Flux will automatically create a GitHub repository and attach the Flux Toolkit components to it. On GitHub, the repository will be available under your account.
This GitHub repository will contain all the configuration for the Flux core components in a namespace.
Flux automatically applies these configurations to your cluster in the specified namespaces. This behavior only applies if one or more configurations with the custom resource definitions, HelmRelease, Kustomization, GitRepository, and HelmRepository are added to this GitHub repository.
Generating a Personal Access Token on GitHub
To generate a GitHub token, follow these instructions.
Configuring GitHub Credentials
If you’re following along on a Mac or a Linux machine, run the following commands to configure GitHub Credentials:
export GITHUB_USER=<username>
export GITHUB_TOKEN=<access-token>
If you’re on a Windows machine, then run the following commands to configure GitHub Credentials:
set GITHUB_USER=<username>
set GITHUB_TOKEN=<access-token>
Bootstrapping the FluxCD Toolkit Into the Kubernetes Cluster
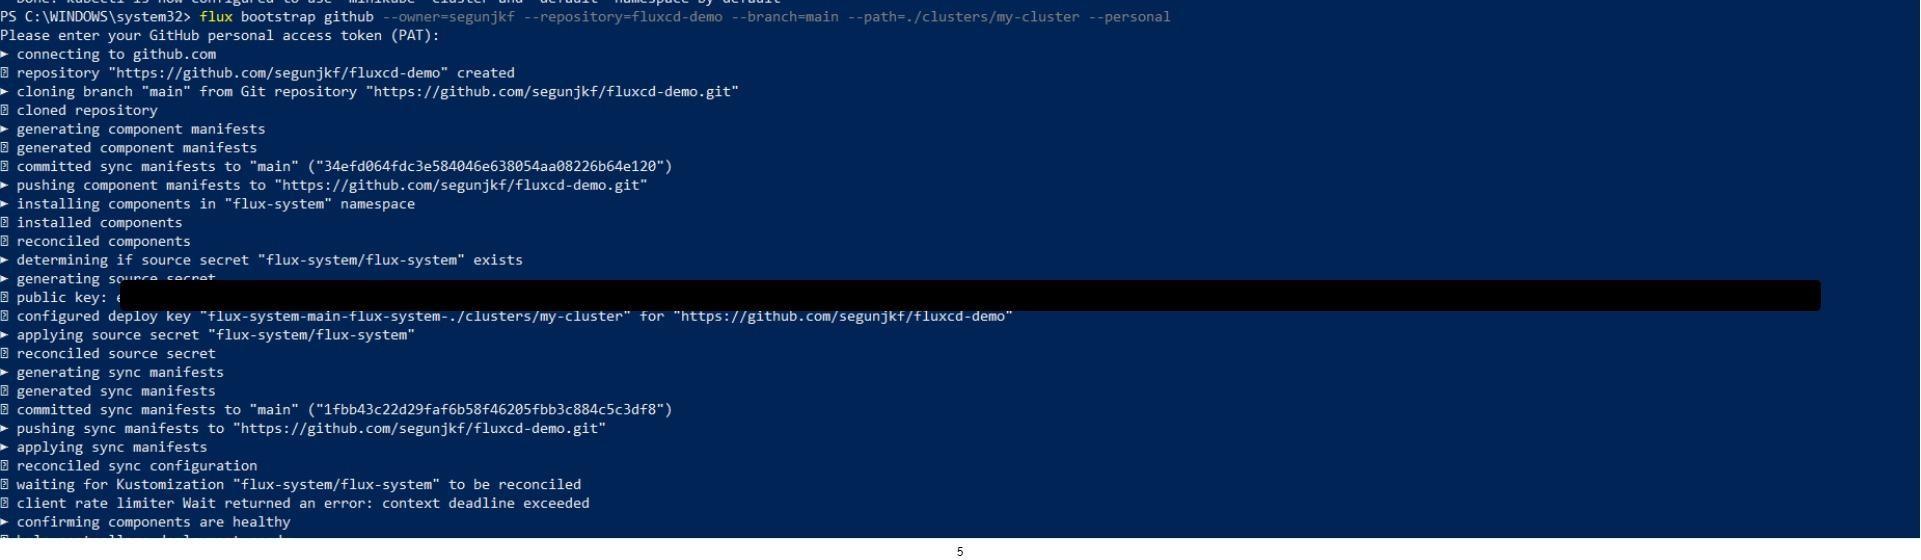
After you’ve configured your GitHub credentials, you’re ready to bootstrap the Flux Toolkit inside your cluster. To do so, run the following commands:
flux bootstrap github \\

--owner=$GITHUB_USER \\

--repository=fluxcd-demo \\

--branch=main \\

--path=./clusters/my-cluster \\

--personal
This command will create a GitHub repository in your GitHub account named fluxcd-demo, add the configurations for the Flux components into the repository, and bootstrap the components into your cluster in the namespace called flux-system.
Next, run the following commands to verify that the FluxCD Toolkits have been deployed in your cluster:
kubectl get deployment -n flux-system
FluxCD Toolkit Components
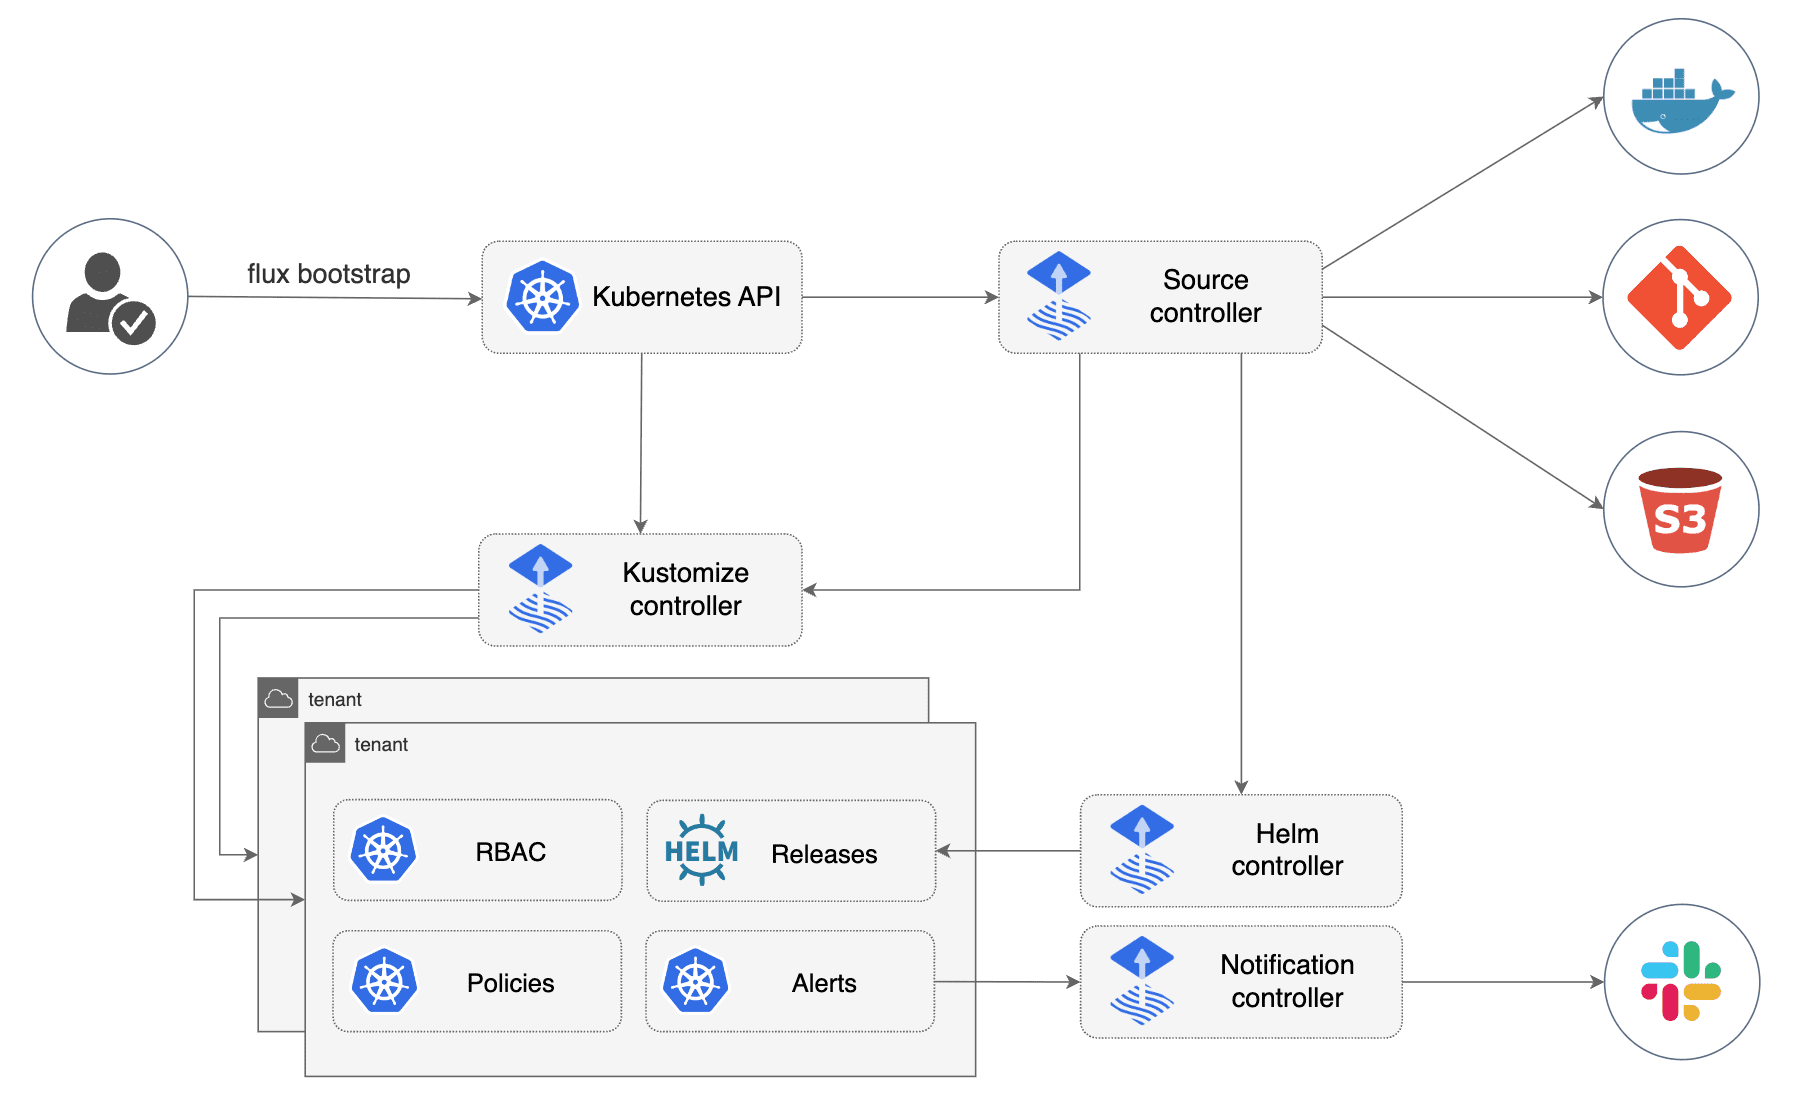
The Flux Toolkit has been bootstrapped into your cluster, and it consists of four main components: Source Controller Helm Controller Kustomize Controller Notification Controller
Source Controller
Source Controller is a controller in a Kubernetes cluster that is responsible for acquiring artifacts, which are tar.gz files containing Kubernetes resource manifest data, from external sources. Based on semantic version policies, it can detect changes in these sources based on cryptographic signatures.
Additionally, the Source Controller can send outbound notifications when updates are available and react to inbound notifications for Git pushes and Helm chart uploads. Clients can access the Source Controller as a read-only service to retrieve artifacts.
Helm Controller
Helm controller is the controller in a Kubernetes cluster that is responsible for managing Helm artifacts. The source controller obtains Helm charts from Helm repositories or other sources, and the Helm controller performs actions based on the creation, mutation, or removal of a HelmRelease resource in the cluster. The HelmRelease resource describes the desired state of a Helm release. Some parts of the Helm controller’s work are shared with the Source Controller.
Kustomize Controller
Kustomize Controller is the controller in a Kubernetes cluster that is responsible for reconciling the cluster state with the desired state as defined by Commit manifests obtained from the Source controller. These manifests are used to distribute or apply resources to the cluster.
The Kustomize controller also supports health assessment of deployed resources and dependency ordering, enables garbage collection of deleted resources, and provides notifications of cluster state changes. It also manages permission access in a secure manner for multi-tenant clusters via Kubernetes Service Account impersonation and validates manifests against the Kubernetes API. Kustomizations can target and deliver resources to a remote cluster, even if that cluster does not have its own Flux controllers.
Notification Controller
Notification Controller is a Kubernetes operator that specializes in handling inbound and outbound events. It is responsible for connecting to external systems, such as GitHub, GitLab, and the like. It’s responsible for notifying the GitOps toolkit controllers about source changes. It also dispatches the events emitted by the GitOps toolkit controllers to external systems, such as Slack, Microsoft Teams, Discord, and RocketChat, based on the severity of the event and the objects involved.
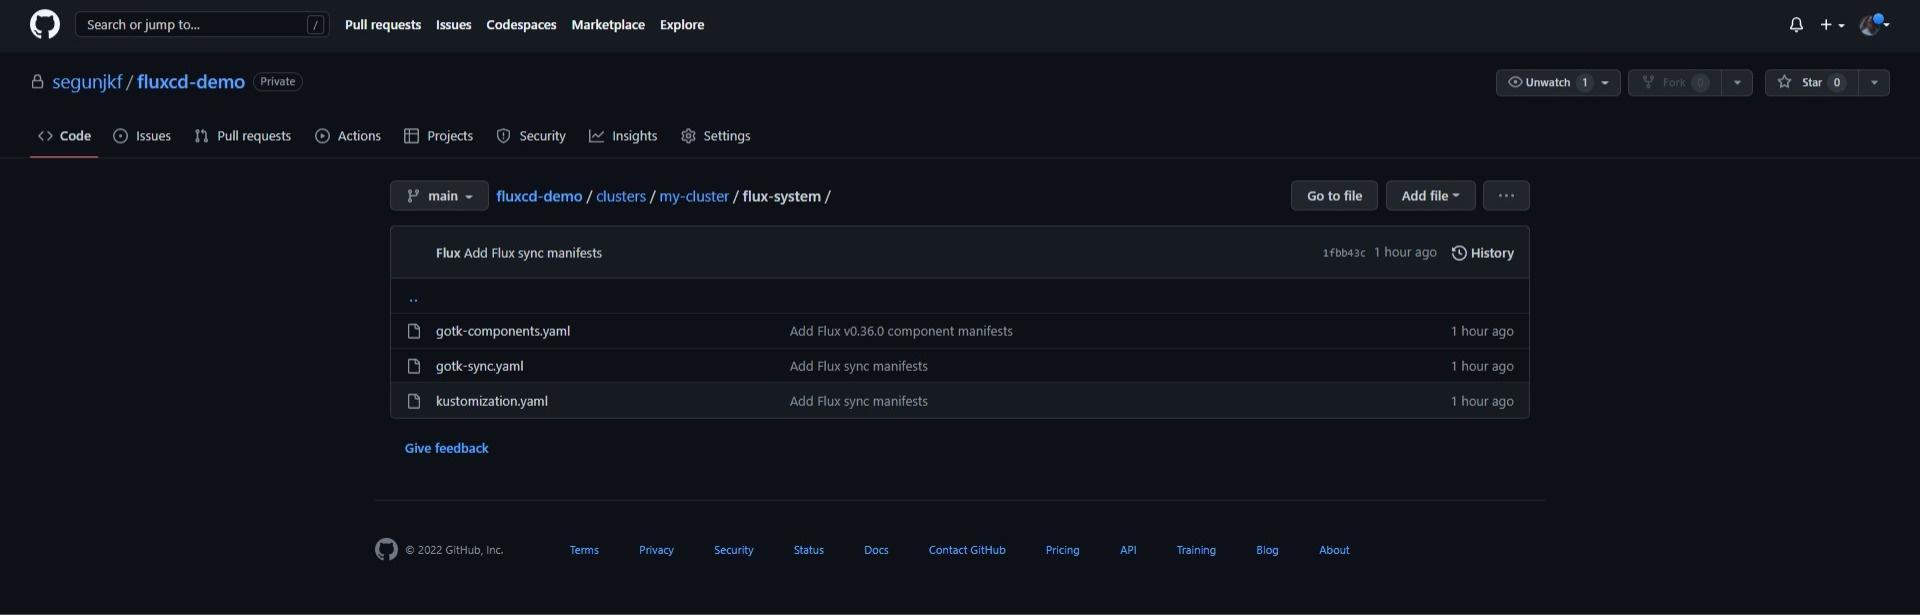
In your browser, go to https://github.com/your-github-username/fluxcd-demo to confirm the repository that flux created, https://github.com/your-github-username/fluxcd-demo/tree/main/clusters/my-cluster/flux-systemclusters/mycluster/flux-system/, and view the configuration YAML files that Flux used to install the toolkit in your cluster.
Automating Deployment To Cluster With Flux Cli

Your cluster now has Flux controllers installed with a Github repository that was used to bootstrap the components. For all configuration and deployment, Flux will now use the flux-demo repository as a “source of truth”.
If any configurations are stored, or changes are made to the toolkit components in the fluxcd-demo repository, the Flux toolkit automatically applies those configurations and changes to the cluster.
Installing the FluxCD Prometheus and Grafana Stacks
Next, you should install the FluxCD Prometheus and Grafana stacks from the FluxCD official repository in an imperative way to display the options available in Flux. Registration of the Prometheus and Grafana Git repositories is required because it will create a Git source in Flux to monitor the repository for changes. To do so run the following commands:
flux create source git flux-monitoring \
--interval=30m \
--url=https://github.com/fluxcd/flux2 \
--branch=main
Upon running this command, Flux creates a source repository called flux-monitoring in the repository Flux created. The URL for flux-monitoring will be set to Flux Repository, which contains the Prometheus and Grafana components. The main branch will be set as the reference to pull changes from, and the interval for checking the changes from the repository will be set to 30 minutes.

Create a Kustomization Configuration
Next, run the flux create command below to create a kustomization configuration. This configuration applies the kube-prometheus-stack configurations stored in the official Flux repository to your cluster.
flux create kustomization kube-prometheus-stack \
  --interval=1h \
  --prune \
  --source=flux-monitoring \
  --path="./manifests/monitoring/kube-prometheus-stack" \
  --health-check-timeout=5m \
  --wait
Let’s parse the above command:
flux create kustomization kube-prometheus-stackcreates a Kustomization resource with the specified name in the Kubernetes cluster using the Flux tool.–interval=1h sets the Kustomization resource to update every 1 hour.
–prune enables pruning of deleted resources from the cluster.
–source=flux-monitoring specifies the source for the manifests used by the Kustomization resource.
–path=“./manifests/monitoring/kube-prometheus-stack” specifies the path to the manifests for the kube-prometheus-stack deployment.
–health-check-timeout=5m sets the health check timeout to 5 minutes.
–wait waits until the operation is complete.
This Kustomization resource can be used to manage the deployment of the kube-prometheus-stack in the cluster.

After installing the Kube-Prometheus-stack, the next step is to install Flux Grafana dashboards, which will be used to monitor and visualize the Flux control plane usage and reconciliation stats from the kube-Prometheus-stack.
flux create kustomization monitoring-config \
  --depends-on=kube-prometheus-stack \
  --interval=1h \
  --prune=true \
  --source=flux-monitoring \
  --path="./manifests/monitoring/monitoring-config" \
  --health-check-timeout=1m \
--waitHere’s an overview of the command options:
flux create kustomization monitoring-configcreates a Kustomization resource with the specified name in the Kubernetes cluster using the Flux tool.–depends-on=kube-prometheus-stack specifies that the monitoring-config Kustomization resource depends on the kube-prometheus-stack deployment.
–interval=1h sets the Kustomization resource to update every 1 hour.
–prune=true enables pruning of deleted resources from the cluster.
–source=flux-monitoring specifies the source for the manifests used by the Kustomization resource.
–path=“./manifests/monitoring/monitoring-config” specifies the path to the manifests for the monitoring-config deployment.
–health-check-timeout=1m sets the health check timeout to 1 minute.
–wait waits until the operation is complete.
This Kustomization resource can be used to manage the deployment of the monitoring-config in the cluster, ensuring that it depends on the kube-prometheus-stack deployment.
Accessing the Grafana Dashboard

To access the Grafana dashboard, you need to forward traffic to the Grafana server. To do so, run the following commands:
kubectl -n monitoring port-forward svc/kube-prometheus-stack-grafana 3001:80To log in to your Grafana Dashboard, you should use the default credentials for the kube-Prometheus-stack.
Username: admin
Password: prom-operator
Navigate to http://localhost:3001/d/flux-control-plane if you’re following along on your local machine. Navigate to your server’s IP followed by port 3001 (http://YOUR_SERVER_IP:3001/d/flux-control-plane) if you’re following along with a cloud server.
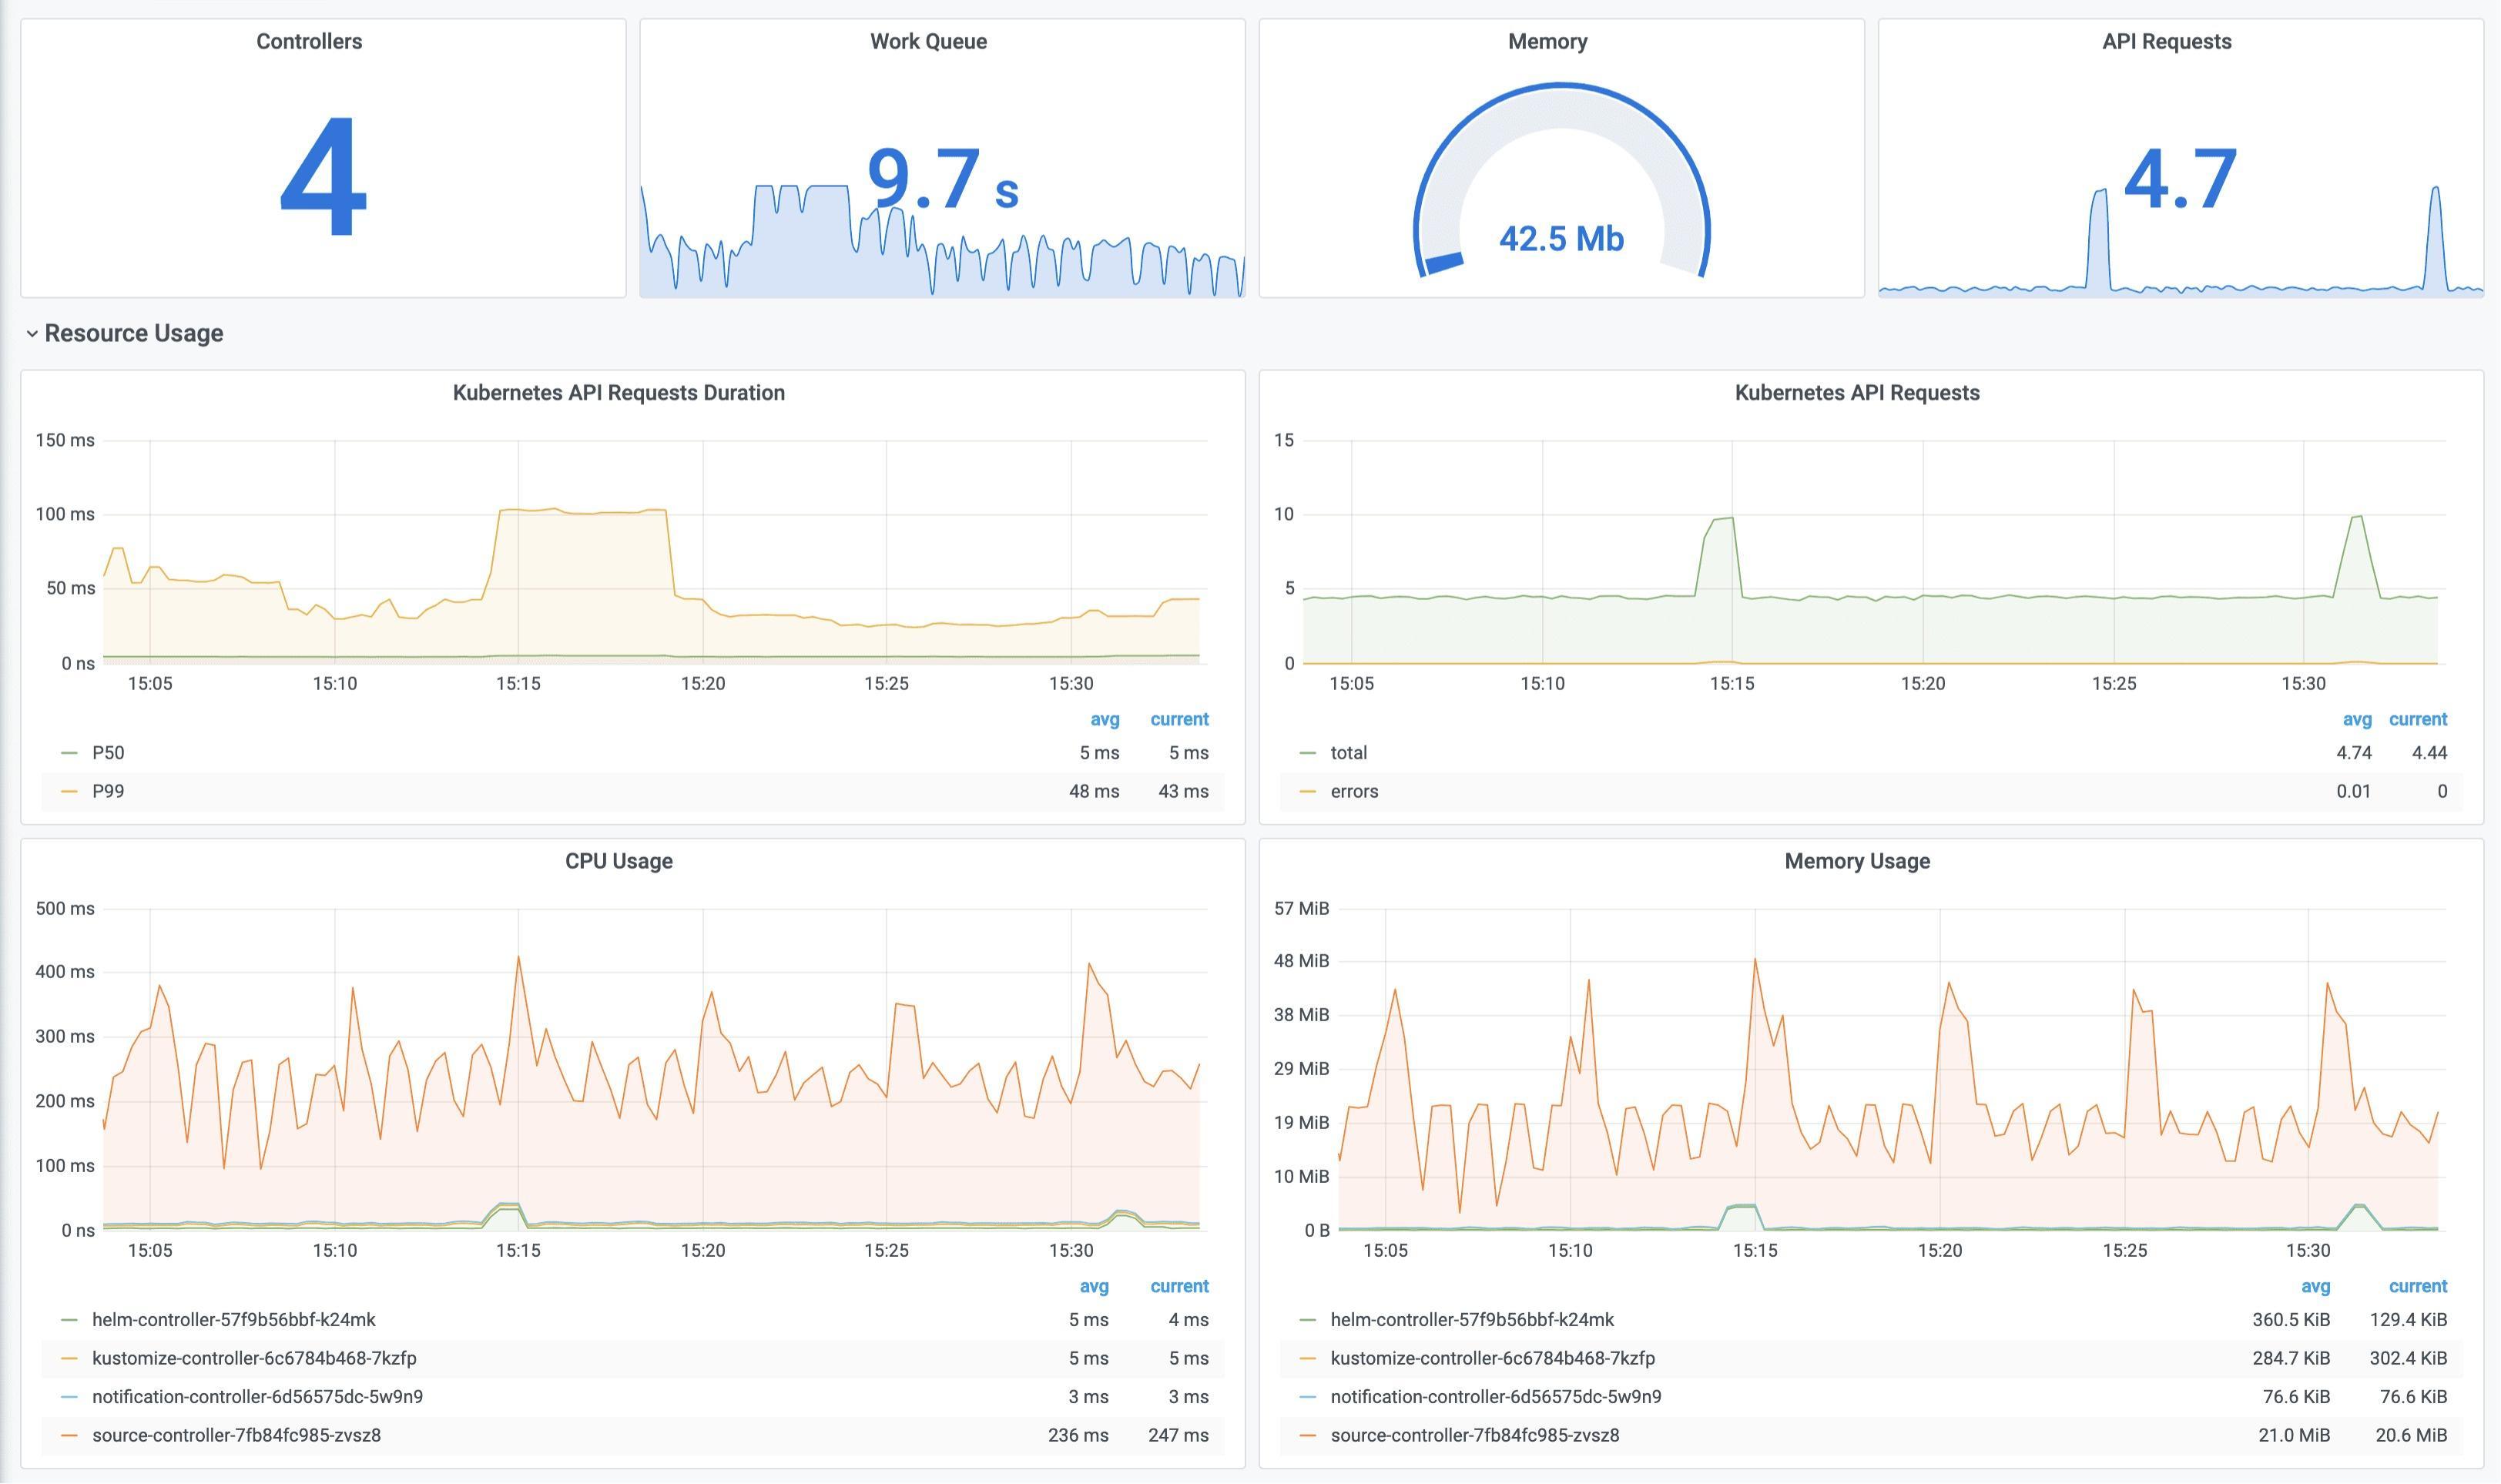
The Flux Prometheus and Grafana monitoring stacks have now been deployed to your cluster. These stacks were deployed to your cluster in an imperative manner, which works fine, but it goes against GitOps’ principles of using Git repositories as the source of truth for managing deployments in a Kubernetes cluster.
The recommended way to deploy the monitoring stacks is the declarative approach. This involves defining the desired state of the cluster in Git repositories, using Git as the source of truth for deployments. The GitOps tooling can then be used to automatically reconcile the desired state with the actual state of the cluster. This approach allows for better traceability and control over the deployments, and it aligns with the principles of GitOps.
Automating Deployment Declaratively to the Cluster with Flux
So far, you’ve used the Flux CLI to deploy Prometheus and Grafana stacks with Flux to your cluster. In this section, you will use a YAML file to deploy a 2048 game application to your cluster declaratively. You can templatize all of your Kubernetes deployment files to Git using this method, making it the source of everything in your Kubernetes environment. With this method, you can easily rollback and update your Kubernetes configuration files.
Creating a Repository for the Manifests
The first step is to create a Git repository that will host your Kubernetes deployment manifest and FluxCD manifest. To do so, run the following commands:
# create directory ~/2048

mkdir -p 2048/apps

# Switch to the ~/2048 directory and initialize a local Git repository.

cd ~/2048 && git init
Next, run the below gh repo command to create a public GitHub repository (2048). This repository will contain the 2048 game deployment manifest.
gh repo create 2048 --public 
You now have a Git repository created. The next step is to add the Kubernetes deployment manifest and the Flux manifest.
Now, you’ll have to cd into the app directory:
cd apps/Now create 2048.yaml in the app/ directory in your preferred editor and add the following configuration:
apiVersion: apps/v1
kind: Deployment
metadata:
  labels:
    app: 2048-game
  name: 2048-game
spec:
  replicas: 2
  selector:
    matchLabels:
      app: 2048-game
  strategy: {}
  template:
    metadata:
      labels:
        app: 2048-game
    spec:
      containers:
      - image: alexwhen/docker-2048
        name: 2048-game
        ports:
        - containerPort: 80

---
apiVersion: v1
kind: Service
metadata:
  name: game-service
  labels:
    app: game-service
spec:
  ports:
  - name: 2048-game
    port: 80
  selector:
    app: 2048-game
This YAML file defines a Deployment and a Service resource in the Kubernetes cluster. The Deployment resource creates two replicas of the 2048 game app and exposes them through a Service.
The Deployment resource uses the specified image for the 2048 game app and sets the container port to 80. It uses the specified labels to identify the app and the replicas, and it uses a matching selector to determine which replicas should be part of the deployment.
The Service resource exposes the 2048 game app replicas through a Service with the specified name and labels. It uses the specified port for the Service and uses the matching selector to determine which replicas should be included in the Service. This allows external clients to access the 2048 game app through the Service.
Creating a Flux Configuration Manifest
The next step is to create a manifest for Flux configuration to deploy your 2048 game application. In the root folder, create a file named flux.yaml and add the following configuration.
## change directory to the root folder (2048)
cd ..apiVersion: source.toolkit.fluxcd.io/v1beta2
kind: GitRepository
metadata:
name: 2048-game
namespace: flux-system
spec:
interval: 1m
url: https://github.com/segunjkf/2048
ref:
branch: main Let’s take a closer look at the fields in the above configuration:
ApiVersion: source.toolkit.fluxcd.io/v1beta2 denotes the API version for the GitRepository resource.
Kind: GitRepository specifies that this is a GitRepository resource.
Name: 2048-game and namespace: flux-system are the metadata fields that specify the name of the GitRepository resource and the namespace in which the GitRepository resource should be created, respectively.
Interval:1m sets the GitRepository resource to update every 1 minute.
Urlhttps://github.com/segunjkf/2048 specifies the URL for the GitHub repository that contains the manifests for the 2048 game deployment. Please make sure to change this to the URL of the GitHub repository you created.
Branch: main specifies the branch to use for the GitRepository resource.
apiVersion: kustomize.toolkit.fluxcd.io/v1beta2
kind: Kustomization
metadata:
name: 2048-game
namespace: flux-system
spec:
interval: 5m0s
path: ./apps
prune: true
sourceRef:
kind: GitRepository
name: 2048-game
targetNamespace: 2048-game Here,
ApiVersion: kustomize.toolkit.fluxcd.io/v1beta2 specifies the API version for the Kustomization resource.
Kind: Kustomization indicates that this is a Kustomization resource.
Metadata specifies the metadata for the resource, including the name and namespace.
Other specifications include setting interval: 5m0s to update the Kustomization resource every 5 minutes and path: ./apps specifies the path to the Kubernetes deployment manifest in the Git repository. In this case, the path is “./apps”.
At this point, the flux.yaml file would look like this:
apiVersion: source.toolkit.fluxcd.io/v1beta2
kind: GitRepository
metadata:
  name: 2048-game
  namespace: flux-system
spec:
  interval: 1m
  url: https://github.com/segunjkf/2048
  ref:
    branch: main
---
apiVersion: kustomize.toolkit.fluxcd.io/v1beta2
kind: Kustomization
metadata:
  name: 2048-game
  namespace: flux-system
spec:
  interval: 5m0s
  path: ./apps
  prune: true
  sourceRef:
    kind: GitRepository
    name: 2048-game
targetNamespace: 2048-game Now stage, commit, and push these files to your Git repository.
cd ..

git add .

git commit -m "Automating Flux deployment"

git branch -M main

## Replace the URL below with the url of the Git Repository you created

git remote add origin https://github.com/segunjkf/2048.git

git push -u origin main
Before applying the FluxCD configuration file, you must first create a namespace called ‘2048-game’. This is the namespace where the 2048 game will be hosted. To do so, run the following command:
kubectl create namespace 2048-gameDeploying the Application With Flux
Now apply the flux.yaml file to deploy your application with Flux:
kubectl apply -f flux.yamlAfter applying the Flux configuration file, you need to verify if FluxCD has deployed your application. To do so run the following command:
kubectl get pods -n 2048-game
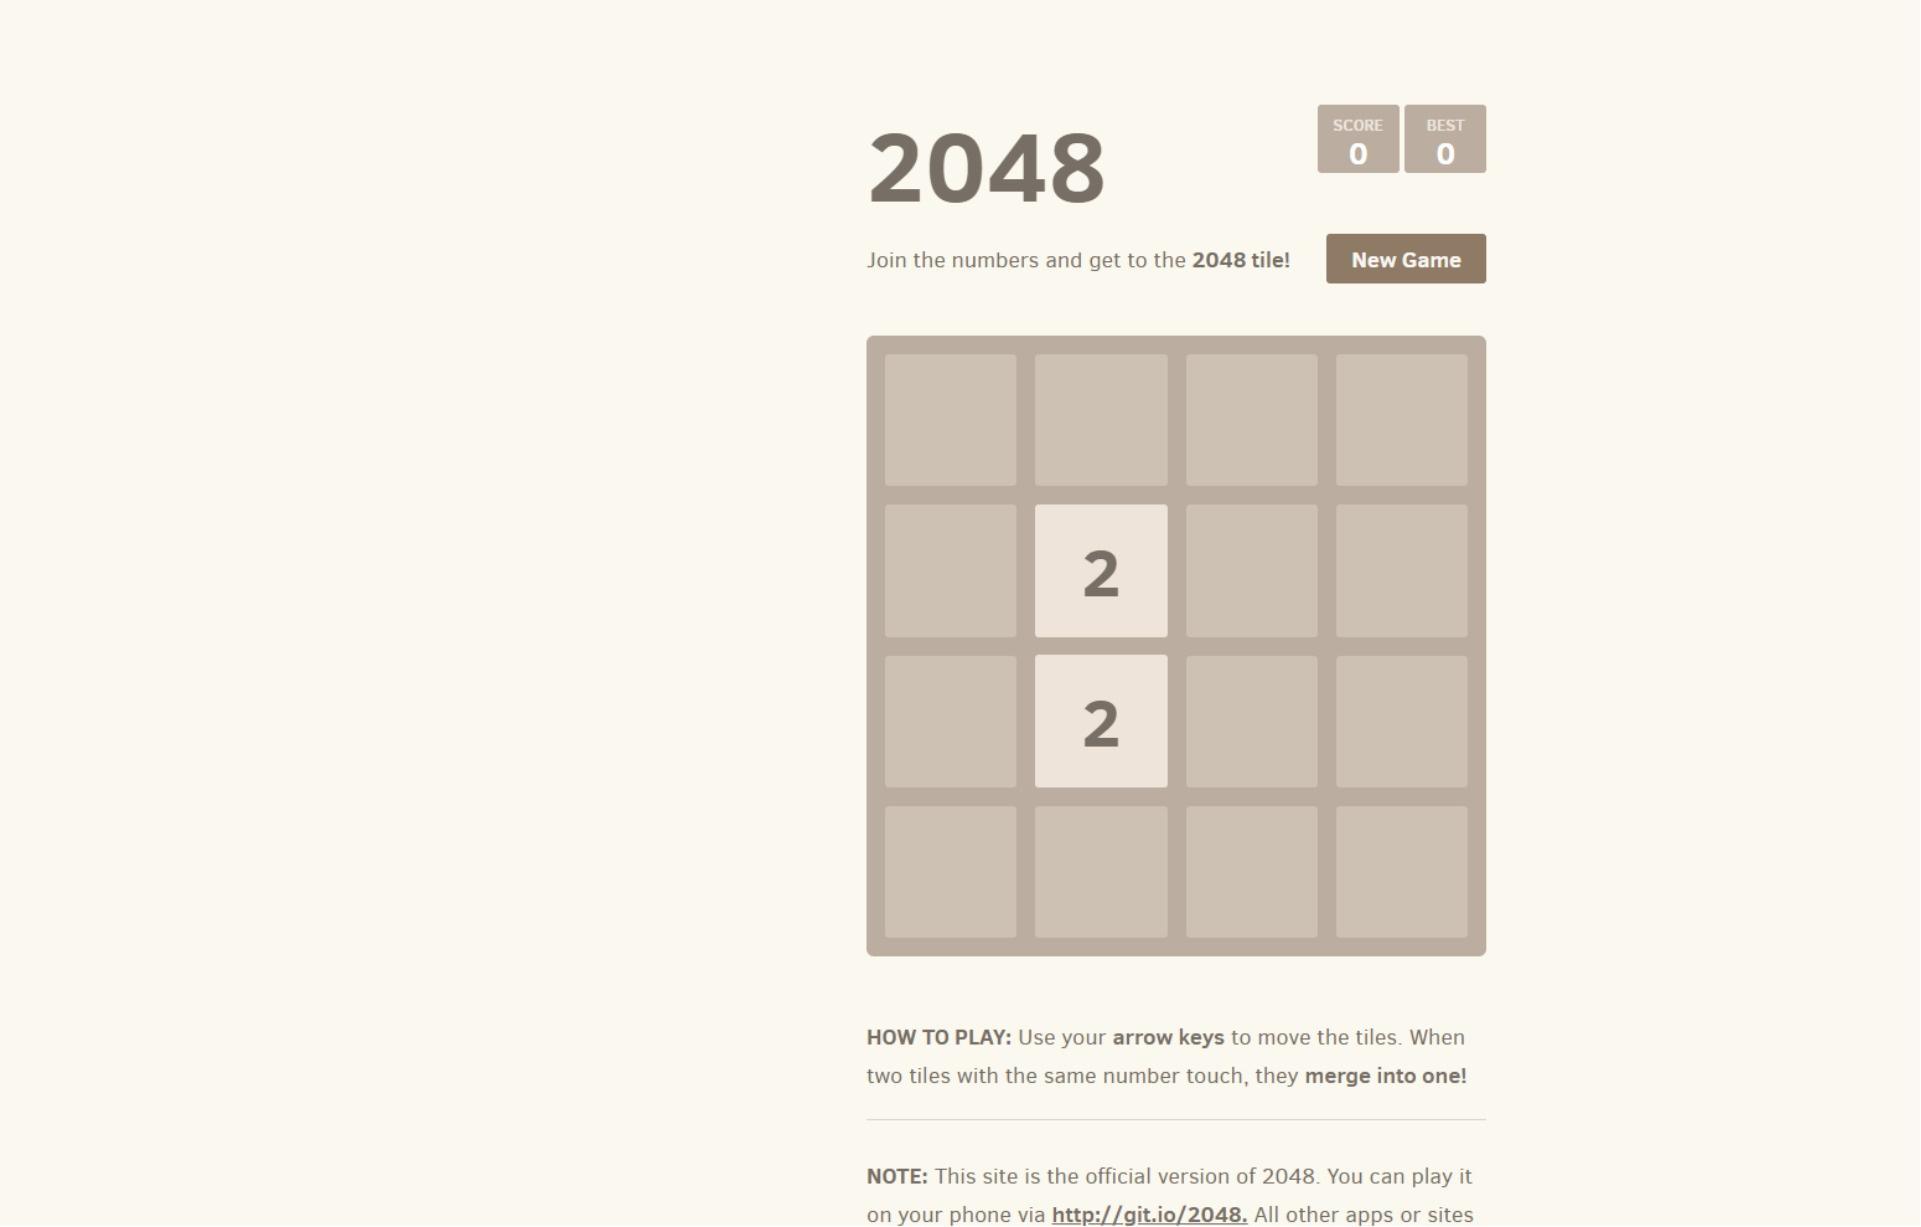
Now, run the below kubectl command to port-forward port 8085 to port 80, the HTTP port for the 2048 game application running in a container. Doing so provides you access to the 2048 game application via a web browser.
kubectl port-forward svc\2048-service -n 2048 8086:80As you can see below, the 2048 service has been configured and listens for incoming connections via port 80.

Finally, open your favorite web browser and navigate to one of the following endpoints:
http://localhost:8086 (local) – If you’re running a local Kubernetes cluster on your computer
http://SERVER_IP:8086 (cloud) – If you’re running a Kubernetes cluster on a VM provisioned with a cloud provider. Replace
with your server’s actual IP address.
Demonstrating FluxCD’s Capabilities
To demonstrate FluxCD continuous delivery capabilities, you make changes to the Git repository and verify that Flux automatically applies the changes to your Kubernetes cluster.
Open your favorite web browser and navigate to https://github.com/segunjkf/2048/edit/main/apps/2048.yaml. Make sure you replace segunjkf with your GitHub username.
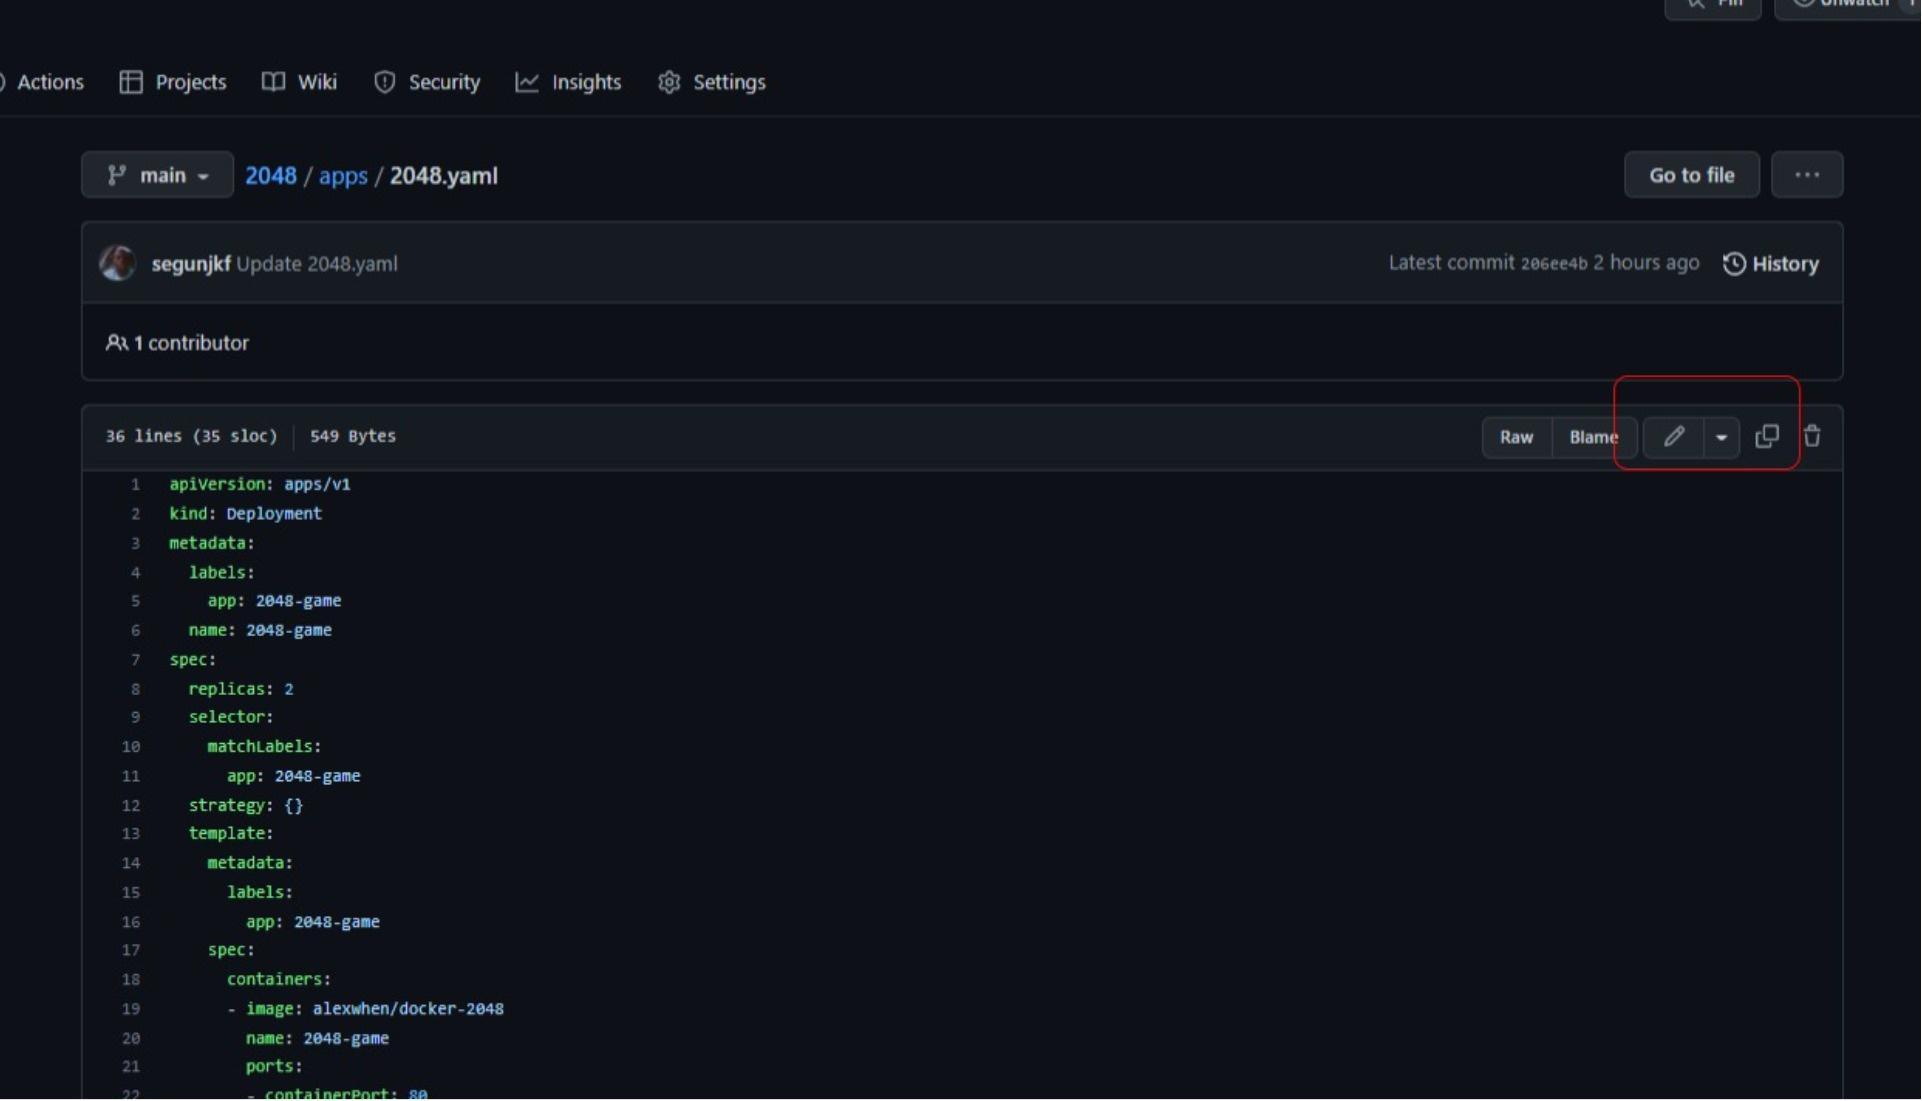
Now edit the deployment file; change the replicas from 2 to 3, save, and commit the changes.
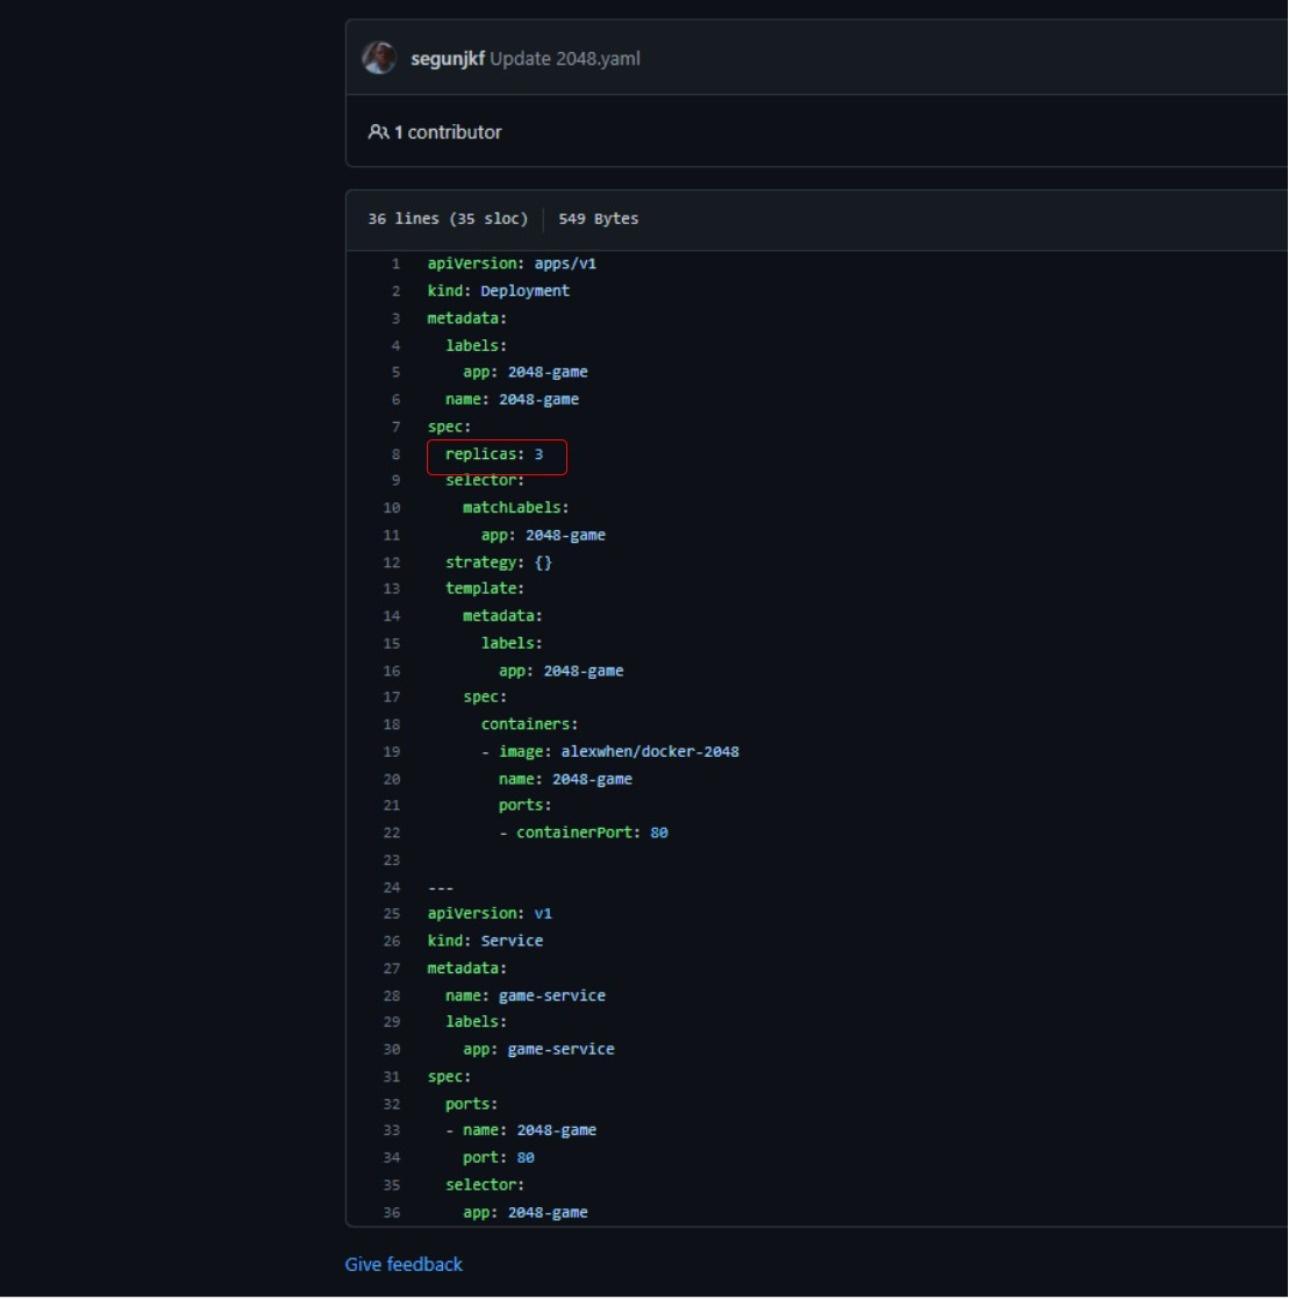
Wait for a few minutes and confirm that FluxCD has applied the new changes to your cluster. ✅
kubectl get pods -n 2048-game
To sum up, you have used Flux to set up a continuous delivery pipeline to your cluster. You deployed a Flux Prometheus and Grafana monitoring stack imperatively and the 2048-game application declaratively.
FluxCD also supports deployments with Helm and alerting system for notification.
Conclusion
You’ve now got a good grip on how Flux can automate your Kubernetes manifest deployment by tracking updates in your repos, following the GitOps logic. And you aren’t just limited to GitHub; it works with GitLab repositories too.
If you’re looking to further optimize your build automation, you might want to give Earthly a look! It’s a powerful tool that can complement your use of Flux and other GitOps tools.
Curious about more? Explore ArgoCD, another cool GitOps tool. Want to see how they stack up? Here’s a killer comparison guide.
Turn your engineering standards into automated guardrails that provide feedback directly in pull requests, with 100+ guardrails included out of the box and support for the tools and CI/CD systems you already have.