Using ArgoCD for Kubernetes Deployments
In this Series
Table of Contents
This article discusses the integration of ArgoCD in Kubernetes environments. Earthly enhances CI build processes deployments with reproducible builds. Check it out.
Kubernetes has simplified the container management process for microservice applications, but developers often face challenges when using this notoriously complex platform to achieve constant software delivery.
GitOps, a CD (continuous delivery) set of practices for Kubernetes, uses Git as a single source of truth for declarative infrastructure and applications, so that code versions can be more easily tracked and updated. One tool to help achieve GitOps is ArgoCD. Argo is designed to deploy apps to Kubernetes.
Among its other features, ArgoCD can help with managing and automating releases as well as assist with single sign-on (SSO) integration, auditing, and managing metric trackers such as Prometheus.
This article will introduce you to ArgoCD, offer some common use cases, and demonstrate how to implement ArgoCD in your project.
What Is ArgoCD?
ArgoCD is a lightweight tool that reads an environment configuration (written as a Helm chart, Kustomize file, Jsonnet, or YAML files) from a Git repository and applies the changes to a Kubernetes cluster. It constantly monitors Git files to ensure the actual state on the cluster corresponds to the configurations on Git.
ArgoCD Use Cases
ArgoCD helps users deploy applications to Kubernetes clusters. Releases can be automated using GitHub Actions.
It integrates easily with other providers for SSO. Instead of requiring a user to establish their identity many times, SSO allows them to prove their identity once and access services using an authentication token. To integrate ArgoCD with SSO, you can either use a bundled Dex OpenID Connect provider (for example, SAML or LDAP) or an existing OIDC provider (for example, Okta, OneLogin, Auth0, Microsoft, Keycloak, or G Suite).
It allows you to view an extensive audit of any changes made to your code as well as who made the changes and when. This is possible because the Git commit history provides a natural audit log system.
ArgoCD can also be used to gather application and API server metrics. Application metrics monitor health status, sync history, and other data. The API server is a gRPC/REST server that exposes the API consumed by the Web UI. It can be used for collecting data on request and response activity.
Implementing ArgoCD
ArgoCD can be useful when you need to constantly sync the state of your environment configurations on Git with the state of your applications as they run on clusters. This enables the operations team to be aware of all the infrastructure changes that have been applied to the cluster. Each commit is reviewed before being merged.
There are a few prerequisites for implementing ArgoCD on your project:
- A kubectl command-line tool
- A kubeconfig file (default location is
~/.kube/config).
Step 1: Install ArgoCD
Create a namespace called argocd. This isolates the environment used for running ArgoCD from the environment used for development, staging, or production. Run this command:
kubectl create namespace argocd
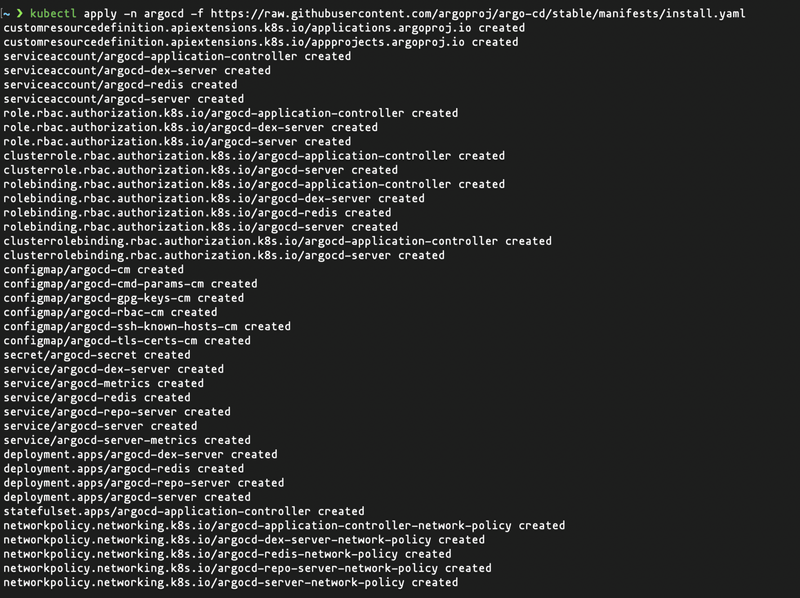
kubectl apply -n argocd -f https://raw.githubusercontent.com/argoproj/argo-cd/stable/manifests/install.yaml
The -n is used for specifying the namespace, in this case argocd. This will install ArgoCD and other components (service-account, RBAC, ConfigMap) into the namespace. You should see something similar to this:
Step 2: Install ArgoCLI
You need the latest ArgoCLI version to be able to interact with ArgoCD from the command line. You can find the installation instructions for different operating systems on GitHub. To install the CLI on macOS, run:
brew install argocdStep 3: Access the ArgoCD API Server
The ArgoCD API server is not exposed by default. You might want to log in to the server to create applications and pipelines, as well as perform other operations from a dashboard. There are a number of ways to access the API server:
- Ingress: This allows you to define rules on how you can access applications on your cluster, such as path-based routing, domain, and subdomain. You can read more on how to use Ingress in the operator manual.
- Service type of LoadBalancer: This allows you to also access the server by changing the ArgoCD service type to LoadBalancer. Use the following command:
kubectl patch svc argocd-server -n argocd -p '{"spec": {"type": "LoadBalancer"}}'- Port-forwarding: This allows you to route requests to a particular port on the host. It’s usually good for testing. This tutorial will use the port-forward option. To port-forward the ArgoCD server API requests to a port on the host, run:
kubectl port-forward svc/argocd-server -n argocd 8888:443Here 8888 is the host port and 443 is the container port.
After port-forwarding to a particular port on the host machine, you should see something similar to this:
> kubectl port-forward svc/argocd-server -n argocd 8888:443
Forwarding from 127.0.0.1:8888 -> 8080
Forwarding from [::1]:8888 -> 8080
Handling connection for 8888
When you visit port 8888, you should see an interface to log in. The username is admin, and you can get the password by running this command on your cluster:
kubectl -n argocd get secret argocd-initial-admin-secret -o jsonpath="{.data.password}" | base64 -dStep 4: Add Your App to ArgoCD
There are two ways to add your application to ArgoCD: via the CLI or the UI.
To use the CLI, you need to log in with a username and password. The default username is admin, and you can get the password from the instructions above. Run this command to log in to the CLI:
argocd login <ARGOCD_SERVER> The ARGOCD_SERVER can either be the IP or hostname of the server where you installed ArgoCD.
To add your application via the CLI, run this command:
argocd app create guestbook --repo https://github.com/argoproj/argocd-example-apps.git --path guestbook --dest-server https://kubernetes.default.svc --dest-namespace defaultThe application name is guestbook, whereas --repo specifies a repository,--path specifies the path to the project, --dest-server specifies the cluster URL, and --dest-namespace specifies the namespace. You can check out other configurations in the manual under argocd app create.
Note that when using ArgoCD locally, https://kubernetes.default.svc should be used as the application’s Kubernetes API server address. If ArgoCD is deployed to an external cluster, then it can be changed to the respective cluster URL.
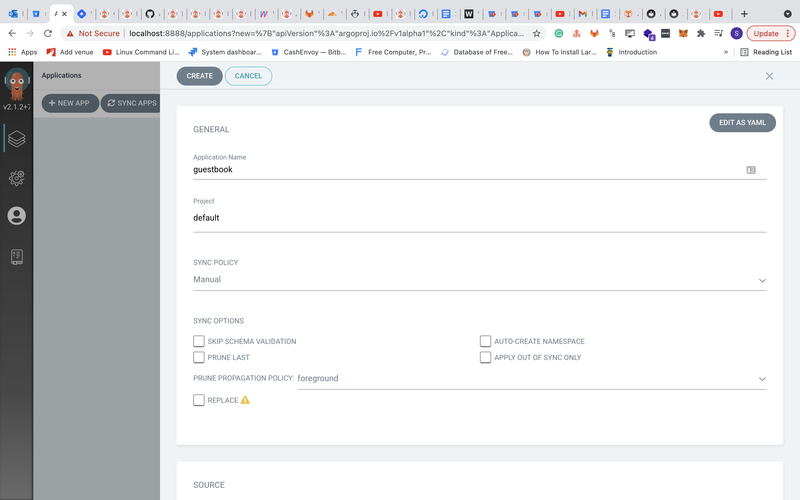
The process changes if you’re adding your application via UI. After you follow step 3 above, give the application a name like guestbook and use the project default. Set the sync policy as manual:
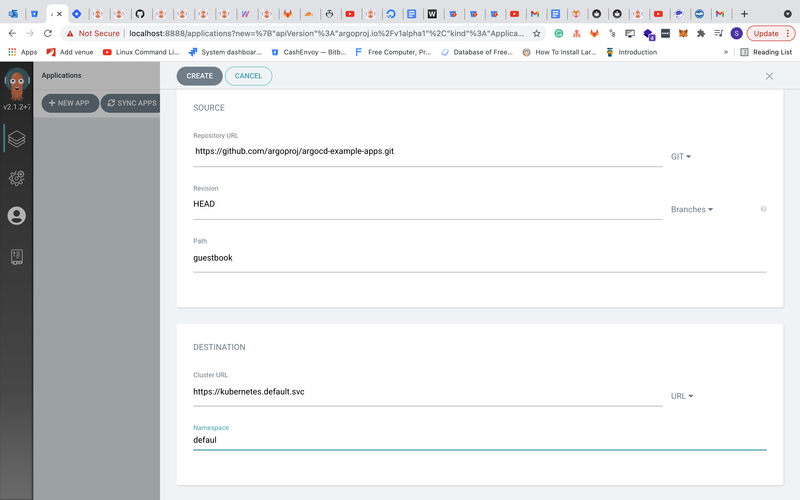
Add your application to ArgoCD by configuring the repository URL and the path. You can leave the revision as HEAD. For the cluster, you can use https://kubernetes.default.svc and set the namespace to default:
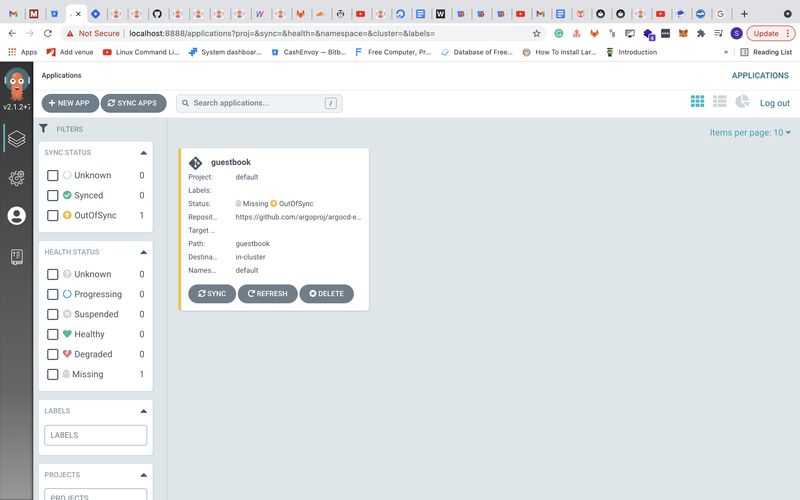
Finally you should see something like this:
Step 5: Deploy the Application
Before you deploy, check the status of your application. Run:
argocd app get guestbook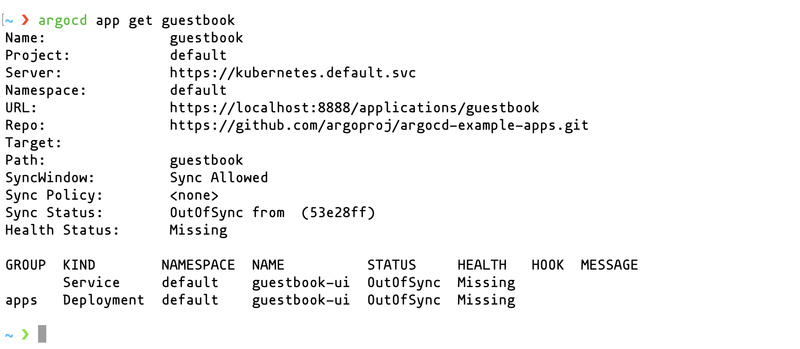
argoco app get guestbook
By default it will have a status of OutOfSync, since the application hasn’t been deployed and no Kubernetes resources have been created.
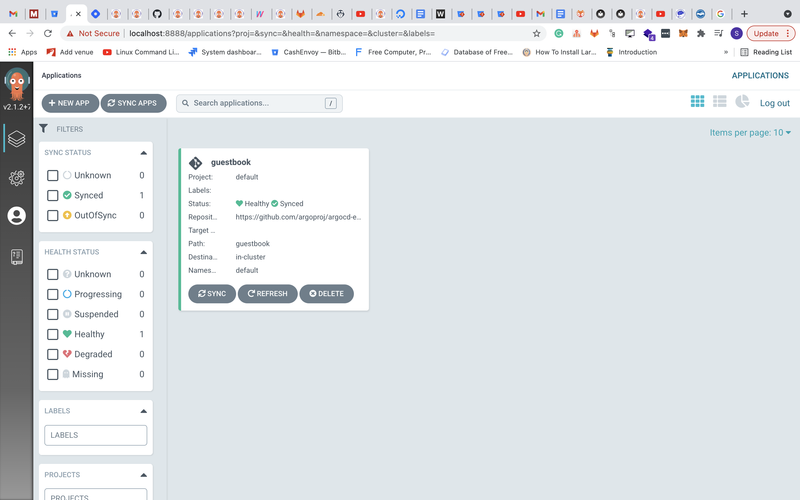
To deploy it, run:
argocd app sync guestbookCheck the dashboard now and you’ll see the application has been synced (deployed).
Step 6: Demonstrate the Deployment Pipeline
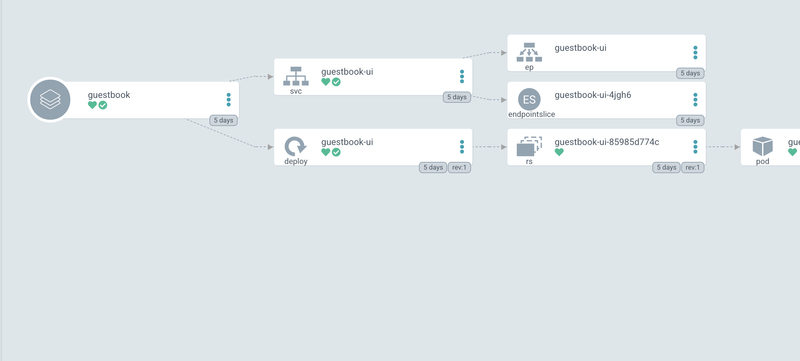
When you create a new application, ArgoCD represents the application as a graph. Each component serves as a node with a path to its dependencies and sub-dependencies. In the deployment below, you can see the application is made up of service and deployment. The deployment is further broken down into replica sets and pods, with an arrow pointing to each component. ArgoCD keeps track of each Kubernetes object and ensures the state of the configuration files on GitHub matches that of the cluster.
To see the deployment pipeline in process, you can use one of the ArgoCD example applications on GitHub by forking and updating the YAML files based on the applications you selected while setting up. For example, make a change to the values.yaml file under helm-guestbook:
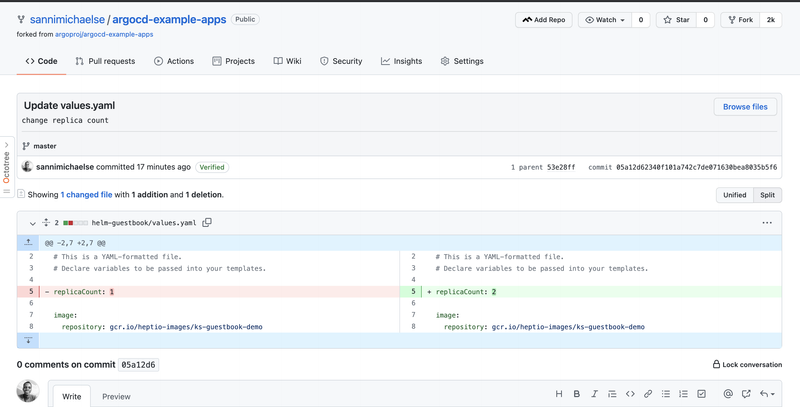
The changes made to the configuration file triggered an update to the state of the application on the dashboard. Depending on the type of sync you set up when creating the application, this update can be automatic or manual. For automatic sync, changes are fetched and applied to the cluster. For manual sync, you will need to do that from the dashboard.
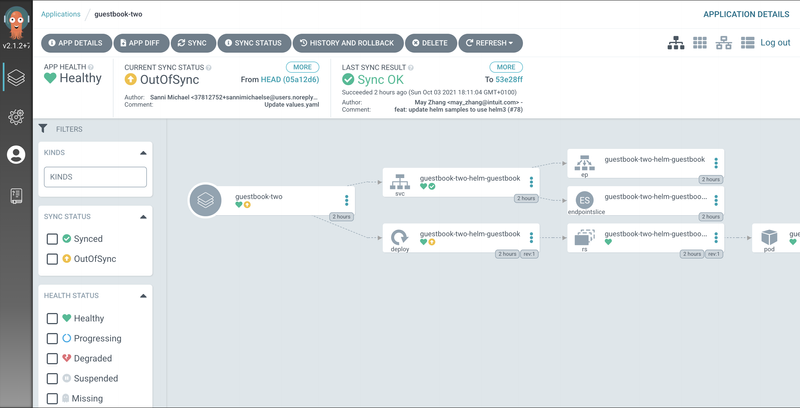
The image above shows the application is out of sync because of the changes made to the configuration files on Git.
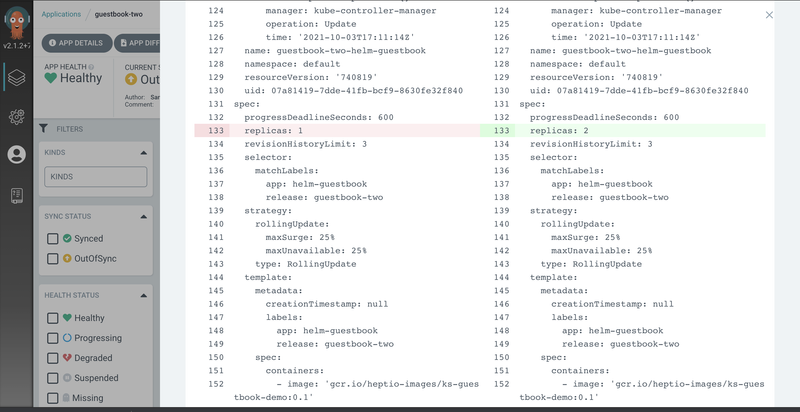
The figure above shows the difference between the current state and the changes made to the files on Git.
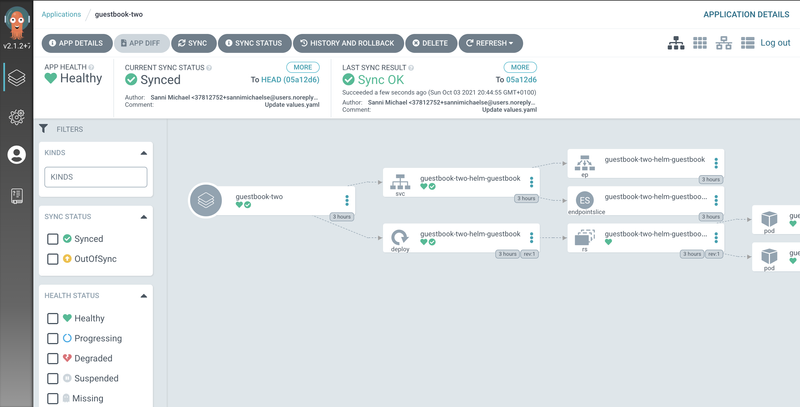
To sync manually, click on the Sync button and ArgoCD will deploy the new changes to the cluster. The yellow mark on the deployment changes to green and the status of the application changes from Out of Sync to Synced.
ArgoCD Integrations
ArgoCD integrates well with Kubernetes tools. Here are some examples:
- Prometheus: With Prometheus, ArgoCD makes it easy to collect application and API server metrics. This can be useful when you need to keep track of your application logs and gain insights into what happens at each point. The metrics and logs can also be used for debugging.
- Kube-Watch: ArgoCD allows you to integrate with Kube-Watch for notifications. This is handy when you need to send notifications to an environment such as Slack, generally through webhooks.
- Git Webhook Configuration: The API server can be configured to listen to webhook events instead of pulling from the repository every three minutes. This is useful when you want to send frequent messages to the server or when you need to handle other custom edge cases in your application for deployment. It supports Git webhook notifications from GitHub, GitLab, Bitbucket, Bitbucket Server, and Gogs.
Conclusion
ArgoCD is a powerful tool that allows you to deploy your application by constantly checking the state of the environment configurations on Git and ensuring it matches that of the cluster. ArgoCD also provides an intuitive UI for managing applications and pipelines, which improves overall UX.
To further improve your CI/CD workflow with ArgoCD, you can use Earthly. Earthly allows you to execute builds in Docker containers and can also run on popular CI tools like Jenkins, CircleCI, GitHub Actions, and AWS CodeBuild. Earthly acts as an interface between language-specific tooling and build specification.
Earthly Cloud: Consistent, Fast Builds, Any CI
Consistent, repeatable builds across all environments. Advanced caching for faster builds. Easy integration with any CI. 6,000 build minutes per month included.


