Using Octopus Deploy to Simplify Complex Deployments
In this Series
Table of Contents
This guide provides instructions for setting up Octopus Deploy. Earthly ensures reproducible builds in your CI pipeline. Check it out.
Deployment is an integral part of the software development life cycle. It is the process where the application’s codebase is compiled, run through a series of tests (such as unit, integration, and build tests), and then deployed to different environments (such as development, staging, or production). To speed up the process of deployments and ensure deployment reliability during software development, developers introduced the concept of automated deployment or continuous deployment (CD).
Continuous deployment involves automating the process of validating new changes to a codebase, ensuring it passes all test cases, installing all dependencies, building a binary package from the codebase as the case may be, and then deploying into one or more environments. This process has many advantages, like eliminating repetitive deployment tasks, increasing focus on developing the product, and improving overall productivity. There are several tools that you can use for continuous deployment, and among such tools is Octopus Deploy.
Octopus Deploy is a continuous deployment platform that manages releases, automates deployments, and handles the routine procedures and operations that keep your software running all in one place. In this article, you will learn more about Octopus Deploy and how to use it to simplify your deployment pipeline.
Benefits of Octopus Deploy
There are several benefits to using Octopus Deploy—here’s an overview of a few of them.
Ease in Configuring your Deployment Process
Octopus Deploy allows you to set all your continuous deployment processes in its application rather than use multiple applications for your deployment processes. It gives you access to over 450 automation templates ranging across a variety of familiar technologies, such as Terraform, Kubernetes, and Docker. Furthermore, it provides deployment patterns, such as Canary) and Blue-green, that allow you to roll out your releases in bits. Additionally, Octopus Deploy allows you to use the same deployment process across multiple environments with the help of variables. These variables can be secrets and passwords that are secured on the platform. Octopus Deploy uses these variables across multiple deployment targets, environments, channels, or tenants, thereby improving the ease of your deployment process configuration.
Support for Numerous Integration Tools
You can easily plug Octopus Deploy into any of the continuous integration (ci) tools that your team uses. It supports CI tools, such as Jenkins, TeamCity, and GitLab. Furthermore, with Octopus Deploy, you can configure it to run SQL scripts, upload files, or run Bash scripts after a deployment. Octopus Deploy also integrates with many other popular CI tools that you might need in your development process.
Automation of Deployment Routine
With Octopus Deploy, there is a central location for you to manage deployment. There are scenarios where you may need to restart your web servers, clear your cache, clean up files, or perform certain pre and post-deployment operations on your server; but with Octopus Deploy, these can all be automated. Furthermore, Octopus Deploy has a section that displays logs of all automations that have been performed for auditing purposes.
On-Premises Usage
If your development team is working on a sensitive data application or there are other reasons for on-premises usage, you are not excluded from using Octopus Deploy. Octopus Deploy can be installed on your on-premises machines or in the cloud, depending on your team’s needs.
Multi-Tenancy Support
Multi-tenancy is a software architecture in which a single application instance can serve multiple customers or tenants. In other words, with a single instance, you can manage releases and deployments, and automate processes for multiple customers on a single account without creating separate accounts for each customer.
Deployment Process Notifications
Notifications are important in any automated process. With Octopus Deploy, you can receive Slack and email notifications about your deployments. You can also configure it to notify your monitoring tools about your deployments.
Logs and Audit Trails for Deployments
Octopus Deploy provides a centralized view that contains details about your deployment process. This ensures that you have a comprehensive overview of what is happening in your deployment pipelines.
Implementing Octopus Deploy
To learn how to use Octopus Deploy, follow these step-by-step instructions, which will explain how to set up Octopus Deploy and how to connect it to your application.
1. Set Up Your Octopus Deploy Server
Octopus Deploy is available in the cloud, or it can be self-hosted, depending on your preference. For the sake of this tutorial, you will be using the cloud version of Octopus Deploy. Both versions have the same functionalities; the only difference is that the cloud version is maintained by the Octopus Deploy support team, while the self-hosted version is maintained by your team.
First, visit Octopus Cloud and sign up for the cloud-hosted version. Fill in the required details and activate your account. Once your account has been activated, you will see a page like this:
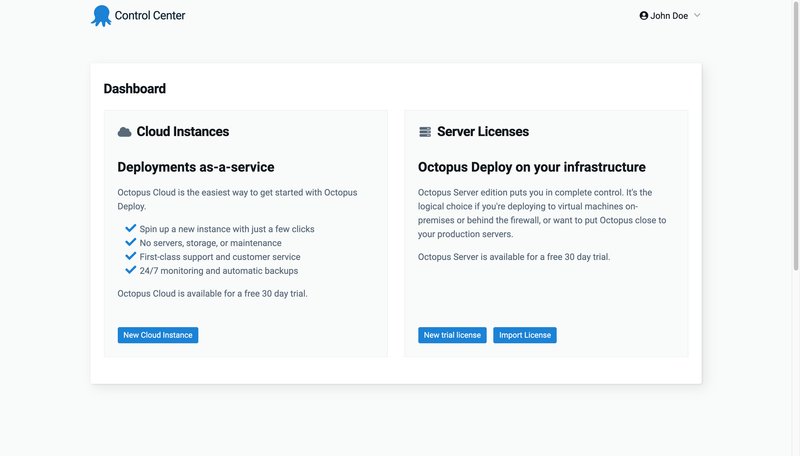
Click on New Cloud Instance for your application and fill in the required information. Once that is done, you will be redirected to your Control Center:
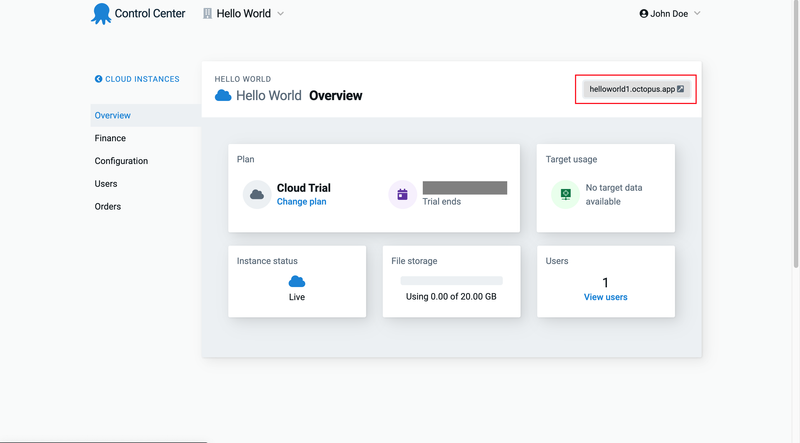
Click on the specified link in the screenshot above to be redirected to your dashboard. Then click on Create your first environment, and you should see a screen like this:
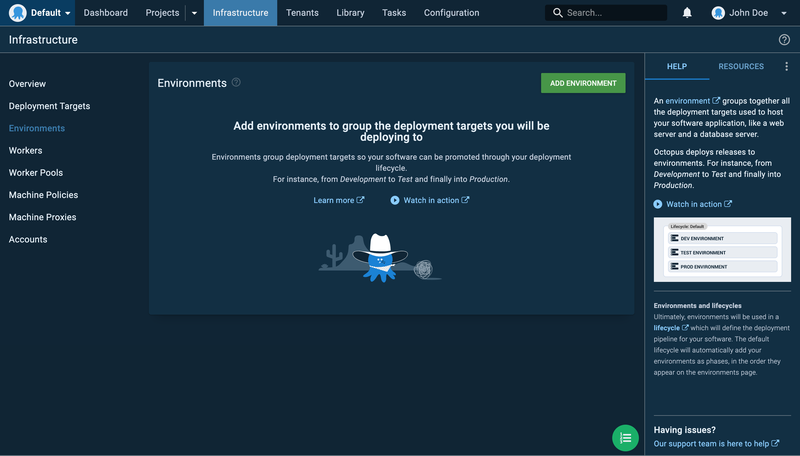
2. Set Up Your Environments
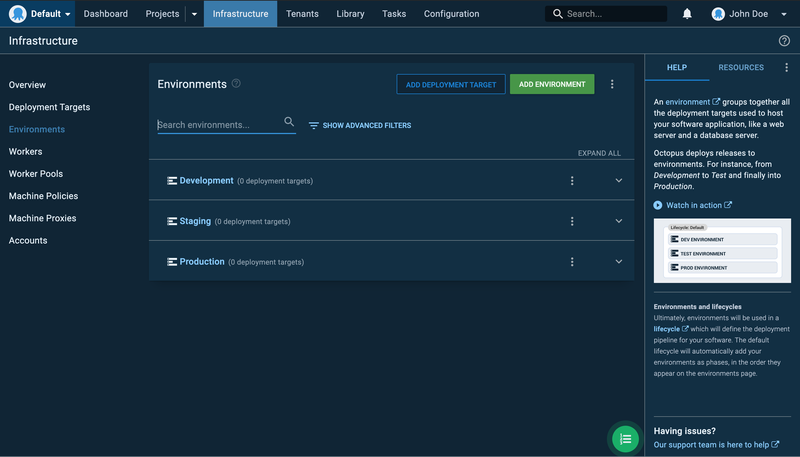
There are a variety of different environment stages available, depending on your team preferences. The environment page allows you to create such environments, like dev, test, staging, and production, for your deployment targets.
Click on Add Environment and fill in the required details. You can add as many environments as you like based on your team’s requirements.
3. Set Up Your Deployment Targets
Deployment targets allow you to set up your servers where your application(s) will be deployed. Start by clicking Deployment Targets on the left sidebar and then select the Add Deployment Target button.
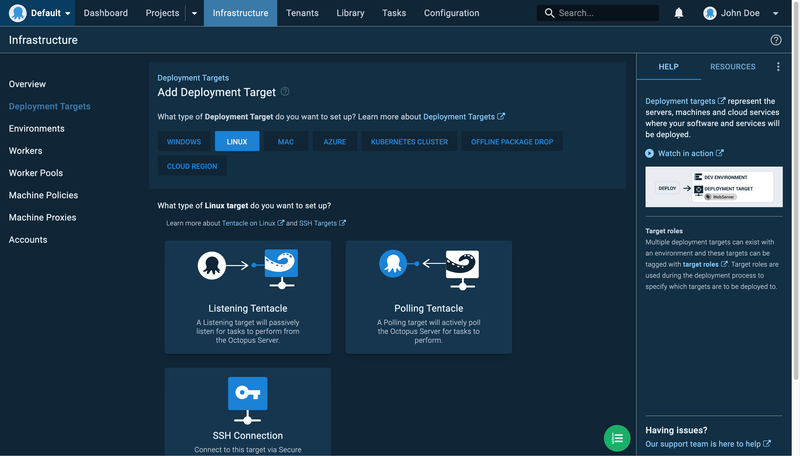
For the sake of this tutorial, you will be using the Linux environment and the listening tentacle. Hover over the Listening Tentacle card and click Add. Fill in the required details of your server, which includes the IP and the tentacle port; and a thumbprint icon with alphanumeric characters will appear. This will be used to create the tentacle on your server.
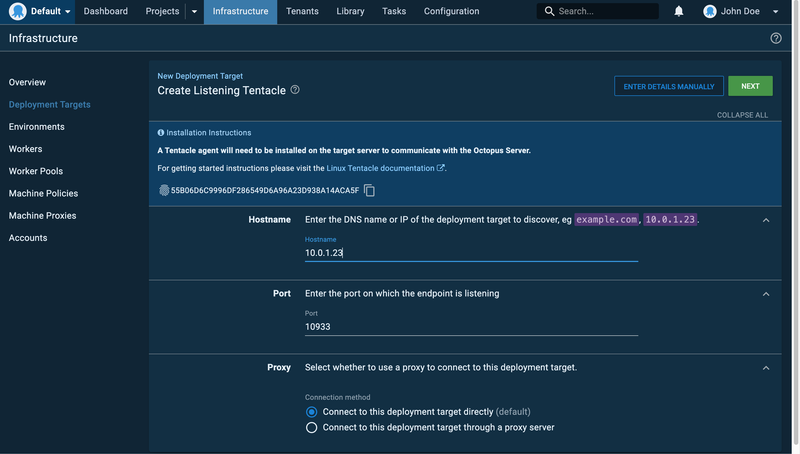
Create the Listening Tentacle
Before you proceed to click Next, you will need to set up the listening tentacle on your server.
Connect to your Linux server via SSH and ensure it meets the following requirements. Then run the commands below for Debian and Ubuntu servers:
sudo apt-key adv --fetch-keys https://apt.octopus.com/public.key

sudo add-apt-repository "deb https://apt.octopus.com/ stretch main"
# for Raspbian use
# sh -c "echo 'deb https://apt.octopus.com/ buster main' >> /etc/apt/sources.list"

sudo apt-get update

sudo apt-get install tentacle
Or run the commands below for Red Hat, Fedora, and CentOs servers:
wget https://rpm.octopus.com/tentacle.repo -O /etc/yum.repos.d/tentacle.repo

yum install tentacle
Now your tentacle has been successfully installed, configure the tentacle by running the following command:
/opt/octopus/tentacle/configure-tentacle.shThen start the service:
/opt/octopus/tentacle/Tentacle service --install --startEnsure that port 10933 is exposed.
Continue with the Deployment Target Configuration
Click on the Next button to verify the tentacle you have just configured on your server. If successful, you will see the screen below:
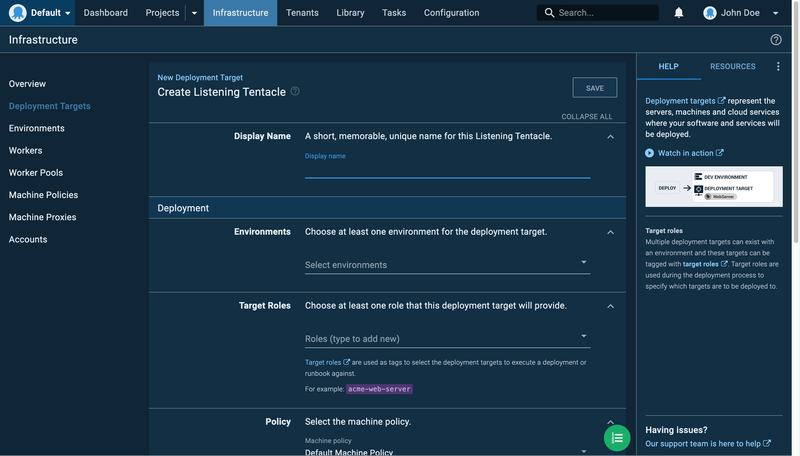
Fill in the display name and select an environment from the list of the environments you have created. Then add a new target role (a tag that ensures that you deploy the right application to the correct servers) and click the Save button.
Now you have successfully configured a deployment target.
4. Create a Project
Projects allow you to create and manage your deployment releases. Click Projects on the menu bar at the top and then select the Add Project button. Enter the project name and click Save.
5. Configure Your Node.js Application
To activate the Octopus Deployment process, which you will create in the next step, you have to package your application and push it to the Octopus repository. There are several ways to package your application, but for the sake of this tutorial, you will be using the Octopus Command Line (CLI) in conjunction with GitHub Actions. Note that you can use any continuous integration tool of your choice.
At the root level of your codebase, create a folder: .github/workflows. In this folder, create a file called pipeline.yaml. (You can give it any file name of your choice.)
Copy the content of this pipeline.yaml into your pipeline.yaml file.
Line 9 of the YAML file contains the package ID you will be using to create your Octopus Deployment process in the next step.
In the pipeline.yaml file, you will be making use of the Octopus CLI in communicating with your Octopus Server to deploy your application into their respective environments. Here is a sample GitHub repository.
Once you are done, push your code to your GitHub repository to trigger the pipeline. The pipeline will run the necessary test, package your application, and deploy it to the package repository recognized by Octopus Deploy.
6. Create a Deployment Process
A deployment process is the step-by-step actions Octopus Deploy performs to deploy your application on your respective servers. You can also include processes to be performed after your application has been deployed.
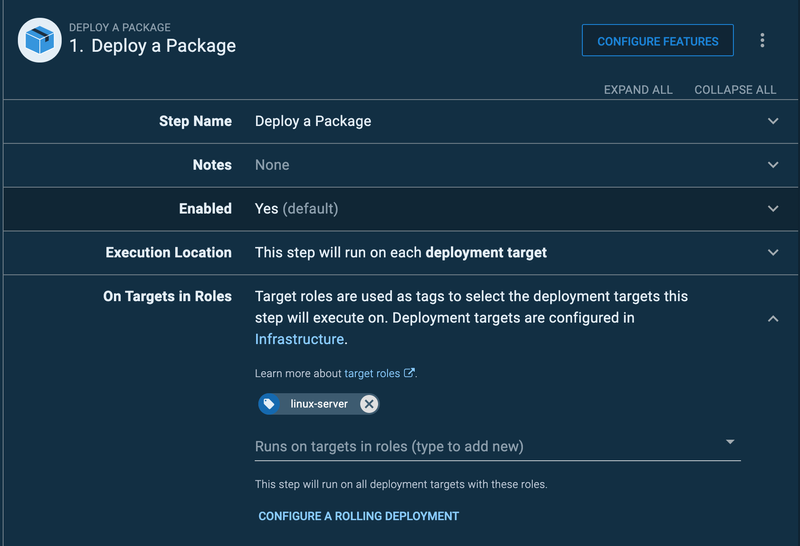
On the left sidebar, click Process and then click the Add Step button. Select Package and then scroll down to hover over the Deploy a Package card. Then click the Add button.
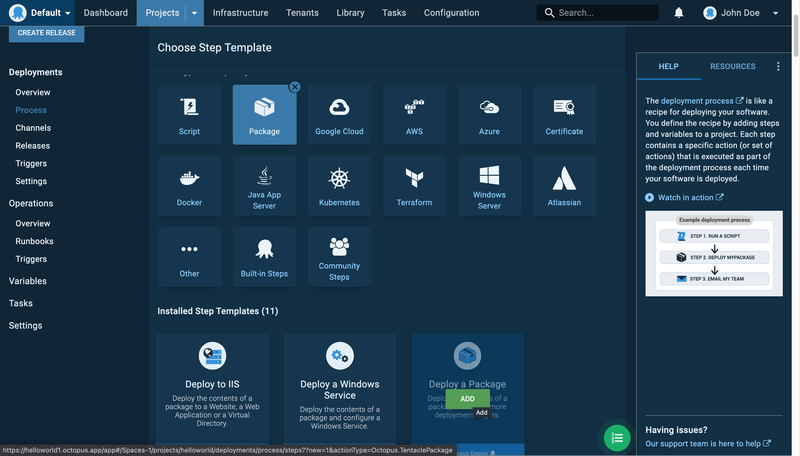
Fill in only the required details as seen below:
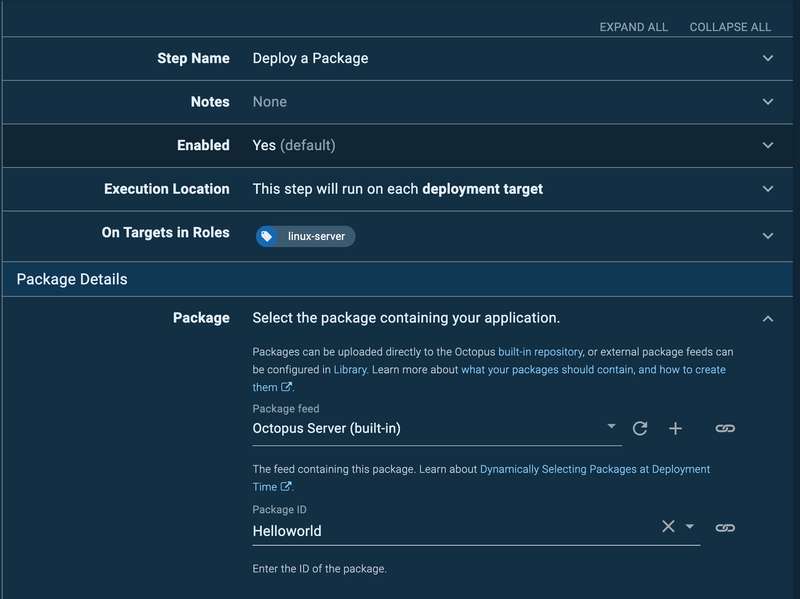
In the Package ID input field, add the package title you used in your pipeline.yaml file:
You have successfully implemented the deployment process. However, after deployment, you may want to perform certain actions, like restarting your server and updating ENVs. Furthermore, each new deployment of your application is deployed in a new folder in the Octopus directory on your server. Since the folder is named using the deployment release version ID, you will need to copy the latest deployment to the location where it is accessible by your process manager, such as PM2.
At the top right, click the Add Step button; select the Script card; and then scroll down to the Run a Script card and click Add.
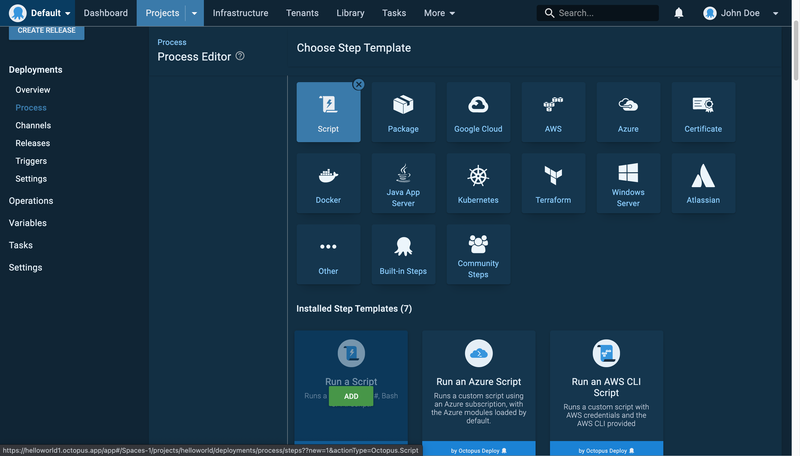
Fill in the step name and add target roles. In the script section, select Bash and paste this code:
BASE=/home/Octopus/Applications/$(get_octopusvariable "Octopus.Environment.Name")/$(get_octopusvariable "Octopus.Project.Name")
cd $BASE/$(get_octopusvariable "Octopus.Release.Number")

touch .env
echo PORT=$(get_octopusvariable "PORT") >> .env
echo TIMEZONE=$(get_octopusvariable "TIMEZONE") >> .env

rm -rf $BASE/site
mkdir $BASE/site
cp -r $BASE/$(get_octopusvariable "Octopus.Release.Number")/. $BASE/site/
This code creates an ENV file after deployment and then copies the latest deployment to the directory where the process manager serves the application.
The variables in the code above are not hard-coded but securely stored on the Octopus Deploy platform. Octopus uses variables so that your deployment process can be parameterized and dynamic. Since you are deploying to multiple environments, you will want to use variables specific to each environment. For instance, the database string for development is different from the database string for production. In order to create dynamic variables, select on the Variables link located on the left sidebar in a new window; then you can add variables based on environments as seen below:
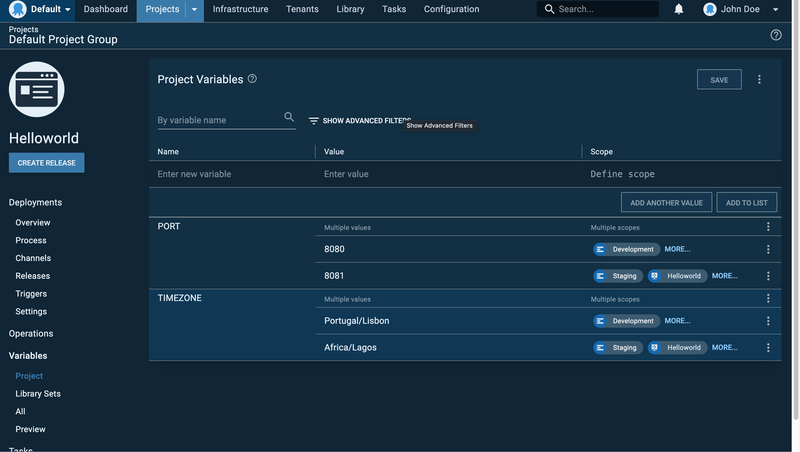
Click on the Save button to save your deployment process steps. Now you have successfully configured your Octopus Deployment server.
Conclusion
In this article, you have learned that Octopus Deploy can provide tremendous benefits when integrated into your software development life cycles. It eases the workload in managing deployment to multiple servers and allows your team to focus on other important things.
If you want to take your continuous integration pipeline to the next level, consider a tool like Earthly. Earthly allows you to execute your builds in containers, thereby making them self-contained, portable, and repeatable. Earthly can be easily used instead of, or in conjunction with, Octopus. And Earthly’s caching and parallel mechanisms make your builds repeatable and fast.
Earthly Lunar: Monitoring for your SDLC
Achieve Engineering Excellence with universal SDLC monitoring that works with every tech stack, microservice, and CI pipeline.


