Introduction to AWS Networking
The article explains how to create a network in AWS. Earthly streamlines the build process for DevOps engineers working with AWS. Learn more about Earthly.
When you first create an AWS account a lot of resources get created for you by default. For starters, you’ll get a VPC in each region. In each of those you’ll get subnets, a Route Table, an Internet Gateway, a CIDR range of IPs, and a Security Group. But what actually is all this stuff? If you’re not someone who is super familiar with networking, it can be a little overwhelming.
In this tutorial we’ll create all the resources that AWS gives you in a default VPC from scratch. Along the way we’ll take a look at each one and see what role it plays in your AWS network.
The actual thing we will accomplish by the end is pretty simple: We will deploy a webserver on an ubuntu machine, but we will do it on an AWS network that we set up completely on our own.
To follow along all you’ll need is an AWS account. I’ll also assume a working knowledge of linux and ssh.
Regions and Availability Zones
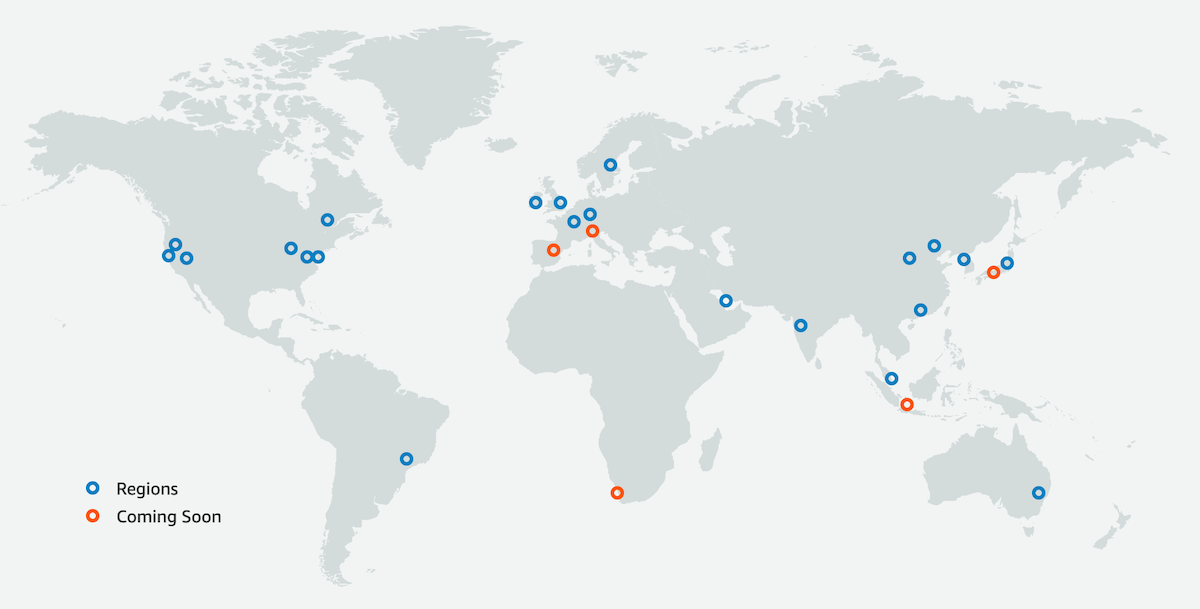
Before we can get started, we need to understand a couple key concepts. First, that AWS is split up into Regions and Availability Zones. Get used to hearing about this, it’s like their favorite thing to talk about.
Regions are large geographical areas. They have names in AWS like US East, US West, Asian Pacific East, Asian Pacific West. There’s one in Canada and one in South America and many more around the world. When you sign into your account, you can see the region you are currently working in at the upper right menu bar. If you click it, you’ll see a list of all the regions and be able to switch which region you want to access and set up services in.
Within those regions are the actually data centers where your AWS services run. There are multiple data centers within each region. These data centers (or sometimes a group of a few of them) are called Availability Zones.
This is part of the power of using AWS because when you deploy something like, say, a Database, you can deploy it across multiple availability zones. This ensures that if some sort of disaster were to happen at one data center, your data would still be safe at the other one. It’s also helpful if you have clients accessing your services from different parts of the country, or the world, because it allows you to deploy close to where your users are.
VPCs
Ok, so a Region is just a part of the world, and an Availability Zone is just sections of that region where the data centers are. That brings us to the VPC. A VPC is your Virtual Private Cloud. It’s basically your own private network on AWS. VPCs exist within regions and span multiple Availability Zones. When you create an account, AWS sets up a VPC for you in every region across the world, which is very nice of them, but for our own learning, let’s create our own.
Creating A New VPC
Sign into your AWS console and navigate to the VPC service. You can do this by typing “VPC” in the search bar.
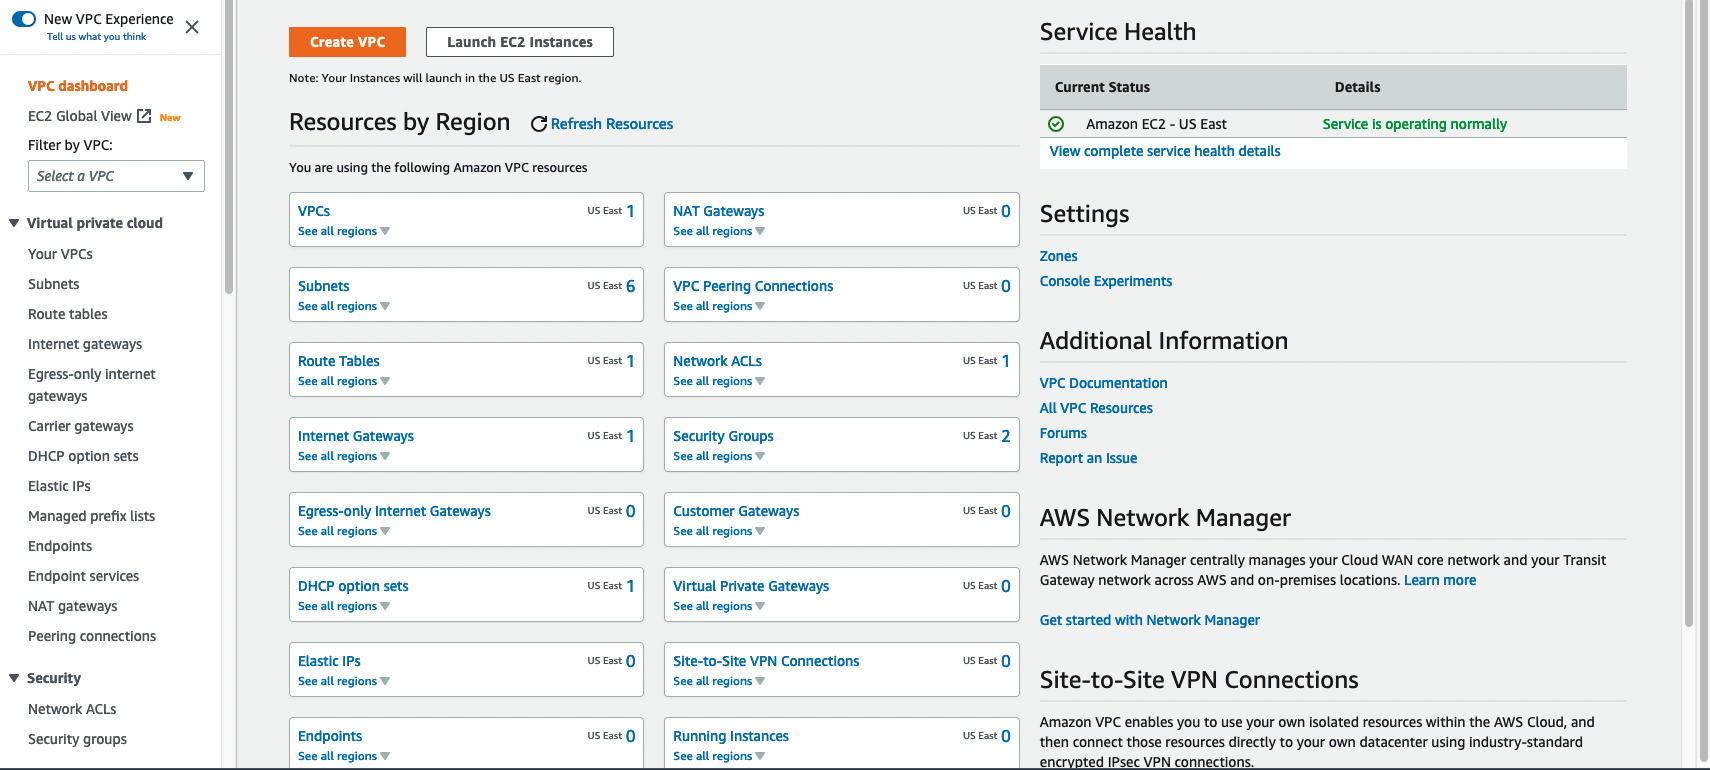
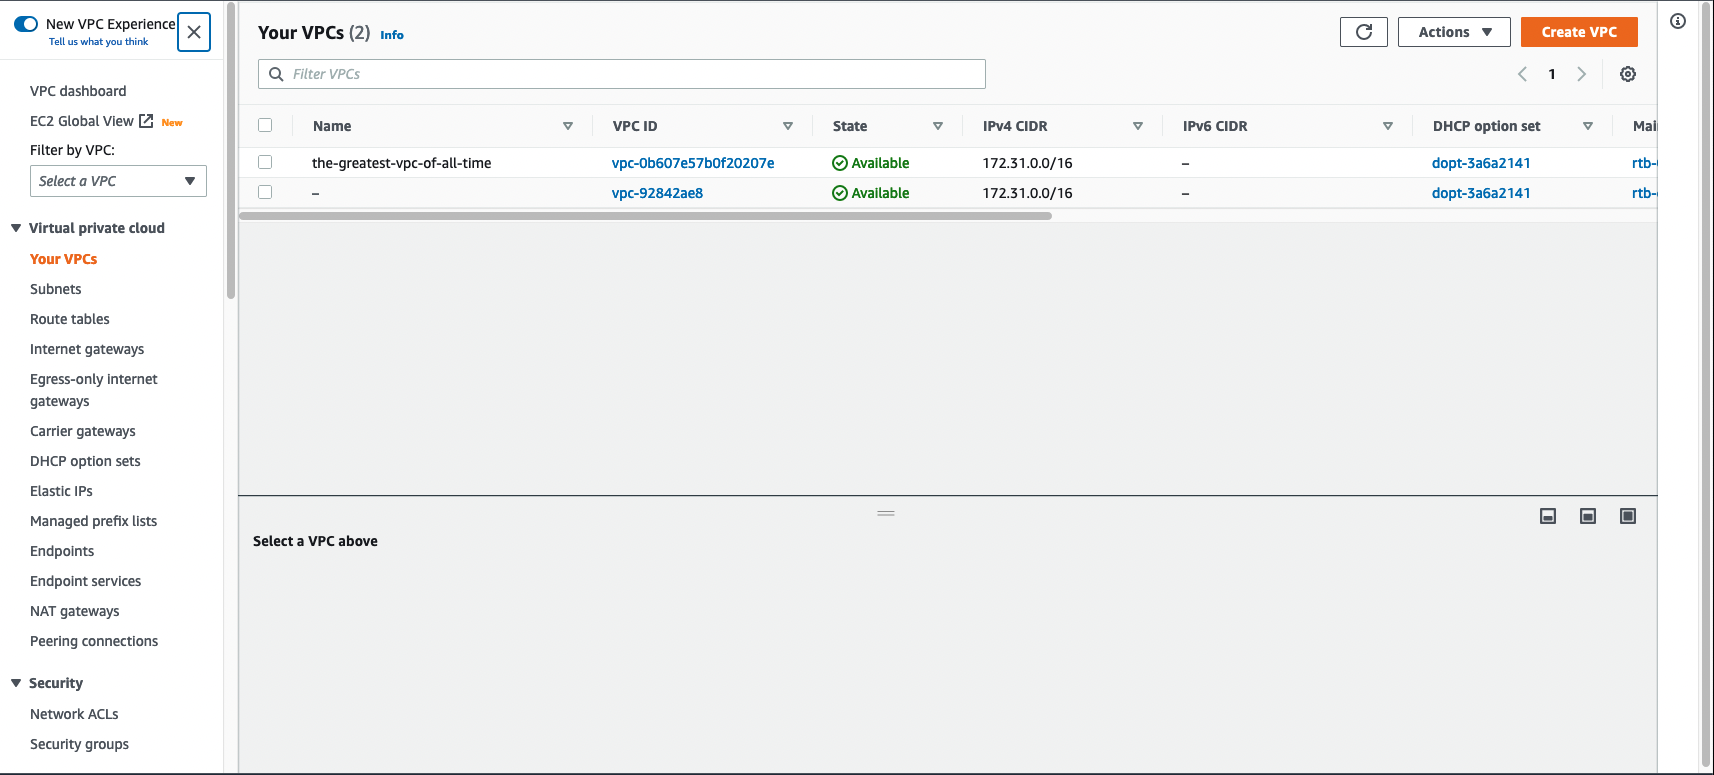
Remember that we get a VPC in each region by default, so you’ll see one already created like I have in the image above.
Click the button in the upper left that says Create VPC. There’s an option VPC and more that will walk you through creating your VPC, subnets, routers etc all at once. This is a great tool to get set up quickly, but for learning purposes, we are going to skip out on doing it the easy way and just select VPC only.
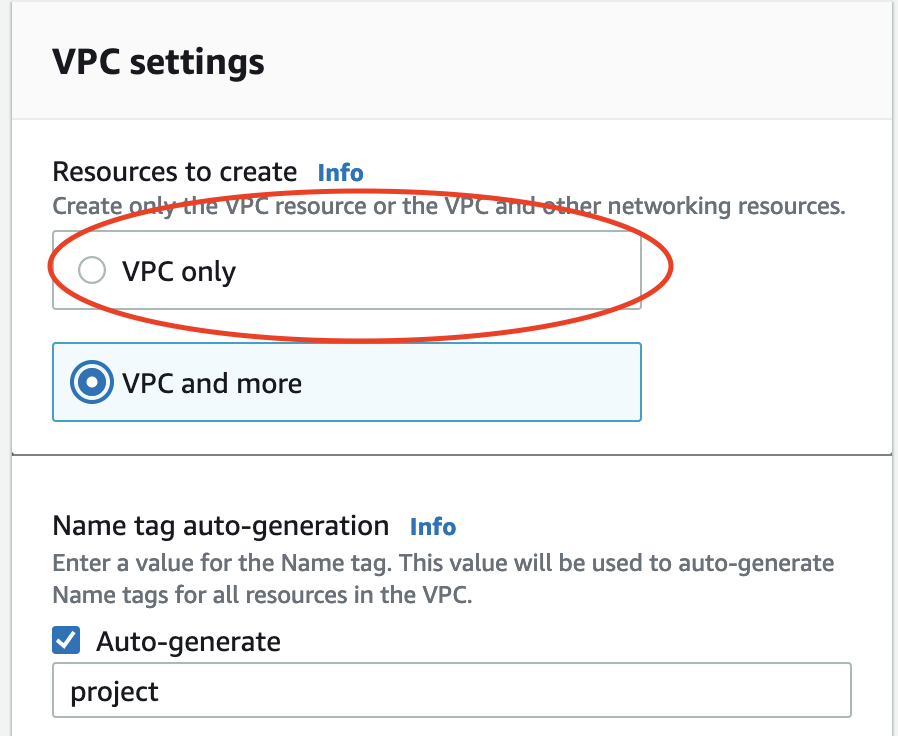
First thing we need to do is name our VPC. Instead of picking something lame like test-vpc-one or my-vpc, let’s call it the-greatest-vpc-of-all-time. It won’t be, but it’s fun to lie.
Next, we’ll need to define an IPv4 CIDR range. This is the range of IP addresses that will be available to us inside the network. Remember, a VPC is just a network, and when we define a network, we need to define a range of IP addresses that devices on that network can use to identify themselves and talk to other devices on the network. (Note that these are all internal IPs, meaning they won’t be accessible outside of the VPC. For that, we’ll need to create something else which we will get to later.)
For now, we are going to use the same CIDR range that AWS would have given us if we’d used the default VPC: 172.31.0.0/16. This uses a range called RFC 1918, which is not used on the internet, so there’s no chance any of our internal network addresses will conflict with one’s on the internet. The /16 means we’ll have 2^16 or 65,536 IP addresses to use on our VPC. More than enough.
Understanding CIDR ranges is really important when setting up a network anywhere, not just on AWS and creating CIDR ranges could be an article all on its own. How they work and how to use them effectively requires a deeper understanding of IP addresses than we have time for here. If you want to truly understand CIDR ranges this video and this article are great places to start.
And here is a chart that can help you choose the right range for your network.
That’s all we’ll need to do for this section. Click Create VPC and we’re done.
Subnets
Regions contain AZs which contain VPCs which contain: subnets.
We can’t deploy an EC2 instance, Amazon’s virtual machine, directly into a VPC. We first need to divide the VPC into subnets. These are subsets of the IP CIDR range we set up earlier. Subnets allow us to group things in our network, which makes communication and security easier to deal with. The default VPC comes with two subnets. One has access to the internet, the other does not. This is pretty common. You may wan’t your web app or API to be accessible from the internet, but have your database deployed in a subnet that is closed off from the internet.
You can create as many subnets as you want in your VPC, as long as you have IP address to assign to them, but for now, we are just going to create a single subnet in our VPC.
In the left hand menu, under the Virtual Private Cloud section, select subnets. This will bring you to a list of all the subnets that exist in your selected region. Again, ignore the default subnets that were created automatically.
In the upper right click Create subnet. The first thing it will ask for is the VPC you want your new subnet to live in. Select the the-greatest-vpc-of-all-time.
Below that there will be a section where we can configure settings for our new subnet. In this case we can be boring and call it webserver-subnet.
Next, we need to choose which Availability Zone our subnet should live it. Remember, VPCs take up entire regions. Within the VPC we have many subnets that each live in an Availability Zone. We can choose where to put the subnet, or let AWS randomly choose. For our purposes it doesn’t really matter. The main point here is knowing that a subnet has a specific AZ.
Last thing we need to do is set up a CIDR range for the Subnet. This needs to be a subset of the IPs we set up for the entire VPC. In this case we will use 172.31.0.0/24.
Once your done click Create Subnet.
Creating an EC2 Instance
Ok, so far we’ve just been clicking buttons in the AWS UI, which isn’t very exciting. Now, we finally get to create something a little more tangible, an actual EC2 instance. An Amazon Elastic Compute Cloud (EC2) instance is a virtual machine we can deploy into a subnet. Basically, this is the computer we want to add to our network. We’ll use this machine to run an nginx server that will be accessible from the Internet.
In the search bar in the top menu search for EC2.
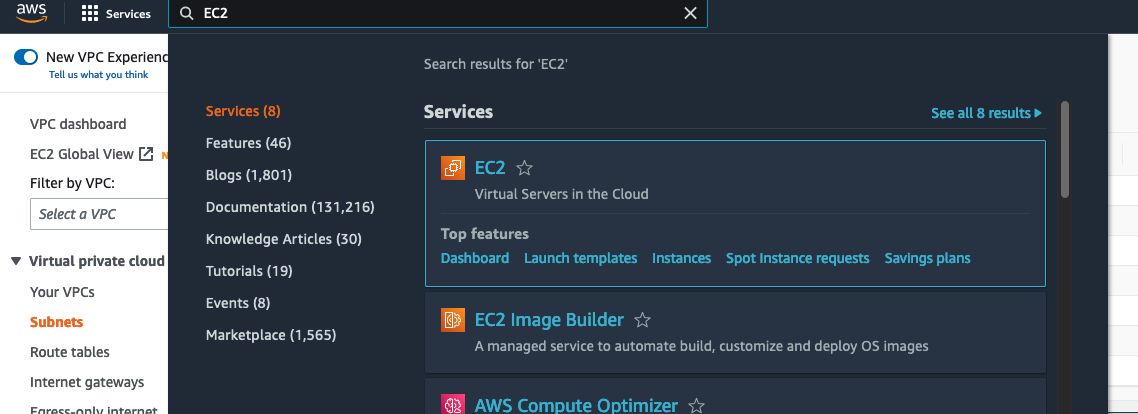
On the next page select Instances from the side menu. This is where you’ll find a list of all EC2 instances running in your current region. If you’re working with a new account you won’t see any instances running. In the upper right corner click Launch instances. This will take you to a page where you can configure your virtual machine.
Name and OS
Give your instance a name and then under Application and OS Images you can select an OS to use on your instance. I’ll be using Ubuntu Server 22.04 for this tutorial.
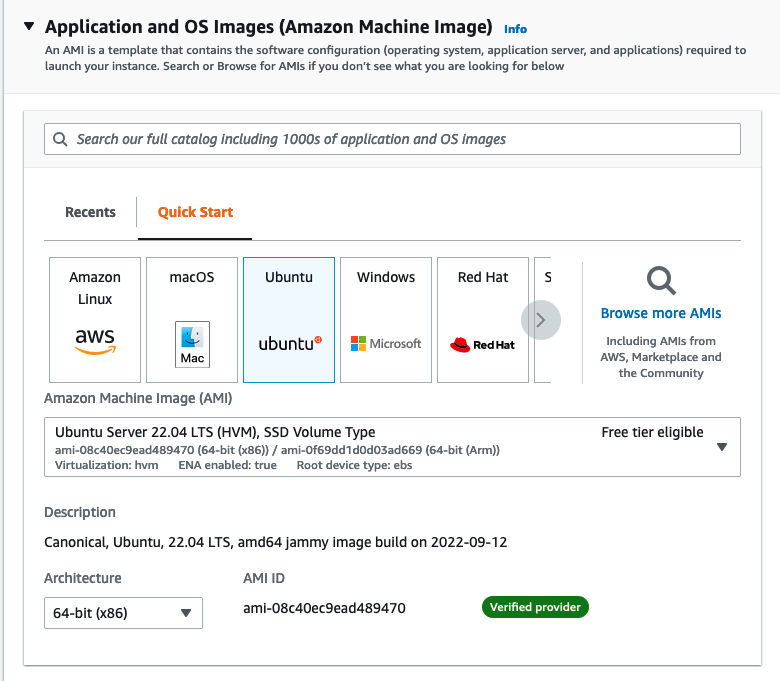
Instance Type doesn’t really matter here since we won’t be doing much with this beyond installing nginx. I chose t2.micro because it’s part of the Free Tier.
Key Pair
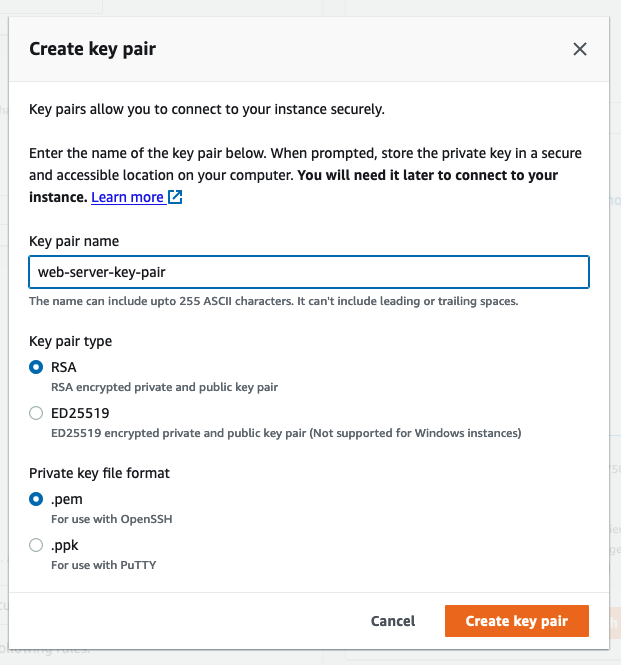
We’ll need to create a key pair so we can ssh into the EC2 instance and install nginx. After you click create pair you’ll automatically download the key. Make note of its location because we will need it later.
Network Settings
For me, AWS set the VPC for my instance as the default VPC, not the one we created. To change it to the the-greatest-vpc-of-all-time click edit in the upper right corner of the networking section.
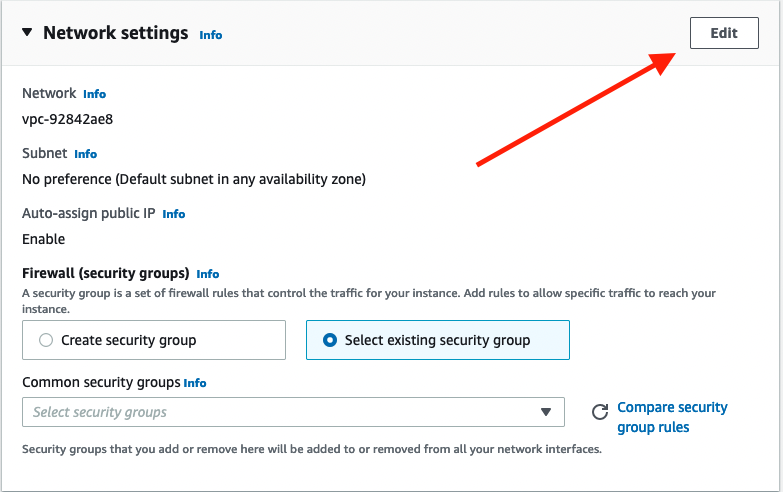
From there you can also edit the subnet. We only have one right now so we only have one choice.
Then select auto assign public IP. This will make sure our instance is given an IP address that is accessible from the internet.
Security Groups
Let’s pause for a second and discuss security groups. Security groups are like firewalls for your EC2 instances. They allow you to set up rules about which traffic is allowed reach your instance. After you set up these rules, you can reuse them by adding more instances to a security group.
So back in our instance creation, we need to select a security group. We don’t have any yet in this VPC, so we need to select the option to create one. We need to add three rules for our security group.
- SSH - so we can access the machine and install nginx.
- HTTP - For web traffic
- HTTPS - Also for web traffic
Luckily AWS already has some presets that will help us out. You can add rules with the Add security group rule button at the bottom. For source type for each one you can select Anywhere. This is standard for HTTP and HTTPS since you generally want to allow traffic from anywhere to your website. (You have the option of black listing IPs in the future if you need to.) For SSH you probably do not want to leave it open to anyone, but for testing purposes we won’t worry about it.
That’s the last thing we need to set up. Click Launch Instance.
Your instance will take a minute or two to launch. You can check the status by returning to the EC2 Dashboard and clicking on Instances (running).

Once the instance is up, you can go to a summary page of the instance and see that it was assigned a private IP address that falls within the range we set up for our subnet.

Notice that your instance has a public IP address. We can try to use this to ssh into the instance, but it won’t work. Event though we have the public IP and we set up the rules to allow ssh in the security group, those settings only apply at the EC2 instance level. We need to also allow traffic into the network, and for that we’ll need an Internet Gateway.
Internet Gateway
The Internet Gateway is what gives your VPC a tunnel to the internet. Without one, communication is limited to within the VPC. Go to your VPCs dashboard. In the menu on the left, click on Internet Gateways. Then, in the upper right click Create internet gateway. All we need to do here is give our gateway a name.
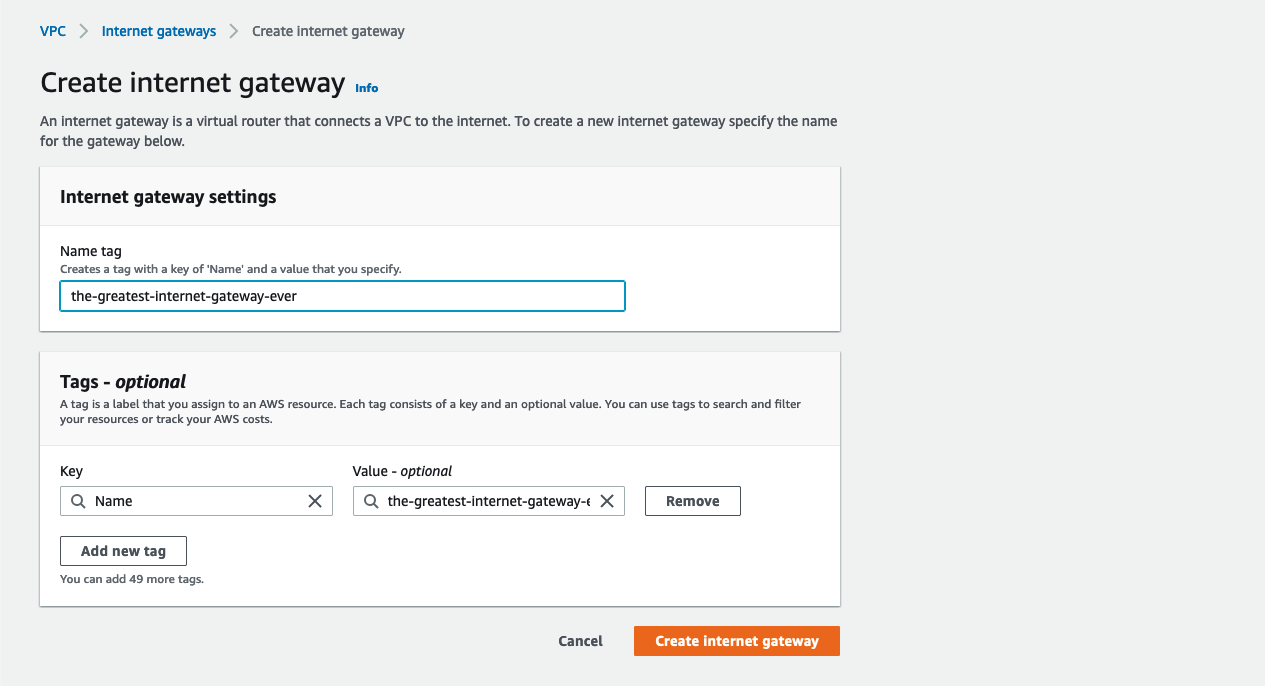
After you create your gateway it needs to be associated or “attached” to a VPC. Select actions in the upper right and click on Attach To VPC. Select the-greatest-vpc-of-all-time and click Attach internet gateway.

That’s it, we’ve now created a gateway for our VPC.
Route Table
The Internet Gateway allows us access to the Internet, the route table is what says which traffic can go where. Every subnet you create within a VPC will need to be associated with a route table. You can think of this as the bridge between your gateway, which allows traffic into the VPC, and the subnet.
You should see Route Tables in the left hand menu. Click it and you’ll be taken to the dashboard for the route tables. There will be some default tables created already, but let’s create a new one. Click Create route table in the upper left. Give your route table a name and make sure you associate it with the correct VPC.
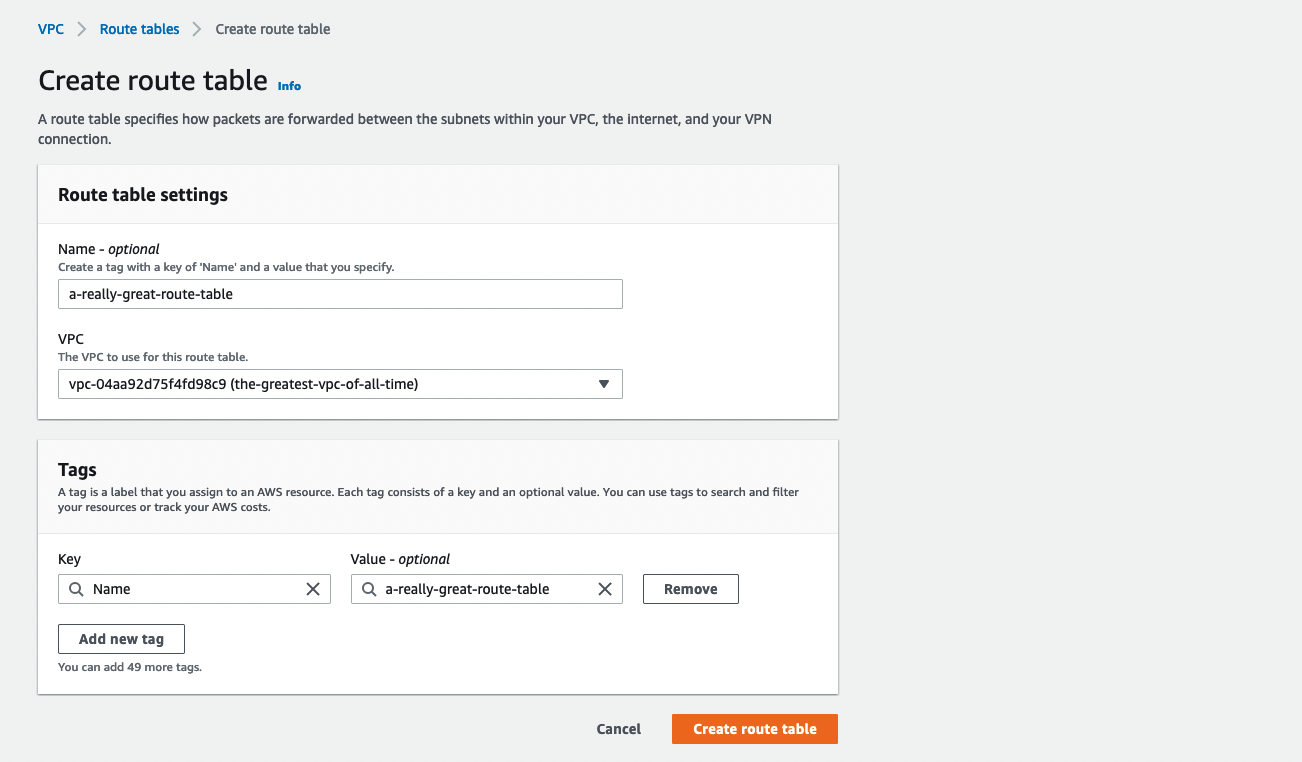
After you create the table, you’ll be taken to Details page it. Here is where we can complete that bridge from VPC to subnet. Select the tab that says Subnet associations. Then click the Edit subnet associations button on the right.
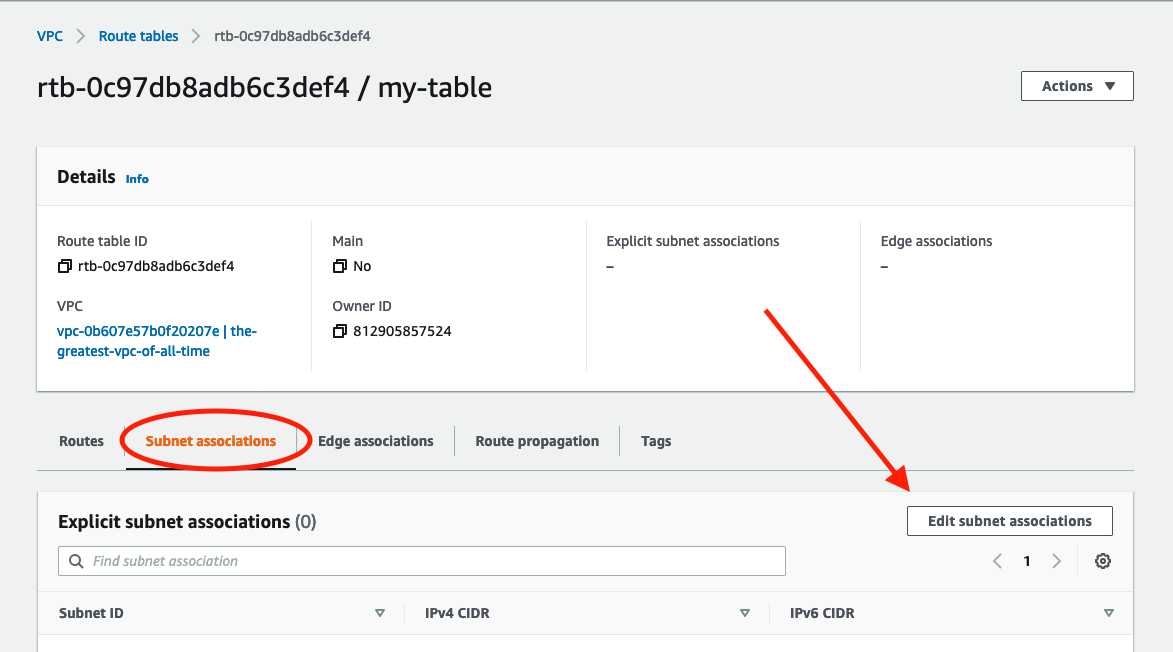
Select subnet we created in the last step and click Save associations.
Now we have a bridge, but we need to set up some routes that tell the router it’s ok to allow traffic from the internet to use this bridge. Under the routes tab select Edit routes.

Here you can add new routes to the route table. In our case we want to allow all traffic from our internet gateway to any subnet that is associated with this Route Table. In our case, just the subnet we created earlier.
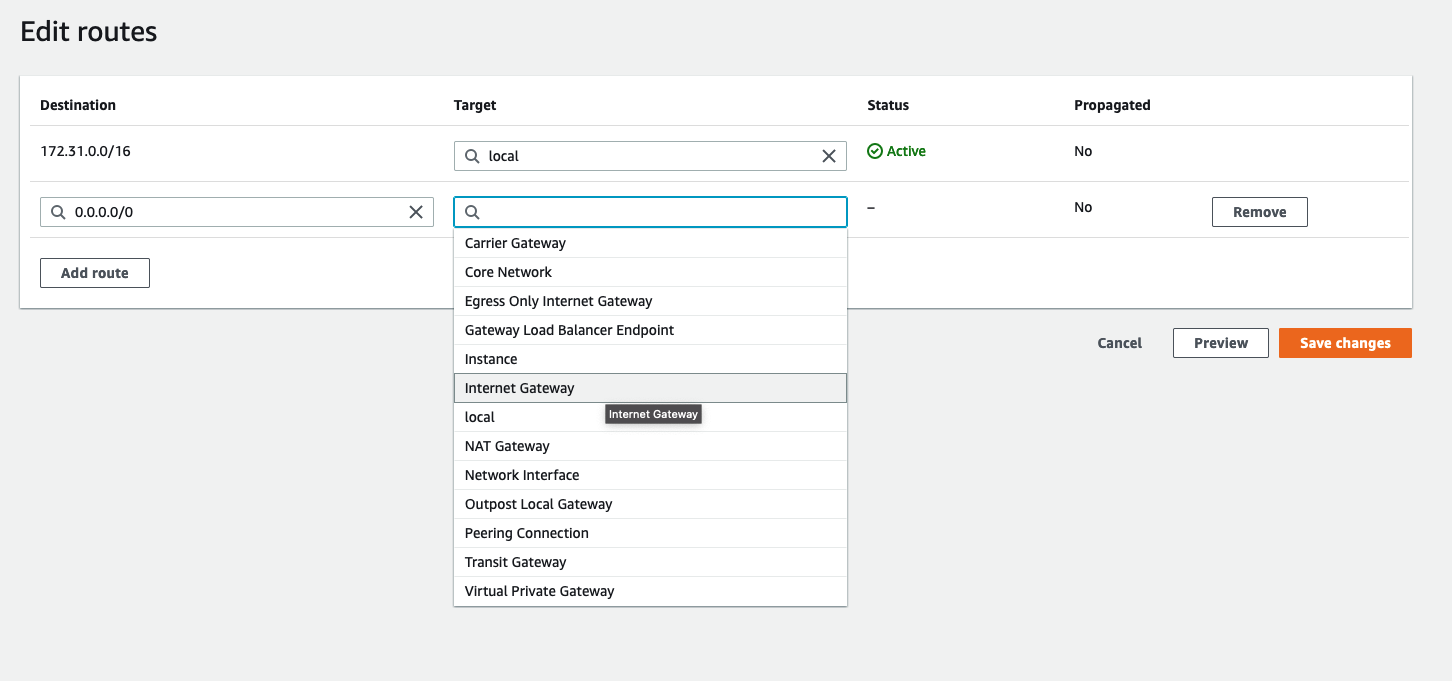
After you click “Internet Gateway” you’ll be able to choose the gateway we created.
And that should be it. We should have everything in place.
A Quick Review
- We created a VPC which is a virtual network inside of AWS. We also created a CIDR range, which is a range of IP addresses we can use to identify devices and services within our network and allow them to communicate between each other.
- Next, we created a subnet, which is just a subset of the IPs we set up in our VPC
- Within that subnet we deployed an EC2 instance, which in our case was a machine running Linux.
- Next we needed to create a “bridge” from the outside internet that connects to our EC2 instance. For that we created an Internet Gateway, which attached to our VPC and was associated with our new subnet.
- We created a route table and told it to accept traffic from the Internet Gateway and pass it along to our subnet and on to our EC2 instance.
Connecting to Our New EC2 Instance
To confirm this is all working as planned, let’s try to SSH into our EC2 instance. Back on the dashboard for your instance, locate the public ipv4 address.

In your terminal, use the pem key to SSH into the running instance using the following command: ssh -v <path-to-key>/web-server-key-pair.pem ubuntu@<ip-address-for-your-instance>
ssh -i Downloads/web-server-key-pair.pem ubuntu@54.159.44.62
WARNING: UNPROTECTED PRIVATE KEY FILE
If you get an error: WARNING: UNPROTECTED PRIVATE KEY FILE!, you’ll need to update the permissions on the pem key.
chmod 400 <path-to-key>/web-server-key-pair.pemThen try again.
Nginx
Connecting via SSH proves our instance is reachable from the internet. Hurray! Just to take it one step further, let’s confirm that HTTP is working by installing nginx and connecting via a web browser.
Nginx is a lightweight webserver that is super easy to install and set up. While you are still connected to the EC2 instance run:
sudo apt update
sudo apt install nginx
That’s it, no more setup is needed. Now you can paste the same IP address into your browser, and you should see the nginx welcome page returned.

Conclusion
This tutorial has provided basic insights into setting up a secure AWS network. Remember, the default VPCs that AWS provides in each region are completely usable and free. You can use them without fully understanding them, but it’s always better to know how things work.
Once you’ve got your AWS network up and running, you might want to consider making your builds smoother with Earthly. It’s a tool that can significantly enhance your build automation process. So, do check it out!
There’s plenty more to learn in this area, so keep exploring.
Earthly Cloud: Consistent, Fast Builds, Any CI
Consistent, repeatable builds across all environments. Advanced caching for faster builds. Easy integration with any CI. 6,000 build minutes per month included.


