Creating and Managing VPCs with Terraform: A Step-by-Step Guide
Table of Contents
This article explains the basics of setting up a Virtual Private Cloud (VPC) with Terraform. Users of Terraform find Earthly’s approach to CI build speed powerful. Learn how.
Amazon Virtual Private Cloud (Amazon VPC) is a service that allows you to create a virtual network within the Amazon Web Services (AWS) cloud environment. It gives you complete control over your network configuration, including your choice of IP address range, creation of subnets, and configuration of route tables and network gateways. With Amazon VPCs, you can securely launch AWS resources, such as Amazon Elastic Compute Cloud (Amazon EC2) instances, Amazon Relational Database Service (Amazon RDS), and Lambda functions, in a logically isolated environment.
VPCs offer several benefits, including the following:
- Increased security: VPCs give you control over who has access to your resources and how they can communicate with each other.
- Increased flexibility: VPCs give you the flexibility to design your network architecture to meet your specific needs.
- Improved performance: VPCs can help improve the performance of your applications by reducing network latency.
Meanwhile, Terraform is an open source infrastructure-as-code (IaC) software tool developed by HashiCorp that enables you to safely and predictably create, change, and improve infrastructure. Terraform can be used to manage infrastructure on a variety of platforms, including AWS, Azure, and Google Cloud Platform (GCP), using a declarative configuration language (ie HashiCorp Configuration Language (HCL)).
In this tutorial, you’ll learn how to create a VPC on AWS using Terraform. In doing so, you’ll learn about all the elements of a VPC and how to configure each of them.
How to Create a VPC on AWS Using Terraform
Before you begin, you need an AWS account, and you need to install the AWS Command Line Interface (CLI) version 2.11.20 (or newer).
To check what version of the AWS CLI you have, run the following:
aws --versionOutput:
aws-cli/2.11.20 Python/3.11.3 Windows/10 exe/AMD64 prompt/offYou also need to install Terraform version 1.4.6 or newer. A list of the available Terraform executables for each platform is available on Terraform’s website:
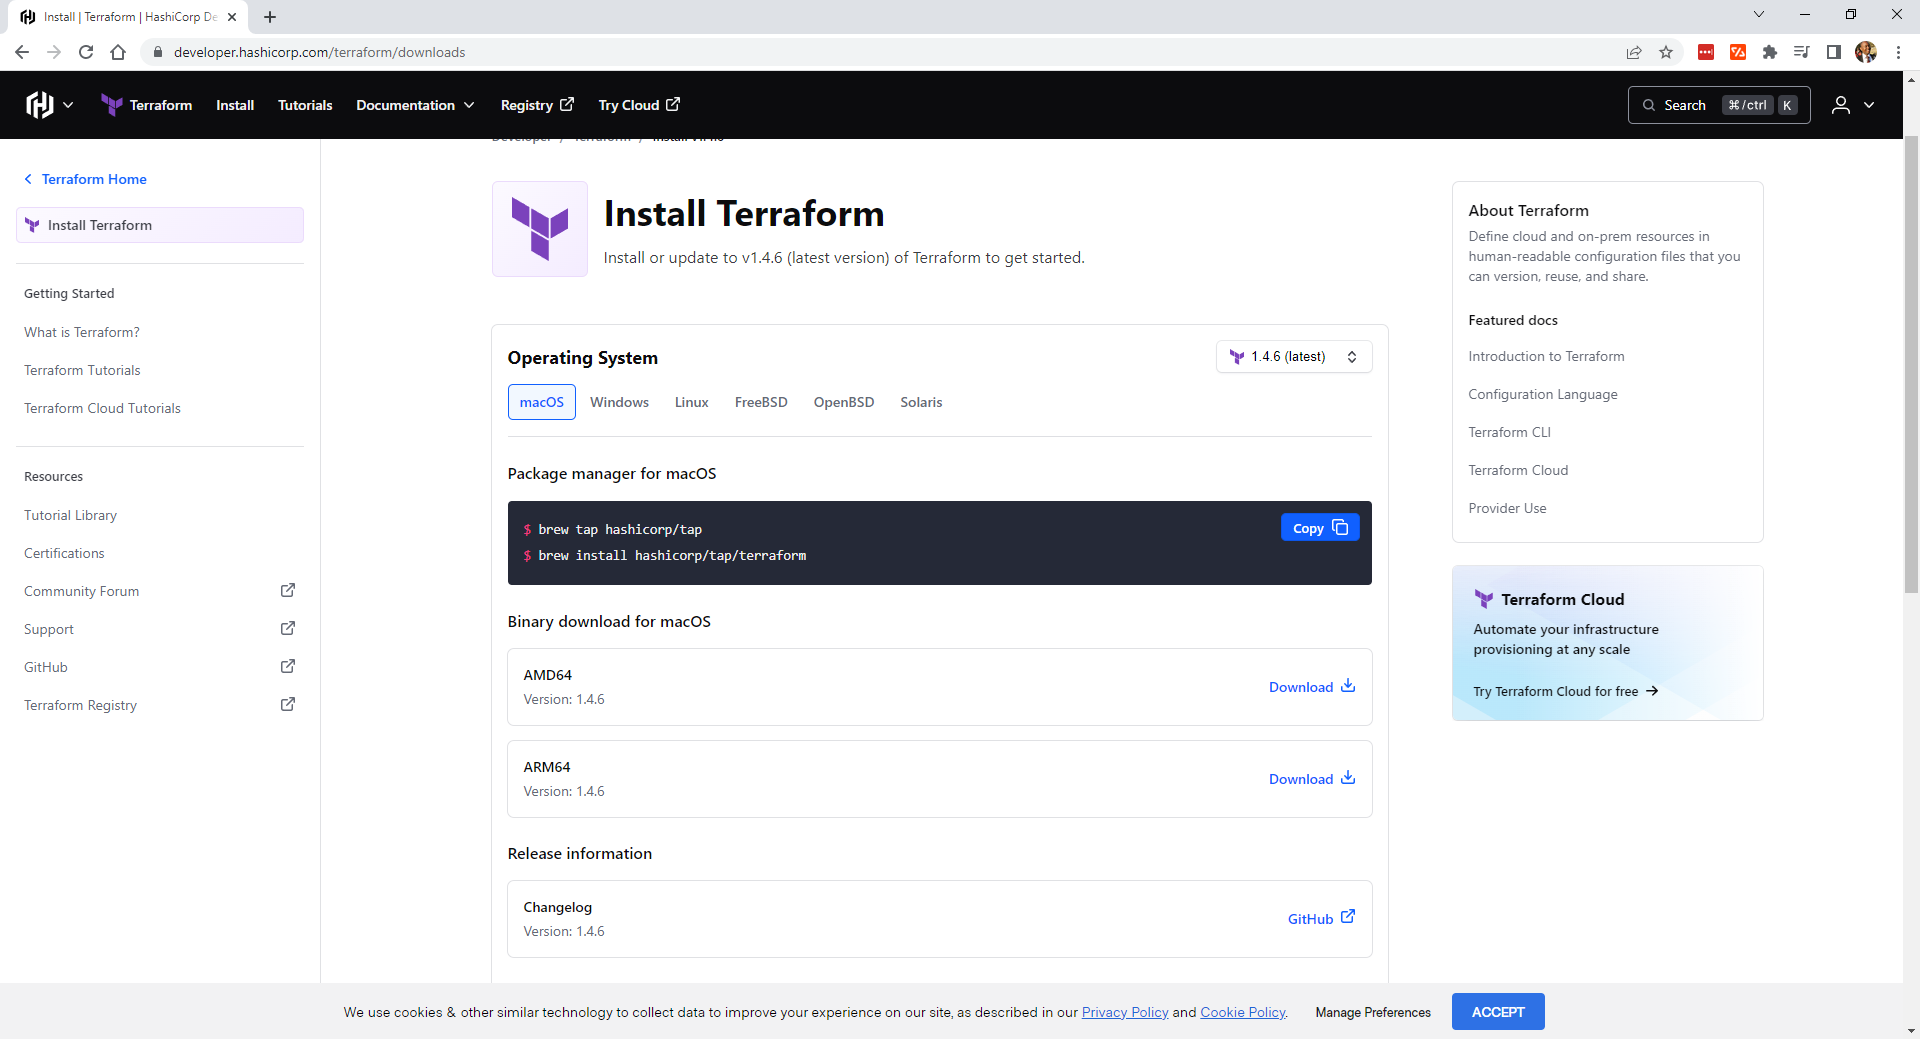
Once you’ve installed Terraform, run the following command to get the Terraform version and confirm that it is installed correctly:
terraform --versionMy version is 1.4.6, running on the Windows platform:
Terraform v1.4.6 on windows_amd64Finally, create a new directory called terraform-vpc-demo. This will be your project file. The full Terraform configuration used in this guide can be found on this GitHub repo.
Configure AWS Credentials
Once you’ve created your new directory, it’s time to configure Terraform to work with your AWS account.
Create a Terraform User
To configure Terraform and AWS to work together, you need to log into your AWS Management Console with a user account that can create other users (ie a root AWS account or an account with administrator access):
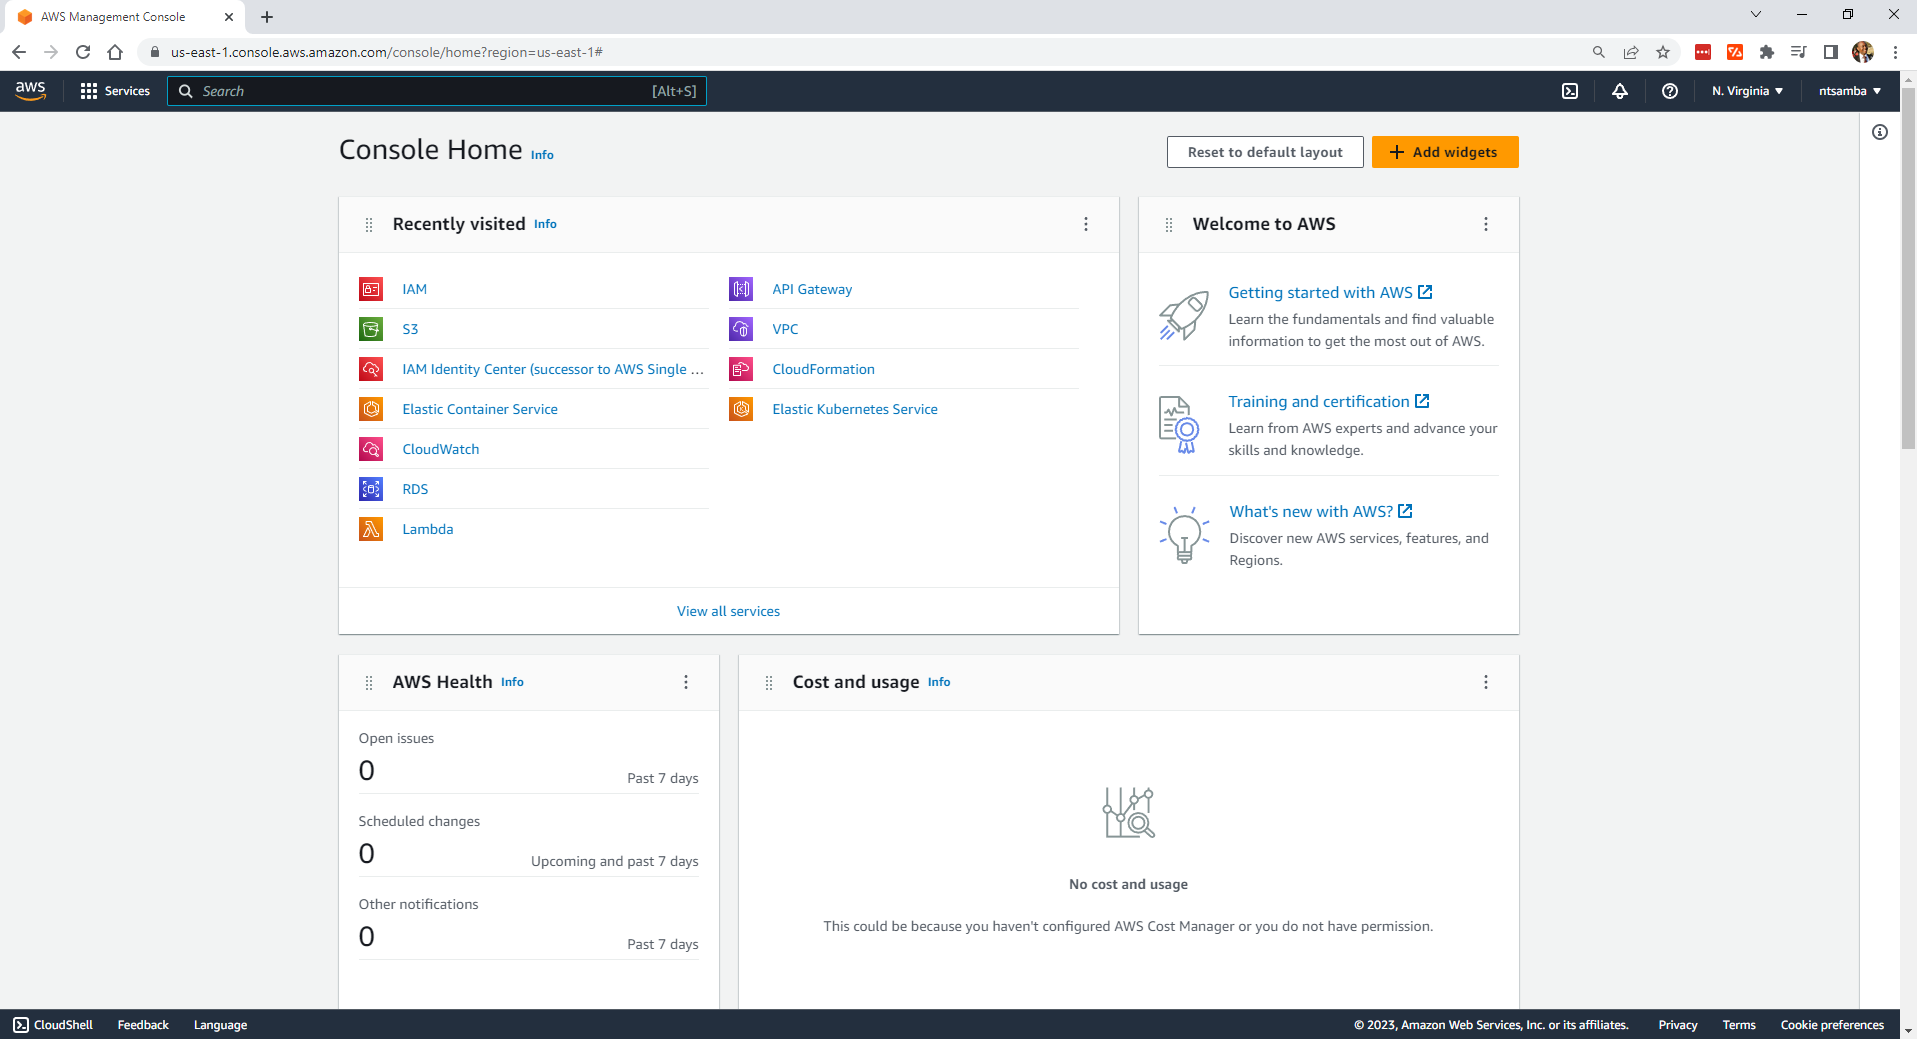
You need the IAM user as that is what Terraform will use to read and update your AWS environment. This IAM user will perform the actions specified by your Terraform commands.
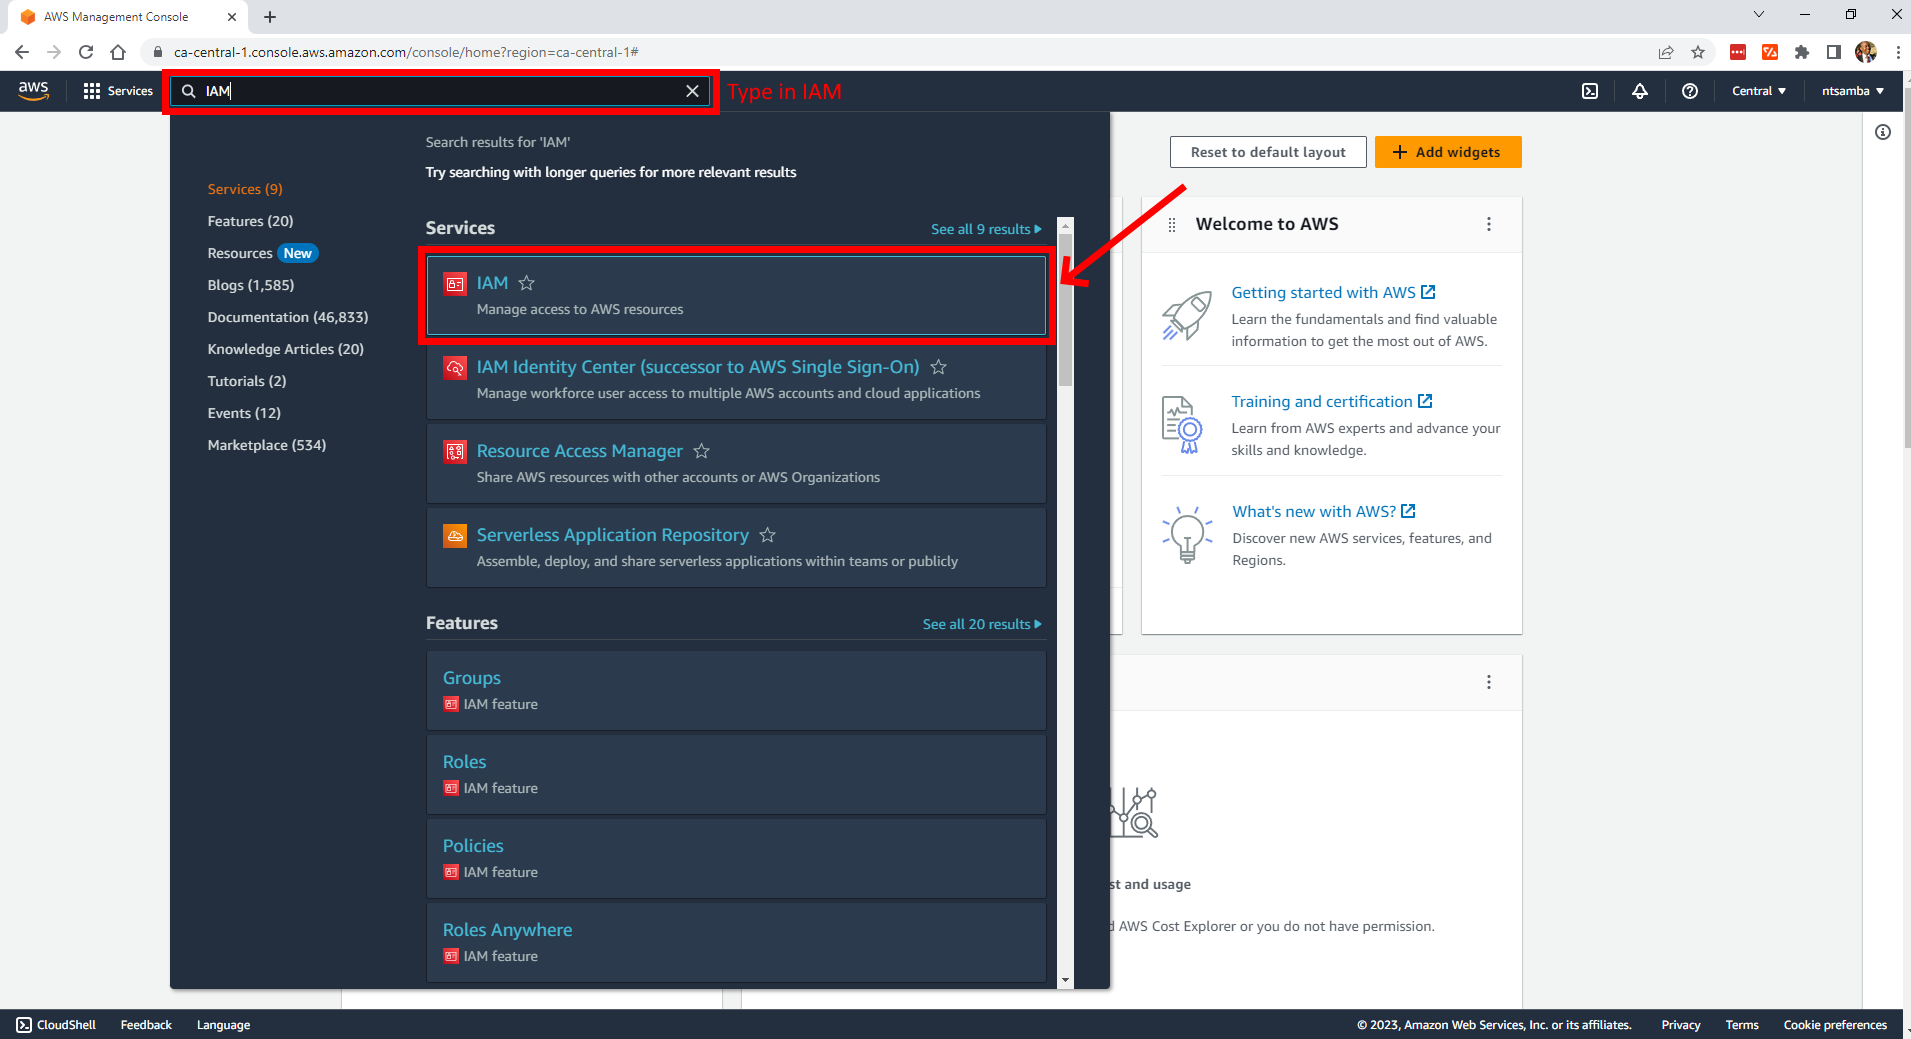
Once logged in, select IAM:
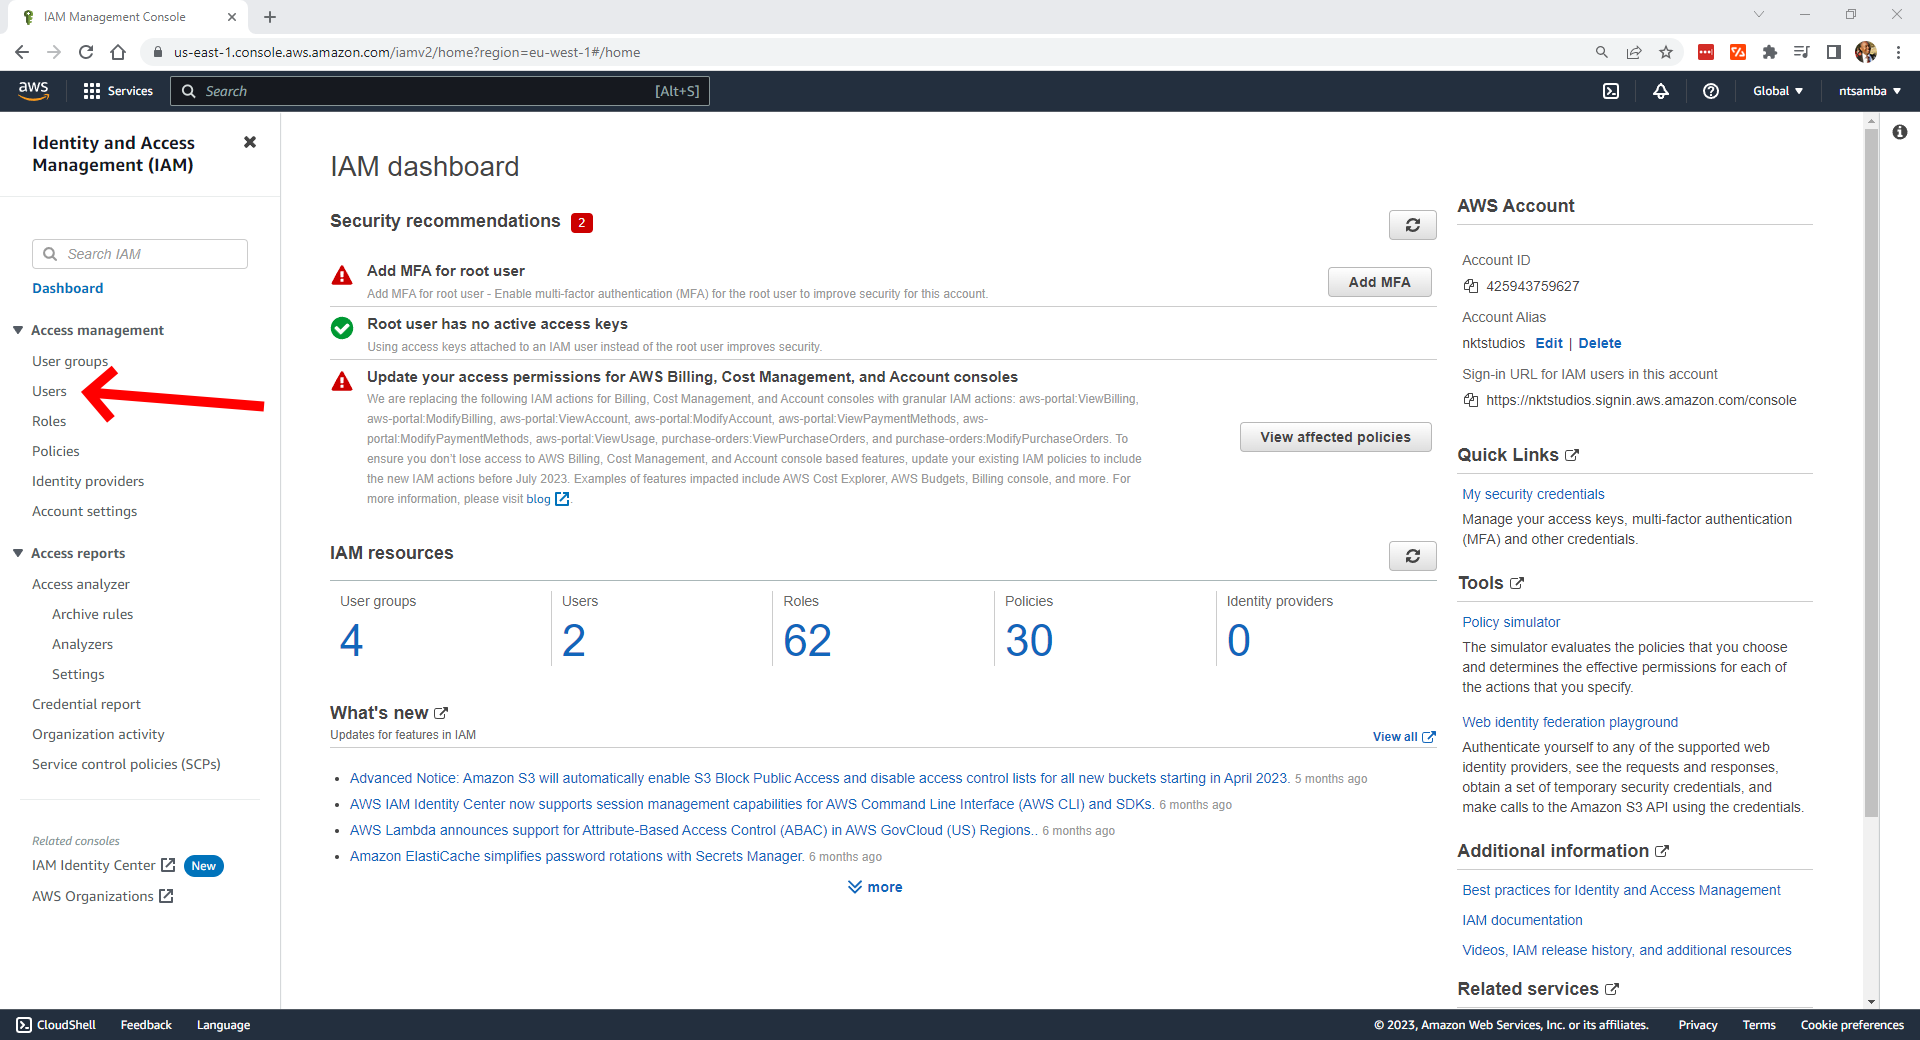
Click on Users to open the users’ console;
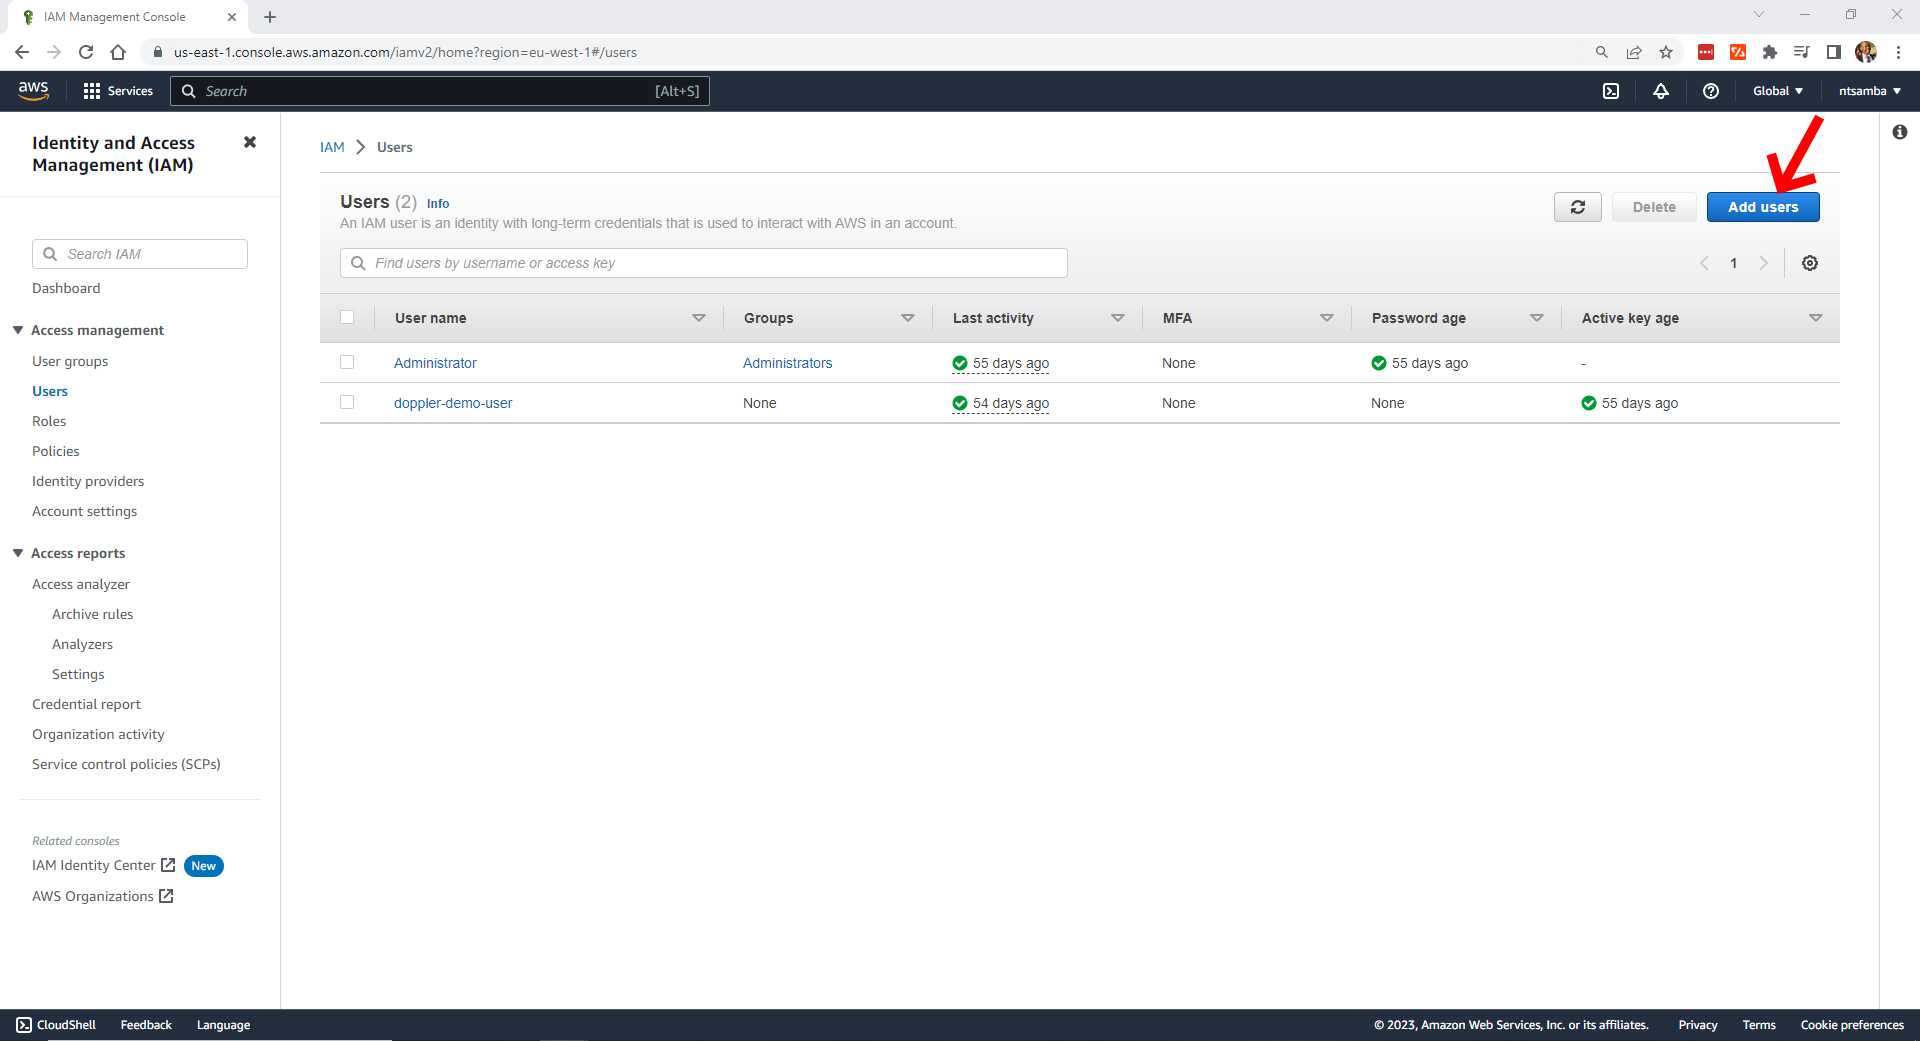
And then select Add users in the upper right-hand corner:
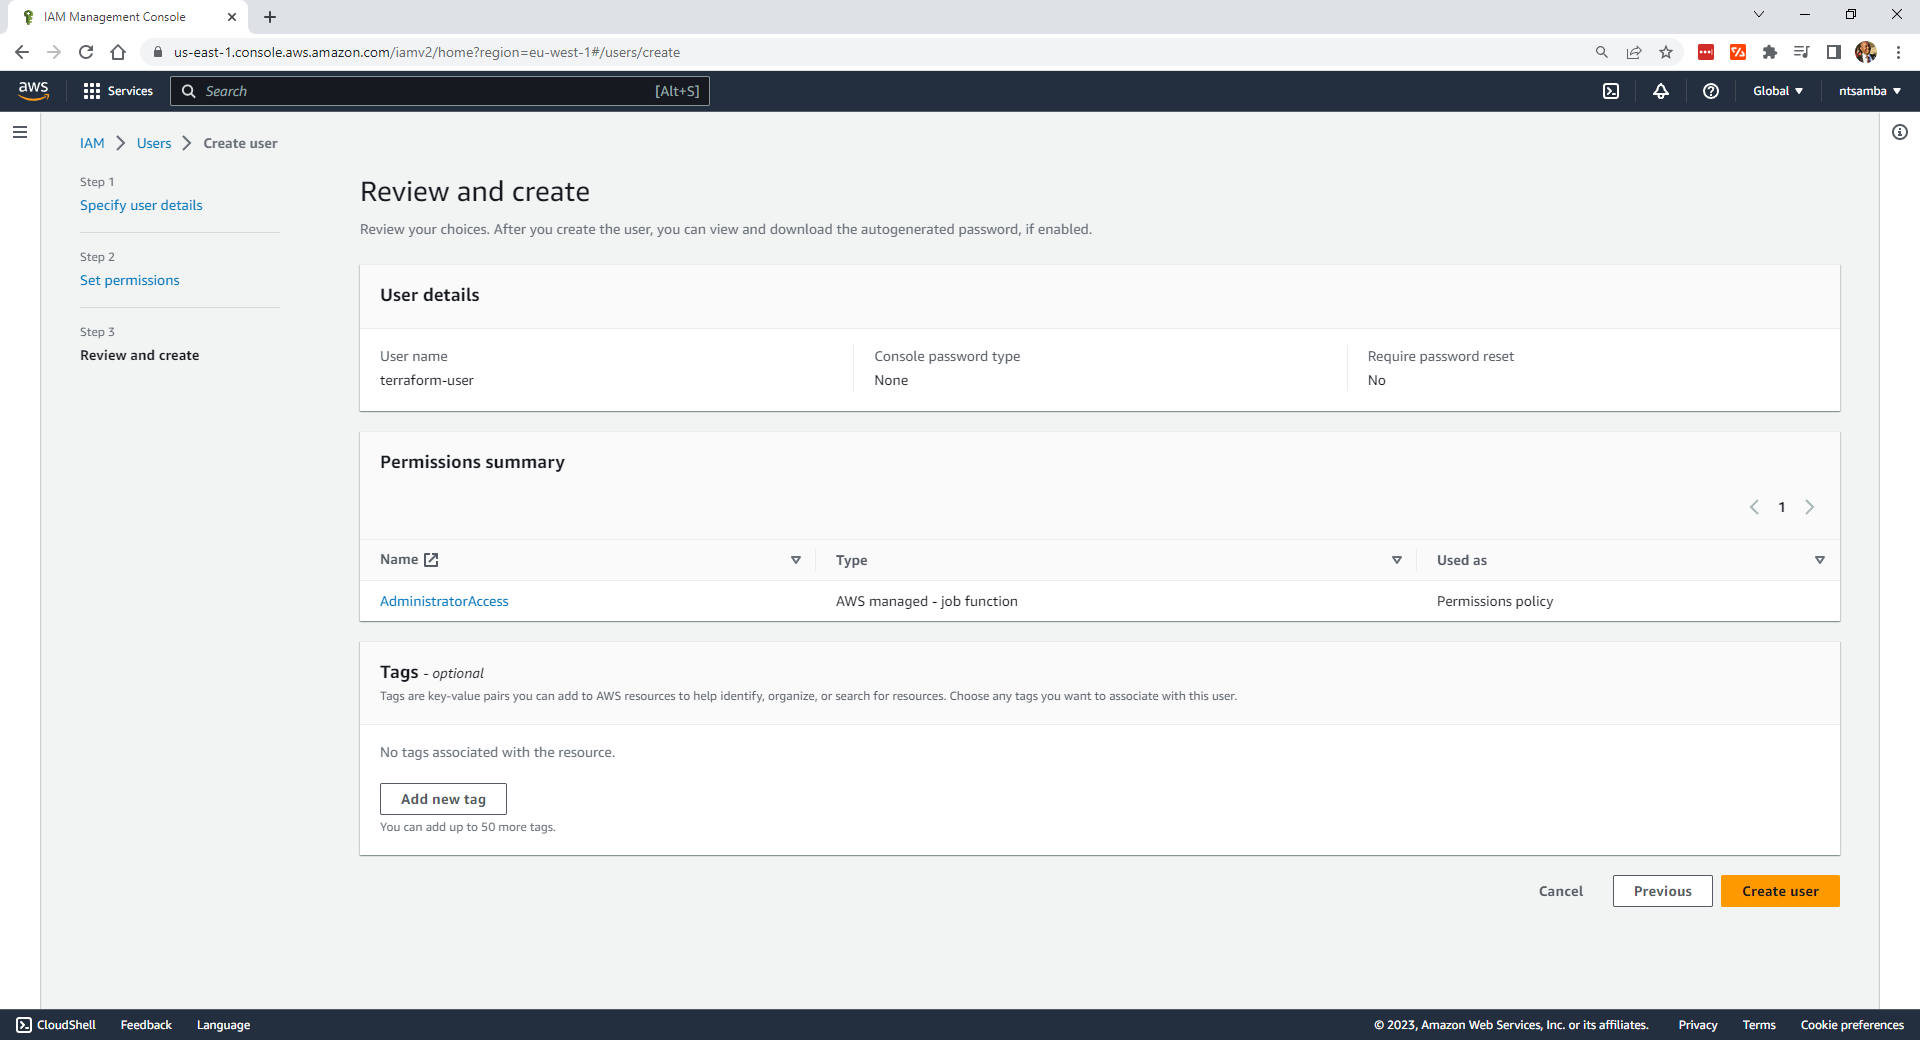
This opens up the Create user page where you can specify the user details. Give the user a name (ie terraform-user) and make sure you leave the “Provide user access to the AWS Management Console” unchecked, as you don’t need access to this:

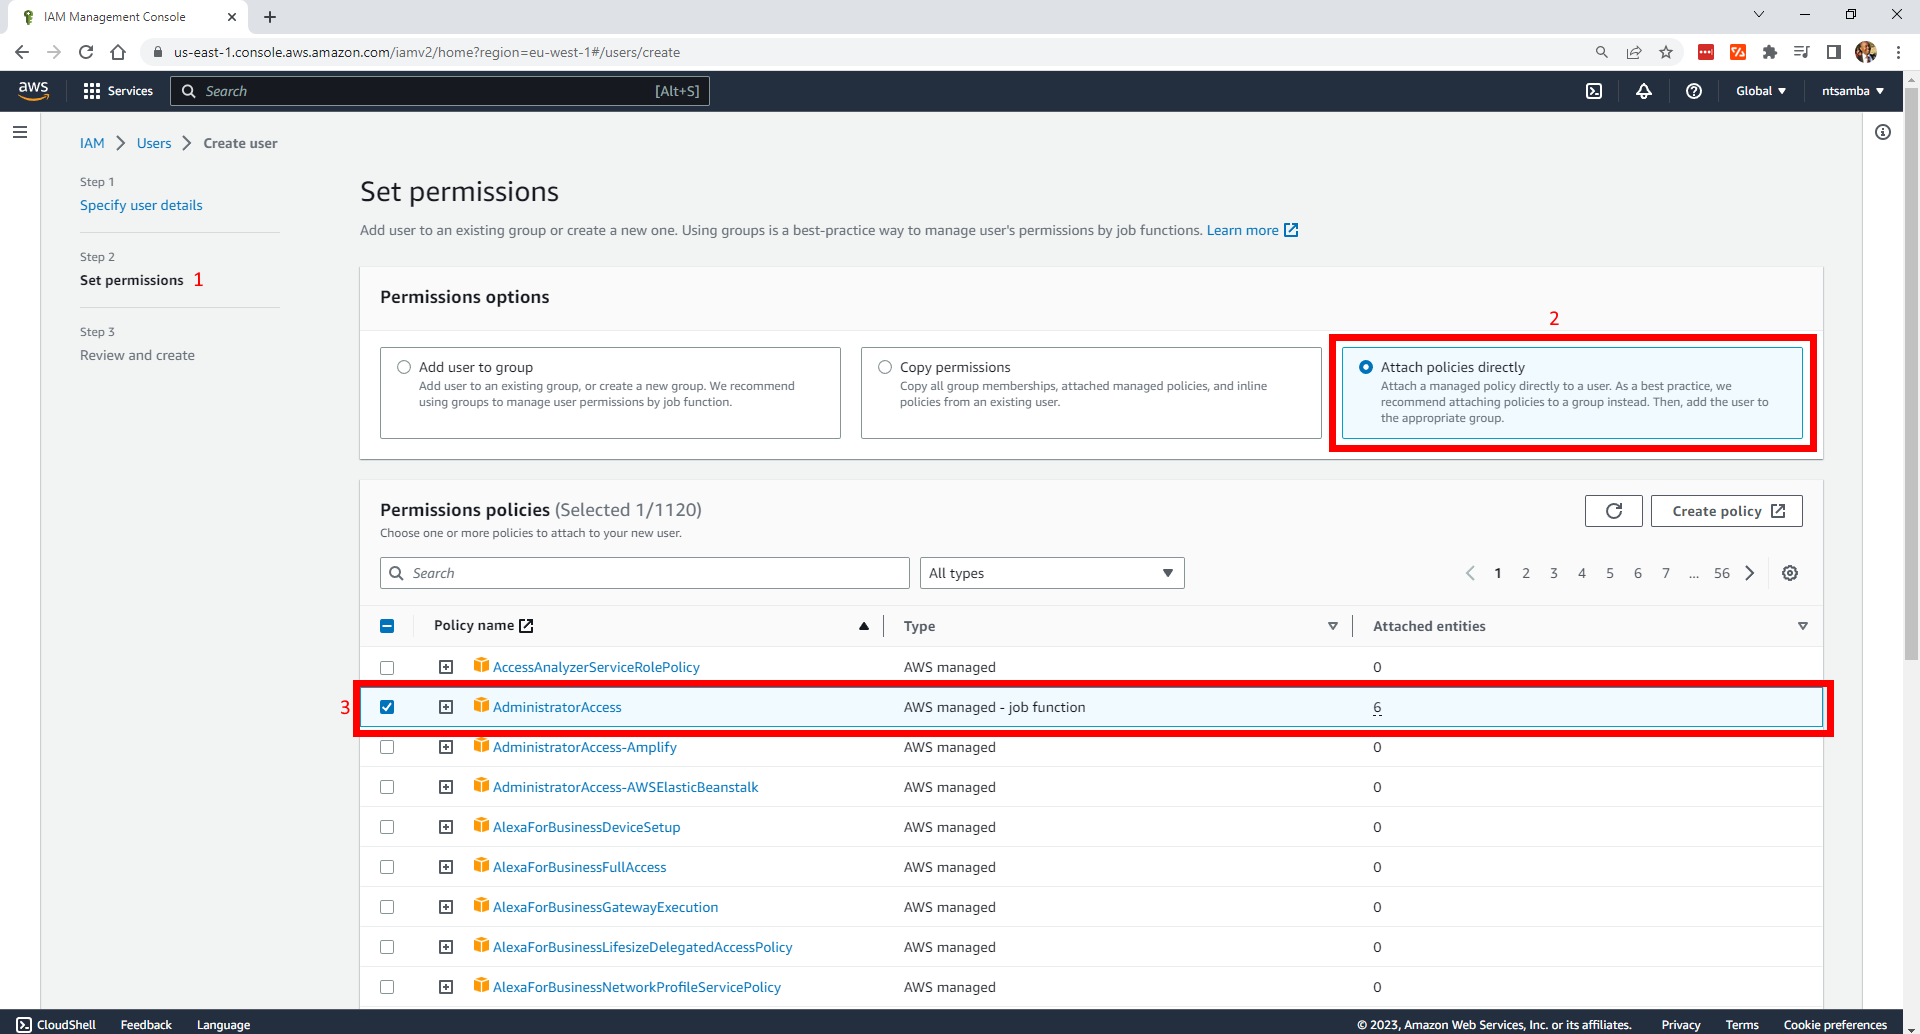
Click on Next to set the permissions. Then under Permissions options, select Attach policies directly, and under Permissions policies, tick the checkbox next to AdministratorAccess. This gives the user the permissions they need to create any resource with Terraform:
Scroll down to the bottom of the page and click on Next to review and create the user.
Make sure everything is as you intend; then select Create user.
You should receive a confirmation that the user has been successfully created and the user has been added to the list of users:
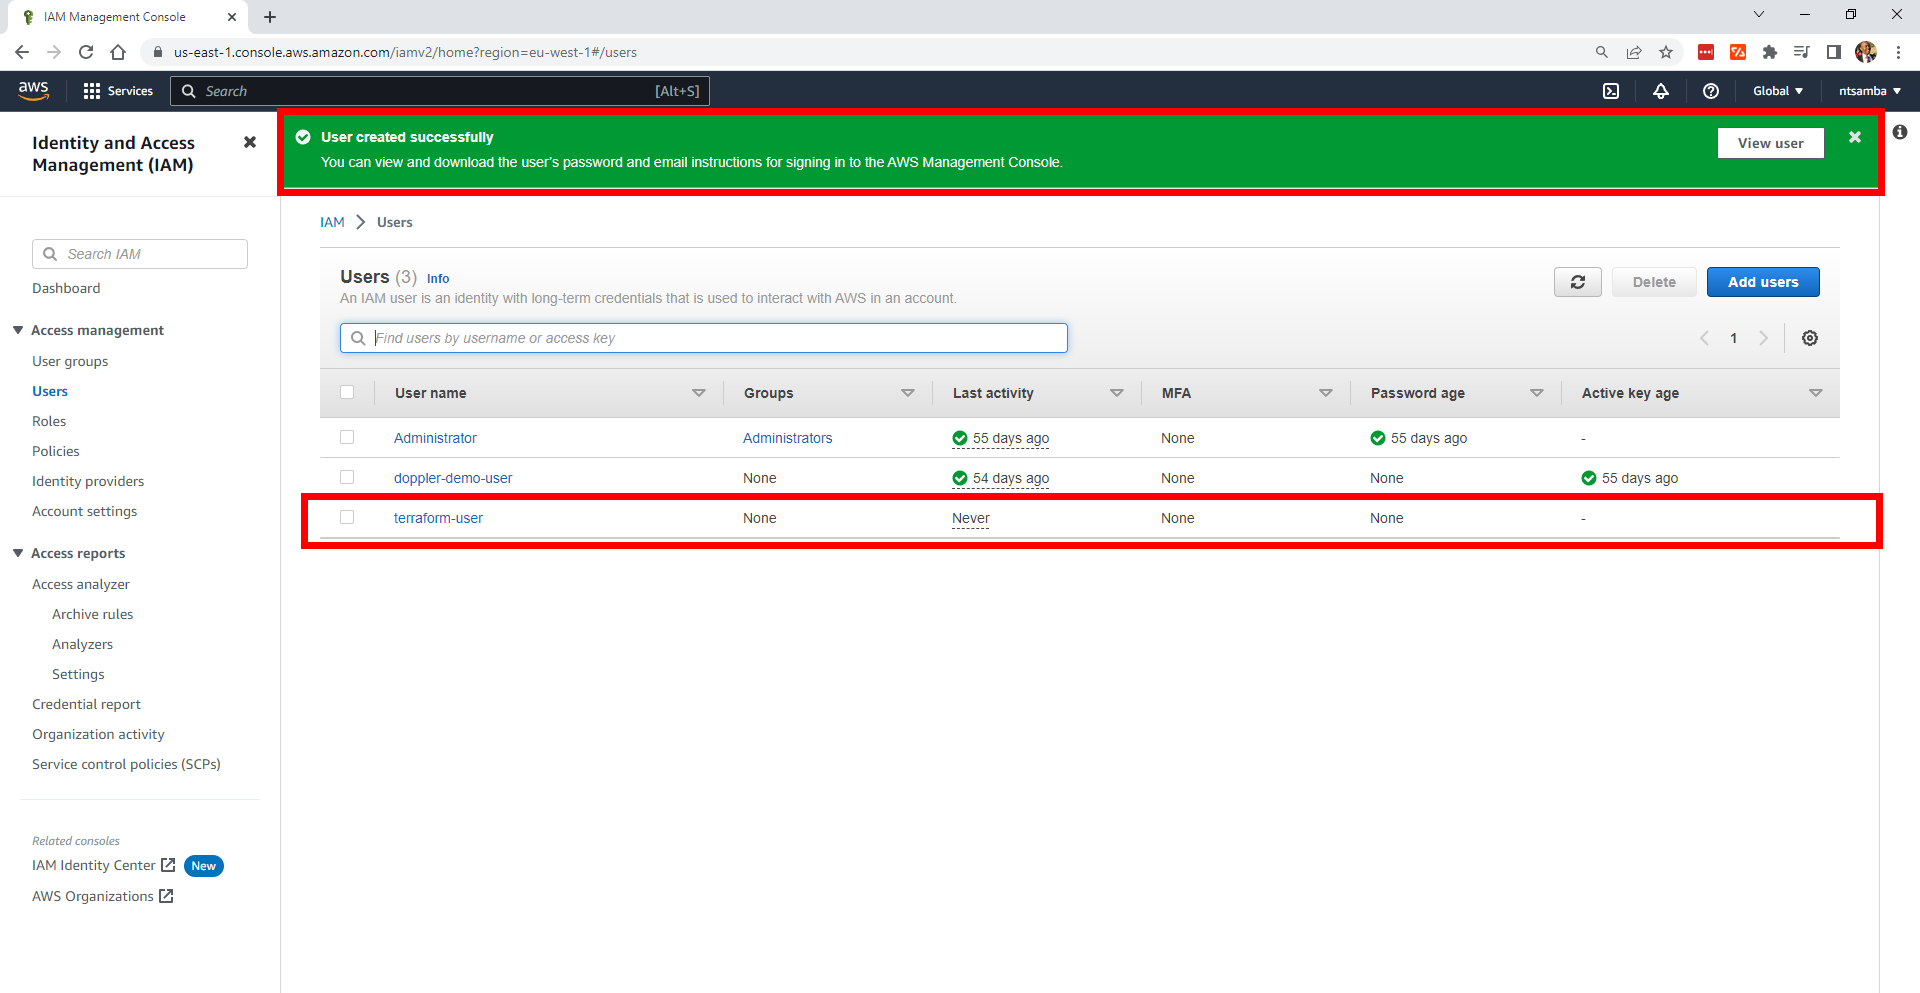
To view the new user’s details, you can click on View user on the confirmation at the top of your screen, or you can select the new username in your list of users.
On the terraform-user details page, select Security credentials:
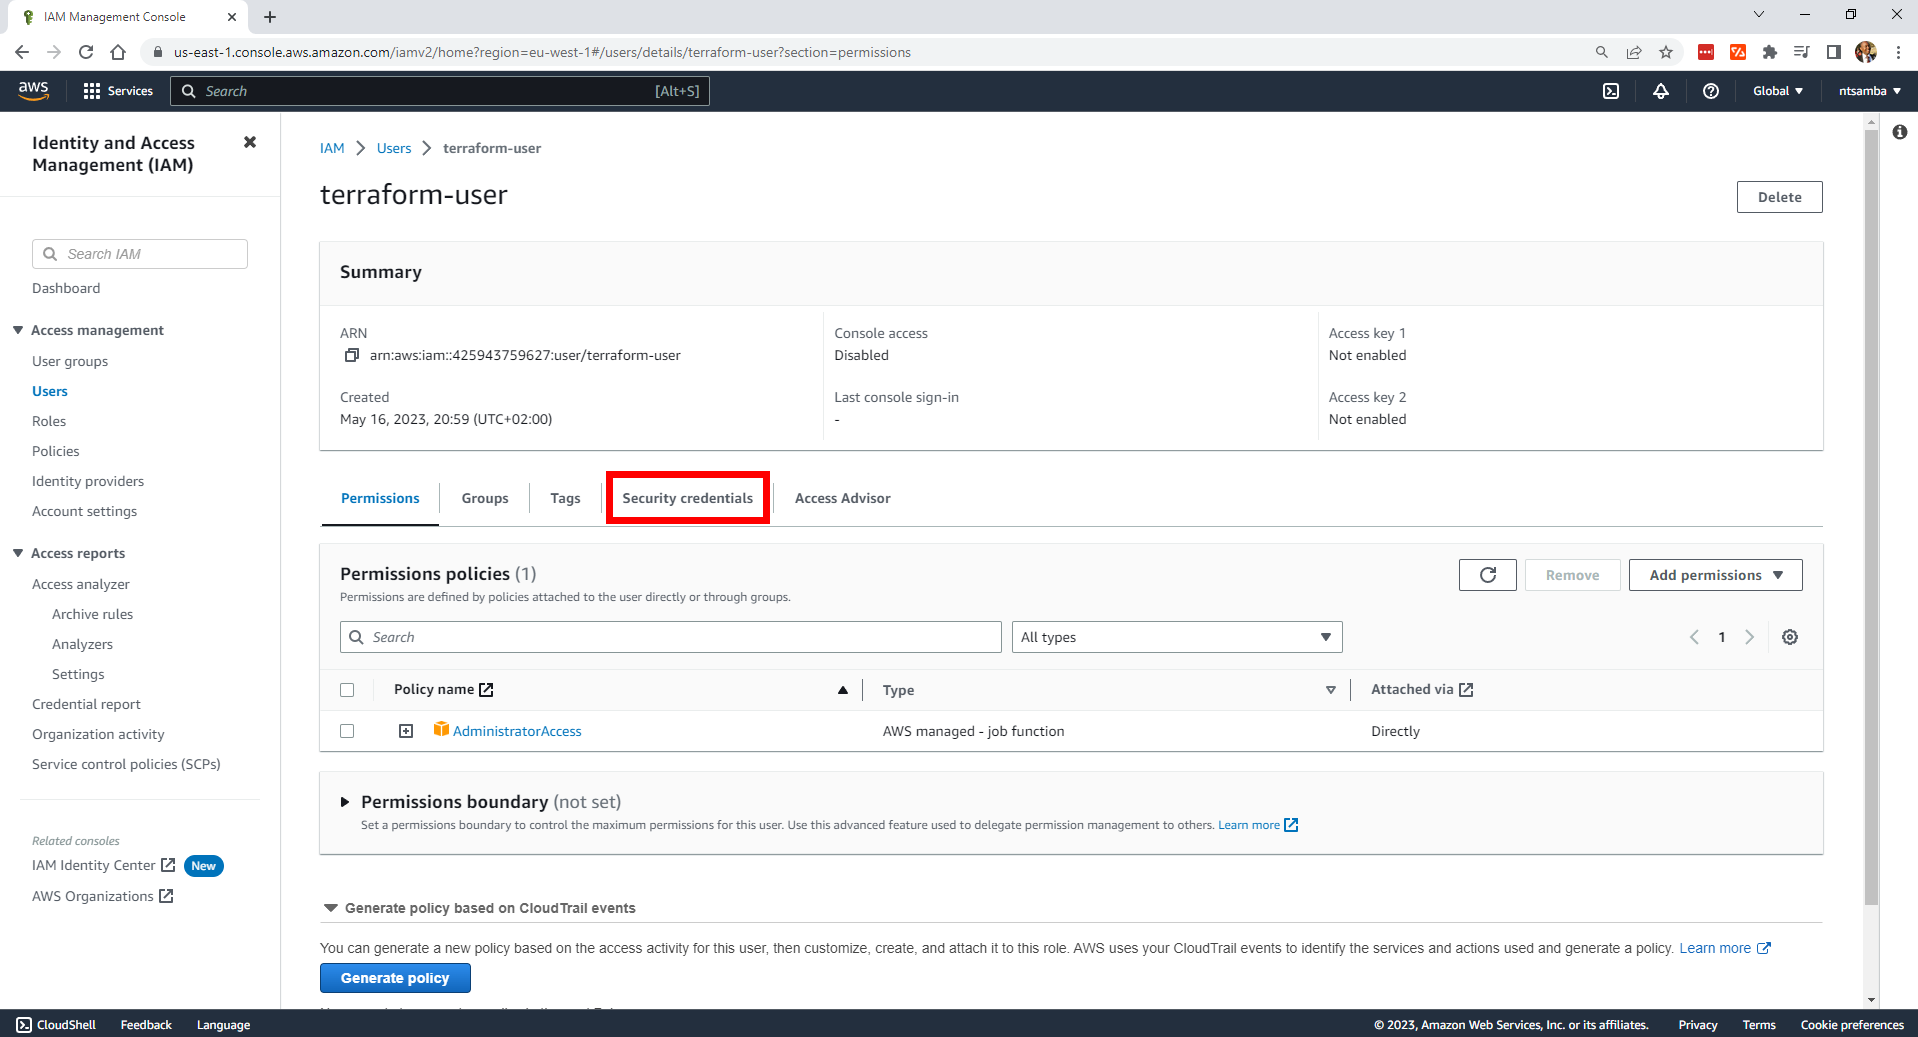
Then scroll down to the Access keys section and select Create access key:

Select the Command Line Interface (CLI) option and tick the I understand the above recommendation and want to proceed to create an access key checkbox:
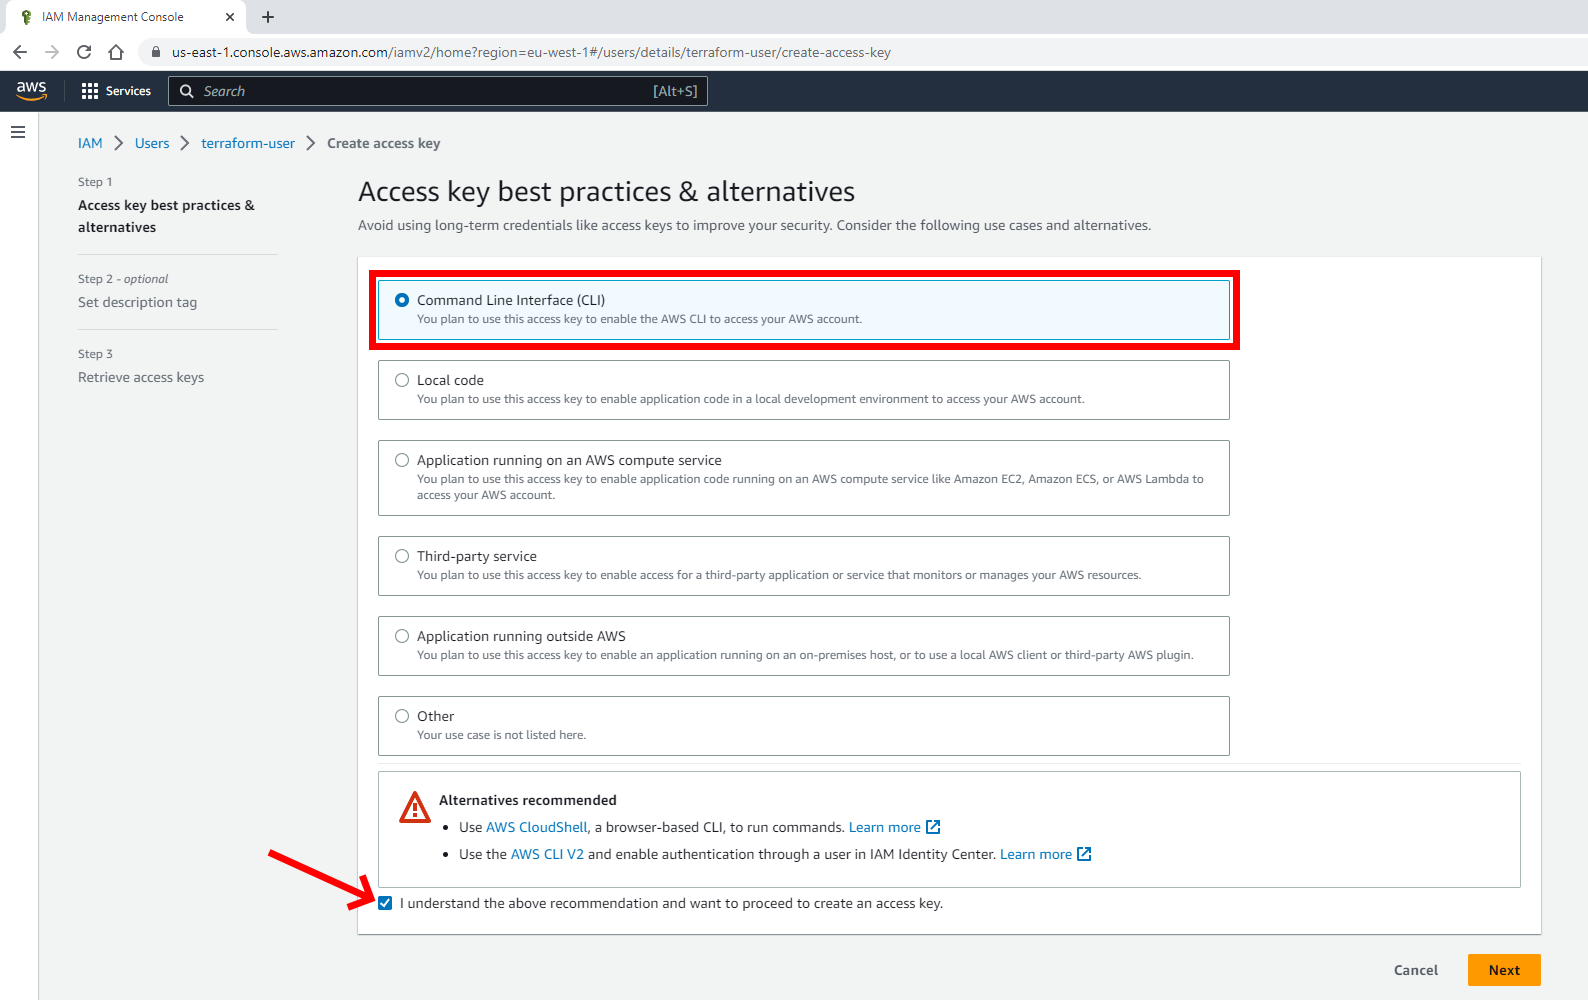
Select Next to set the optional description tag and add the following description: “Access key for terraform demo”:

Then click on Create access key. You’ll get confirmation that the key was created successfully. Click on Show to view the key, or you can download a CSV file with the credentials. Make sure you save this information in a safe place as this is the only time you can access the secret key:
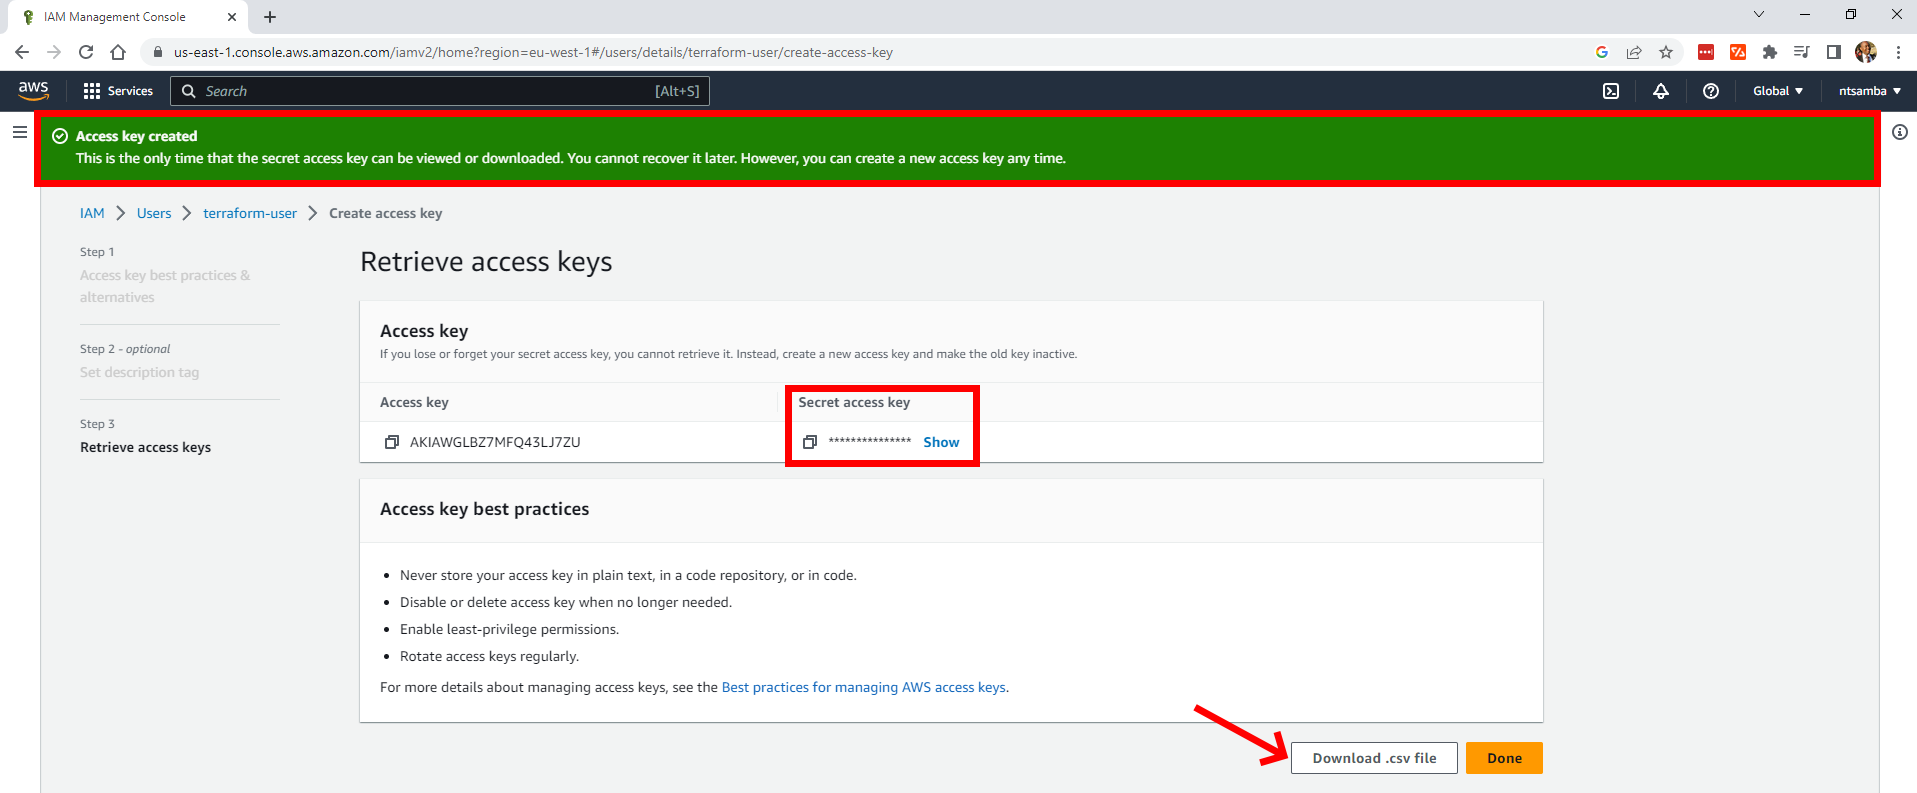
Click on Done to close the Retrieve access keys page.
Configure the AWS Credentials
After creating your new Terraform user, you need to set the credentials (ie access key and secret access key) to be used by Terraform to provision resources. To do so, open a new terminal, and run the aws configure command:
aws configureFollow the prompts to set the following fields: AWS Access Key ID, AWS Secret Access Key, Default region name, and Default output format.
Input the access key ID and secret access key you retrieved previously. For the region name, put in the default region you want to use (ie eu-west-1). The Default output format can be any of JSON, YAML, YAML-stream, text, and table. However, If you don’t put anything in there, it defaults to JSON (which is what’s used in this tutorial):

Build the VPC
Now that Terraform is installed and your AWS credentials are configured, it’s time to build the VPC.
Create a VPC with the following components:
| Component | Description |
|---|---|
| Subnets | Subnets are subdivisions of a VPC’s IP address range. A subnet is a smaller, more specific part of a VPC that’s used to segregate resources such as Amazon Elastic Compute Cloud (EC2) or Amazon Relational Database Service (RDS) within the VPC. Subnets are identified by a Classless Inter-Domain Routing (CIDR) block and can be public or private. Public subnets have a route to the internet gateway, but private subnets do not. |
| Internet gateway | An internet gateway enables the communication between EC2 instances in a VPC and the internet. It provides a target for routing traffic to and from the internet. |
| NAT gateway | A Network Address Translation (NAT) gateway is a network interface that allows instances in a private subnet to access the public internet. It essentially acts as a bridge between the private subnets and the internet. |
| Security groups | Security groups act as virtual firewalls that control inbound and outbound traffic for instances within a VPC. They define the allowed protocols, ports, and IP ranges for communication. |
Navigate to the project directory that you created previously (ie terraform-vpc-demo) and create main.tf and resources.tf files in it. The main.tf file contains all the VPC configurations, and the resources.tf file contains all the configurations of the resources you create in the VPC.
Add the following code to the main.tf file:
provider "aws" {
  region = "eu-west-1"  # Replace with your desired AWS region
}

resource "aws_vpc" "demo-vpc" {
  cidr_block = "10.0.0.0/16"
  tags = {
    Name = "demo-vpc"
  }
}
This code sets the provider as AWS. A provider is a plugin that lets Terraform manage an external API, which in this case is AWS. It also creates an Amazon VPC called demo-vpc with a cidr_block and a tag called demo-vpc defined.
Initialize Terraform
To initialize Terraform, run the following command in the working directory:
terraform initInitialization plays a crucial role in Terraform, as it sets up essential components and configurations like provider plugins and backend settings. This ensures seamless and consistent execution of Terraform operations.
You should get the following output, which signifies that Terraform was successfully initialized in the directory with the main.tf file:
Initializing the backend...

Initializing provider plugins...
- Finding latest version of hashicorp/aws...
- Installing hashicorp/aws v4.67.0...
- Installed hashicorp/aws v4.67.0 (signed by HashiCorp)

Terraform has created a lock file .terraform.lock.hcl to record the
provider selections it made above. Include this file in your version
control repository so that Terraform can guarantee to make the same
selections by default when you run "terraform init" in the future.

Terraform has been successfully initialized!

You may now begin working with Terraform. Try running "terraform plan"
to see any changes that are required for your infrastructure. All
Terraform commands should now work.

If you ever set or change modules or backend configuration for Terraform,
rerun this command to reinitialize your working directory. If you forget,
other commands will detect it and remind you to do so if necessary.
Run the terraform plan Command
The terraform plan command gives you a preview of the actions Terraform will take to create, delete, or modify your infrastructure. You can also save a plan (ie save the actions that Terraform will have to complete) and then apply it later.
To run the command, run terraform plan within the project directory (ie the terraform-vpc-demo directory):
terraform planYour output looks like this:
Terraform used the selected providers to generate the following
execution plan. Resource actions are indicated with the following symbols:
  + create

Terraform will perform the following actions:

  # aws_vpc.demo-vpc will be created
  + resource "aws_vpc" "demo-vpc" {
      + arn                                  = (known after apply)
      + cidr_block                           = "10.0.0.0/16"
      + default_network_acl_id               = (known after apply)
      + default_route_table_id               = (known after apply)
      + default_security_group_id            = (known after apply)
      + dhcp_options_id                      = (known after apply)
      + enable_classiclink                   = (known after apply)
      + enable_classiclink_dns_support       = (known after apply)
      + enable_dns_hostnames                 = (known after apply)
      + enable_dns_support                   = true
      + enable_network_address_usage_metrics = (known after apply)
      + id                                   = (known after apply)
      + instance_tenancy                     = "default"
      + ipv6_association_id                  = (known after apply)
      + ipv6_cidr_block                      = (known after apply)
      + ipv6_cidr_block_network_border_group = (known after apply)
      + main_route_table_id                  = (known after apply)
      + owner_id                             = (known after apply)
      + tags                                 = {
          + "Name" = "demo-vpc"
        }
      + tags_all                             = {
          + "Name" = "demo-vpc"
        }
    }

Plan: 1 to add, 0 to change, 0 to destroy.

──────────────────────────────────────────────────────────────────────────

Note: You didn't use the -out option to save this plan, so Terraform can't
guarantee to take exactly these actions if you run "terraform apply" now.
The plan specifies that one resource, the vpc.demo-vpc, will be created. It also specifies that resources will be created in the eu-west-1 region and, currently.
Currently, you should have only the default VPC in the region:
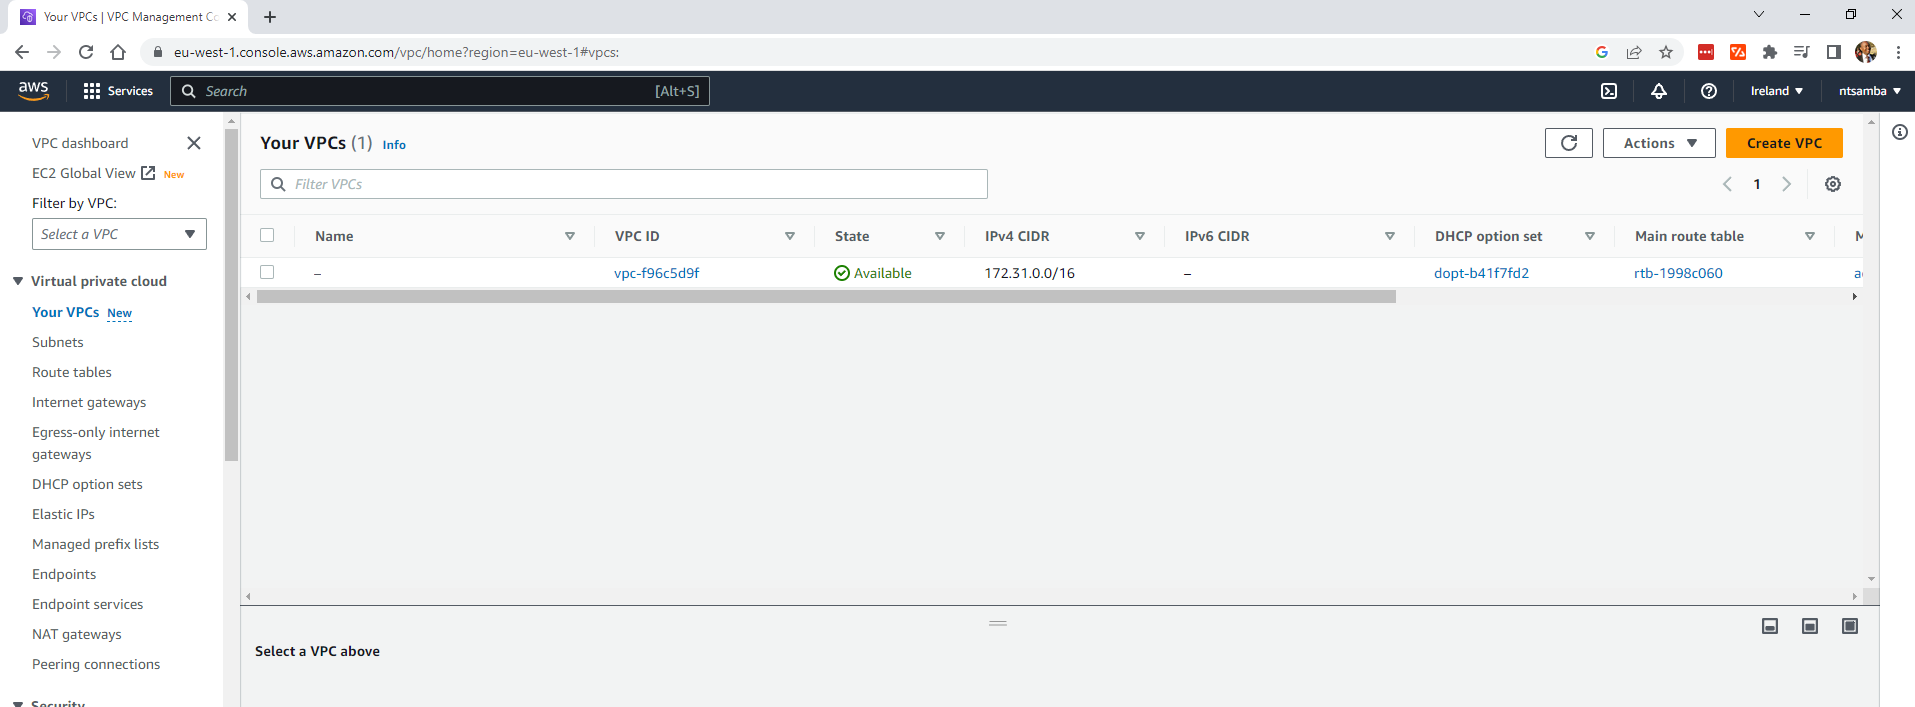
Apply the Changes
The terraform plan command only shows you what will change, you need to run terraform apply to actually apply the changes:
terraform applyThis is what your output looks like:
Terraform used the selected providers to generate the following execution
plan. Resource actions are indicated with the following symbols:
  + create

Terraform will perform the following actions:

  # aws_vpc.demo-vpc will be created
  + resource "aws_vpc" "demo-vpc" {
      + arn                                  = (known after apply)
      + cidr_block                           = "10.0.0.0/16"
      + default_network_acl_id               = (known after apply)
      + default_route_table_id               = (known after apply)
      + default_security_group_id            = (known after apply)
      + dhcp_options_id                      = (known after apply)
      + enable_classiclink                   = (known after apply)
      + enable_classiclink_dns_support       = (known after apply)
      + enable_dns_hostnames                 = (known after apply)
      + enable_dns_support                   = true
      + enable_network_address_usage_metrics = (known after apply)
      + id                                   = (known after apply)
      + instance_tenancy                     = "default"
      + ipv6_association_id                  = (known after apply)
      + ipv6_cidr_block                      = (known after apply)
      + ipv6_cidr_block_network_border_group = (known after apply)
      + main_route_table_id                  = (known after apply)
      + owner_id                             = (known after apply)
      + tags                                 = {
          + "Name" = "demo-vpc"
        }
      + tags_all                             = {
          + "Name" = "demo-vpc"
        }
    }

Plan: 1 to add, 0 to change, 0 to destroy.

Do you want to perform these actions?
  Terraform will perform the actions described above.
  Only 'yes' will be accepted to approve.

  Enter a value:
Enter yes to approve the changes so Terraform starts creating the VPC. If the creation is successful, you’ll get the following output:
Enter a value: yes

aws_vpc.demo-vpc: Creating...
aws_vpc.demo-vpc: Creation complete after 4s [id=vpc-02fab61ec18bf51db]
To check if the VPC was created successfully, log in to your AWS Console with the root user and in the AWS services search bar, type in VPC. On the results click on VPC to open the VPC Console.
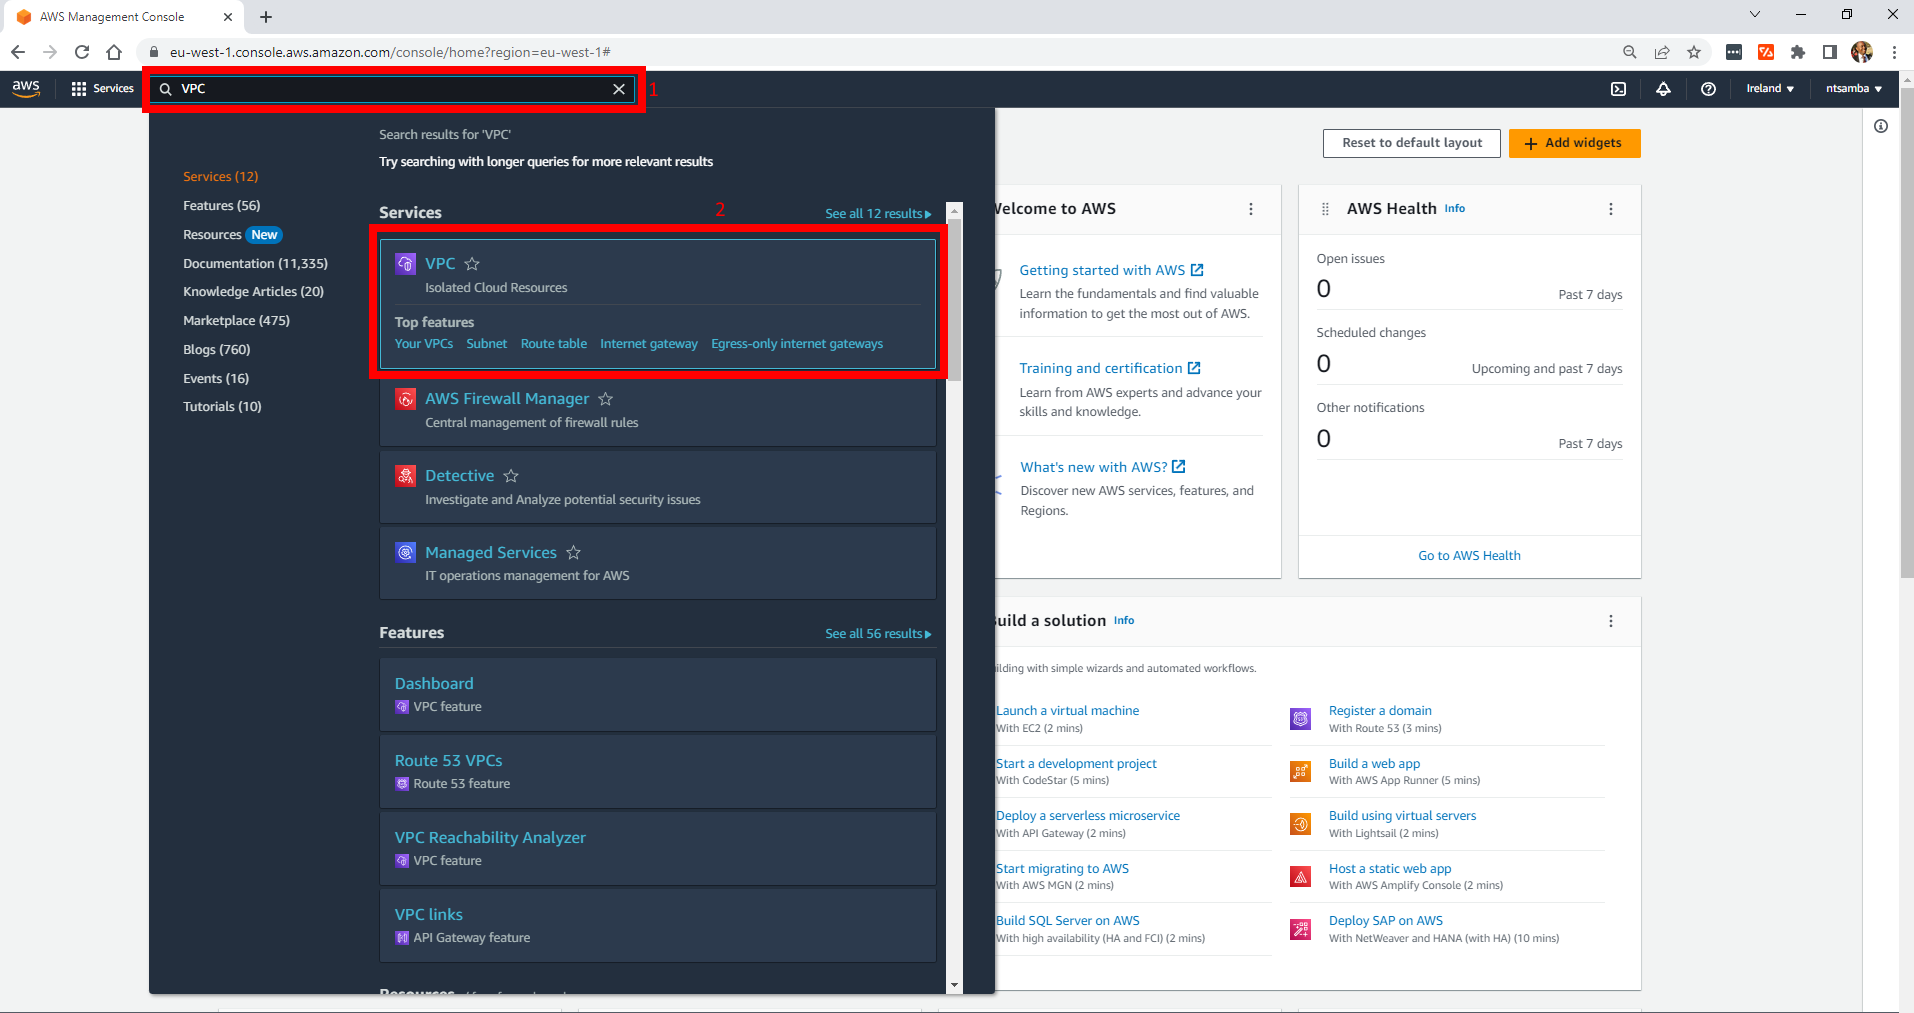
On the VPC console, click on VPC and you should see the Demo VPC that was created:
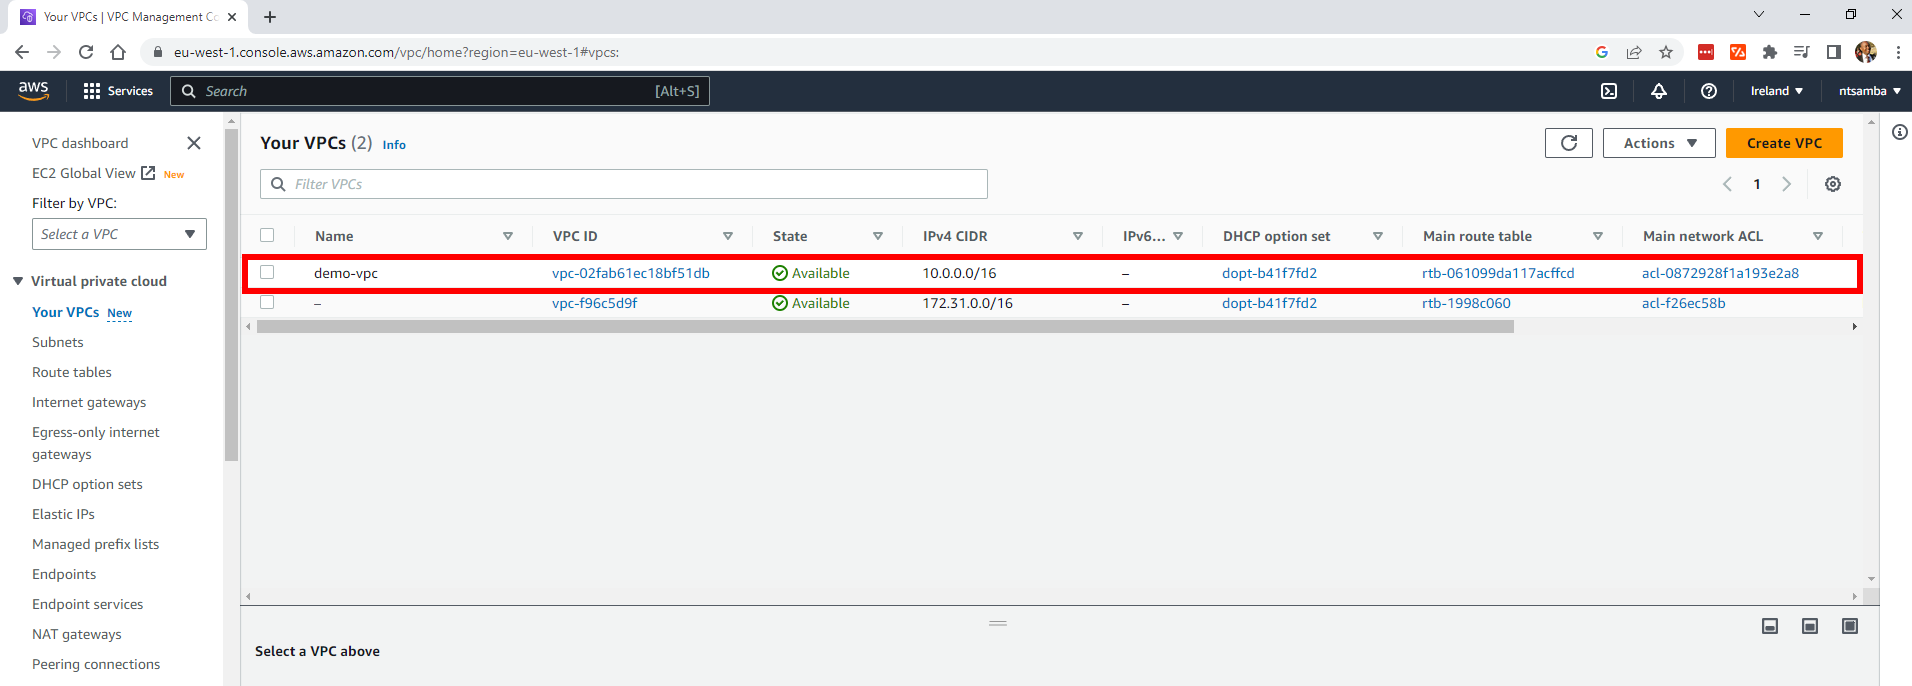
If you do not see the VPC created, make sure you’re in the right region (ie the region specified in your Terraform code) in the provider block.
Please note that the VPC is associated with an existing Dynamic Host Configuration Protocol (DHCP) option set and has a main route table and a main network access control list (ACL) that you did not specify in the Terraform code.
If you select the VPC you created and scroll down, you’ll see that it doesn’t have any subnets:
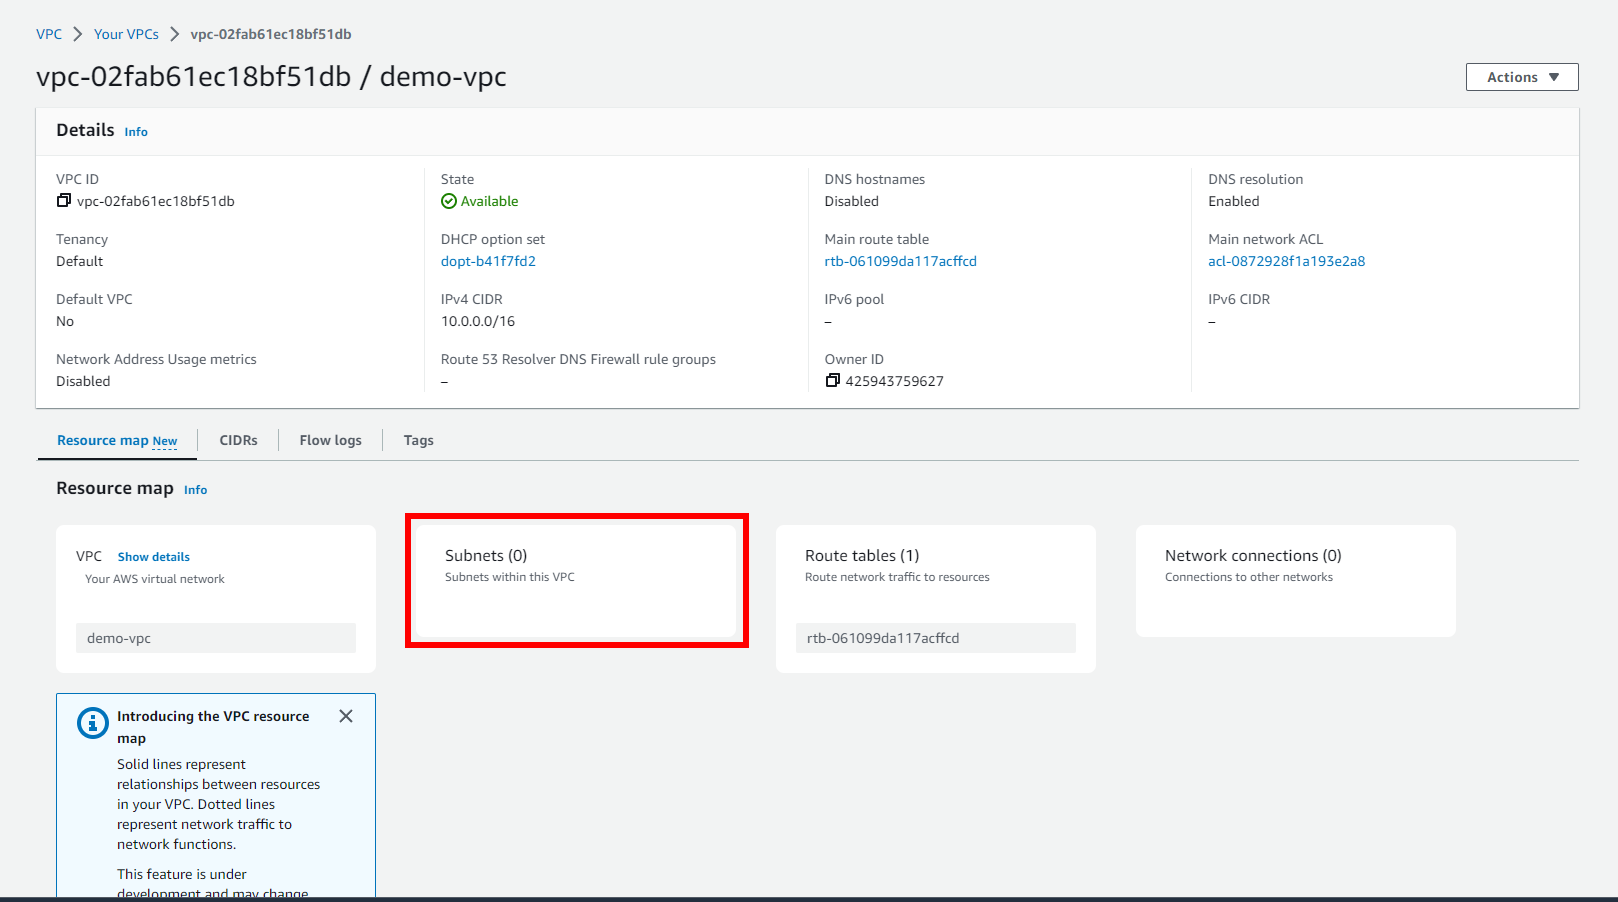
Create Subnets
Subnets are created in an AWS VPC to segment the VPC’s IP address range into smaller, more manageable blocks, providing isolation and fault tolerance. Subnets also allow you to distribute resources across different availability zones, enhancing the high availability of your applications and services in the cloud.
To create subnets in the VPC demo-vpc, add the following configurations to the main.tf file:
resource "aws_subnet" "private-subnet-1" {
  vpc_id     = aws_vpc.demo-vpc.id
  cidr_block = "10.0.1.0/24"
  availability_zone = "eu-west-1a"
  tags = {
    Name = "private-subnet-1"
  }
}

resource "aws_subnet" "private-subnet-2" {
  vpc_id     = aws_vpc.demo-vpc.id
  cidr_block = "10.0.2.0/24"
  availability_zone = "eu-west-1b"
  tags = {
    Name = "private-subnet-2"
  }
}

resource "aws_subnet" "public-subnet-1" {
  vpc_id     = aws_vpc.demo-vpc.id
  cidr_block = "10.0.3.0/24"
  availability_zone = "eu-west-1a"
  tags = {
    Name = "public-subnet-1"
  }
}

resource "aws_subnet" "public-subnet-2" {
  vpc_id     = aws_vpc.demo-vpc.id
  cidr_block = "10.0.4.0/24"
  availability_zone = "eu-west-1b"
  tags = {
    Name = "public-subnet-2"
  }
}
This creates four subnets: two private subnets and two public subnets, one for each of the availability zones, eu-west-1a and eu-west-1b. Private and public subnets are necessary in an AWS VPC to separate resources with different levels of internet accessibility. Public subnets allow resources to have direct internet access, while private subnets restrict internet access, providing an additional layer of security for sensitive or internal resources.
The line vpc_id = aws_vpc.demo-vpc.id specifies that the newly created subnet, named public-subnet-2, will be associated with the VPC identified by the resource demo-vpc from the AWS provider. The .id at the end retrieves the unique identifier (ie ID) of the VPC resource to establish an association between the subnet and the corresponding VPC in the same AWS region.
Then run the plan command, and if all goes well, apply the changes:
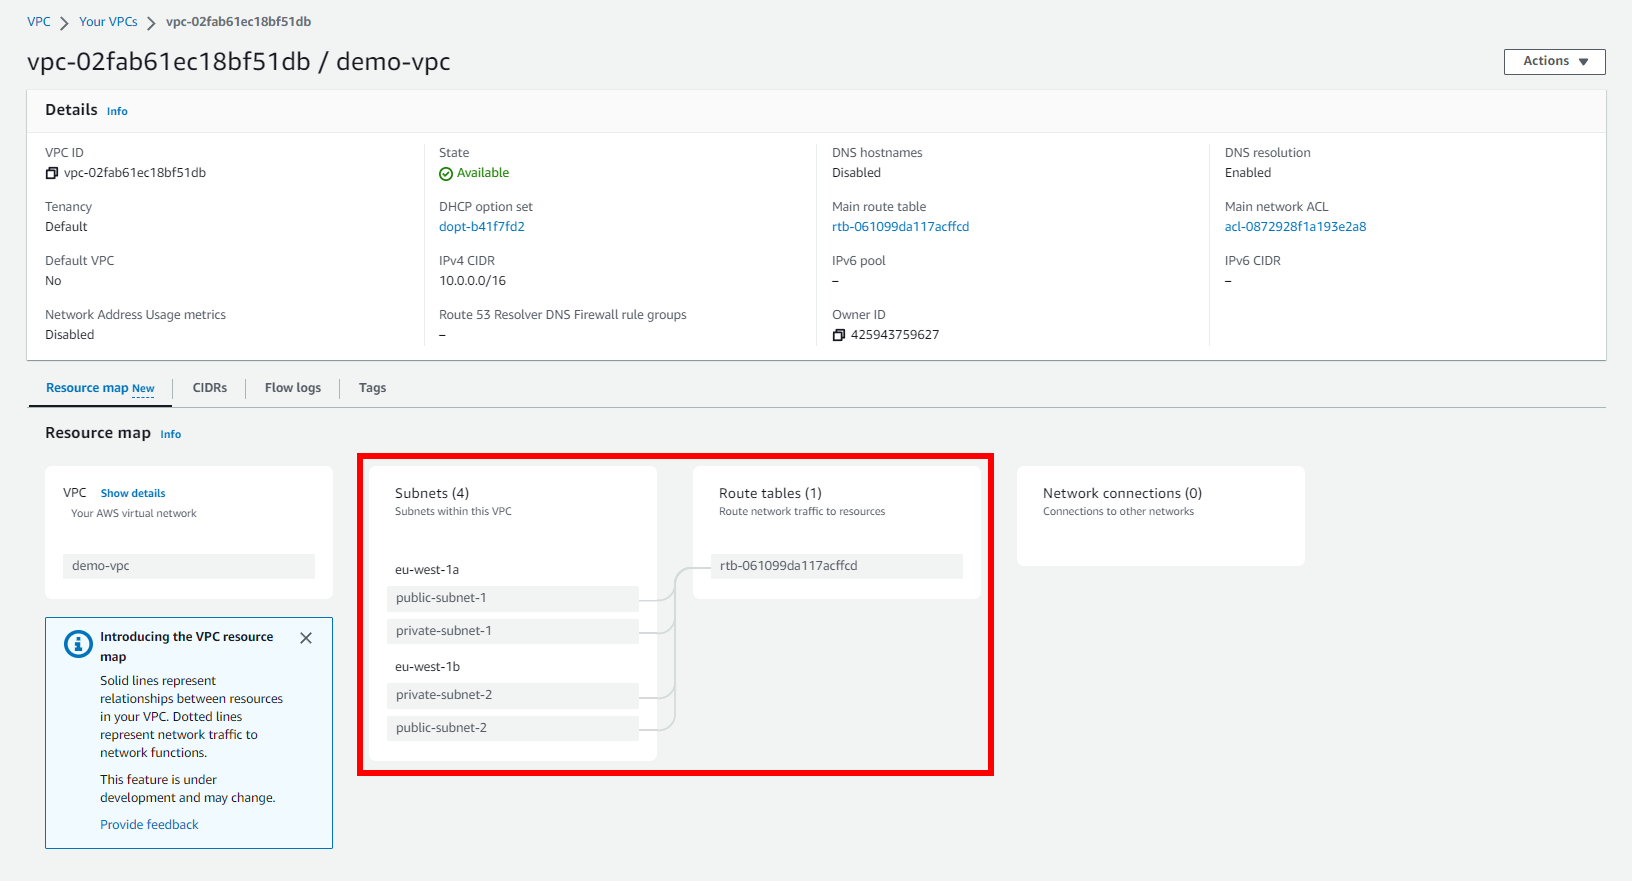
Create an Internet Gateway
To provide internet access to the public subnets, you need to create an internet gateway. Add the following configuration to create an internet gateway called demo-igw in the main.tf file:
resource "aws_internet_gateway" "demo-igw" {
  vpc_id = aws_vpc.demo-vpc.id
  tags = {
    Name = "demo-vpc-IGW"
    }
}
Specifying the VPC ID associates this internet gateway with the demo-vpc VPC. Currently, you only have the default internet gateway:

Please note: It’s not advisable to use the default gateway as you would need to modify resources which is introduced later in the article.
Once you apply the changes with terraform apply, you’ll see that the demo-vpc-IGW internet gateway has been created:

demo-vpc-IGW internet gateway createdCreate a Third Route Table and Associate Public Subnets
You currently will have one or two route tables depending on whether you have done prior work in the AWS region:

Please note: The route table with the VPC ID: vpc-f96c5d9f existed in the AWS environment prior to this tutorial.
In this case, you need to create a third route table and associate the public subnets with this table so that the public subnets can be publicly accessible over the internet.
To do so, add the following configuration in the main.tf file:
resource "aws_route_table" "public-route-table" {
  vpc_id = aws_vpc.demo-vpc.id
  tags = {
    Name = "public-route-table"
  }
}
Then apply the changes to create a public route table called public-route-table:

After applying the changes, you need to associate the public subnets with it. Currently, all the subnets are implicitly associated with the main route table:
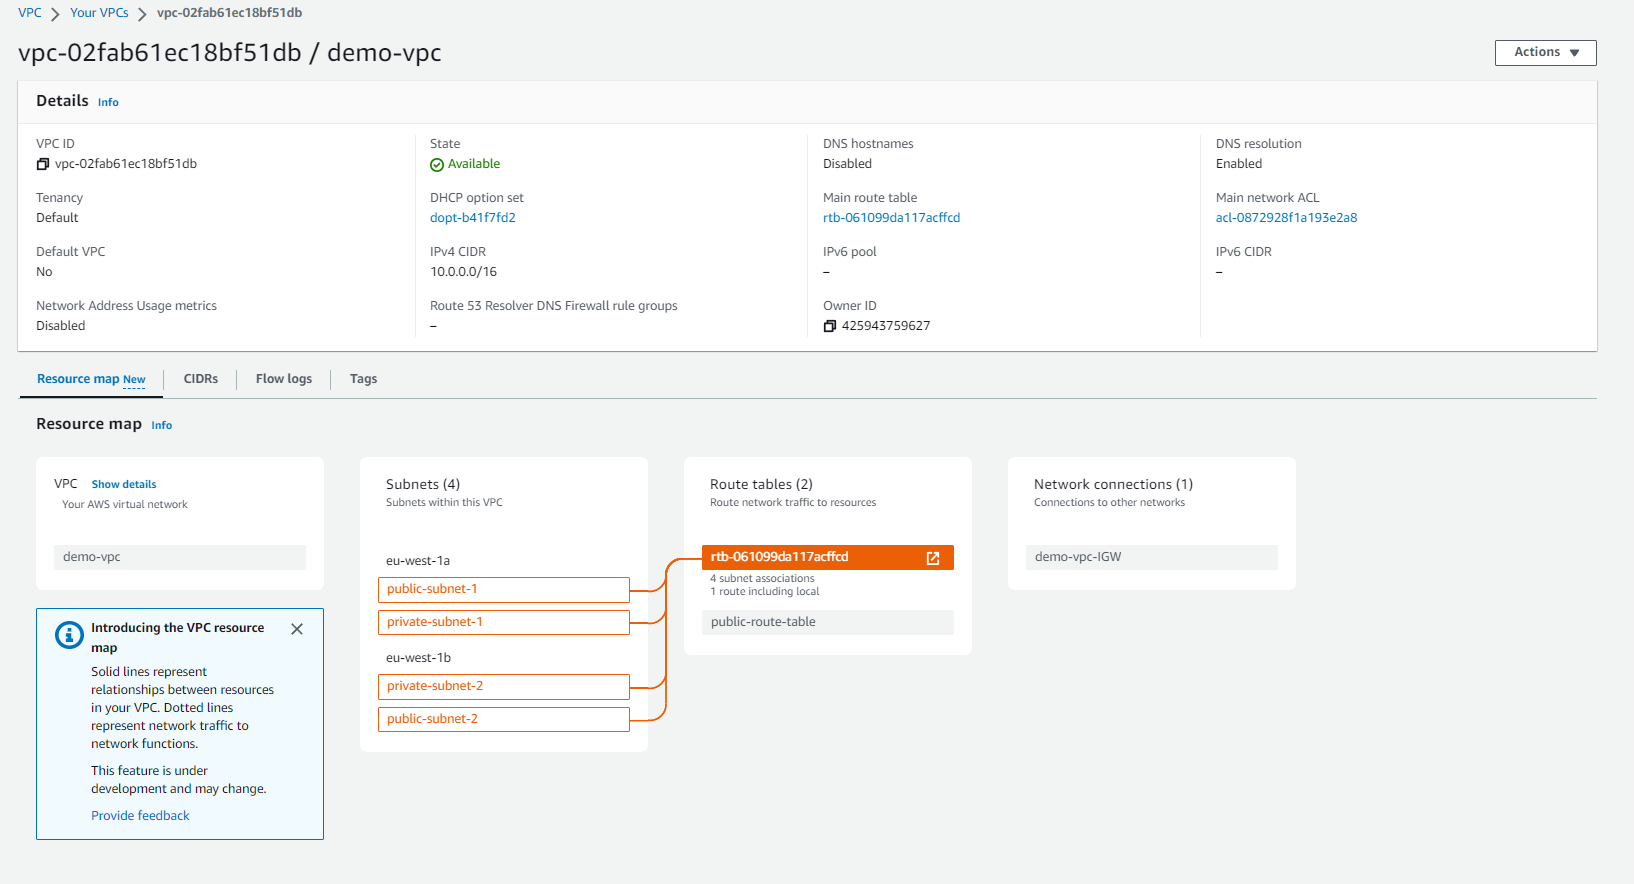
To associate the public subnets with the public-route-table, add the following configuration to the main.tf file:
resource "aws_route" "public-route" {
  route_table_id         = aws_route_table.public-route-table.id
  destination_cidr_block = "0.0.0.0/0"
  gateway_id             = aws_internet_gateway.demo-igw.id
}

resource "aws_route_table_association" "public-subnet-1-association" {
  subnet_id      = aws_subnet.public-subnet-1.id
  route_table_id = aws_route_table.public-route-table.id
}

resource "aws_route_table_association" "public-subnet-2-association" {
  subnet_id      = aws_subnet.public-subnet-2.id
  route_table_id = aws_route_table.public-route-table.id
}
Then apply the changes, and the public subnets are now fully public:
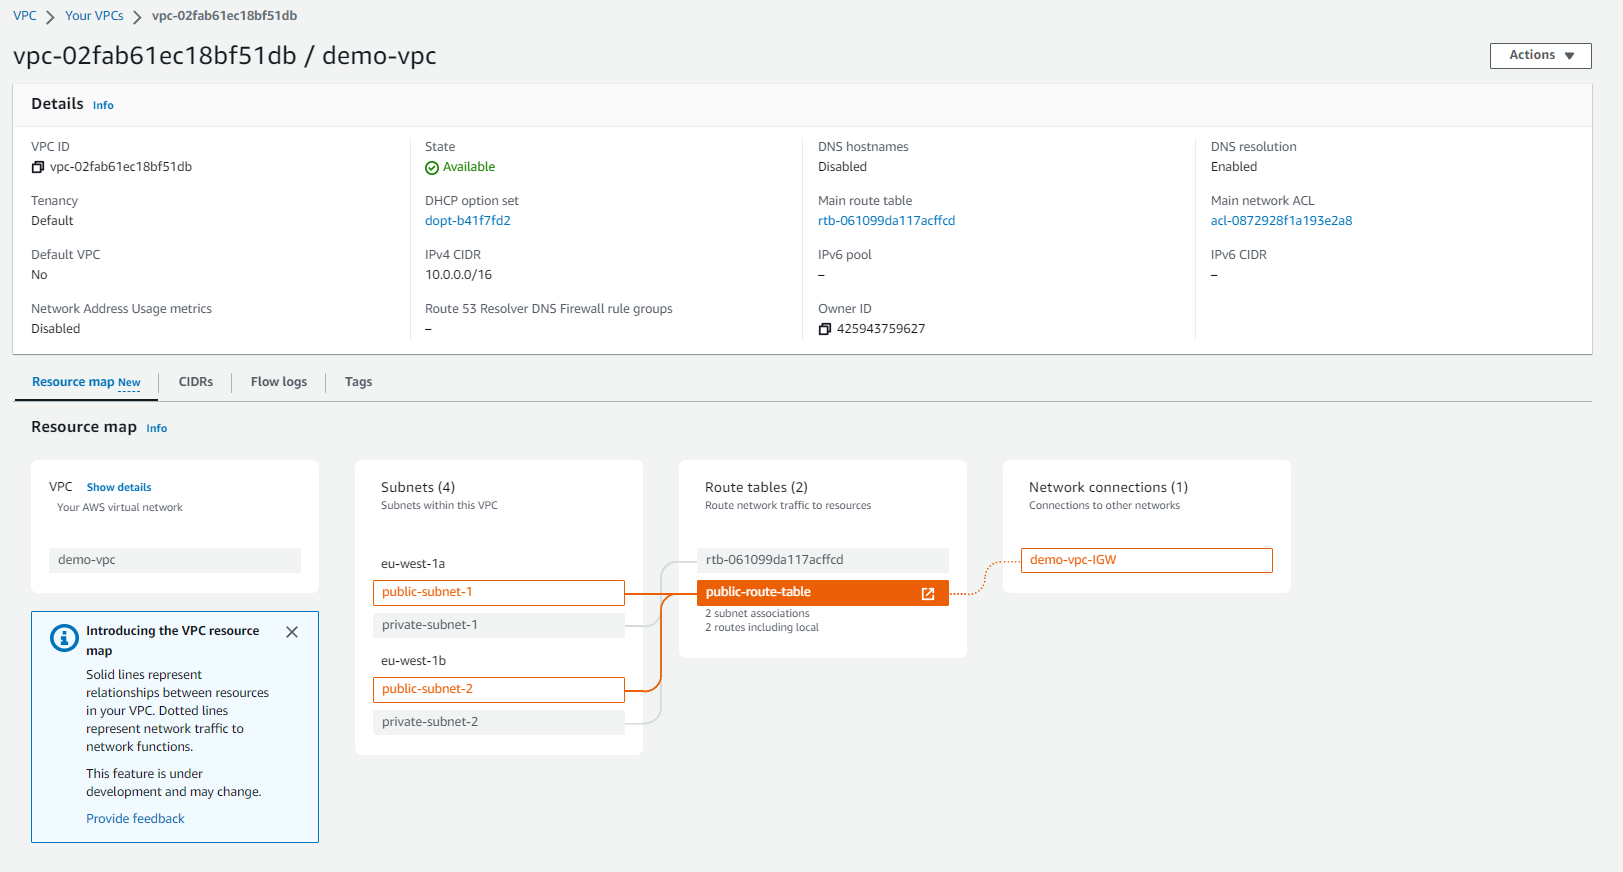
Create a NAT Gateway
To enable connectivity in the private subnets, you need to create a NAT (Network Address Translation) gateway and associate it with the private subnets. Then you need to attach the NAT Gateway to an Elastic IP Address (EIP).
In AWS, an EIP is essential for obtaining a static and public IP address that remains associated with your AWS account. This EIP serves as a consistent endpoint for various resources such as EC2 instances, NAT gateways, or load balancers. Even if these resources are stopped or restarted, the EIP ensures there are no IP address changes or service interruptions, allowing for uninterrupted access to your resources.
Currently, there is no EIP address:

And there is no NAT gateway:

To create the NAT gateway, add the following configuration in the main.tf file:
resource "aws_eip" "nat-eip" {
  vpc = true
   tags = {
      Name = "nat-eip"
      }
}

resource "aws_nat_gateway" "nat-gateway" {
  allocation_id = aws_eip.nat-eip.id
  subnet_id     = aws_subnet.public-subnet-1.id
  tags = {
      Name = "nat-gateway"
      }
}
This configuration creates an Elastic IP address that is used to create the NAT gateway (ie nat-gateway). Apply the configuration, and you should see that the Elastic IP address and NAT gateway were created:


Configure Security Groups
Once you’ve created the NAT gateway, it’s time to create security groups that act as virtual firewalls. Security groups control inbound and outbound traffic based on defined rules. By creating security groups, you can precisely manage network access to your instances, allowing you to specify which protocols, ports, and IP addresses are permitted, ultimately enhancing the security posture of your cloud infrastructure.
We are going to create two security groups, web-sg and db-sg:
web-sgis intended for web servers or instances that need to receive incoming HTTP traffic on port80. The ingress rule allows incoming TCP traffic on port80from any source IP address (ie0.0.0.0/0). The egress rule allows all outbound traffic to any destination IP address (ie0.0.0.0/0).db-sgis intended for database servers or instances that need to receive incoming traffic on port3306(typically used for MySQL database connections). The ingress rule allows incoming TCP traffic on port3306from the private subnets (in this case,10.0.1.0/24and10.0.2.0/24which are the IP address of the private subnets), allowing communication only from within the VPC. The egress rule allows all outbound traffic to any destination IP address (ie0.0.0.0/0).
To create the security groups, add the following configuration to the main.tf file:
resource "aws_security_group" "web-sg" {
  vpc_id = aws_vpc.demo-vpc.id
  name   = "web-sg"

  ingress {
    from_port   = 80
    to_port     = 80
    protocol    = "tcp"
    cidr_blocks = ["0.0.0.0/0"]
  }

  egress {
    from_port   = 0
    to_port     = 0
    protocol    = "-1"
    cidr_blocks = ["0.0.0.0/0"]
  }

  tags = {
    Name = "web-sg"
  }
}

resource "aws_security_group" "db-sg" {
  vpc_id = aws_vpc.demo-vpc.id
  name   = "db-sg"

  ingress {
    from_port   = 3306
    to_port     = 3306
    protocol    = "tcp"
    cidr_blocks = ["10.0.1.0/24", "10.0.2.0/24"]
    # Allow traffic from private subnets
  }

  egress {
    from_port   = 0
    to_port     = 0
    protocol    = "-1"
    cidr_blocks = ["0.0.0.0/0"]
  }

  tags = {
    Name = "db-sg"
  }
}
By configuring the security groups in this way, web-sg allows incoming HTTP traffic from anywhere, and db-sg only allows incoming database traffic from the specified private subnets. This helps to ensure the appropriate security and restricts access to services such as databases.
Once you apply the changes, web-sg and db-sg are created:

web-sg and db-sg security groups createdPlease note: The other three security groups existed in my AWS environment prior to this tutorial.
Provision Your Resources
Now that you’ve finished building the VPC, move on to provisioning resources.
Provision Amazon EC2 Instances
Provisioning EC2 instances is necessary to create and manage virtual servers in the cloud within the AWS infrastructure. To create two EC2 instances, add the following configuration in the resources.tf file:
resource "aws_instance" "private-instance" {
  ami           = "ami-00aa9d3df94c6c354"FF
  instance_type = "t2.micro"
  subnet_id     = aws_subnet.private-subnet-1.id
  tags = {
    Name = "private-instance"
  }
}

resource "aws_instance" "public-instance" {
  ami           = "ami-09fd16644beea3565"
  instance_type = "t2.micro"
  subnet_id     = aws_subnet.public-subnet-1.id
  tags = {
    Name = "public-instance"
  }
}
This configuration creates two EC2 instances: one in a private subnet called private-instance and the other in the public subnet called public-instance. These instances are provisioned using the Amazon Linux 2023 Amazon Machine Image (AMI) (ie ami-00aa9d3df94c6c354) and the Ubuntu Server 22.04 Long Term Support (LTS) (ie ami-09fd16644beea3565). Then they’re associated with their respective subnets. This association is crucial as it ensures that public instances are placed in public subnets, while private instances are deployed to private subnets.
As a reminder, there are currently no instances in the environment:

You need to apply the configuration to add these two instances:

Manage VPCs With Terraform
You’ve probably already realized that you can create Amazon VPCs with Terraform as well as manage them (ie change configurations), remove resources, and even destroy the VPC with all its elements. This enables you to version, review, and maintain your infrastructure configurations in a consistent and reproducible manner. By treating infrastructure as code, you can apply software engineering practices, such as version control, code review, and automated testing to your infrastructure changes.
Update the VPC Configuration and Modify Subnets
To update the VPC configuration, all you need to do is make changes to the configuration file specifying the update. To demonstrate, update the private subnet configuration by swapping the availability zones. In this case, private-subnet-1 changes from the availability zone eu-west-1a to eu-west-1b, and private-subnet-2 changes from eu-west-1b to eu-west-1c.
In the main.tf file, edit the following configuration:
resource "aws_subnet" "private-subnet-1" {
  vpc_id     = aws_vpc.demo-vpc.id
  cidr_block = "10.0.1.0/24"
  availability_zone = "eu-west-1a"
  tags = {
    Name = "private-subnet-1"
  }
}

resource "aws_subnet" "private-subnet-2" {
  vpc_id     = aws_vpc.demo-vpc.id
  cidr_block = "10.0.2.0/24"
  availability_zone = "eu-west-1b"
  tags = {
    Name = "private-subnet-2"
  }
}
And update it with this:
resource "aws_subnet" "private-subnet-1" {
  vpc_id     = aws_vpc.demo-vpc.id
  cidr_block = "10.0.1.0/24"
  availability_zone = "eu-west-1b"
  tags = {
    Name = "private-subnet-1"
  }
}

resource "aws_subnet" "private-subnet-2" {
  vpc_id     = aws_vpc.demo-vpc.id
  cidr_block = "10.0.2.0/24"
  availability_zone = "eu-west-1a"
  tags = {
    Name = "private-subnet-2"
  }
}
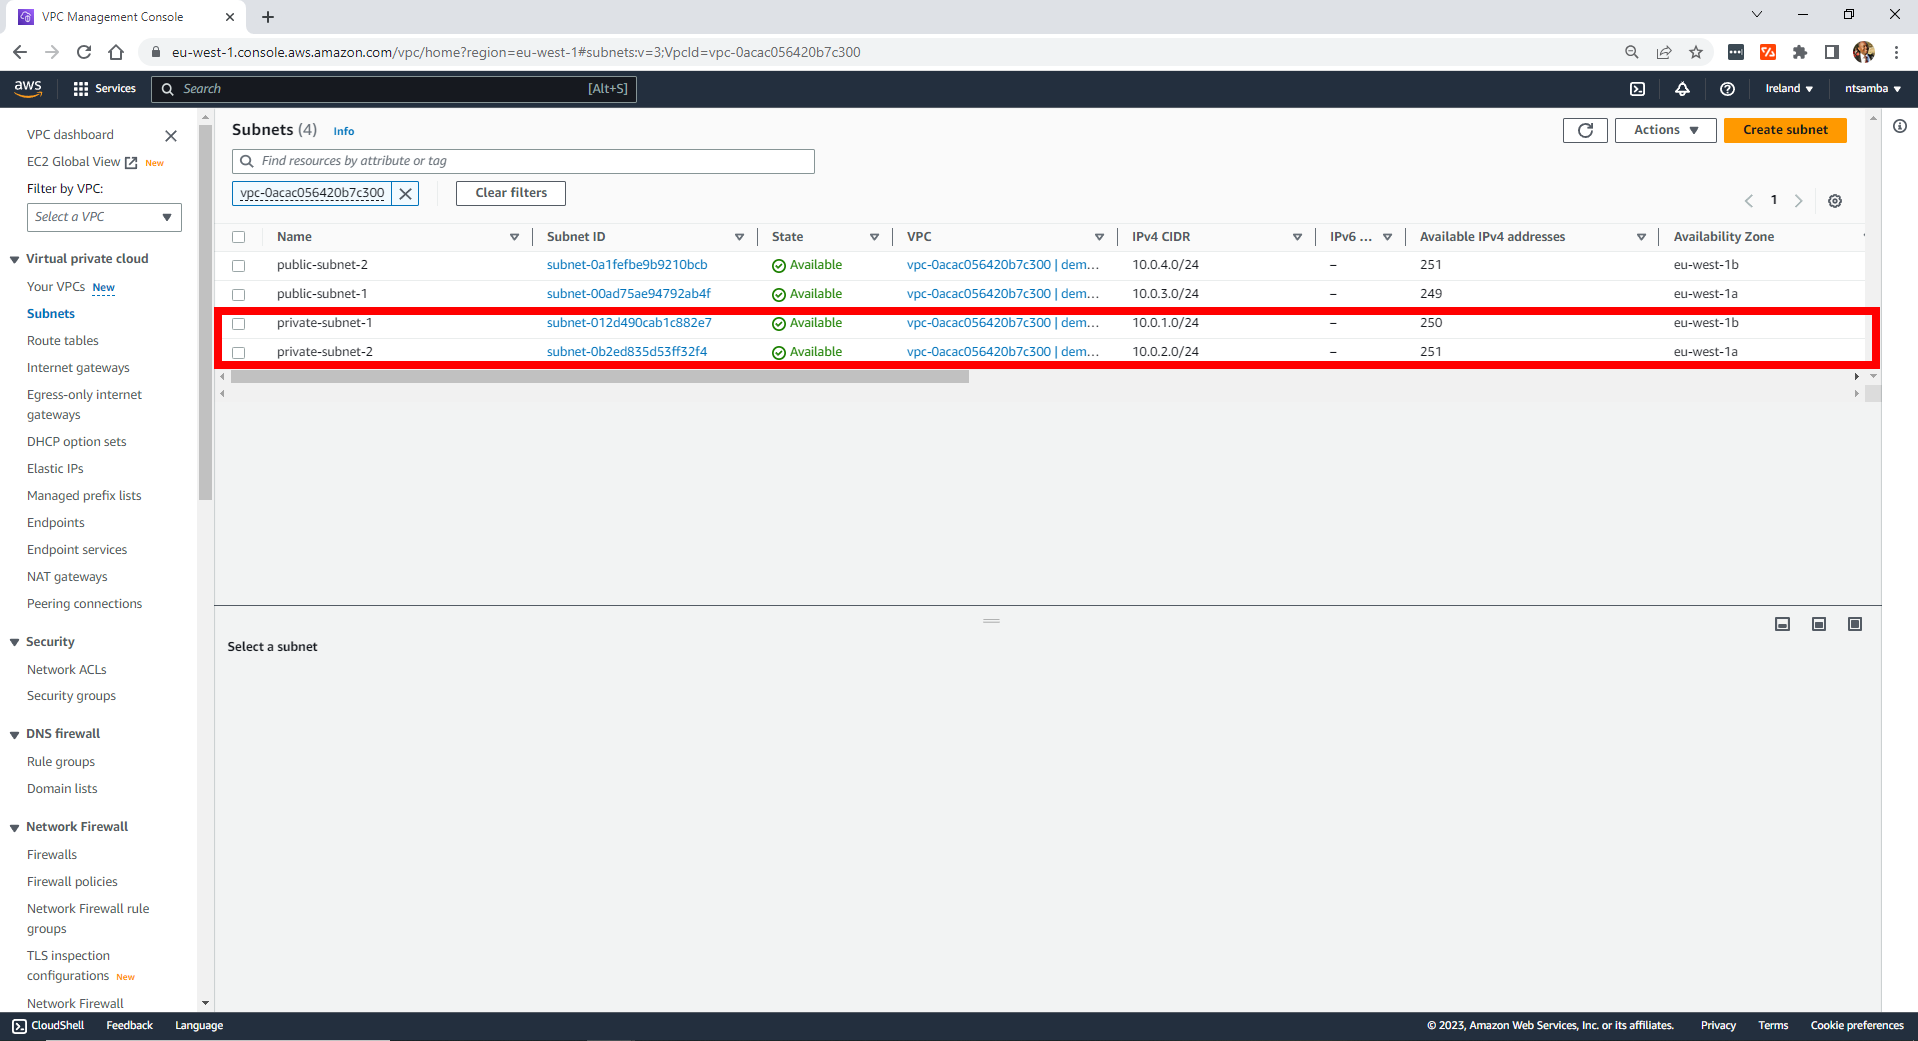
Apply the changes and the private subnets’ availability zones are updated. This change also updates the private-instance.
Destroy the VPC
To destroy the VPC and its associated resources, you can use the terraform destroy command:
terraform destroyWhen you run the command, you are prompted to review the resources that will be destroyed. Type yes to confirm.
Executing the terraform destroy command permanently deletes all the resources you created within the Terraform configuration. In this case, it deletes the VPC, subnets, EC2 instances, security groups, internet gateway, and NAT gateway. Make sure you have a backup strategy in place before executing this command.
Conclusion
In this tutorial, you learned how to use Terraform to create a VPC on AWS. This included creating a basic VPC, configuring internet access using an internet gateway, and creating security groups to control inbound and outbound traffic.
To learn more about Terraform and VPCs, check out these resources:
- The official Terraform documentation provides comprehensive information about Terraform, including tutorials, guides, and detailed explanations of various features and resources.
- The AWS Provider documentation specifically focuses on how to use Terraform to manage AWS resources, including VPCs.
- There’s also a GitHub repository with a collection of Terraform example configurations for various AWS resources, including VPCs. This can help serve as a reference if you’re looking to build more complex VPC configurations.
Earthly Lunar: Monitoring for your SDLC
Achieve Engineering Excellence with universal SDLC monitoring that works with every tech stack, microservice, and CI pipeline.


