How to Speed Up Your Docker Build with BuildKit Cache
Table of Contents
This article discusses how to optimize Docker builds using BuildKit. Earthly enhances BuildKit, elevating your continuous integration process. Check it out.
When it comes to building Docker images, faster build times can significantly enhance a developer’s workflow by enabling rapid testing, iteration, and deployment. Thankfully, BuildKit can help. It’s a modern build toolkit that’s integrated with Docker, and it can help you improve the speed and reliability of the image creation process.
BuildKit improves build performance with innovative features like build caching (which reuses layers from previous builds) and parallelization to simultaneously handle multiple build stages. It also boosts efficiency by detecting and skipping unused build stages while providing enhanced security features for secrets handling. These features are particularly useful in an environment where continuous integration and continuous delivery (CI/CD) are vital components of a responsive development pipeline.
In this tutorial, you’ll learn how BuildKit cache can be used to improve Docker builds. Whether you’re building images occasionally or managing complex multistage build processes, understanding BuildKit will give you the knowledge you need to make your development cycle more efficient.
What Is BuildKit?
BuildKit is a toolkit designed to efficiently convert source code into build artifacts. Previously, Docker utilized its legacy builder to build images from Dockerfiles. However, the legacy builder isn’t very inefficient because it reads the Dockerfile line by line and performs the build serially.
In contrast, BuildKit speeds up the build process through parallelization and caching. Initially available as an experimental builder since Docker v19.03, BuildKit became the default builder with the release of Docker v23.0.
BuildKit uses a low-level build (LLB) definition format to define a content-addressable dependency graph that can be used to create very complex build definitions. An external frontend converts build instructions to LLB so that BuildKit can execute them.
BuildKit’s uses an external frontend which means that it’s essentially infinitely extensible. It’s not necessarily tied to Docker, and many other projects such as Earthly, GitPod, and Dagger use BuildKit.
This article focuses on the BuildKit cache mounts. Often during builds, you have to download or install packages, such as NPM or Pip packages. Rebuilding the image means you need to download and install the packages every time. With BuildKit cache mounts, you can create a persistent cache that lets you reuse the downloaded packages for subsequent builds.
How to Use BuildKit Cache to Speed Up Your Docker Build
Before getting started with this tutorial, make sure you have the following prerequisites:
- Docker Engine or Docker Desktop installed on your operating system. If you’re on Linux, the latest version of Docker will work, but if you’re on Mac or Windows, Docker Desktop may be the better option. This tutorial uses Docker version 24.0.6 for Linux.
- BuildKit installed. If you’re using Docker Desktop or Docker Engine version 23.0 or later, BuildKit is the default builder, and you don’t need to download anything. However, if you’re using an older version of Docker, you’ll need to install BuildKit using the installation guide.
You’ll use this demo payment app in this tutorial. It’s a mock application, so there’s no processing of data behind the scenes. Additionally, the information you enter never leaves your local machine.
For this tutorial, let’s assume you’re working for a fintech company developing an innovative payment app designed to facilitate seamless transactions for users worldwide. The development team is made up of a diverse group of developers working on various features such as fraud detection, user experience improvements, and integration with different banking APIs.
In this scenario, each service of the payment app is containerized, and the CI system rebuilds them multiple times throughout the day. This means even minor changes in the source code trigger a complete rebuild of the Docker images, wasting time and resources.
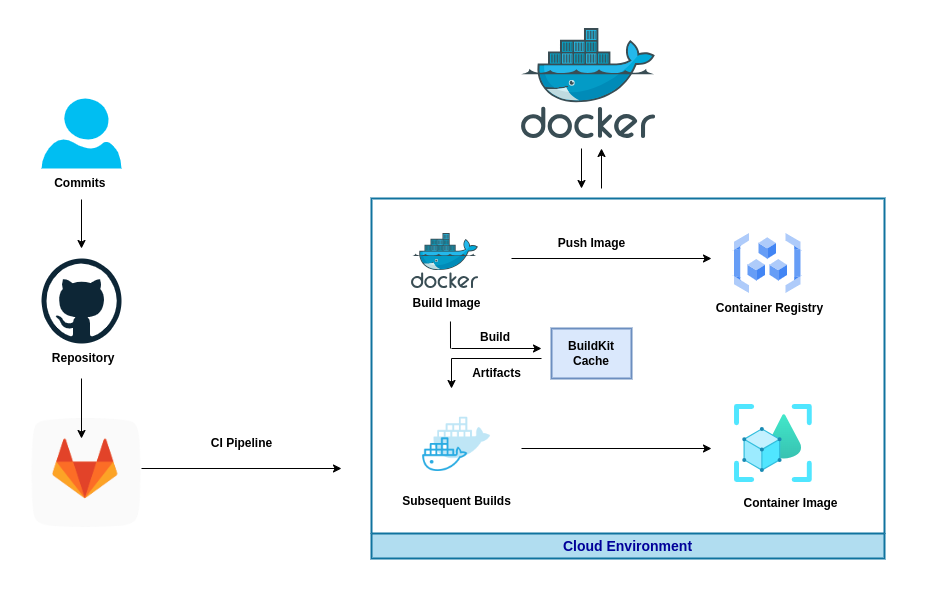
In the following sections, you’ll use BuildKit’s intelligent layer caching system to ramp up the build speed. Here’s a rough architecture diagram showing the implemented solution’s flow:

Identify the Baseline
Before implementing BuildKit caching to speed up your Docker build, you need to identify the baseline build time. To do so, start by cloning the project repository from the mock payment app and navigating to the app folder:
git clone https://github.com/rubaiat-hossain/buildkit-demo-app
cd buildkit-demo-app
This demo payment app is quite basic, so it doesn’t do much in terms of processing. However, the app is Kubernetes-ready, so you can quickly deploy it to one of your local clusters and test it out.
The Dockerfile takes care of containerizing the app. If you open this file, you can see that the RUN npm install line is the bottleneck in this setup since it needs to install all the dependencies for each build. When you cache this step using BuildKit, it should speed up the entire build process.
Establish Baseline Build Duration
Once you clone the repository, you can identify the baseline duration your Docker image takes to build by running the following command:
time docker build -t payment-app .Note: If you’re using Docker Desktop and Docker Engine v23.0 and later,
docker buildwill use BuildKit by default. To force it to not use BuildKit, you need to runexport DOCKER_BUILDKIT=0before running thebuildcommand. If you’re using Docker Engine below v23.0, you don’t need to update anything.
The baseline duration will be used as a reference point to compare against after implementing BuildKit’s cache.
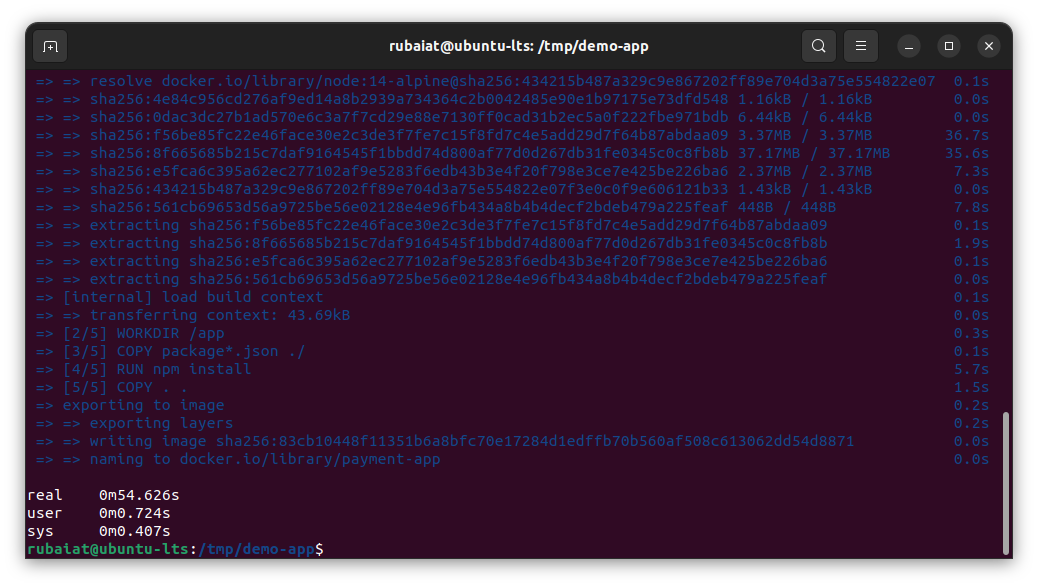
As you can see from the following screenshot, it took over 54 seconds to build the payment app image from the Dockerfile:

This build time can vary from system to system, but it should give you a baseline value you can use.
Create a New Dockerfile for BuildKit Caching
To use BuildKit cache mounts for your Docker build, first open the Dockerfile file:
gedit DockerfileThen, change the RUN npm install line to RUN --mount=type=cache,target=/app/node_modules npm install --prefer-offline:
FROM node:14-alpine

WORKDIR /app

COPY package*.json ./

# Enable caching for node_modules
RUN --mount=type=cache,target=/app/node_modules npm install --prefer-offline

COPY . .

EXPOSE 3000

CMD ["node", "index.js"]
Make sure you save and close this file.
By modifying Dockerfile to use BuildKit’s cache, you instruct Docker to cache the /app/node_modules directory between builds. This change means that when you build your Docker image, BuildKit uses a cache for the node_modules directory.
Initial Build with the Optimized Dockerfile
Now that you’ve changed your Dockerfile for the payment app, it’s time to rebuild the container image. Since this is the initial build using the new Dockerfile, it will populate the BuildKit cache, which means you don’t need to measure the build duration for this step.
First, make sure to enable BuildKit for Docker by setting an environment variable:
export DOCKER_BUILDKIT=1Note: As before, Docker Desktop and Docker Engine v23.0 and later uses BuildKit by default. However, if you had turned off BuildKit in the previous section, you must run this command to enable it back again. For Docker Engine below v23.0, it is required to turn on BuildKit.
Then, perform the initial build using the following command:
docker build -t payment-app .Subsequent builds will use this cache to reduce build time.
Rerun the Build and Measure Performance Improvements
Rerun the build process using the optimized Dockerfile so that you can compare it with your baseline:
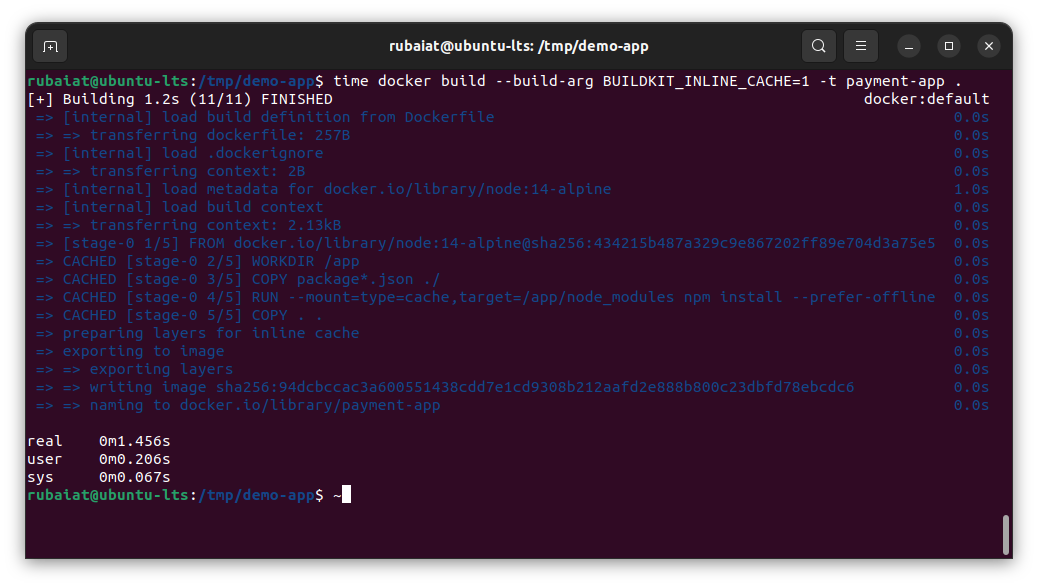
time docker build -t payment-app .As you can see from the following image, the build process only took about 1.5 seconds:

Compared to the baseline duration of 54 seconds, using the BuildKit cache reduced the build time of the demo payment app significantly. Although these times may vary on your local system, you should still see a significant benefit from using BuildKit caching.
Conclusion
In this article, you learned how to use BuildKit to speed up Docker builds, which is a crucial element in optimizing development and CI/CD pipelines. With BuildKit, developers can enjoy the benefits of reusable layers, parallelized stages, and efficient resource usage, which collectively contribute to a more streamlined and rapid build process.
Cache mounts are just one weapon in BuildKit’s arsenal. With BuildKit, you get useful features such as secrets handling, garbage collection, parallelization of independent build stages, detection and skipping of unused files and an overall improvement in performance and extensibility.
All the source code for this tutorial is available in this GitHub repository.
Earthly Lunar: Monitoring for your SDLC
Achieve Engineering Excellence with universal SDLC monitoring that works with every tech stack, microservice, and CI pipeline.


