Introducing Docker Buildx

Table of Contents
Getting started with Docker is relatively straightforward, thanks to the vast repository of publicly available images that you can use to help build your applications. However, if you spend enough time working with Docker, you’ll inevitably need to create your own images. In most cases, the tool that you’ll use to do this is Buildx, a Docker CLI plugin that allows you to build images by leveraging the capabilities of BuildKit.
If you’ve worked with Buildx’s predecessor command, docker build, you’ll likely find the UI of docker buildx familiar. This similarity is intentional and allows Buildx to act as a drop-in replacement while still giving you expanded build capabilities thanks to the BuildKit backend.
Additionally, thanks to a variety of drivers, you have several options available (including options for Docker and Kubernetes) for how to run the BuildKit instance itself. And since BuildKit has interchangeable drivers, Buildx can leverage nodes running on different CPU architectures — whether physically or virtually — to produce multiplatform Docker images. This can enable a variety of interesting opportunities and benefits.
In this tutorial, you’ll learn all about the docker buildx command and how to leverage it in your work. You’ll learn about its key features and follow along with a step-by-step tutorial on how to use it to build multiplatform images.
What Is Docker Buildx?
Over time, Docker has evolved into a highly modular tool with various interchangeable parts. One such component is Docker Build, an ecosystem of tools and features that are part of Docker Engine.
The Docker Build architecture consists of two main pieces: the client and the backend. As of Docker Engine 23.0, Buildx is the default build client used for interfacing with the BuildKit backend.
The main value-added feature of Buildx is that it uses BuildKit behind the scenes while maintaining familiar syntax. This means you have access to more advanced build functionality, such as in-container driver support, which allows you to execute builds within Docker containers or the remote driver. This enables you to connect to an externally managed BuildKit instance.
Additionally, having different builder drivers and being able to use multiple builders together lets you take advantage of features like multiplatform builds, where you can build a single image to run natively on different CPU architectures, as well as multiple-node builds, where you can build the image for each platform simultaneously by leveraging several builder instances, leading to quicker, more efficient builds.
Using Docker Buildx to Build a Container Image
To get started with Buildx, there are two main requirements:
- First, install Docker, as Docker Engine 19.03 or higher is required to use Buildx.
- Then, install the Buildx plugin. If you’re using Docker Desktop for Windows or macOS, Buildx is included by default.
Once you’ve installed these prerequisites, it’s time to start using Buildx to build your Docker images.
Building a Multiplatform Image
Multiplatform images can be useful in a variety of situations. For instance, maybe you have development machines spread across multiple platforms, such as Intel and Apple silicon Macs, or perhaps your development machines are all AMD64, but you plan to run your production or testing workloads on more cost-effective ARM64 nodes like those provided by AWS Graviton. Either way, being able to build your images to run natively on multiple CPU architectures is beneficial.
By default, when you have Buildx configured properly, there will be a default builder instance. You can see all your builder instances by running docker buildx ls:

docker buildx lsThis command lists all your configured builders. In this case, there’s only one, and it’s named default. To view more details about this builder, you can run docker buildx inspect default:
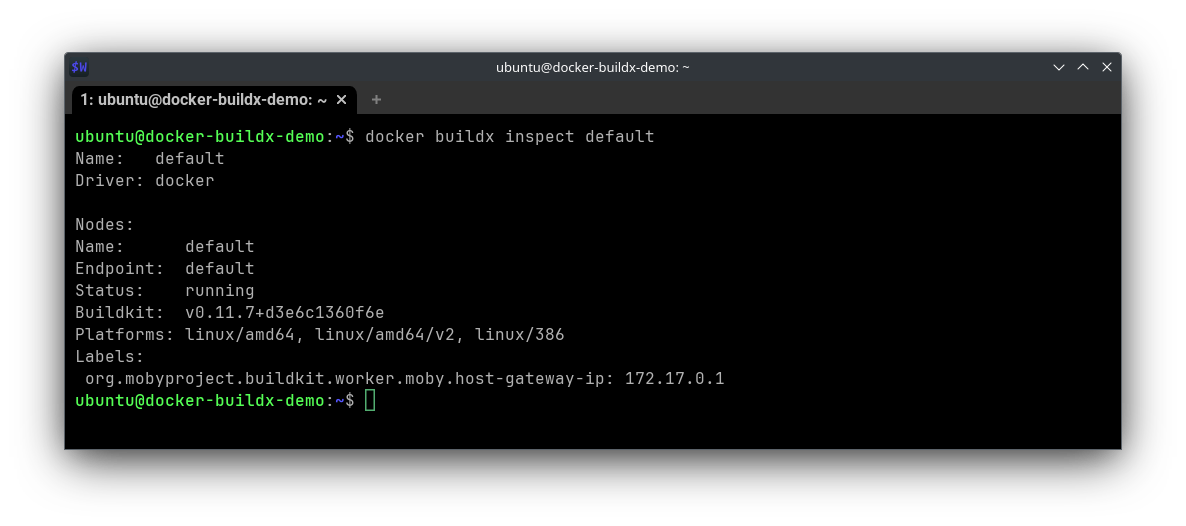
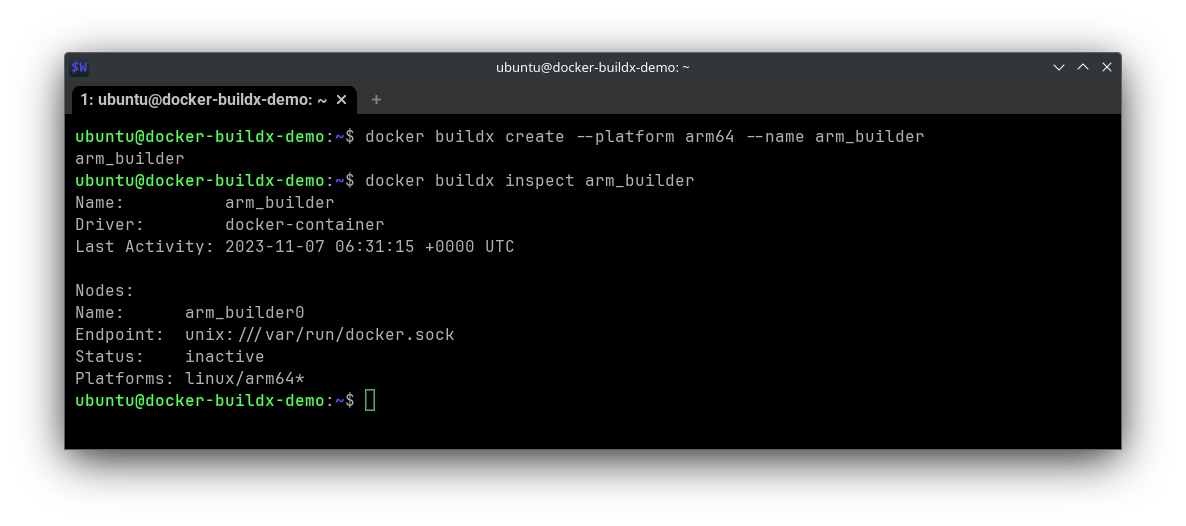
docker buildx inspect defaultAs you can see, this instance is only usable for the AMD64 and 386 platforms. If you want to build an image for ARM64, you must create a new builder. Luckily, thanks to Buildx’s various drivers, you can create a builder for ARM64 from your AMD64 host by running docker buildx create --platform arm64 --name arm_builder --use:
docker buildx createWith the builder created, the next thing you need is a Dockerfile to build. For demonstrative purposes, you can use a simple Node.js application to respond to web requests with a string denoting the host’s architecture. If you want to follow along, create a new directory to hold the relevant files, and then in that directory, create a file called index.js and add the following code to it:
const http = require('http');
const os = require('os');

const server = http.createServer((req, res) => {
  if (req.url === '/') {
    res.setHeader('Content-Type', 'text/plain');
    res.end(`CPU Architecture: ${os.arch()}\n`);
  } else {
    res.statusCode = 404;
    res.end('Not Found');
  }
});

const port = 3000; // You can change this to the desired port number

server.listen(port, () => {
  console.log(`Server is running on http://localhost:${port}`);
});
Next, in that same directory, create a file called Dockerfile with the following content:
# Use the official Node.js image as the base image
FROM node:14
# Set the working directory in the container
WORKDIR /app
# Copy the application files to the container
COPY index.js /app/index.js
# Expose the port on which your Node.js application will run
EXPOSE 3000
# Define the command to start your Node.js application
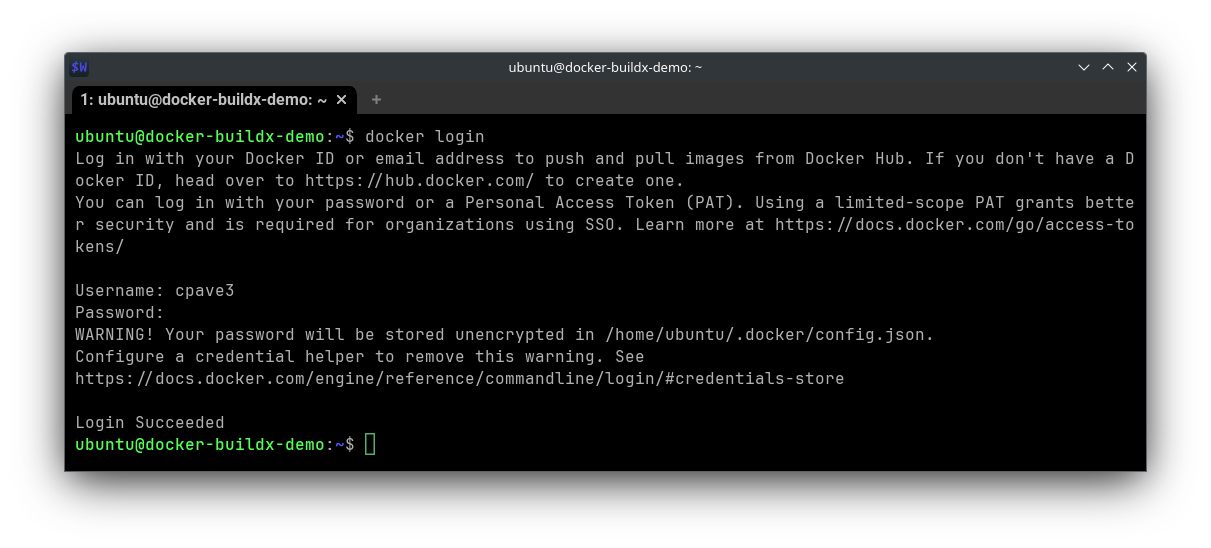
CMD ["node", "index.js"]These files, in tandem, create a container running the Node.js application. However, before building the image, you should ensure that your Docker client is authenticated with Docker Hub or your registry of choice. This allows Buildx to push the newly created image, as you’ll need to pull the image down onto a different device to verify that it’s working as intended.
To authenticate with Docker Hub, run docker login and follow the prompts:
docker loginOnce authenticated, you can build and push your multiplatform image with a single command:
docker buildx build --platform linux/amd64,linux/arm64 \
-t cpave3/node-arch-test:latest --push .
Remember to substitute cpave3/node-arch-test:latest for your own preferred value, in the form of {username}/{image}:{tag}.
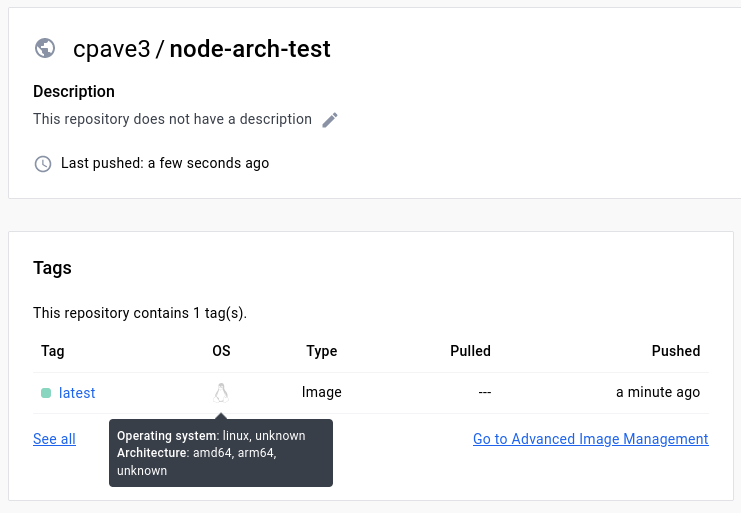
This command uses the builder instance you created previously to facilitate the multiplatform building of this image. Once the image is built, Buildx uploads it to Docker Hub. This can take some time, but when it’s done, you should see your image upon navigating to your Docker Hub account.
When you hover over the OS indicator, you’ll see the supported architectures — in this case, AMD64 and ARM64:
Finally, it’s time to verify that this image runs as intended on each architecture. You could use virtualization for this if you prefer, but if you have machines of the appropriate architectures handy (like a desktop and an M1 MacBook), then using real devices is likely the more straightforward solution.
On each of the machines you’d like to check, run the following command to pull and run the image (again, substituting the username, image, and tag as needed):
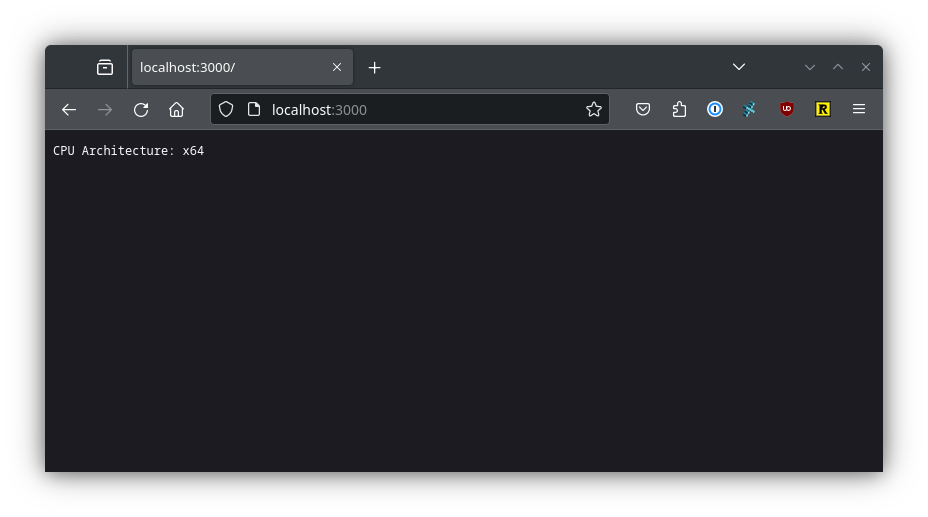
docker run -p 3000:3000 cpave3/node-arch-test:latestOnce the image is running on each machine, navigate to the host’s IP address on port 3000, and you should see the output. On AMD64 (AMD Ryzen Desktop), the output will look like this:
And on ARM64 (MacBook Pro M1), the output will look like this:
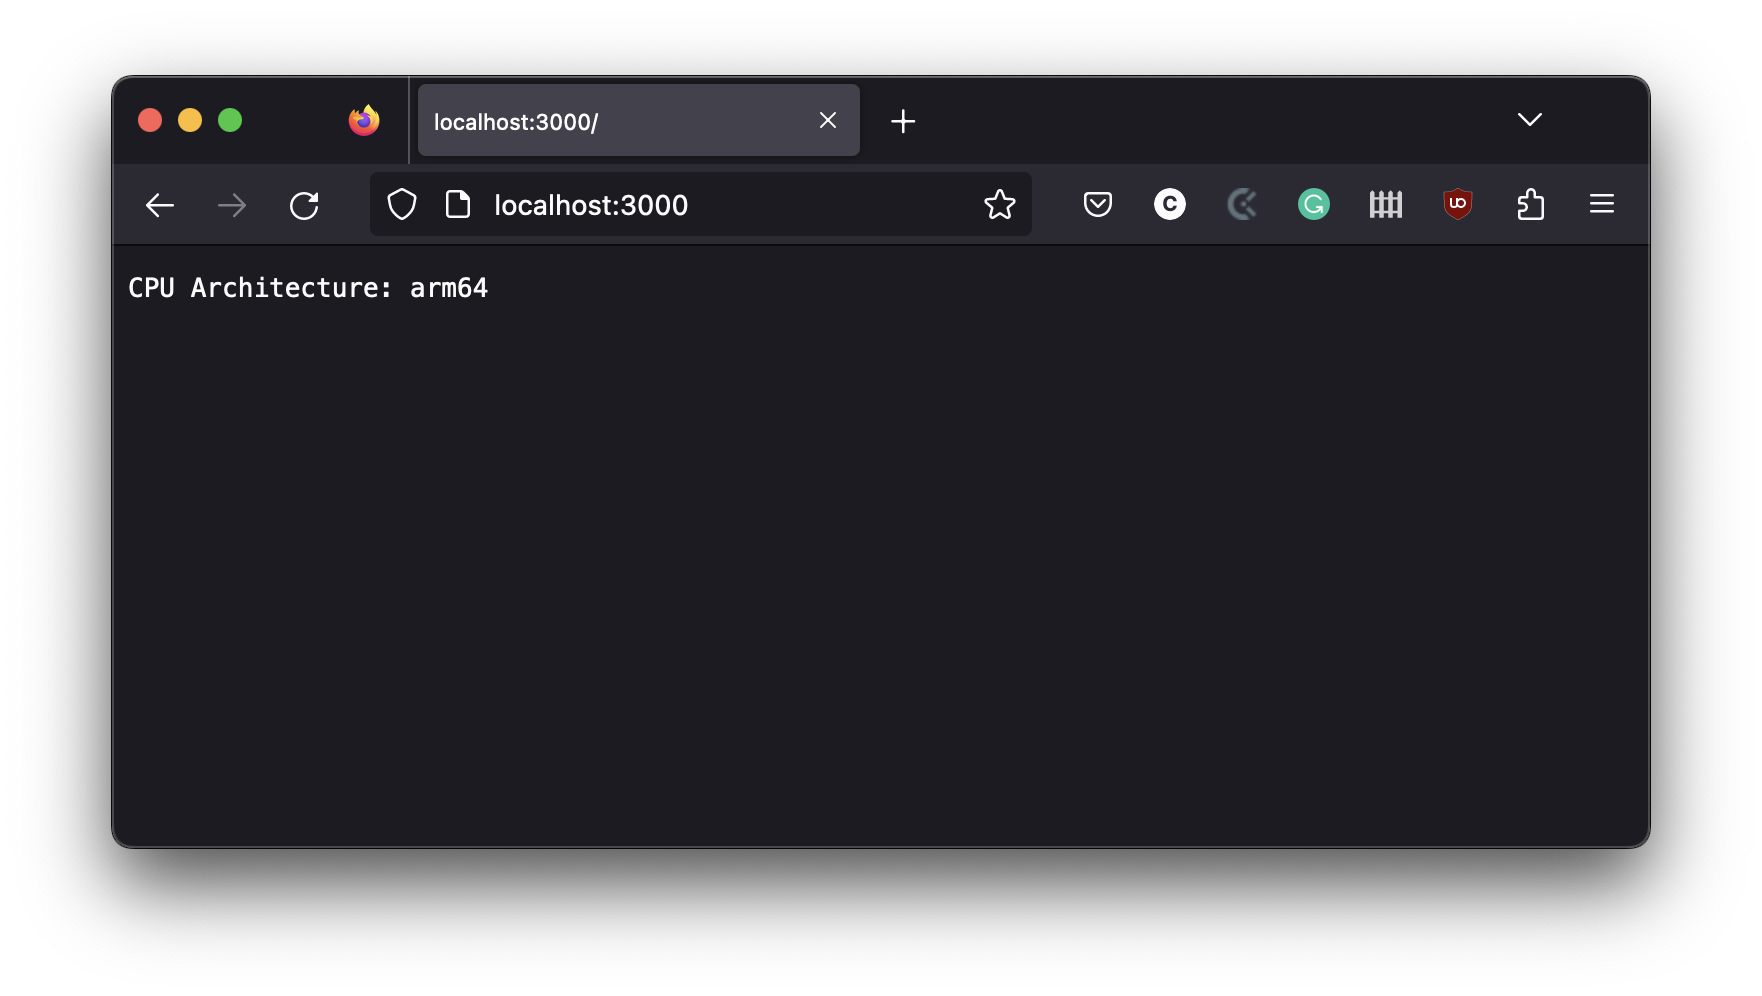
As you can see, Node.js identifies that it’s running on the expected architecture in both cases. In cases where it’s not so obvious when an image is built for multiple architectures, you can use imagetools to inspect an image. This utility is bundled with Buildx and can be accessed with docker buildx imagetools inspect cpave3/node-arch-test:latest:
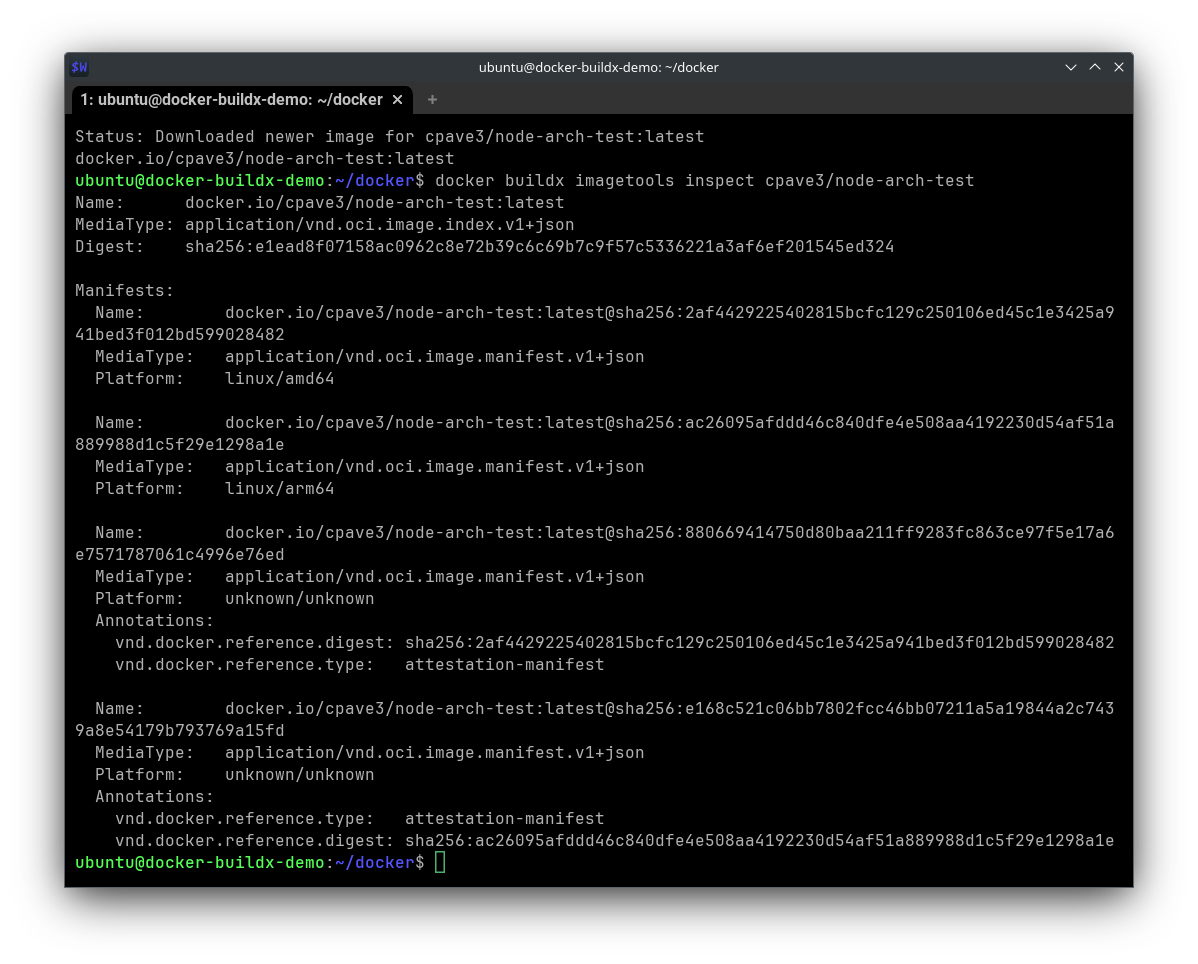
imagetools inspect node-arch-testHere, you can see manifests for both expected architectures. You can use this tool to inspect images directly on Docker Hub as well. For instance, by running docker buildx imagetools inspect alpine, you can see that the alpine image is built for even more architectures:
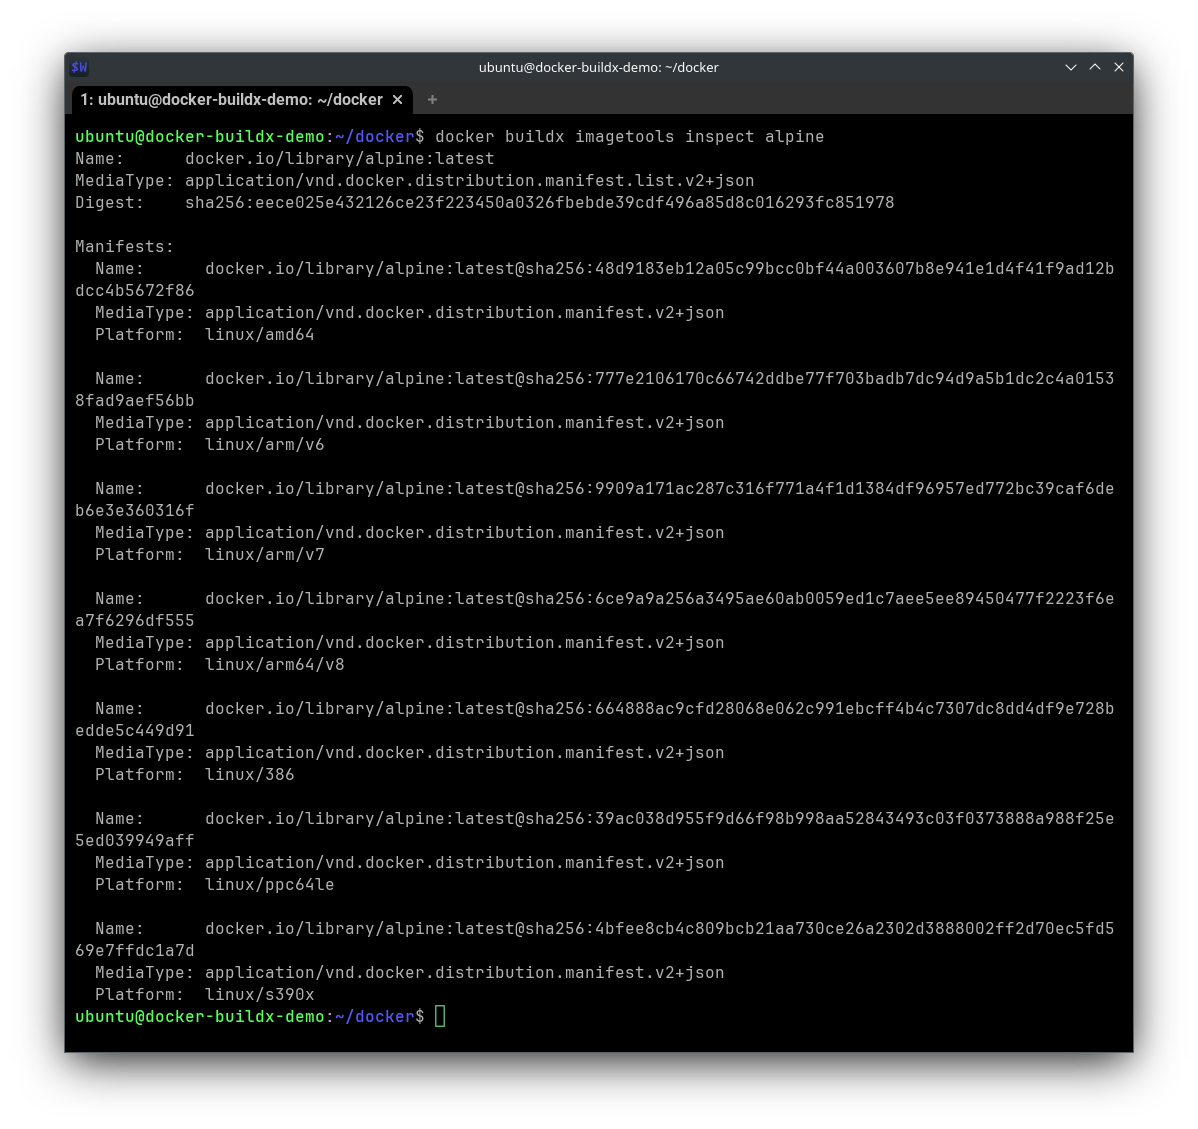
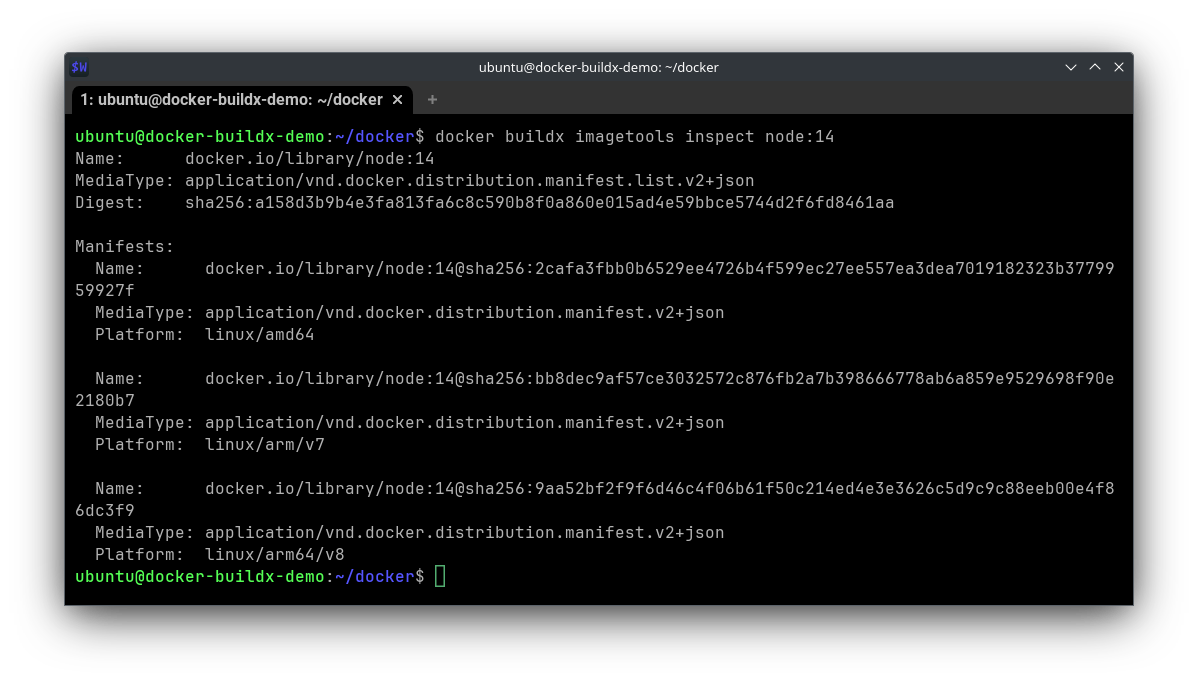
imagetools inspect alpineAside from the fact that Alpine-based images tend to be smaller, this makes Alpine an excellent candidate to serve as the basis of your own images, as you’ll need whatever image you build upon to also support the architectures you want to build for. As you can see, this is the case for the node:14 image used as the base for the node-arch-test image:
imagetools inspect nodeBetween BuildKit, Buildx, and imagetools, you should have everything you need to start working with and building multiplatform Docker images for your applications.
Conclusion
This article introduced Docker’s Buildx plugin, combining BuildKit’s capabilities with the classic Docker build syntax. With Buildx, you can create multiplatform images compatible with various CPU architectures, allowing for greater flexibility and efficiency across devices like AWS Graviton and Apple silicon MacBooks, without needing emulation.
To further enhance your container build process, consider Earthly. Earthly provides additional efficiency and reproducibility in your builds, ensuring that they are consistent across different environments. It’s a powerful combination for developers looking to streamline their Docker workflows. Check it out and boost your Docker game!
Turn your engineering standards into automated guardrails that provide feedback directly in pull requests, with 100+ guardrails included out of the box and support for the tools and CI/CD systems you already have.