Using Continuous Testing in DevOps Workflows

Table of Contents
Automation testing is a crucial element to speed up your delivery process. It aims to flush out any potential regressions. The more you automate, the more confidence you gain in the quality of your software because the quality of each release of your application or library is measurable. Additionally, you reduce costs and save time and effort by reducing manual testing.
The caveat is that automated tests have no value if they are not executed regularly alongside your continuous integration (CI) pipeline. CI refers to frequently merging developer code changes and building and creating an artifact that can later be tested and deployed.
Extending the CI process by adding automated tests is referred to as continuous testing (CT). CT enables you to apply the fail-fast principle. You test each code change, build, and deployment against several layers of automated tests. Thus, it results in rapid feedback on the quality of your product and the state of the development process.
GitHub Actions is a great first step for implementing CT. It’s flexible and powerful enough to bring every step of the CI/CT process into a single place. Your application, tests, and workflow configuration lives with your code in your repository. Furthermore, the learning curve for GitHub Actions is relatively smooth thanks to the Marketplace that provides thousands of Actions ready to use out of the box.
What Does It Take to Implement Continuous Testing?
A good CI/CT process always contains at least the following steps:
- Build
- Deployment
- Integration tests
- End-to-end tests
In this tutorial, you will implement these four steps using GitHub Actions, as well as add performance tests.
The Build steps include code compilation and unit tests. Also, note that it’s convenient to deploy your application in a dev environment before running complex tests such as integration and end-to-end. However, you may also run your application in GitHub Actions for test purposes.
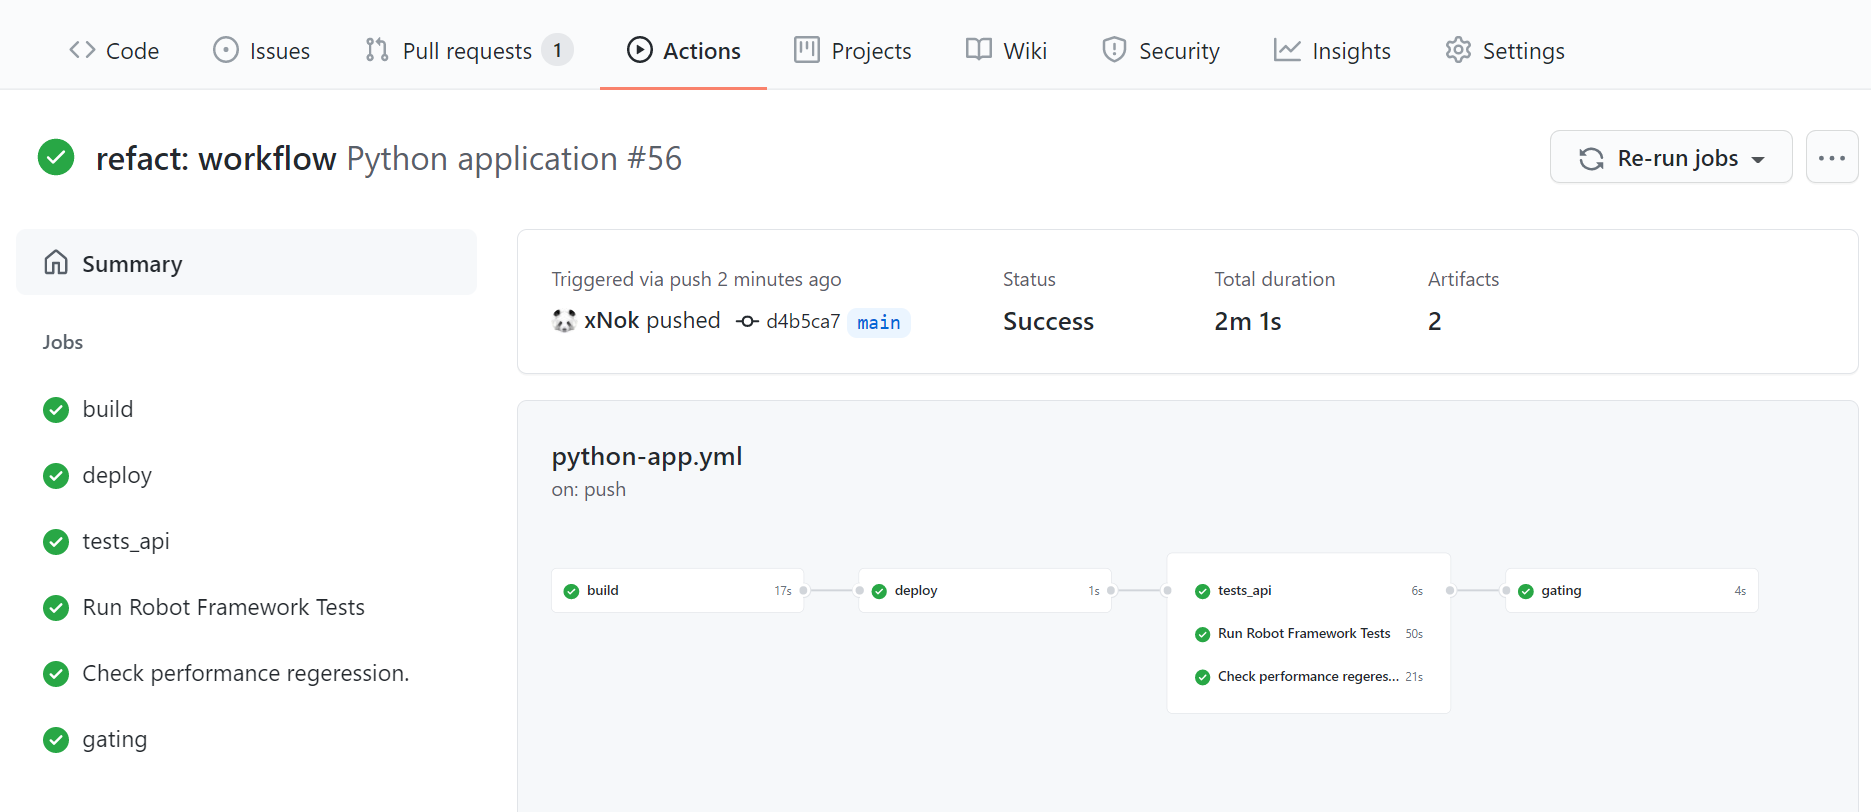
In this article, I assume you’ll deploy to a dev environment and focus on implementing different types of tests. Here is a visual of the final workflow for this tutorial:
Implementing continuous testing can be challenging. If you are on a team that is new to this fail-fast approach, it may be a frustrating transition. In addition, seeing builds or pipelines failing can be overwhelming at the beginning. I suggest prioritizing fixing tests over focusing on new features. This may also be a significant change.
To remediate those challenges, you should rely on the five DevOps principles described by Jez Humble in The DevOps Handbook:
- Culture
- Automate
- Lean
- Measure
- Sharing
Implementing continuous testing is first a change in culture. Selecting the right tools for CI/CT can greatly improve collaboration.
Keep your process lean. Testing should not slow down your process. Instead, select the right amount of tests at the right time in the process. Monitor your job execution time, prefer small tasks that can fail fast, and provide rapid feedback instead of long-running ones.
Automate as much and as early as possible because it helps validate that the integration is successful. Delaying test implementation is counterproductive.
Measure your improvement and build a baseline for the quality of your software. For example, collect your code coverage, number of successful vs. failed tests, and performance metric.
Don’t forget to encourage knowledge sharing. Test automation is not a single person’s job: everyone on the team should know how the test suites work and learn how to fix simple errors when the workflows fail.
Implementing CI/CT With GitHub Actions
Now that you know the basics of CT, it’s time to see how to implement the first step by creating a GitHub Actions workflow that builds and runs your unit tests.
Build a GitHub Actions Workflow with Unit Tests
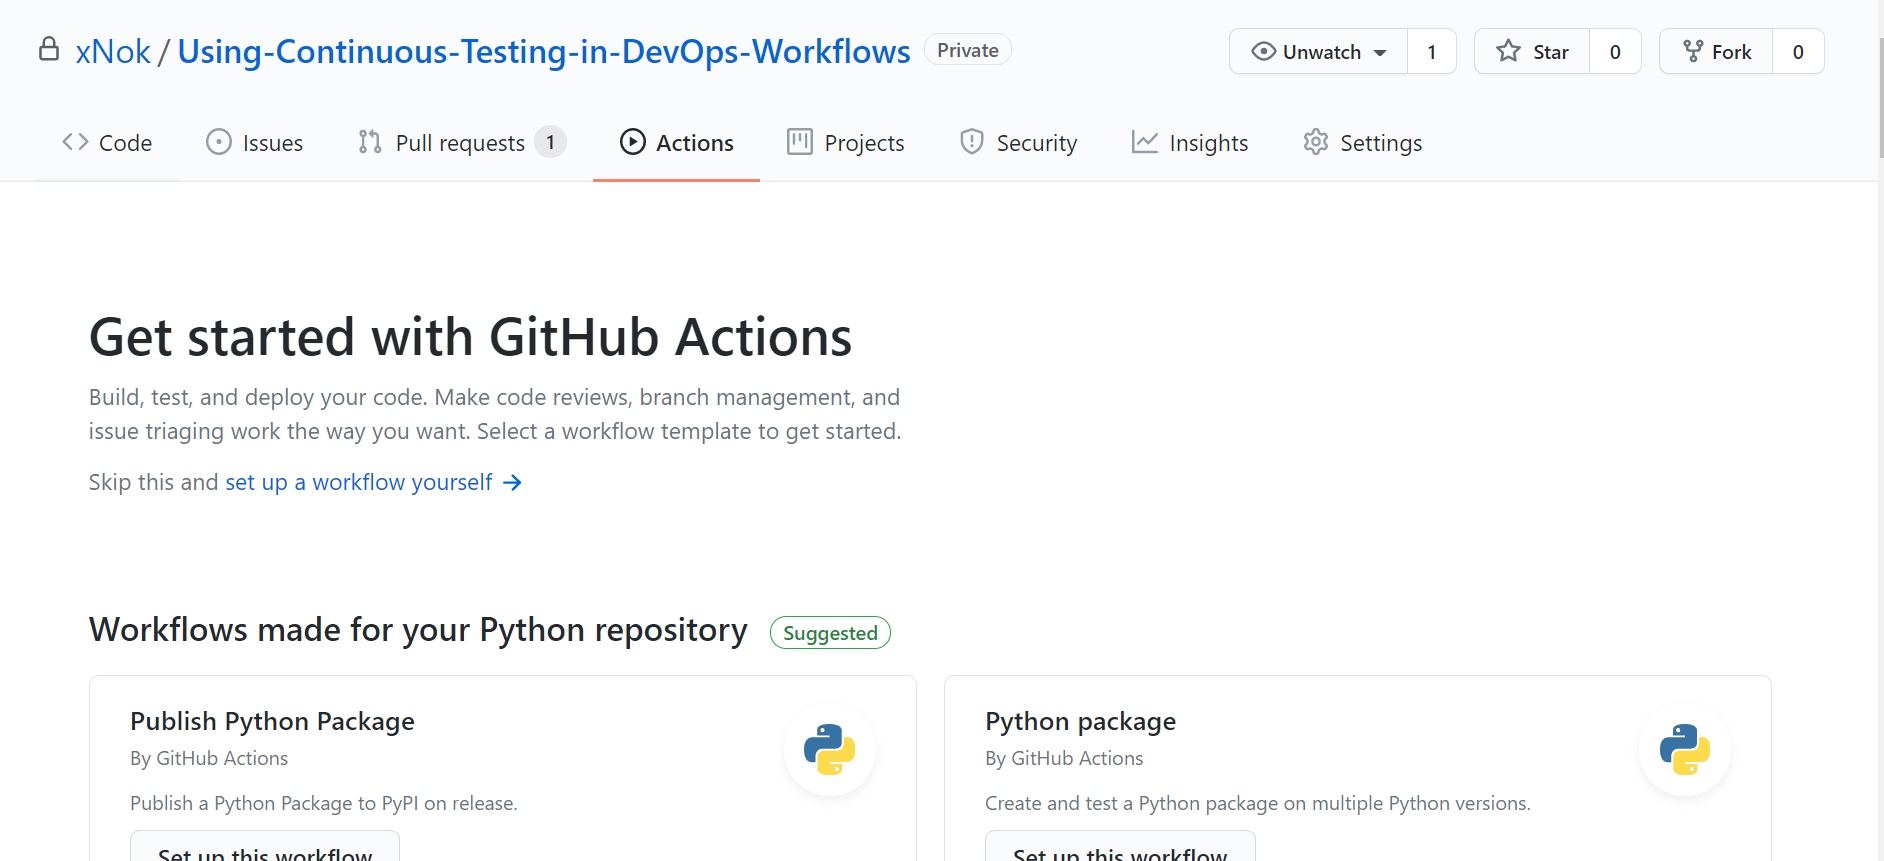
The first thing you need to get started is an initial workflow. If you already committed your application to a GitHub repository, click Actions. GitHub will automatically select and recommend a simple workflow that best suits your language.
Select one of them by clicking Set up this workflow, review the workflow steps, and commit.
Right away, you should see your workflow starting to build and test your application. Many starting workflows also include linting that validates the formatting and detects potential errors.
A GitHub Actions workflow contains three elements:
- Triggers (
on) specify when the workflow must be executed. The most common use case is to run a workflow on push and pull-request on themainbranch. - Jobs determine sets of actions composing your pipeline and are executed in parallel unless dependencies between jobs are specified.
- Steps are the individual components of a job and can be of two types:
ScriptsorActions. Steps defining arunattribute execute a command on the host defined byruns-onat the beginning of a job. Steps containingusesexecute an Action, a reusable automation script.
It’s straightforward to extend a workflow once you understand those three concepts. Here’s a sample workflow for a Python application:
name: Python application

on:
  pull_request:
    branches: [ main ]

jobs:
  build:

    runs-on: ubuntu-latest

    steps:
    - uses: actions/checkout@v2
    - name: Set up Python 3.9
      uses: actions/setup-python@v2
      with:
        python-version: 3.9
    - name: Install dependencies
      run: |
        python -m pip install --upgrade pip
        pip install flake8 pytest
        if [ -f requirements.txt ]; then pip install -r requirements.txt; fi
    - name: Lint with flake8
      run: |
        # stop the build if there are Python syntax errors or undefined names
        flake8 . --count --select=E9,F63,F7,F82 --show-source --statistics
        # exit-zero treats all errors as warnings. The GitHub editor is 127 chars wide
        flake8 . --count --exit-zero --max-complexity=10 --max-line-length=127 --statistics
    - name: Test with pytest
      run: |
        pytest
This what a basic workflow looks like:
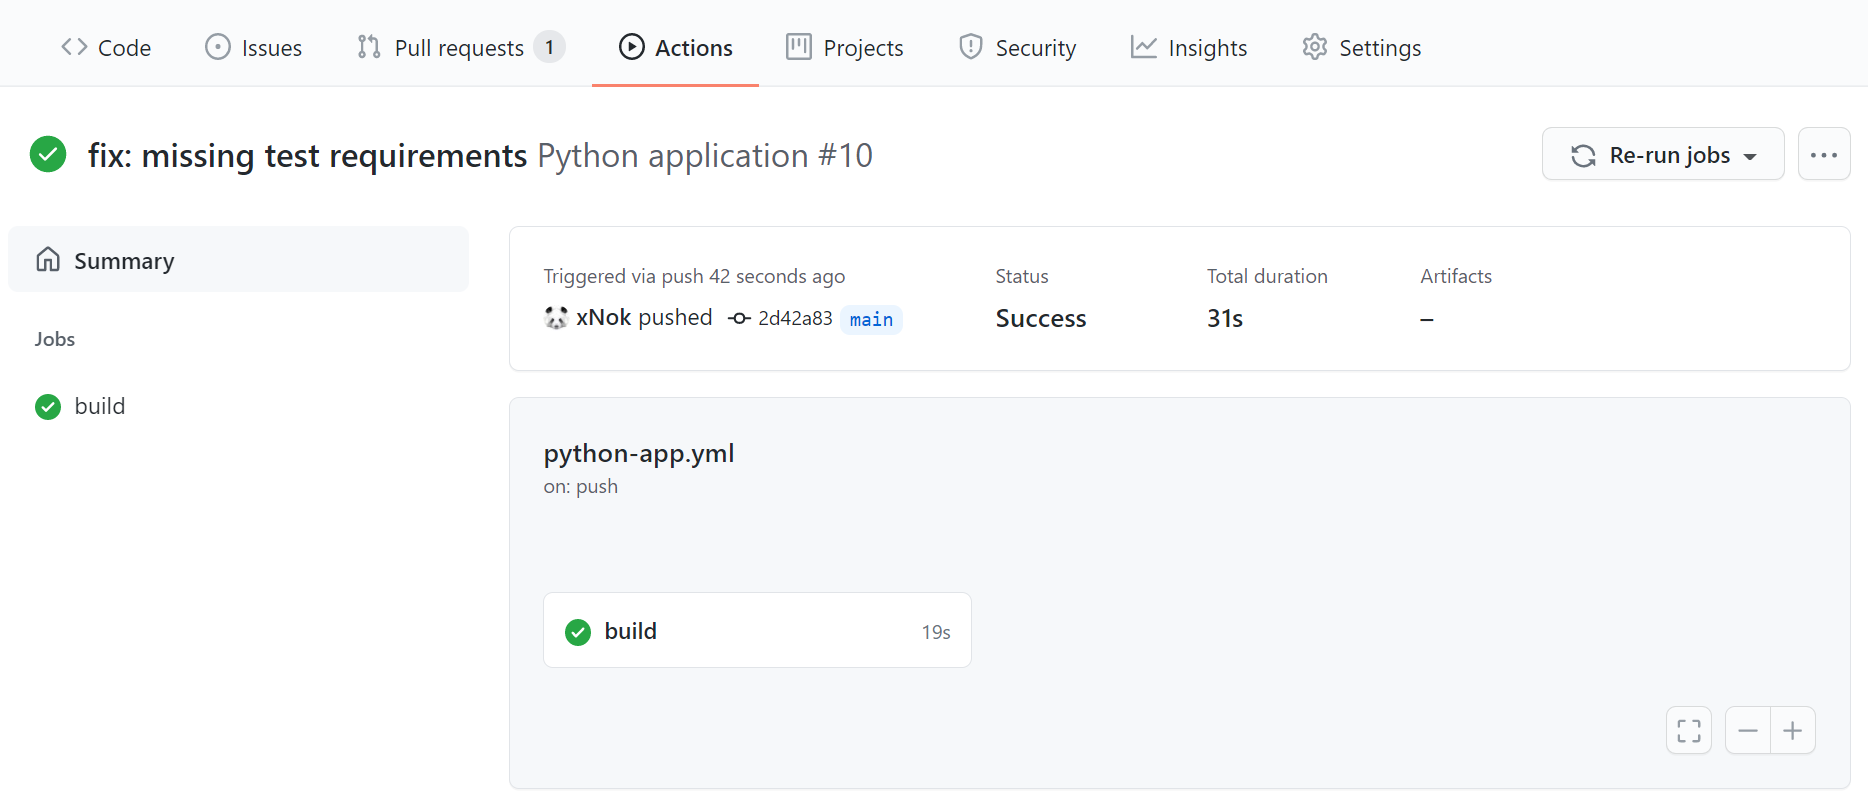
Add Code Coverage Reports
On GitHub, most users rely on third parties to get coverage reports (such as SonarQube or Codecov). Integrating those SaaS into your workflow is simple, thanks to the GitHub Actions Marketplace. Most third parties providing code coverage reports have created an Action to make the integration seamless.
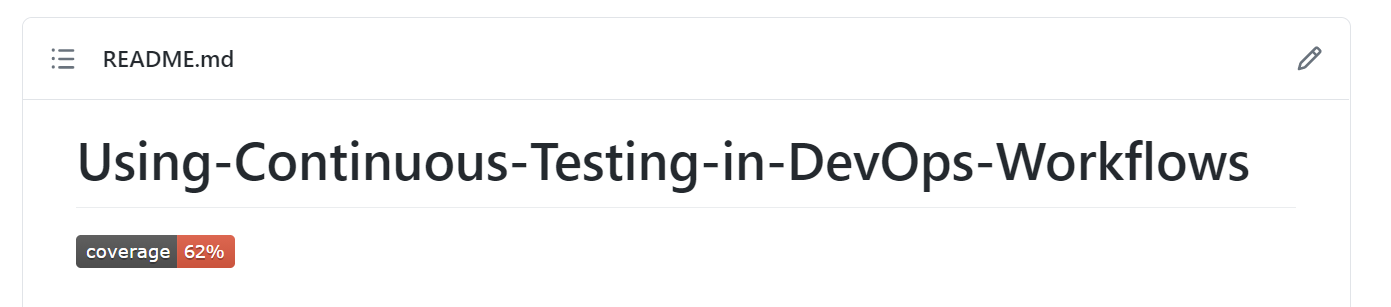
But let’s not rely on a third party yet. Instead, generate a badge to display in your Readme.md. You’re putting in place the first step toward tracking code quality.
- Edit your existing
Test with xxxstep to generate a coverage report. - Save the coverage report as an artifact. Storing workflow data as artifacts.
- Create a new job called
gatingand download the coverage report. This job must be executed afterbuild; therefore, you must declareneeds: buildin your configuration. - Parse the coverage report to extract the coverage value. I provided a small script that does just that.
- Generate the badge and add it to your README. Follow the setup step in the documentation of schneegans/dynamic-badges-action@v1.1.0.
# This workflow will install Python dependencies, run tests, and lint with a single version of Python
# For more information see: https://help.github.com/actions/language-and-framework-guides/using-python-with-github-actions

name: Python application

on:
  push:
    branches: [ main ]
  pull_request:
    branches: [ main ]

jobs:
  build:
    runs-on: ubuntu-latest
    steps:
    - uses: actions/checkout@v2
    - name: Set up Python 3.9
      uses: actions/setup-python@v2
      with:
        python-version: 3.9
    - name: Install dependencies
      [...]
    - name: Lint with flake8
      [...]
    - name: Test with pytest
      # Update the command to generate coverage report
      run: pytest --cov-report xml --cov=phonebook tests/
    - name: Upload pytest test coverage
      # Upload the coverage result as an artifact
      uses: actions/upload-artifact@v2
      with:
        name: coverage-results
        path: coverage.xml
      # Use always() to always run this step to publish test results when there are test failures
      if: ${{ always() }}

  gating:
    runs-on: ubuntu-latest
    needs: build

    steps:
    - name: Download coverage report
      uses: actions/download-artifact@v2
      with:
        name: coverage-results
    - name: Get the Coverage
      shell: bash
      run: |
        regex='<coverage.+line-rate="([0-9).[0-9]+)".+>'
        line=$(grep -oP $regex coverage.xml)
        [[ $line =~ $regex ]]
        coverage=$( bc <<< ${BASH_REMATCH[1]}*100 )
        if (( $(echo "$coverage > 80" |bc -l) )); then
          COLOR=green
        else
          COLOR=red
        fi
        echo "COVERAGE=${coverage%.*}%" >> $GITHUB_ENV
        echo "COLOR=$COLOR" >> $GITHUB_ENV
    - name: Create the Badge
      # save the badge configuration in a Gist
      uses: schneegans/dynamic-badges-action@v1.1.0
      with:
        auth: ${{ secrets.GIST_SECRET }}
        gistID: ab3bde9504060bd1feb361555e79f51d
        filename: coverage.json
        label: coverage
        message: ${{ env.COVERAGE }}
        color: ${{ env.COLOR }}
This is what your updated workflow looks like:
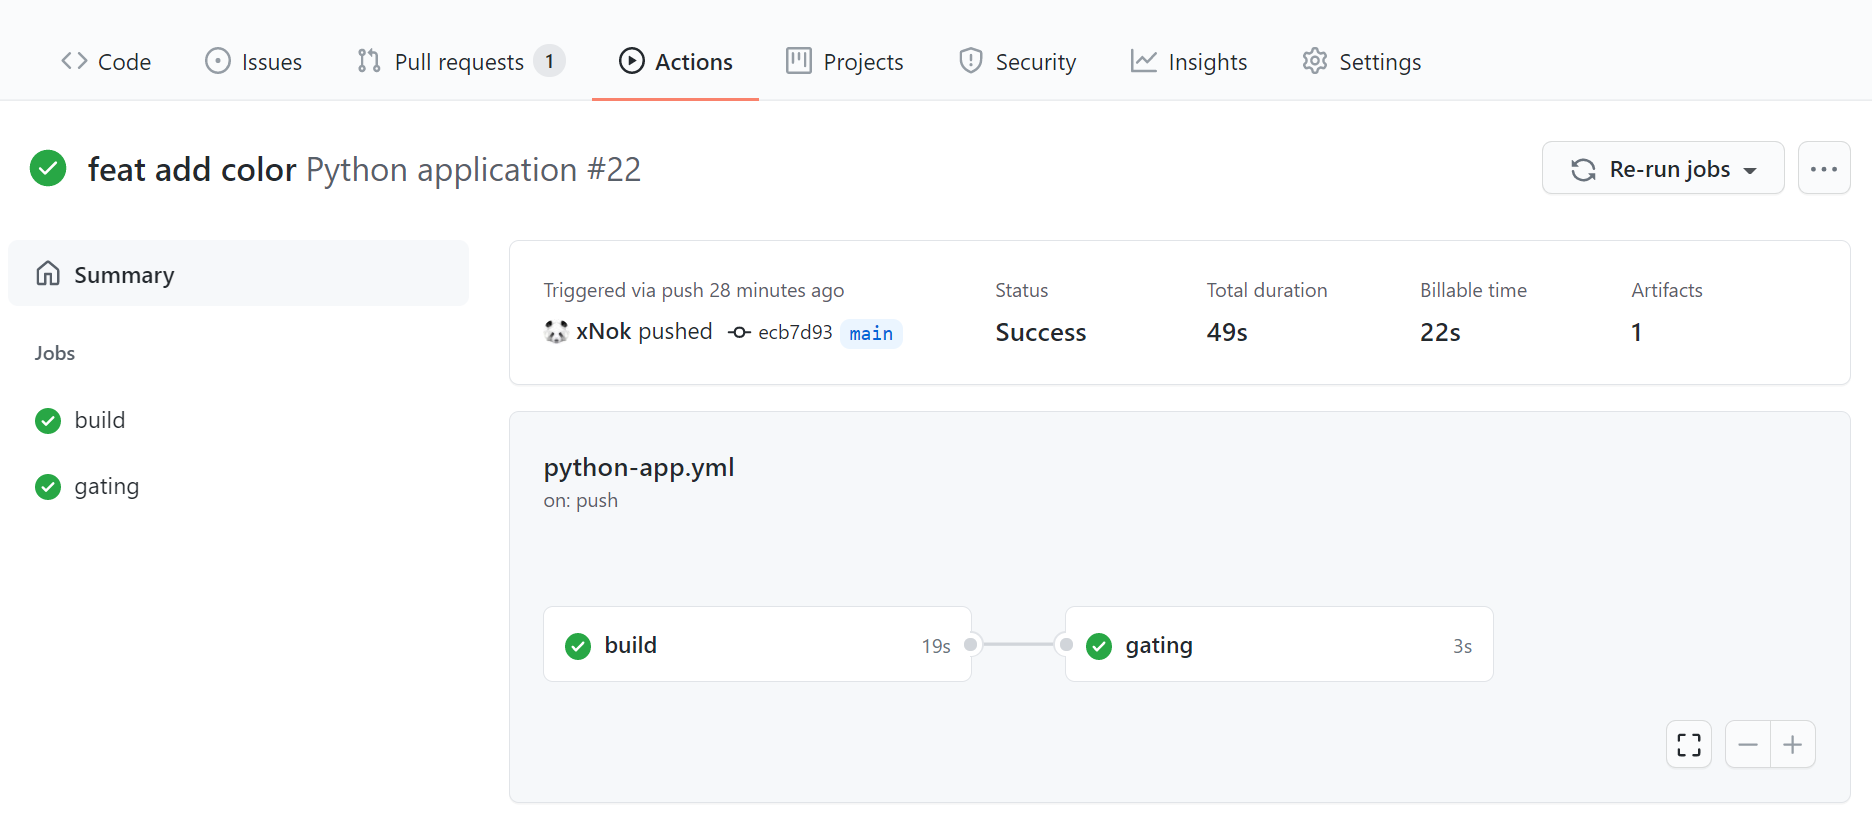
And you got a badge to decorate your readme.md.
Extending CT with Other Types of Testing
You have a basic CI workflow that includes unit tests and coverage reports. Now to obtain an excellent CT workflow, you need to expand with more layers of tests. You will add three new jobs:
- For API testing,
- For end-to-end testing
- For performance testing
Add API Testing
API testing is part of integration testing. Integration testing aims to determine whether individual units meet your requirement when combined together. When performing integration testing, you target the boundary (or interfaces) of your system. In this specific case, you are aiming your test at a RESTful API. Having API tests ensures that sets of functionality meet your requirement and validates that your web server and connection to a database works properly.
While you could write an API test in the same language as your application, you should also consider a tool like Postman/Newman. Postman lets you define a sequence of HTTPS calls and validate each of them using their JavaScript test framework. This makes it easy to share integration test suites. Other developers can use them to facilitate their development process, for instance, mobile developers working with a different stack than backend developers. Newman is the command-line interface that lets you run the Postman tests.
Now that you have selected an API testing framework go to GitHub Actions Marketplace and look for an Action that meets your demands. For instance, Newman Action.
Now edit your workflow configuration:
- Add a new job that must be executed after the deployment using
needs: deploy. - Define the steps of your job:
- Check out your repository using the Action
actions/checkout@master. - Run Newman using the Action you just found in the Marketplace.
- Check out your repository using the Action
- Move the gating job at the end of the workflow by changing the
needsproperty.
name: Python application
on:
push:
branches: [ main ]
jobs:
build:
[...]
deploy:
[...] # our deployment steps
tests_api:
needs: deploy
runs-on: ubuntu-latest
steps:
- uses: actions/checkout@master
- uses: matt-ball/newman-action@master
with:
collection: tests_integration/postman_collection.json
environment: tests_integration/postman_environment.json
gating:
needs: tests_api
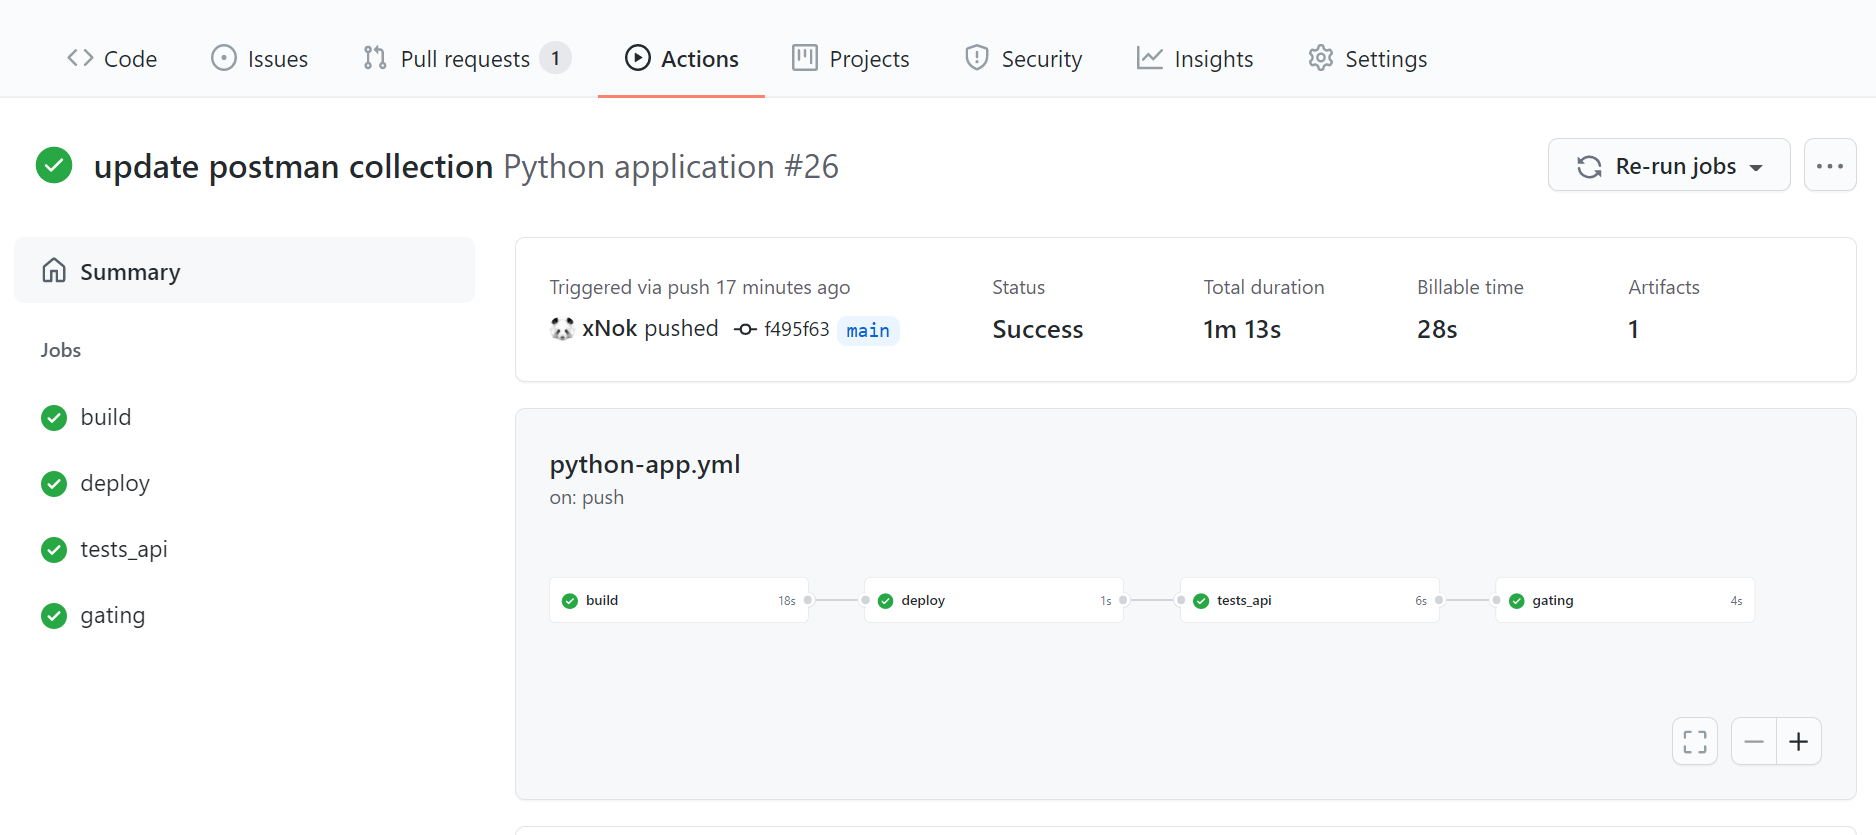
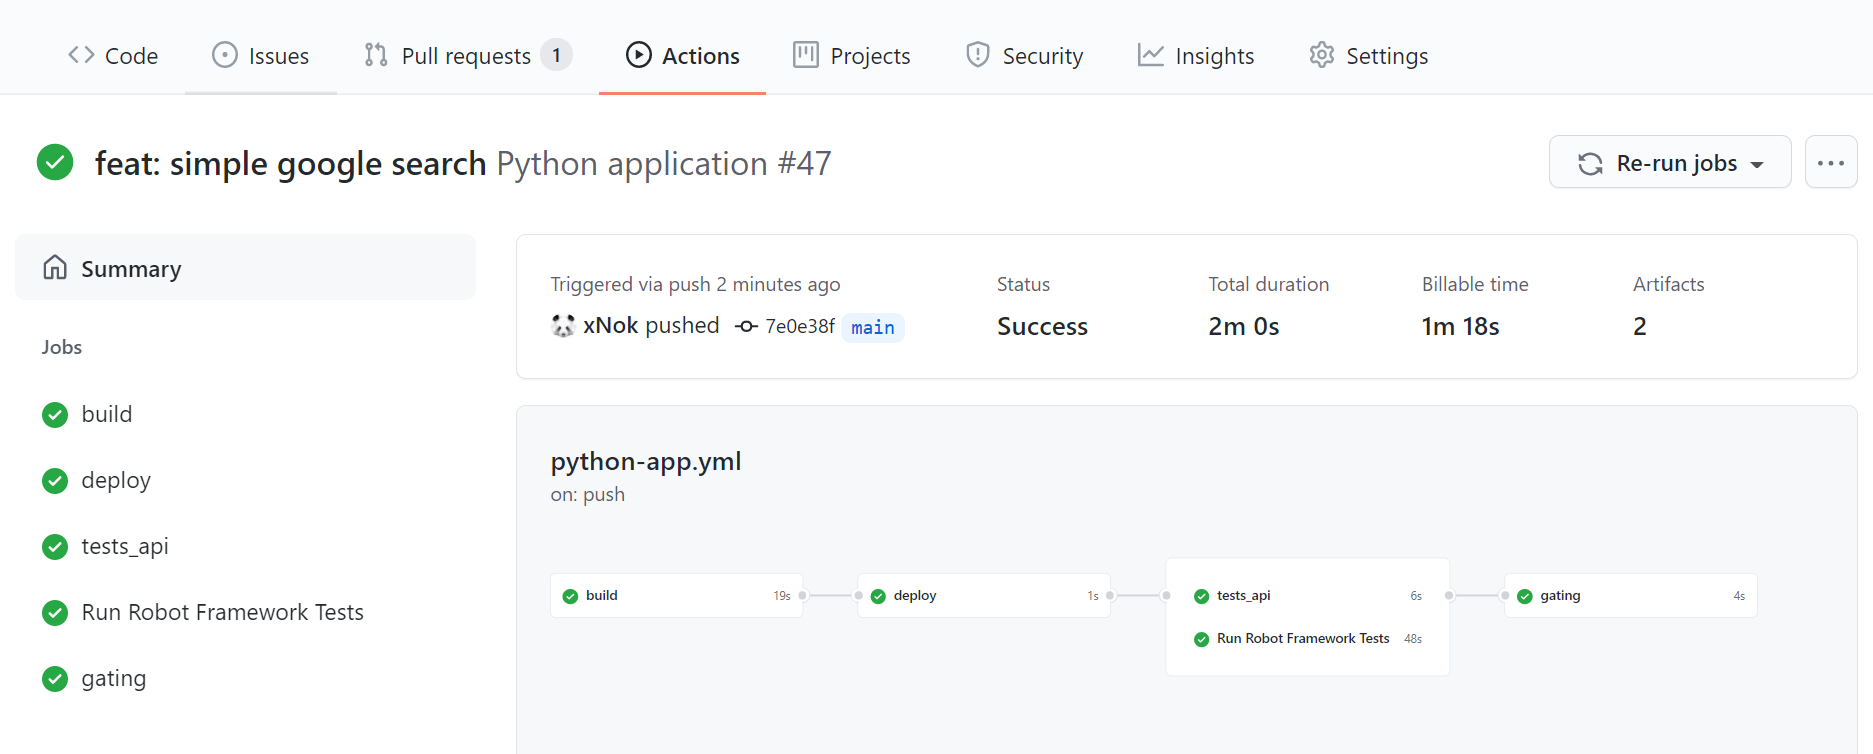
[...] # we move the gating at the end of the workflowNow your workflow should contain four sequential jobs:
Add End-To-End Testing
End-to-end testing (e2e) aims to test complete use cases from the user perspective. Think of e2e as replacing a human with a robot.
When it comes to selecting an e2e framework, I recommend prioritizing one that supports the Gherkin language. Gherkin promotes writing tests in natural language (aka, plain English). With this approach, more people can understand test cases, including product owners and business analysts. As a result, you foster better collaboration within the team.
Verbalizing tests also ensure that you are writing them from the user’s perspective and not making the mistake of testing the functions you just coded.
I selected Robot Framework for this example. Robot Framework uses Selenium to control a web browser and thus replace a human by simulating clicks and text entries.
Once again, you can go to GitHub Actions Marketplace and look for an Action meeting your needs. For instance, Robot Framework Docker Action.
Add a new job called test_e2e to the workflow configuration. This job must be executed after deploy using needs: deploy. You will notice that since tests_api and test_e2e both need deploy, they will be executed in parallel after the deployment.
Have a look at the result:
Your configuration should look along those lines to achieve this workflow:
name: Python application

on:
  push:
    branches: [ main ]

jobs:
  build: [...]
  deploy: [...]
  tests_api: [...]
  test_e2e:
    runs-on: ubuntu-latest
    needs: deploy
    name: Run Robot Framework Tests
    steps:
      - name: Checkout
        uses: actions/checkout@v2
      - name: Create folder for reports
        run: mkdir reports
      - name: Robot Framework Test
        # NOTE: joonvena/robotframework-docker-action@v0.1 had permissions issue
        # This action is based on a Docker image. I had to fall back to that image
        # and use --user flag
        run: |
          docker run \
            -v ${PWD}/reports:/opt/robotframework/reports:Z \
            -v $/tests_e2e:/opt/robotframework/tests:Z \
            --user $(id -u):$(id -g) \
            -e BROWSER=chrome \
            ppodgorsek/robot-framework:latest
      - name: Upload test results
        uses: actions/upload-artifact@v1
        if: always()
        with:
          name: robotframework report
          path: reports
  gating:
    needs: [tests_api, test_e2e]
    [...] # move the gating at the end of the workflow
Add Performance Testing
Performance testing is a broad topic because there are multiple types of performance testing. Most online sources agree on six types:
- Load testing
- Stress testing
- Soak testing
- Spike testing
- Scalability testing
- Capacity testing.
However, I don’t recommend you try to include each of them. Instead, consider one of two ways to tackle performance testing:
- Identify bottlenecks. Design an experiment that identifies bottlenecks and measures the limit of your system.
- Benchmarking. Identify critical elements of your application and measure its speed. The goal is to improve one performance metric over time; conversely, you want to be alerted in case of metric degradation and address the problem as soon as possible.
As before, create a new job (called test_performance). This time I did not find an Action on the Marketplace that fit my requirement. But I recommend this Medium article to help you select your framework and implement the steps of the job yourself.
Here is the workflow I came up with for my Python application:
name: Python application

on:
  push:
    branches: [ main ]

jobs:
  build: [...]
  deploy: [...]
  tests_api: [...]
  test_e2e: [...]
  test_performances:
    name: Check performance regression.
    runs-on: ubuntu-latest
    needs: deploy
    steps:
      - uses: actions/checkout@v2
      - name: Set up Python 3.9
        uses: actions/setup-python@v2
        with:
          python-version: 3.9
      - name: Install dependencies
        run: |
          python -m pip install --upgrade pip
          pip install flake8 pytest
          if [ -f requirements.txt ]; then pip install -r requirements.txt; fi
          if [ -f test-requirements.txt ]; then pip install -r test-requirements.txt; fi
      - name: Run benchmark
        run: pytest tests_performances --benchmark-json output.json
      - name: Store benchmark result
        uses: rhysd/github-action-benchmark@v1
        # NOTE: this action only works for public repository
        # A pull-request is open with a fix
        with:
          tool: 'pytest'
          output-file-path: output.json
          # Personal access token to deploy GitHub Pages branch
          github-token: $
          # Push and deploy GitHub pages branch automatically
          auto-push: true
          # Show alert with commit comment on detecting possible performance regression
          alert-threshold: '200%'
          comment-on-alert: true
          fail-on-alert: true
          alert-comment-cc-users: '@xNok'
Your final workflow must look like this:

Conclusion
Continuous testing is the next step after you successfully implement continuous integration. It further improves the speed of your application development process and adds a quality control layer to it.
Remember, there are three essential stages in a continuous testing workflow, each testing your system from a different perspective:
- Unit tests validate the internal logic.
- Integration tests validate the response of the system from its boundary.
- End-to-end tests validate the system from the user’s perspective.
Adding performance tests can help you track important metrics and ensure that changes do not negatively impact your users.
Finally, to succeed in implementing CT, remember that testing should become part of your team’s DNA and share the same five pillars as DevOps: culture, automation, lean, measurement, and sharing.
As your CT process grows and becomes more ingrained in how you work, take a look at Earthly’s ability to produce a repeatable build process. It can help make testing in GitHub Actions a more straightforward process.
Turn your engineering standards into automated guardrails that provide feedback directly in pull requests, with 100+ guardrails included out of the box and support for the tools and CI/CD systems you already have.