Automating Data Pipelines and Workflows Using Apache Airflow

Are you seeking a powerful, user-friendly platform to manage your data workflows? If so, Apache Airflow might be just what you need. Apache Airflow is a powerful, open-source platform for managing complex data workflows and machine learning tasks. Its Python-based architecture seamlessly integrates with other Python tools and its web-based interface simplifies monitoring and managing workflows. With features like task dependency management and retries, Airflow streamlines workflow management to improve efficiency for teams of any size.
Apache Airflow can transform your data engineering and workflow management processes, automating tasks, monitoring progress, and collaborating with your team all from a single platform.
In this article, we’ll take you on a journey to explore Apache Airflow’s architecture and components, and its key features. Additionally, the article will explain how to get started with Apache Airflow, including installation and configuration, and how to write DAG code. We’ll also cover best practices for using Apache Airflow.
Architecture of Apache Airflow
Knowing the architecture of Airflow is crucial for effective workflow orchestration and data pipeline management. We’ll explore the key components and interactions that makeup Airflow’s architecture.
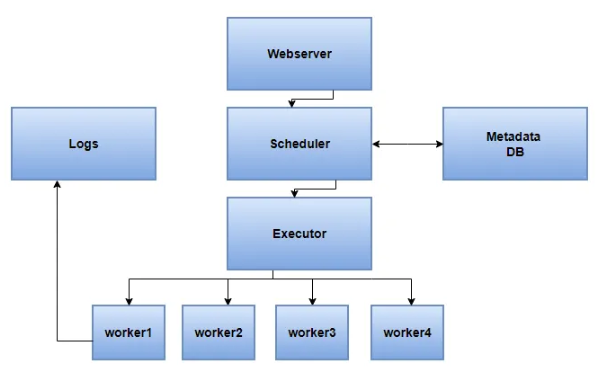
Airflow has a modular architecture that consists of several components, each responsible for a specific task. The core components of Airflow are:
Web server: The Airflow web server provides a user-friendly UI for managing workflows and tasks. It allows users to view and edit DAGs, monitor task progress, and manage task dependencies.
Scheduler: The Airflow scheduler is responsible for scheduling tasks and triggering task instances to run. The scheduler checks for new tasks to run and creates task instances based on the defined schedule.
Executor: The Airflow executor is responsible for executing tasks defined in Airflow DAGs. It listens for new tasks to execute and runs them when triggered by the scheduler. Airflow supports several executor types, including LocalExecutor, SequentialExecutor, CeleryExecutor, and KubernetesExecutor.
SequentialExecutor: SequentialExecutor is the simplest executor and executes tasks in sequential order. It is useful for testing and development, where only a few tasks are involved, and execution order is not critical.
LocalExecutor: LocalExecutor is an executor that runs tasks locally on the Airflow server. It is useful when you have limited resources and only a small number of tasks to execute. LocalExecutor is recommended when running Airflow on a single machine with limited resources. It is more efficient than SequentialExecutor as it can execute tasks in parallel, but it still has limitations in terms of scalability and fault tolerance.
CeleryExecutor: CeleryExecutor is a distributed executor that allows Airflow to run tasks on a distributed system, such as a cluster of servers or a cloud-based environment. It uses Celery as the message broker and task queue system. CeleryExecutor is recommended when running Airflow on a larger scale, as it provides better scalability and fault tolerance.
Database: Airflow stores its metadata and task execution logs in a backend database. Airflow supports several databases, including PostgreSQL, MySQL, and SQLite.
Message broker: Airflow uses a message broker to communicate between the scheduler and executor. Airflow supports several message brokers, including Redis, RabbitMQ, and Apache Kafka.
DAGs: Airflow DAGs (Directed Acyclic Graphs) define the workflows and tasks to be executed. DAGs are defined in Python code and typically contain multiple tasks that are executed in a specific order. Tasks can be dependent on other tasks, allowing for complex workflows.
Overall, the Airflow architecture is designed to be flexible and scalable, allowing it to handle large-scale data processing workflows. The modularity of Airflow allows users to customize the components to meet their specific needs and integrate them with other tools in their data processing pipeline.
Operators
Operators are used in Airflow to define workflows in a modular and reusable way. Instead of creating a single monolithic script to run a complex process, you can break it down into smaller tasks and use operators to execute each task. This makes it easier to maintain and modify the workflow over time, as you can update individual tasks or add new ones without affecting the rest of the workflow.
Operators also provide a consistent interface for interacting with external systems, such as databases or APIs. By using hooks to interface with these systems, operators can be reused across multiple workflows, making it easier to create new workflows that leverage existing code.
Airflow comes with a variety of built-in operators for different types of tasks, such as BashOperator for running a Bash script, PythonOperator for running a Python function, and EmailOperator for sending emails. There are also third-party operators available for other types of tasks. Here are some examples:
BashOperator
Use the BashOperator when you need to execute a Bash command or script on the Airflow server. This can be useful for running shell scripts, calling command-line utilities, or interacting with the file system. Here is an example that runs a simple Bash command:
extract_data = BashOperator(
    task_id='extract_data',
    bash_command='python /path/to/extract_script.py',
    dag=dag
)
This code creates an Airflow BashOperator object called extract_data, the task will run a Python script located at /path/to/extract_script.py.
Here’s what each argument in the BashOperator() function call represents:
task_id: A string that uniquely identifies the task. In this case, it is set toextract_data.bash_command: The Bash command that the task should execute. In this case, it is set topython /path/to/extract_script.py, which will execute the Python script that extracts data from a source file.dag: The DAG that the task belongs to. In this case, it is set to the dag object that we defined earlier.
PythonOperator
Use the PythonOperator when you need to execute a Python function on the Airflow server. This can be useful for performing custom business logic, interacting with APIs, or manipulating data. Here’s an example:
transform_data = PythonOperator(
    task_id='transform_data',
    python_callable=transform_data,
    dag=dag
)
This code creates an Airflow PythonOperator object called transform_data, the task will execute a Python function called transform_data().
Let’s take a closer look at the arguments in the PythonOperator() function call:
task_id: A string that uniquely identifies the task. In this case, it is set totransform_data.python_callable: The Python function that the task should execute. In this case, it is set to thetransform_datafunction, which is defined elsewhere in the code and performs the necessary data transformation operations.dag: The DAG that the task belongs to. In this case, it is set to the dag object that we defined earlier.
PostgresOperator
The PostgresOperator is used to execute SQL commands on a PostgreSQL database as part of an Airflow ETL workflow. It can be used to load data, run queries, create, or drop tables, and perform backups, or restores. The operator takes SQL commands as a parameter and requires a PostgreSQL connection ID defined in Airflow’s connections settings. Here’s an example:
load_data = PostgresOperator(
    task_id='load_data',
    postgres_conn_id='my_postgres_conn',
    sql='INSERT INTO my_table (col1, col2) SELECT col1, col2 FROM \
    transformed_data;',
    dag=dag
)
This code creates an Airflow PostgresOperator object called load_data, the task will execute a SQL statement that loads transformed data into a PostgreSQL database.
In the PostgresOperator() function call:
task_id: A string that uniquely identifies the task. In this case, it is set toload_data.postgres_conn_id: The connection ID for the PostgreSQL database that the task should load data into. In this case, it is set tomy_postgres_conn, which must be defined in Airflow’s connections configuration and provide the necessary credentials to access the database.sql: The SQL statement that the task should execute. In this case, it is set toINSERT INTO my_table (col1, col2) SELECT col1, col2 FROM transformed_data;, which will insert data from thetransformed_datatable (which was created in thetransform_datatask) into themy_tabletable in the connected PostgreSQL database.dag: The DAG that the task belongs to. In this case, it is set to the dag object that we defined earlier.
EmailOperator
Use the EmailOperator when you need to send an email. This can be useful for sending notifications, alerts, or reports.
Suppose you have an Airflow DAG that runs a series of ETL jobs on a daily basis. You want to receive an email notification each time the DAG completes so that you can be alerted if there are any issues with the workflow. To do this, you can use the EmailOperator to send an email to your inbox with the status of the DAG run. Here’s an example code:
    send_email_task = EmailOperator(
        task_id='send_email',
        to=['you@example.com'],
        subject='Deployment successful!',
        html_content='The deployment was successful.',
        dag=dag,
        trigger_rule='all_success'
    )
The EmailOperator class is used to send an email notification. The instance created by this code has the following parameters:
task_id=‘send_email’: This sets a unique identifier for this task in the DAG.to=[‘you@example.com’]: This specifies the email address of the recipient.subject=‘Deployment successful!’: This sets the subject of the email.html_content=‘The deployment was successful.’: This sets the body of the email in HTML format.dag=dag: This specifies the DAG that this task belongs to.trigger_rule=‘all_success’: This sets when this task should be triggered. In this case, it is set to ‘all_success’, which means that the task will only be triggered if all of its upstream tasks have succeeded.
Each operator has its own set of parameters that define its behavior, such as the command to run in a BashOperator, or the SQL query to execute in an SQLOperator. By combining these operators in a DAG (Directed Acyclic Graph), you can create complex workflows that orchestrate the execution of multiple tasks.
Connections and Hooks
Connections and hooks are two important concepts in Apache Airflow that enable users to interact with external systems and resources within their workflows.
Connections are a way to define reusable credentials and other settings for external systems, such as databases, APIs, and cloud services. Hooks are a higher-level abstraction over Connections, providing a simplified interface for interacting with external systems from within tasks in a DAG. Hooks allow users to write code that interacts with external systems without having to worry about the underlying details of the connection.
For example, the PostgresHook automatically looks for the connection with a conn_id of postgres_default if you don’t pass one in.
How to Install Apache Airflow via Docker
It is recommended that you install Docker Desktop.
You can verify the installation of Docker by executing the following command in the command prompt:
docker --versionTo deploy Airflow on Docker Compose, We should fetch docker-compose.yaml by executing the following command in the command prompt.
curl -LfO "https://airflow.apache.org/docs/apache-airflow/2.2.3/docker-compose.yaml"The resulting output should be as shown below:

This file contains several service definitions:
postgres: This service runs a PostgreSQL database, which is commonly used as the backend database for Airflow. Airflow stores its metadata and task execution logs in this database, so it’s a crucial component for Airflow to function properly.
redis: This service runs a Redis server, which is commonly used as the message broker for Airflow. The scheduler and worker use Redis to communicate with each other and coordinate task execution.
airflow-webserver: This service runs the Airflow web server, which is the main interface for interacting with Airflow. The web server provides a user-friendly UI to manage Airflow DAGs, schedules, and tasks.
airflow-scheduler: This service runs the Airflow scheduler, which is responsible for scheduling tasks and triggering task instances to run. The scheduler checks for new tasks to run and creates task instances based on the defined schedule.
airflow-worker: This service runs the Airflow worker, which executes tasks defined in Airflow DAGs. The worker listens for new tasks to execute and runs them when triggered by the scheduler.
airflow-triggerer: This service runs a separate process that listens for external triggers to kick off Airflow DAGs. This can be useful for triggering workflows based on external events or data.
airflow-init: This service runs initialization scripts to set up Airflow’s database schema and create an admin user. This is typically run only once when the Airflow environment is first set up.
flower: This service runs a separate process that provides a web-based UI for monitoring Airflow tasks and workers. This can be useful for tracking the progress of tasks and troubleshooting issues.
All these services allow you to run Airflow with CeleryExecutor. These services can all be important components of an Airflow deployment, depending on the specific needs and requirements of the project. The database and message broker services are particularly critical for Airflow to function properly, while the triggerer and Flower services can provide additional functionality for managing and monitoring workflows.
Some directories in the container are mounted, which means that their contents are synchronized between your computer and the container.
- ./dags - you can put your DAG files here.
- ./logs - contains logs from task execution and scheduler.
- ./plugins - you can put your custom plugins here.
mkdir -p ./dags , ./logs , ./pluginsAirflow instance can now be initialized using the ‘airflow-init’ service
docker-compose up airflow-initThe resulting output should be as shown below. Exited with code 0 means it’s deployed successfully. You may get a warning that AIRFLOW_UID is not set, but you can ignore it.

Now that all the related services have been initialized, it’s time to run Airflow.
docker-compose up -dThe resulting output should be as shown below
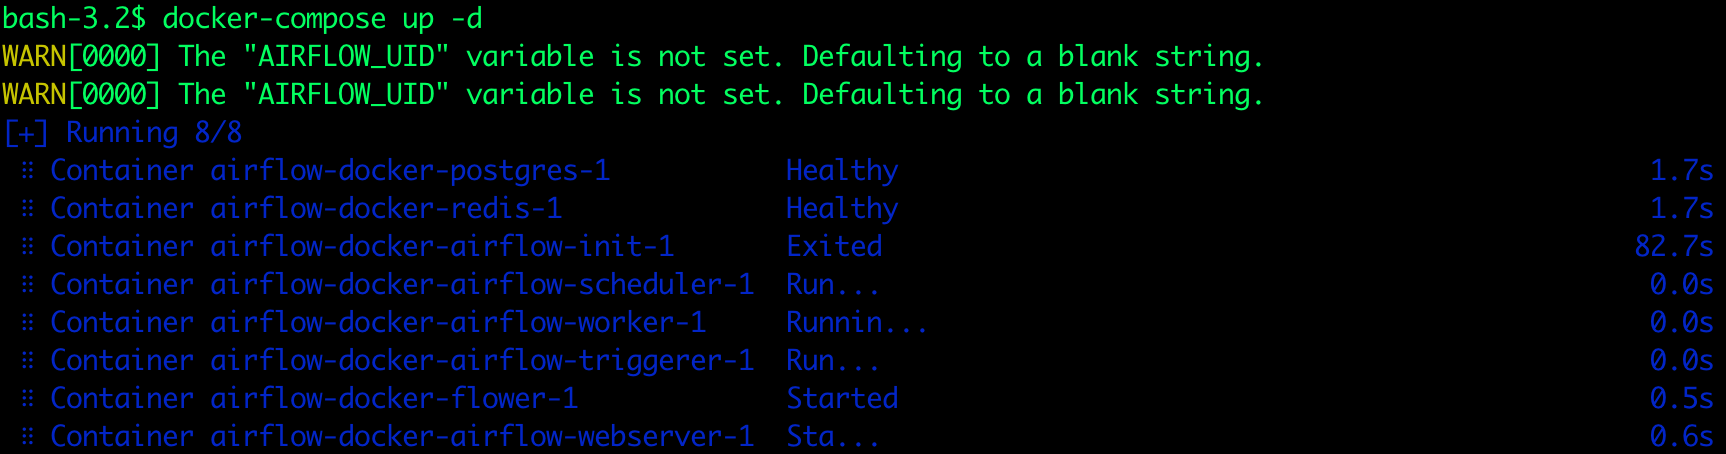
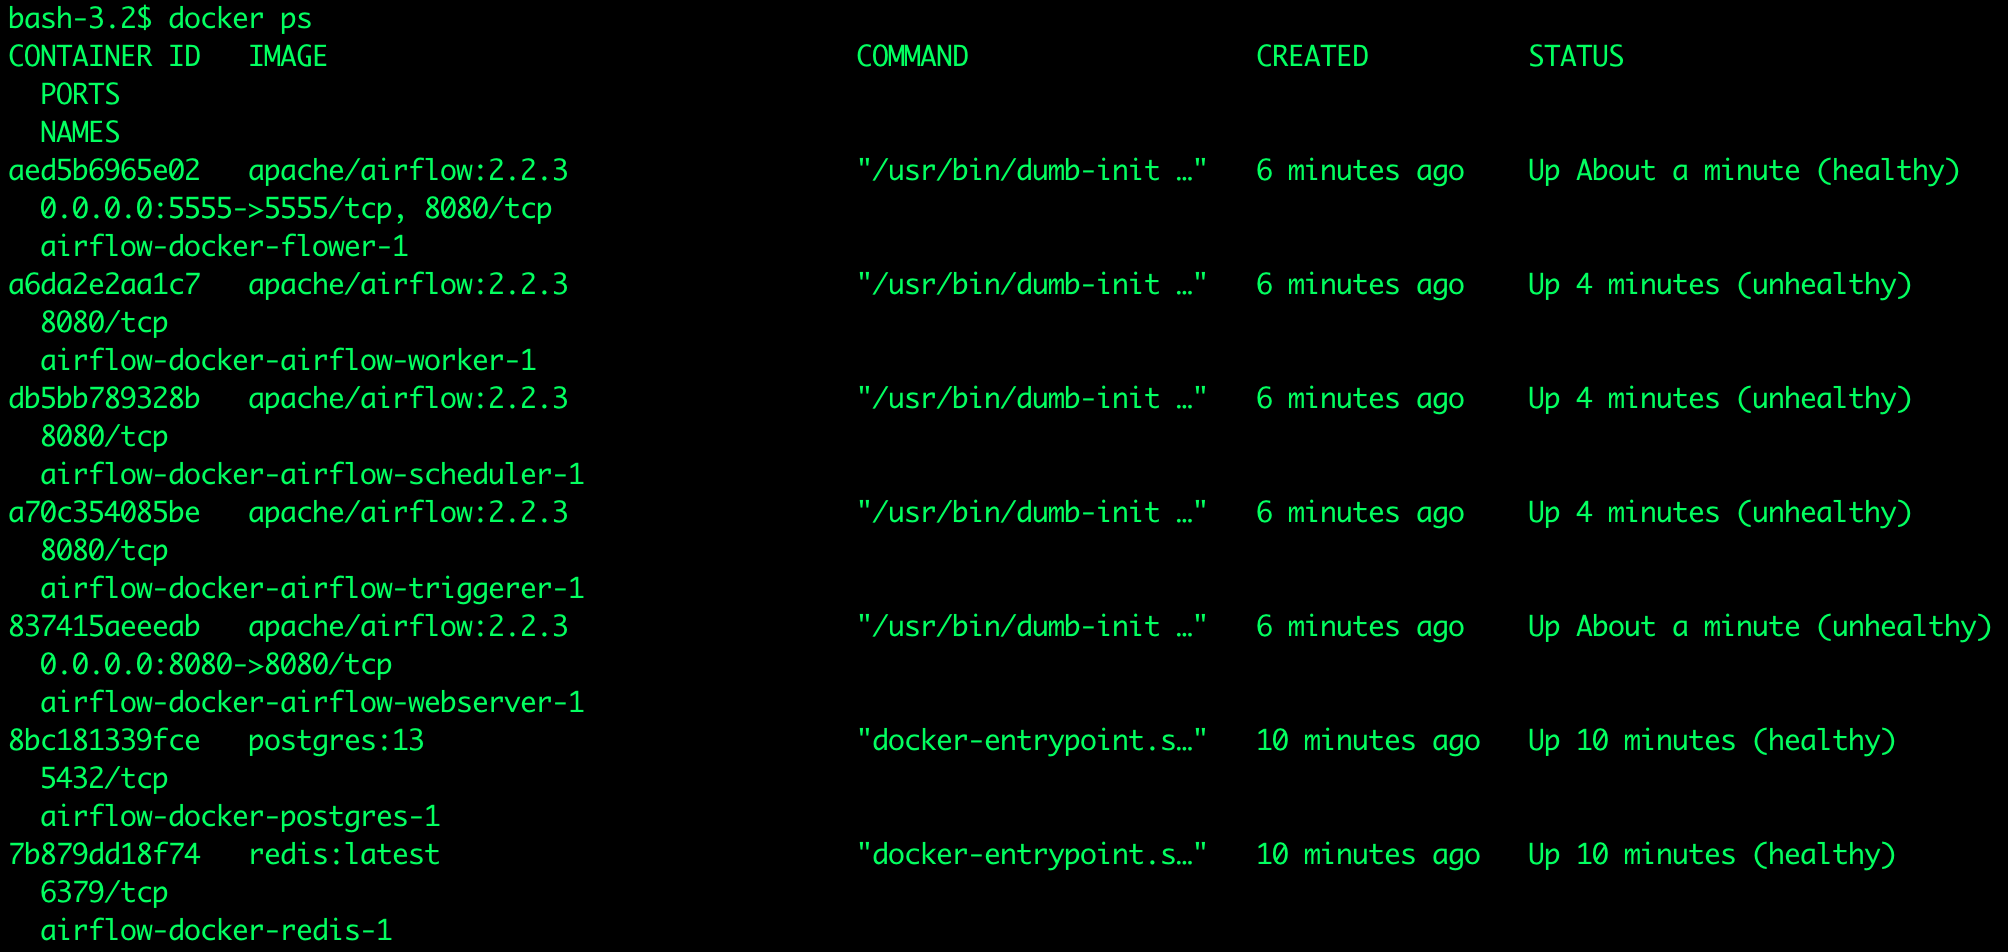
To check if the Airflow service is running, execute the following command in the command prompt:
docker psThe resulting output should be as shown below:
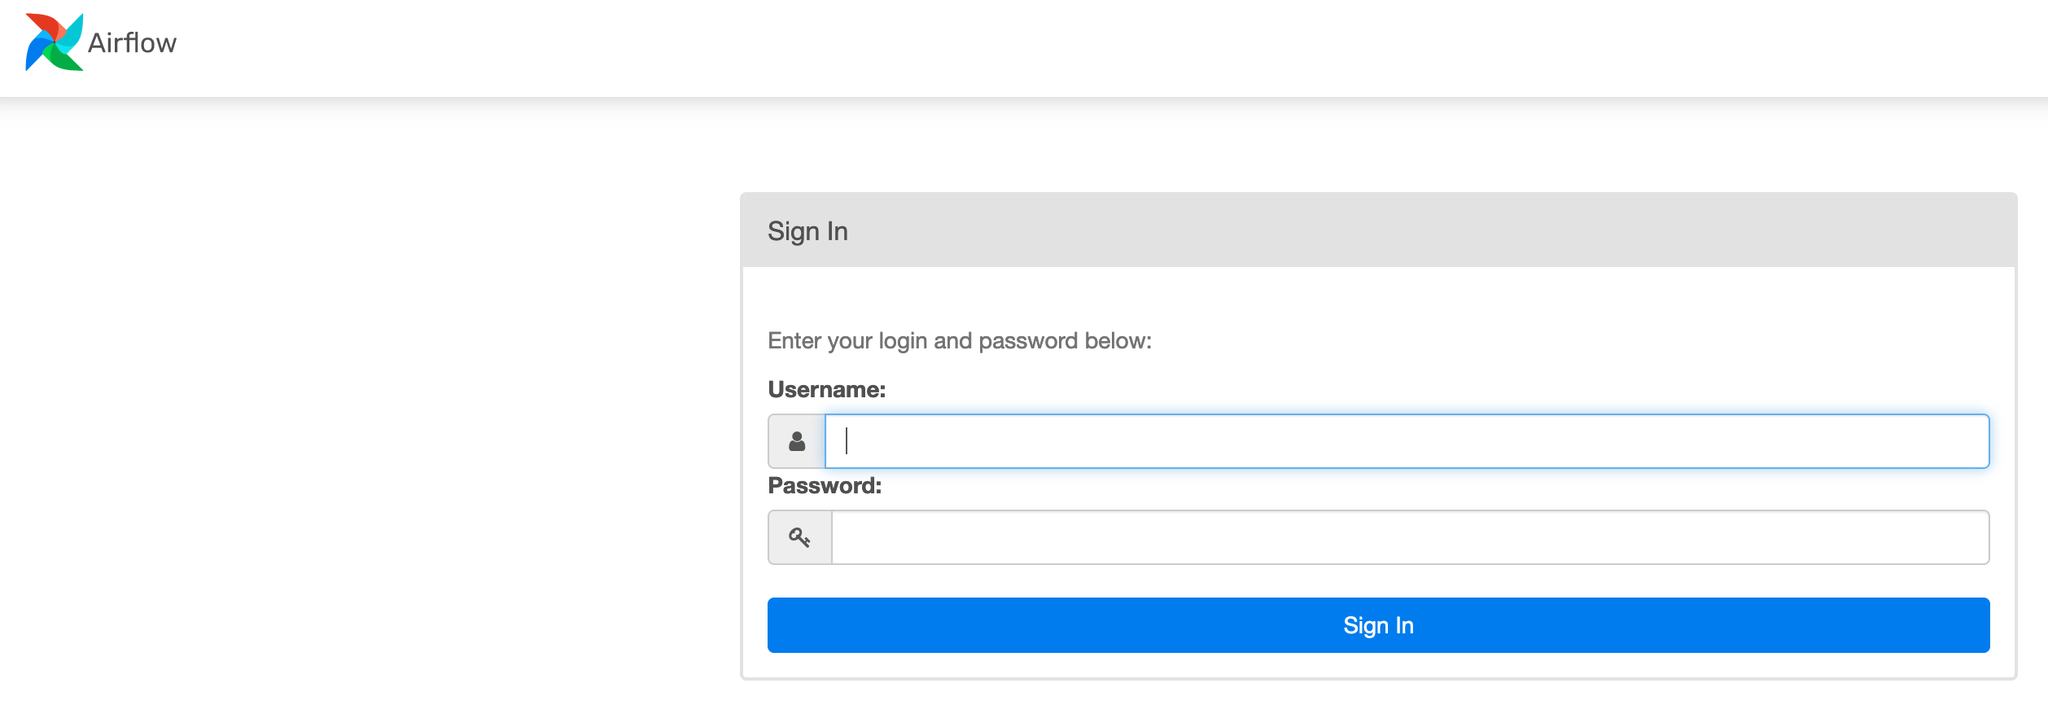
Open a web browser and enter the following localhost URL: http://localhost:8080. Set the username “airflow” and the password “airflow”:
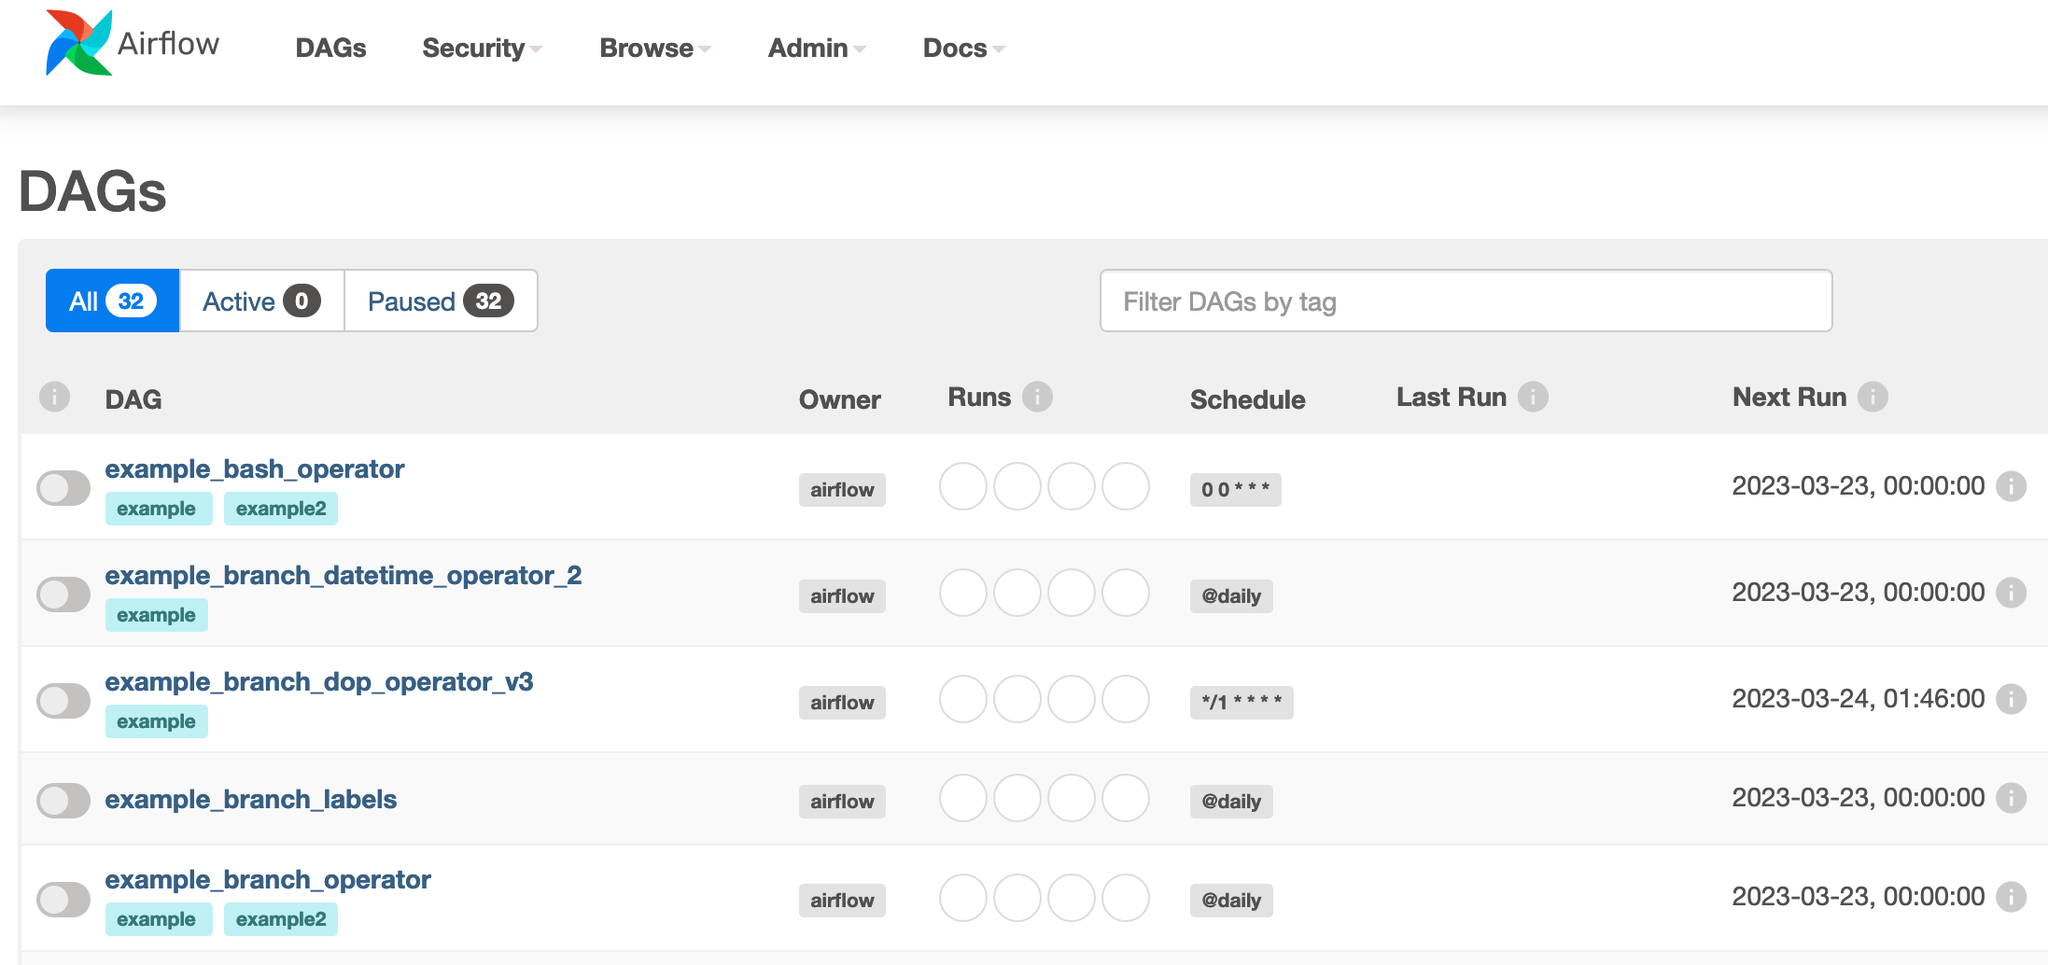
Finally, Apache Airflow is up as shown below
Running ETL Pipelines With Airflow
Let’s take an example of how Airflow can be used to automate a data processing pipeline.
Let’s say you work at a retail company, and your team is responsible for processing and analyzing sales data.
Your team has a defined process for this task that includes the following steps:
- Download: Download the file from the URL located here.
- Extract: Extract two columns from the file downloaded in the previous task.
- Transform: Transform the extracted columns to be all lowercase. -Load: Compress the transformed and extracted data.
You can get the full DAG Python code at this GitHub link
Now we can start writing DAG code:
1. Import Libraries
Import the necessary modules and packages, including the DAG class from Airflow, the BashOperator class, and the days_ago and timedelta functions from Airflow’s dates module.
from airflow import DAG
from datetime import timedelta
from airflow.utils.dates import days_ago
from airflow.operators.bash_operator import BashOperator
2. Set Up Default Arguments
Default arguments are a key component of defining DAGs in Airflow. These arguments provide a way to specify common settings and behaviors for all tasks in a DAG, such as the start date, email notifications, retries, and other properties. By setting default arguments, you can avoid having to repeat the same settings for each individual task and ensure that all tasks in a DAG are configured consistently.
default_args = {
    'owner': 'airflow',
    'depends_on_past': False,
    'start_date': datetime(2018, 9, 1),
    'email_on_failure': False,
    'email_on_retry': False,
    'schedule_interval': '@daily',
    'retries': 1,
    'retry_delay': timedelta(seconds=5),
}
In the above snippet:
owner: Specifies the owner of the DAG. This is typically the name of the person or team responsible for maintaining the DAG.depends_on_past: Specifies whether a task instance should depend on the success of the previous task instance.start_date: Specifies the date and time when the DAG should start running.email_on_failure: Specifies whether to send an email notification when a task fails.email_on_retry: Specifies whether to send an email notification when a task is retried.schedule_interval: The frequency with which the task should run. In this case, it is set to run once per day.retries: Specifies the number of times to retry a failed task.retry_delay: Specifies the delay between retries. In this case, we’re using a delay of 5 seconds.
3. Define the DAG
In this step we will define the dag. And it will include:
dag_id: A unique identifier for the DAG. In this case, it is set toETL_DAG.default_args: A dictionary containing default values for various configuration options related to the DAG. These options were previously defined in the default_args dictionary that we discussed in the previous section.description: An optional string that describes the purpose of the DAG. In this case, it is set toETL DAG using Bash.schedule_interval: The frequency with which the DAG should run. In this case, it is set to run once per day, as indicated by the timedelta(days=1) argument.
dag = DAG(
    dag_id='ETL_DAG',
    default_args=default_args,
    description='ETL DAG using Bash',
    schedule_interval=timedelta(days=1),
)
4. Define the Tasks
In this step, we will define the tasks that make up the ETL workflow. Each task will include:
- A
task_idstring that uniquely identifies the task. - The Bash command that the task should execute.
- The DAG that the task belongs to, as defined in the previous steps.
#Download the file from the URL located
download=BashOperator(
task_id='download',
bash_command='curl "https://cf-courses-data.s3.us.cloud-object-storage.appdomain.cloud/IBM-DB0250EN-SkillsNetwork/labs/Apache%20Airflow/Build%20a%20DAG%20using%20Airflow/web-server-access-log.txt" > /opt/airflow/dags/web_server_log.txt',
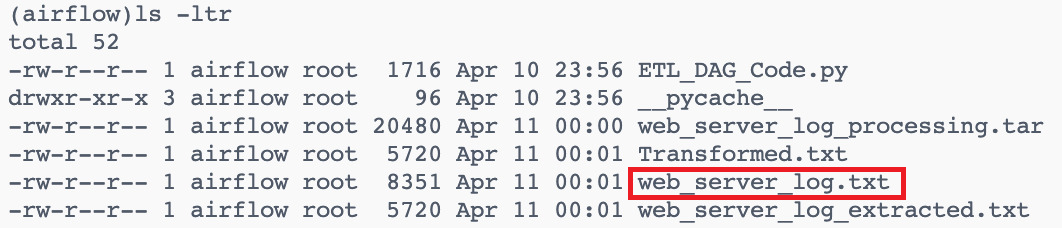
dag=dag,
)As you can see below, web_server_log.txt file has been downloaded:
And the web_server_log.txt file contains many columns like timestamp, latitude, longitude, visitorid, and so on as shown below
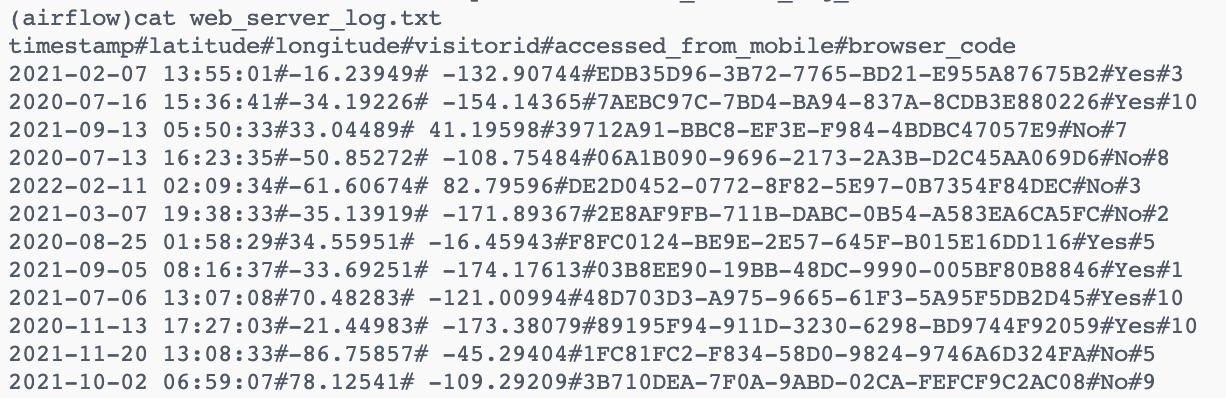
We will extract two columns (timestamp,visitorId) from the file downloaded. So we will use the bash command to extract the two columns and create a new file with the name web_server_log_extracted.txt
#Extract two columns from the file downloaded
extract=BashOperator(
    task_id='extract',
    bash_command='cut -f1,4 -d"#" \
    /opt/airflow/dags/web_server_log.txt > \
    /opt/airflow/dags/web_server_log_extracted.txt',
    dag=dag,
)
As you can see below, web_server_log_extracted.txt file has been created with the extracted columns.

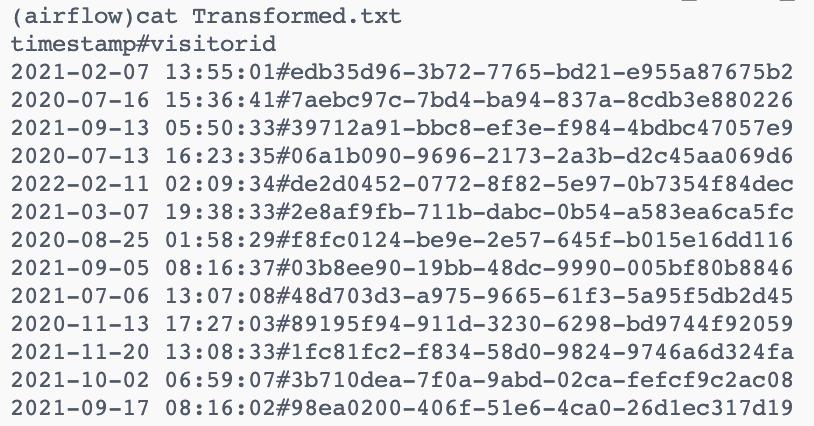
Now we will transform the extracted columns to be all lowercase and create a new file with the transformed data.
#Transform the extracted columns to be all lowercase
transform=BashOperator(
    task_id='transform',
    bash_command='tr  "[A-Z]" "[a-z]"  < \
    /opt/airflow/dags/web_server_log_extracted.txt > \
    /opt/airflow/dags/Transformed.txt',
    dag=dag,
)
As you can see below, Transformed.txt file has been created with the transformed columns.
The last step is to compress the transformed and extracted data.
#Compress the transformed and extracted data
load=BashOperator(
    task_id='load',
    bash_command='tar cfv /opt/airflow/dags/web_server_log_processing.tar  \
    /opt/airflow/dags/web_server_log_extracted.txt \
    /opt/airflow/dags/Transformed.txt',
    dag=dag,
)
As you can see below, the web_server_log_processing.tar file has been created.

5. Define the Task Dependencies
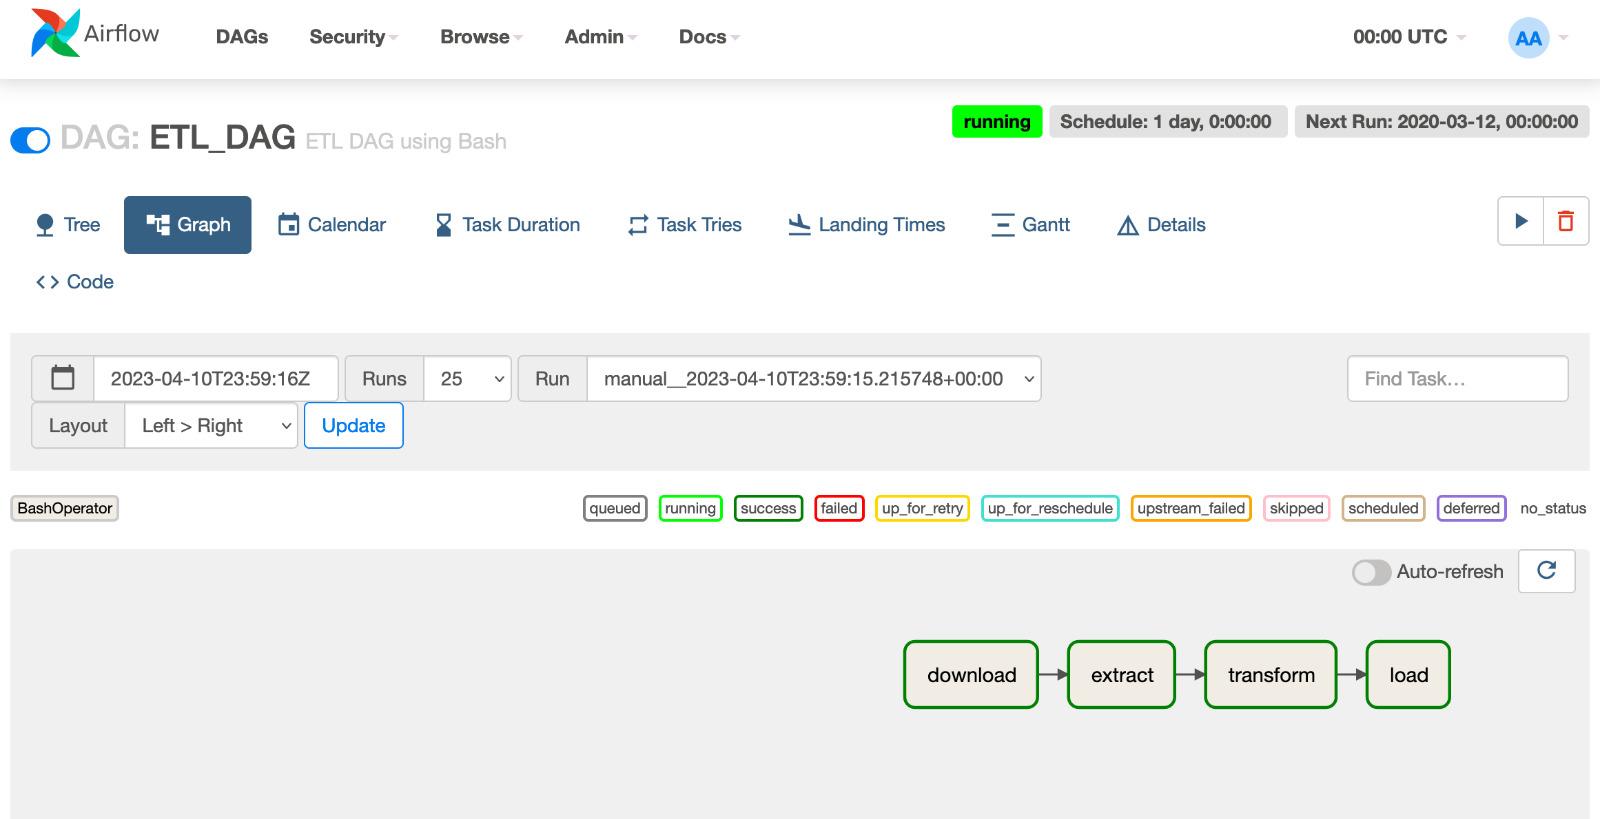
This code defines the task dependencies in an Airflow DAG. Tasks in Airflow can depend on other tasks, and this is defined using the >> operator. In this example, The output of download is used as the input for extract, and the output of extract is used as the input for transform and so on. In other words, the download, extract and transform tasks are dependencies or upstream tasks for the load, which is a downstream task.
download >> extract >> transform >> loadAnd when the workflow is successful, the output will be like this:
In the previous example, we used sequential execution but sometimes we need another type of execution like
- Parallel execution: In some workflows, you may have multiple tasks that can be executed in parallel, rather than in a strict sequential order. For example, you may have a task that downloads data from multiple sources in parallel, followed by a task that merges the data. In this case, the order of execution may not be strict, and the upstream and downstream tasks would need to be identified based on their dependencies. Here is an example:
with DAG('parallel_execution', start_date=datetime(2023, 3, 29), \
schedule_interval=None) as dag:


    download_task_1 = PythonOperator(
        task_id='download_task_1',
        python_callable=download_data_from_source,
        op_kwargs={'source': 'source_1'}
    )
    download_task_2 = PythonOperator(
        task_id='download_task_2',
        python_callable=download_data_from_source,
        op_kwargs={'source': 'source_2'}
    )
    download_task_3 = PythonOperator(
        task_id='download_task_3',
        python_callable=download_data_from_source,
        op_kwargs={'source': 'source_3'}
    )

    merge_task = PythonOperator(
        task_id='merge_task',
        python_callable=merge_data,
        provide_context=True
    )
    [download_task_1, download_task_2, download_task_3] >> merge_task
The three download tasks can be executed in parallel since they don’t have any dependencies on each other. The merge_task is downstream of all three download tasks, and can only be executed after they have all been completed successfully.
Best Practices for Using Apache Airflow
- Use the right executor: Airflow supports different executors, such as SequentialExecutor, LocalExecutor, and CeleryExecutor.For example, if you have a small workflow with a few tasks, you can use SequentialExecutor. If you have a large workflow with many tasks, you can use CeleryExecutor.
- Use sensors to trigger tasks: A sensor is a type of task in Airflow that waits for a certain condition to be met before triggering downstream tasks. For example, you can use a FileSensor to wait for a file to be available before triggering a task that processes the file.you can check Sensors for more information.
- Use XCom to share data between tasks: XCom is a mechanism in Airflow that allows tasks to exchange data. For example, you can use XCom to pass the output of one task as input to another task. you can find more information on XCom.
- Optimizing Performance: Tune configuration parameters such as increasing worker processes, setting a higher concurrency value, and optimizing DAG code by using efficient Python libraries and queries.
- Avoiding common pitfalls: Set up task dependencies properly, understand the implications of using the latest_only operator, handle task failures, and set up proper logging. For example, if you have a daily task that runs at midnight and you use the latest_only operator, the task will not run if the execution is delayed for any reason, such as a system outage.
Conclusion
This article dove into the nitty-gritty of Apache Airflow, its strengths, and how to effectively install, configure, and write DAG code for it. We also explored some best practices for its use. Future upgrades might lead to better cloud integration, improved data streaming support, and cooler visualization & monitoring features. Airflow’s versatility makes it a superb tool - and it’s just going to keep getting better!
As you continue to explore tools to streamline your data engineering processes, you might also be interested in Earthly. It’s an open-source build automation tool that could be a great addition to your toolkit, especially if you’re looking to further optimize your build.
Turn your engineering standards into automated guardrails that provide feedback directly in pull requests, with 100+ guardrails included out of the box and support for the tools and CI/CD systems you already have.