Understanding Django Signals

Table of Contents
In Django, signals allow certain senders to inform a set of receivers that specific actions have occurred. Django signals are used to send and receive specific essential information whenever a data model is saved, changed, or even removed. This relates to specific past or present client-provided events that occur in real time.
This article will teach you all you need to know about Django signals and how to use them in your project. You’ll learn the following concepts of Django signals and their applications:
- Types of signals and how they should be received
- Methods in the Django
Signalsmodule - Functions to send, receive, or listen to signals
- Using signals in Django applications
Prerequisites
To follow along with this article, you need to have a basic understanding of the following:
- Django version 3 project setup
- Python 3
- Familiarity with Django models and views
You can download the code and follow along.
Overview of Django Signals
A signal is a method of processing tasks before or after the subscribed events are ready to update. Then, whether the interesting period is before or after the event is complete depends on the execution time of the signal. Signals in Django make subscribers aware of particular events that happen in the different components of the application.
Signals in Django also decouple various parts of event processes. Decoupling makes sense when you need to avoid the synchronization of application components. In short, signals allow developers to write codes that run on separate events and operating systems threads to achieve better performance.
For instance, processes like sending emails after the registration of a user should be separated from the application so as to not block the running thread.
The concept outlined above is used by Django signals to construct a dispatcher.
Dispatcher
Dispatchers are the built-in connect() and disconnect() methods of Django signals, which perform signaling with different parameters. They notify subscribers when a certain action is complete or ready.
To register a receiver function that gets called by signals, you use Django signals dispatcher connect() method. For instance, let’s make a receiver function and connect to it once an HTTP request is sent.
    def get_notified(sender, **kwargs):
        """ Printing a notification string. """
        print("HTTP request finished")
The get_notified() function prints out the notification string. It is a receiver because it requires a sender model class wherever it is called.
Now, let’s connect the receiver with the dispatcher. There are two ways to achieve this. The first way is to import the request_finished class from Django signals and pass the receiver function created when calling the connect() method on request_finished, as shown:
    from django.core.signals import request_finished

    request_finished.connect(get_notified)
Registering Receiver Functions Using Decorators
The other way to register a receiver function is through decorators.
In a nutshell, decorators are functions that return a different internal function that is abstracted away from usage outside the context of the decorator. This means that the receiver function will be passed into the internal method defined in the connect() method in the Django source code.
    from django.core.signals import request_finished
    from django.dispatch import receiver

    @receiver(request_finished)
    def get_notified(sender, **kwargs):
        print("HTTP request finished")
In this code snippet, we are referencing request_finished to call our receiver get_notified() function when an HTTP request is finished.
How to disconnect a receiver function from the signal? <signal>.disconnect(receiver=None, sender=None, dispatch_uid=None) is the general syntax to disconnect a receiver from the connected signal.
Therefore, the receiver function can be disconnected by calling the disconnect() method on the request_finished module.
    from django.core.signals import request_finished
    request_finished.disconnect(dispatch_uid=REQUEST_FINISH_DISPATCH_UID)
The receiver argument itself dictates whether the registered receiver function should be disconnected or not. However, it may be None if the dispatch_uid argument is used to identify such a receiver function.
Note that it is preferable to always provide docstrings in signal functions.
Most Frequently Used Django Models Signals

Here, we’ll go over Django’s most popular signals. These signals are typically transmitted when various model methods like save() and __init__() are invoked.
The model class save() method is always called whenever it is saving an instance to the database in Django. For example:
    from django.db.models import models

    class User(models.Model):
        name = models.Charfield(max_length=250)

        def __str__():
            return self.name

    user = User()
    user.name = "John"
    user.save()
We created a User model class that inherits from the Django Model class. This allows us to override some internal methods like __str()__ which returns a representation of the model. The instance name will be used to represent the object in the Django admin interface.
In addition, the __init()__ model method will be called when the instantiation occurs. So this method will create a class instance and associate a specific property like name to the object.
We then reference the user object’s name property and assign it to “John”. Now the save() method is called on the user instance. This will commit the new instance to the database immediately.
Now let us discuss the various Django signals. Note that you can import all the signals from django.db.models.signals. The list of signals that can be subscribed to is as follows:
The init Signals
The following signals are applicable only for the __init()__ model method. They are:
pre_initpost_init
pre_init
This signal is useful in many real-world applications like keeping track of the time at which the client’s HTTP requests are received on the server. This happens before a model’s __init__() method is called. This signal is also invoked with several arguments, including:
sender: which denotes the model class that just created the instance.*args: include all additional__init__()method parameter tuples that are unpacked using the*operator.**kwargs: the dictionary passed to the__init__()method where the key is the property such as thenameof theUsermodel instance and the value is the value of the property.
The snippet below will signal the callback() receiver function when the User model is ready to instantiate a new object of the class.
    from django.core.signals import pre_init
    from datetime import datetime

    @receiver(pre_init, sender=User)
    def callback(sender, **kwargs):
        print(f"User model __init()__  method is called initially \
        at {datetime.now()}")
Here’s a sample output:
User model __init()__  method is called initially at
2023-01-12 16:50:42.193280
post_init
This signal can be used when a particular model class needs to be aware of new objects created. For example, logging some information about activities that occur for event tracking on the server.
The post_init signal is sent when the ___init__() method finishes execution having created the instance. This signal needs two arguments:
sender: the model class that transmits the signal.instance: another name of the object produced by the__init__()model method.
    from django.core.signals import post_init
    from datetime import datetime

    @receiver(post_init, sender=User)
    def callback(sender, instance, **kwargs):
        print(f"User {instance.name} is created at {datetime.now()}")
Also, the above snippet will signal the callback() receiver function whenever the User instance is created. This function prints out the message string “User John is created at 2022-12-31:07:00:00” when it’s called (a sample output).
The save Signals

We’ll now discuss save signals. They are:
pre_savepost_save
pre_save
When a signal needs to be sent before a model instance is saved to the database, use this Django signal. Note that the save() method will be called after the instance is created and before it’s saved to the database. As you might have guessed, the following arguments are necessary to call the signal:
sender: the model class that just created the instance.instance: another object’s name created by the model method__init__().raw: a Boolean to detect whether the sender model is properly saved or not. It defaults to True.using: used to state database aliases.update_fields: a list of fields supplied to the model methodsave(). If no value is specified, it defaults to None.
So we have a model Profile that needs pre_save and post_save signals. This is just an illustration of how these signals can be used.
from django.db.models.signals import pre_save

class Profile(models.Model):
    to_receive_new_user = models.BooleanField(default=False)
    created_at = models.DateTimeField(auto_now_add=True)

    @receiver(pre_save, sender=User)
    def update_profile(sender, instance, **kwargs):
        instance.to_receive_new_user = True
        instance.save()
        return instance
You’ll observe that in response to a pre_save signal to the receiver decorator, the update _profile() receiver function modifies the property to_receive_new_user. Every time an instance is created before being saved to the database, the receiver function is called. Additionally, you’ll see that the created Boolean was not included in the receiver parameters. This is because an instance has not yet been created.
post_save
This signal is activated each time a model instance is saved. Except for the Boolean keyword created, this signal has all the same arguments as pre_save. Once an instance is created, the model will send the Boolean created to the receiver.
from django.db.models.signals import post_save
from django.contrib.auth.models import User

class Profile(models.Model):
    is_new_user_created = models.BooleanField(default=False)
    created_at = models.DateTimeField(auto_now_add=True)

@receiver(post_save, sender=User)
def update_profile(sender, created, instance, **kwargs):
    if created:
        instance.is_new_user_created = True
        instance.save()
    return instance
To call the post_save signal, the update_profile() function is decorated as the receiver. By making the User model a sender, it automatically accesses the instance saved to the database. The receiver only needs to use the save() method on the instance to save the changes to the database by changing the Boolean is_new_user_created to True.
pre_delete and post_delete
Similarly, pre_delete and post_delete signals perform their receiver functions before and after each instance is removed, respectively. Let’s take a look at how these signals are used in the examples below.
from django.db.models.signals import pre_delete, post_delete
from django.contrib.auth.models import User

class Order(models.Model):
    grocery = models.CharField(max_length=250)

@receiver(pre_delete, sender=Order)
def get_order_notification(sender, instance, **kwargs):
    print(f"The {instance.grocery} groceries delete request was \
    received on {datetime.now()}.")

@receiver(post_delete, sender=Order)
def get_order_notification(sender, **kwargs):
    print(f"The grocery was deleted successfully on {datetime.now()}.")
Sample output for the pre_delete signal will be like this:
The tomato groceries delete request was received on
2023-01-12-16:50:42.193280.
While the sample output for the post_delete signal will be like this:
The grocery was deleted successfully on 2023-01-12-16:52:42.193290.Here, we define two receiver functions that print message strings to the console before and after an instance is deleted, respectively. The sender model class is Order.
Note that the instance is not one of the arguments of the post_delete receiver function because the signal cannot reference the instance object after it is deleted.
A Practical Application: Designing an Endpoint

Now we’ll design a ForgotPassword endpoint to further our understanding of Django signals.
Set up and start your Django project’s admin section at the domain. http://localhost:8000/admin/. The built-in Django User model will be utilized.
Next, create a superuser who has access to the admin panel. Run your migration commands after that to create a file for the User model migration and migrate the registered model to the database.
python3 manage.py createsuperuser
python3 manage.py makemigrations
python3 manage.py migrate
Launch your development server in a separate terminal and log in to the admin panel to create a user for testing.
python3 manage.py runserverHere’s what we’d like to do next.
We provide a POST request endpoint to submit the email of the user who forgot the password. Then, in the backend, such an email is confirmed against the records in the database, and if discovered, a secret four-digit one-time password is generated, sent to the supplied email, and saved to the User ForgotPassword model.
In a real-world application, the created one-time password will most likely be added to an in-memory database with a short expiration period, such as Memcached or Redis.
Additionally, we’ll be using mailtrap to email the users’ one-time password generated for verification. This platform allows you to simulate the email production environment. They provide a sandbox testing inbox to receive emails from your local development server.
Create a helper.py file inside your application folder, and add the following email sender code. We are utilizing Django’s built-in send_mail module.
# helper.py
from django.core.mail import send_mail
from smtplib import SMTPException
from auth_system.settings import EMAIL_HOST_USER

import secrets

def send_account_otp(email , user, subject):
    otp = secrets.choice(range(1000, 10000))
    message = f"Hi {user.username},\n\nYour account one-time-password \
    is {otp}.\
        \n This one-time password will expire in the next 10 minutes.\
        \n Kindly supply it to move forward in the pipeline.\n\n\nCheers"
    email_from = EMAIL_HOST_USER
    recipient_list = [email]
    try:
        send_mail(subject, message, email_from, recipient_list)
    except SMTPException as e:
        print('There was an error sending an email. '+ e)
        return

    return otp
You must make your system thread safe to prevent the block of the running thread as well. This is because sending emails requires some time, it could cause the system to respond slowly or even crash if the process of sending emails is unsuccessful. Then, resolving this problem will require a separate thread for the procedure.
Create a thread.py file inside your application folder. Add the below code snippets:
# thread.py

import threading
from smtplib import SMTPException
from auth_system.settings import EMAIL_HOST_USER
from .helper import send_account_otp

class SendForgetPasswordEmail(threading.Thread):

    def __init__(self , email , user):
        self.email = email
        self.user = user
        self._otp = 0
        threading.Thread.__init__(self)

    def run(self):
        try:
            subject = "@noreply: Your password reset one time password."
            self._otp = send_account_otp(self.email, self.user, subject)
            #this returns the sent otp
        except SMTPException as e:
            print('There was an error sending an email. '+ e)

    def get_otp(self):
        return self._otp
We created the class SendForgetPasswordEmail which inherits from the Thread Django base class. To avoid thread blocking, it is necessary to use a separate thread for sending emails.
We also override the run() method to send the email. This method comes from the Python Thread base class. It runs the thread whenever a start() method is called on the thread. The Python thread run() and start() methods can be referenced here, link.
In addition, the get_otp() method returns a one-time password sent to the user’s email. Note that _otp with a preceding underscore is considered private property. The proper way of accessing such properties outside the class is to create a “get” method that returns them. This is what the get_otp() method does.
Let’s now add the ForgetPassword model class. Add the following by editing your models.py file:
# models.py
from django.db import models
from django.contrib.auth.models import User

class ForgetPassword(models.Model):
    user = models.ForeignKey(User , on_delete=models.CASCADE)
    forget_password_otp = models.CharField(max_length=10 ,null=True, \
    blank=True)
    is_user_password_updated = models.BooleanField(default=False)
    created_at = models.DateTimeField(auto_now_add=True)
    updated_at = models.DateTimeField(auto_now=True)

    def __str__(self):
        return self.user.username

@receiver(post_save, sender=ForgetPassword)
def send_email_otp(sender, instance, created, **kwargs):
    try:
        if created:
            """ EXECUTING THREAD TO SEND EMAIL """
            new_thread = SendForgetPasswordEmail(email=instance.email ,\
             user=instance.user)
            new_thread.start()
            new_thread.join() #joining another thread to run one \
            #to catch the otp value
            instance.forget_password_otp = new_thread.get_otp()
            #setting the user otp
            instance.save()
            return instance
    except SystemError as e:
        print(e)
This model defines five properties, which are as follows:
user: the user acting on the model.forget_password_otp: the user’s one-time password sent to email.is_user_password_updated: Boolean indicating whether or not the user’s password has been successfully updated.created_at: the date when the model instance is created.updated_at: the date that the password was changed.
We define a receiver function with a post_save signal where the execution of email threading happens.
After the user’s email is saved to the database, an instance of the ForgetPassword model is created, and the signal notifies the receiver function. Then, a new thread is spawned to send the secret one-time password to the user’s email.
Note that we join another thread to the running one to catch the one-time password that the send_mail() function returns. This is one possible way to return the one-time password sent to the user’s email.
The value of the one-time password is then accessed through the get_otp() method. Lastly, the forgot_password_otp model property is set with this value, and the data is saved to the database.
Now run your migrations to register the newly created model:
python3 manage.py makemigrations
python3 manage.py migrate
Add an endpoint route in your application urls.py file. This route is forwarded to the views class ForgotPasswordView when your application receives an HTTP POST request.
#urls.py
from . import views

path('user/account/forgot-password', views.ForgotPasswordView.as_view(), \
name="forgot-password"),
Let’s also modify the views.py file for the endpoint incoming HTTP request.
# views.py

from rest_framework.views import APIView
from rest_framework.response import Response
from rest_framework import status
from .models import ForgetPassword

class ForgotPasswordView(APIView):
    """ Unauthorized User Forgot Password View """

    def post(self, request):

        try:
            user = User.objects.get(email=request.data['email'])

        except Exception as err:
            return Response({
                "message": f"User account with email \
                {request.data['email']} not found.",
                "status_code": status.HTTP_404_NOT_FOUND,
                "error": str(err)
            })

        forgot_password_obj = ForgotPassword.objects.filter\
        (user=user).first()
        forgot_password_obj.is_user_password_updated = True
        forgot_password_obj.save()
        return Response({
            "Message": "Success. Check your email for the otp.",
            "Status_Code": status.HTTP_201_CREATED
         })
Inside the views.py file, we define the API logic that will respond to the HTTP POST request. We start by defining a class view ForgotPasswordView inherited from APIView Django rest framework views. Then, we override the post method with several parameters like self and request objects.
We use the try and except block to query the User object with the incoming email from the HTTP POST request. Afterwards, the user filters the ForgotPassword object which then changes the is_user_password_updated Boolean property to True and saves it to the database.
Remember that a post_save signal has been configured in the models.py file to execute the send_mail thread when the ForgotPassword instance is saved. This shows how powerful the signals are in the Django framework.
Then, an HTTP response is sent back to the client with the sample output;
{
    "Message": "Success. Check your email for the opt.",
    "Status_Code": 201
}
Note that the HTTP response is not dependent on the email threading. That is, the response is generated as fast as possible instead of waiting for the email to finish. This is the advantage of separating threads when working on application components.
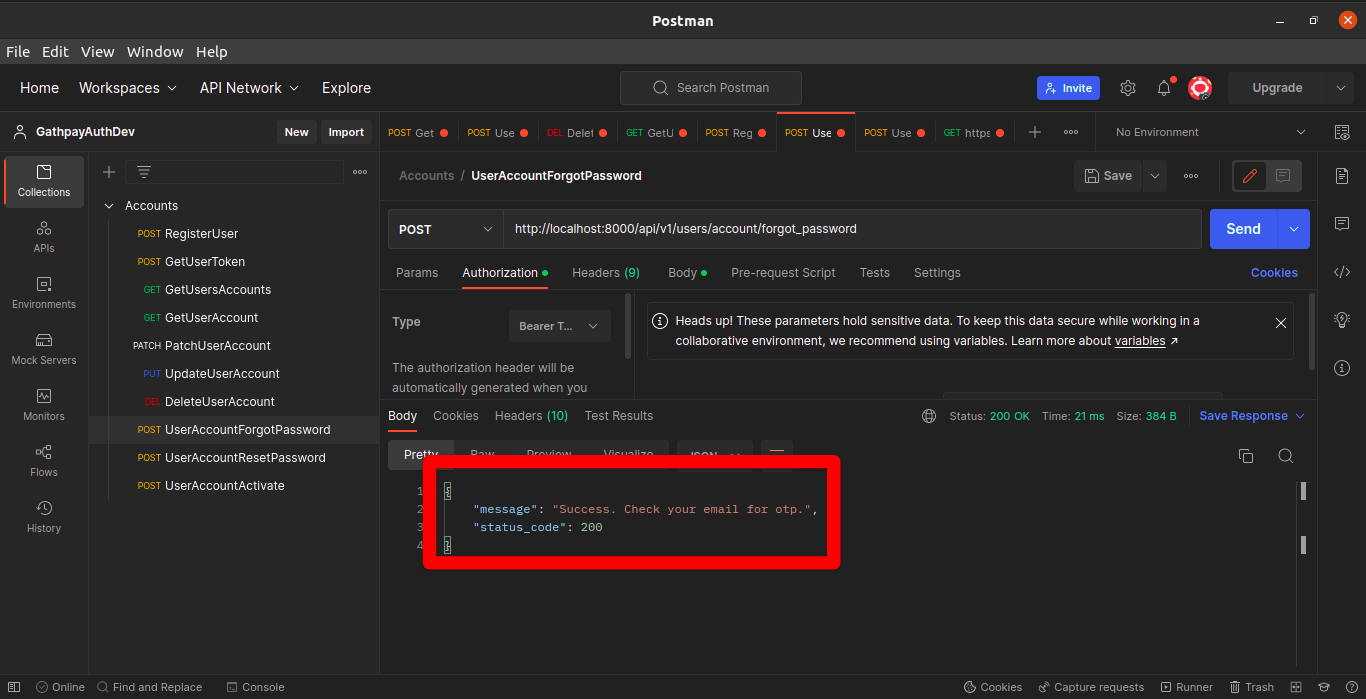
Now launch your development server and use your preferred [API testing] tool such as Postman to test the endpoint. Next, send a POST request with the user’s email as the body to http://localhost:8000/user/account/forgot password.
The images below show a sample output of the endpoint working as expected. Hopefully, if you follow along, you will achieve the same results. As you can see, the endpoint returns a successful message for this test.
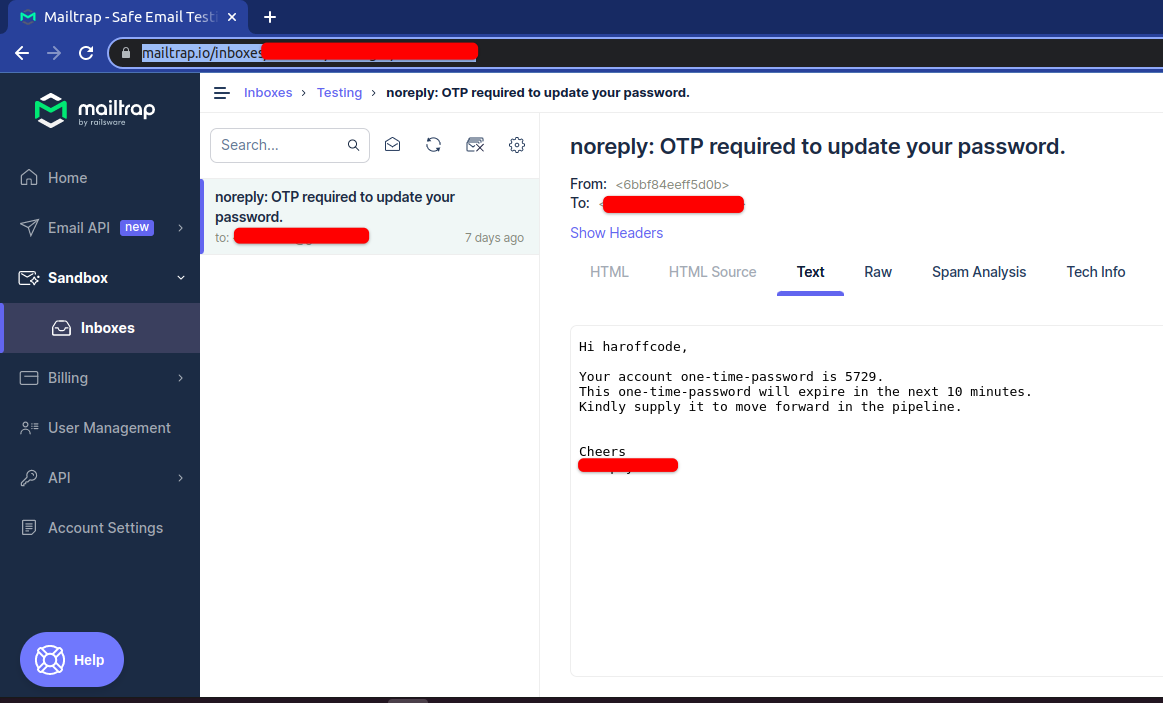
The other image below shows the “mailtrap” sandbox environment for simulating email production:
Conclusion
In this tutorial, we dove into Django signals, covering different types and how to use them in real-life applications. We unraveled the mystery of how Django internally creates and saves object instances using save() and _init()_. We explored ways to connect signals with receiver functions, and touched upon post_init, pre_init, pre_save, post_save, pre_delete, and post_delete signals with examples. We also learned about the disconnect() method. Finally, we built a feature using signals and threading to send emails.
As you continue to expand your knowledge of Django signals, you might also want to streamline your Django build processes. If so, why not give Earthly a try? This tool can help you optimize your development workflow, making it even more efficient and effective.
Turn your engineering standards into automated guardrails that provide feedback directly in pull requests, with 100+ guardrails included out of the box and support for the tools and CI/CD systems you already have.