WebSocket Protocol with Django Channels

Table of Contents
In this tutorial, we’ll learn how to build a real-time communication application with The Django Channels package and The WebSocket Protocol. The application we will create will be a platform where users can join multiple pre-created groups and share ideas with members of the group. The entire project is available on my Github.
Objectives
By the end of the tutorial, you should be able to:
- Write the client-side WebSocket code with the Websocket API
- Setup a Websocket project for the development environment
- Build a real-time communication project with Django Channels
- Configure a Websocket server with Django Channels
- Have a solid understanding of the WebSocket protocol
Prerequisite
To follow along with this tutorial you should have:
- Some experience working with Django
- Experience working with the command line
- Experience working with GIT
- Working knowledge of HTTP
- Familiarity with HTML and Javascript
Overview of WebSocket
The WebSocket protocol is a web protocol that allows bi-directional communication between the client ( web browser ) and the server over a single TCP connection.
It is used in applications where real-time communication is needed like chatting applications and multiplayer games.
Unlike an HTTP connection, which is closed after a request is made and a response is recieved, a Websocket connection stays open and allows both the client and the server to continue sending messages.
Django Channels
Django-Channels, or simply Channels, is a python package that extends the web protocol supported for Django beyond HTTP to other web protocols like WebSocket, IoT, and Chat protocols etc.
The Channels package supports the native synchronous nature of Django while still allowing you to write asynchronous code.
It also supports the Django Authentication and Session system.
The Channels package makes use of consumers (which are the equivalent of Django views). A consumer is instantiated per each WebSocket connection from the client, and they persist until the web socket connection is closed.
A consumer can also communicate with other consumers and multiple consumers can be part of a single channel group. The communication between multiple consumers can be achieved via channel layers. (More on channel layers soon.)
Building the Application
Project Setup
Create a working directory and
cdinto it..$ mkdir DiscussIt $ cd DiscussItCreate and activate a virtual environment.
$ python3 -m venv venv
$ source venv/bin/activate
Install Django and Channels
$ pip install django,django-channelsStart a new Django Project in the current working directory
$ django-admin startproject DiscussIt .Add the packages you installed in the
requirements.txtfile:$ pip freeze > requirements.txtCreate a
.envfile in the project directory for the environment variables.Create a Django application called chat:
$ python manage.py startapp chatAdd the
chatapp and the Django channel package to the list of the installed apps in thesettings.pyfile:INSTALLED_APPS = [ #installed package 'channels' ... #installed APP 'chat', ]Run initial migrations to create the database table for the applications installed by Django:
$ python manage.py migrateStart the development server:
$ python manage.py runserver
Since you have added channels to the list of INSTALLED_APP, it will take over the runserver command and spin up the ASGI server from the asgi.py rather than the WSGI server configured in the wsgi.py file:

Once you confirm this is working as expected, you can stop the server for now..
Right now, your project structure should look like this:
├── chat
│   ├── admin.py
│   ├── apps.py
│   ├── __init__.py
│   ├── migrations
│   │   └── __init__.py
│   ├── models.py
│   ├── tests.py
│   └── views.py
├── manage.py
├── requirements.txt
└── DiscussIt
    ├── asgi.py
    ├── __init__.py
    ├── .env
    ├── settings.py
    ├── urls.py
    └── wsgi.py
The Models
We will need three database models for our application:Group, Message and Event.
The Group model will store all the information about a group chat like the group name, and its members.
The Message model will store information about a message that was sent to a group. The information will include the sender of the message, the group it was sent to, the timestamp of the message and the content of the message.
The Event model will store information about a user joining or leaving a group and the timestamp they joined or left.
To create the models, open the models.py file and add the following model classes.
Group Model
#chat/models.py

from django.db import models
from django.contrib.auth import get_user_model
from uuid import uuid4

from django.urls import reverse
# Create your models here.

User = get_user_model()


class Group(models.Model):
    '''The group model where multiple users can share and discuss ideas'''
    uuid = models.UUIDField(default=uuid4, editable=False)
    name = models.CharField(max_length=30)
    members = models.ManyToManyField(User)

    def __str__(self) -> str:
        return f"Group {self.name}-{self.uuid}"

    def get_absolute_url(self):
        return reverse("group", args=[str(self.uuid)])

    def add_user_to_group(self, user:User):
        '''A helper function to add a user to a group and create an event object'''
        self.members.add(user)
        self.event_set.create(type="Join", user=user)
        self.save()

    def remove_user_from_group(self, user:User):
        '''An helper function to remove users from group members when they \
        leave the group and create an event for the timestamp the user left the group'''
        self.members.remove(user)
        self.event_set.create(type="Left", user=user)
        self.save()
We give the group a UUID, a name, and then a list of members, which in this case is represented by a many-to-many join with the existing User model that comes with Django out of the box.
Then we just need a couple of helper functions and the ability to add and remove user from the group.
Message Model
The message model is pretty self explanatory.
class Message(models.Model):
    author = models.ForeignKey(User, on_delete=models.CASCADE)
    timestamp = models.DateTimeField(auto_now_add=True)
    content = models.TextField()
    group = models.ForeignKey(Group ,on_delete=models.CASCADE)

    def __str__(self) -> str:
        date = self.timestamp.date()
        time = self.timestamp.time()
        return f"{self.author}:- {self.content} @{date} {time.hour}:{time.minute}"
Event Model
We will keep track of users coming and going through the use of Events.
class Event(models.Model):
    '''
    A model that holds all events related to a group like when a user joins the group or leaves.
    '''
    CHOICES = [
        ("Join", "join"),
        ("Left", "left")
        ]
    type = models.CharField(choices=CHOICES, max_length=10)
    description= models.CharField(help_text="A description of the event that occurred",\
    max_length=50, editable=False)
    user = models.ForeignKey(User, on_delete=models.CASCADE)
    timestamp = models.DateTimeField(auto_now_add=True)
    group = models.ForeignKey(Group ,on_delete=models.CASCADE)

    def save(self, *args, **kwargs):
        self.description = f"{self.user} {self.type} the {self.group.name} group"
        super().save(*args, kwargs)

    def __str__(self) -> str:
        return f"{self.description}"
Run the Migrations
The next step is to run migrations for the models you just created:
$ python manage.py makemigrations chat
$ python manage.py migrate
Include the three models in the admin.py file so that you can have access to them on the admin page:
#chat/admin.py

from .models import *
# Register your models here.

admin.site.register(Message)
admin.site.register(Event)
admin.site.register(Group)
Views
Now that we have the models set up, let’s create the Django view where all the groups in the application are listed as well as a view for a particular group chat.
Even though the protocol you will be working with the most is the websocket protocol, you still need the Django views and the URL that handles HTTP because the user will arrive at the page via HTTP and the HTML page template will be loaded by the view function associated with the URL. Also, the initial websocket handshake will be performed via HTTP.
Open the chat/views.py and add the following code to create the views:
#chat/views.py
from django.http import HttpResponseForbidden
from django.shortcuts import render, get_object_or_404
from .models import Group
from django.contrib.auth.decorators import login_required


@login_required
def HomeView(request):
   '''The homepage where all groups are listed'''
   groups = Group.objects.all()
   user = request.user
   context = {
       "groups":groups,
       "user":user
   }
   return render(request,template_name="chat/home.html",context=context)

@login_required
def GroupChatView(request, uuid):
   '''The view for a group where all messages and events are sent to the frontend'''

   group = get_object_or_404(Group, uuid=uuid)
   if request.user not in group.members.all():
       return HttpResponseForbidden("You are not a member of this group.\
                                       Kindly use the join button")

   messages = group.message_set.all()
   '''
   messages are the message the members
   of a group send to the group
   '''

   events = group.event_set.all()
   '''
   events are the messages that indicates
   that a user joined or left the group.
   They will be sent automatically when a user join or leave the group
   '''


   #Combine the events and messages for a group
   message_and_event_list = [*messages, *events]

   # Sort the combination by the timestamp so that they are listed in order
   sorted_message_event_list = sorted(message_and_event_list, key=lambda x :     x.timestamp)

   #get the list of all group members
   group_members = group.members.all()

   context ={
       "message_and_event_list":sorted_message_event_list,
       "group_members":group_members,
       }

   return render(request, template_name="chat/groupchat.html", context=context)
Now let’s create an HTML template for these views:
Create the following file structure in the chat applications:
├── templates
│   └── chat
│       ├── base.html
│       ├── groupchat.html
│       └── home.html
Add the following HTML code to the base.html:
<!-- chat/templates/chat/base.html -->
<!DOCTYPE html>
<html lang="en">
<head>
    <meta charset="UTF-8">
    <meta http-equiv="X-UA-Compatible" content="IE=edge">
    <meta name="viewport" content="width=device-width, initial-scale=1.0">

   <title>{%block title%}{%endblock title%}</title>
</head>
<body>
    {%block content%}
    {% endblock content%}
</body>
    {%block script%}
    {%endblock script%}

</html>
Open the home.html and add the following HTML code snippets:
<!-- chat/templates/chat/home.html -->
{%extends 'chat/base.html'%}
{% block title%} Home {%endblock title%}
{% block content%}
    <h1 style="margin-top: 3px;">DiscusIt Home Page</h1>
    <ul>
        {%for group in groups%}
        <div id="{{group.uuid}}">
            <li><a>{{group.name}}</a></li>
            {% if request.user in group.members.all%}
                <button id="leave-{{group.uuid}}" class="group_option" value="leave_group {{group.uuid}}">\
                Leave</button>
            {%else%}
                <button id="join-{{group.uuid}}" class="group_option" value="join_group {{group.uuid}}">\
                Join</button>
            {%endif%}
            {% if request.user in group.members.all%}
            <button id="open-{{group.uuid}}" class="group_option" value="open_group {{group.uuid}}">\
            Open</button>
            {%endif%}
        </div>
        {%endfor%}

    </ul>
{%endblock content%}
In the HTML code, you have three buttons associated with each group, the Leave, Open and Join buttons. The Leave and Open buttons are displayed if the current user is a member of the group and only the Join button otherwise. Also, the id attribute of each button is <action>-<group uuid> where the action is either Join, Leave or Open.
For the group chat, open the groupchat.html file and add the following code:
<!-- chat/templates/chat/groupchat.html -->
{% extends 'chat/base.html'%}
{% block title%} Chat Room{%endblock title%}
{% block content%}
<textarea id="chat-log" cols="100" rows="20"></textarea><br>
<input id="chat-message-input" type="text" size="100"><br>
<input id="chat-message-submit" type="button" value="Send">

<script>
    document.querySelector('#chat-log').value = ""
    {% for message_event in message_and_event_list%}

   document.querySelector('#chat-log').value += ( {{message_event}}  + '\n');
{%endfor%}
</script>


<h3>Group Members</h3>
<ul id="members">
{% for member in group_members%}
<li id="members-{{member.username}}">{{member}}</li>
{%endfor%}
</ul>
{%endblock content%}
In the HTML code above we: Load the messages and the events messages that are rendered from the view. Use Javascript DOM manipulation to add the message and event into the chat log. List the group members of the group. The HTML list item tag li for each member, has an id attribute of members-<username>.
Add URL patterns to the views so you can see what the page looks like.
Create a urls.py file in the chat application and add the following URL patterns:
#chat/urls.py
from django.urls import path, include
from . import views

urlpatterns = [
   path("", views.HomeView, name="home"),
   path("groups/<uuid:uuid>/", views.GroupChatView, name="group")
]
Include the URL patterns of the chat/urls.py in the main project’s urls.py file:
#DiscussIt/urls.py
from django.urls import path, include

urlpatterns=[
    ...
    path('', include("chat.urls")),
]
Create a superuser to log in via the admin page and create dummy data for the Group, Event, and Message model:
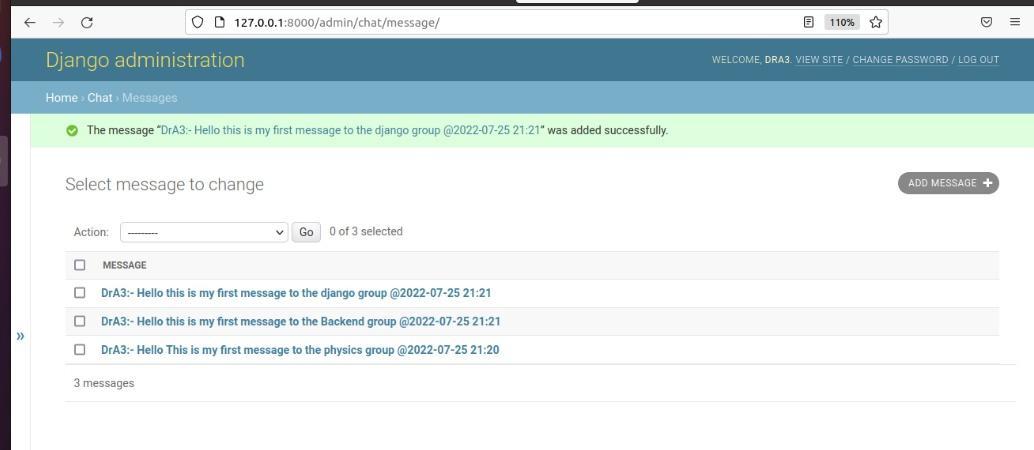
$ python manage.py create superuserThe dummy groups I created:
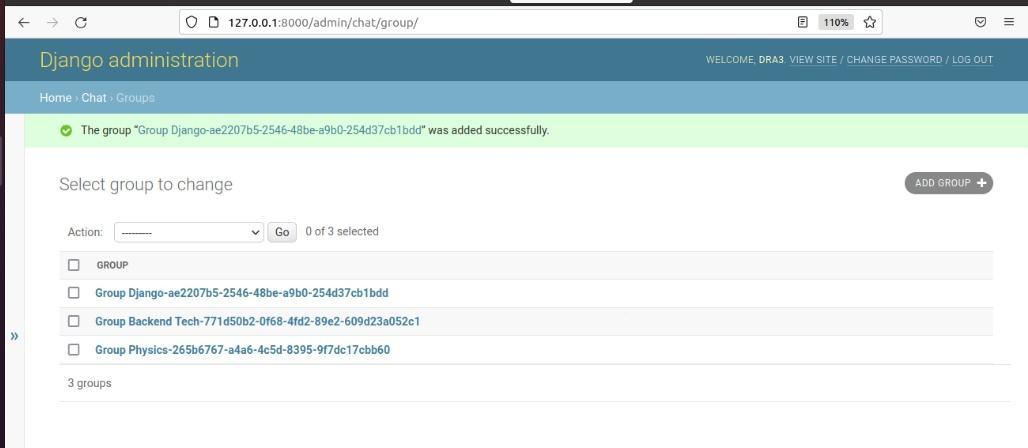
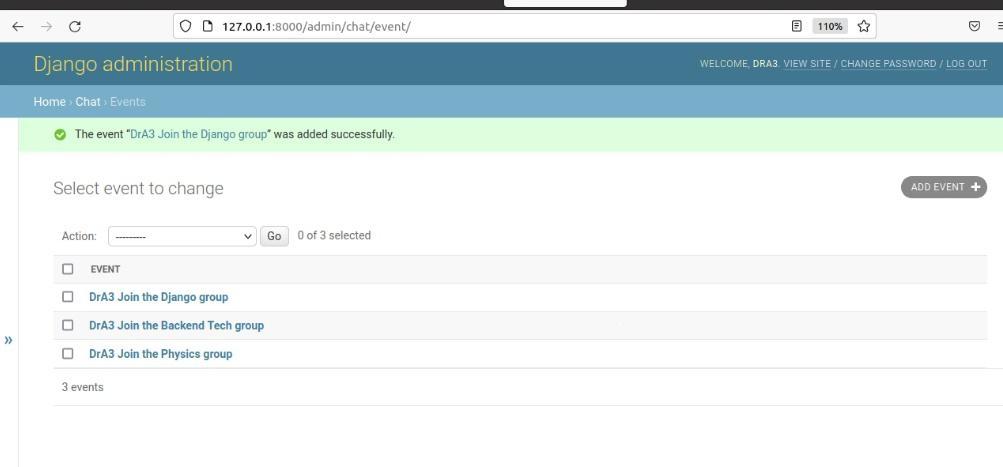
The dummy user joins events:
The dummy group messages:
Now that you have the dummy data, you can navigate to the home page and see what the page looks like:
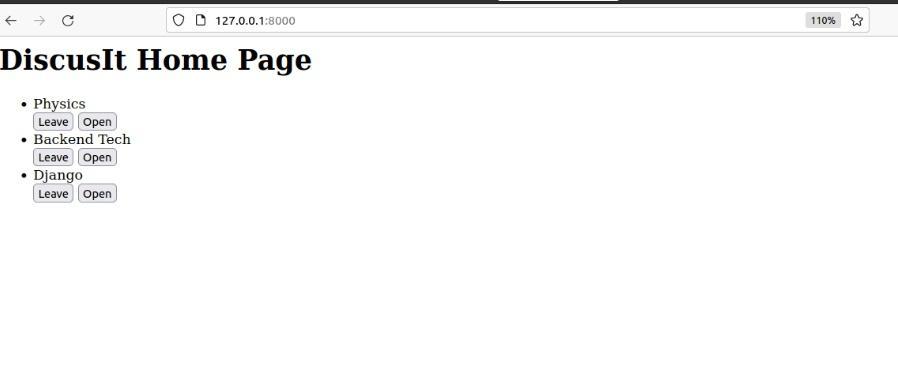
The leave and open buttons are displayed for each group since the user is a member of all groups.
The buttons are not working presently, you will fix that up later.
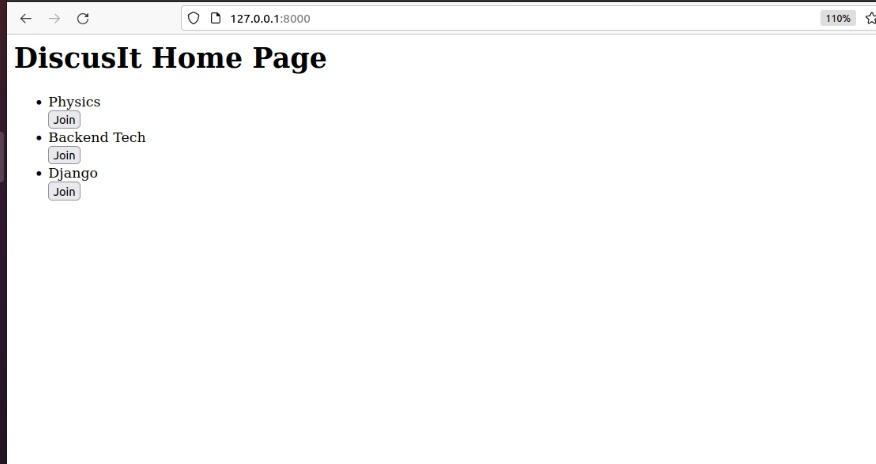
To see the Join button, remove the user from the group on the admin page.
The page will look as shown below:
Now that you have an idea of what the home page looks like, you can check the group page.
Copy the uuid for a group and navigate to the group page at group/<group uuid>
The group page looks as shown below:

That’s it for the basic Django set-up. We can now connect the Django channels to handle websocket connections.
Channels
In the chat folder, create a consumers.py file for the consumers that will handle the websocket connection from the client.
Add the following code to the file:
from channels.generic.websocket import WebsocketConsumer

class JoinAndLeave(WebsocketConsumer):
    def connect(self):
        print("server says connected")

    def receive(self, text_data=None, bytes_data=None):
        print("server says client message received: ", text_data)
        self.send("Server sends Welcome")

    def disconnect(self, code):
        print("server says disconnected")
The consumer class can either be synchronous or asynchronous or both. The consumer class you created above inherits from the WebsocketConsumer class which allows you to write your consumer in synchronous code and takes care of the asynchronous operations in the background.
The consumer class you created has the connect, receive, and disconnect methods which are presently just printing messages to the terminal regarding the event they received.
The connect method handles the client’s Handshake request.
The receive method handles any message sent to the server from the websocket client API’s send method.
The disconnect method is the equivalent of the client’s onclose method.
The next step is to create a websocket route that will call the JoinAndLeave consumer.
Create a routing.py file in the chat application and add the following code:
from django.urls import re_path, path

from . import consumers

websocket_urlpatterns = [
    path('', consumers.JoinAndLeave.as_asgi())
]
The .as_asgi() converts the class to an ASGI application and it is similar to .as_view() in Django classes.
At this point, you have two different web protocols with different routes: the HTTP protocol and the websocket protocol.
You need to create a protocol router so that the ASGI server can know how to route these different protocols.
The Channels package provides a ProtocolTypeRouter class that can do that for us.
Modify the asgi.py file as shown below:
from channels.routing import ProtocolTypeRouter, URLRouter
import os
from django.core.asgi import get_asgi_application


os.environ.setdefault('DJANGO_SETTINGS_MODULE', 'DiscussIt.settings')

asgi_application = get_asgi_application() #new

import chat.routing #new

application = ProtocolTypeRouter({
            "http": asgi_application,
            "websocket": URLRouter(chat.routing.websocket_urlpatterns)
                       })
Inside the ProtocolTypeRouter, you specified the protocol you want to route as a dictionary object which has a key of the protocol and the value of the protocol application.
The get_asgi_application() takes care of the http protocol only.
You specified the URL routers for the websocket protocol using the URLRouter class where you passed the list of websocket patterns you created earlier.
Open the settings.py file and add the following configuration:
ASGI_APPLICATION = 'DiscussIt.asgi.application'Creating the Client
The next step is to create the client websocket API that will communicate with the consumer you just created.
Open the templates/chat/home.html file and add the following:
{% block script %}

<script>

base_url =  ${window.location.hostname}:${window.location.port}/

base_url =  ${window.location.hostname}:${window.location.port}/

const websocket = new WebSocket( ws://${base_url} )

websocket.onopen = function(event){
    console.log('client says connection opened')
    websocket.send("Client sends Welcome")
}

websocket.onmessage = function(event){
    console.log("client says server message received: ", event)
}


</script>
{% endblock script %}
The code above established a websocket connection to the websocket URL associated with the JoinAndLeave consumer and defined three event handlers. Let’s run the server to see when these events are fired.
Run the development server and navigate to the home page.
You should get this message in the development server and console:
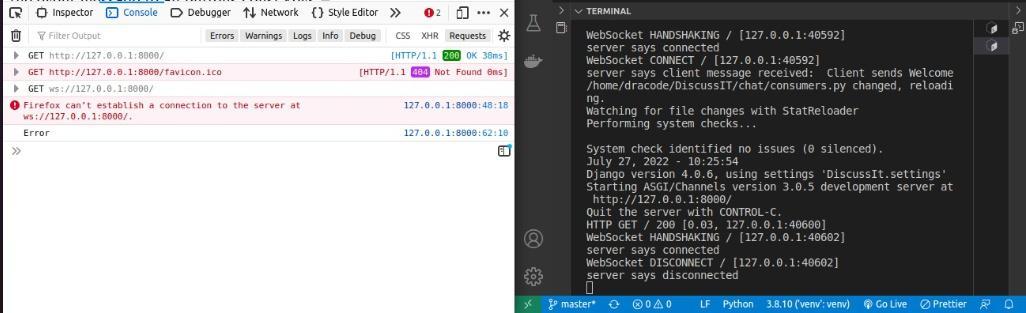
In the console, you got an error message: Firefox can't establish a connection to the server at ws://127.0.0.1:8000/ and “Error” which you logged in the onerror event handler.
For the server, The “server says connected” message you printed in the connect method was printed during the handshake.
The websocket disconnect message was also printed.
The issue here was that the server needs to accept the opening handshake from the client.
To fix this, add self.accept() in the connect method of the consumer to accept the handshake:
def connect(self):
          ...
    self.accept()
Reload the homepage and you should get the following in the console and the web server:
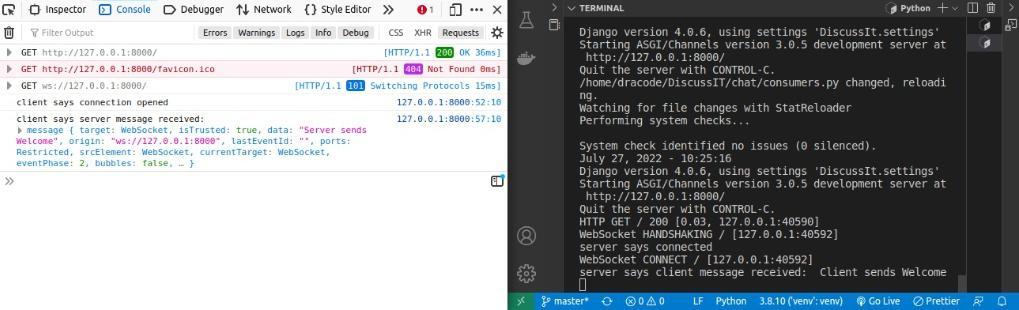
In the server, you have the WebSocket HANDSHAKING and the Websocket CONNECT indicating that the server accepted the connection.
The message sent in the client’s onopen event handler was also printed in the receive method.
In the console, you have the message you printed in the onopen event handler. Also, the client received the message the server sent that you printed in the onmessage event handler.
It also receives other information about the connection.
This shows the server can now send and receive messages from the client and vice versa.
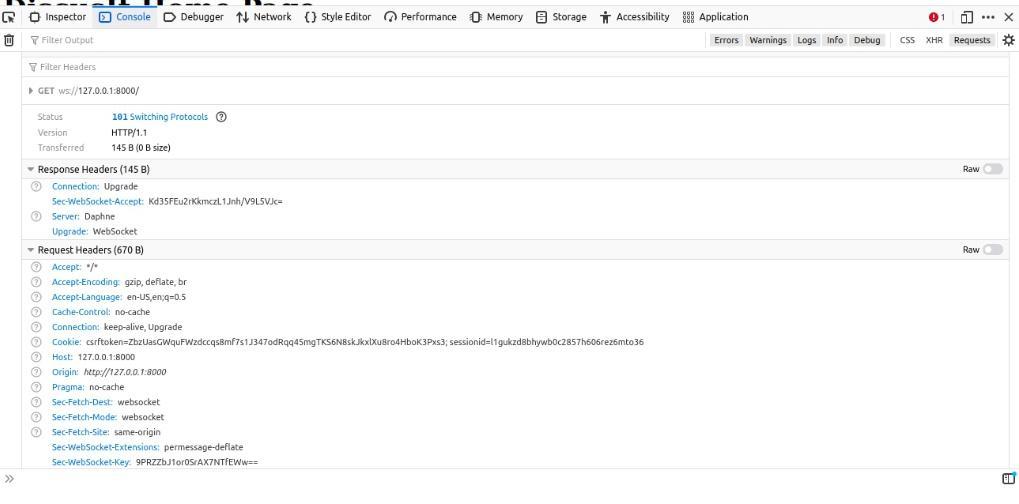
If you expand the GET response, you can view the request-response Headers associated:
Reviewing the Flow
The client arrives at the homepage via an HTTP request , and the server calls the Home view which renders the Home template. In the template, The client instantiates an instance of the websocket API which sends a Handshake request to the server via the websocket URL. The server calls the consumer associated with the URL which accepts the Handshake and the connection is established.
Associating Users With Connections
To associate the user with a websocket connection, you can wrap the URLRouter class with the AuthMiddlewareStack provided by channels. This will populate the metadata about the connection with the user instance.
The Metadata can be accessed from the self.scope attribute in the consumer class. The scope is similar to the request.META in Django.
Also, for security purposes, you will add the AllowedHostsOriginValidator that validates the origin of the websocket connection.
Modify the asgi.py file as shown below:
from channels.security.websocket import AllowedHostsOriginValidator

application = ProtocolTypeRouter({
"http": asgi_application,
"websocket":
    AllowedHostsOriginValidator(
        AuthMiddlewareStack(
            URLRouter(chat.routing.websocket_urlpatterns)
                ),
            )
})
Getting the Buttons Working
The next step now is to get the Home page buttons working.
When a user clicks on the Leave button, they should leave the associated group. A leave Event object is then created at the backend.
When a user clicks on the Join button the user is added to the group and a join Event object is created.
Add the following JS script to the chat/home.html page:
function add_event_to_all_buttons(){
    /*Add an event listener that sends the event message to all buttons*/
    const keys = document.querySelectorAll('.group_option');
    keys.forEach(item => {
        item.addEventListener('click', send_event_message)
    }
)}

function send_event_message(event){
/*Send the uuid and the value of the button that was clicked*/
    const { target } = event;
    group =target.value.split(" ")
    group_uuid = group[1]
    action = group[0] // Will either be leave_group or Join_group or open_group
    if(action == "open_group"){
        window.location.replace( http://${base_url}groups/${group_uuid} )
        }
    else{
    data = {
        type":action,
        "data":group_uuid,
        }
    websocket.send(JSON.stringify(data))
    }
}
add_event_to_all_buttons()
When a user clicks on a button the client calls the send_event_message function and sends the uuid value of the group to the server.
In the payload, you specified the type as the action that you parsed from the value of the button that the user pressed. The action is either leave_group or join_group. The open_group button opens the group page that you will be creating soon.
Handling Messages on the Server
Add the following to your JoinAndLeave class:
#chat/consumers.py
from django.contrib.auth.models import User
from .models import Event, Message, Group
      ...

class JoinAndLeave(WebsocketConsumer):

    def connect(self):
        self.user = self.scope["user"]
        self.accept()

    def receive(self, text_data=None, bytes_data=None):
        text_data = json.loads(text_data)
        type = text_data.get("type",None)
        if type:
            data = text_data.get("data", None)

        if type == "leave_group":
            self.leave_group(data)
        elif type == "join_group":
            self.join_group(data)

    def leave_group(self, group_uuid):
        group = Group.objects.get(uuid=group_uuid)
        group.remove_user_from_group(self.user)
        data = {
            "type":"leave_group",
            "data":group_uuid
            }
        self.send(json.dumps(data))

    def join_group(self, group_uuid):
        group = Group.objects.get(uuid=group_uuid)
        group.add_user_to_group(self.user)
        data = {
            "type":"join_group",
            "data":group_uuid
            }
        self.send(json.dumps(data))
The AuthMiddlewareStack you added earlier will populate the scope with the current user which you can then retrieve in the consumer.
This line in the connect method of the JoinAndLeave consumer retrieves the current user:
self.user = self.scope["user"]In the receive method, The code loads the JSON data that the frontend sends and retrieves the value of the type and data of the message.
The join_group method adds the current user to the group whose uuid was sent from the frontend and sends the same data back to the frontend.
The leave_group method removes the user from the group and sends the data back to the frontend.
The data will be received in the frontends onmessage event handler method.
Handling Messages on the Frontend
Modify the websocket.onmessage in the chat/home.html file as shown below:
websocket.onmessage = function(event){
/*Called when the websocket server sends a message to the client websocket*/
    message = JSON.parse(event.data)
    type = data.type
    data = message.data
    switch(type){
        case "leave_group":
            leave_group_handler(data)
            break;
        case "join_group":
            join_group_handler(data)
            break;
    }
}

function leave_group_handler(uuid){
    /*Remove the Leave Button and Open button and create a new Join Button*/
    var leave_button = document.getElementById( leave-${uuid} )
    var open_button = document.getElementById( open-${uuid} )
    leave_button.remove()
    open_button.remove()
    var button =  <button id="join-${uuid}" class="group_option" value="join_group $    {uuid}">Join</button>
    var dev_body = document.getElementById(uuid)
    dev_body.innerHTML += button
    add_event_to_all_buttons()
}
function join_group_handler(uuid){
    /*Remove the Join Button and add the Leave and Open button*/
    var leave_button = document.getElementById( join-${uuid} )
    leave_button.remove()
    var button =  <button id="leave-${uuid}" class="group_option" value="leave_group $    {uuid}">\
    Leave</button>
    var open_button =  <button id="open-${uuid}" class="group_option"     value="open_group ${uuid}">\
    Open</button>

    var dev_body = document.getElementById(uuid)
    dev_body.innerHTML += button
    dev_body.innerHTML += open_button
    add_event_to_all_buttons()

//get_all_buttons()
}
Depending on the type of the message that the backend sends, the client calls either the join_group_handler or the leave_group_handler. These handlers update the UI of the page.
Group Messaging
The next step now is to create a consumer that will allow the users to send and receive messages in the group.
The consumer class you created earlier in the server side uses a synchronous approach. It can only communicate with the client API. In order to create a chat room where multiple users can post and receive messages, we’ll need to create a consumer class that can communicate with multiple other instance of the consumer class. All these same instances have to be in the same channel layer group.
Channel Layer Groups
The channel layer group is like a broadcast system that allows you to perform operations on the consumers that are in the same group. You can add a consumer instance to the channel layer group, you can remove a consumer instance and you can broadcast to the consumer instances in the same group. You need to configure channel_layers in the settings.py file via the CHANNEL_LAYERS configuration before you can use it.
The channels_redis package is the only official channels maintained channel layer supported for production use (source Channels doc).
But for development purposes, you can use the in-memory channel layer that the Django-channels package provides.
In settings.py , add the following:
#DiscussIt/settings.py

CHANNEL_LAYERS = {
    "default": {
        "BACKEND": "channels.layers.InMemoryChannelLayer"
    }
}
Add the following to the chats/consumer.py
#chat/consumers.py
from channels.generic.websocket import WebsocketConsumer, AsyncWebsocketConsumer
from channels.layers import channel_layers
from channels.db import database_sync_to_async
import asyncio
            ....

class GroupConsumer(AsyncWebsocketConsumer):
    async def connect(self):
        self.group_uuid = str(self.scope["url_route"]["kwargs"]["uuid"])
        self.group = await database_sync_to_async(Group.objects.get)(uuid = self.group_uuid)
        await self.channel_layer.group_add(
                self.group_uuid,self.channel_name)

        self.user = self.scope["user"]
        await self.accept()

    async def receive(self, text_data=None, bytes_data=None):
        pass
The AsyncWebsockect requires you to write async support code. However, operations like database access are synchronous. The channels package provides the database_sync_to_async that can convert the operation to an asynchronous type.
You need to import the channel_layers that will allow multiple instances of the consumers to communicate. Each instance of the of the channel consumer has a unique channel_name that is stored in the channel_name attribute of the consumer class.
The websocket endpoint that will connect to this consumer will be groups/<uuid:uuid>/
In the connect method of the consumer class, you retrieve the uuid from the URL path from the route attributes of the scope metadata.
You retrieved the Group object with the uuid using the database_sync_to_async. You need to await this since it is an asynchronous operation.
The channel layer has send() , group_send(), group_add(), group_discard() methods which are all async functions.
The group_add method adds a consumer instance to the group.
The group_send method broadcasts messages to the consumers in the same group.
await self.channel_layer.group_add(self.group_uuid,self.channel_name)The line above in the connect method add the instance of the GroupConsumer class — that has a name that is stored in the self.channel_name — to a channel group that is identified by the group chat’s uuid.
The next step is to create a websocket URL pattern for this consumer.
Add the following to the chat/routing.py :
websocket_urlpatterns = [
        ...
    path('groups/<uuid:uuid>/',consumers.GroupConsumer.as_asgi())
]
The next step is to add the client websocket API to the chat/groupchat.html page:
{%block script%}

<script>
    base_url =  ${window.location.host}${window.location.pathname}

    const chatSocket = new WebSocket( ws://${base_url} );

    chatSocket.onopen = function(e){
        console.log("connected")

    chatSocket.onclose = function(e) {
        console.error('Chat socket closed unexpectedly');
    };

    document.querySelector('#chat-message-input').focus();
    document.querySelector('#chat-message-input').onkeyup = function(e) {
    if (e.keyCode === 13) { // enter, return
        document.querySelector('#chat-message-submit').click();
        }
    };

    document.querySelector('#chat-message-submit').onclick = function(e) {
        const messageInputDom = document.querySelector('#chat-message-input');
            const message = messageInputDom.value;
            chatSocket.send(JSON.stringify({
            'type':"text_message",
            "author": {{request.user}} ,
            'message': message
            }));
        messageInputDom.value = '';
        };

</script>

{%endblock script%}
When a user types a message and clicks the send button, the message is sent to the backend via the chatSocket.send method. This is sent together with a type of text_message as well as the author which is the current user in the request object.
The next step is to handle this message in the consumer on the backend.
Modify the GroupConsumer as shown below:
class GroupConsumer(AsyncWebsocketConsumer):
        ....
    async def receive(self, text_data=None, bytes_data=None):
        text_data = json.loads(text_data)
        type = text_data.get("type", None)
        message = text_data.get("message", None)
        author = text_data.get("author", None)
        if type == "text_message":
            user = await database_sync_to_async(User.objects.get)(username=author)
            message= await database_sync_to_async(Message.objects.create)(
            author = user,
            content = message,
            group =self.group
            )
        await self.channel_layer.group_send(self.group_uuid, {
            "type":"text_message",
            "message":str(message),
            "author":author
        })

    async def text_message(self, event):
        message = event["message"]
        author = event.get("author")

        returned_data = {
            "type":"text_message",
            "message":message,
            "group_uuid":self.group_uuid
        }
        await self.send(json.dumps(
                returned_data
                ))
When you send a broadcast message with the group_send method of the channel_layers class, it will call a method on the consumer class that has the same name as the value of the type key in the message. In that method, you can then send the message via the self.send() method.
The Group model has the add_user_to_group and remove_user_from_group methods you used in the join_group and leave_group methods of the JoinAndLeaveGroup consumer. These methods create a model Event objects of type join and leave respectively for the user.
You can add a post save signal to send this event message to the frontend to notify users in a group when a new user has joined or left.
Create a signals.py file in the chat app and add the following code:
from django.dispatch import receiver
from .models import Event
from django.db.models.signals import post_save
from channels.layers import get_channel_layer
from asgiref.sync import async_to_sync

@receiver(post_save, sender=Event)
def broadcast_event_to_groups(sender, instance, **kwargs):
    channel_layer = get_channel_layer()
    group_uuid = str(instance.group.uuid)
    event_message = str(instance)
    async_to_sync(channel_layer.group_send)(group_uuid,
        {
        "type":"event_message",
        "message":event_message,
        "status":instance.type,
        "user":str(instance.user)
        }
)
Each consumer class has a channel_layer attribute that we can access inside the consumer as self.channel_layer, However when we are outside the consumer class,like in the broadcast_event_to_groups signal receive above, we can only retrieve the channel layer via the get_channel_layer() function.
The broadcast will be received in the event_message method of the consumer since you specified the type as event_message.
Add the event_message method in the GroupConsumer as shown below:
async def event_message(self, event):
    message = event.get("message")
    user = event.get("user", None)

    await self.send(
        json.dumps(
                    {
                "type":"event_message",
                "message":message,
                "status":event.get("status",None),
                "user":user
                    }
                  )
        )
You need to handle these two messages in the frontend’s websocket API onmessage event handler method.
Add the following in the groupchat.html:
chatSocket.onmessage = function(e) {
    const data = JSON.parse(e.data);
    document.querySelector('#chat-log').value += (data.message + '\n');
    status = data.status
    user = data.user

    if (status == "Left"){

        document.getElementById( members-${user} ).remove()
    }else if(status == "Join"){
        var members_list = document.getElementById('members')
        var members_item = document.createElement("li")
        members_item.innerHTML = user
        members_item.setAttribute("id",  members-${user} )
        members_list.appendChild(members_item)
    }
};
Both the event_message and text_message are added to the chat log. If the type of the message is event_message, you check if the value of the status key passed from the backend is Left and remove the user from the list of group members else if the value of the status key is Join , you add the user to the list of group members.
Reviewing the Flow
When a member of a group opens the group: The client arrives at the grouppage via an HTTP request , and the server calls the GroupChatView view which retrieves the chat and event messages for the group chat and renders them in the groupchat template. In the template, The client instantiates an instance of the websocket API which sends a Handshake request to the server via the websocket URL. The server calls the consumer associated with the URL which accepts the Handshake and the connection is established While accepting the Handshake, the instance of the consumer is added to a channel group that is identified by the chat group uuid.
When a user sends a message to the group: The message is sent from the client via the chatsSocket.send to the chatSocket endpoint The receive method of the consumer class associated with the endpoint receives the message. The message is broadcasted to every GroupConsumer class instance in the same channel group via the group_send method of the channel_layers. This is received by the text_message message method of each GroupConsumer class since text_message was specified as the message type. The text message is sent to each client via the send method in the text_message method The message is received in the client by the onmessage event handler. The chat log is then updated with the message
When a user joins or leaves a group: The post save signal is dispatched after the group chat instance is saved when the user is added or removed from the group chat The broadcast_event_to_groups signal receiver receives the event and create an event message. The event message is broadcasted to all GroupConsumer instance in the same group. The broadcast message is received from by the event_message method on the GroupConsumer. The message is sent to the client and the chat log is updated.
Conclusion
WebSockets and Django-channels open up a world of possibilities, like real-time IoT device communication. This tutorial was just a sneak peek into their potential. You managed to build a real-time chat app using them. If you’re looking to optimize your Django Channels build process, you might want to give Earthly a shot! It’s a great tool for optimizing builds. Here’s the project code from today - keep experimenting, learning, and optimizing your build processes!
Turn your engineering standards into automated guardrails that provide feedback directly in pull requests, with 100+ guardrails included out of the box and support for the tools and CI/CD systems you already have.