Understanding Docker Volumes

In this Series
Table of Contents
Docker is a common containerization solution that offers a user-friendly interface. It allows you to deploy your application as a lightweight process set rather than a complete virtual machine.
Docker images are like a snapshot of a container’s file system and contain both your application and its dependencies. When you run it, you recreate the container’s state. You don’t have to be concerned about setting up your environment because running an image recreates everything for you and is isolated from your operating system and other running containers.
The Docker interface is simple and users can easily create and implement applications into their containers or carry out version management, copy, share, and modify, just like managing ordinary code.
However, containers often need to use data beyond their container or share data between containers. While it may be tempting to rely on the host file system, a better solution is to work with persistent data in a container, namely Docker volumes.
A Docker volume is an independent file system entirely managed by Docker and exists as a normal file or directory on the host, where data is persisted.
In this guide, you’ll learn how volumes work with Docker, what they do, and what the best practices are for keeping them secure and effective.
What Are Docker Volumes
The purpose of using Docker volumes is to persist data outside the container so it can be backed up or shared.
Docker volumes are dependent on Docker’s file system and are the preferred method of persisting data for Docker containers and services. When a container is started, Docker loads the read-only image layer, adds a read-write layer on top of the image stack, and mounts volumes onto the container filesystem.
Why Docker Volumes?
If you are using Docker for development, you must be familiar with the -v or --volume flag that lets you mount your local files into the container. For instance, you can mount your local ./target onto the /usr/share/nginx/html directory container or an nginx container to visualize your html files.
echo "<h1>Hello from Host</h1>" > ./target/index.html
docker run -it --rm --name nginx -p 8080:80 -v "$(pwd)"/target:/usr/share/nginx/html nginx
Navigate to http://localhost:8080/ and you should see “Hello from Host”.
This is called a bind mount and is commonly used by developers. But, if you are using Docker Desktop on Windows or MacOS bind, mounts have significant performance issues. As a result, using volumes may be the best alternative for holding state between container runs.
Unlike bind mount, where you can mount any directory from your host, volumes are stored in a single location (most likely /var/lib/docker/volumes/
You can also save data to a remote server or in cloud Docker volumes with alternative volume drivers like sshfs.
In addition, Docker enables you to manage volume with the command line docker volume, making their management simple.
Creating and Managing Docker Volumes
In this section, you’ll learn how to create a Docker volume implicitly and explicitly and then declare it from a Docker file. Then you’ll learn how to view a data volume, mount it to a container, and configure it using docker-compose.
Create a Docker Volume Implicitly
The easiest way to create and use a volume is with docker run and the -v or --volume flag. This flag takes three arguments separated by ::
-v <source>:<destination>:<options>If the “source” is a path that was used in the previous example, Docker will use a mount bind. If the “source” is a name, then Docker tries to find this volume or creates one if one cannot be found. Below, the previous example has been updated to use a volume instead of a mount bind:
docker run -it --rm --name nginx -p 8080:80 -v demo-earthly:/usr/share/nginx/html nginxYou can check to make sure the container was properly created with docker volume ls which lists all existing volumes.

docker volume lsNote that the volume in question is not empty. If a volume is completely empty, the container’s content is copied to the volume.
You can check the status of your volumes on Linux. This gives you a chance to see where volumes are stored:
ls /var/lib/docker/volumes/target/_data/demo-earthlyOn Mac and Windows it’s a bit more tricky. In order to keep things simple, you can mount the volume on an ubuntu container and use ls to see the content of your volume:
docker run -it --rm -v demo-earthly:/opt/demo-earthly ubuntu ls /opt/demo-earthlyCreate a Docker Volume Explicitly
Alternatively you can use the docker volume create command to explicitly create a data volume. This command gives you the option to choose and configure the volume driver. The implicit creation of volumes always uses the local driver with default settings.
docker volume create --name demo-earthlyDeclare a Docker Volume from Dockerfile
Volumes can be declared in your Dockerfile using the VOLUME statement. This statement declares that a specific path of the container must be mounted to a Docker volume. When you run the container, Docker will create an anonymous volume (volume with a unique id as the name) and mount it to the specified path.
FROM nginx:latest

RUN echo "<h1>Hello from Volume</h1>" > /usr/share/nginx/html/index.html
VOLUME /usr/share/nginx/html
Lets build and run your new image:
docker build -t demo-earthly .
docker run -p 8080:80  demo-earthly
You can now validate that nginx serves your message at http://localhost:8080/.
More importantly, an anonymous Docker volume has been created, and every time you start a new container, another volume is created with the content of /usr/share/nginx/html.
docker volume lsFrom the above example, a volume directory data with the text file test containing “Hello from Volume” is created.
View a Data Volume
To manage your data, sometimes you need to list data volumes from the command line as a point of reference, which is faster than repeatedly checking the configuration files. You can use the docker volume ls command to view a list of data volumes.
docker volume lsdocker volume inspect command to view the data volume details.
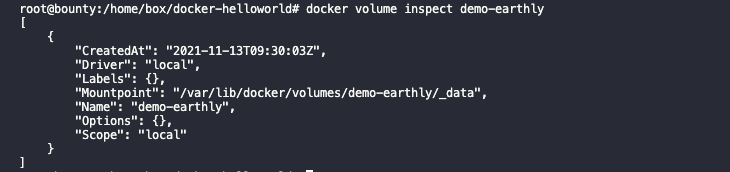
docker volume inspectMount a Volume to a Container
As you have seen through the various examples -v and --volume are the most common way to mount a volume to a container using the syntax:
-v <name>:<destination>:<options>One notable option is ro which means that the volume will be mounted as read-only:
docker run -it -v demo-volume:/data:ro ubuntuTry to write into the folder/data to validate that the volume is in read-only mode:
echo "test" > /data/testAn alternative to -v is to add the --mount option to the docker run command. --mount is the more verbose counterpart of -v.
To launch a container and mount a data volume to it, follow this syntax:
docker run --mount source=[volume_name],destination=[path_in_container] [docker_image]Replace [path in container] with the path to attach the Docker volume [volume_name] in the container.
For example, run the following command to start an Ubuntu container and mount the data volume to it.
docker run -it --name=example --mount source=demo-volume,destination=/data ubuntuRemember if the volume doesn’t exist Docker will create it for you.
List the contents of the container to see if the volume is mounted successfully. You should find the Docker volume name defined in the above data syntax.

Configure a Volume Using docker-compose
Although there are many ways to create a volume, it’s more convenient to use the docker-compose command to easily share data between multiple containers.
The use of the volume property in compose files is very similar to -v and --volume. That being said, to perform a bind mount (mount a directory from your local machine), you can use a relative path unlike -v with the command docker run that requires an absolute path.
version: "3.2"
services:
  web:
    image: nginx:latest
    ports:
      - 8080:80
    volumes:
      - ./target:/usr/share/nginx/html
The containers and hosts in the above configuration use volumes in the services definition (web) to mount ./target from the host to /usr/share/nginx/html of the container. As with the first example, if you navigate to http://localhost:8080/ you should read “Hello from Host”.
With docker-compose, volumes must be declared at the same level as services. Then you can refer to them by their name.
version: "3.2"
services:
  web:
    image: nginx:latest
    ports:
      - 8080:80
    volumes:
      - html_files:/usr/share/nginx/html
  web1:
    image: nginx:latest
    ports:
      - 8081:80
    volumes:
      - html_files:/usr/share/nginx/html

volumes:
  html_files:
In this example, you declared a volume named html_files and used it in both web and web1 service. Multiple containers can mount the same volume.
Running docker-compose up will create a volume named <project_name>_html_files if it doesn’t already exist . Then run docker volume ls to list the two volumes created, starting with the project name.
You can also manage container outside of you docker-compose file, but you still need to declare them under volumes and set the property external: true.
version: "3.2"
services:
  web:
    image: nginx:latest
    ports:
      - 8080:80
    volumes:
      - html_files:/usr/share/nginx/html

volumes:
  html_files:
    external: true
If you don’t have html_files, you can use docker volume create html_files to create it. When you add external, Docker will find out if the volume exists; but if it doesn’t, an error will be reported.
Copy Files Between Containers from a Shared Volume
Let’s look at how Docker volumes enable file sharing across containers.
In this example, use the volume and container we previously defined and execute the following commands:
docker create volume demo-earthlydocker run -it --name=another-example --mount source=demo-volume,destination=/data ubuntuNavigate to the data volume directory and create a file using the command touch demo.txt. Exit the container, then launch a new container another-example-two with the same data volume:
docker run -it --name=another-example-two --mount source=demo-volume,destination=/data ubuntuThe demo.txt file you created in the preceding container should list another-example in the output.

Docker Volume Best Practices
Now that you’ve learned how to implement Docker volumes, it’s important to keep in mind a few best practices:
- Always mount volumes as read-only if you only need to read from them.
- Always set the permissions and ownership on a volume.
- Always use environment variables for the host path or volume name in a production environment.
Conclusion
Often, you want your containers to use or persist data beyond the scope of the container’s lifetime. You can use volumes to solve this problem by working with Docker to mount, create, and share volumes between containers.
In this guide, you looked at how volumes work with Docker, what they do, and where volumes are the preferred solution.
If you enjoyed this tutorial you might want to grab a copy the free eBook “Docker Fundamentals”. It covers the essentials of Docker, including volumes, networking, secrets management, logging, multistage builds, debugging, and even practical use cases like integration with Visual Studio Code and GitHub Actions. Download the free Docker Fundamentals ebook right now.If you’re working on containerized builds across a team, keeping Docker best practices and build standards consistent can be tricky. Earthly Lunar helps enforce these standards directly in PRs, so your team stays aligned without manual review overhead.
Turn your engineering standards into automated guardrails that provide feedback directly in pull requests, with 100+ guardrails included out of the box and support for the tools and CI/CD systems you already have.