Building a Monorepo with Gradle
Table of Contents
This article discusses the management of Gradle monorepos. If monorepos are your thing, Earthly might be worth a look. Earthly significantly enhances build efficiency in monorepos. Check it out.
Gradle is a powerful and flexible build tool used for code compilation, testing, and deployment. It’s widely used in Java and Android ecosystems but supports many other languages as well, including Kotlin, C/C++, and JavaScript.
One of Gradle’s key features is its ability to handle monorepos efficiently. A monorepo is a repository that includes multiple distinct projects within its structure. This approach offers several advantages, including facilitating code sharing, collaboration, and reuse among projects, which ultimately reduces redundancy and promotes consistency.
Thanks to its cross-platform compatibility, Gradle allows seamless usage across diverse operating systems. Other noteworthy features include the build cache, which significantly reduces build times by reusing task outputs from previous builds and is particularly beneficial in large monorepo projects. Additionally, Gradle effectively manages dependencies from various sources and supports conflict resolution, transitive dependencies, and project dependencies—important for monorepos with intricate project dependencies.
In this tutorial, you’ll learn how to create and manage a monorepo using Gradle.
Create and Manage a Monorepo with Gradle
Before you begin this tutorial, make sure you have the following prerequisites:
- Gradle installed and ready for use (make sure your version is 8.5 or newer)
- An IDE for working with a Java application
- The Java JDK (version 8 or newer)
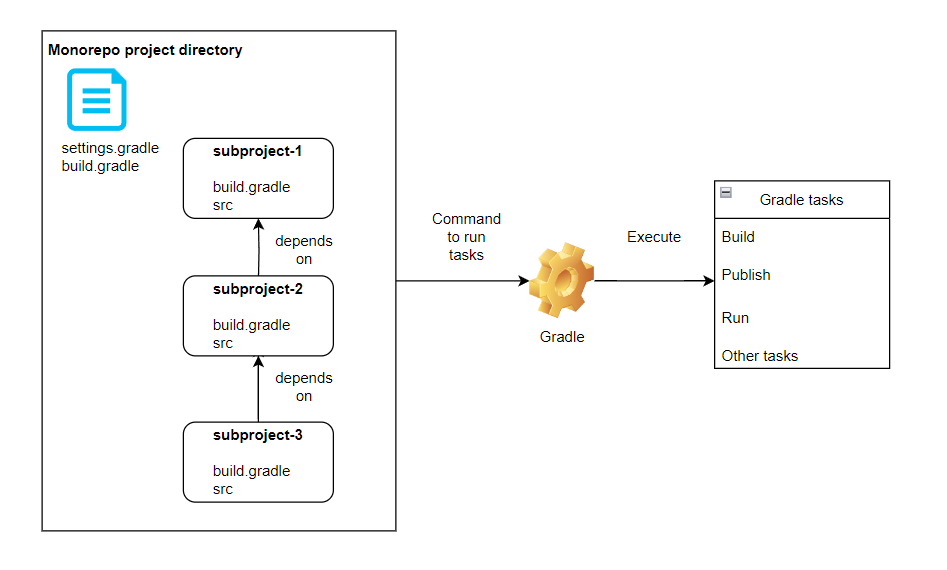
In this scenario, you’ll be working with an imaginary e-commerce company called “ZZZ,” whose backend engineering team is tasked with designing and delivering a backend project with a Gradle-based monorepo setup. You’ll create and manage three subprojects within a single monorepo setup using Gradle. Among the three subprojects, subproject-2 depends on subproject-1, and subproject-3 depends on subproject-2:

In the diagram above:
- The monorepo project directory is the root directory of the monorepo. It contains all of the subprojects and other files related to the project.
- The
settings.gradlefile is used to configure Gradle for the monorepo. It tells Gradle which subprojects are part of the monorepo and where they are located. - Each subproject is a separate project with its own
build.gradlefile and source code. Subprojects can be applications, libraries, or other types of projects. - The
build.gradlefile is used to configure Gradle for each subproject. It tells Gradle how to build each subproject and what dependencies it has. - Each
srcdirectory contains the source code for the corresponding subproject. - Gradle tasks are the tasks that Gradle can run to build, test, and deploy the subproject.
In terms of dependencies, subproject-2 depends on subproject-1, which means that subproject-1 needs to be built before subproject-2. Similarly, subproject-3 depends on subproject-2, which needs to be built before subproject-3. All these subprojects will be developed and bundled in such a way that they work together to print a greeting message.
Create a Monorepo Project Directory
The first step to building a monorepo with Gradle is to create a monorepo project directory. Here, it’s named building-a-monorepo-with-gradle. This directory will contain all of the subprojects and other files related to the project.
Execute the following command in the terminal from the project directory to initialize a basic Gradle project:
gradle initAn interactive terminal will appear. Select the following:
Starting a Gradle Daemon (subsequent builds will be faster)

Select type of project to generate:
  1: basic
  2: application
  3: library
  4: Gradle plugin
Enter selection (default: basic) [1..4] 1

Select build script DSL:
  1: Kotlin
  2: Groovy
Enter selection (default: Kotlin) [1..2] 2

Project name (default: building-a-monorepo-with-gradle):

Generate build using new APIs and behavior \
(some features may change in the next minor release)? \
(default: no) [yes, no]


> Task :init
To learn more about Gradle by exploring our Samples \
at https://docs.gradle.org/8.5/samples

BUILD SUCCESSFUL in 2m 33s
2 actionable tasks: 2 executed
If successful, you should see the following files in the root project directory:
.gitattributes
.gitignore
.gradle
build.gradle
gradle
gradlew
gradlew.bat
settings.gradle
Create Subprojects
To create subprojects, navigate to the project root directory and create directories for each of the subprojects using the following command:
mkdir subproject-1 subproject-2 subproject-3Then, edit the settings.gradle file and paste the following at the end of the file:
include 'subproject-1', 'subproject-2', 'subproject-3'This statement ensures that the newly created subproject directories are considered part of the monorepo project. To verify this, execute the following command in the terminal:
gradle -q projectsYour output should look like this:
------------------------------------------------------------
Root project 'monorepo-gradle'
------------------------------------------------------------

Root project 'monorepo-gradle'
+--- Project ':subproject-1'
+--- Project ':subproject-2'
\--- Project ':subproject-3'
Develop Subprojects
Now that the directories for the subprojects are created and included as part of Gradle’s monorepo project, it’s time to develop the three subprojects.
Create Subproject-1
Start by creating a build.gradle file in the subproject-1 directory. Then, edit that file to include the following syntax:
dependencies {

}
Subproject-1 serves as a library and does not depend on other subprojects, so you can leave the dependencies section empty.
Next, create the directory structure for developing the source code using the following command:
cd subproject-1
mkdir src\main\java\subproject\
Note: This tutorial was prepared on a Windows-based machine, which is why you see slashes. mkdir does not include the -p flag to create the new directory structure with subdirectories in it. Feel free to change the command as per your machine’s operating system.
Create a Java file named Library.java in the newly created subproject directory and paste the following code into it:
package subproject;

public class Library {
    public static String getMessage() {
        return "Hello from Library!";
    }
}
This code defines a class named Library and prints the message Hello from Library! when the getMessage function is called. Later, you’ll call this library function from subproject-2, which depends on subproject-1.
Create Subproject-2
For subproject-2, create a build.gradle file in the subproject-2 directory, then edit that file to include the following syntax:
dependencies {
    implementation project(":subproject-1")
}
As previously stated, subproject-1 serves as a library, and subproject-2 depends on subproject-1. That’s why the dependencies section is filled in.
Next, create the directory structure for developing the source code using the following command:
cd subproject-2
mkdir src\main\java\subproject\
Create a Java file named Service.java in the newly created subproject directory and paste the following code into it:
package subproject;


public class Service {
    public String serve() {
        return Library.getMessage();
    }
}
This code defines a class named Service and has a function called serve. This function in turn calls subproject-1’s getMessage method via the previously defined Library class. Later, you’ll call the serve function from subproject-3.
Create Subproject-3
For subproject-3, create a build.gradle file in the subproject-3 directory, then edit that file to include the following syntax:
mainClassName = 'subproject.App'

dependencies {
    implementation project(":subproject-2")
}

// Custom run task
task runApp(type: JavaExec) {
    mainClass = mainClassName
    classpath = sourceSets.main.runtimeClasspath + sourceSets.main.output
}
Subproject-3 is an app that depends on subproject-2. Because subproject-3 is an application that needs to be run to generate the greeting message, other sections of the build.gradle code call out the main application class file name (which you’ll create soon) and the custom runApp task.
The runApp task is used to execute the Java application within Gradle. It specifies the main class to run and configures the classpath to include both project-specific classes and runtime dependencies. This enables convenient and integrated execution within Gradle’s build process, offering flexibility and control over launching the application.
Create the directory structure for developing the source code using the following command:
cd subproject-3
mkdir src\main\java\subproject\
Create a Java file named App.java in the newly created subproject directory and paste the following code into it:
package subproject;

public class App {
    public String getGreeting() {
        Service service = new Service();
        return service.serve();
    }

    public static void main(String[] args) {
        System.out.println(new App().getGreeting());
    }
}
This code defines a class named App and has a function called getGreeting. This function in turn calls subproject-2’s serve method via the previously defined Service class. This serve function, in turn, calls subproject-1’s getMessage function, completing the whole cycle of dependency.
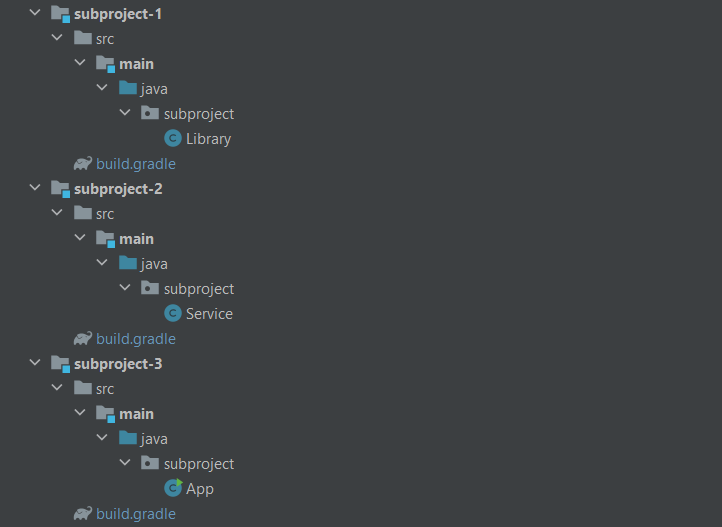
The final structure of your subprojects should look like this:

Build the Monorepo Project Using Gradle
Now that all of the subprojects are ready, it’s time to build them using Gradle. However, before you can do that, you must prepare the build.gradle of the monorepo project to define the shared configurations of all the subprojects. If you don’t prepare this file, you’ll encounter errors when you run the gradle build command from the monorepo’s root project directory.
To prepare the build.gradle file in the building-a-monorepo-with-gradle directory, add the following content:
def javaProjects = [
        project(":subproject-1"),
        project(":subproject-2"),
        project(":subproject-3"),
]

configure(javaProjects) {
    println "${project.name}"
    apply plugin: 'application'
    version '1.0.0'
    repositories {
        mavenCentral()
    }

    dependencies {

    }

    test {
        useJUnitPlatform()
    }
}
This code defines the configuration applicable for each subproject and enables each subproject to be built and run as a standalone application. It also sets a common version and utilizes Maven Central for dependency management.
Then, trigger the build process of the entire monorepo project using the following command:
cd building-a-monorepo-with-gradle
gradle build
All subprojects are built with the execution of a single command, which exemplifies how easy it is to manage a monorepo project with Gradle.
The output of the build command should look like this:
> Configure project :
subproject-1
subproject-2
subproject-3

BUILD SUCCESSFUL in 1s
15 actionable tasks: 15 executed
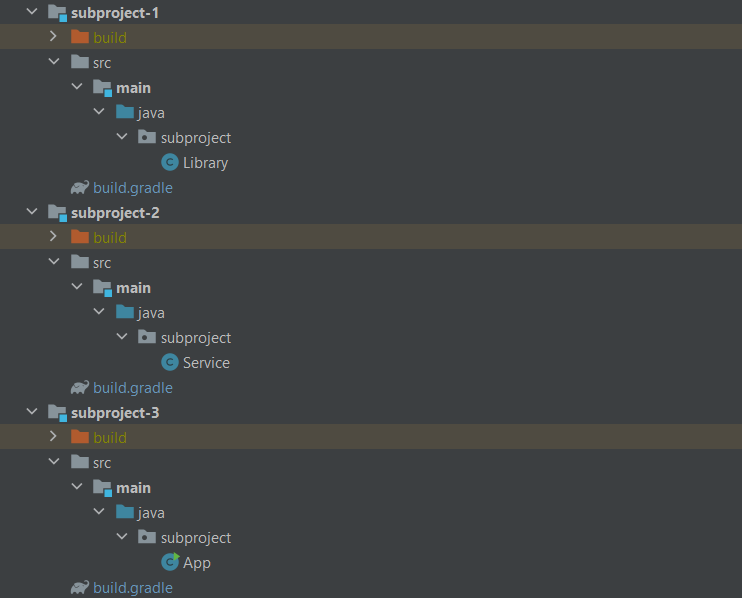
You should also see a build directory holding the output of the gradle build command in each of these subprojects:

If you rerun the same gradle build command, your output will look like this:
> Configure project :
subproject-1
subproject-2
subproject-3

BUILD SUCCESSFUL in 1s
15 actionable tasks: 15 up-to-date
Notice the last statement in the output: 15 actionable tasks: 15 up-to-date. Before, it was 15 actionable tasks: 15 executed. The difference is that during the second invocation of the gradle build command, Gradle by default uses the cache and skips certain steps (eg compilation) to improve the build cycle time.
Run the App
Now that the build is ready, run the app with the following command:
cd building-a-monorepo-with-gradle
gradle :subproject-3:runApp
This command calls the custom task runApp that you defined previously in subproject-3, which is the app containing the main class. Your output should look like this:
> Configure project :
subproject-1
subproject-2
subproject-3

> Task :subproject-3:runApp
Hello from Library!
Notice that the message from subproject-1 is getting printed via the calls passed across multiple subprojects involved in this monorepo project.
Go ahead and change the greeting message in subproject-1’s Library.java class from Hello from Library! to Hello from Subproject-1! as follows:
package subproject;

public class Library {
    public static String getMessage() {
        return "Hello from Subproject-1!";
    }
}
Then, execute the following command to build the projects:
cd building-a-monorepo-with-gradle
gradle build
Your output should look like this:
> Configure project :
subproject-1
subproject-2
subproject-3

BUILD SUCCESSFUL in 1s
15 actionable tasks: 11 executed, 4 up-to-date
Notice that the last statement in the output now says 15 actionable tasks: 11 executed, 4 up-to-date, meaning that due to the changes made in the source code file of subproject-1, the Gradle tool has performed eleven tasks while skipping four tasks and relying upon the cache for those tasks.
This shows how Gradle’s dependency management works at a high level when one of the dependencies gets updated and how it affects the build chain or cache usage process.
Conclusion
In this tutorial, you learned how to create and manage a monorepo using Gradle with multiple Java-based subprojects.
As your mono-repo expands, build times can grow, and at that point, it can make sense to look at solutions for keeping mono-repo build times under control.
Also, if you’re wrestling with Java monorepos, Earthly could be your new best friend. Imagine this: a tool that knows exactly what needs to be built and what doesn’t. Earthly simplifies Java monorepos with content addressing and an auto-skip feature. It uses a build graph to show the build steps and their dependencies, enhancing performance and reliability by running steps in parallel and skipping unnecessary ones. Try it out for free today.
The tutorial’s source code is available in this GitHub repository.
Earthly Lunar: Monitoring for your SDLC
Achieve Engineering Excellence with universal SDLC monitoring that works with every tech stack, microservice, and CI pipeline.


