A Guide to Setting Up Your Monorepo for JavaScript Projects with Lerna
In this Series
Table of Contents
The article explains how to configure a Lerna monorepo. Earthly streamlines and accelerates monorepo build processes. Learn more about Earthly.
There are a lot of build tools in the JavaScript ecosystem. Some of them have overlaps in functionality, and others, like Lerna, focus on solving a particular problem.
Lerna is a self-described “build system for managing and publishing multiple JavaScript/TypeScript packages from the same repository.” You don’t need a tool like Lerna to operate a monorepo — a version-controlled code repository that stores multiple projects or applications within a single, centralized repository — but it improves the developer experience by solving several common issues, including streamlining version management tasks, publishing or deploying new code, managing dependencies between projects, and running commands against multiple projects simultaneously.
In this tutorial, you’ll learn how to leverage Lerna to manage a simple TypeScript monorepo. You’ll see how to set up Lerna, create some packages, and publish them to npm. You will also see how you can use Lerna along with GitHub Actions and Earthly to simplify the continuous integration (CI) of your monorepo.
This article assumes you have a working understanding of JavaScript, knowledge of TypesScript, React, package management, and bundling with tools like Rollup is beneficial but not necessary.
How To Implement a Lerna Monorepo for JavaScript Projects
Before you start the tutorial, you’ll need to create free accounts (if you don’t already have them) with each of the following services:
You also need to ensure that you have the following installed on your system:
- Node.js (this tutorial uses v18)
- Docker
- Git
- Earthly
- A code editor (Visual Studio (VS) Code is a good choice if you don’t have a preference)
With the prerequisites out of the way, it’s almost time to get started. However, before setting up the Lerna monorepo, it’s important to understand how Lerna versioning works.
How Lerna Versioning Works
Lerna has two different versioning strategies: fixed mode (which is the default) and independent mode.
Fixed Mode
In fixed mode, all packages in the monorepo will share the same version. This makes version management a simpler affair but has some drawbacks. Namely, if one package has a breaking change, all packages will receive a major version increase, even if some packages have not changed since the last release.
Independent Mode
In comparison, the independent mode allows you to specify versions for each package. When you publish your packages, Lerna will prompt you to specify the new version of each package that has changed since the last release. This gives you a finer grain of control over your versioning scheme but introduces some additional overhead in version management, as you will need to specify versions for each package you publish, which becomes increasingly laborious as the number of packages in your monorepo grows.
This tutorial will use the default fixed mode for simplicity’s sake, but you can use the independent mode if you prefer to control each package’s version numbers.
Creating the Monorepo
The first package you will create is a simple button React component. To begin, you need to create a new directory for your monorepo and then initialize it with Lerna. You can do this by running the following commands:
mkdir monorepo
cd monorepo
npx lerna init
npm install
git init
Please note: If you want to use independent mode, you can substitute
npx lerna initwithnpx lerna init --independent.
Now that your monorepo has been created, you can make your first package by running the following commands:
cd packages
mkdir my-button
cd my-button
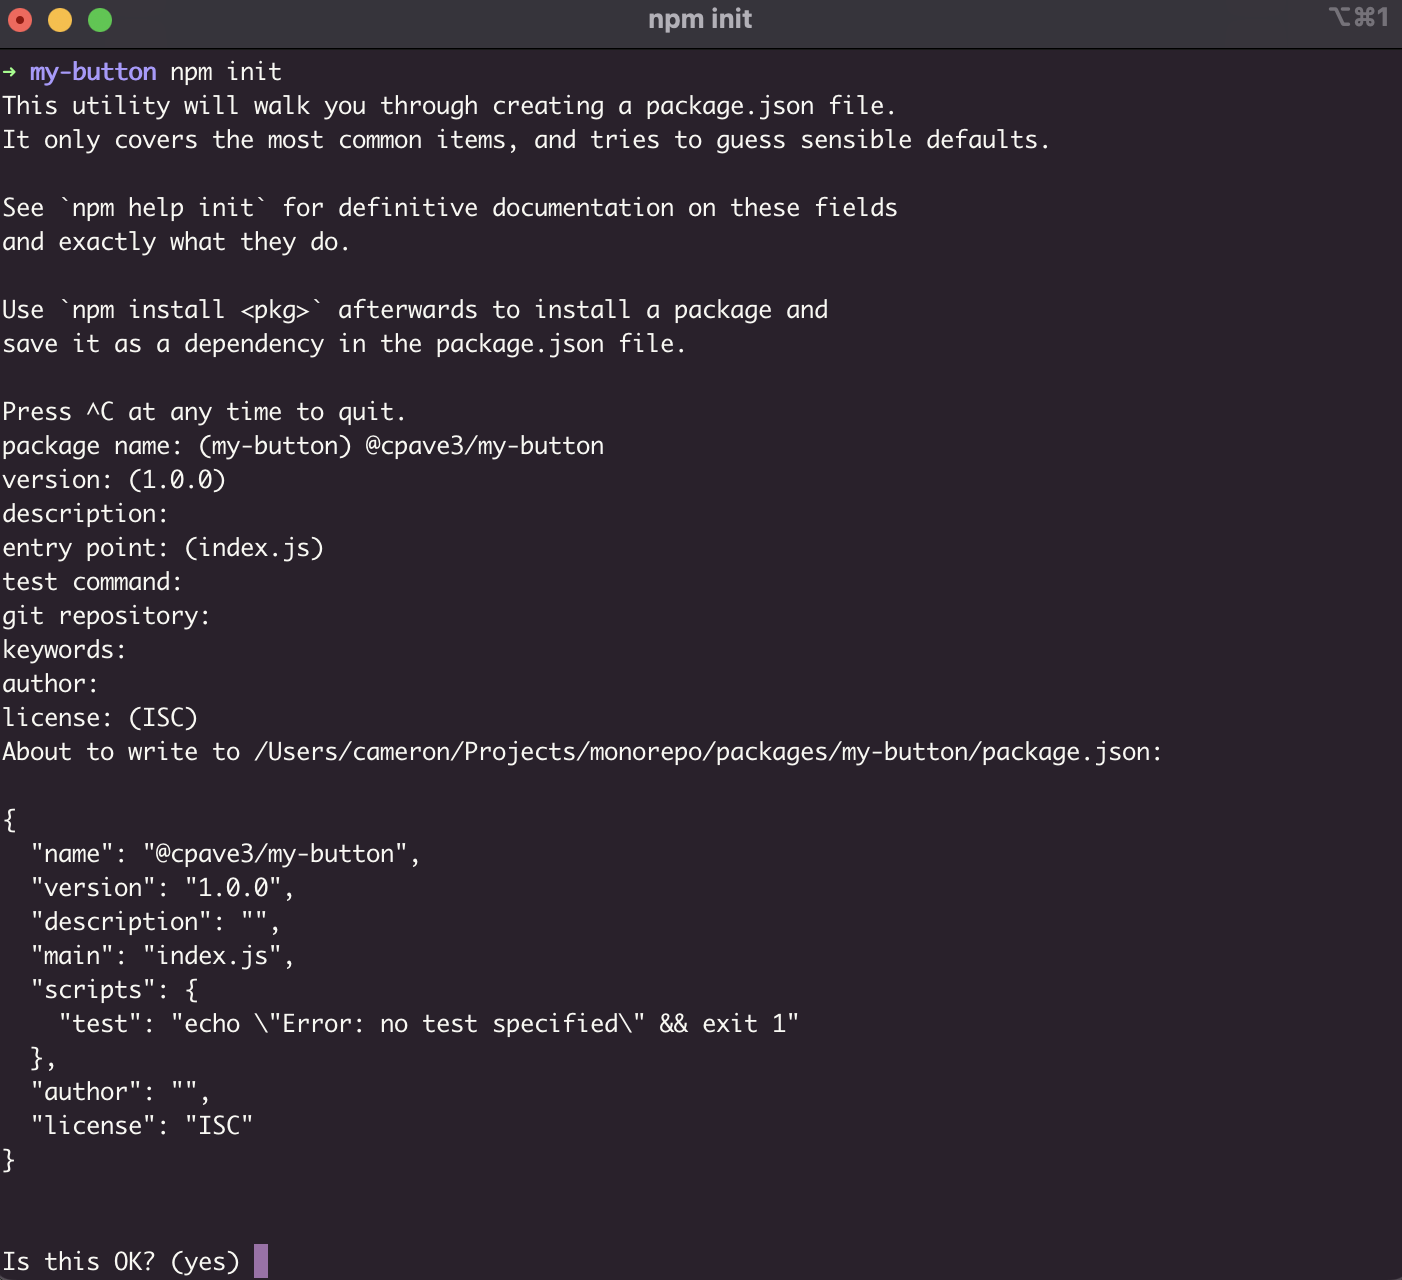
npm init
The last command will prompt you with several questions, the first of which will ask you what the package name should be:

Set the package name as @{your-npm-username}/my-button, which will cause it to be scoped to your user account when you publish it later. This means you don’t have to have a unique name for the package, as the prefix will differentiate it from any other packages with similar names. The default answers to the other questions are fine at this stage, as you will edit this file later to update the values.
Next, you need to install the dependencies for this package. This package will be a simple React button component. You can install the dependencies with the following command:
npm install rimraf react react-dom typescript @types/react rollup \
@rollup/plugin-node-resolve @rollup/plugin-typescript \
@rollup/plugin-commonjs rollup-plugin-dts jest ts-jest \
@testing-library/react @testing-library/user-event @types/jest \
jest-environment-jsdom --save-dev
This will install all the dependencies that you will need for this package, including the dependencies for the upcoming testing and bundling.
You can create the basic structure of the package with the following command:
mkdir -p src/components/Button
touch src/index.ts
touch src/components/Button/Button.tsx
touch src/components/Button/Button.spec.tsx
touch src/components/Button/index.ts
After running this, you need to update the content of each of the created files like so:
src/index.ts:
export * from "./components/Button";src/components/Button/index.ts:
export * from "./Button";src/components/Button/Button.tsx:
import * as React from 'react';

export interface ButtonProps {
    label: string;
    onClick?: (e: React.MouseEvent<HTMLButtonElement>) => void;
};

export function Button({label, onClick}: ButtonProps) {
    return <button onClick={onClick}>{label}</button>
};src/components/Button/Button.spec.tsx:
/**
 * @jest-environment jsdom
 */

import React from 'react';
import { render, screen } from '@testing-library/react';
import { Button } from './';

test('renders button', () => {
  render(<Button label='button test' />);
  expect(screen.getByRole('button', { name: 'button test' })).toBeDefined();
});
Next, from the my-button package’s root directory, run the following command to initialize TypeScript:
npx tsc --initThis will create a tsconfig.json file. Open that file, and replace its content with the following:
{
  "compilerOptions": {
    "target": "es5",
    "esModuleInterop": true,
    "forceConsistentCasingInFileNames": true,
    "strict": true,
    "skipLibCheck": true,
    "jsx": "react",
    "module": "ESNext",
    "declaration": true,
    "declarationDir": "types",
    "sourceMap": true,
    "outDir": "dist",
    "moduleResolution": "node",
    "allowSyntheticDefaultImports": true,
    "emitDeclarationOnly": true,
  }
}
Next, create jest.config.cjs in the package’s root with the following content:
module.exports = {
    testMatch: ['**/+(*.)+(spec|test).+(ts|js)?(x)'],
    moduleFileExtensions: ['ts', 'tsx', 'js', 'jsx'],
    transform: {
        '^.+\\.tsx?$': 'ts-jest'
    }
};
This should allow your tests to run under TypeScript. You also need to add a configuration file for Rollup, which will be used for building the package. You can do this by creating rollup.config.js with the following content:
import resolve from "@rollup/plugin-node-resolve";
import commonjs from "@rollup/plugin-commonjs";
import typescript from "@rollup/plugin-typescript";
import dts from "rollup-plugin-dts";

export default [
    {
      input: "src/index.ts",
      output: [
        {
          file: "dist/cjs/index.js",
          format: "cjs",
          sourcemap: true,
        },
        {
          file: "dist/esm/index.js",
          format: "esm",
          sourcemap: true,
        },
      ],
      plugins: [
        resolve(),
        commonjs(),
        typescript({ tsconfig: "./tsconfig.json" }),
      ],
    },
    {
      input: "dist/esm/types/index.d.ts",
      output: [{ file: "dist/index.d.ts", format: "esm" }],
      plugins: [dts()],
    },
  ];
Finally, update my-button’s package.json file with the following keys, adding or overriding existing keys as needed:
{
…
"main": "dist/cjs/index.js",
  "module": "dist/esm/index.js",
  "types": "dist/index.d.ts",
  "files": [
    "dist"
  ],
  "scripts": {
    "test": "jest",
    "build": "rimraf dist && rollup -c"
  },
  "type": "module",
  "publishConfig": {
    "access": "public"
  },
…
You can test that everything works after these changes by running the two following commands from my-button’s root:
npm run test
npm run build
If both of these commands pass, the package is usable. If you receive errors from either command, it’s possible that something is misconfigured, or that you have missed some code. Double-check to make sure that you have included all relevant code snippets, and try again.
Creating the Second Package
Having only a single package in a monorepo defeats the purpose of the endeavor, so it’s best to create at least one additional package. The second package you’ll create is a simple text input React component. Luckily, you can reuse most of what you have already done by duplicating your first package and changing a few pieces, specifically the component itself, the package name, the test, and the import paths.
Duplicate the package like so:
# from monorepo/packages/
cp -r my-button my-input
cd my-input
Next, change the package’s name in package.json from my-button to my-input (leaving the username prefix intact.
Then rename the following files and directories as shown here:
src/components/Button→src/components/Inputsrc/component/Input/Button.tsx→src/components/Input/Input.tsxsrc/components/Input/Button.spec.tsx→src/components/Input/Input.spec.tsx
You will also need to change the import paths in the following files if your IDE did not do it for you:
src/index.tssrc/components/Input/index.ts
After this, replace the content of the component and test files with the following:
src/components/Input/Input.tsx:
import * as React from 'react';

export interface InputProps {
    value?: string;
    defaultValue?: string;
    onChange?: (e: React.ChangeEvent<HTMLInputElement>) => void;
    testId?: string;
};

export function Input({ value, defaultValue, onChange, testId }: \
InputProps) {
    return <input type="text" value={value} defaultValue={defaultValue} \
    onChange={onChange} data-testid={testId} />
};src/components/Input/Input.spec.tsx:
/**
 * @jest-environment jsdom
 */

import React from 'react';
import { render, screen, waitFor } from '@testing-library/react';
import userEvent from '@testing-library/user-event';
import { Input } from '.';

test('renders input', async () => {
  render(<Input testId='input' />);

  const input = screen.getByTestId('input');

  userEvent.type(input, 'test string');

  await waitFor(() => {
    expect(screen.getByDisplayValue('test string')).toBeDefined();
  });

});
Finally, verify that everything works by running the test and build commands in the new package:
npm run test
npm run build
At this point, it is recommended to make a commit to save your work before continuing to the next section.
Publishing From the Monorepo
One of the useful features of Lerna is that it allows you to manage the publishing of multiple packages at once. To see this in action, follow along.
Make sure that you’ve changed the package names in my-button and my-input to be prefixed with your npm username, like @{npm-username}/{package-name}. Then commit any outstanding changes and push everything to your GitHub remote repository.
Next, make sure you’re logged into npm by running the following command:
npm loginThis will prompt you for some details, like your username, password, email, and two-factor authentication (2FA) code (if enabled). Once this is complete, you can run the following command to begin the publishing process:
npx lerna publishPlease note: If you have 2FA enabled on npm, you will need to prefix this command with
NPM_CONFIG_OTP=xxxxxx, wherexxxxxxis your six-digit 2FA code.
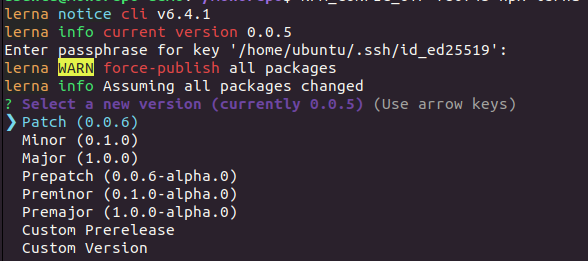
At this point, you will be asked to choose how the package versions will be updated:

These version increments follow the Semantic Versioning scheme, where the following are true:
- Major versions indicate a breaking change
- Minor versions indicate a backward compatible feature
- Patch versions indicate a backward compatible bugfix
It’s worth noting that Lerna will typically only publish versions for packages it has detected changes for through its hashing system. The exception to this is that if you have a major version of 0, all changes are considered “breaking”, so all packages will be updated and published, even if you haven’t changed them since the last time they were published. You can force the publishing of unchanged packages at any time using the --force-publish option if you would like to.
Upon selecting which version increment you want to use, Lerna will ask you to confirm the new versions:

Once the publish command completes successfully, your packages should be built and available on npm. This is a very streamlined process for publishing packages, and you can see how this would scale well when there are dozens of packages under management.
However, publishing packages aren’t the only thing that Lerna helps with. You can also leverage its ability to run commands against all its packages to streamline your CI efforts.
Running CI With the Monorepo
A common use case for CI pipelines is running builds and tests to ensure that everything is working as expected, and GitHub Actions are a popular choice for this. In this section, you’ll see how to get your package’s tests running in CI with the help of Lerna.
To prepare the CI workflow, you can use Earthly, a platform-agnostic CI tool that allows you to run workflows the same way, regardless of the CI platform. Configuring CI workflows can be notoriously tedious, as it will often lead to many small commits where you need to tweak things until they work properly with your CI platform of choice (GitHub Actions, in this case). Earthly alleviates this by letting you develop your CI workflows locally and then runs them on your platform of choice. This works because both your local system and the GitHub Actions runner will be executing the same Earthfile, with the same earthly executable, leading to a much more consistent experience between development and CI.
Configuring Earthly for this use case is quite simple. Create a file called Earthfile in the root of your monorepo and add the following content:
VERSION 0.6
FROM node:18-alpine
WORKDIR /monorepo

build:
    COPY . ./
    RUN npm install
    RUN npx lerna run build

test:
    COPY . ./
    RUN npm install
    RUN npx lerna run test
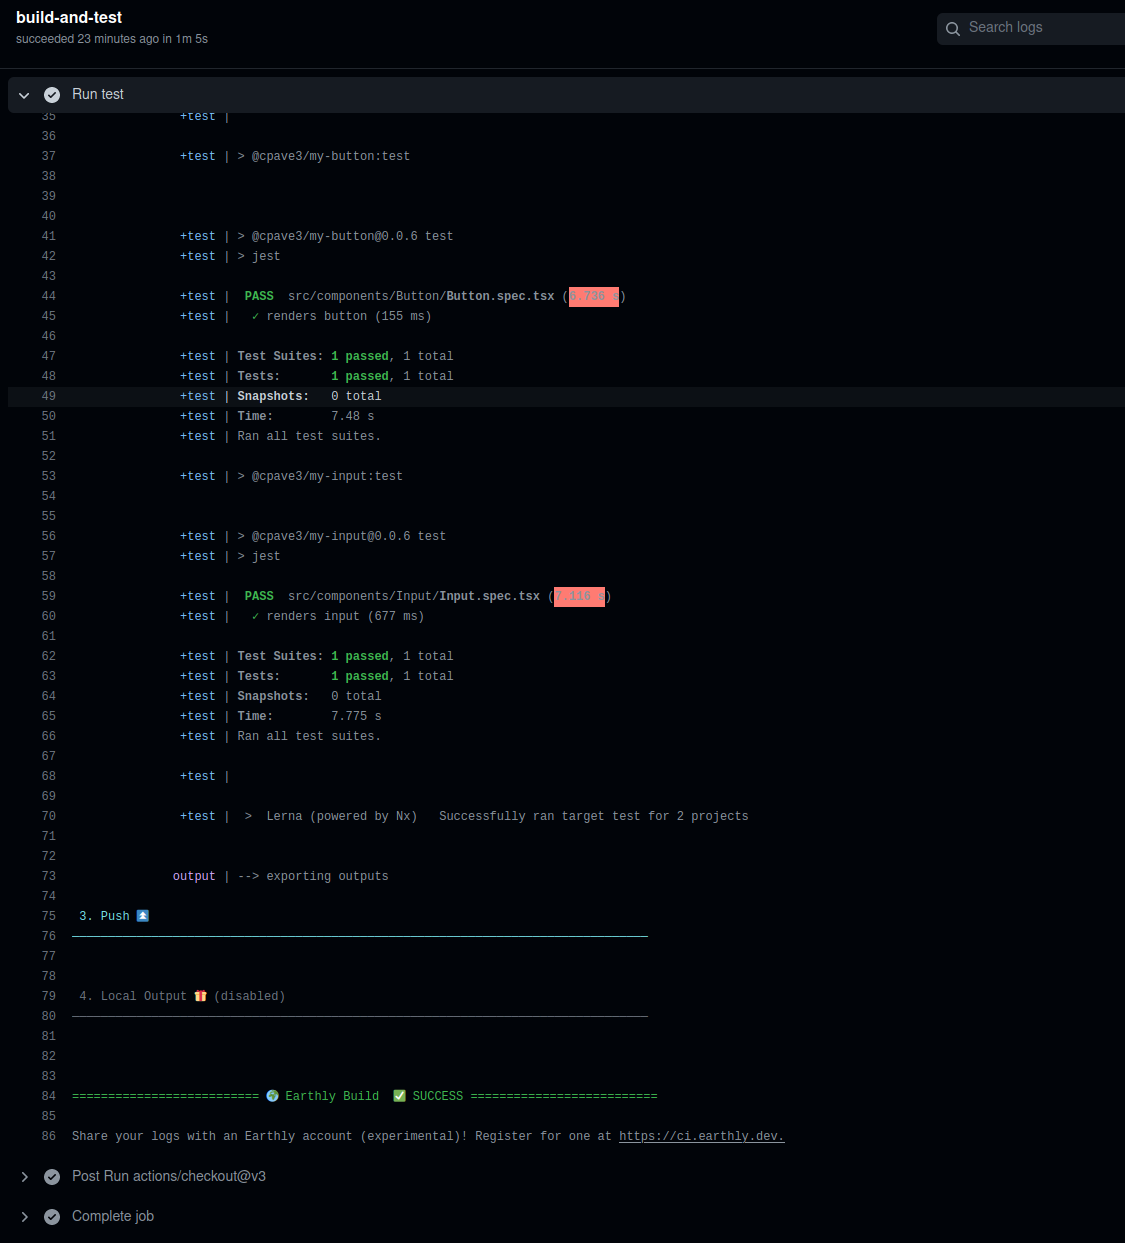
The syntax is inspired by Dockerfiles, so it will be familiar if you have worked with Docker before. To test your config, run earthly +build and earthly +test to run the build and test steps, respectively. This will download the necessary Docker image and use it to run the build or test scripts of your packages. If everything works, you should see an output that looks like this:

If both commands are working locally, they should work in CI as well. To configure a Github Actions to use these, run the following commands to create a new workflow:
mkdir -p .github/workflows
touch .github/workflows/ci.yml
Next, open the newly created ci.yml file, and add the following content:
# .github/workflows/ci.yml

name: CI

on:
  push:
    branches: [ main ]
  pull_request:
    branches: [ main ]

jobs:
  build-and-test:
    runs-on: ubuntu-latest
    env:
      FORCE_COLOR: 1
    steps:
    - uses: actions/checkout@v3
    - name: Put the git branch back into git (Earthly uses it for tagging)
      run: |
        branch=""
        if [ -n "$GITHUB_HEAD_REF" ]; then
          branch="$GITHUB_HEAD_REF"
        else
          branch="${GITHUB_REF##*/}"
        fi
        git checkout -b "$branch" || true
    - name: Download latest earthly
      run: "sudo /bin/sh -c 'wget https://github.com/earthly/earthly/releases/download/v0.6.30/earthly-linux-amd64 \
      -O /usr/local/bin/earthly && chmod +x /usr/local/bin/earthly'"
    - name: Earthly version
      run: earthly --version
    - name: Run build
      run: earthly --ci --push +build
    - name: Run test
      run: earthly --ci --push +test
This config is based on the official reference example from Earthly. It will execute your Earthly configuration in a GitHub action when you push code to the repository.
Save and commit your changes and then push them to GitHub. When you visit your repo in the browser, navigate to the Actions tab, and you should see a CI pipeline running for the config you just pushed. Click on it, and you should see that your build and test steps have been completed successfully, running through Earthly and Lerna:

When to Use Lerna
Lerna is a powerful tool for managing JavaScript monorepos and it is one of the first major tools to do so. It gives you a lot of benefits that can save time when managing multiple packages, such as streamlined version management, and the ability to easily run commands against multiple packages at once. However, these benefits are not without cost.
The most notable disadvantage is that it’s yet another tool in the toolchain and another potential point of failure. Moreover, Lerna is not entirely without issues; if you use it for an appreciable period, you may run into problems. For instance, issues can arise when inter-package dependencies call for various varieties of the same package. This can typically be solved by leveraging the no-hoist functionality present in package managers like npm and Yarn, but it adds another layer to an already complex build system and is another point of possible failure.
Thankfully, due to its age and popularity, there is a lot of community support for Lerna, so if you have an issue, you’ll likely be able to find a solution in one form or another.
It’s also worth noting that Lerna isn’t the only player in this space anymore. The major package managers (npm, Yarn, and pnpm) now offer workspace features, which can handle a lot of the same use cases as Lerna. Lerna will even leverage these features itself, depending on which package manager you use.
Whether you use Lerna or one of the package managers’ solutions, such tools are indispensable when working with monorepos.
Conclusion
In this tutorial, you’ve seen how to set up a monorepo with Lerna. You learned how to add multiple packages to it, publish those packages to npm, and run CI workflows for those packages using Github Actions and Earthly.
If you’ve configured CI workflows before, you know how frustrating it can be when you aren’t able to test your changes without pushing them. Earthly solves this problem by giving you portable, reproducible CI workflows that run the same locally as they do in the cloud, saving you time and giving you peace of mind when configuring CI.
Earthly Lunar: Monitoring for your SDLC
Achieve Engineering Excellence with universal SDLC monitoring that works with every tech stack, microservice, and CI pipeline.


