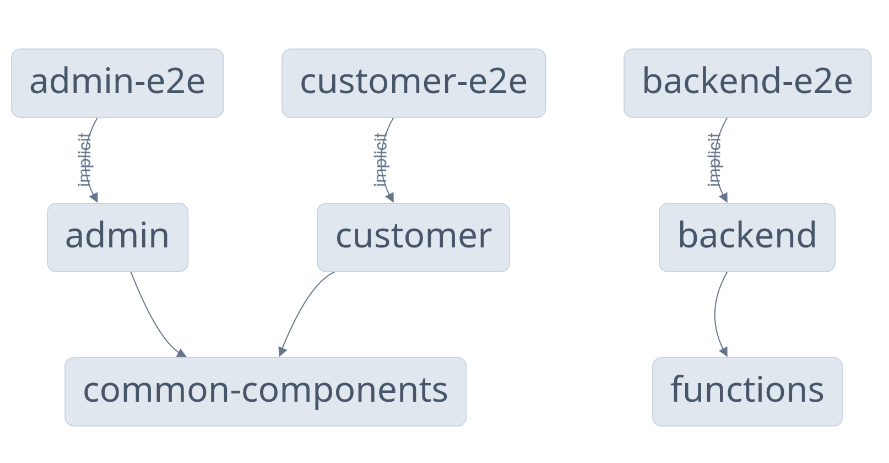
Getting Started with Nx Monorepos: A Beginner's Guide
Table of Contents
This article explains how to manage monorepos using Nx. Earthly ensures reproducible builds for monorepo workflows, regardless of programming language. Check it out.
Imagine you have a collection of distinct but interrelated projects. For instance, you might have an app with its own React frontend and Node.js backend, or two different Angular applications sharing a common collection of components. Monorepos offer an effective solution to organize these distinct but interrelated projects into a single repository.
With a monorepo, all related projects can be housed in a single location, providing clear visibility over all your projects. When you make new changes to one project, you can easily assess how it impacts the others.
Monorepos facilitate seamless code sharing, collaborative work on projects, and synchronization of releases across different projects. However, managing multiple interdependent projects within a single repository requires a capable build tool, such as Nx, to efficiently handle the intricacies.
If you’re looking to learn more about Nx and how it works, this article is for you. You’ll learn all about Nx, including its pros and cons. You’ll also learn how to create and manage a monorepo with Nx.
Monorepos and Monorepo Tools

A majority of software projects are made up of smaller, interlinked components. While it may be tempting to put them in separate repositories, it may become convoluted as the number of components and the dependencies between them grows.
If you have different components across different repositories and different teams working on them, each team will likely introduce its tooling and styles. Since the projects are isolated, it’s also possible that one project will be updated with a change that breaks the projects that depend on it.
By consolidating all the projects in a single monorepo, you can have a bird’s-eye view of all your projects in one place as well as centralized tooling, style guides, and tests. You can also easily manage the impact of changes and improve synchronization between projects.
Monorepos also introduce new complexities since you have multiple projects in a single repo. Building and testing projects require special attention since the projects may depend on each other. This is why monorepos require specialized build tools that take the pain out of managing multiple projects. Some famous monorepo tools are Bazel, Turborepo, and Nx.
Nx is a fast and extensible monorepo build tool from Nrwl and is used by companies such as Walmart, FedEx, and Shopify to efficiently manage their monorepos. Originally designed for handling Angular monorepos, Nx has expanded its capabilities over time to encompass various JavaScript frameworks such as React, Node.js, and even languages outside JavaScript, such as Go, C#, and Rust.
In Nx, a monorepo is known as a workspace. Each workspace can have multiple (possibly interdependent) projects.
Pros
Some of the advantages of Nx include the following:
Integration With Frameworks and Tools
As previously stated, Nx integrates with popular JavaScript frameworks, such as React, Vue, Angular, Express, and Expo; testing frameworks, such as Jest and Cypress; and bundlers, such as Vite and webpack. Apart from these JavaScript technologies, Nx also offers support for frameworks in other languages, such as Flutter and .NET, as well as tools such as Firebase.
The modular plugin system of Nx means that you can only install support for languages that you require. This extensibility and a large selection of languages and frameworks make Nx a great choice for a variety of monorepo projects.
Nx also has official extensions for VS Code and JetBrains IDEs as well as a community-maintained plugin for Neovim. These extensions make it easy to configure and use Nx straight from the editor.
Tasks
Nx comes built-in with common tasks such as serve, build, and test, which are generally used to run a development server in all projects, build distributable copies of all projects, and run unit tests in all projects, respectively. It’s also possible to add new tasks in nx.json, or you can run tasks in parallel for maximum efficiency.
Caching and Affected Mechanism
Nx offers caching of dependencies and task results, with optional remote caching through Nx Cloud. It has a generous free tier as well as a free tier for personal and open source software usage. Even if you don’t opt into using Nx Cloud, by default, Nx uses a local computation cache that is saved for one week. This helps speed up building and testing by replaying tasks from the cache instead of running it from scratch.
Another noteworthy feature of Nx that enhances the efficiency of working with monorepos is the “affected” mechanism. With this mechanism, you can selectively build and test only those projects that have been impacted by the most recent changes.
Introspection Tools
With Nx, you have the option to visualize the projects within your monorepo using the nx graph command. This command generates a graphical representation of the projects and their interdependencies on an HTML web page. This visualization allows you to easily understand the architecture of your monorepo.
Extensibility
Nx demonstrates its extensibility with the use of plugins. These plugins enable seamless integration with additional frameworks and tools, expanding Nx’s capabilities significantly. For instance, the DDD plugin provides domain-driven design support.
In addition, Nx offers flexibility in how you use it. You can utilize Nx for both monorepos, managing multiple interdependent projects, as well as stand-alone projects. In the latter case, you can benefit from the preconfigured tooling and plugins provided by Nx, even with just a single project.
When it comes to monorepos, Nx offers two options: package-based and integrated repos. Each approach serves different project requirements and preferences.
Integrating Nx into an existing project is a breeze, thanks to its user-friendly nature and adaptability.
Cons
While Nx comes with numerous advantages, it’s important to be aware of some of its drawbacks:
- Nx has limited language support. It doesn’t support commonly used languages like Java or C++. Even though it supports languages like Go, it’s predominantly used for JavaScript and TypeScript-based projects.
- Apart from the graph and affected mechanism, Nx has very little build introspection capabilities compared to something like Bazel or Earthly.
- Nx only offers extensions for VS Code, JetBrains, and Neovim, which can be frustrating if you’re used to using another editor.
Implementing Monorepos With Nx
Now let’s create a monorepo consisting of the following projects:
- Two React applications:
customerandadmin. - A React library named
common-componentsthat will have components shared by the previous two React applications. - A Node.js server named
backend. - A TypeScript library named
functionsthat will be used bybackend.

To follow along, make sure you have Node.js installed. This article uses Node.js 20.3.0.
Create an Nx Workspace
You need to start by creating an Nx workspace with the following command:
npx create-nx-workspace@latestYou’ll be asked a few questions. Answer with the following:
- Where would you like to create your workspace?: Provide a name of the workspace:
myorg. Nx will create a directory with the same name and store your projects there. - Which stack do you want to use?: Pick react for this tutorial.
- What framework would you like to use?: You can select one of the React frameworks that Nx officially supports. To keep things simple, pick none.
- Standalone project or integrated monorepo?: Choose integrated. You can find the difference between a stand-alone project and an integrated monorepo in the official Nx documentation.
- Application name: Use customer, which will be the first app you’ll create.
- Which bundler would you like to use?: Choose vite.
- Default stylesheet format: Choose css.
- Enable distributed caching to make your CI faster: Select Yes.

Once the command finishes running, you’ll have a directory named myorg. Navigate to that directory, as the rest of the tutorial will take place there.
In apps/customer, you’ll find that you have a React project. You also have an end-to-end (E2E) test set up with Cypress in apps/customer-e2e.
Now it’s time to create a second React app with the following command:
npx nx g @nx/react:app adminThis creates another React app named admin in the apps directory as well as an E2E test in apps/admin-e2e.
Before you can create the Node.js backend, you need to install the Node.js plugin for Nx:
npm install -D @nx/nodeRun the following command to create a Node.js application in the apps/backend directory. Choose express as the framework of choice:
npx nx g @nx/node:app backendThen create a React library that will be used by the customer and admin applications:
npx nx g @nx/react:lib common-componentsChoose jest as the test runner and vite as the bundler. This creates a React library in libs/common-components.
Finally, create a JavaScript library named functions that will be used by the backend application:
npx nx g @nx/js:lib functionsChoose none for both the test runner bundler.
At this point, you should have the following directory structure:
|__ apps
|    |__ admin
|    |__ admin-e2e
|    |__ backend
|    |__ backend-e2e
|    |__ customer
|    |__ customer-e2e
|__ libs
|    |__ custom-components
|    |__ functions
You can explore the projects and their interdependencies by running the following command, which opens a new page in your browser:
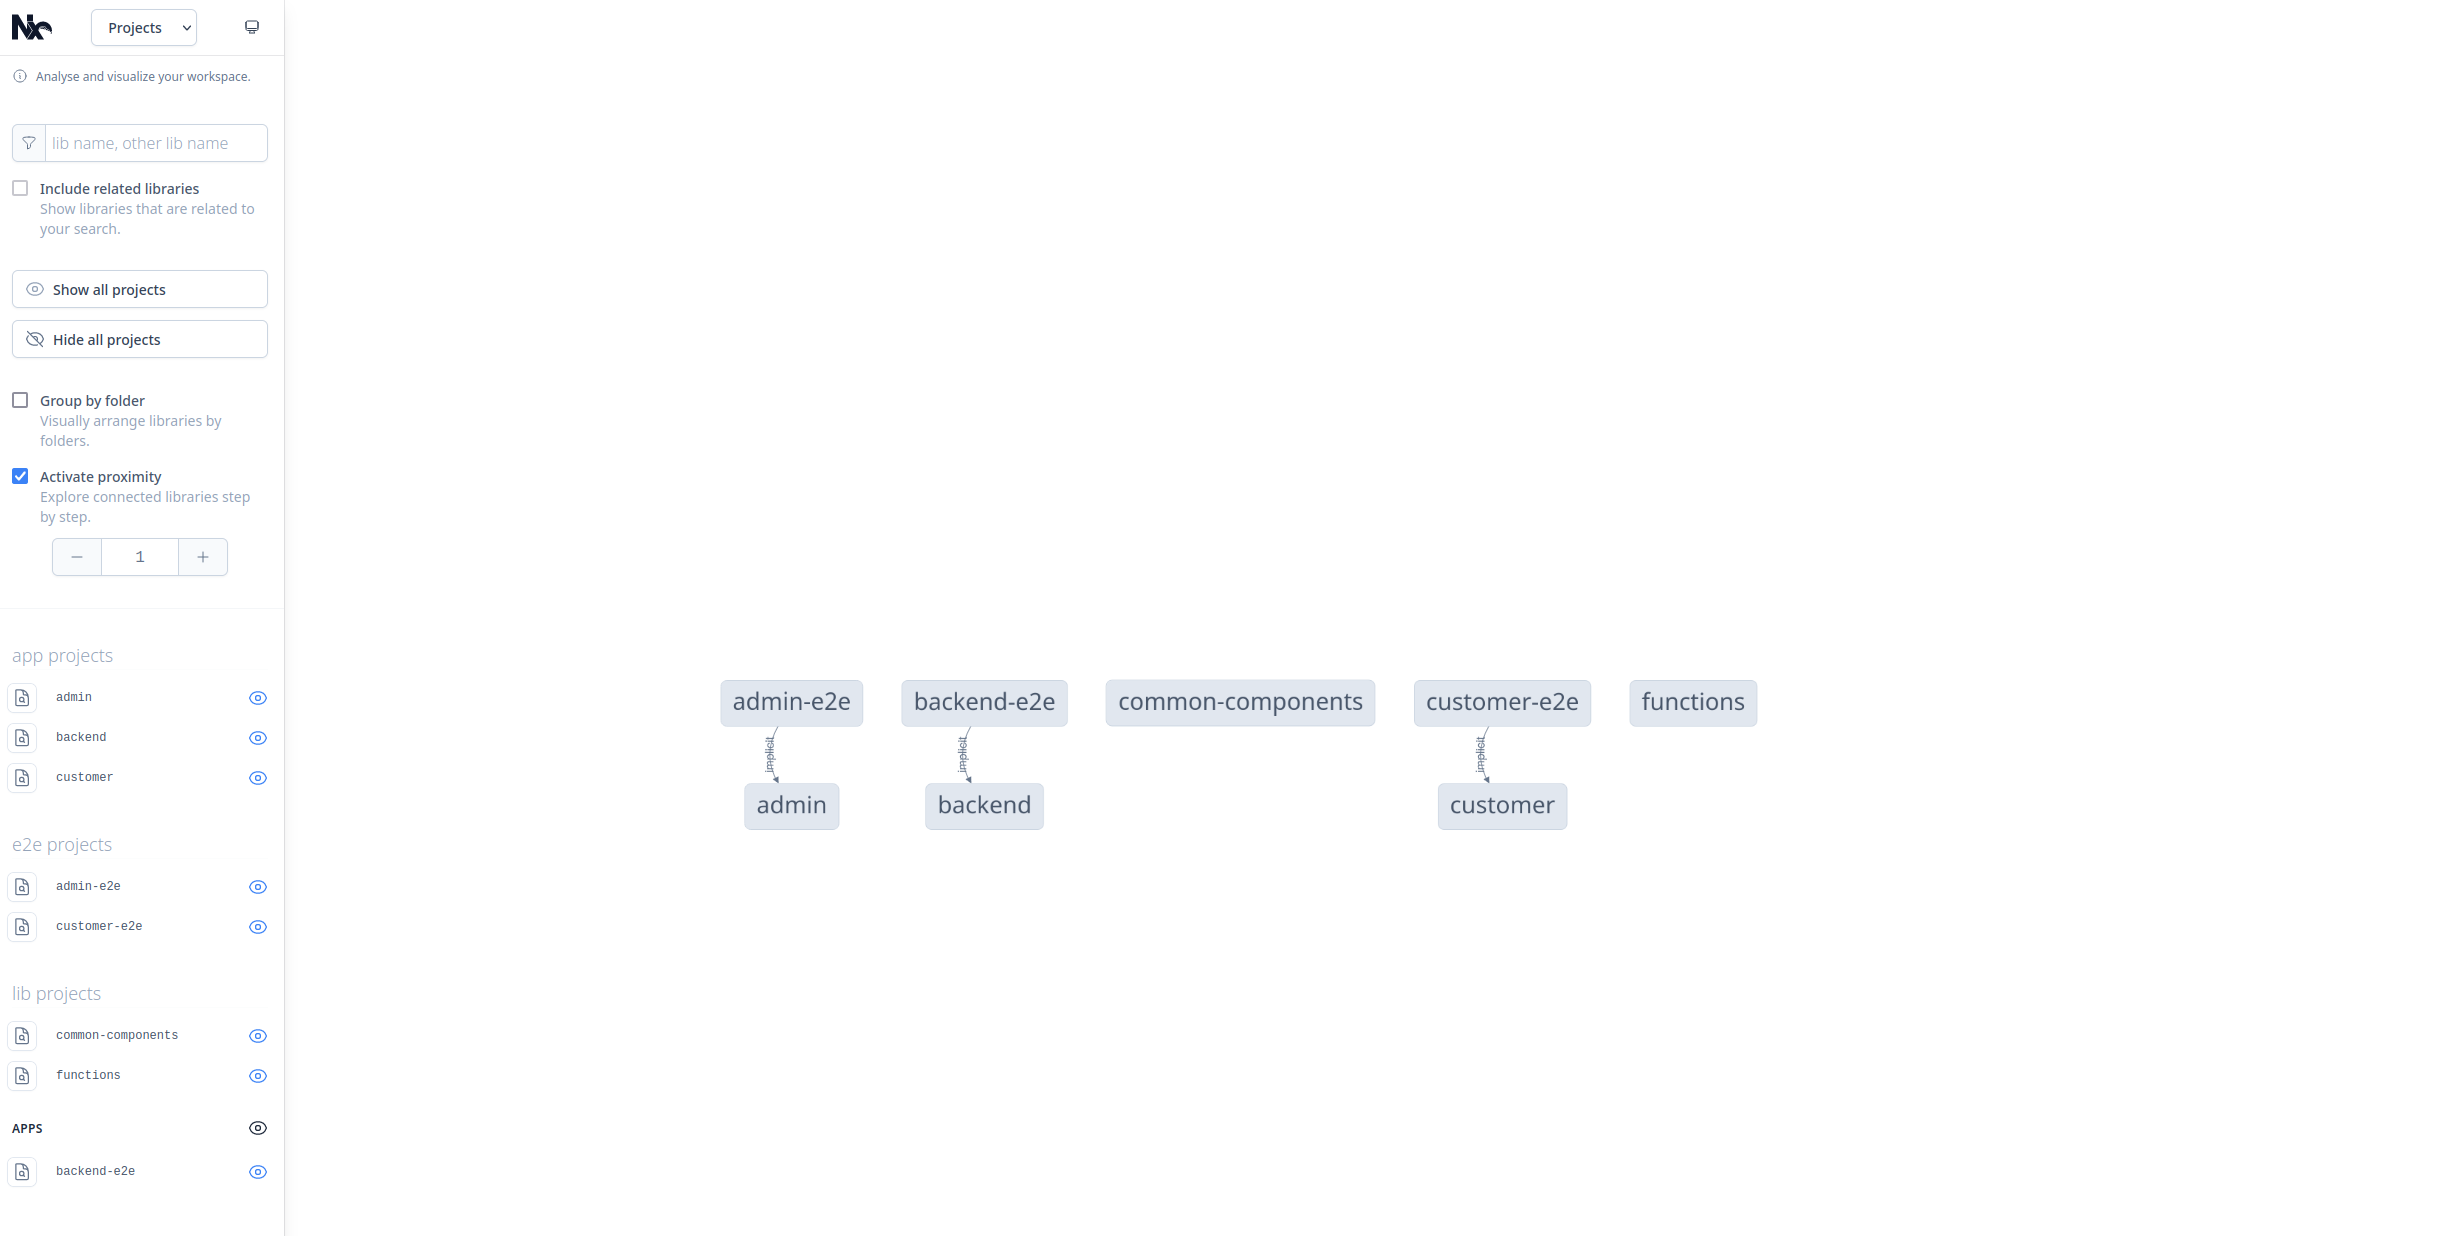
npx nx graphSelect Show all projects in the sidebar, and you’ll see the following screen:

As you can see, you have five projects and three E2E tests. The E2E tests have implicit dependencies on their corresponding projects. However, none of the projects are dependent on each other.
Create a new Header component in common-components that will be used in both admin and customer with the following command:
npx nx g @nx/react:component header \
--project=common-components --export
Open libs/common-components/src/lib/header/header.tsx and replace the existing code with the following:
import styles from './header.module.css';

/* eslint-disable-next-line */
export interface HeaderProps {
  text: string;
}

export function Header(props: HeaderProps) {
  return (
    <header>{props.text}</header>
  );
}

export default Header;
You can use this component by installing it from “@myorg/common-components” (which you’ll do soon). Initially, you need to install Axios, which will be used to make HTTP requests to the backend server.
Installing a library in an Nx workspace is different because you need to install the library globally instead of in the project directory.
Have you noticed that none of your projects have
node_modules? This is because Nx takes care of installing dependencies globally in a workspace.
Run the following command in the workspace:
npm install axios corsOpen apps/admin/src/app/app.tsx and replace the existing code with the following:
// eslint-disable-next-line @typescript-eslint/no-unused-vars
import styles from './app.module.css';

import { Header } from '@myorg/common-components';
import { useEffect, useState } from 'react';

import axios from 'axios';

export function App() {
  const [message, setMessage] = useState('');

  useEffect(() => {
    axios.get('http://localhost:3000/admin').then((response) => {
      setMessage(response.data);
    });
  }, []);

  return (
    <div>
      <Header text="Welcome to admin!" />
      <p>{message}</p>
    </div>
  );
}

export default App;
This code makes a GET request to http://localhost:3000/admin, where the backend returns a message. This message is then displayed on the page using the Header component.
Repeat the same step with the customer app. Open apps/customer/src/app/app.tsx and add the following code:
// eslint-disable-next-line @typescript-eslint/no-unused-vars
import styles from './app.module.css';

import { Header } from '@myorg/common-components';
import { useEffect, useState } from 'react';

import axios from 'axios';

export function App() {
  const [message, setMessage] = useState('');

  useEffect(() => {
    axios.get('http://localhost:3000/customer').then((response) => {
      setMessage(response.data);
    });
  }, []);

  return (
    <div>
      <Header text="Welcome to customer!" />
      <p>{message}</p>
    </div>
  );
}

export default App;
This code is largely the same as the admin code, except this time, you make a request to http://localhost:3000/customer.
Now create a currentDate function in the functions project that will be used in the backend. This function simply returns the current date. For that, you use the date-fns library:
npm install date-fnsOpen libs/functions/src/lib/functions.ts and replace the existing code with the following:
import { format } from 'date-fns';

export function currentDate(): string {
  return format(new Date(), 'yyyy-MM-dd');
}
Finally, create the backend app at apps/backend/src/main.ts:
import express from 'express';
import { currentDate } from '@myorg/functions';
import cors from 'cors';

const host = process.env.HOST ?? 'localhost';
const port = process.env.PORT ? Number(process.env.PORT) : 3000;

const app = express();
app.use(cors({ origin: '*' }));

app.get('/customer', (req, res) => {
  res.send(`[ customer ] ${currentDate()}`);
});

app.get('/admin', (req, res) => {
  res.send(`[ admin ] ${currentDate()}`);
});

app.listen(port, host, () => {
  console.log(`[ ready ] http://${host}:${port}`);
});
This code creates a simple Express app with two routes: /customer and /admin. Both routes use the currentDate function imported from @myorg/functions and return the current date, along with an indication of customer or admin.
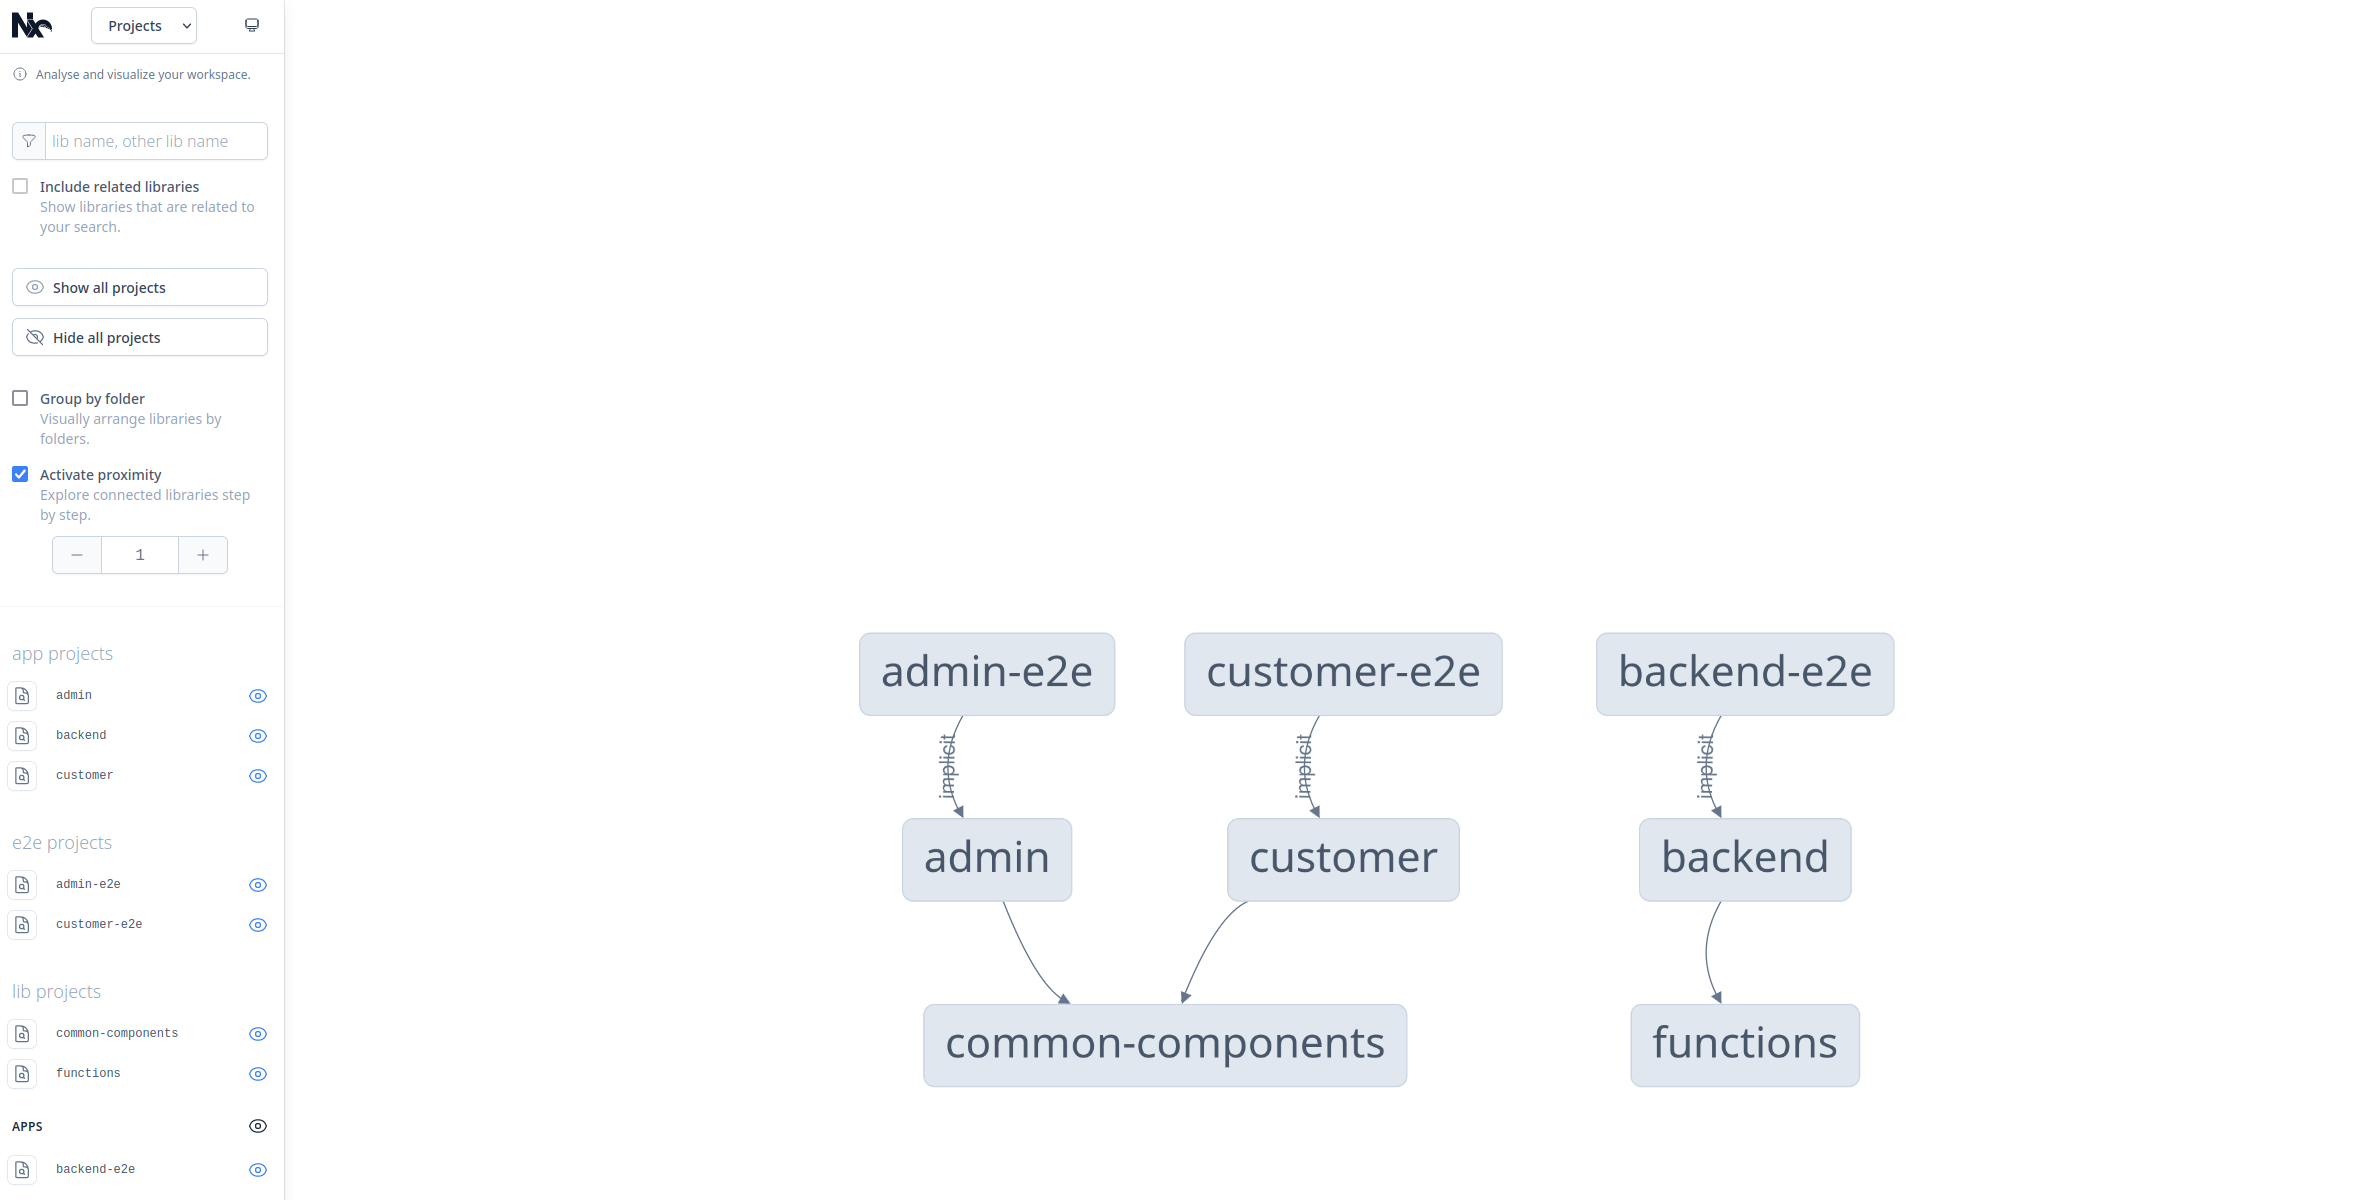
Run npx nx graph again and select Show all projects:

This time, you can see that you have dependencies between the projects. Both customer and admin depend on common-components, and backend depends on functions.
To run the projects, start the backend project with the following command:
npx nx serve backendThen in another terminal, start the admin app:
npx nx serve adminVisit http://localhost:4200 and verify that you can see the admin page:

To run the customer app, stop the admin app and then start the customer app with the following:
npx nx serve customer
The Affected Mechanism
Typically, almost all commits change only a small subset of your projects. This means it’s a waste of time and resources to build and test every single project every time you make a new commit. To tackle this, Nx offers a mechanism called “affected” mechanism. With this mechanism, only the projects that have been changed by a commit and the projects depending on this changed project are built and tested. See this in action:
Start by creating a commit to mark the current state:
git add .
git commit -m "Initial commit"
Now, change the common-components project. Open libs/common-components/src/lib/header/header.module.css and add the following CSS code:
header {
    color: red;
}
Check which projects have been affected by this change with the following command:
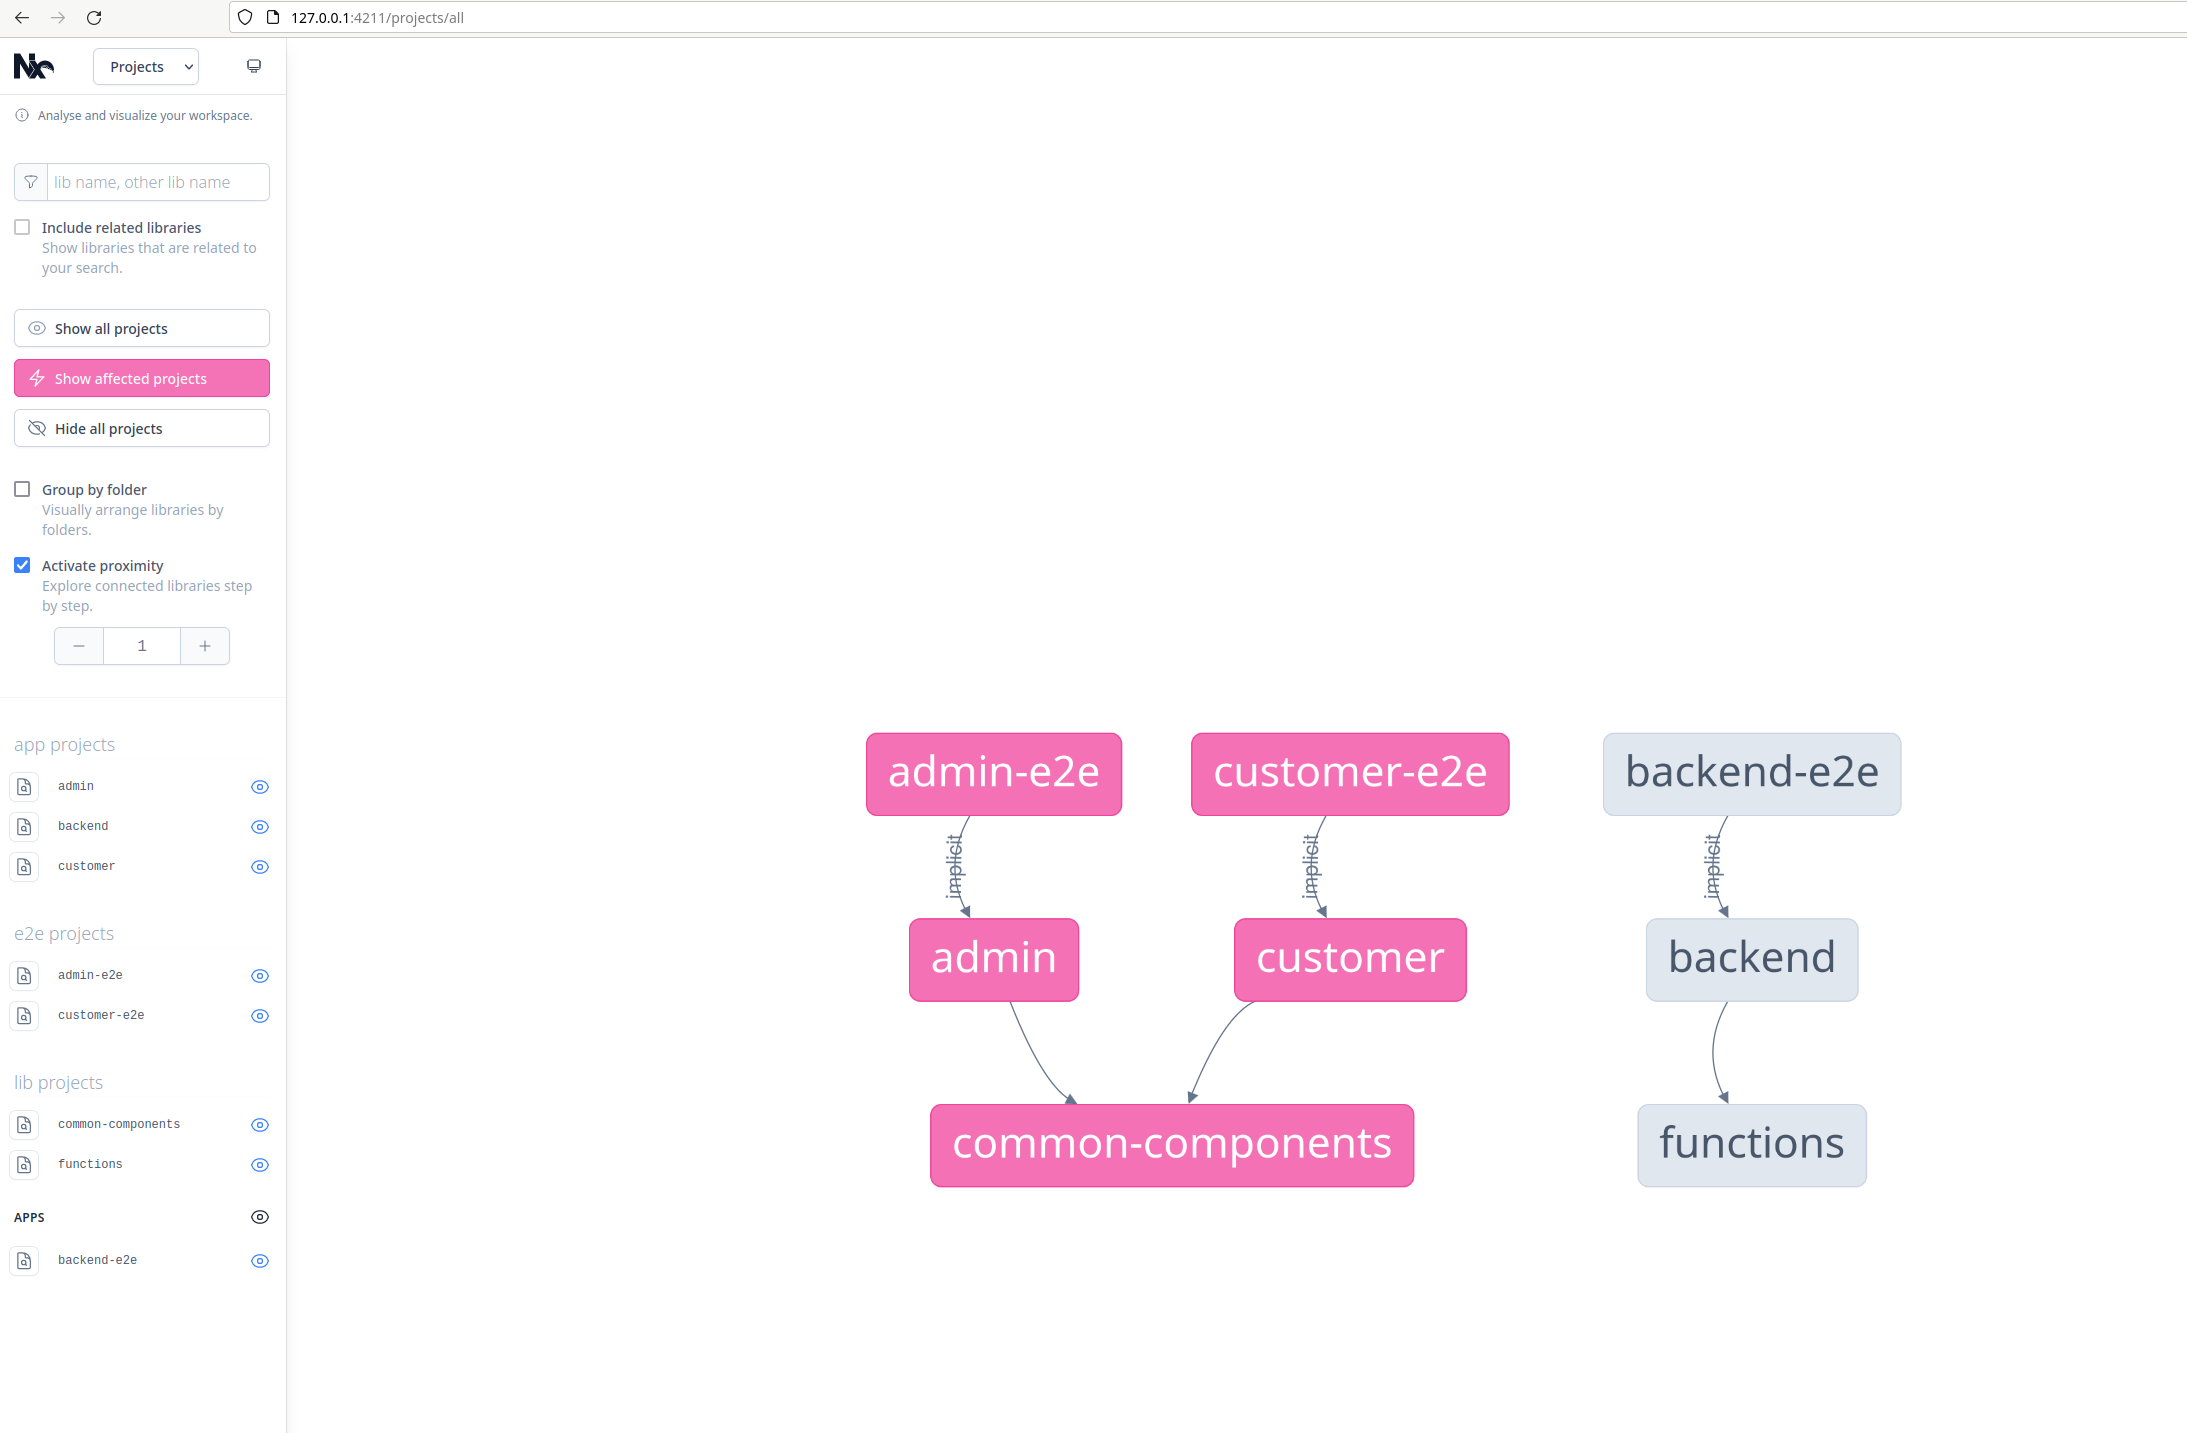
npx nx affected:graphSelect Show all projects, and you’ll see that the customer, admin, common-components, and their corresponding E2E tests are marked in red. This is because changing common-components also affects these projects:

Now you can run the tests for only the affected projects with the following command:
npx nx affected -t testThe tests will fail since you haven’t written tests for the modified code. Note that only the tests for the affected components were run:

All the code for this tutorial can be found in this GitHub repo.
Conclusion
Monorepos are becoming the norm for organizing multiple interrelated projects in a single repo. To make full use of a monorepo, you must use a build tool that is capable of efficiently handling a monorepo.
In this article, you explored a powerful tool called Nx. You learned about its pros and cons and saw how easy it is to build a monorepo with it. If your projects are predominantly in JavaScript or TypeScript, then you can’t go wrong with Nx. If your projects include use of other languages, Nx can still work but you might want to take a look at Earthly.
Earthly Lunar: Monitoring for your SDLC
Achieve Engineering Excellence with universal SDLC monitoring that works with every tech stack, microservice, and CI pipeline.


