How to Set Up a TypeScript Monorepo
In this Series
Table of Contents
The article discusses the advantages of a monorepo approach. Earthly streamlines the build process and guarantees uniformity in builds across multiple projects. Check it out.
In recent years, monorepos have become a trending topic in the IT community. When using a monorepo, an organization stores all its projects in the same repo. Monorepos are particularly popular among web developers, since most of their projects use JavaScript or TypeScript and rely on the same npm dependencies.
In this tutorial, we’ll go over what a monorepo is, why, and when you should consider adopting it, and how to set up a TypeScript monorepo with npm.
What Is a Monorepo?
A monorepo is a software-development approach in which one repository contains the code and assets of several projects. It is a global project that contains smaller projects. Each of these projects can be anything from a single application to reusable packages of components or utility functions. Within a monorepo, these packages are typically called local packages.
A monorepos generally includes many applications and several packages; a package can depend on other packages. For example, the ui package may use functions exposed by the utils package. On the other hand, the apps are usually not dependent on each other.
Monorepo is not to be confused with a monolithic application! A monolith is a single project whose components must be deployed together. A monorepo, on the other hand, consists of several independent applications that live in the same repository and share code through local packages, but can be deployed on their own. Thus, monorepos allow greater deployment flexibility than monoliths.
What Are Some Benefits of a Monorepo?
There are three specific reasons to consider adopting a monorepo approach:
- It’s easier to standardize code and tooling across teams. Because all code is stored in the same place, it’s easier to apply the same rules for indentation and linting. Every team relies on the same code linting and formatting libraries, which are part of the monorepo.
- It enables better visibility and collaboration across teams. Developers have access to all projects, which makes it easier to reuse and share code.
- It facilitates file organization and easier management of code dependencies. In a monorepo, there’s one version for each dependency. This means that you no longer have to worry about incompatibilities or conflicting versions of external libraries.
When Should You Start Using a Monorepo?

The perfect time to adopt a monorepo approach is when you’re starting a project. This way, you can take advantage of all its benefits from day one.
A monorepo strategy is particularly appealing if you have a large number of projects or plan to scale quickly. With a monorepo, you’re not starting from scratch when you create a new project; all you have to do is add it to the monorepo, and you immediately have access to several packages and an existing CI setup. Monorepos are especially worthwhile if your projects are based on the same technologies as this enables code sharing. Even tech giants like Google rely on a huge monorepo.
At the same time, the monorepo approach has its pitfalls.
First, don’t forget that setting up a build pipeline for your monorepos may not be easy. This is especially true if your monorepo consists of several apps that should be deployed in a particular order. If your pipeline isn’t perfectly configured, your deployments could lead to downtime or malfunction.
Second, coordinating the versioning of all products, services, and libraries that are part of a monorepo is a complex process. If you adopt a monorepo, you need to pay even more attention to each commit. Also, every member on the development team should be highly skilled with Git or a similar version control system.
So if your teams use very different technologies, a polyrepo might be the best approach. But keep in mind that migrating from a polyrepo to a monorepo can be cumbersome, challenging, and time consuming. While this migration might sometimes be worth the effort, the earlier you adopt a monorepo, the better.
How to Build a TypeScript Monorepo With NPM
Building a monorepo in TypeScript isn’t a simple task, which is why several monorepo build tools are on the market these days to make things easier. The most popular monorepo build tools are Lerna, Nx, and Turborepo. With these, you can set up a monorepo in TypeScript with a bunch of npm commands. However, you may not be able to understand what these tools do behind the scenes or why.
The only way to master monorepos in TypeScript is to understand how they work. So let’s learn how to implement a TypeScript monorepo based on npm workspaces.
You can take a look at the final result by cloning the GitHub repository that supports this tutorial with the following command:
git clone https://github.com/Tonel/typescript-monorepoNow let’s build a TypeScript monorepo from scratch!
Prerequisites
To build a TypeScript monorepo with npm workspaces, you’ll need:
- Node.js >= 14
- npm >= 7
Note that you need npm >= 7 because npm workspaces were introduced in version 7. We’ll go over why you need them and what they are soon.
Initialize the Directory Structure
This is what your monorepo directory structure should look like:
typescript-monorepo
├── src
├── node_modules
├── ...
└── packages
The src folder stores a Node.js TypeScript application, while /packages contains the shared local libraries defined as npm workspaces. Note that there is only one node_modules folder in the entire codebase. This means that each package has its npm dependencies stored in the global node_modules folder.
Let’s create this basic folder setup with the following commands:
# create the monorepo root directory
mkdir typescript-monorepo

# enter the newly created directory
cd typescript-monorepo

# creating the subdirectory
mkdir src
mkdir packages
Define the Global package.json File
Inside the monorepo-typescript directory, launch the following command:
npm init -yThis initializes a package.json file for you. Note that the -y flag tells npm init to automatically say yes to all questions npm would otherwise ask you during the initialization process.
Now, let’s update the /package.json as follows:
    {
      "name": "monorepo-typescript",
      "version": "1.0.0",
      "description": "A monorepo in TypeScript",
      "private": true,
      "workspaces": [
        "packages/*"
      ]
    }
In detail, make sure the workspaces property is present and configured as above. Npm workspaces allow you to define multiple packages within a single root package. With this configuration, every folder inside /packages with a package.json file is considered a local package.
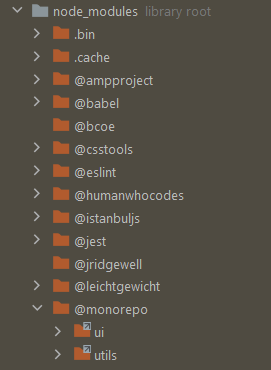
When you run npm install in the root directory, folders within packages/ are symlinked to the node_modules folder. For example, let’s assume you have a ui local package. After running npm install, your monorepo project should have the following folder structure:
typescript-monorepo
├── ...
├── node_modules
│  ├── ui -> ../packages/ui
│  └── ...
├── package.json
├── package-lock.json
└── packages
   └── ui
       ├── ...
       └── package.json
As you can see, the ui package folder also appears in the node_modules directory. Specifically, the ui folder inside node_modules links to the ui folder inside ./packages.
Add the Core Dependencies
Since you’re setting up a TypeScript monorepo, you need to install typescript as a root dependency with the following command:
npm install typescriptNote that the libraries installed here should be considered a core dependency of the project.
You also need ts-node and its types. Install them as dev dependencies with the npm command below:
npm install --save-dev @types/node ts-node ts-node transforms TypeScript into JavaScript and allows you to execute TypeScript on Node.js without precompiling. Since src contains a Node.js app, you need ts-node to run the files placed in the src folder.
All packages in your application should follow the same linting and indentation rules. This is why you should add eslint and prettier to your root project’s dependencies. Since this is a TypeScript codebase, you also need @typescript-eslint/eslint-parser and @typescript-eslint/eslint-plugin. These are the TypeScript parser and plugin for eslint, respectively.
Install them all as dev dependencies with the npm command below:
npm install eslint prettier @typescript-eslint/eslint-parser @typescript-eslint/eslint-pluginThen, create an eslint configuration file. For example, you can initialize a .eslintrc.json file as follows:
{
  "extends": [
    "eslint:recommended",
    "plugin:@typescript-eslint/recommended"
  ],
  "parser": "@typescript-eslint/parser",
  "plugins": [
    "@typescript-eslint"
  ]
}
Similarly, create a prettier configuration file. Again, you can define a .prettierrc.json file as below:
{
  "trailingComma": "all",
  "tabWidth": 2,
  "printWidth": 120,
  "semi": false,
  "singleQuote": false,
  "bracketSpacing": true
}
Now, all code within the monorepo codebase have the same style and follow the same rules.
Add a Local Package

Now let’s set up a local package. The @monorepo/utils package includes all the utility functions to use across the entire monorepo.
First, create the utils folder inside /packages:
mkdir utilsInitialize a package.json file inside utils with this npm command:
npm init --scope @monorepo --workspace ./packages/utils -yThe --scope flag specifies an npm scope name in the package name.
You should adopt the same npm scope name for all your local packages. This keeps your monorepo node_modules directory cleaner, as all your local packages will appear as links in the same @<scope_name> folder. Also, it makes local imports more elegant and easy to recognize from global npm libraries.
Make sure package.json contains the following content:
    {
      "name": "@monorepo/utils",
      "version": "1.0.0",
      "description": "The package containing some utility functions",
      "main": "build/index.js",
      "scripts": {
        "build": "tsc --build"
      }
    }
Here, you’re simply defining a basic package.json file with a custom build script that runs tsc --build. If you’re not familiar with this command, tsc is the TypeScript compiler. In detail, tsc compiles TypeScript to JavaScript according to the rules defined in tsconfig.json. This is why you also need a tsconfig.json file. Initialize it as follows:
{
    "compilerOptions": {
        "target": "es2022",
        "module": "commonjs",
        "moduleResolution": "node",
        "declaration": true,
        "strict": true,
        "incremental": true,
        "esModuleInterop": true,
        "skipLibCheck": true,
        "forceConsistentCasingInFileNames": true,
        "rootDir": "./src",
        "outDir": "./build",
        "composite": true
    }
}
This is a basic tsconfig.json template. In particular, notice the last three options.
To make the package cleaner, put all your code in the src local directory under ui. With the rootDir option, you can define the package root directory where you intend to place your code. Similarly, the outDir option makes sure that the package is built in the local ./build directory inside ui.
As explained in the TypeScript documentation, set the composite option to true. Since you’re likely to reference this project in other parts of the monorepo, this enables you to reference this package in other tsconfig.json. As you’re about to learn, this will be useful in the next few steps.
Now, define the logic of the package by creating an src directory:
cd packages/ui
mkdir src
This folder contains all your code. Then, initialize an index.ts file as follows:
// ./packages/utils/index.ts

export function isEven(n: number): boolean {
    return n % 2 === 0
}
Note that this is just a simple example. In a real-world scenario, define all your utility functions in the
./srcfolder.
This is what the file structure of the @monorepo/utils local package looks like:
utils
└── src
│   └── index.ts
├── package.json
└── tsconfig.json
You just learned how you can define a local package for your monorepo. Repeat this process as many times as you need, depending on the number of local packages you want to define.
As explained earlier, npm automatically processes any package.json file under /packages to create a link between the local package folder and the package folder in node_modules. This is also why each package requires a package.json file. So, every time you define a local package, you should run npm install in the root folder of your directory.
Verify That the Local Package Works
You can build the local package to see if it works with the command below:
npm run build --workspace ./packages/utilsMake sure to launch it in the root directory of the monorepo. This command executes the build script defined in the local package.json of the package specified with the --workspace flag. Don’t forget that a local package is nothing more than an npm workspace, which is why you need to use the --workspace flag.
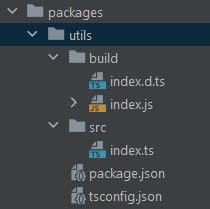
At the end of the compilation process, if everything worked as expected, you can find the compilation results in the .packages/utils/build folder as follows:

Define a Global tsconfig.json File
Initialize a tsconfig.json file in the root directory with the following content:
{
  "compilerOptions": {
    "incremental": true,
    "target": "es2022",
    "module": "commonjs",
    "declaration": true,
    "strict": true,
    "moduleResolution": "node",
    "esModuleInterop": true,
    "skipLibCheck": true,
    "forceConsistentCasingInFileNames": true,
    "rootDir": "./src",
    "outDir": "./build"
  },
  "files": [
  ],
  "references": [
    {
      "path": "./packages/utils"
    }
  ]
}
Thanks to TypeScript references, you can split a TypeScript project into smaller parts. With the references option, you can define the list of packages your TypeScript monorepo consists of. When running tsc -- build in the root directory, the TypeScript compiler accesses all packages defined in references and compiles them one by one in order.
For example, let’s assume you also added a ui package. In that case, the references option of ./tsconfig.json looks like this:
"references": [
  {
    "path": "./packages/utils"
  },
  {
    "path": "./packages/ui"
  }
]
Add a new build script in the global ./package.json file:
"scripts": {
  "build": "tsc --build --verbose"
}
The --verbose flag to make tsc log what it’s doing in the terminal.
Now, if you run npm run build in the root directory, tsc should print:
Projects in this build:
  * packages/utils/tsconfig.json
  * packages/ui/tsconfig.json
  * tsconfig.json
As you can see, tsc builds the projects in the order specified in the references field.
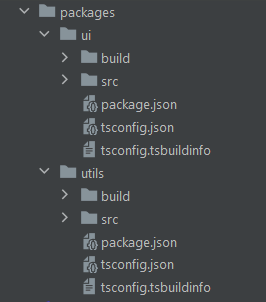
At the end of the compilation process, for each local package, you’ll have:
- A
./packages/<package-name>/buildfolder

- A link from
node_modules/@<scope_name>/<package-name>to./packages/<package-name>

Use a Local Package Inside Another Local Package
Now, let’s assume you want to use some utility functions from the @monorepo/utils in the @monorepo/ui package. All you have to do is run the following npm command in the root directory:
npm install @monorepo/utils --workspace ./packages/uiThis adds @monorepo/utils as a dependency in @monorepo/utils.
Take a look at the local package.json file inside ./packages/ui and you’ll see:
"dependencies": {
  "@monorepo/utils": "^1.0.0"
}
This means that @monorepo/utils was correctly added as a dependency.
Now, in ./packages/ui/index.ts, you can access the utility functions exposed by @monorepo/utils as follows:
// ./packages/ui/index.ts

import { isEven } from "@monorepo/utils"

export function FooComponent() {
  // giving a random integer number between 0 and 5
  const randomNumber = Math.floor(Math.random() * 5)
  console.log(`FooComponent: ${randomNumber} -> isEven: \
  ${isEven(randomNumber)}`)

  // UI component implementation ...
}
In detail, you can import the functions from the @monorepo/utils package with the following line:
import { isEven } from "@monorepo/utils"Add an External npm Package to a Local Package
Your local packages may require external npm libraries. In this case, don’t run an npm install command inside the package folder; that would add the dependency to the local package.json file and consequently generate a locale node_modules folder. This violates the core idea that a monorepo has only one node_modules.
Instead, follow this procedure to add an external npm package to a local package of your monorepo.
Let’s assume you want to add [moment](https://www.npmjs.com/package/moment) to the @monorepo/ui package. Run the following npm install command in the root folder of your monorepo:
npm install moment --workspace ./packages/uiThis installs moment in the monorepo’s node_modules folder and adds the following section to the local packages.json inside ./packages/ui:
"dependencies": {
  // ...
  "moment": "^2.29.4"
}
You can verify that everything went as expected by checking that there’s only one node_modules folder in the entire monorepo project.
Then, you can use moment as below:
// ./packages/ui/index.ts

import { isEven } from "@monorepo/utils"
import moment from "moment"

export function FooComponent() {
  // giving a random integer number between 0 and 5
  const randomNumber = Math.floor(Math.random() * 5)
  console.log(`[${moment().toISOString()}] FooComponent: \
  ${randomNumber} -> isEven: ${isEven(randomNumber)}`)

  // UI component implementation ...
}
In detail, you can import moment and use it in @monorepo/ui with the following import statement:
import moment from "moment"Putting It All Together
Now, add @monorepo/utils and @monorepo/ui as project dependencies in the global ./package.json file with this npm command:
npm install @monorepo/utils @monorepo/uiThen, create a ./src/index.ts file and make it use the functions exposed by your local packages:
import { FooComponent } from "@monorepo/ui"
import { isEven } from "@monorepo/utils"

console.log(isEven(4))
FooComponent()
Now, test if the Node.js ./src/index.ts file works:
# building the monorepo and all its packages
npm run build

# running the compiled index.js
node src/index.js
This prints:
true
[2022-11-23T14:28:14.220Z] FooComponent: 4 -> isEven: true
Congratulations! You just learned how to set up a TypeScript monorepo based on npm workspaces.
Conclusion
As you know, a monorepo consists of several applications, with each application relying on many packages that may depend on each other. So to ensure that you can correctly deploy an application that’s part of a monorepo, it’s essential to build and deploy each package in the right order. Therefore, you need to define a monorepo pipeline.
Earthly can help you with that. It’s a build automation tool that enables you to run all your builds in containers. Earthly runs on top of the most popular CI systems, such as Jenkins, CircleCI, GitHub Actions, and AWS CodeBuild, and you can easily adopt it to set up your monorepo pipeline.
Earthly Lunar: Monitoring for your SDLC
Achieve Engineering Excellence with universal SDLC monitoring that works with every tech stack, microservice, and CI pipeline.


