Building and Managing a Kubernetes Cluster Using Kubeadm
Table of Contents
The article simplifies Kubernetes cluster management. Earthly enhances CI/CD with powerful build automation. A great Kubernetes companion Learn more about Earthly.
Are you looking for a tool to quickly bootstrap a Kubernetes cluster? Why not try kubeadm?
Kubeadm is an excellent tool for quickly creating a Kubernetes cluster. By running a series of pre-checks, kubeadm ensures that the server has all the components and configurations needed for Kubernetes. In addition to bootstrapping a Kubernetes cluster with ease, kubeadm also allows you to customize and configure cluster components.
In this guide, you’ll learn how to set up a Kubernetes cluster using kubeadm, upgrade the cluster, and deploy an application to test if it works.
Prerequisites
To bootstrap clusters with kubeadm, you’ll need the following, as specified in the documentation:
One or more instances running a Linux distribution, usually Debian or Red Hat. This guide will utilize two virtual machines (t3.micro) running Ubuntu on AWS, one for the control-plane node and one for the worker node.
Each instance should have at least 2 GB of RAM; however, 4 GB is suggested to ensure that your test environment operates properly. The control plane node should have at least two virtual CPUs.
Ensure that each node has its own hostname, MAC address, and product UUID. You can follow these instructions for more details.
Ensure that traffic is allowed through your firewall using the ports and protocols.
Full network connectivity between machines (machines can either be in a public or private network).
Enable Iptables Bridged Traffic on All the Nodes
In Linux, IPtables is a basic firewall used to organize traffic rules. It is the default operation mode for kube-proxy in Kubernetes. To enable communication between nodes, each node’s iptables should be able to see bridged traffic correctly. For this, you should ensure that net.bridge.bridge-nf-call-iptables is set to 1 in the sysctl configuration.
For IPtables to see bridged traffic, execute the following commands on all the nodes:
cat <<EOF | sudo tee /etc/modules-load.d/k8s.conf
overlay
br_netfilter
EOF
Next, configure the sysctl parameters required by setup; the parameters set below will persist across reboots.
cat <<EOF | sudo tee /etc/sysctl.d/k8s.conf

net.bridge.bridge-nf-call-iptables  = 1

net.bridge.bridge-nf-call-ip6tables = 1

net.ipv4.ip_forward  = 1
EOF
Apply the sysctl parameters to make sure that the changes are applied without rebooting:
sudo sysctl --systemDisabling Swap Memory
The Kubernetes scheduler determines which node is the best fit for deploying newly created pods. Allowing memory swapping on a host system can lead to performance and stability issues within Kubernetes. For this reason, Kubernetes requires that you disable swap in the host system. To ensure that the node does not use swap memory, run the following command on all nodes:
sudo swapoff -a && sudo sed -i '/ swap / s/^\(.*\)$/#\1/g' /etc/fstabThe command above performs two operations:
- It disables the swap memory.
- After disabling the swap memory, it comments out the swap entry in /etc/fstab, ensuring that the swap remains disabled after every reboot.
Installing Docker Engine
Kubernetes uses a container runtime to run containers in pods. To use Kubernetes, you must first install a container runtime, such as containerd, CRI-O, or Docker engine. If you need help with choosing the right container runtime, check out this comprehensive comparison of popular container runtimes.
📑 If you already have a container runtime installed, proceed to the next section on configuring cgroup drivers.
This section outlines the steps for installing Docker Engine, which you’ll use for the remainder of this tutorial. To install other container runtimes, refer to the instructions in this guide.
Start by installing the following packages on each node:
sudo apt install ca-certificates curl gnupg lsb-releaseStep 1: Add Docker Official GPG key.
curl -fsSL https://download.docker.com/linux/ubuntu/gpg | \
sudo gpg --dearmor -o /usr/share/keyrings/docker-archive-keyring.gpg
Step 2: Configure the stable Docker release repository.
echo "deb [arch=$(dpkg --print-architecture) \
signed-by=/usr/share/keyrings/docker-archive-keyring.gpg] \
https://download.docker.com/linux/ubuntu $(lsb_release -cs) stable" \
| sudo tee /etc/apt/sources.list.d/docker.list > /dev/null
Step 3: Once the new repository is added, you’ll only have to update the apt index and install Docker:
sudo apt-get update && sudo apt install docker-ce \
docker-ce-cli containerd.io -y
Step 4: Start and enable docker service. Docker has now been installed, so you need to start and enable the Docker service on all nodes for it to start working:
sudo systemctl start docker && sudo systemctl enable docker Step 5: Finally, verify that docker is working.
sudo systemctl status docker 
Configuring a cgroup driver
In order for the kubelet process to function correctly, its cgroup driver needs to match Docker’s. On each node, use the following command to adjust the Docker configuration:
cat <<EOF | sudo tee /etc/docker/daemon.json
{

  "exec-opts": ["native.cgroupdriver=systemd"],

  "log-driver": "json-file",

  "log-opts": {

    "max-size": "100m"
  },

  "storage-driver": "overlay2"
}
EOF
In the above configuration:
exec- optsis the execution option to be used by the container.log-driverdenotes the default driver for container logs. The container log will be written into this file.log-optsis the configuration option for the JSON-file with amax-sizeof 100m.storage-driverdenotes the storage driver to be used by the container.
For more details, see Configuring a cgroup driver.
Once you’ve adjusted the configuration on each node, restart the Docker service and its corresponding daemon.
sudo systemctl daemon-reload && sudo systemctl restart dockerInstalling Kubeadm, Kubelet, and Kubectl
After setting up Docker and configuring the cgroup driver, you should install kubeadm, kubectl, and kubelet from the official Kubernetes package repository. To do so, follow along with the steps outlined in this section.
Download the public key for accessing packages on Google Cloud and add it as follows:
curl -s https://packages.cloud.google.com/apt/doc/apt-key.gpg \
| sudo apt-key add -
Add the Kubernetes release repository:
sudo add-apt-repository "deb http://apt.kubernetes.io/ \
kubernetes-xenial main"
Next, update the package index to include the Kubernetes repository:
sudo apt-get updateYou can now Install kubeadm, kubelet, and kubectl:
sudo apt-get install -y kubeadm=1.13.4-00 kubelet=1.13.4-00 \
kubectl=1.13.4-00 kubernetes-cni=0.6.0-00Note: All packages are set to 1.13.4 because they are stable versions. In production environments, it’s more common to deploy a tested version of Kubernetes than the latest.
Run the following command to prevent automatic updates to the installed packages:
sudo apt-mark hold kubelet kubeadm kubectlBlocking these packages ensures that all nodes will run the same version of kubeadm, kubelet, and kubectl. Display the help page for kubeadm:
kubeadm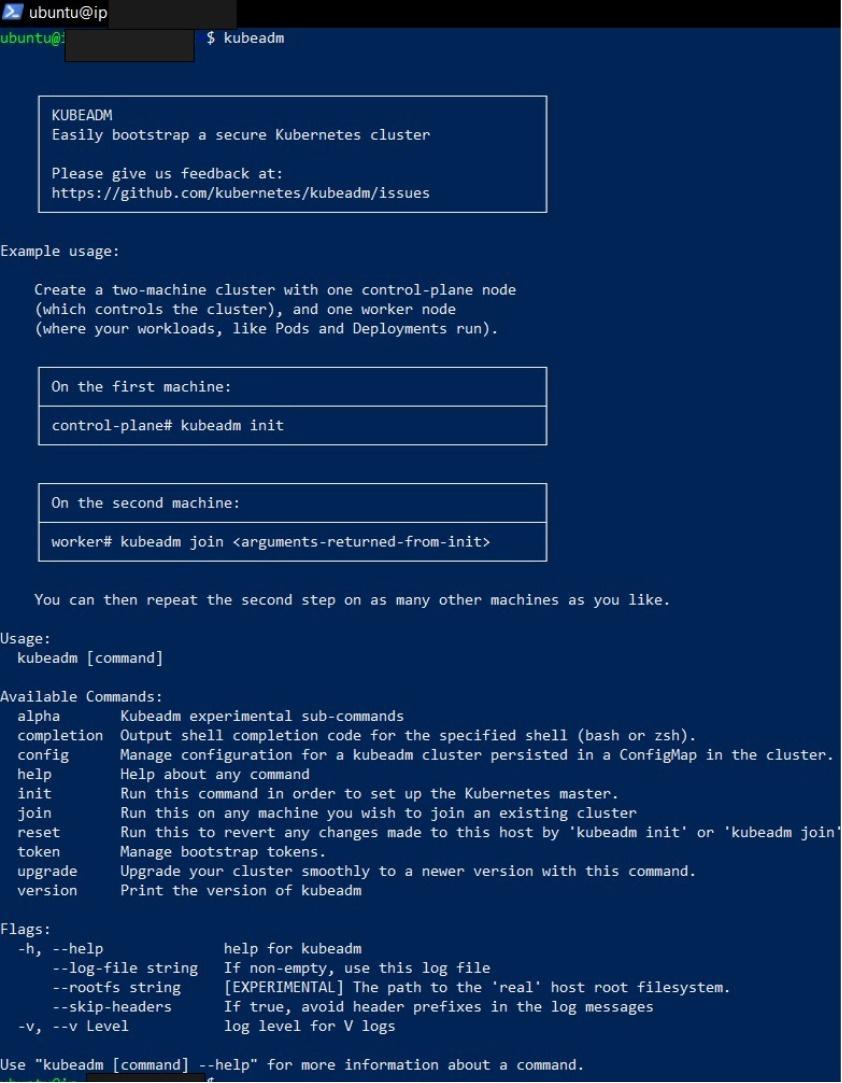
Read through the output to get a high-level overview of how a cluster is created and the commands that are available in kubeadm.
Initializing the Control-Plane Node
You now have two nodes with kubeadm, kubelet, and kubectl installed. It’s now time to initialize the Kubernetes control plane, which will manage the worker node and pods within the cluster.
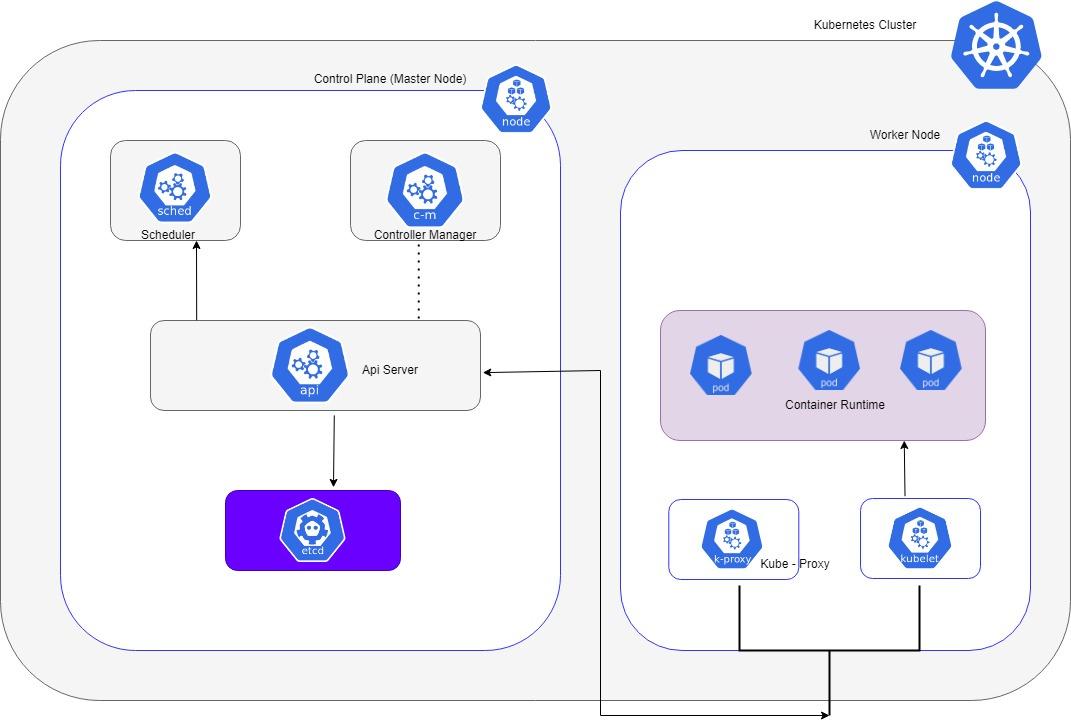
During this process, a certificate authority is created along with all cluster components, including kubelets, masters, API servers, controller managers, schedulers, etcd), and any additional components that may be needed.
As part of the initialization, sensible default values that adhere to best practices are used, which include:
–apiserver-advertise-address: This address will be used to announce that the Kubernetes API server is listening. If no network interface is specified, the default network interface will be used.
–pod-network-cidr: This flag is important because it indicates the IP address range for the pod network. This enables the control-plane node to assign CIDRs to each node automatically. The 192.168.0.0/16 range used in this example is related to the Weave network plugin.
–node-name: This is the name of the node.
In addition, many command options are available to configure the process. This includes the option to provide your own certificate authority or use an external etcd key-value store.
Initializing the Cluster
To initialize the Kubernetes cluster, run the following command on the master node:
sudo kubeadm init --pod-network-cidr=192.168.0.0/16 --kubernetes-version=stable-1.13 --node-name master
Read through the output to understand what is happening. At the end of the output, useful commands for configuring kubectl and joining worker nodes to the cluster are given.
Copy the kubeadm join command at the end of the output and store it somewhere so you can access it later. It is simply more convenient to reuse the given command, although you can regenerate it and create new tokens using the kubeadm token command. The join tokens expire after 24 hours by default.
To initialize your user’s default kubectl configuration—using the admin kubeconfig file— generated by kubeadm, run the following commands:
mkdir -p $HOME/.kube
sudo cp -i /etc/kubernetes/admin.conf $HOME/.kube/config
sudo chown $(id -u):$(id -g) $HOME/.kube/config
Confirm you can use kubectl to get the cluster component statuses:
kubectl get componentstatuses
The output confirms that the scheduler, controller-manager, etcd are all Healthy. The Kubernetes API server is also operational; else, kubectl would have returned an error attempting to connect to the API server. Enter kubeadm token --help if you would like to learn more about kubeadm tokens.
Get the nodes in the cluster:
kubectl get nodes
You can probe deeper into the master node’s NotReady status by describing it as follows:
kubectl describe nodes
Installing Weave CNI
In the Conditions section of the output, observe that the Ready condition is False. The kubelet is not ready because a network plugin is not available. This is because kubeadm does not install network plugins by default. You can see the cni config uninitialized message as well. The Container Network Interface or the CNI is implemented by network plugins. Initializing a network plugin will resolve these issues.
We’ll now install Weave, a network plugin. Run the following commands to install the Weave pod network plugin:
kubectl apply -f https://docs.projectcalico.org/v3.1/getting-started/kubernetes/installation/hosted/rbac-kdd.yaml

kubectl apply -f https://github.com/weaveworks/weave/releases/download/v2.8.1/weave-daemonset-k8s-1.11.yaml
The commands first install the cluster roles and bindings that are used by Weave (rbac-kdd.yaml). Then a variety of resources are created to support pod networking. A daemonset is used to run a Weave-node pod on each node in the cluster.
Check the status of the nodes in the cluster:
kubectl get nodes
kubectl get pods -all-namespaces
With the network plugin initialized, the master node is now Ready. Learn more about other network plugins supported by Kubernetes.
Joining the Worker Node to the Kubernetes Cluster

Now that you’ve successfully initiated the master node, the next step is to connect the worker node to the cluster. SSH into your worker node and run the kubeadm join command you saved earlier or generate a new one with this command:
kubeadm token create --print-join-command
Verify whether the node has already been added to the Kubernetes cluster by exiting the worker node and connecting to the master via SSH.
kubectl get nodes
Upgrading the Kubernetes Cluster

In addition to supporting Kubernetes cluster upgrades, kubeadm makes upgrading your Kubernetes cluster as simple as possible with minimal downtime. In this guide, you’ll learn how to upgrade Kubernetes from version 1.13.4 to version 1.14.1.
Although cluster upgrades are always supported, you should understand any changes between releases by reading the release notes and how they could impact your workloads. In addition, you should always backup important data before upgrading, and test upgrades before deploying them to production.
Update the kubeadm binary with version 1.14.1.
sudo curl -sSL https://dl.k8s.io/release/v1.14.1/bin/linux/amd64/kubeadm -o /usr/bin/kubeadmBefore you upgrade, you need to verify the upgrade plan for upgrading Kubernetes to version 1.14.1:
sudo kubeadm upgrade plan v1.14.1Note: This command checks that your cluster can be upgraded, and fetches the versions you can upgrade to if you don’t specify a version. It also shows a table with the component config version states.
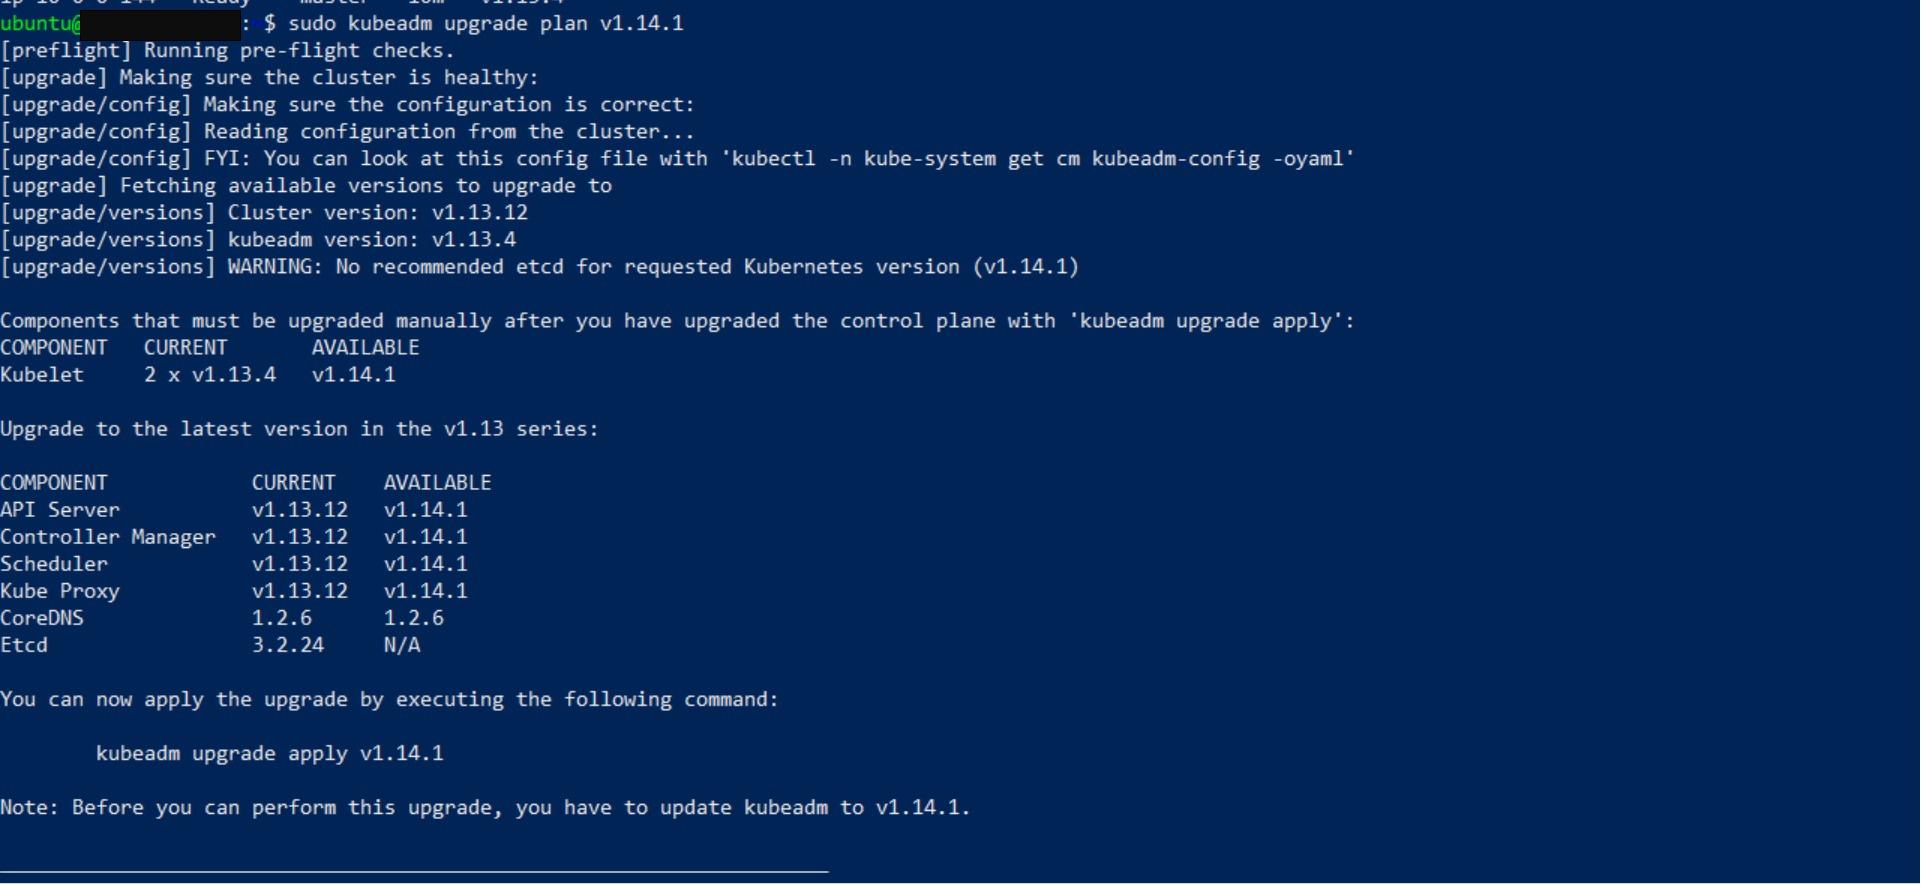
The output describes several checks that are performed before upgrading the cluster. This display informs you that you must upgrade the kubelet manually on each cluster node. The planned version changes for all cluster components are summarized in the COMPONENT section.
Next, apply the upgrade plan by issuing the following command:
sudo kubeadm upgrade apply v1.14.1 -y
Note: If the upgrade procedure times out, you can safely try again until it succeeds. The upgrade command is idempotent, so you can run it as many times as required to complete the upgrade.
Upgrading the Master Node
Prepare the master node for upgrade by making it unschedulable and evicting the workloads:
kubectl drain $HOSTNAME --ignore-daemonsets
Upgrade the kubelet, kubeadm, and kubectl apt packages:
sudo apt-get update
sudo apt-get upgrade -y --allow-change-held-packages \

     kubelet=1.14.1-00 kubeadm=1.14.1-00 \
     kubectl=1.14.1-00 kubernetes-cni=0.7.5-00
The upgrade may take a few minutes to complete.
Note: If you see a Configuring grub-pc menu, select ‘Keep the local version currently installed’.
After a successful upgrade, bring the master node back online by making it schedulable. To do this you have to uncordon the master node:
kubectl uncordon $HOSTNAMEGet the node information to confirm that the version of the master is 1.14.1:
kubectl get nodes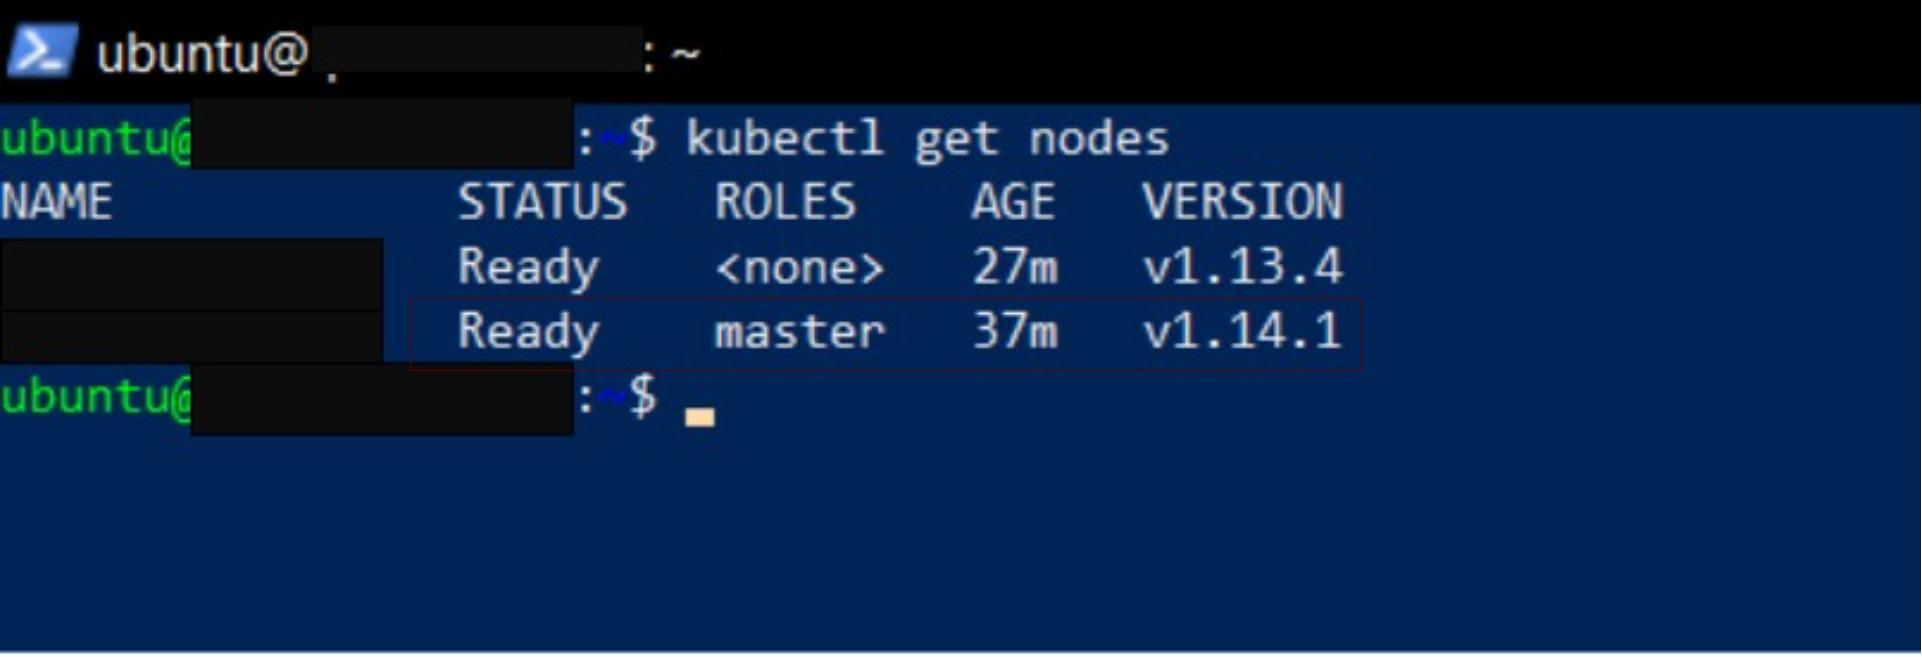
Upgrading the Worker Node
Following the successful upgrade of the master node, the worker node needs to be upgraded. As a first step, you must make the worker node unavailable and prepare for the upgrade by making it unschedulable.
Firstly, get the worker’s name:
worker_name=$(kubectl get nodes | grep \<none\> | cut -d' ' -f1)After obtaining the node’s name, to make the worker node unscheduled, you have to drain it.
kubectl drain $worker_name --ignore-daemonsets
After draining the node, the next step is to upgrade it. Connect via SSH to the worker node and use kubeadm to update the Kubernetes packages and the worker node’s kubelet configuration:
sudo apt-get update
sudo apt-get upgrade -y --allow-change-held-packages \
     kubelet=1.14.1-00 kubeadm=1.14.1-00 \
     kubectl=1.14.1-00 kubernetes-cni=0.7.5-00
Run the kubeadm upgrade command to update the worker node:
sudo kubeadm upgrade node config --kubelet-version v1.14.1
Restart the worker node’s kubelet:
sudo systemctl restart kubeletNow connect via SSH in the master node and uncordon the worker node:
kubectl uncordon $worker_nameConfirm the worker node is ready and running version 1.14.1:
kubectl get nodes
To sum up: kubeadm facilitates the upgrade of Kubernetes control planes and nodes without downtime. The cluster has now been upgraded from version 1.13.4 to 1.14.1 seamlessly and with no downtime.
Creating a Deployment for Testing

You now have a working Kubernetes cluster, complete with a master and worker node. To ensure that Kubernetes is properly configured, you’ll create a demo project to test the cluster setup. You will deploy an NGINX web server in the Kubernetes cluster using the deployment resource.
Firstly, create an Nginx deployment with a container image of the Nginx with two replicas:
kubectl create deployment nginx --image=nginx --replicas=2In order to access the Nginx deployment, you must create a service resource. You can do this by running the following commands:
kubectl expose deployment nginx --type=ClusterIP \
--port=80 --target-port=80 --name=web
The service type clusterIP and port 80 named “web” are created for the Nginx deployment.
Get the Cluster IP of the service:
service_ip=$(kubectl get service web -o jsonpath='{.spec.clusterIP}')Now send an HTTP request to the web service to confirm availability:
curl $service_ip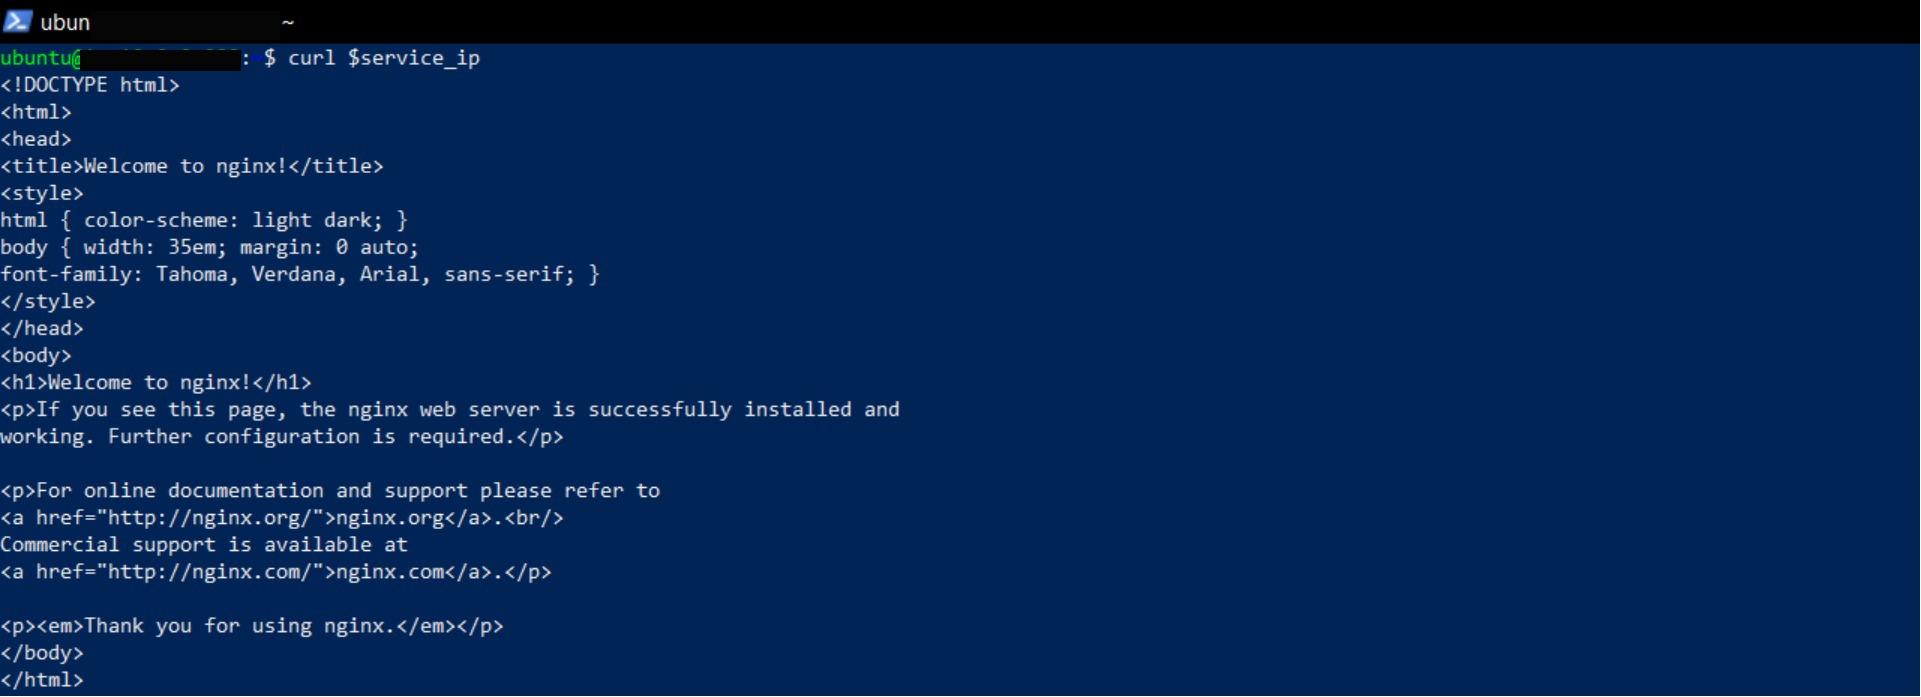
The image above shows the response received after an HTTP request was sent to Nginx deployment in the Kubernetes cluster. The response returns the home page of the Nginx server. Your Kubernetes cluster is now running a working application. You can now deploy applications to the cluster using the kubectl apply command. ✅
Conclusion
In this article, we’ve explored how kubeadm makes cluster bootstrapping and upgrading seamless. While it shines for development and non-autoscaling workloads, it might not be the best fit for large-scale autoscaling production clusters. Kubeadm hands off hardware and infrastructure management, essential for node autoscaling, to infrastructure providers.
As you continue to explore and level up your Kubernetes build process, you might want to give Earthly a spin. It’s a definite game-changer for builds and could be the next step in optimizing your development workflow.
Earthly Cloud: Consistent, Fast Builds, Any CI
Consistent, repeatable builds across all environments. Advanced caching for faster builds. Easy integration with any CI. 6,000 build minutes per month included.


