Using Pants to Manage a Python Monorepo

Table of Contents
If your application comprises multiple projects, you can choose between two approaches: storing each project in its own code repository or storing all the projects in one repository. This single repository in the second approach is known as a monorepo. A monorepo is a version control system that holds multiple projects in one repository. A monorepo has advantages, such as easier code reuse and dependency management. However, it also has some disadvantages, such as security challenges with access control and the need for a tool to handle builds efficiently.
In this article, you’ll learn about Pants. You’ll learn how Pants works and how to use it to build, configure, and manage a Python monorepo.
Monorepo Tools

Monorepos have some benefits over multiple repositories, such as easier code reuse, better dependency management, and faster cross-project collaboration. Since all the relevant components are in the same repository, you can test and refactor them more efficiently.
However, monorepos also have some drawbacks, such as limited access control for each project, frequent merging conflicts, and difficult versioning. Setting up and organizing the project to meet common standards, such as linting, testing, and building, can also be challenging and time-consuming.
You can overcome these drawbacks by using a tool designed to handle monorepos. Some popular tools for monorepo management include the following:
- Nx: Nx is a monorepo tool that was developed by Nrwl. It supports not only JavaScript and Angular but also languages such as Go and Rust.
- Earthly: Earthly is an open source monorepo tool. It uses BuildKit to create sandbox environments and provides an easy transition from inherent build tools as it has a syntax similar to that of Dockerfiles.
- Bazel: Bazel is a monorepo tool from Google, which is designed to be fast and scalable. Bazel is a powerful tool that supports many languages, including C++, Java, and Objective-C.
- Pants: Pants is a monorepo tool that uses a structure similar to Bazel. Pants is popular with large organizations that find Bazel challenging for development workflows.
If you’re interested in an in-depth comparison of monorepo tools, you can check out this article.
As this article focuses on using Pants to manage a Python monorepo, take a closer look at the tool before getting into the tutorial.
Introducing Pants
Pants is a build system, a monorepo tool that is fast, scalable, and user-friendly. You can use Pants to create a build system for any monorepo project developed with Python, Go, Java, Scala, Kotlin, shell, or even Docker.
Pants is easy to learn because it relies on static code analysis for establishing module dependencies.
Some of Pants’s other features include the following:
- Caching
- Remote execution
- Self-examination of the builds
- Adaptation flexibility
Pants is often compared to Bazel because of their similar structure. According to Pants users, compared to Bazel, Pants is easier to set up, is better optimized for Python and Docker images, and has more comprehensive and approachable documentation. Despite all its features and benefits, Pants also has some drawbacks. While it has good support for some languages, such as Python, it lacks support for other languages, such as JavaScript and Rust.
To learn more about Pants, check out this article.
Using Pants to Build and Manage a Python Monorepo

For this tutorial, assume that you are providing development support for a company that wants to convert one of its application repositories to an efficiently working monorepo.
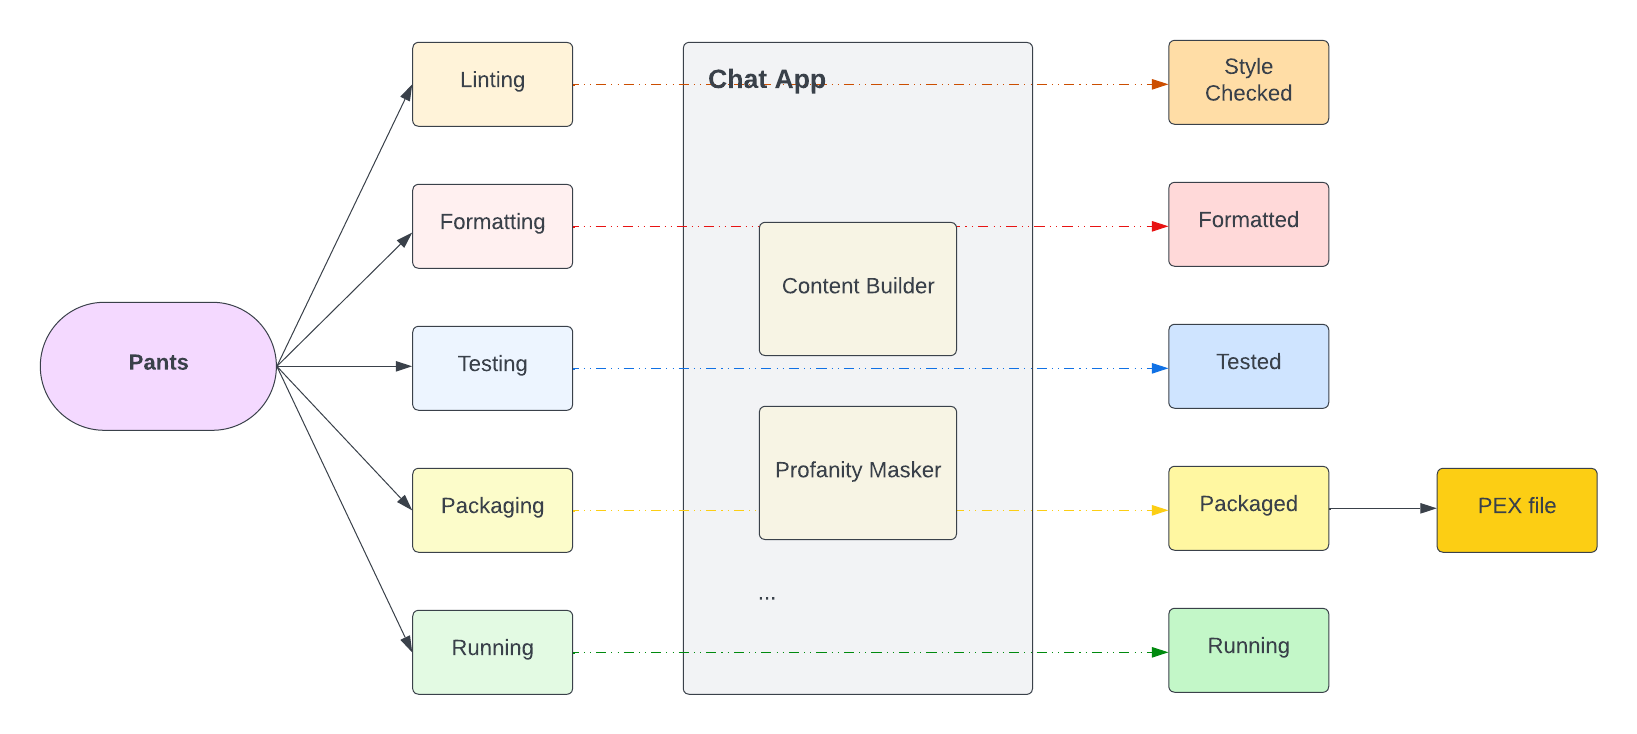
The company has a chat application that consists of two modules: Content Builder and Profanity Masker.
You need to install Pants and enable it on the current application code. You then need to configure Pants to make it more efficient as a monorepo.
The following is a high-level diagram of the solution the company requires:
Prerequisites
You need the following for this tutorial:
- Python 3.9 or above.
- An IDE of your choice, such as Visual Studio Code.
- Git CLI 2.37.1 or above.
- A package manager. This tutorial will run on macOS, so brew will be installed.
Setting Up the Project
Run the following command in your home directory to clone the repository for the chat application:
git clone https://github.com/SystemCraftsman/pants-python-monorepo-demo.gitNavigate to the project directory in a terminal window:
cd pants-python-monorepo-demoThe project structure is as follows:
├── LICENSE
├── README.md
├── chatapp
│   ├── __init__.py
│   ├── contentbuilder
│   │   ├── __init__.py
│   │   ├── builder.py
│   │   └── builder_test.py
│   ├── main.py
│   └── profanitymasker
│       ├── __init__.py
│       ├── bad_words.json
│       ├── masker.py
│       └── masker_test.py
└── requirements.txt
There are two modules in the chat application chatapp: contentbuilder and profanitymasker. The contentbuilder creates content and applies rules like profanity checking. It relies on the profanitymasker module to perform the profanity check, which checks for inappropriate words and masks them. The inappropriate words are listed in the bad_words.json file.
In order to configure this repository as a monorepo with Pants, you first need to install the Pants CLI.
You can install the Pants CLI using the Homebrew package installer:
brew install pantsbuild/tap/pantsIf you are using Linux, you can run the following command to install the Pants CLI:
curl --proto '=https' --tlsv1.2 -fsSL \
https://static.pantsbuild.org/setup/get-pants.sh | bash
After the installation, run the following command to verify it’s installed successfully:
which pantsOn a macOS system, the output should be as follows:
/usr/local/bin/pantsConfiguring the Project Using Pants
In the pants-python-monorepo-demo, run the following command to initialize the project as a Pants project:
pantsThe command should present a prompt similar to the following:
No Pants configuration was found at or above
YOUR_HOME_DIRECTORY/pants-python-monorepo-demo.
Would you like to configure
YOUR_HOME_DIRECTORY/pants-python-monorepo-demo as a Pants project? (Y/n):
Press Y and ENTER on your keyboard and wait for the pants command to add the relevant files to your project.
The output should be similar to the following:
Fetching latest stable Pants version since none is configured
Creating YOUR_HOME_DIRECTORY/pants-python-monorepo-demo/pants.toml
and configuring it to use Pants 2.16.0
01:34:41.71 [INFO] waiting for pantsd to start...
01:34:46.77 [INFO] waiting for pantsd to start...
01:34:49.03 [INFO] pantsd started
01:34:49.13 [INFO] Initializing scheduler...
01:34:49.63 [INFO] Scheduler initialized.
01:34:49.68 [WARN] Please either set `enabled = true` in the
[anonymous-telemetry] section of pants.toml to enable sending
anonymous stats to the Pants project to aid development, or set
`enabled = false` to disable it. No telemetry sent for this run.
An explicit setting will get rid of this message.
See https://www.pantsbuild.org/v2.16/docs/anonymous-telemetry for details.
No goals specified.
Use `pants help` to get help.
Use `pants help goals` to list goals.
To initialize the project as a Pants project, the CLI creates a few hidden folders and a file called pants.toml, which contains the configuration for a Pants project.
As you can see from the logs, the CLI also starts the Pants daemon called pantsd, which runs as a process and listens to the file system events to keep the build information warm for actions like pants run.
In an IDE of your choice, open the pants-python-monorepo-demo project. In the root of the project, you should see the generated pants.toml file with the following content:
[GLOBAL]
pants_version = "2.16.0"
The next configuration you should apply involves telemetry usage. Pants allows you to share some anonymous telemetry with the development team. However, since this feature is unnecessary for this tutorial, incorporate the following configuration to the pants.toml file to disable it:
[anonymous-telemetry]
enabled = false
You should also set the repository root for the project. Because the project’s root is the repository folder you are in, you can set it as /. Add the following configuration into your pants.toml file:
[source]
root_patterns = ["/"]
You should also set the interpreter version and the search path for the interpreters, which you can do by adding the following configurations to your file:
[python]
interpreter_constraints = [">=3.9.*"]

[python-bootstrap]
search_path = [
    "<PYENV>",
    "/usr/local/bin",
]
The pants.toml file should be as follows:
[GLOBAL]
pants_version = "2.16.0"

[anonymous-telemetry]
enabled = false

[source]
root_patterns = ["/"]

[python]
interpreter_constraints = [">=3.9.*"]


[python-bootstrap]
search_path = [
    "<PYENV>",
    "/usr/local/bin",
]
You will be editing this file further in the following steps. Note that this is not the final version of this configuration file.
Defining the Backend and Creating the BUILD Files
Pants requires that you store the metadata of each application or module that resides in a directory. For this, it uses a file called BUILD, which is created in every directory, including the root of the project.
To do this, you first need to define a backend.
Because this is a Python project, you should add the Python backend definition in the pants.toml configuration file.
Add the following configuration snippet under [GLOBAL]:
[GLOBAL]
pants_version = "2.16.0"
backend_packages.add = [
  "pants.backend.python",
]
Run the following command in the root of the project to initialize the BUILD files:
pants tailor ::The output should be as follows:
01:51:25.05 [INFO] Initialization options changed: reinitializing scheduler...
01:51:35.47 [INFO] Scheduler initialized.
Created BUILD:
  - Add python_requirements target root
Created chatapp/BUILD:
  - Add python_sources target chatapp
Created chatapp/contentbuilder/BUILD:
  - Add python_sources target contentbuilder
  - Add python_tests target tests
Created chatapp/profanitymasker/BUILD:
  - Add python_sources target profanitymasker
  - Add python_tests target tests
Verify that four BUILD files are generated. One is in the root directory of the project, and the other ones are located in each module directory chatapp, contentbuilder, and profanitymasker.
Navigate to the BUILD file in the contentbuilder directory and replace its content with the following snippet:
# This target sets the metadata for all the Python non-test
# files in this directory.
python_sources(
    name="lib",
)

# This target sets the metadata for all the Python test
# files in this directory.
python_tests(
    name="tests",
)
With the above configuration, you define where your source files and your tests will reside. You inform Pants that you have a lib directory, which serves as the source folder for your source code, while your test code is located in thetests directory.
To update the BUILD file in the profanitymasker module, navigate to the profanitymasker directory and replace the BUILD file’s content with the following configuration snippet:
# This target sets the metadata for all the Python
# non-test files in this directory.
python_sources(
    name="lib",
    dependencies=[":bad_words"],
)

# This target sets the metadata for all the Python
# test files in this directory.
python_tests(
    name="tests",
)

# This target teaches Pants about your JSON file,
# which allows other targets to depend on it.
resource(
    name="bad_words",
    source="bad_words.json",
)

# This target allows you to build a `.whl` bdist and a
# `.tar.gz` sdist by auto-generating
#  `setup.py`. See https://www.pantsbuild.org/docs/python-distributions.
#
# Because this target has no source code, Pants cannot infer dependencies.
# It depends on `:lib`,
#  which means it will include all the non-test Python files in this
# directory and any of
#  their dependencies.
python_distribution(
    name="dist",
    dependencies=[":lib"],
    wheel=True,
    sdist=True,
    provides=setup_py(
        name="chatapp.profanitymasker",
        version="0.0.1",
        description="A profanity masker.",
    ),
)
With the above configuration, you again define the source and test directories, but this time for the profanitymasker module. Because the profanitymasker is a module, you must distribute it separately, so you should define the python_distribution BUILD target. With the above python_distribution target, you can publish your module as a separate project to a package repository such as PyPI.
After you have the two modules configured, you should update the BUILD file in the chatapp directory to define the application entry point for the project.
To do this, replace the content in the BUILD file with the following configuration snippet:
# This target sets the metadata for all the Python non-test files in
# this directory.
python_sources(
    name="lib",
)

# This target allows you to bundle your app into a PEX binary file via
#  `pants package`. You can also run it with `pants run`. See
#  https://www.pantsbuild.org/docs/python-package-goal and
#  https://www.pantsbuild.org/docs/python-run-goal.
pex_binary(
    name="pex_binary",
    entry_point="main.py",
)
Finally, navigate to the repository root and replace the content of the BUILD file with the following content:
# A macro that turns every entry in this directory's requirements.txt into a
# `python_requirement_library` target. Refer to
# https://www.pantsbuild.org/docs/python-third-party-dependencies.
python_requirements(name="reqs")
The above target python_requirements declares Python requirements inline without creating a requirements.txt. Because you have a requirements.txt file already, Pants will use the target to convert each requirement into a python_requirement target automatically.
Once you have replaced all the BUILD file contents, verify your BUILD files are valid.
Run the following command for verification:
pants tailor --check ::You should see no outputs if your BUILD files are valid. Otherwise, you’ll get some errors as an output.
Running Tests on the Project
Now that you have the project configured and verified, you can run the tests to verify the functionality.
The following command runs tests on the project:
pants test ::Once you run the tests, you should get an error message as follows:
...output omitted...
=================== FAILURES =======================
______________ test_one_bad_word ___________________

    def test_one_bad_word() -> None:
        masker = ProfanityMasker()
>       assert masker.mask("This is bullshit") == "This is ***"
E       AssertionError: assert 'This is bull***' == 'This is ***'
E         - This is ***
E         + This is bull***
E         ?         ++++

chatapp/profanitymasker/masker_test.py:6: AssertionError
- generated xml file: /private/var/folders/0n/m2mcfrmj6h132v21j0jy26jm0000gn/T/pants-sandbox-hMKJOq/chatapp.profanitymasker.masker_test.py.tests.xml -
================= short test summary info ==================
FAILED chatapp/profanitymasker/masker_test.py::test_one_bad_word - AssertionE...
============== 1 failed, 1 passed in 0.35s =================
...output omitted...
As you can see, the masker_test failed. To resolve this issue, navigate to the masker_test.py file within the profanitymasker directory and substitute the value This is *** with This is bull***" within the test_one_bad_word test function.
The modified version of the function is not shared here as it contains inappropriate language.
Run the test again by running the pants test :: command and verify that all tests pass:
✓ chatapp/contentbuilder/builder_test.py:tests succeeded in 2.29s (memoized).
✓ chatapp/profanitymasker/masker_test.py:tests succeeded in 0.70s.
To run a specific test, use the full path of a test instead:
pants test chatapp/contentbuilder/builder_test.pyFor more information about the Python test goal of Pants, you can visit the official Pants documentation.
Linting and Formatting the Project
Like testing, formatting and linting is another important concept of software development, especially when developing with Python, which is a style-sensitive language.
Linting and formatting ensure your code is formatted consistently throughout the application.
Pants supports a wide range of linting and formatting tools for Python.
In this section, you’ll implement the following linters and formatters:
- Flake8: A PEP 8 style and bug linter.
- Black: A popular code formatter.
- Docformatter: A formatter that is specifically used for formatting the docstrings.
If you want to use a specific linter or a formatter in a Pants project, you activate and configure the respective linter or formatter in the pants.toml file.
You can activate any linter or a formatter by simply adding a backend configuration.
Start by adding the Flake8 configuration.
Open the pants.toml file with the IDE of your choice and add the "pants.backend.python.lint.flake8" value in the backend_packages.add configuration array.
After adding the value, the GLOBAL configuration should look as follows:
[GLOBAL]
pants_version = "2.16.0"
backend_packages.add = [
  "pants.backend.python",
  "pants.backend.python.lint.flake8",
]
...full config omitted...
Execute the following command to run the linter:
pants lint ::You should see some error messages:
...output omitted...
chatapp/contentbuilder/builder_test.py:6:80: E501 line too long
(88 > 79 characters)
chatapp/contentbuilder/builder_test.py:8:1: E302 expected 2 blank
lines, found 1
chatapp/contentbuilder/builder_test.py:10:80: E501 line too long
(81 > 79 characters)
chatapp/profanitymasker/masker.py:10:80: E501 line too long
(86 > 79 characters)
chatapp/profanitymasker/masker.py:14:80: E501 line too long
(86 > 79 characters)
chatapp/profanitymasker/masker_test.py:11:80: E501 line too long
(82 > 79 characters)


✕ flake8 failed.
You can see that most of the errors are because of the E501 line too long message, which is a PEP 8 specification.
You can either individually correct the styling of each file or employ a formatter to manage all the code formatting automatically.
To activate the black and docformatter formatter, add the following lines in the backend_packages.add configuration array:
  "pants.backend.python.lint.black",
  "pants.backend.build_files.fmt.black",
  "pants.backend.python.lint.docformatter",
The first and last configurations activate black and docformatter separately.
The pants.backend.build_files.fmt.black is an extra configuration for enabling black to format the BUILD files as well.
The final configuration should be as follows:
[GLOBAL]
pants_version = "2.16.0"
backend_packages.add = [
  "pants.backend.python",
  "pants.backend.python.lint.black",
  "pants.backend.build_files.fmt.black",
  "pants.backend.python.lint.docformatter",
  "pants.backend.python.lint.flake8",
  "pants.backend.python.typecheck.mypy",
]
...full config omitted...
As you activate the black formatter, it’s advisable to delegate the management of certain formatting rules to it rather than rely on Flake8. This is because black has some distinct rules, for example, related to line length.
The
blackspecification says eighty-eight is the optimal number for a line length. You can learn more in the documentation.
In the root directory of the project, create a file called .flake8 with the following content:
[flake8]
extend-ignore:
  E203,  # whitespace before ':' (conflicts with Black)
  E231,  # Bad trailing comma (conflicts with Black)
  E501,  # line too long (conflicts with Black)
This configuration should ignore the related Flake8 configuration and prevent conflict with black formatting.
Run the linting command pants lint :: again to see how all these configurations work.
This time, you should see one formatting error because you solved the line length issue by taking 88 lines into account, which is a black rule.
Although the PEP 8 style guide limits the maximum line length to seventy-nine lines, you can increase it to ninety-nine. See their documentation.
The error details should be as follows:
...output omitted...
chatapp/contentbuilder/builder_test.py:8:1: E302
expected 2 blank lines, found 1
...output omitted...
✕ black failed.
✓ docformatter succeeded.
✕ flake8 failed.

(One or more formatters failed. Run `pants fmt` to fix.)
...output omitted...
Notice that the output suggests running pants fmt to fix the formatting. Run the command for the whole project:
pants fmt :: You should see the following output:
+ black made changes.
✓ docformatter made no changes.
If you run the pants lint :: command again, you should see that black successfully formats the wrongly formatted test file:
✓ black succeeded.
✓ docformatter succeeded.
✓ flake8 succeeded.
For more information about using Python linters and formatters in Pants, you can visit this documentation page.
Packaging and Running the Application
As Python is an interpreted language, applications written in Python don’t need a build process. However, you can package your application.
With Pants, you can create a PEX (Python EXecutable) file, which provides an individual executable Python environment for the Python applications. This is essentially packaging your Python application along with its virtual environment.
To package your project with Pants, you should run the following command:
pants package chatapp/main.pyYou should have an output similar to the following:
03:19:46.24 [INFO] Completed: Building local_dists.pex
03:19:56.03 [INFO] Completed: Building chatapp/pex_binary.pex
with 2 requirements: setuptools<57,>=56.2.0, types-setuptools<58,>=56.2.0
03:19:56.04 [INFO] Wrote dist/chatapp/pex_binary.pex
Notice that a file called pex_binary.pex is created under dist/chatapp directory, which is in your project root directory.
Apart from packaging, you can also run the binary targets via Pants. Execute the following command to run the application as a binary:
pants run chatapp/main.py -- "This is a content"The above command runs the chatapp/main.py script by passing the string parameter This is a content after the -- sign.
Here’s the output:
03:28:56.59 [INFO] Completed: Building lib.pex with 2
requirements: setuptools<57,>=56.2.0, types-setuptools<58,>=56.2.0
This is a content
Try creating some content with inappropriate words to see if the profanity masker runs.
In the phrase "This is a text you idiot", replace “idiot” with profanity and run the same command.
Your output should be as follows:
This is a text you ***Conclusion
In this article, you learned about monorepos, their advantages and disadvantages, and the tools that you can use for monorepos. You also learned about Pants as a monorepo tool and how to build, configure, and manage a Python monorepo with it.
You can find the demo solution in the solution branch of this GitHub repository.
Finally, If you have a monorepo the extends beyond python, using languages like go or Rust that Pants supports less well, then you should take a look at Earthly. It’s open source and works with your existing build tools.
Turn your engineering standards into automated guardrails that provide feedback directly in pull requests, with 100+ guardrails included out of the box and support for the tools and CI/CD systems you already have.