A Developer's Guide to Git LFS
Table of Contents
This article explains how Git LFS manages large files. Earthly significantly speeds up build and test cycles with Git LFS. Learn how.
Have you ever tried adding large files to your Git repository, like video or audio files, and found that it slows down any operations involving the repository? Fortunately, a solution is available in the form of Git Large File Storage (LFS).
Git LFS (Large File Storage) is an open-source Git extension that enables handling large files in a Git repository. Git LFS replaces large files in a Git repository with text pointers stored in the repository, while the actual file contents are stored separately in a Git LFS server.
Git LFS is compatible with popular Git hosting services, such as GitHub, GitLab, and Bitbucket, and is widely used in software development, game development, and data science.
This tutorial will focus on how Git LFS works, how to use it, and its importance in storing large files. You will create a sample project to understand better how Git LFS works. Specifically, you’ll create a simple Python project that uses a large accident dataset from Kaggle. The dataset contains over 1.5 million accident cases spanning several years and covers most of the US accidents. Due to its size, storing the dataset directly in Git would be impractical and slow down the repository’s performance. Therefore, you’ll use Git LFS to store the dataset efficiently and make it easier to work with. Following this example, you’ll learn how to use Git LFS to manage large files in your Git repository and optimize your workflow for smoother collaboration with team members.
Prerequisites
To follow along with this tutorial, you need Git and Curl installed, and you also need to download the US accidents dataset from Kaggle.
Please note that this article uses Ubuntu, therefore, some of the commands here might not work if you have a different operating system.
All the code examples in this tutorial can be found in this Github repository.
Problem with Storing Large Files in Git

Git is a powerful version control system with many benefits, including storing and managing large files. However, it’s important to note that storing large files directly in Git can significantly slow down operations like pulling, pushing, and cloning the repository. This can frustrate collaborators who rely on these operations to work efficiently.
When a large file is added to a Git repository, every collaborator on the repository must download the entire file, including all versions of it. This process can be time-consuming, especially for collaborators with slower internet connections. Additionally, storing large files on Git can result in a large repository size, making collaboration difficult.
To address these issues, there are several solutions available. One approach is using Git LFS (Large File Storage), designed specifically for managing large files in Git repositories.
Benefits and Use Cases of Git LFS
Git LFS is beneficial when dealing with large files. Git LFS can be customized to meet the individual requirements of a project. For example, users can define which file types should be stored using Git LFS. It also supports versioning huge binary files, which is beneficial for keeping historical versions of large data files without storing multiple copies of the same file. This results in reduced repository size and better performance.
In addition to its many benefits, Git LFS is widely used in various industries. For example, it is used in Game development where game developers can use significant multimedia content, such as graphics, sound effects, and video files. Git LFS can assist in managing these multimedia files, leading to smaller repository sizes and improved performance. Machine learning projects involving enormous datasets can be managed using GIT LFS, making version control, and collaboration more manageable.
Lastly, audio, and video production projects that include big, uncompressed audio and video files can also benefit from Git LFS.
How Git LFS Works
Git LFS stores large files outside your repository and replaces them with text pointers in your repository, reducing its storage requirements and speeding up operations on the repository.
When you use Git LFS to commit a large file, the file’s actual content is initially uploaded to the Git LFS server. Afterward, Git LFS substitutes the file in the Git repository with a pointer. This pointer contains relevant information about the original file, such as its size and the URL of the Git LFS server.
When you clone a Git repository that includes Git LFS pointers, the repository is first cloned like any regular Git repository. Then, the Git LFS pointers are fetched, and the actual large files referenced by the pointers are downloaded separately. After downloading, the local pointers in the cloned repository are updated to reference the downloaded files. This allows you to work with the complete repository, including the large files.
The files are stored separately on a Git LFS server, typically a cloud-based storage system. This server is responsible for storing large files and making them accessible to those who need them. The server stores the contents as binary files, each with a unique identifier. Typically, the file contents are compressed to reduce storage requirements and enhance transfer times.

To manage large files in Git repositories, Git LFS provides a client and server that are responsible for managing big file transfers between the local Git repository and the Git LFS server. The Git LFS client is in charge of uploading and downloading file contents to and from the Git LFS server, while the Git LFS server is in charge of keeping and making files available to users who want them.
Working With GIT LFS
In this section, we will install GIT LFS and show how to use some basic GIT LFS commands to perform operations like tracking, untracking, and listing files tracked by Git LFS.
Installing Git LFS
There are various ways you can install Git LFS. You can download and install Git LFS from the project website. Alternatively, you can install it using your package manager or packagecloud.
To install it in Ubuntu, you will use apt-get command line package management tool for handling packages in Linux.
To install GIT LFS on Ubuntu, You will need to update the package list using the apt-get update command. In the terminal:
sudo apt get updateThe next step will be to install the Git LFS package:
curl -s https://packagecloud.io/install/repositories/github/git-lfs/script.deb.sh | sudo bash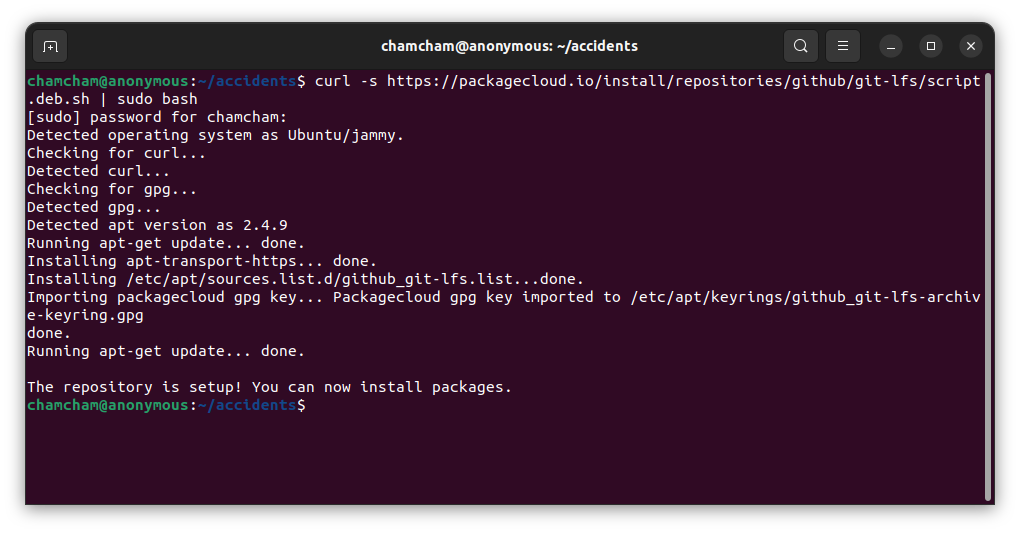
This command downloads and executes a script from Packagecloud that adds the GitHub Git LFS repository to your list of software sources and installs the package for Debian-based distributions. The script aims to add the GitHub Git LFS repository to the list of software sources on Debian-based distributions and install the corresponding package.
Now that the packagecloud repository has been added, you can use the apt package manager to install Git LFS using the following command:
sudo apt install git-lfsThis will install Git LFS and its dependencies on your system.
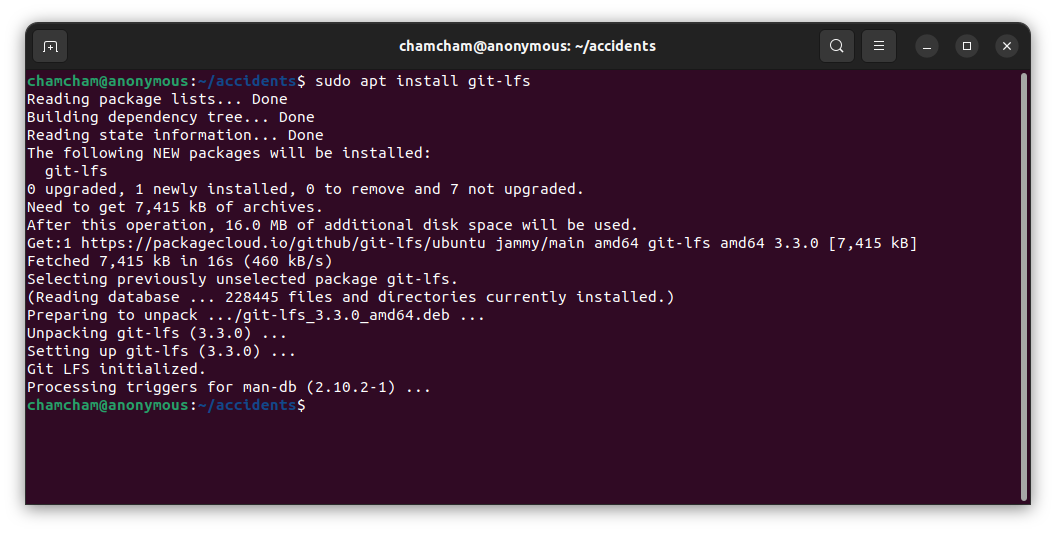
Once you have installed git-lfs, you need to initialize it. You can initialize it with the command below:
git lfs installYou will get the following output:
Git LFS initializedTo verify that Git LFS is installed, run the command git lfs version.
Creating a GitHub Repository
To start using Git LFS, the first step is to create a new GitHub repository where you can store your project.
Create a new repository in your GitHub account called “accidents”. Follow the instructions on GitHub to set up a new repository.
Clone the repository to your local machine and create a new folder called accidents:
git clone <repository_URL>
mkdir accidents
cd accidents
Copy and paste the US_Accidents.csv file, which you downloaded from Kaggle and containing the dataset, into the accidents folder.
Create an accident.py file and add this code:
import pandas as pd # data processing, CSV file I/O (e.g. pd.read_csv)

df = pd.read_csv('US_Accidents.csv')
df.head()
cities_by_accidents = df['City'].value_counts()
print(cities_by_accidents[:10])
The Python code reads a CSV file called US_Accidents.csv and constructs a pandas DataFrame named df. The
The value_counts() method counts the number of accidents in the city and stores it in the cities_by_accidents variable. Finally, it lists the top ten cities with the most accidents.
The output executing this script is shown below:

The accidents folder should contain the following file:
├── accidents.py
└── US_Accidents.csv
Add, commit, and push these files to the repository:
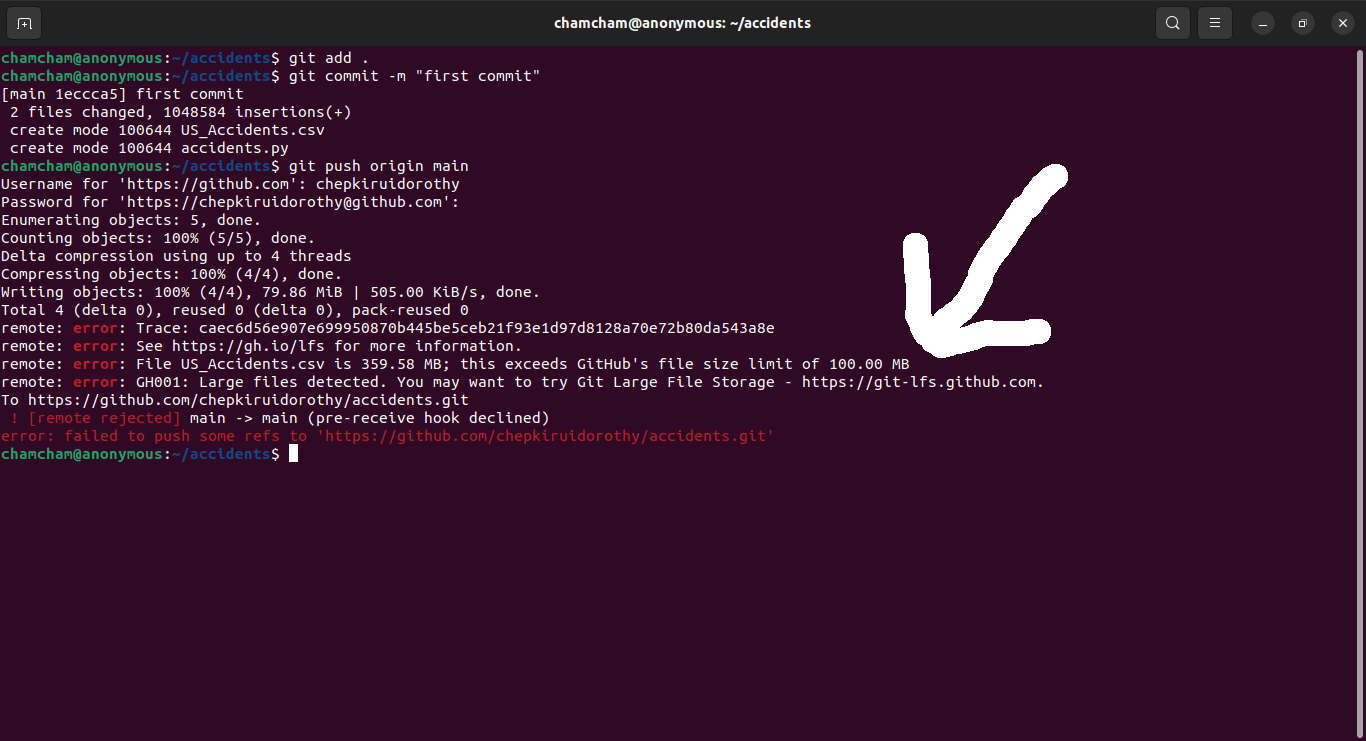
Pushing this file gives the following error:
Trying to push large files gives an error that GitHub’s file limit is 100MB, while the US_Accidents.csv file is 359.58 MB after compression. It also suggests the option of trying Git Large File Storage.
Using Git LFS
To use Git LFS in this repository, the first step will be to initialize Git LFS inside the accidents folder.
git lfs installThis will return the output:
Updated Git Hooks
Git LFS initialized
This installs the necessary hook for Git LFS to work in this repository.
Tracking Files With Git LFS
To track a specific type of file in the repository, you can use the git lfs track command.
The git-lfs track command specifies which files should be managed by Git Large File Storage (LFS) in a Git repository. For example, to track all CSV files, run the following command:
git lfs track "*.csv"This will output:
Tracking "*.csv"This command will modify the repository’s (.gitattributes file by adding the following in the file". If the .gitattributes does not exist, the command will create it and add the following:
*.csv filter=lfs diff=lfs merge=lfs -textThis adds files with a *.csv" extension to the list of file patterns that Git LFS should manage.
This line is a Git configuration command that specifies how Git should handle files with the extension “.csv”. Here’s a breakdown of what each part means:
*.csv: This file pattern specifies which files should be affected by this configuration. In this case, it matches all files with the extension “.csv”.filter=lfs: This part specifies that Git should handle these files using Git LFS (Large File Storage). Git LFS is a Git extension that allows large files to be stored outside the main Git repository and instead stored on a remote server.diff=lfs: This part specifies that Git should use Git LFS to generate diffs (i.e., the changes between versions) for these files.merge=lfs: This part specifies that Git should use Git LFS when merging changes to these files.-text: This part specifies that Git should treat these files as binary files rather than text files. This is important because CSV files can contain non-text characters that can cause problems with Git’s diff and merge tools. By treating them as binary files, Git can avoid these issues.
After you’ve defined the file types to be monitored with Git LFS, you must add the .gitattributes file to the staging area to ensure that Git tracks the file:
git add .attributesOnce Git LFS is all set up in the repository, you can now add, commit, and push the changes to your remote repository:
git add .
git commit -m "add csv file"
git push origin main
git pushOnce the files are uploaded to your remote Git repository, you can check the files that are pushed:

git addYou can also list the files that are currently being tracked using Git LFS by running the git lfs ls-files command lists:
git lfs ls-filesThis will output:
2aa88f5d38 US_Accidents.csvThe 2aa88f5d38 is the file ID, and US_Accidents.csv is its name.
Untracking Files in Git LFS
The primary purpose of untracking files in Git LFS is to change the tracking behavior of specific files, such as by excluding them from future Git LFS operations or transitioning them to a different tracking mechanism. It can be useful when you no longer want to manage certain files with Git LFS or when you want to switch to a different file storage solution.
You can stop tracking a file by using the git lfs untrack command. This command tells Git LFS to stop tracking a particular file, which removes the corresponding pointer file from your Git repository.
For example, you can stop tracking all CSV files in your repository with the command:
git lfs untrack "*.csv"This command will stop tracking all CSV files in the current directory and its subdirectories. Once a file is untracked, it will no longer be tracked by Git LFS and will not be included in any future commits.
However, untracking files do not entirely remove them from your Git repository. The corresponding pointer files will still exist in your Git history, which can increase the overall size of your repository over time. To remove these files from your repository, you should use the git rm command to remove the pointer files from your Git history.
By removing pointer files from your Git repository, you can keep your repository organized, efficient, and focused only on the files you need. This can be especially important when storage space is limited.
Remove the pointer file from your Git repository using the git rm command:
git rm US_Accidents.csvCommit and push the changes to the Git repository:
git commit -m "removed csv file from git lfs"
git push origin main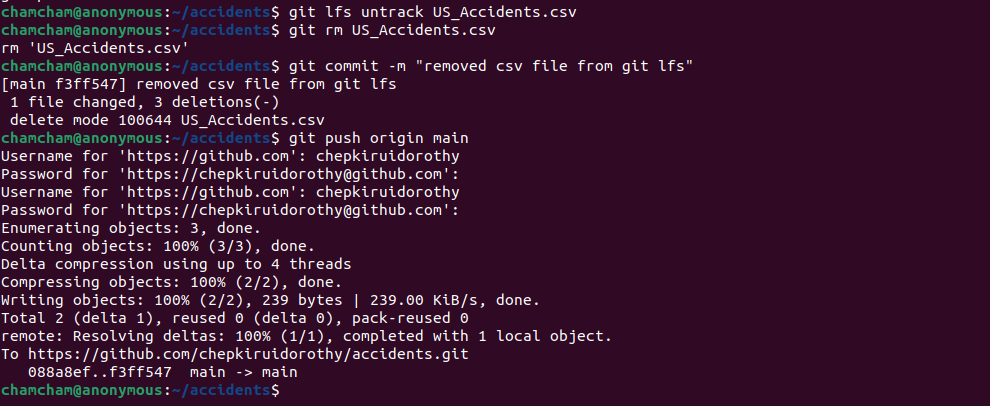
Git Lfs Advanced Features
While the basic functionality of Git LFS is relatively straightforward, it also offers several advanced features that allow for even more efficient and streamlined management of large files. These advanced features, such as batch operations, file locking, custom storage, and concurrent transfers, make Git LFS a versatile tool for managing large files in Git repositories and can help optimize performance and collaboration for users working with large files.
Batch Operations
Git LFS batch operations refer to performing operations on multiple files simultaneously using regular Git commands along with Git LFS commands. For example, you can leverage regular Git commands like git add, git rm to simultaneously perform operations on multiple files. Git LFS will automatically handle the large files according to your tracking configuration. You can use the git lfs migrate command as part of a batch operation workflow to migrate multiple files to Git LFS. The git lfs migrate command helps convert large files previously committed to the repository into LFS objects, reducing the size of your repository and improving its performance.
This command allows you to process multiple files in a batch-like operation rather than handling each file individually. This can be useful in scenarios where many files need to be processed, as it can significantly improve performance and reduce the time required to complete the transfer.
Consider the following scenario: you need to include a new dataset and a video file in your project with a size limit of 100MB. You can get the dataset from the Kaggle. You can also download the video from Pexels.
You will first use the Git LFS to track the dataset file by specifying it as a file to track using the git lfs track command. After tracking, you can commit the changes and push them to the main branch of the Git repository. This will add the new files to your project and make them available to other collaborators.
git lfs track "*.mp4" "*.csv"Commit and push the changes:
git add .
git commit -m "add new files"
git push origin main 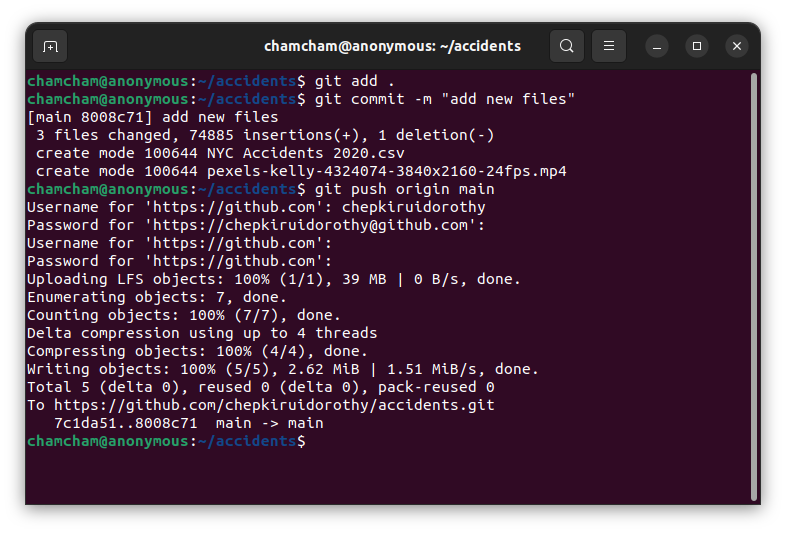
So, our repository contains the Us_Accidents.csv as a Git LFS pointer file and the NYC_Accidents_2020.csv and pexels-kelly-4324074-3840x2160-24fps.mp4 files as large files.
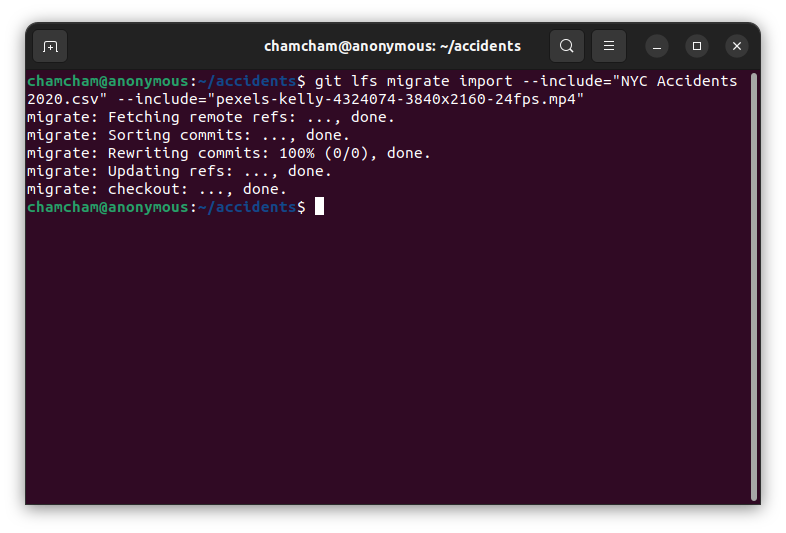
To convert these newly committed files that are already on the remote repository to a Git LFS pointer, you will need to use the git lfs migrate command:
git lfs migrate import --include="NYC Accidents 2020.csv" \
--include="pexels-kelly-4324074-3840x2160-24fps.mp4"
The command git lfs migrate import --include="NYC Accidents 2020.csv" --include = "pexels-kelly-4324074-3840x2160-24fps.mp4" migrates specific files named NYC Accidents 2020.csv and pexels-kelly-4324074-3840x2160-24fps.mp4 to Git LFS. The --include option specifies the file name to migrate. The import mode moves huge objects from the Git history to pointer files maintained and kept by Git LFS.
After following these steps, the files “NYC Accidents 2020.csv” and “pexels-kelly-4324074-3840x2160-24fps.mp4” will be migrated to Git LFS, and their contents will be managed separately from the Git repository itself.
git lfs migrateFile Locking
Git LFS provides file locking, preventing multiple users from simultaneously modifying the same file. This feature is helpful in collaborative projects where multiple users work simultaneously on the same file.
Run the command git lfs lock <filename> to lock a specific file. In this case, the filename is US_Accidents.csv:
git lfs lock US_Accidents.csvThis will output:
Locked US_Accidents.csvThis will create a lock for the specified file and prevent other users from modifying it until you or a user with admin privileges on the repository releases it:
To view the locked files, run the command below:
git lfs locksRunning this command will display a list of all the LFS files currently locked in the repository, along with information about the lock, such as the lock ID, the user who created the lock, and the name of the locked file.
This is useful for determining which files are currently locked in the repository and by whom.
To unlock the file, you can run the following command:
git lfs unlock --id 3015896Enter your username and password as prompted. This will return Unlocked Lock 3015896. This will release the lock with the specified ID and allow other users to modify the file.
Alternatively, you can unlock it using its filename.
git lfs unlock US_Accidents.csvCustom Storage
Git LFS provides the ability to use custom storage solutions for storing LFS objects. This allows users to store LFS objects on their own infrastructure or cloud storage services.
To use custom storage for Git LFS, you must set up a separate server or service to host your LFS objects. This server can be any service that supports the Git LFS API, such as Amazon S3, Microsoft Azure Blob Storage, or a custom storage solution.
Once you have set up your custom storage, you can configure Git LFS to use it by setting the lfs.url configuration option to the URL of your custom storage service. For example:
git config -f .lfsconfig lfs.url \
https://customstorage.com/myrepository.git/info/lfs
You must replace customstorage.com and myrepository.git with your custom storage service’s URL and repository name.
Concurrent Transfers
Concurrent transfers refer to the ability of Git LFS to perform multiple file transfers simultaneously. Specifically, concurrent transfers allow for multiple LFS objects to be uploaded or downloaded simultaneously rather than processing them one at a time. This feature improves the performance of large file transfers. This differs from how batch operations work. Batch operations allow Git LFS to process multiple files in a single operation. This means that Git LFS can initiate one transfer that includes several files rather than initiating a separate transfer for each file.
The number of concurrent transfers can be configured in the Git LFS client or server configuration file. By default, Git LFS is configured to allow three concurrent transfers, which can be adjusted to suit the user’s specific needs.
git config --global lfs.concurrenttransfers 10This command sets the concurrenttransfers option in Git LFS to 10, allowing for up to 10 concurrent transfers of LFS objects. This can help improve transfer speeds for large files and be customized according to the user’s needs and available resources.
The --global flag applies the option globally to all Git repositories on the user’s system. If you just want to set the parameter for a single repository, drop the --global flag and run the command within the repository directory.
Conclusion
Git LFS is a game changer for managing big files in Git repos. Instead of swallowing up storage with massive files, LFS swaps them for text pointers on a separate server, speeding up operations and saving space. You’ve learned how to set up Git LFS, add files to it, and the perks it provides. This tool’s versatility makes it appealing across fields like software dev, game dev, and data science.
And while you’re optimizing your workflow, why not take a look at your build process too? Earthly can help streamline and simplify your builds, making your development process even more efficient.
Earthly Lunar: Monitoring for your SDLC
Achieve Engineering Excellence with universal SDLC monitoring that works with every tech stack, microservice, and CI pipeline.


