Using Azure Functions to Build Your First Serverless Application

Table of Contents
Serverless architecture simplifies the process of building and deploying applications by removing the need to manage servers. You just need to write your application’s business logic in different functions.
These functions are only executed when they’re triggered, and they’re billed based on total running time. You only write and deploy the functions you need. Compare this function-as-a-service (FaaS) concept with infrastructure as a service (IaaS), which requires you to set up a full-fledged virtual machine, or platform as a service (PaaS), which requires you to set up the project, configure continuous integration, continuous delivery (CI/CD) from source control, and be in charge of the whole build process.
In this article, you’ll learn how to set up a serverless architecture deployment on Azure using Azure Functions. You’ll use the Azure Functions Node.js runtime to build a serverless coin flip application. The app manages the state using Azure Cosmos DB and monitors with Azure Application Insights.
Prerequisites
Before you dive into the tutorial, make sure you have a few prerequisites in order:
- An Azure account. Create a free account and get $200 USD in free credits.
- A UNIX environment where you can use the Azure CLI and the Azure Functions core tools. You can use WSL if you’re on Windows.
- The Azure CLI for deploying your function.
- The Azure Functions core tools. You’ll use these core tools to initialize, run, and deploy your functions. The
README.mdfile on the official GitHub repo has installation instructions for all platforms. - Node.js version 16 or higher. Install Node.js from the official website or install using Node Version Manager (NVM).
Build a Serverless Application
This tutorial utilizes the approach of progressing from local development to a cloud environment to help minimize cloud costs that are typically involved in building and testing serverless functions.
To begin, clone this GitHub repository that contains the frontend application code. Once you’ve cloned the repo, you’ll create the different serverless functions that handle the different functionalities of the application. Run the following command to clone the repo:
git clone https://github.com/vicradon/coin-flip.git
cd coin-flip
The coin flip application has the following functionalities:
- A way to create a game session. The serverless function that handles this creates a game entry in Cosmos DB and a shareable gamecode.
- A way for a second player to join a game session.
- A way to trigger a coin flip when both players have joined the game session. This is handled by a Cosmos DB trigger Azure function.
- A way to fetch the current game session from the server.
Get started by creating a folder for your serverless functions. The folder should be located at the root of the coin-flip directory. Run this command to initialize a folder using the Azure Functions core tools:
func init serverless-functions --worker-runtime node \
--language typescript --model V4
This command sets the functions runtime as Node.js and the common language as TypeScript.
Note that this code uses version 4 of the core tools, which is in public preview as of the time of writing. It offers improved developer experience for Node.js developers, such as an immediate npm install after project initialization.
If the command works as expected, your output looks like this:
The new Node.js programming model is in public preview.
Learn more at https://aka.ms/AzFuncNodeV4
Writing package.json
Writing .funcignore
Writing tsconfig.json
Writing .gitignore
Writing host.json
Writing local.settings.json
Writing /workspace/coin-flip/serverless-functions/.vscode/extensions.json
Running 'npm install'...
Navigate into your newly created serverless-functions directory and create your first function:
cd serverless-functions && func new --name CreateGameSession \
--template HTTPTrigger --authlevel anonymous
This command creates a new file, CreateGameSession.ts, under the serverless-functions/src/functions directory. This serverless function uses the HTTP trigger template, which simply means it’s triggered by an HTTP request.
Setting the authLevel as anonymous allows the function to be invoked without an API key. This security setting is ideal for local development or prototyping but might be risky in production.
You can learn more about this in the “Secure the Function” section.
The content of the CreateGameSession file is boilerplate code that displays hello world when called with a query parameter or a request body. You can immediately test this function by starting the local development server using this command:
npm startThe functions server starts on port 7071 with the CreateGameSession function open to receiving a GET or POST request. You can test out this function by pasting this URL on your browser: http://localhost:7071/api/CreateGameSession?name=Barry. You should get a greeting like this: Hello, Barry!
Add Game Session Creation Capability to Your Function
The first function in your serverless application serves as an initializer, creating a game session that two players can participate. Each game session is identified by a gamecode — a unique ID generated using the custom-uuid npm package. The function should return a JSON output with a response message and the gamecode.
Paste the following snippet into your CreateGameSession.ts to enable this functionality:
import {
  app,
  HttpRequest,
  HttpResponseInit,
  InvocationContext,
} from "@azure/functions";
import { generateCustomUuid } from "custom-uuid";

export async function CreateGameSession(
  request: HttpRequest,
  context: InvocationContext
): Promise<HttpResponseInit> {
  context.log(`Http function processed request for url "${request.url}"`);

  const requestBody = await request.json();
  const gamecode = generateCustomUuid("abcdef12345", 5);

  return {
    jsonBody: {
      message: "Created game session",
      gamecode,
    },
  };
}

app.http("CreateGameSession", {
  methods: ["POST"],
  authLevel: "anonymous",
  extraOutputs: [],
  handler: CreateGameSession,
});
The package for generating the shareable gamecode, custom-uuid, has to be installed at this point. Install it using the following command:
cd serverless-functions && npm i custom-uuidDefine a Function for Fetching a Game Session
Next up, you need to define a function to fetch game sessions so that the second player can see the details of the coin flip they’re getting themselves into. Define a new function using the following command:
func new --name FetchGameSession --template HTTPTrigger \
--authlevel anonymous
Now that you’ve defined the function, there’s no way to retrieve the gamecode created by the CreateGameSession function. You have to add a storage mechanism or state management to enable this functionality.
In the next section, you’ll add a way to store your game session object on the Azure Cosmos DB NoSQL database.
Add State Management to Your Function
To add state management to your function, define a Cosmos DB resource on Azure.
Cosmos DB is a NoSQL database that offers different ways to manipulate data through multiple APIs. This tutorial uses the SQL API to store, read, and update documents.
To create a Cosmos DB database, you’ll make use of the Azure CLI. You’ll need to create several resources on Azure. Create a new script in the serverless-functions directory called create-resources.sh and paste the following snippet in it:
resourceGroup=coinflip-rg
location=eastus
storageAccount="coinflipstorage$RANDOM"
functionApp="coinflip$RANDOM"
databaseAccount="coinflipdbacc$RANDOM"
database=coin-flip-db
databaseContainer=coin-flip-sessions
keyvault="coinflipkeyvault$RANDOM"

# Create the resource group
az group create --name $resourceGroup --location $location

# Create the storage account
az storage account create --name $storageAccount --location $location \
--resource-group $resourceGroup --sku Standard_LRS

# Create the functions app
az functionapp create --name $functionApp --resource-group $resourceGroup \
--storage-account $storageAccount --consumption-plan-location $location \
--functions-version 4 –worker-runtime node –os-type Linux –runtime-version 16

# Create the database account
az cosmosdb create --name $databaseAccount --resource-group $resourceGroup \
--default-consistency-level Eventual --locations regionName="East US" \
failoverPriority=0 isZoneRedundant=False

# Create the Cosmos DB database
az cosmosdb sql database create --account-name $databaseAccount --name \
$database --resource-group $resourceGroup

# Create a container within the database
az cosmosdb sql container create --account-name $databaseAccount \
--resource-group $resourceGroup --database-name $database --name \
$databaseContainer --partition-key-path "/gamecode" --throughput 400

# Query the endpoint and key of their database account
endpoint=$(az cosmosdb show --name $databaseAccount --resource-group \
$resourceGroup --query documentEndpoint --output tsv)
key=$(az cosmosdb keys list --name $databaseAccount --resource-group \
$resourceGroup --query primaryMasterKey --output tsv)

echo $endpoint
echo $key
You need to authenticate the CLI before you can use it. Run the following command to set up the authentication flow for the CLI:
az loginFollow the resulting link to log into your Azure account. If you’re having trouble logging in, use the device code flow by running:
az login --use-device-codeAfter successfully authenticating the CLI, run the script to create resources using the following command:
bash create-resources.shThe last two lines of the output are similar to this:
https://coinflipdbacc13692.documents.azure.com/
VBw1tYml83KE7kxNMVD6KpkLQhobIT5oGKhAtxqucJW5rOgyS8mBRKbGbh4eSoMouBzHtNAdVk7FACDblC8sZA==
This first line is the endpoint of the Cosmos DB database account where the coin-flip-db database lives. The second is the key that acts like a password for connecting to this database account.
The functionality for connecting to the database is defined in a new file, getDBContainer.ts, which you’ll create in a serverless-functions/src/utils directory. Create this directory and the required file by running the following command:
mkdir serverless-functions/src/utils && touch \
serverless-functions/src/utils/getDBContainer.ts
Then paste the following code into the file:
import { Container, CosmosClient } from "@azure/cosmos";

export default async function getDbContainer(
 containerId: string
): Promise<Container> {
 const client = new CosmosClient({
   endpoint: "https://coinflipdbacc13692.documents.azure.com:443/",
   key: "VBw1tYml83KE7kxNMVD6KpkLQhobIT5oGKhAtxqucJW5rOgyS8mBRKbGbh4eSoMouBzHtNAdVk7FACDblC8sZA==",
 });
 const database = client.database("coin-flip-db");
 const container = database.container(containerId);
 return container;
}
Replace the values of endpoint and key with the corresponding values of your database account.
This snippet exposes a container object that can be used to create or query data from a Cosmos DB container. With the object returned from this file, you can effectively manage the state of your application. It requires the @azure/cosmos package, so you can install it in the serverless-functions directory using this command:
cd serverless-functions && npm i @azure/cosmosNow, import the getDbContainer function from the serverless-functions/utils/ into the CreateGameSession.ts file. Next, initialize a dbContainer object and create a game session on the Cosmos DB database using the additions in the following snippet:
import getDbContainer from "../utils/getDBContainer";
import { generateCustomUuid } from "custom-uuid";
…

  const requestBody = await request.json();
  const gamecode = generateCustomUuid("abcdef12345", 5);

  const dbContainer = await getDbContainer("coin-flip-sessions");
  await dbContainer.items.create({
    gamecode,
    username: requestBody["username"],
    flip_reason: requestBody["flip_reason"],
  });

  return {
    jsonBody: {
      message: "Created game session",
      gamecode,
    },
…
Restart your functions app server and make a POST request to the /api/CreateGameSession endpoint with the following request body:
{
   "username": "Marv",
   "flip_reason": "Who will walk the dog"
}
After making the request, you should have a response similar to this:
{
   "message": "Created game session",
   "gamecode": "f2ae1"
}
You can set your functions app to reload every time you make a change by running npm run watch in another terminal within the serverless-functions directory.
Join a Game Session
A second player can join a game session by simply registering their username in the game session object. Because Cosmos DB is a nonrelational database, you don’t have to define a player2Username field beforehand. This approach makes it easy to prototype new applications. Create a new file in the serverless-functions/src/functions directory called JoinGameSession.ts, and then add the following to it:
import {
  app,
  HttpRequest,
  HttpResponseInit,
  InvocationContext,
} from "@azure/functions";
import getDbContainer from "../utils/getDBContainer";

export async function JoinGameSession(
  request: HttpRequest,
  context: InvocationContext
): Promise<HttpResponseInit> {
  context.log(`Http function processed request for url "${request.url}"`);

  const requestBody = await request.json();
  const gamecode = requestBody["gamecode"];
  const player2Username = requestBody["player2Username"];

  const dbContainer = await getDbContainer("coin-flip-sessions");

  const { resources: gameSessions } = await dbContainer.items
    .query(`SELECT * from c WHERE c.gamecode='${gamecode}'`)
    .fetchAll();

  const gameSession = gameSessions[0];

  gameSession["player2Username"] = player2Username;

  const { resource: updatedGameSession } = await dbContainer
    .item(gameSession.id)
    .replace(gameSession);

  return {
    jsonBody: {
      id: gameSession.id,
      gameSession: updatedGameSession,
      message: "Joined game session",
    },
  };
}

app.http("JoinGameSession", {
  methods: ["POST"],
  authLevel: "anonymous",
  handler: JoinGameSession,
});
Use Cosmos DB Input Binding to Listen to Change Events
Azure Functions expand beyond HTTP triggers. You can define various triggers like Blob Storage, Cosmos DB, and Queue Storage. These triggers belong to a broader category known as bindings. Bindings serve as both inputs and outputs to functions. An input binding sets up a pipeline for receiving data, while an output binding lets functions push data to other services. You could define an input binding that listens to changes made to a Cosmos DB container — in this case, the coin-flip-sessions container — and then perform an action like flipping a coin. You could define this function using the CLI, but go ahead and create a new file called FlipCoinWhenPlayer2Joins.ts in the serverless-functions/src/functions directory. After creating this file, paste the following into it:
import { app, InvocationContext } from "@azure/functions";
import getDbContainer from "../utils/getDBContainer";

const coinFlipIsHeads = () => {
  const randomNumber = Math.random();

  if (randomNumber > 0.5) {
    return true;
  }
  return false;
};

export async function FlipCoinWhenPlayer2Joins(
  documents: unknown[],
  context: InvocationContext
): Promise<void> {
  context.log(`Cosmos DB function processed ${documents.length} documents`);

  const dbContainer = await getDbContainer("coin-flip-sessions");

  for (let doc of documents) {
    if (doc["player2Username"]) {
      // flip coin here

      doc["winner"] = coinFlipIsHeads() ? "player1" : "player2";

      await dbContainer.item(doc["id"]).replace(doc);
    }
  }
}

app.cosmosDB("FlipCoinWhenPlayer2Joins", {
  connection: "CosmosDBConnection",
  databaseName: "coin-flip-db",
  containerName: "coin-flip-sessions",
  handler: FlipCoinWhenPlayer2Joins,
});
This function requires a variable to be defined in your local.settings.json for it to work locally and under the application settings on the deployed version. So replace the content of your local.settings.json file with the following:
{
  "IsEncrypted": false,
  "Values": {
    "FUNCTIONS_WORKER_RUNTIME": "node",
    "AzureWebJobsFeatureFlags": "EnableWorkerIndexing",
    "AzureWebJobsStorage": "",
    "CosmosEndpoint": "https://coinflipdbacc13692.documents.azure.com:443/",
    "CosmosKey": "VBw1tYml83KE7kxNMVD6KpkLQhobIT5oGKhAtxqucJW5rOgyS8mBRKbGbh4eSoMouBzHtNAdVk7FACDblC8sZA==",
    "CosmosDBConnection": "AccountEndpoint=https://coinflipdbacc13692.documents.azure.com:443/;AccountKey=VBw1tYml83KE7kxNMVD6KpkLQhobIT5oGKhAtxqucJW5rOgyS8mBRKbGbh4eSoMouBzHtNAdVk7FACDblC8sZA==;"
  },
  "Host": {
    "LocalHttpPort": 7071,
    "CORS": "*"
  }
}
Ensure you change the value of CosmosEndpoint and CosmosKey in their respective variables and in the CosmosDBConnection variable.
Now that your function secrets are no longer in plaintext, you can update your getDBContainer.ts file to use the endpoint and keys from the environment. Replace the content of your getDBCotnainer.ts with the following:
import { CosmosClient } from "@azure/cosmos";

export default async function getDbContainer(containerId: string) {
  const client = new CosmosClient({
    endpoint: process.env.CosmosEndpoint,
    key: process.env.CosmosKey,
  });

  const database = client.database("coin-flip-db");
  const container = database.container(containerId);
  return container;
}
Fetch a Game Session
The final function in your functions app is one used to fetch a game session by gamecode. It’s a very simple function and doesn’t require much explanation. It simply runs a query and returns the result.
Create the file FetchGameSession.ts in the serverless-functions/src/functions directory and add the following to it:
import {
  app,
  HttpRequest,
  HttpResponseInit,
  InvocationContext,
} from "@azure/functions";
import getDbContainer from "../utils/getDBContainer";

export async function FetchGameSession(
  request: HttpRequest,
  context: InvocationContext
): Promise<HttpResponseInit> {
  context.log(`Http function processed request for url "${request.url}"`);
  const requestBody = await request.json();
  const dbContainer = await getDbContainer("coin-flip-sessions");

  const { resources } = await dbContainer.items
    .query(`SELECT * FROM c WHERE c.gamecode='${requestBody["gamecode"]}'`)
    .fetchAll();

  const game = resources[0];

  return {
    jsonBody: {
      message: "Fetched game session",
      game,
    },
  };
}

app.http("FetchGameSession", {
  methods: ["GET", "POST"],
  authLevel: "anonymous",
  handler: FetchGameSession,
});
Deploy Your Functions Using CI/CD and GitHub
Now that your function has all your required functions, you can connect the functions app on Azure to the local functions app.
You have two options for deploying your functions app:
- Push from the local development environment using the functions core tools
- Push through CI/CD on a Git hosting service like GitHub
Deploy Your Functions Using the Azure Function Core Tools
To deploy from your local dev environment, query the functionsappname that exists on Azure, then run the deploy command. This deployment can be completed by running the following command:
functionsappname=$(az functionapp list --query "[0].name" -o tsv)
func azure functionapp publish $functionsappname
You should get an output similar to this:
Getting site publishing info...
Uploading package...
Uploading 43.35 MB [##############################################################################]
Upload completed successfully.
Deployment completed successfully.
Syncing triggers...
Functions in coinflip22324:
    CreateGameSession - [httpTrigger]
        Invoke url: https://coinflip22324.azurewebsites.net/api/creategamesession

    FetchGameSession - [httpTrigger]
        Invoke url: https://coinflip22324.azurewebsites.net/api/fetchgamesession

    FlipCoinWhenPlayer2Joins - [cosmosDBTrigger]

    JoinGameSession - [httpTrigger]
        Invoke url: https://coinflip22324.azurewebsites.net/api/joingamesession
Verify that your functions work properly by visiting the URLs.
Your functions have their secrets in plaintext, which poses a security risk, especially if the functions app folder is pushed to source control. You can set the secrets of the functions app that exists on Azure using the CLI.
The following command sets the Cosmos DB URL and key as secrets of the functions app. Replace the values endpoint and key with the corresponding values for your database account and run the following command:
functionsappname=$(az functionapp list --query "[0].name" -o tsv)
az functionapp config appsettings set --resource-group coinflip-rg \
--name $functionsappname --settings "CosmosEndpoint=https://coinflipdbacc13692.documents.azure.com:443/"
az functionapp config appsettings set --resource-group coinflip-rg \
--name $functionsappname --settings "CosmosKey=VBw1tYml83KE7kxNMVD6KpkLQhobIT5oGKhAtxqucJW5rOgyS8mBRKbGbh4eSoMouBzHtNAdVk7FACDblC8sZA=="
az functionapp config appsettings set --resource-group coinflip-rg \
--name $functionsappname --settings "CosmosDBConnection='AccountEndpoint=https://coinflipdbacc13692.documents.azure.com:443/;AccountKey=VBw1tYml83KE7kxNMVD6KpkLQhobIT5oGKhAtxqucJW5rOgyS8mBRKbGbh4eSoMouBzHtNAdVk7FACDblC8sZA=='"
Deploy Your Functions Using CI/CD on GitHub
To set up CI/CD deployment through GitHub, you need to push the existing code to a GitHub repo. Since you did your development in the coin flip clone, which is tracked by Git already, you simply need to point the remote origin to your personal GitHub repo.
Create a GitHub repo and then run the following command:
git remote rm origin
git remote add origin https://github.com/<YOUR_USERNAME>/<YOUR_REPO>.git
After changing the origin, commit all changes and push to the new repo. Then set up automatic deployment by running the following:
functionsappname=$(az functionapp list –resource-group \
coinflip-rg --query "[0].name" -o tsv)
az functionapp deployment list-publishing-profiles --resource-group \
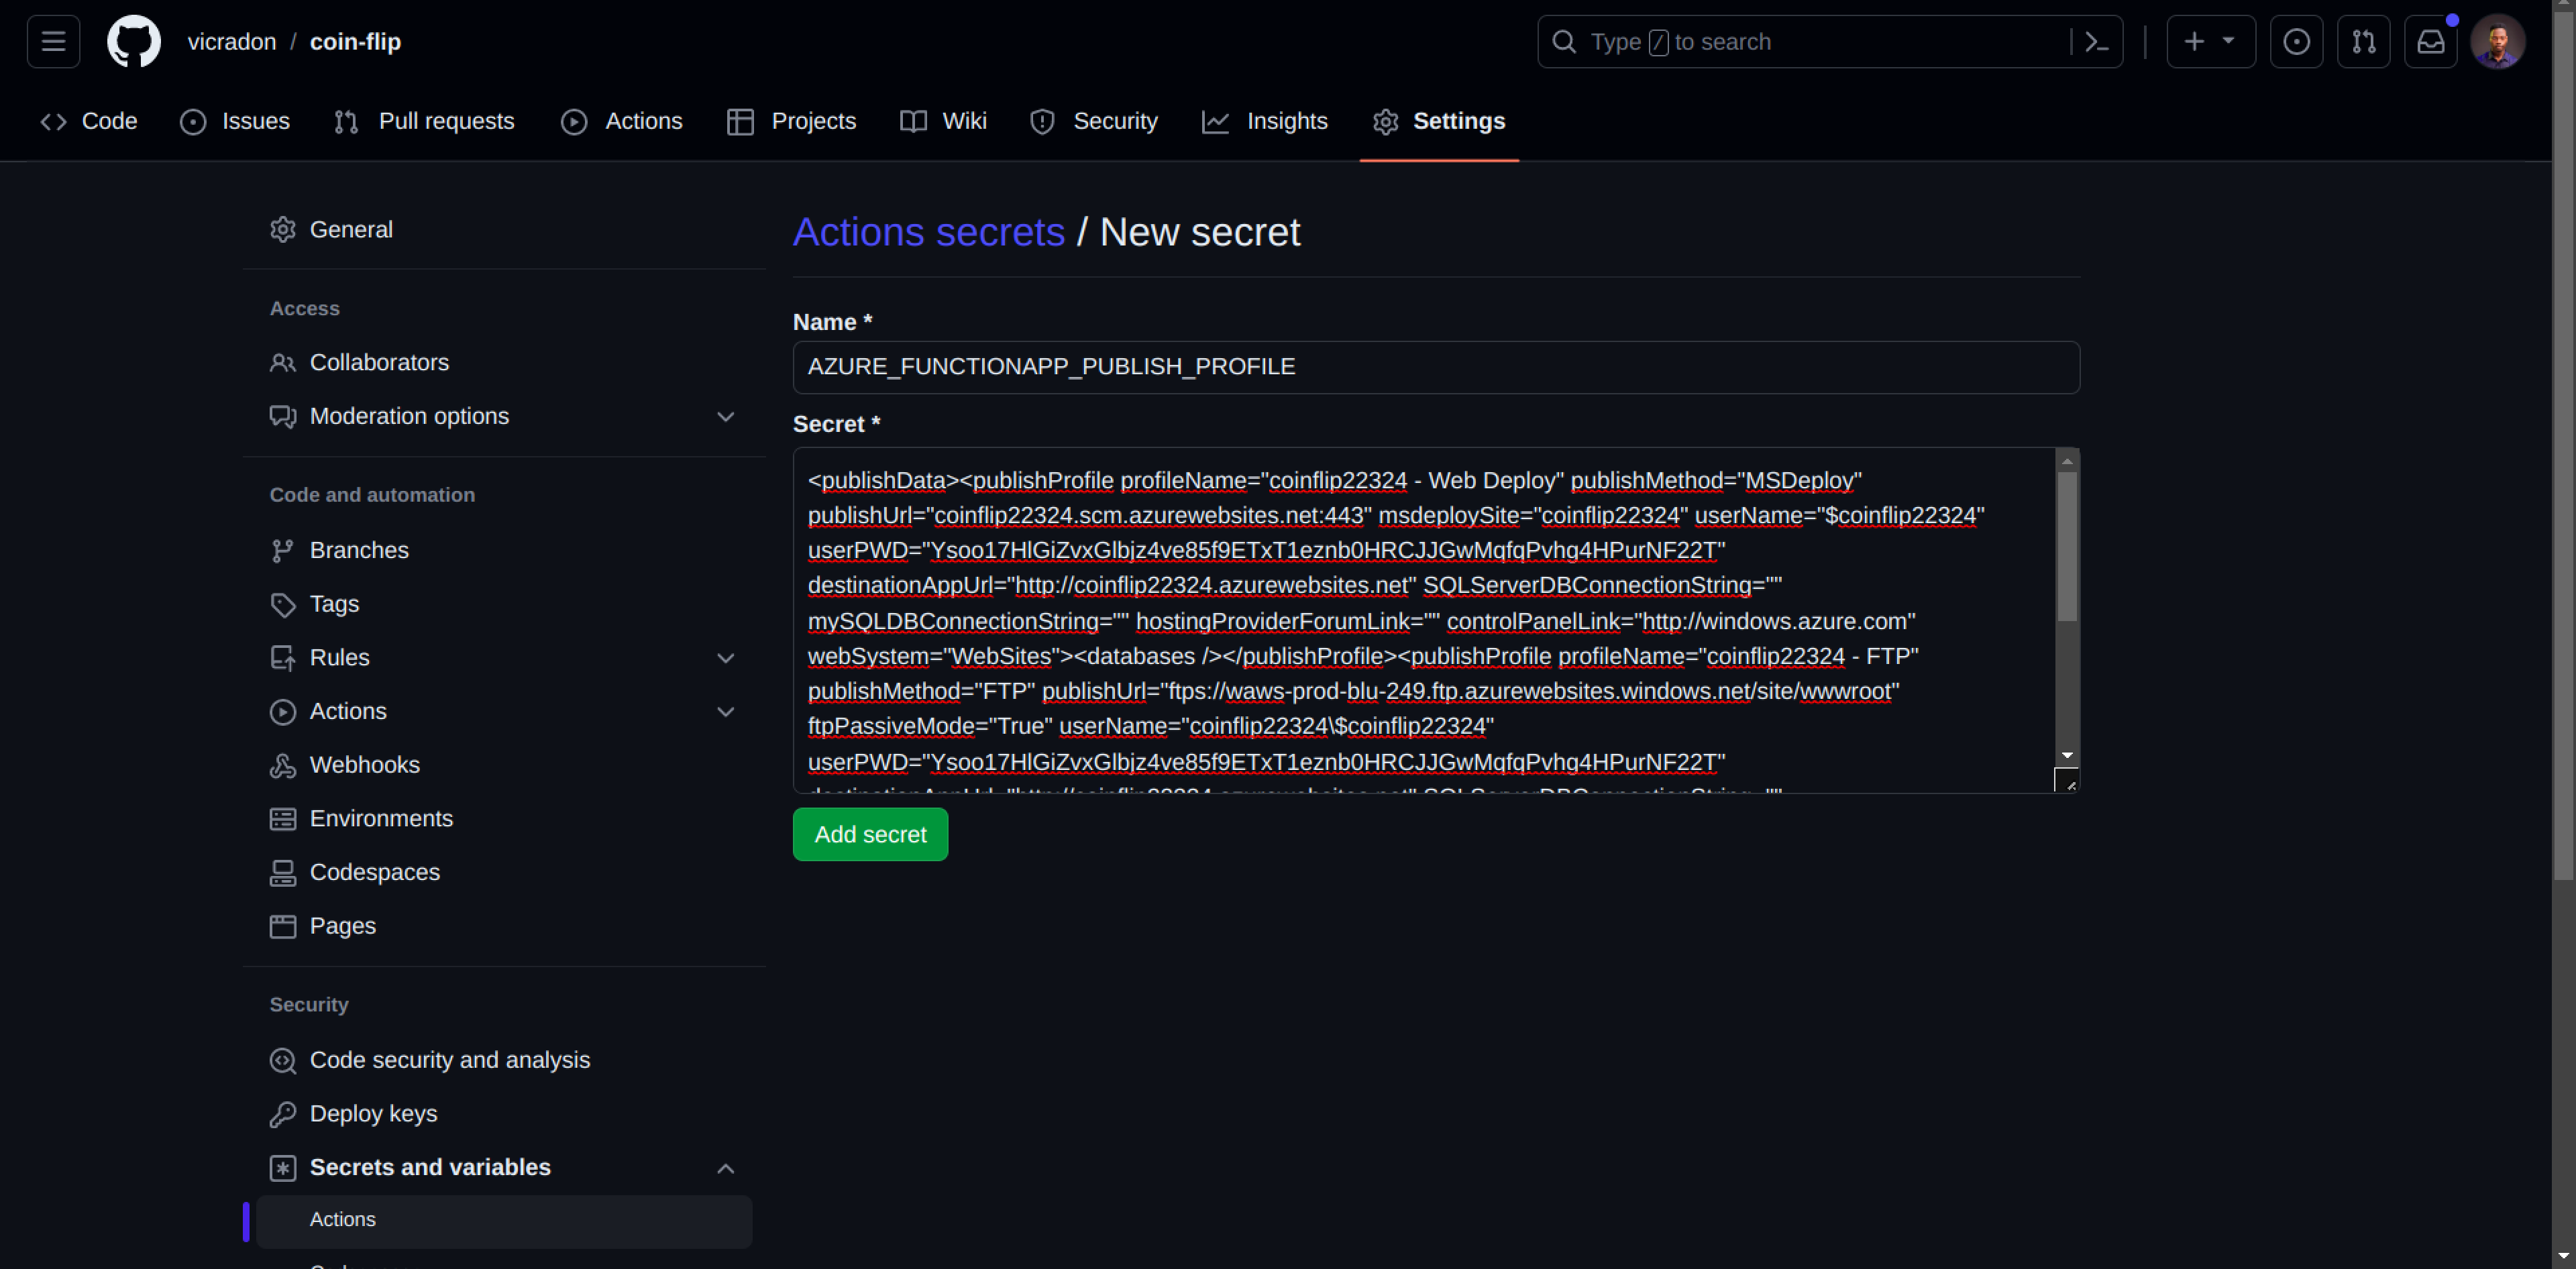
coinflip-rg --name $functionsappname --xmlThis command returns an XML of the publish profile, which you add to your GitHub repo settings. You can access the secrets page through this link: https://github.com/<YOUR_USERNAME>/<YOUR_REPOSITORY_NAME>/settings/secrets/actions/new.
Ensure you replace <YOUR_USERNAME> and <YOUR_REPOSITORY_NAME> with your actual details. On this same page, paste the XML obtained from the most recent command and select Add Secret:
Now, create a new file deploy-to-azure.yml under a .github/workflows directory using the following command:
mkdir .github/workflows -p && touch .github/workflows/deploy-to-azure.ymlAfter the file is created, add the following workflow content to it:
name: Deploy Serverless-functions project to Azure Function App

on: [push]

# CONFIGURATION
# For help, go to https://github.com/Azure/Actions
#
# 1. Set up the following secrets in your repository:
#   AZURE_FUNCTIONAPP_PUBLISH_PROFILE
#
# 2. Change these variables for your configuration:
env:
  AZURE_FUNCTIONAPP_NAME: "<YOUR_FUNCTIONAPP_NAME>"
  # set this to your function app name on Azure
  AZURE_FUNCTIONAPP_PACKAGE_PATH: "serverless-functions"
  # set this to the path to your function app project, defaults to
  # the repository root
  NODE_VERSION: "16.x"
  # set this to the node version to use (e.g. '8.x', '10.x', '12.x')

jobs:
  build-and-deploy:
    runs-on: ubuntu-latest
    environment: dev
    steps:
      - name: "Checkout GitHub Action"
        uses: actions/checkout@v3

      - name: Setup Node $ Environment
        uses: actions/setup-node@v3
        with:
          node-version: $

      - name: "Resolve Project Dependencies Using Npm"
        shell: bash
        run: |
          pushd './$'
          npm install
          npm run build --if-present
          npm run test --if-present
          popd

      - name: "Run Azure Functions Action"
        uses: Azure/functions-action@v1
        id: fa
        with:
          app-name: $
          package: $
          publish-profile: $
# For more samples to get started with GitHub Action workflows to
# deploy to Azure, refer to https://github.com/Azure/actions-workflow-samples
Replace the content of the <YOUR_FUNCTIONAPP_NAME> with the name of your functionapp. You can obtain this by running az functionapp list --query "[0].name" --resource-group coinflip-rg -o tsv.
Because the GitHub deployment uses ZIP deployment to deploy your function, you need to delete an app setting from your application. The current deployment is set to a URL pointing to a blob in the storage account you created earlier. Remove the URL setting by running the following command:
functionsappname=$(az functionapp list –resource-group \
coinflip-rg --query "[0].name" -o tsv)
az functionapp config appsettings delete --name \
$functionsappname --setting-names WEBSITE_RUN_FROM_PACKAGE \
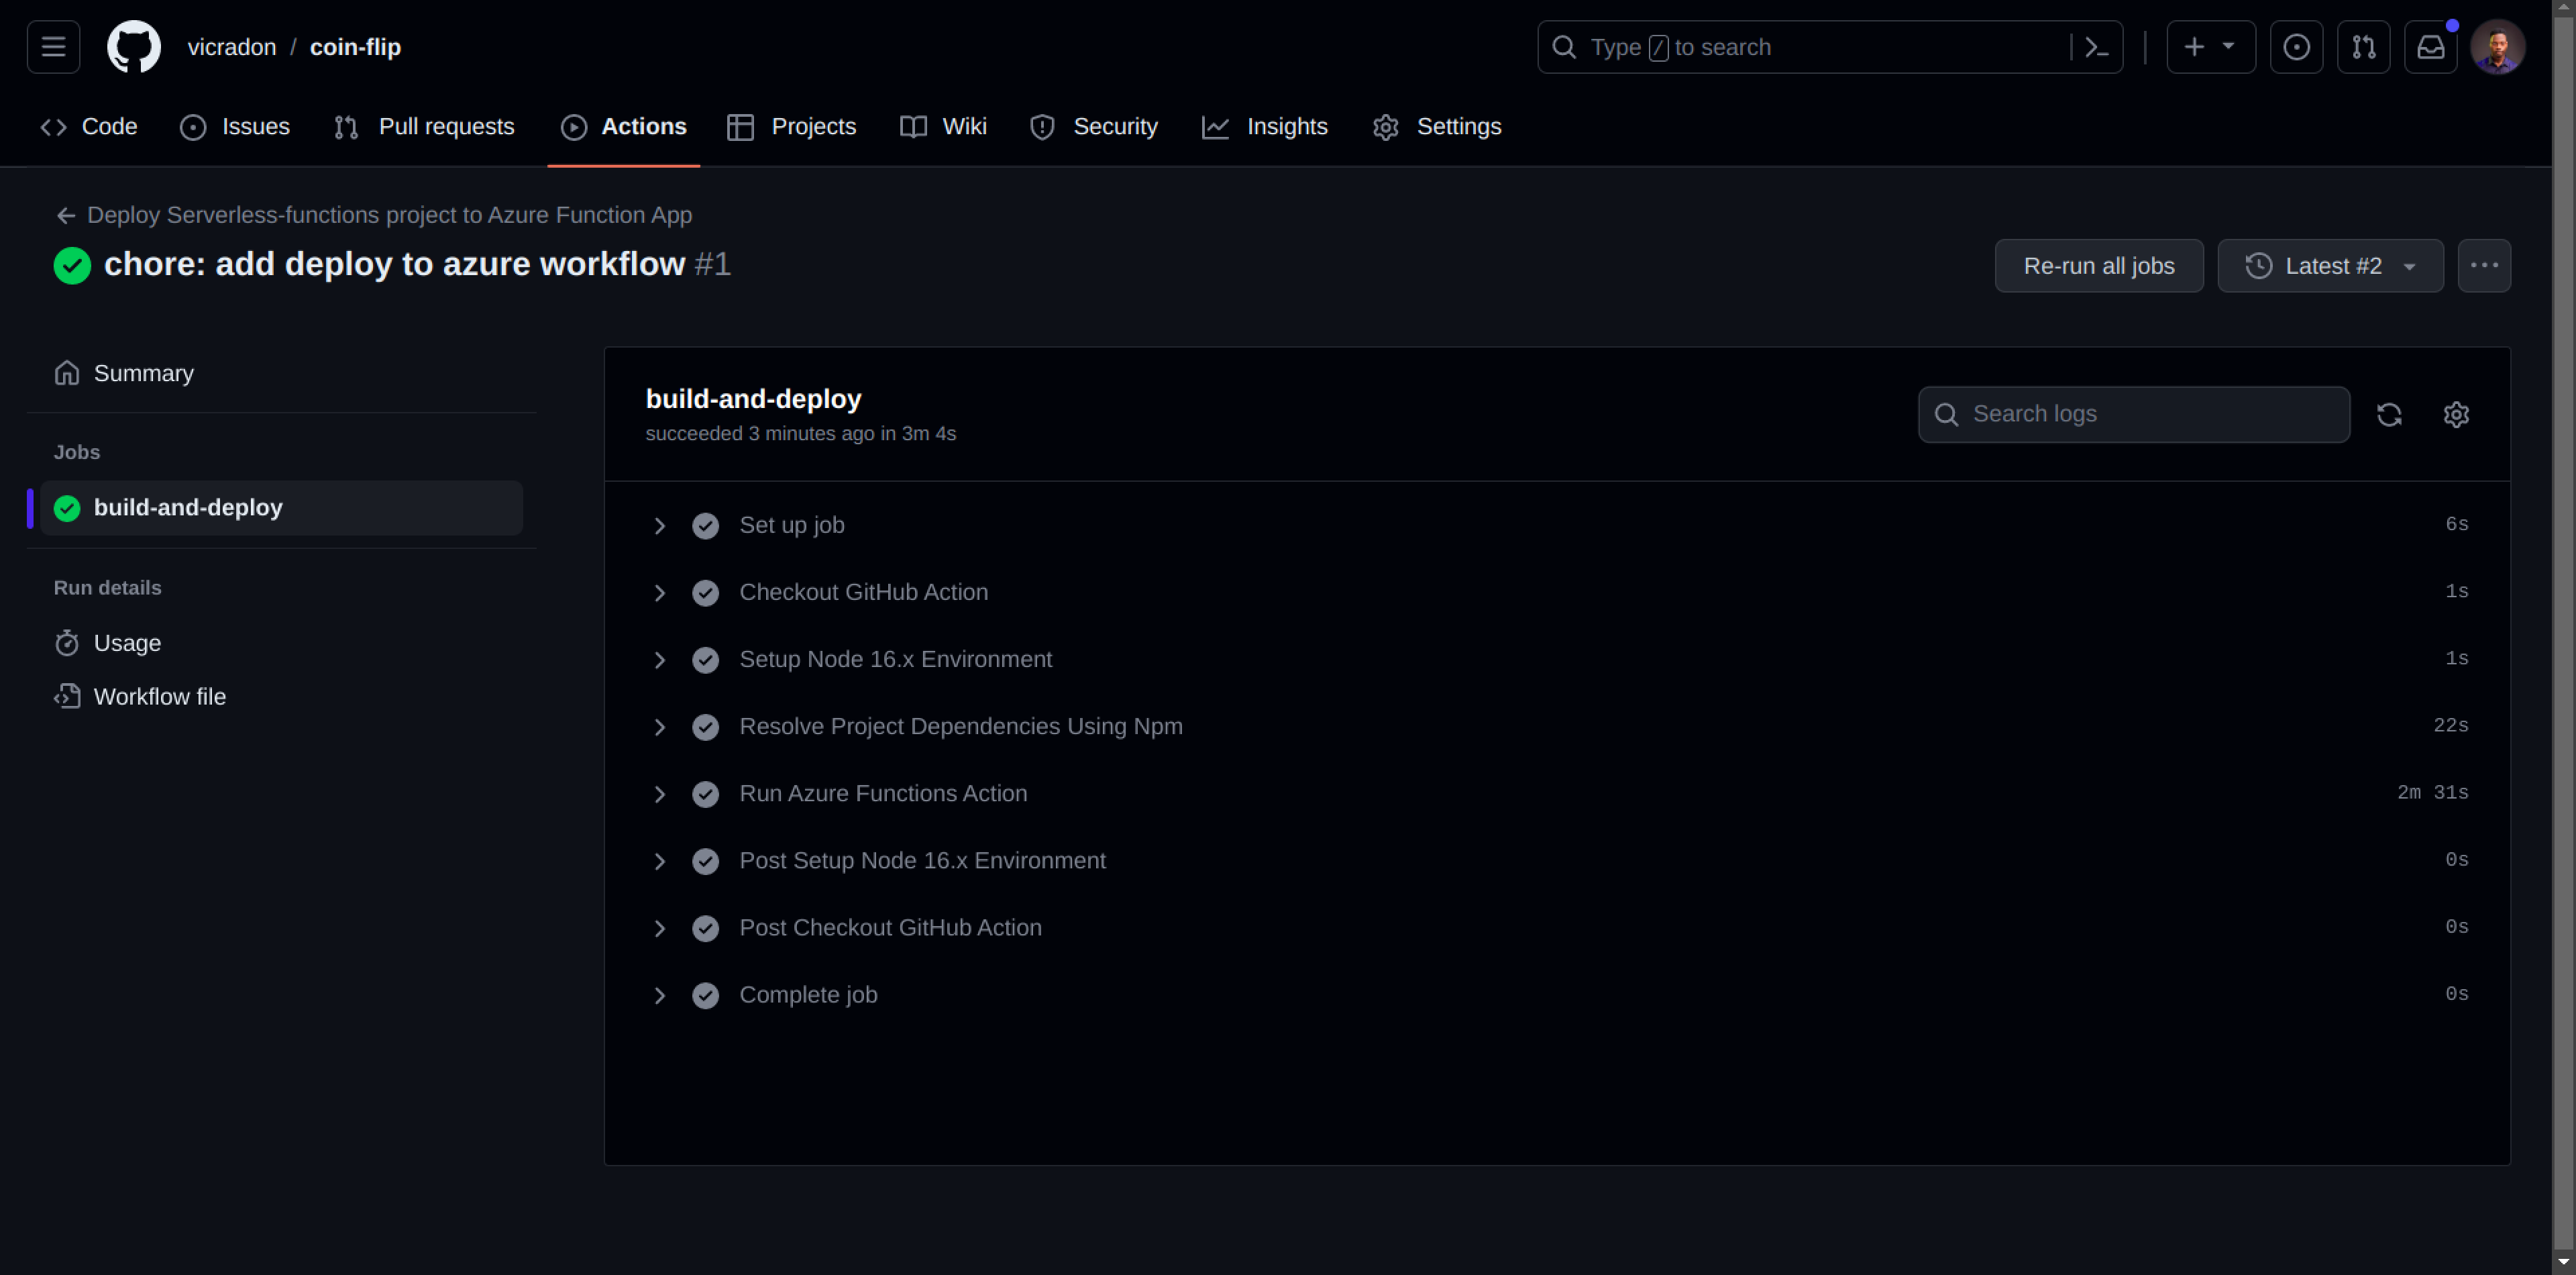
--resource-group coinflip-rgNow, commit the new workflow file and push it to GitHub. The function app is redeployed anytime you push to GitHub. On successful deployment, you should have the following screen on your GitHub Actions page:
Set Up Logging and Monitoring
Logging is a necessary part of every software application, offering insight into how an application is performing in production. You can use the logs that an application produces to implement health checks and investigate issues that may have arisen. Azure functions have a native way to upload logs to the cloud. This is done through context.log, which differs from console.log in this regard. The logs are saved to an Application Insights database.
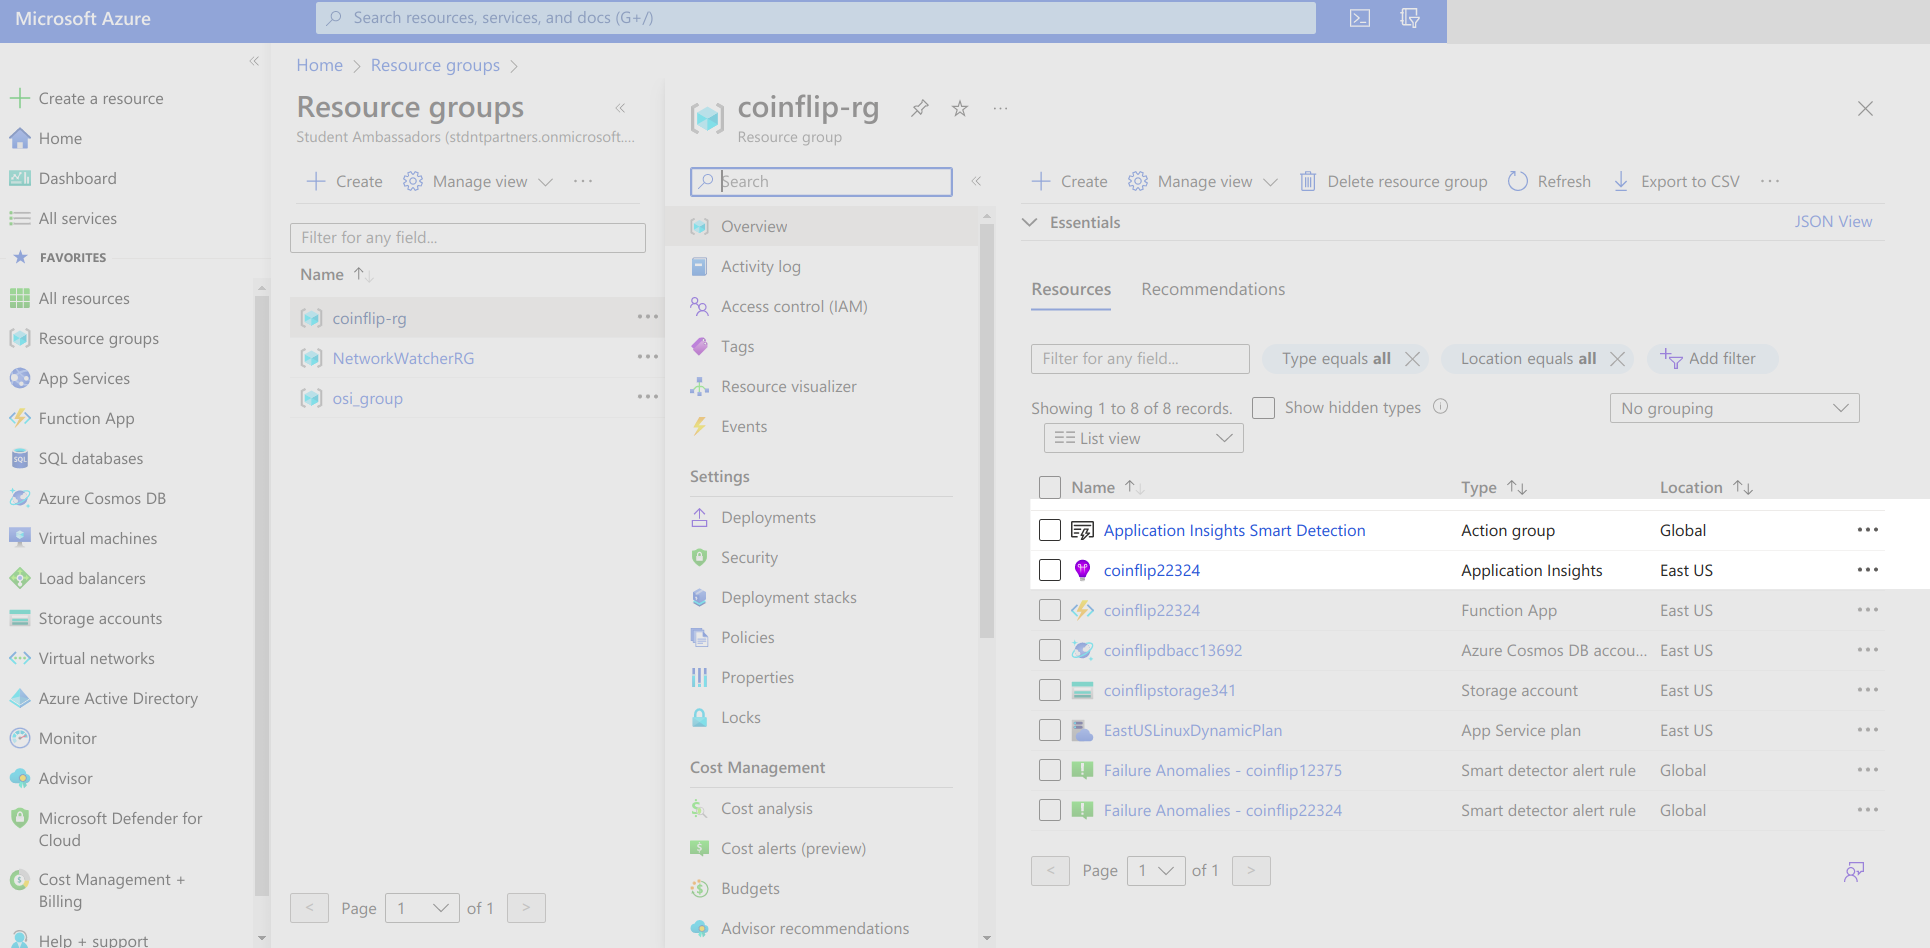
Application Insights is an Azure service for collecting logs and plotting charts based on these logs. You can find your application insights under your coinflip-rg resource group on the Azure portal:
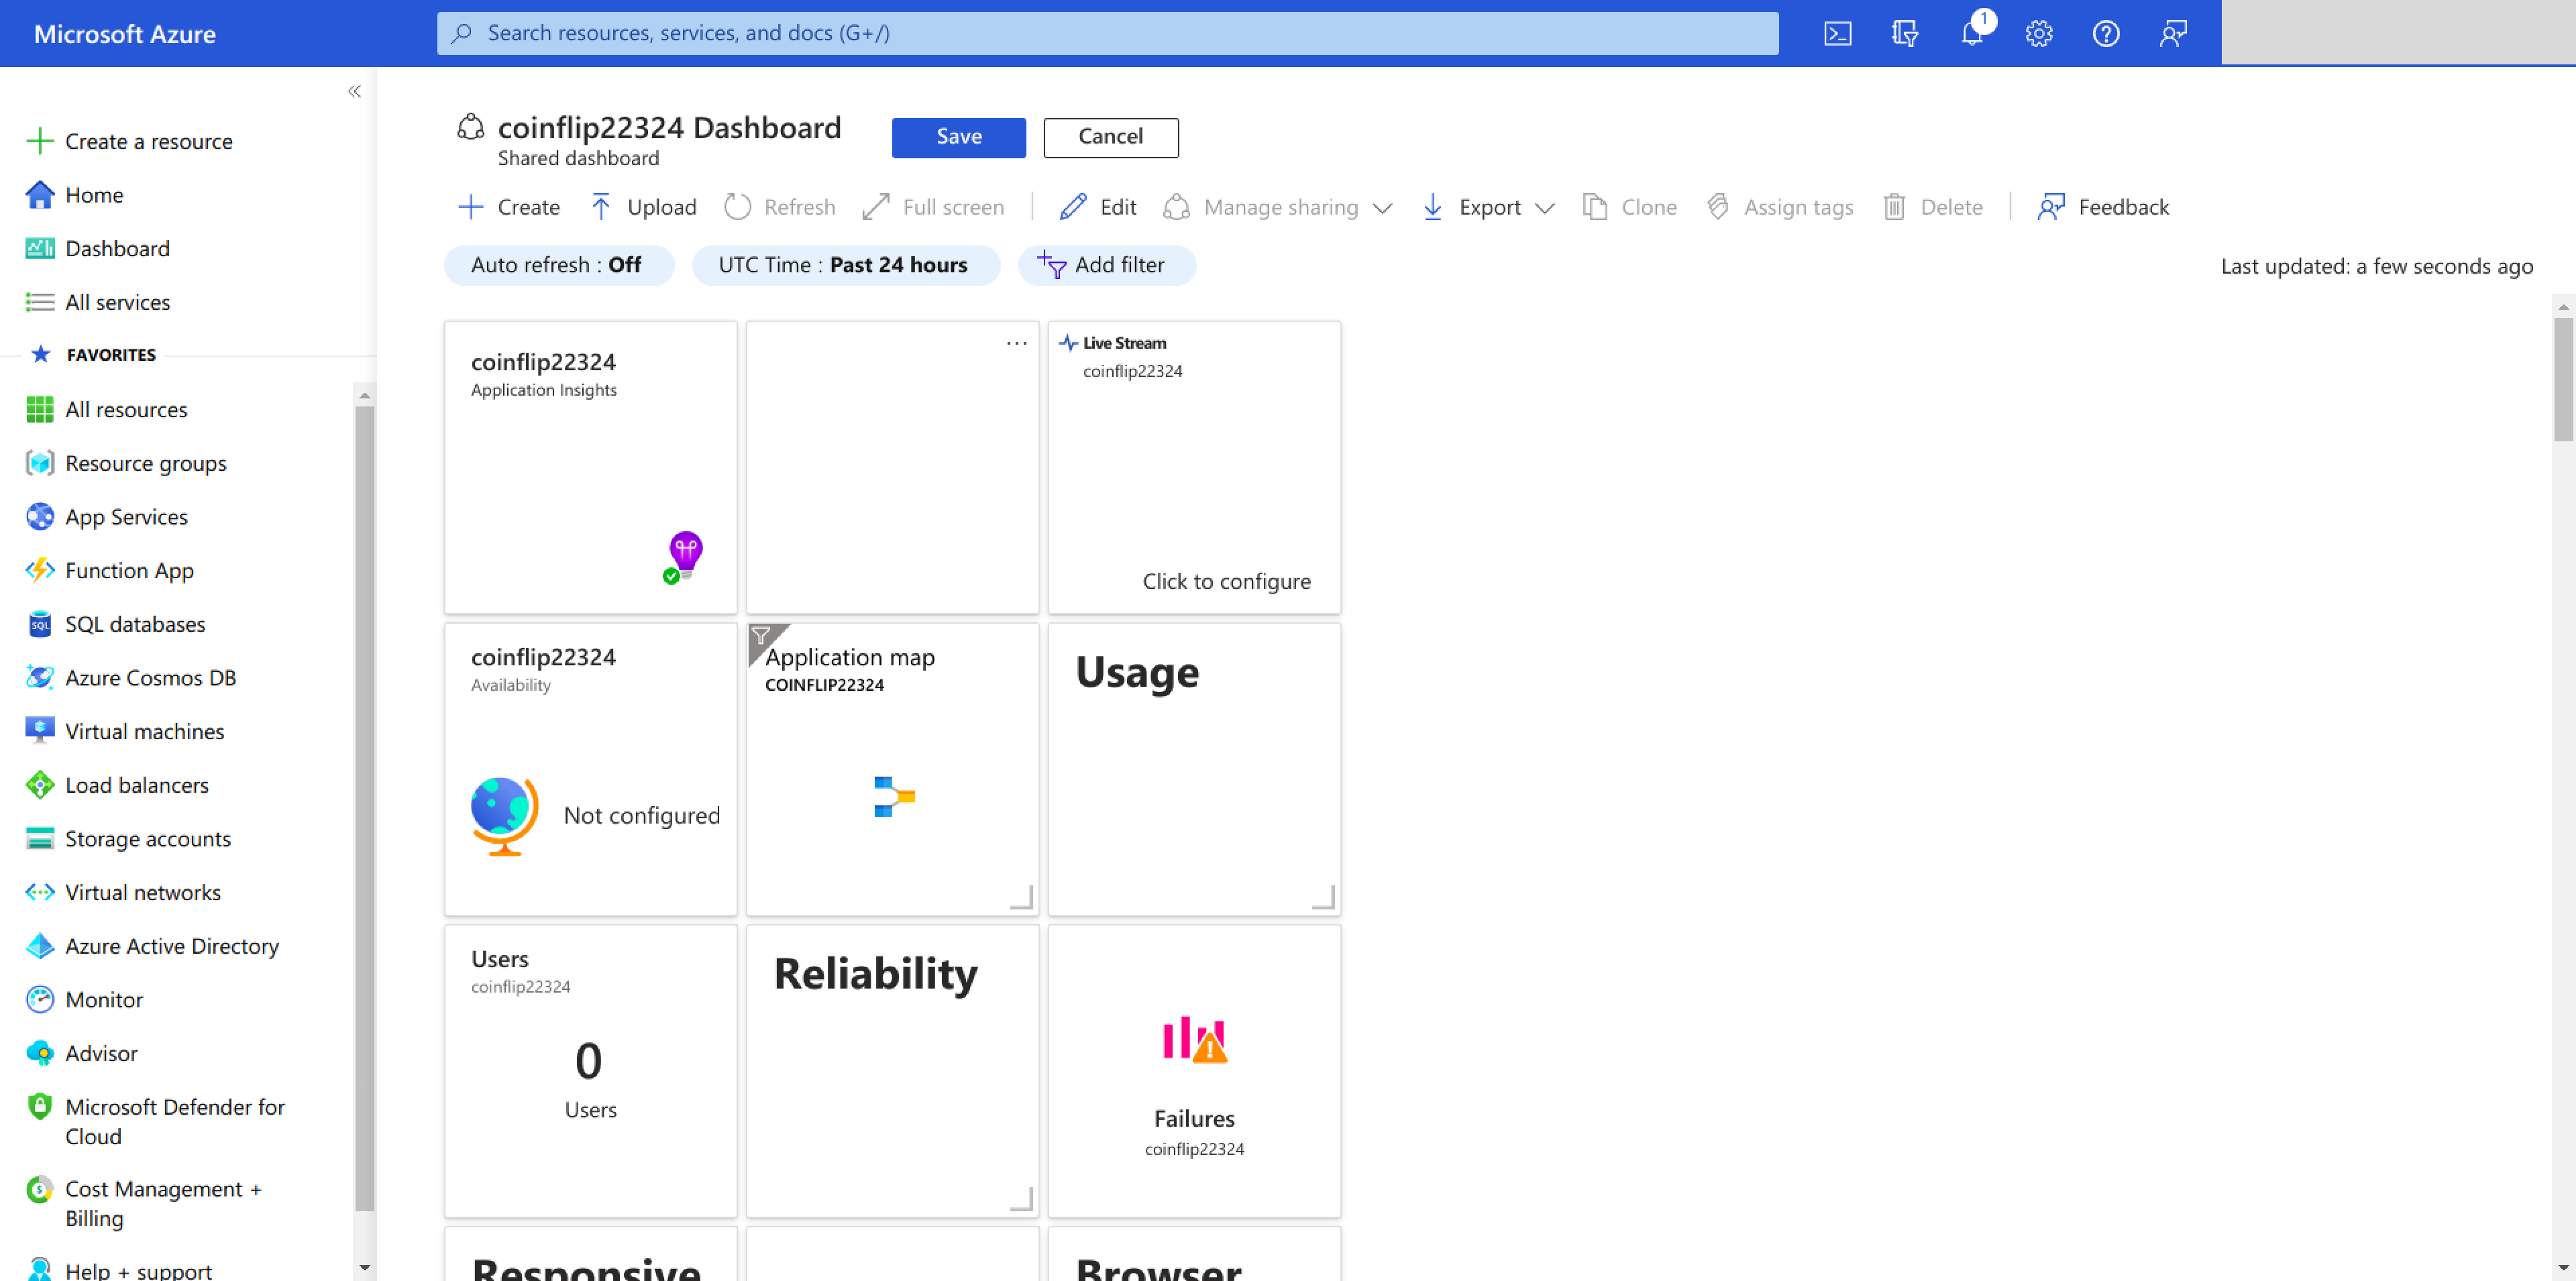
Click on the Application Insights resource to navigate to the Application Insights page. On the Insights page, click Dashboard to navigate to a dashboard where you can set different metrics and logs that you want your application to display:
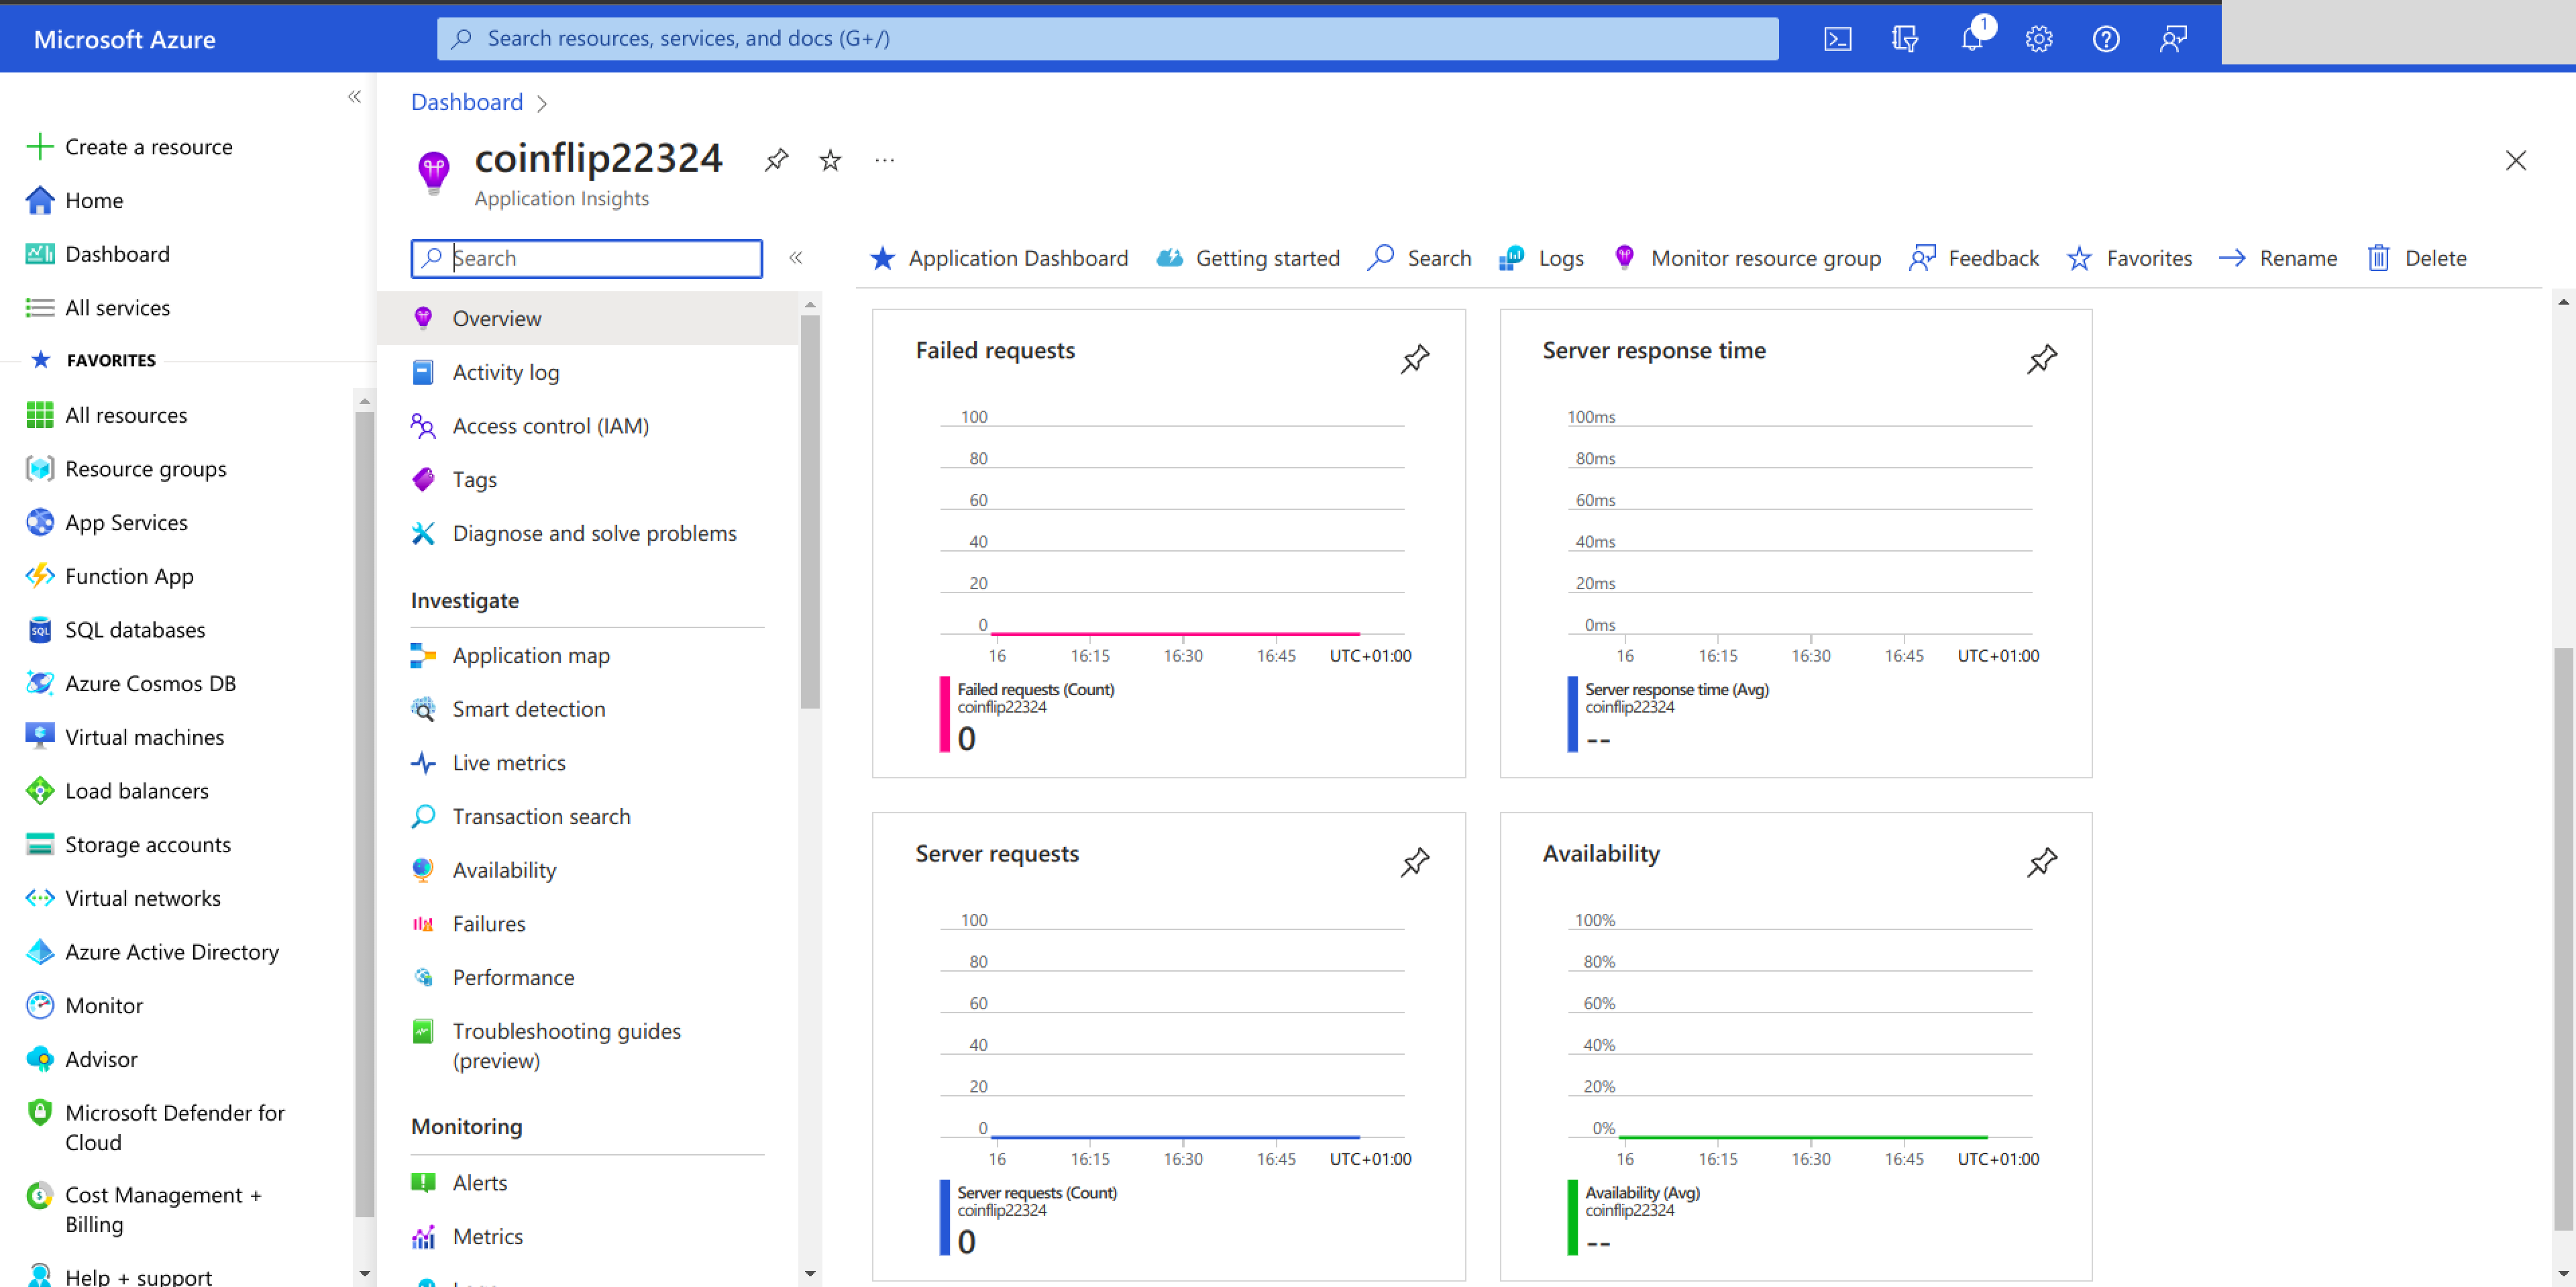
The main application insights page also shows metrics like failed requests and availability, which are helpful for investigating the performance of your application:
Monitor Function Executions
Apart from browsing through logs and metrics on the Application Insights pages, you can set up alerts to notify you when a service is getting out of control. You can access the Alerts page under the Monitoring section of your application insights resource:
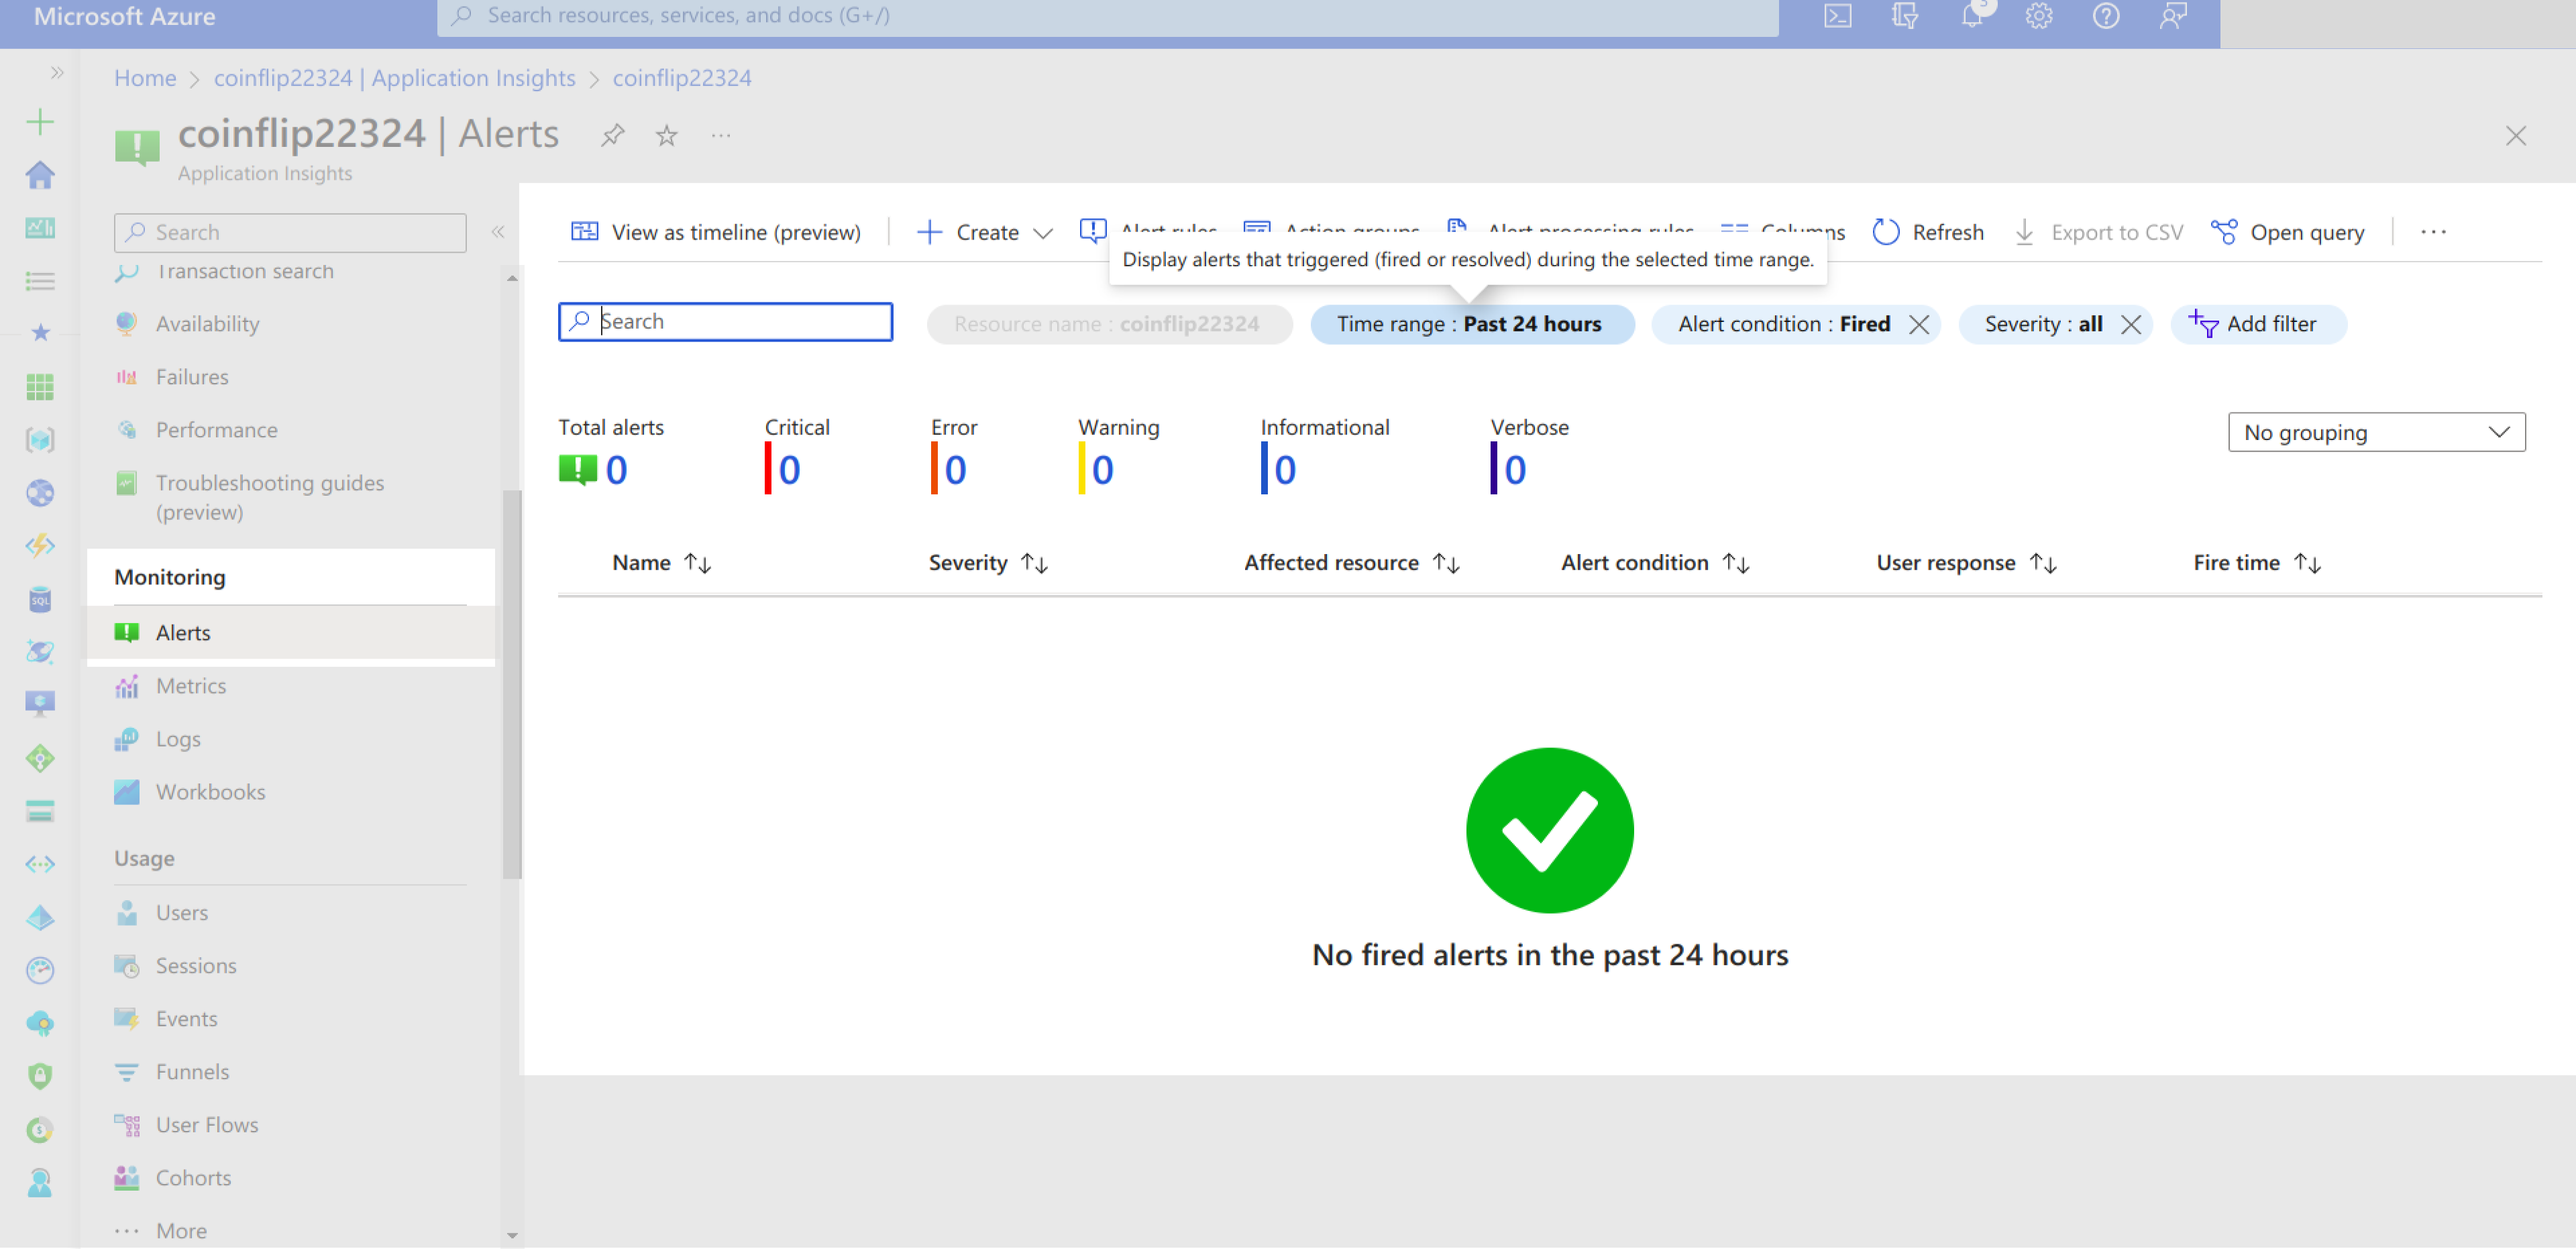
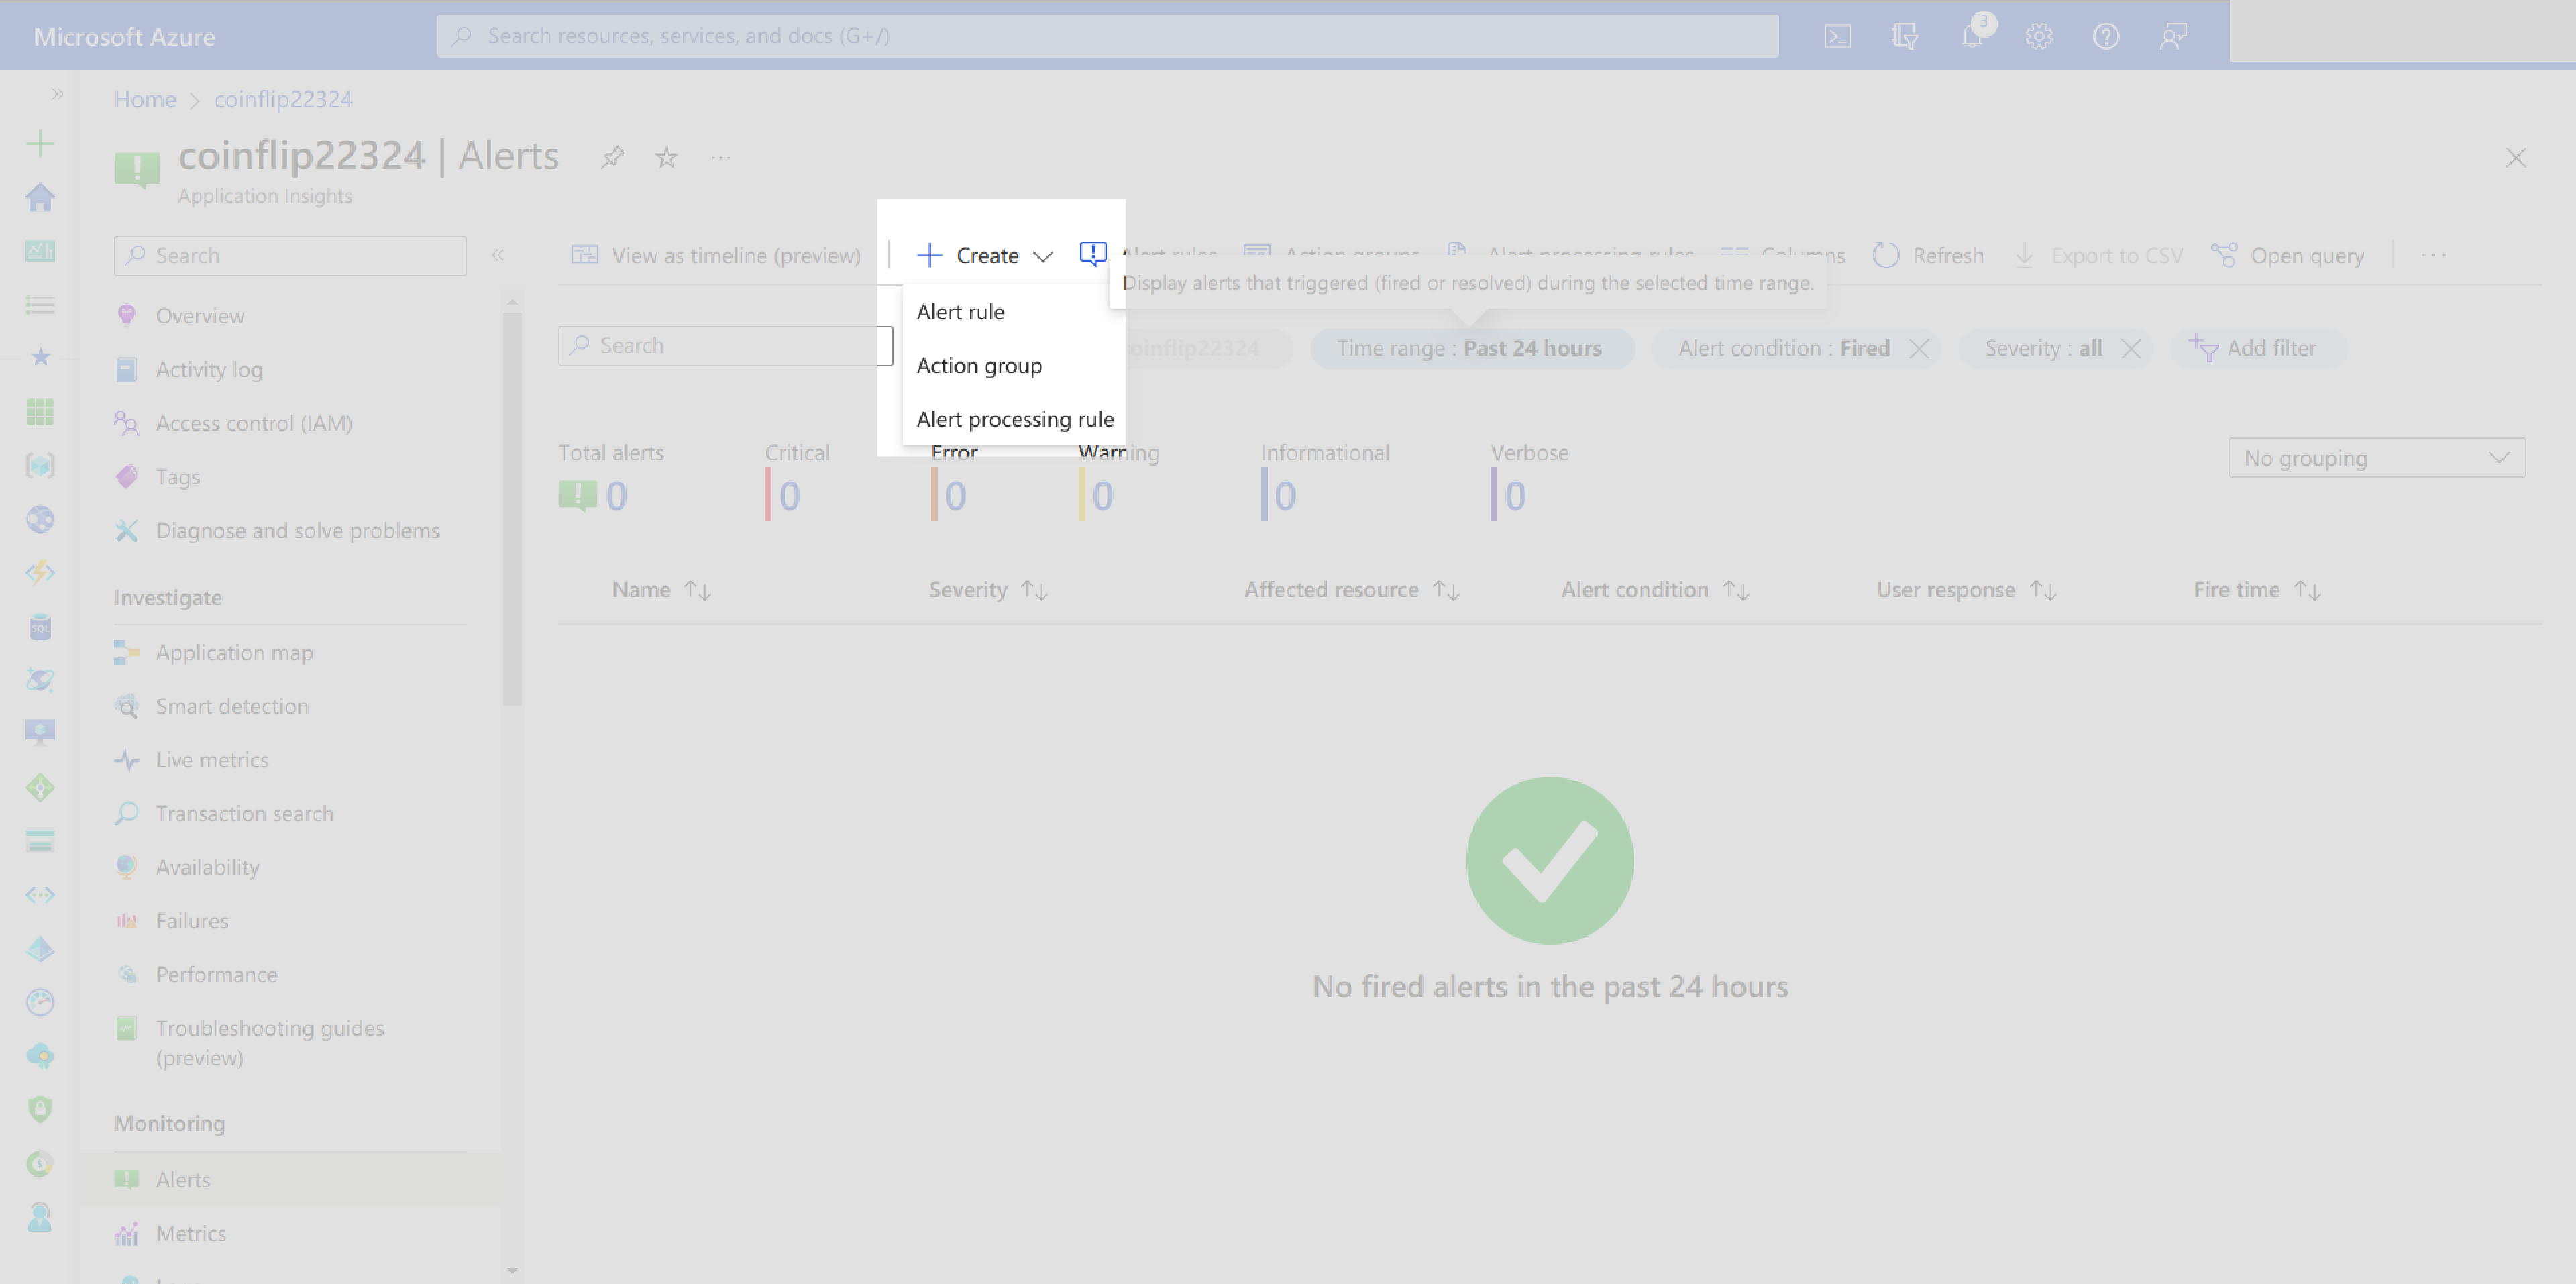
You should not have any alerts set up yet. You can create a new alert by clicking on the Create button and choosing Alert rule:
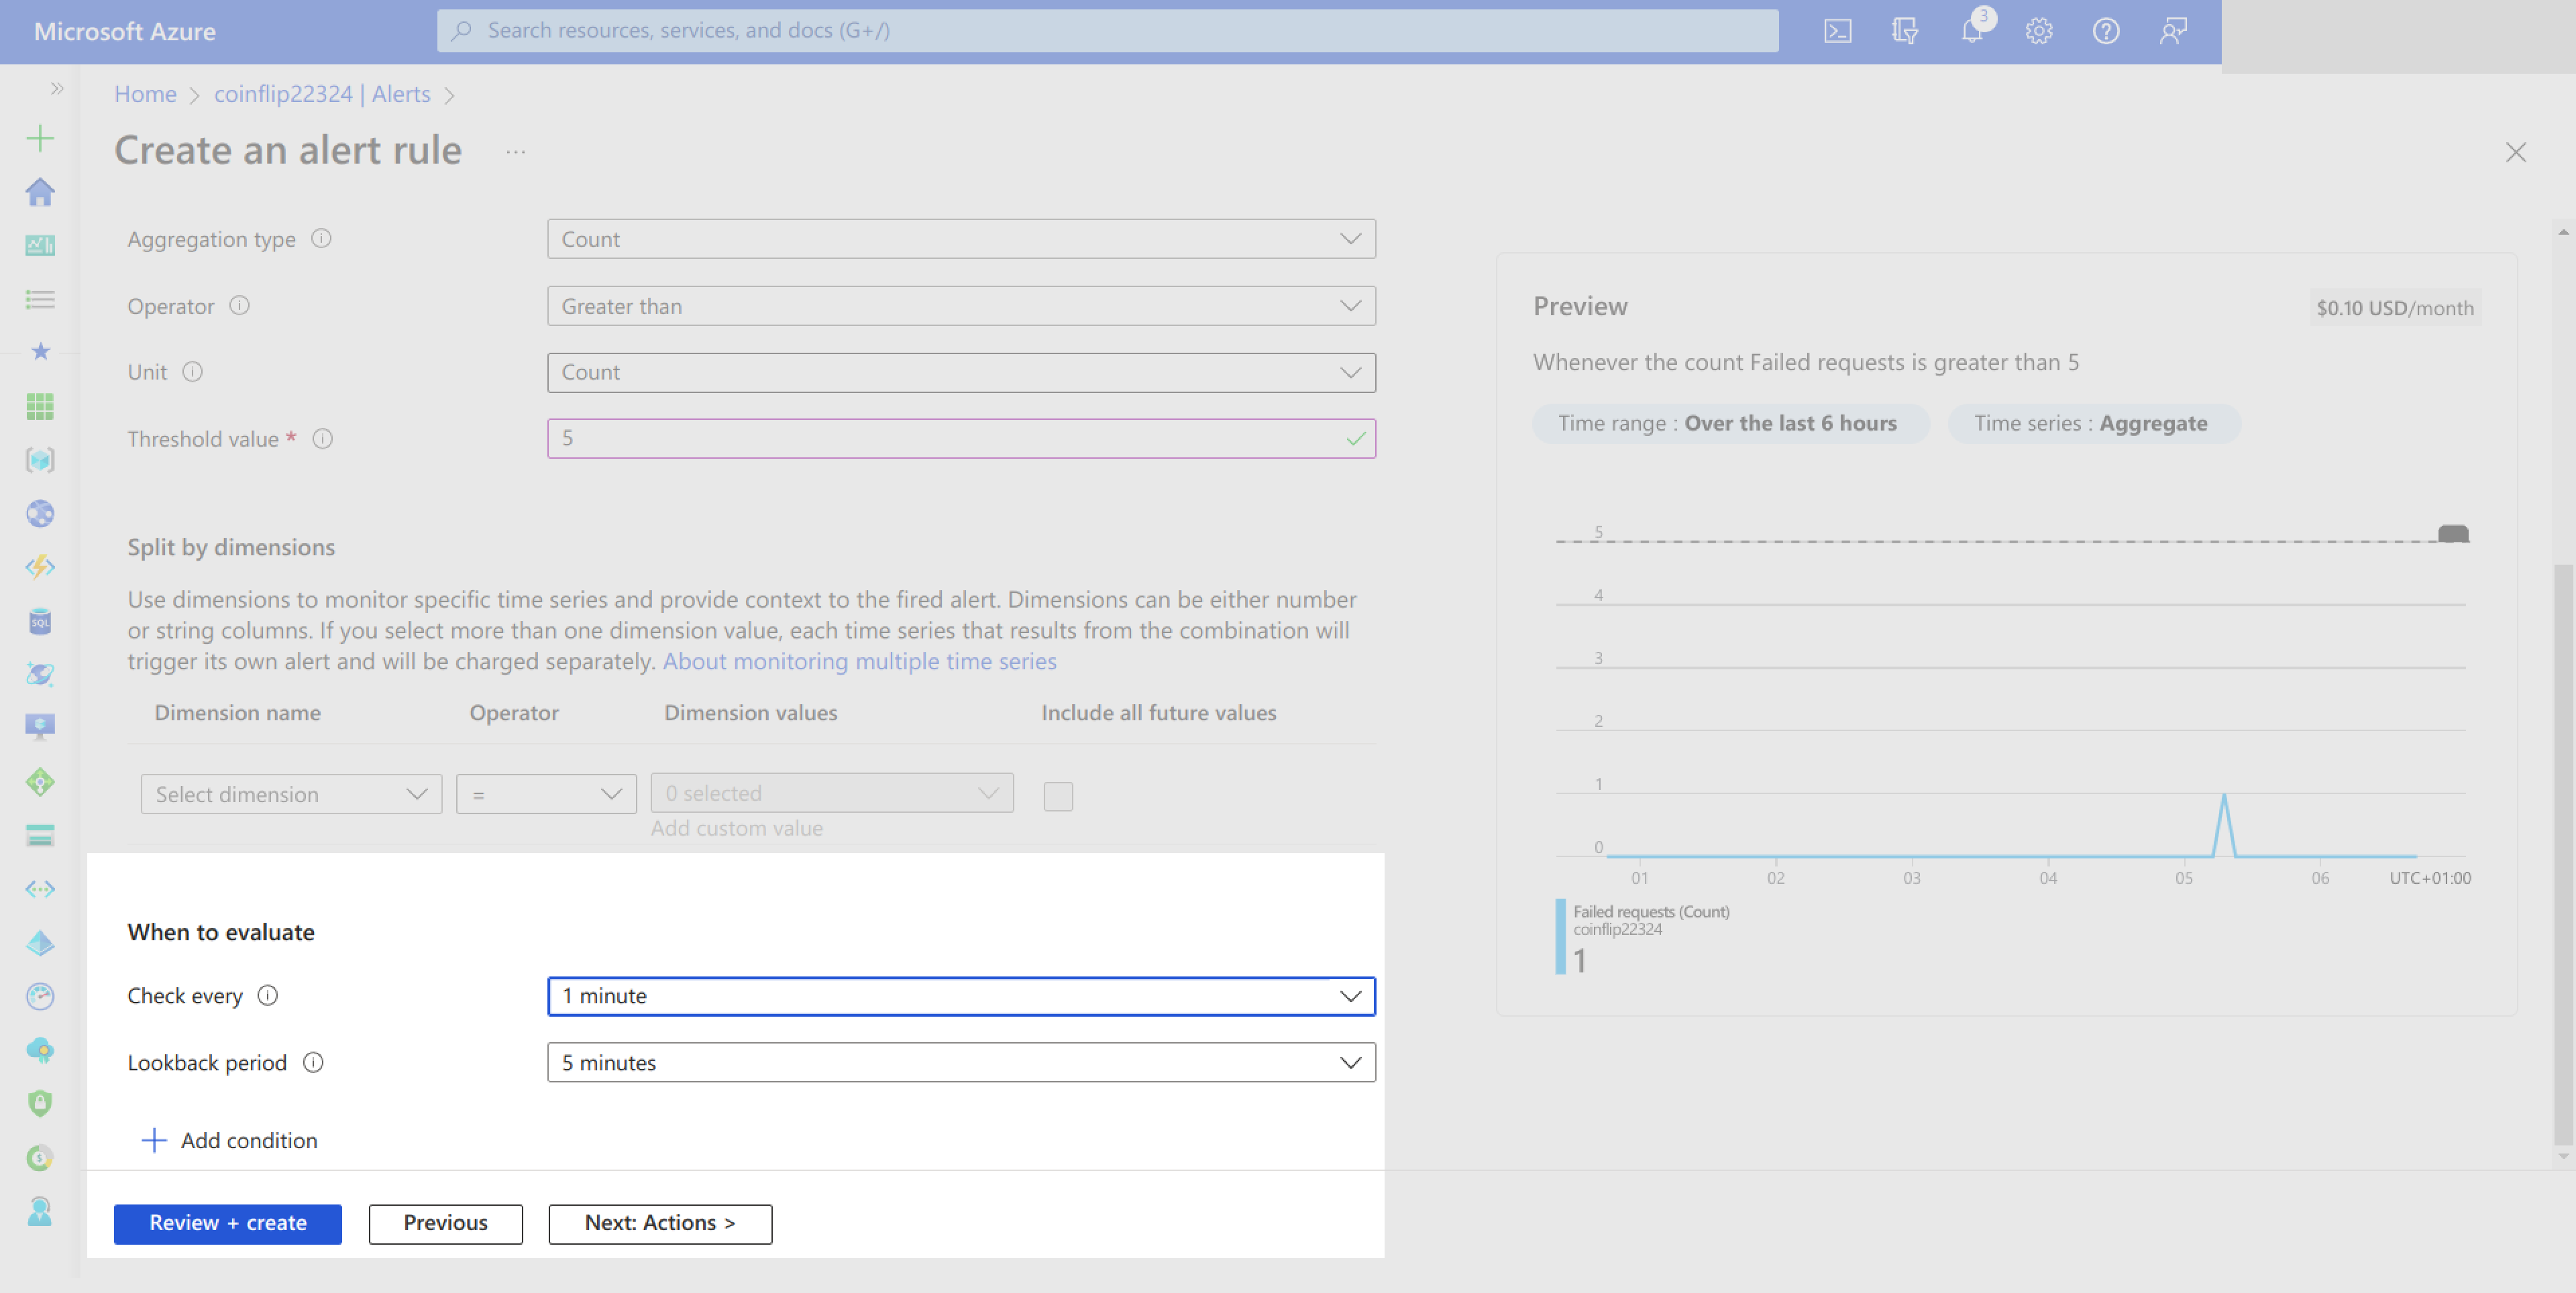
On the Create Alert Rule page, you can set up an alert rule for failed requests. This alert can be set to be triggered when there are more than five failed requests in the timeframe of the alert check:
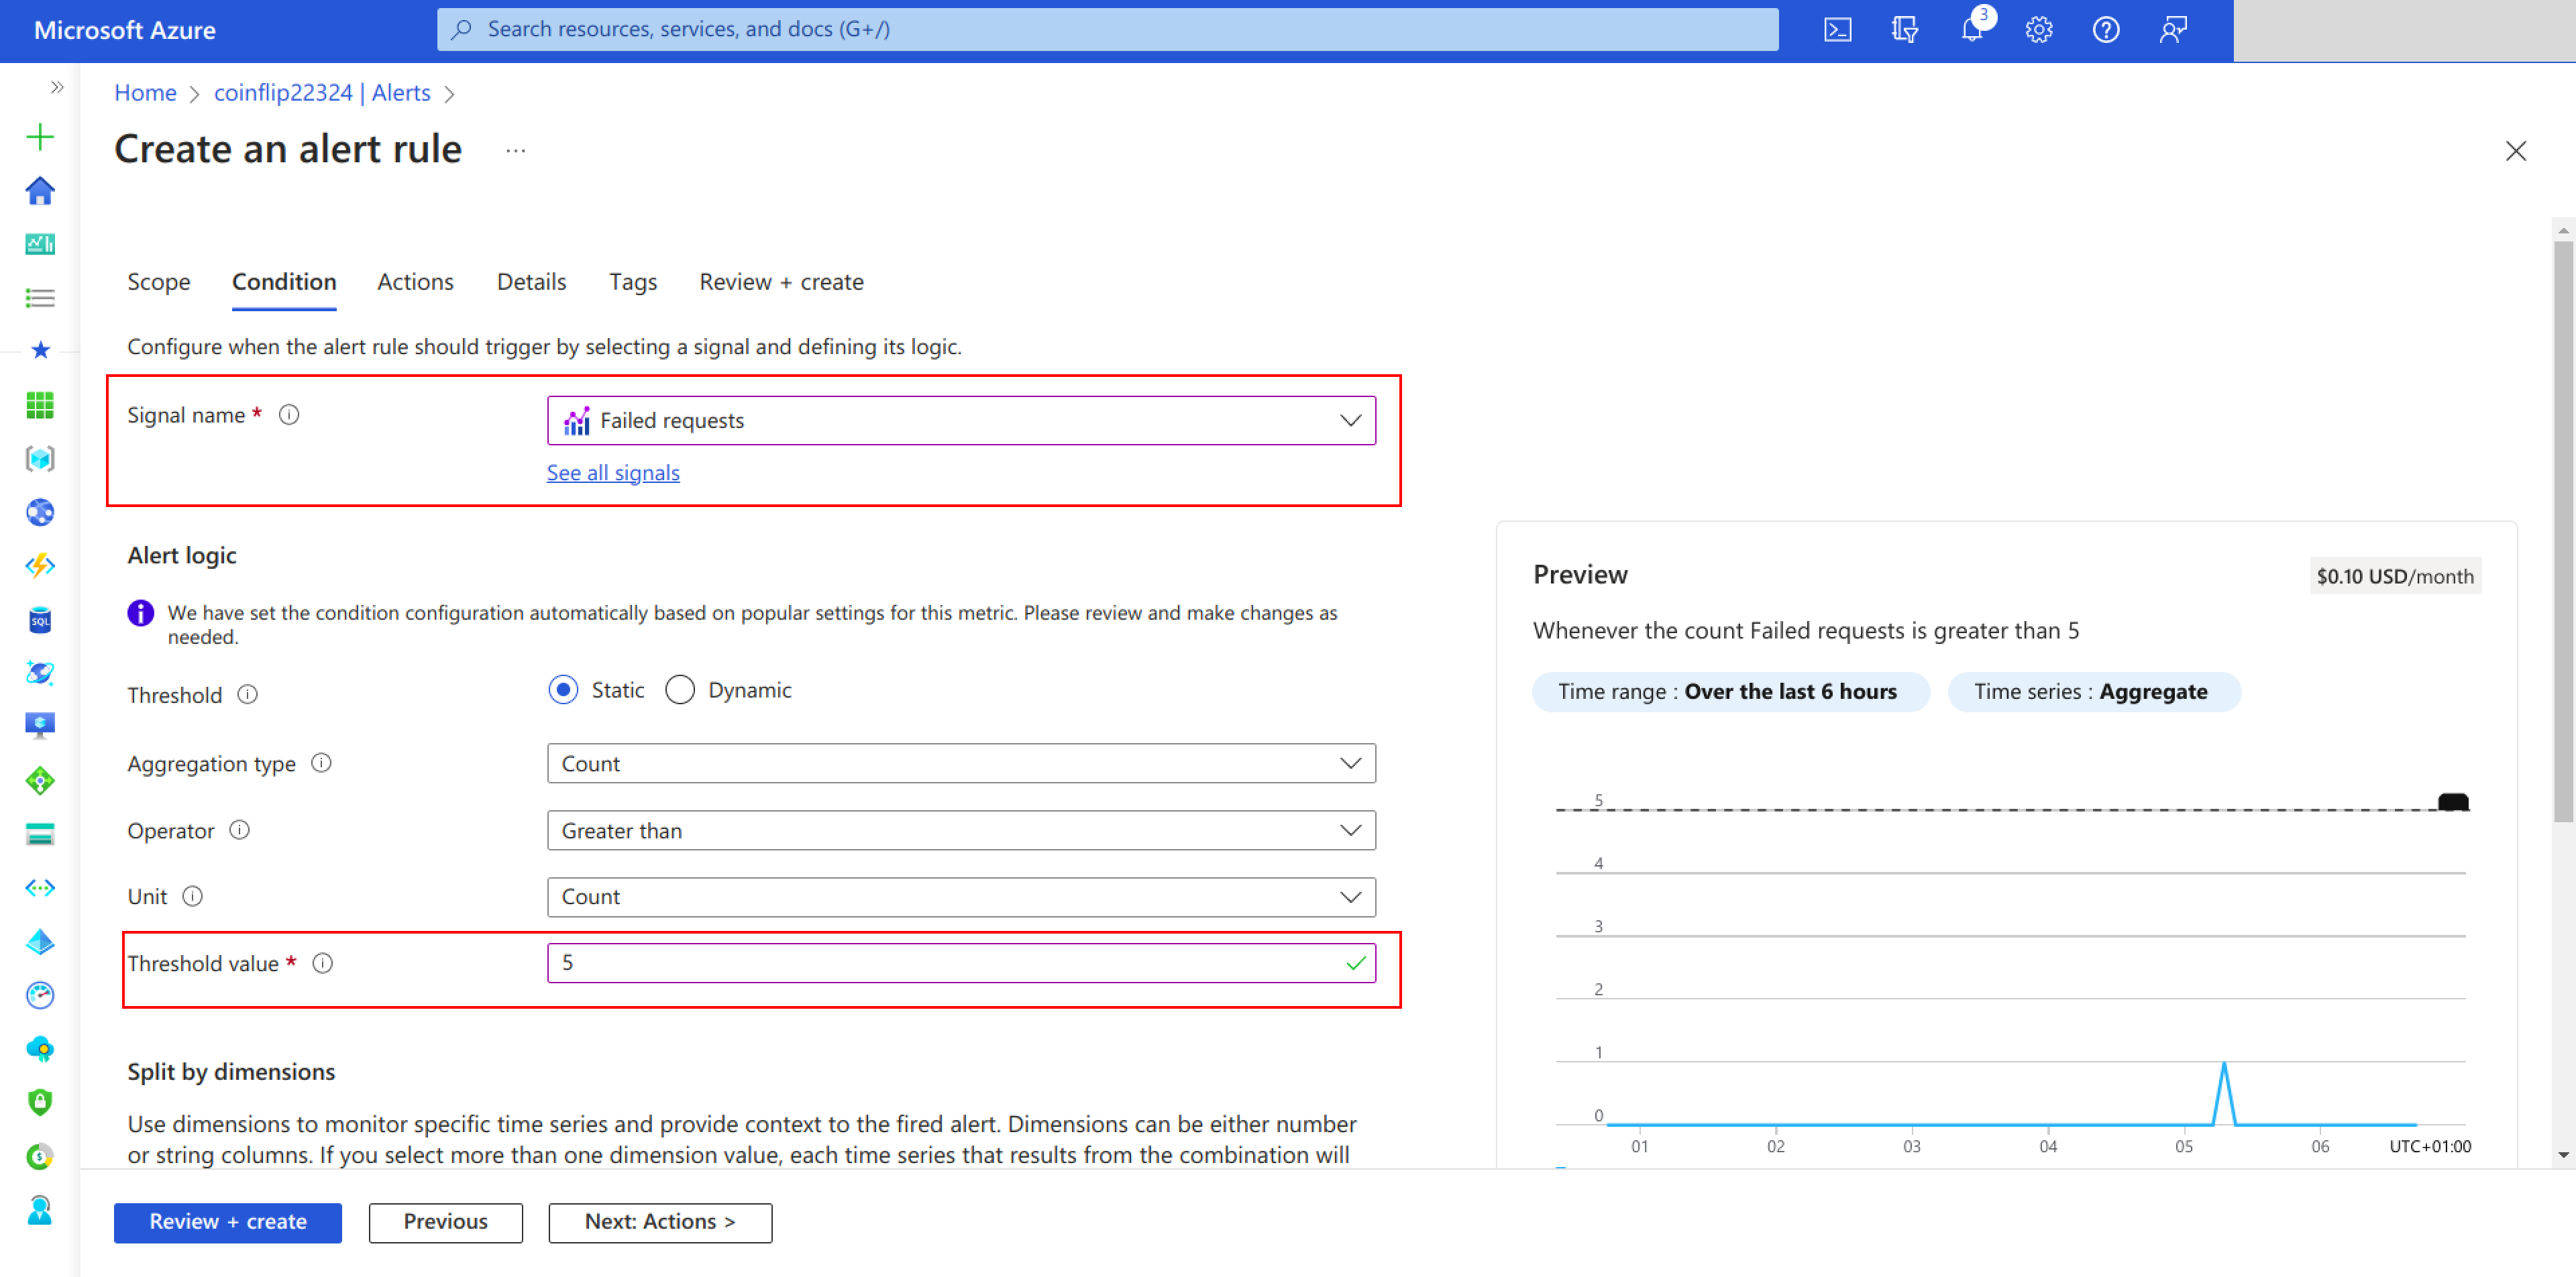
This alert rule is checked every minute, and it looks back at the logs created in the past five minutes for any failed requests. You can choose to change these default values at the bottom of the alerts creation page:
On the Details page of the alerts rule creation flow, you should set the name and the severity of this new alert. The severity does not have to be Error, but it’s better when the alert severity and the type of alert severity (ie failure) both match:

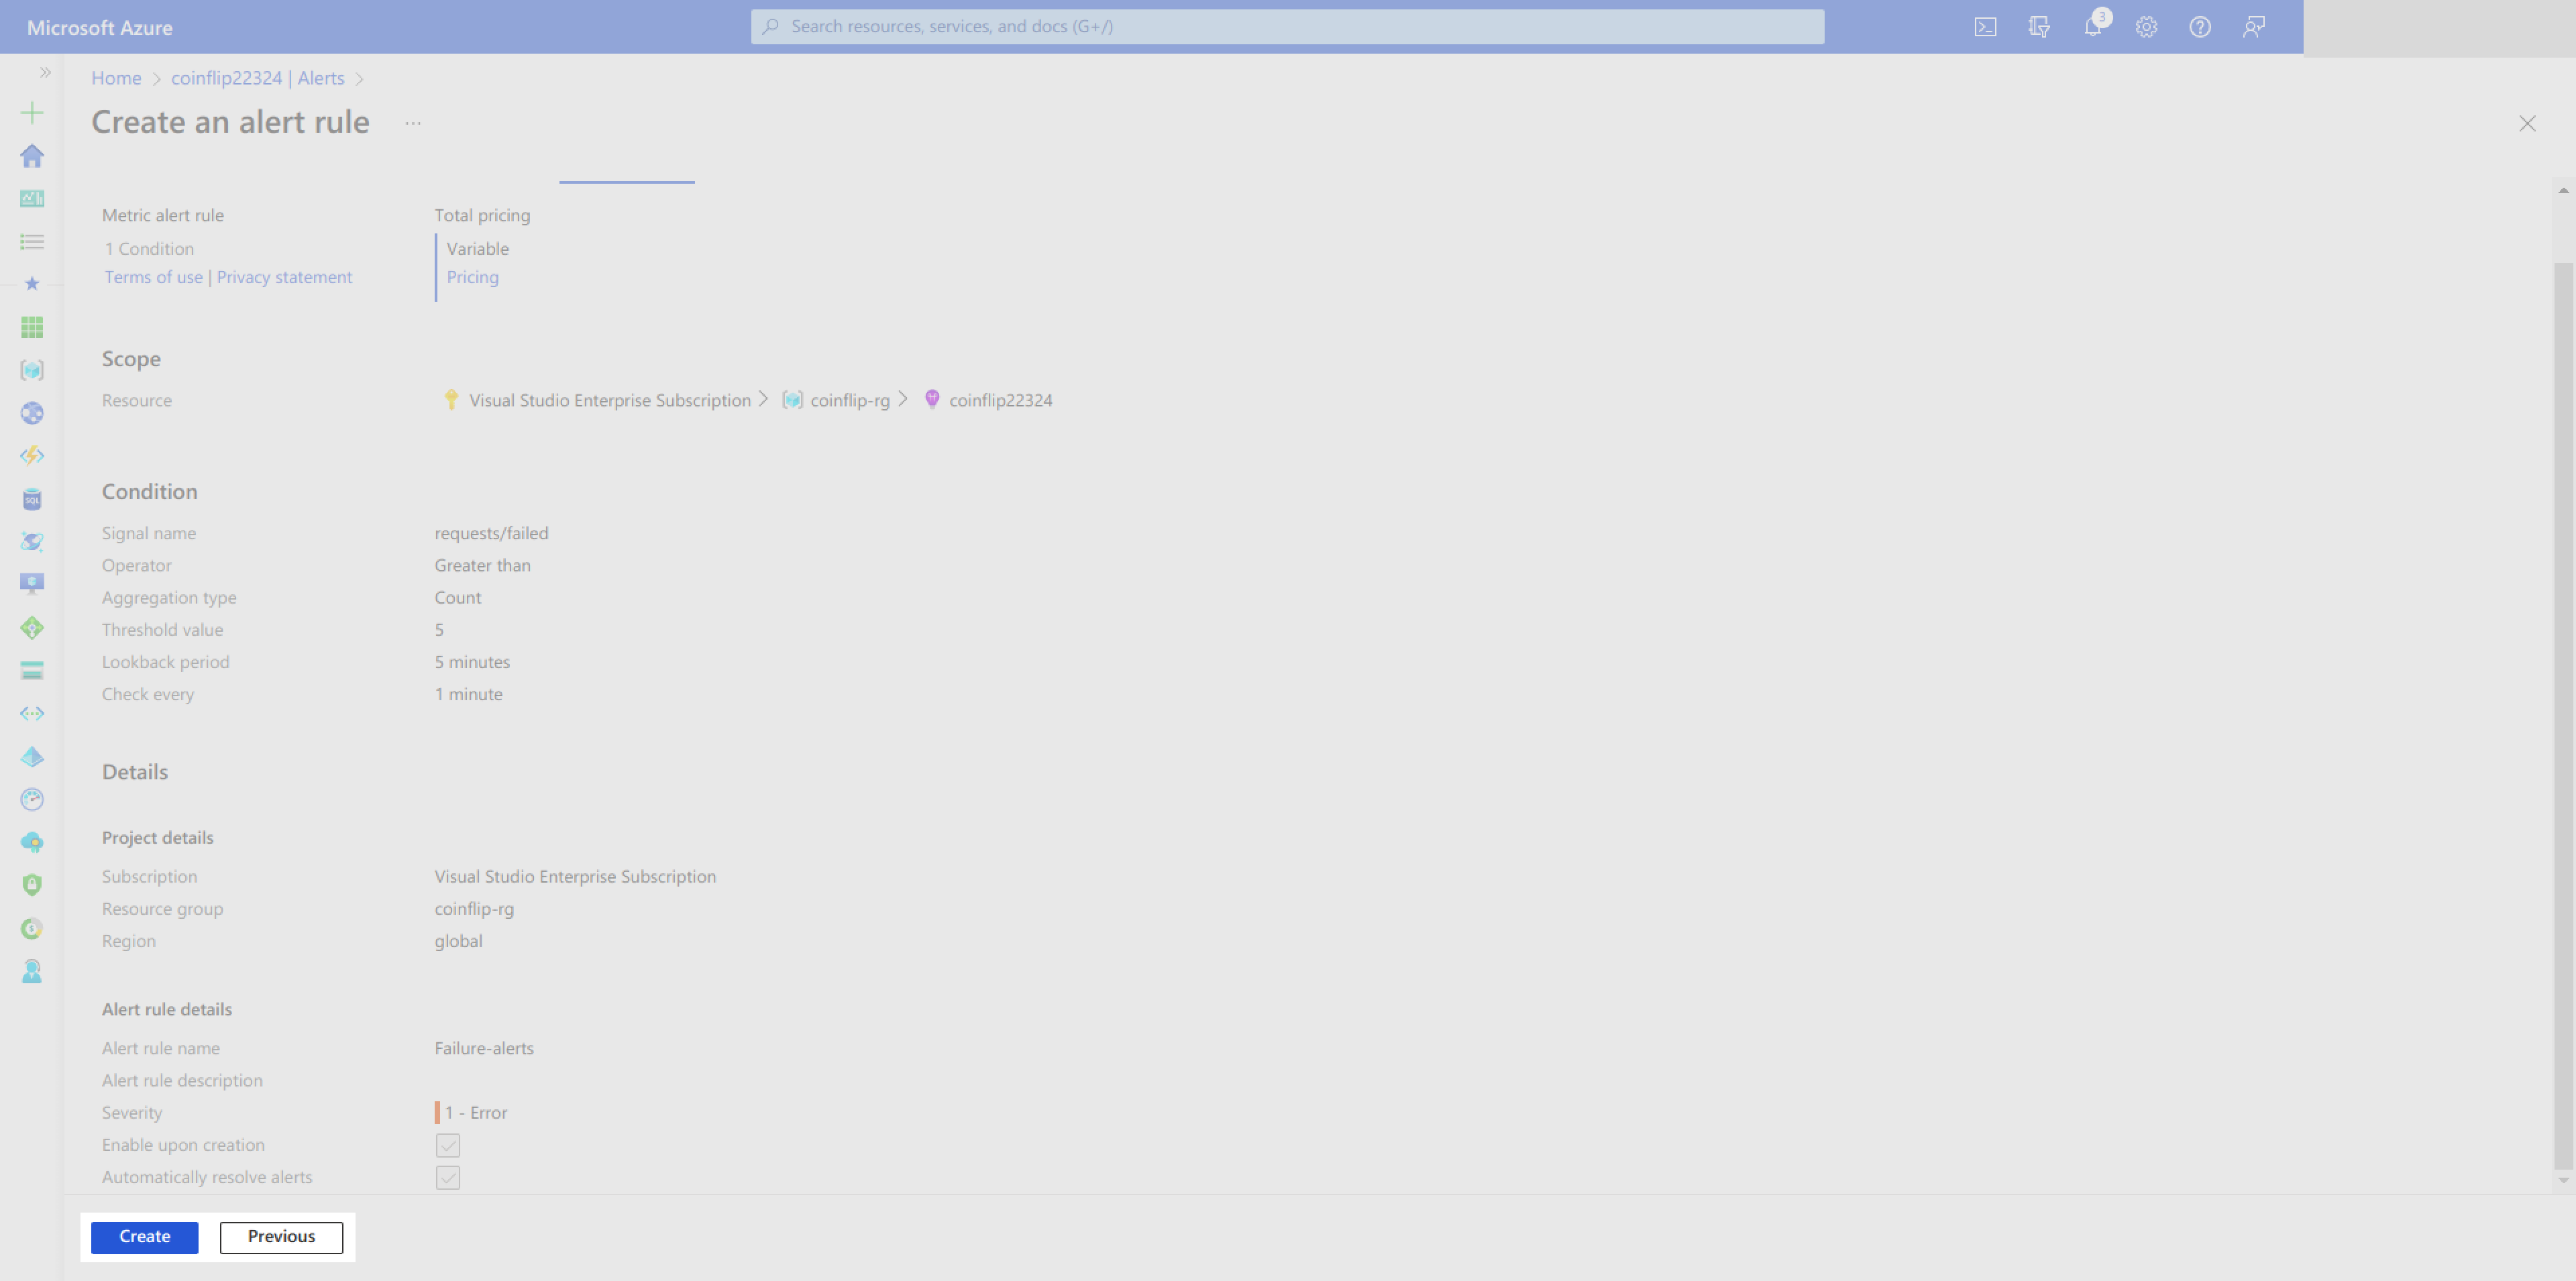
After setting the name and severity, confirm your settings on the Review + Create page and then finalize the alert rule creation by clicking on Create:
Query Logs and Metrics
You can query logs to discover insights about specific metrics you care about. This can done on the Logs page of the function app:
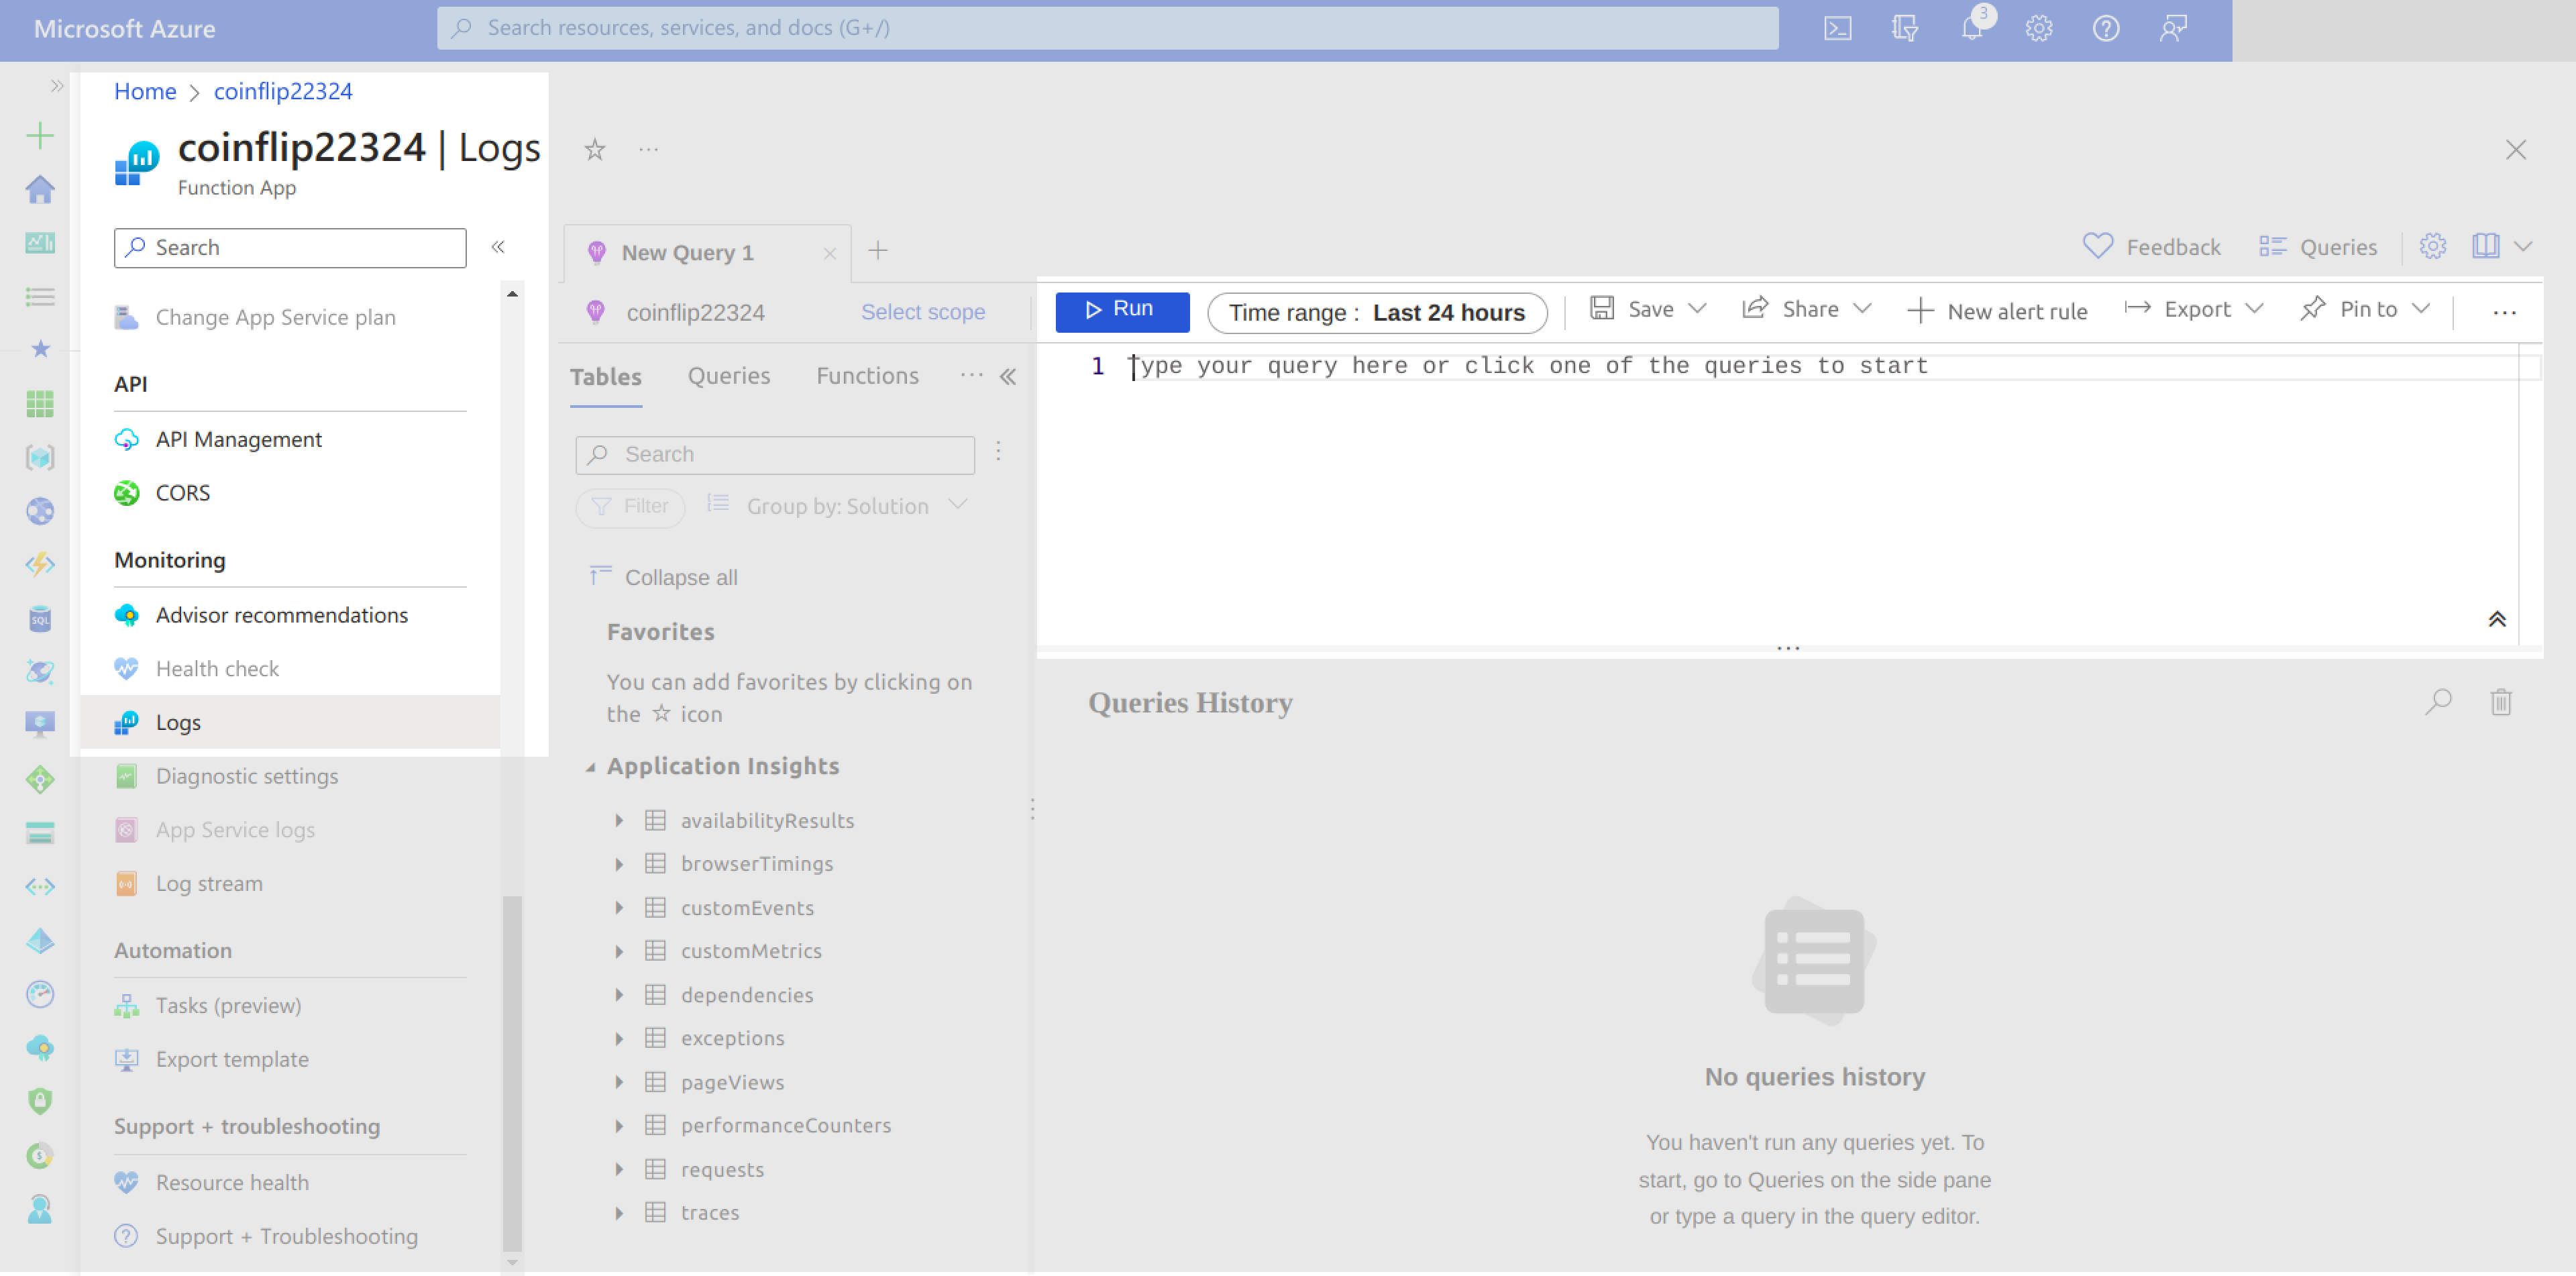
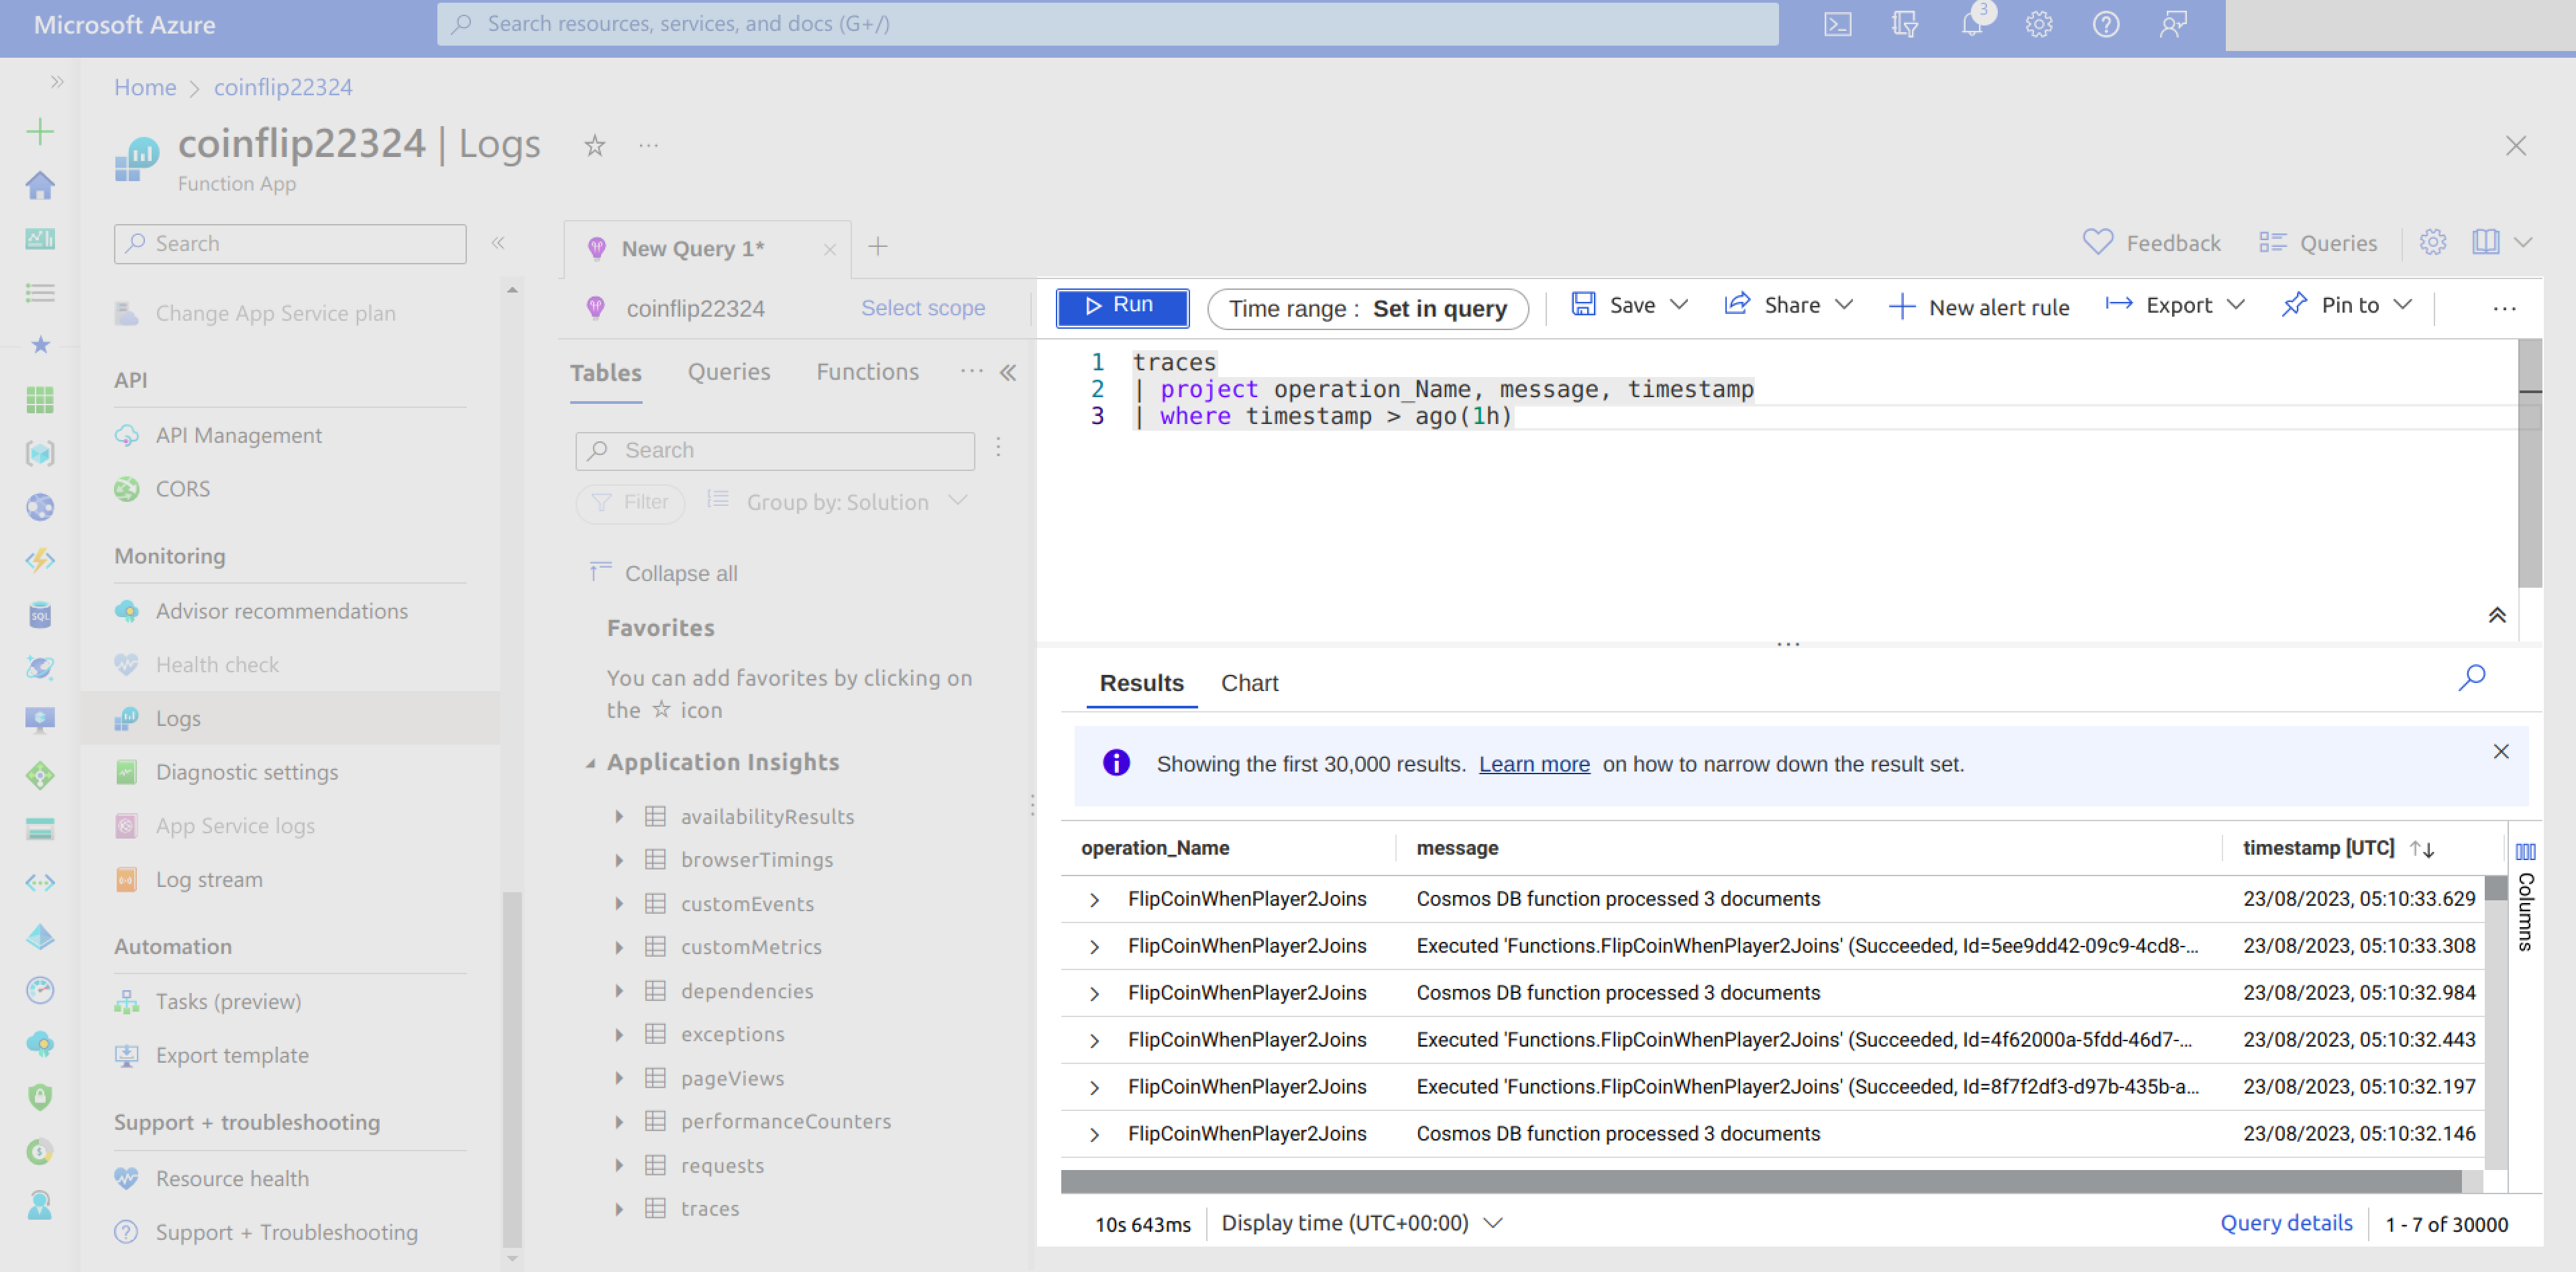
The Logs page opens up with a new query screen that allows you to add a new query. You can fetch the function name, the associating message, and the log time for the first 30,000 logs using the following query:
traces
| project operation_Name, message, timestamp
| where timestamp > ago(1h)
You should get an output similar to this:
You can choose to add multiple queries in the queries input box and execute them separately by highlighting:
traces
| project operation_Name, message, timestamp
| where timestamp > ago(1h)

requests
| summarize count = count() by operation_Name, resultCode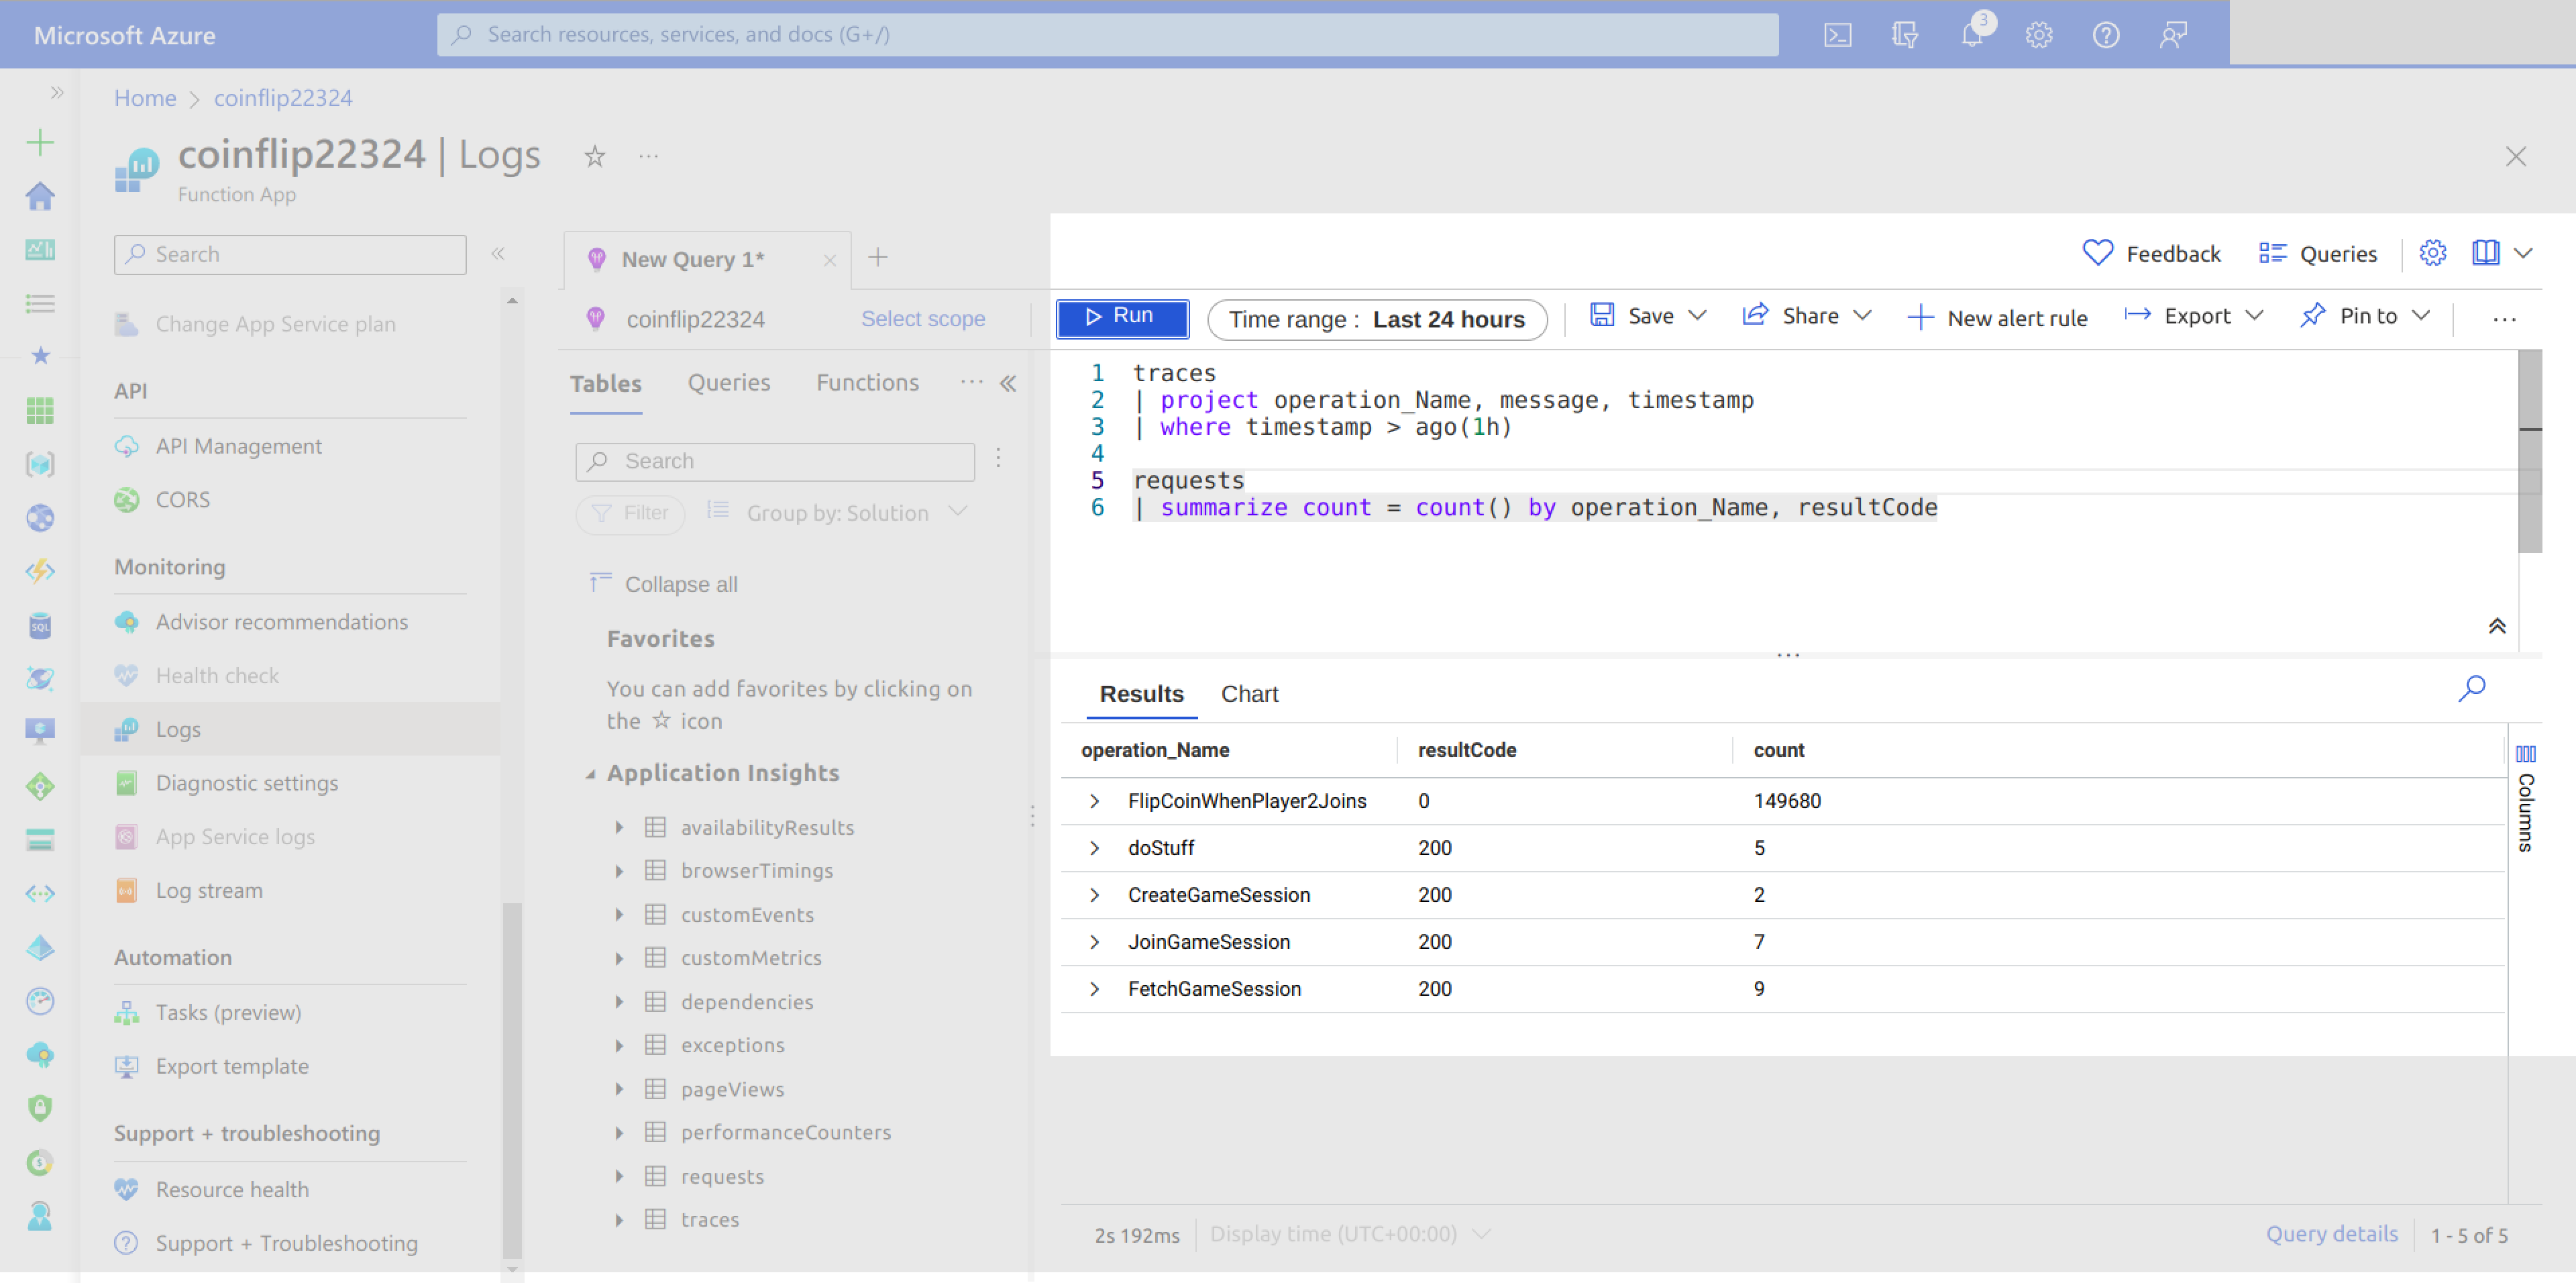
Secure the Function
There are generally two ways of securing your function:
- Using function keys, which can be unique to each client accessing your functions
- Using cross-origin resource sharing (CORS) to limit the domains that can access your function on a browser
In this section, you’ll implement both approaches so your function has maximum security.
Using Function Keys to Secure Your Functions
Function keys are tokens that clients can use to authenticate themselves before being given access to a function. Every function has a default function key, but this key is only used if the authLevel is set as function.
Say you define a new function called doStuff in your local development environment. You can set it to use function key authentication by changing the authLevel to function, as shown here:
app.http("doStuff", {
  methods: ["GET", "POST"],
  authLevel: "function",
  handler: doStuff,
});
Function keys authentication is not enforced when serving functions using the core tools. It’s only enforced when the function is deployed to Azure. If you go to your Azure portal and copy the functions URL, the code should be copied alongside it:
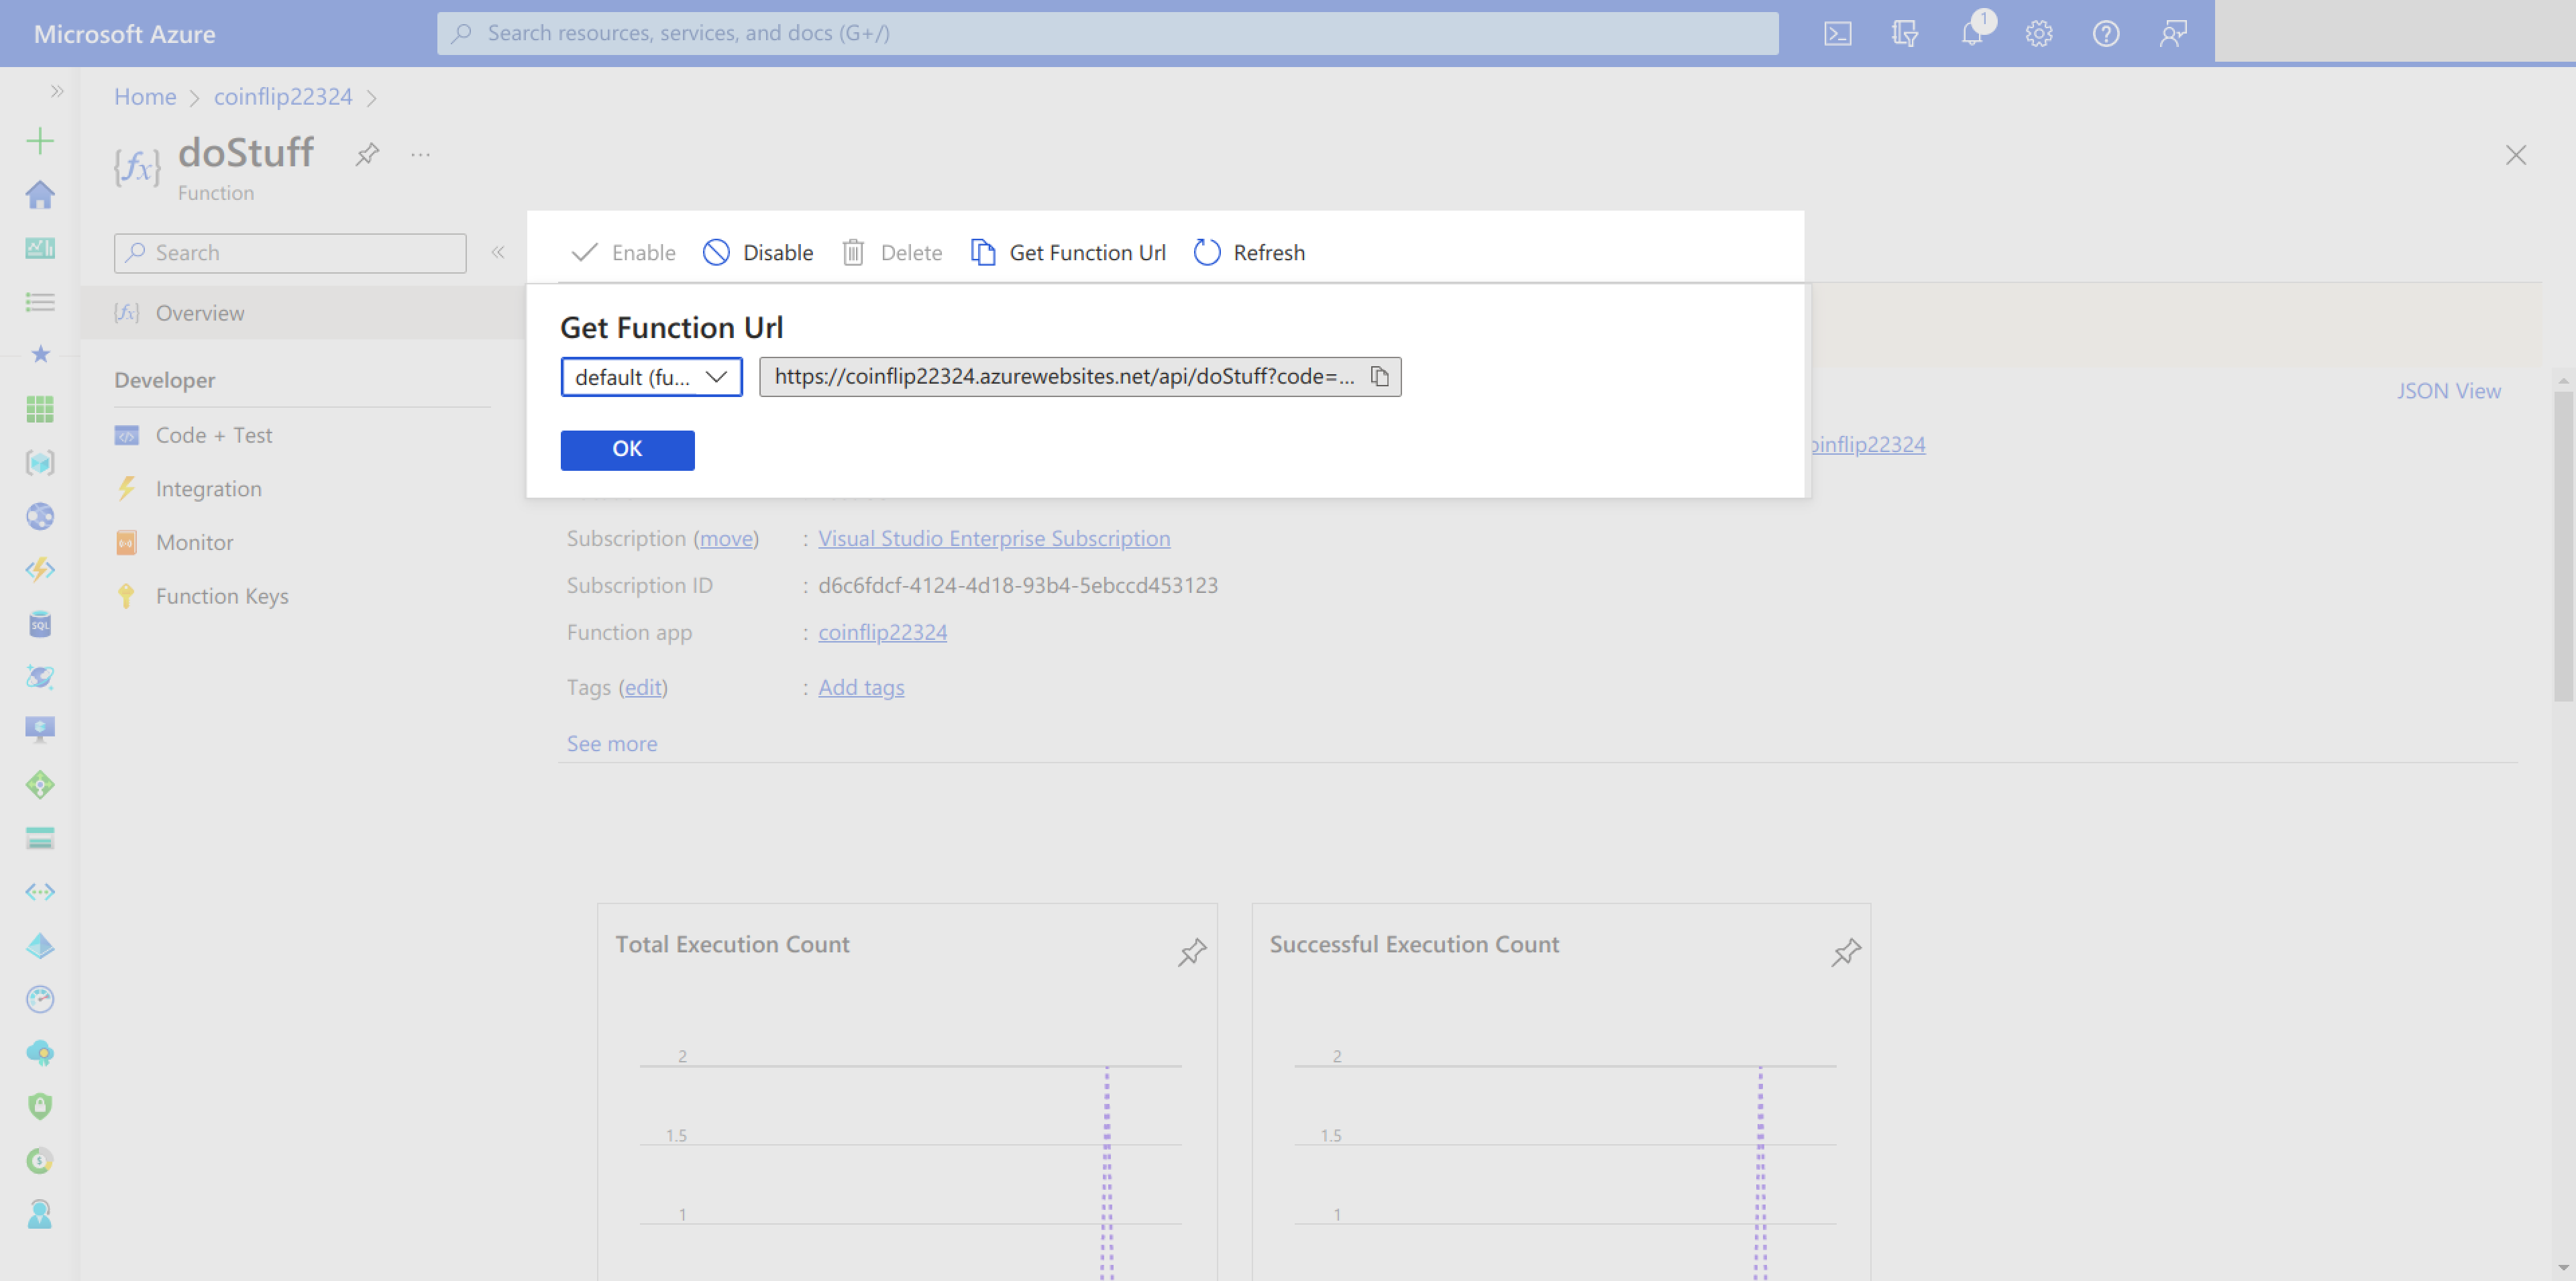
Here is an example function URL: https://coinflip22324.azurewebsites.net/api/doStuff?code=278XNmIuKVHfR3IypYHuwCpm-MUk-dafL2ebBMTxAlKPAzFu9-oxhA==.
If you invoke the function without the code, you will receive a 401 Unauthorized error.
The function key authorization technique is limited if the function is going to be used from a frontend single-page application. This is because the key is exposed to a browser. You should only use function key authorization when you’re calling your function from another server.
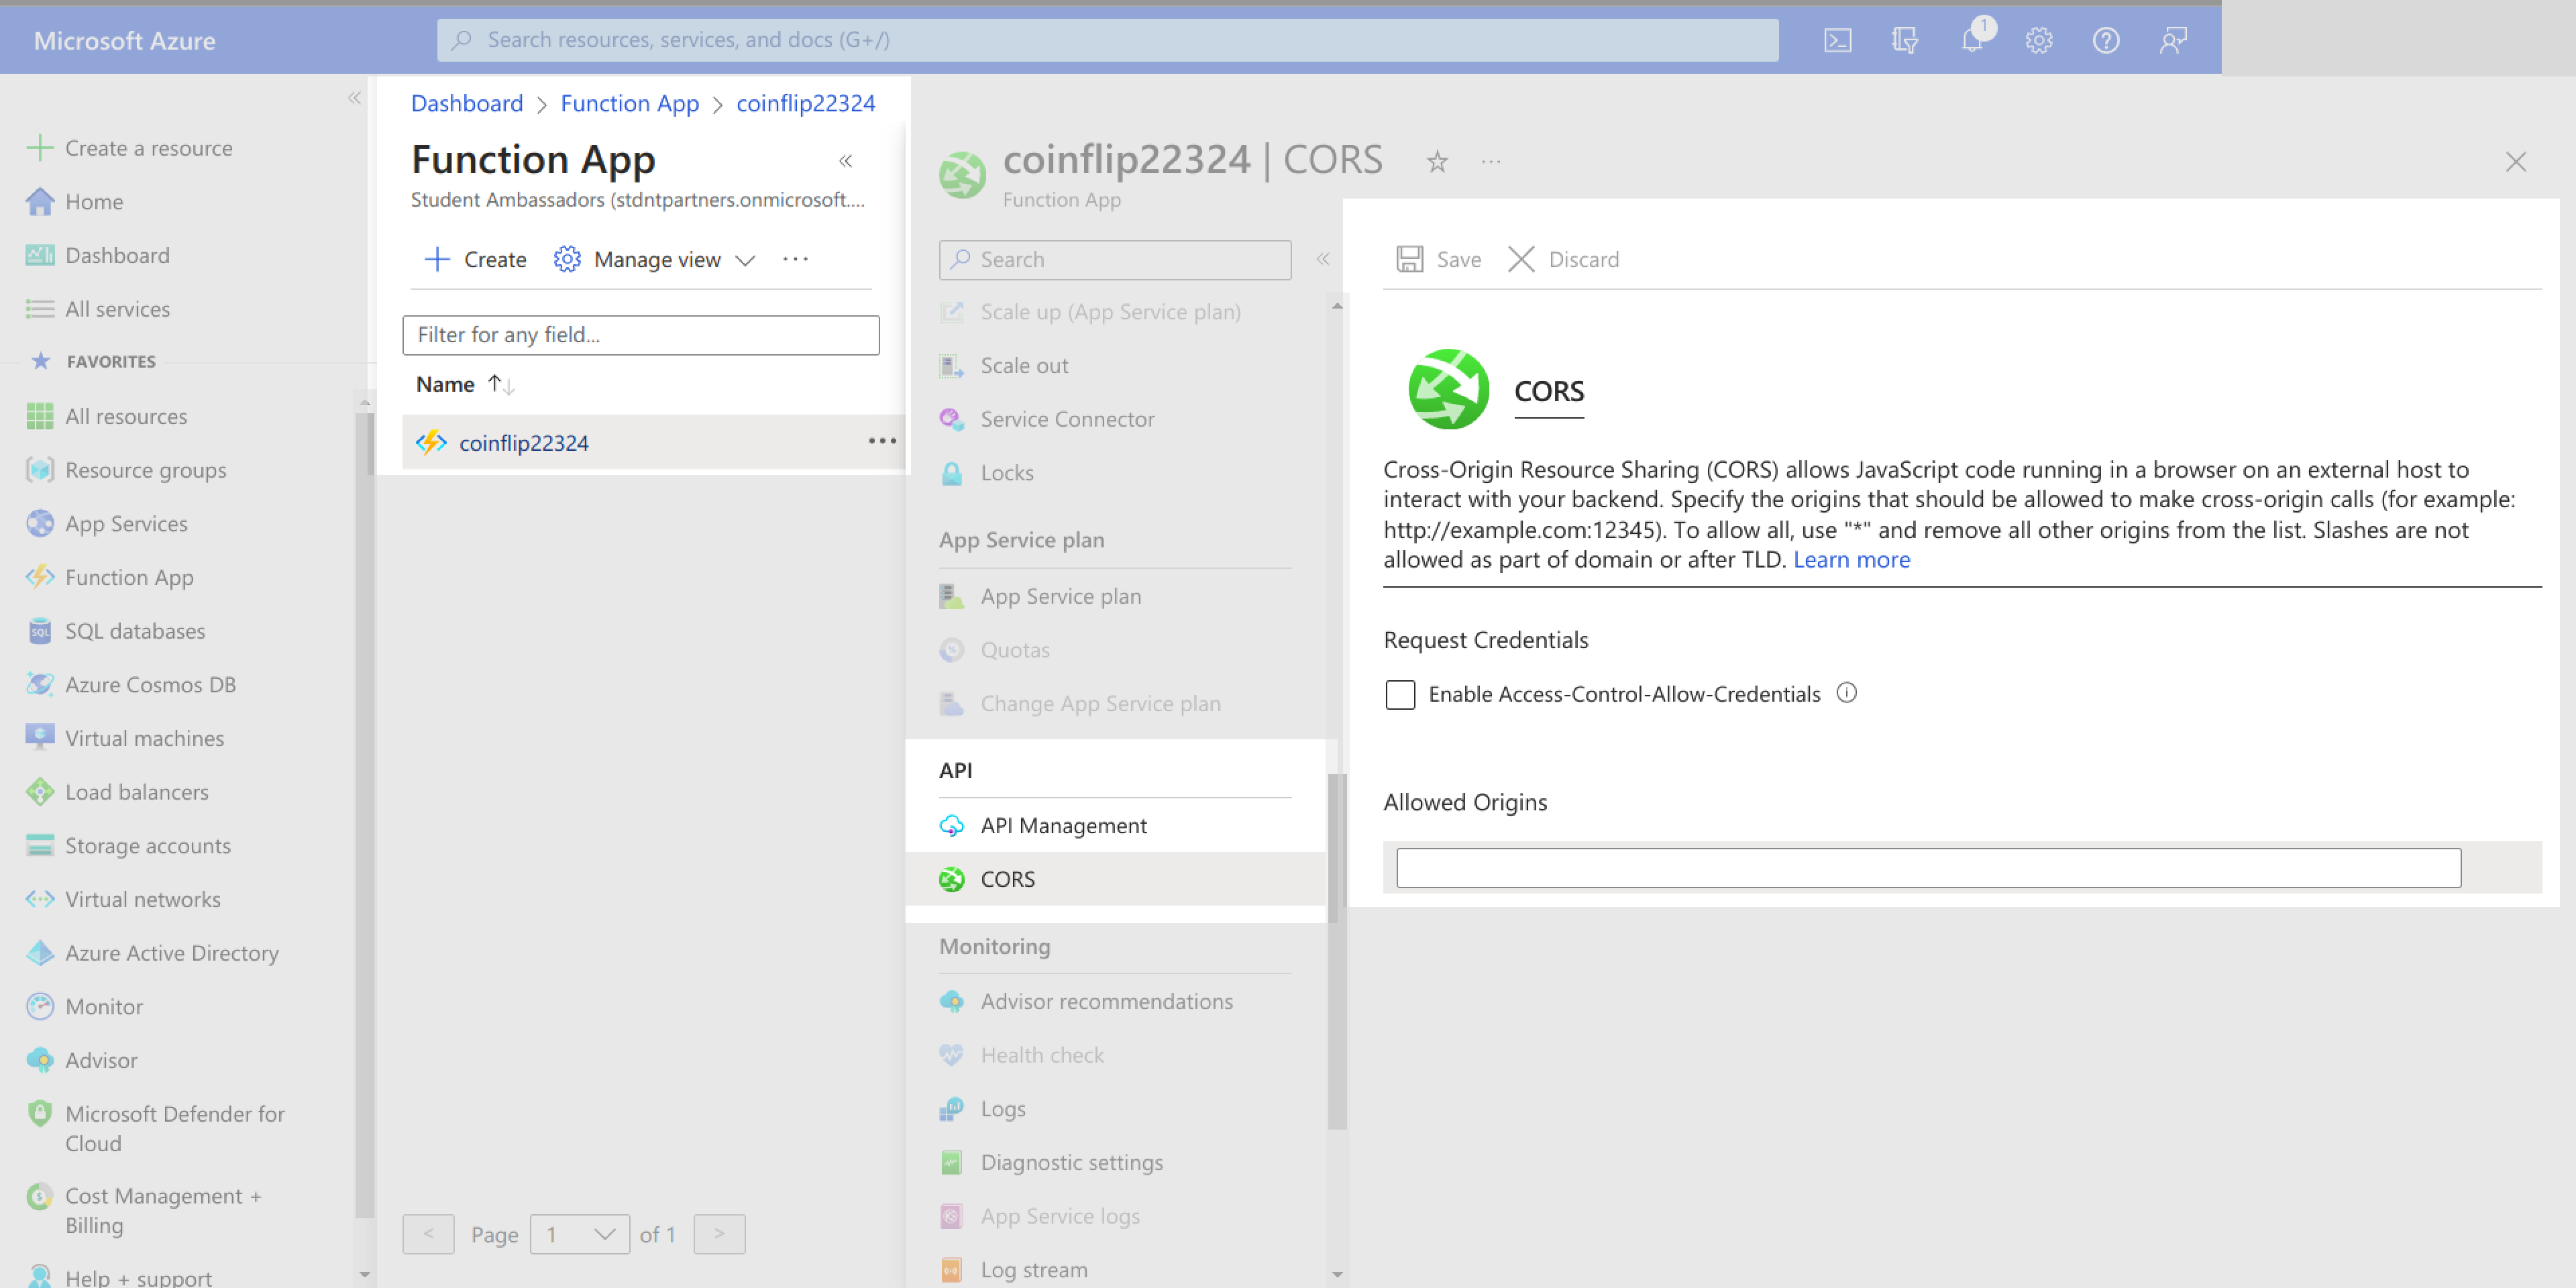
Secure Your Functions Using CORS
When using your Azure functions from a browser environment, it’s wise to set up CORS. This limits the domains that can call your function. You can set up CORS on the Azure portal by navigating to the functions app and scrolling to the CORS page under the API section. The following image shows the flow:
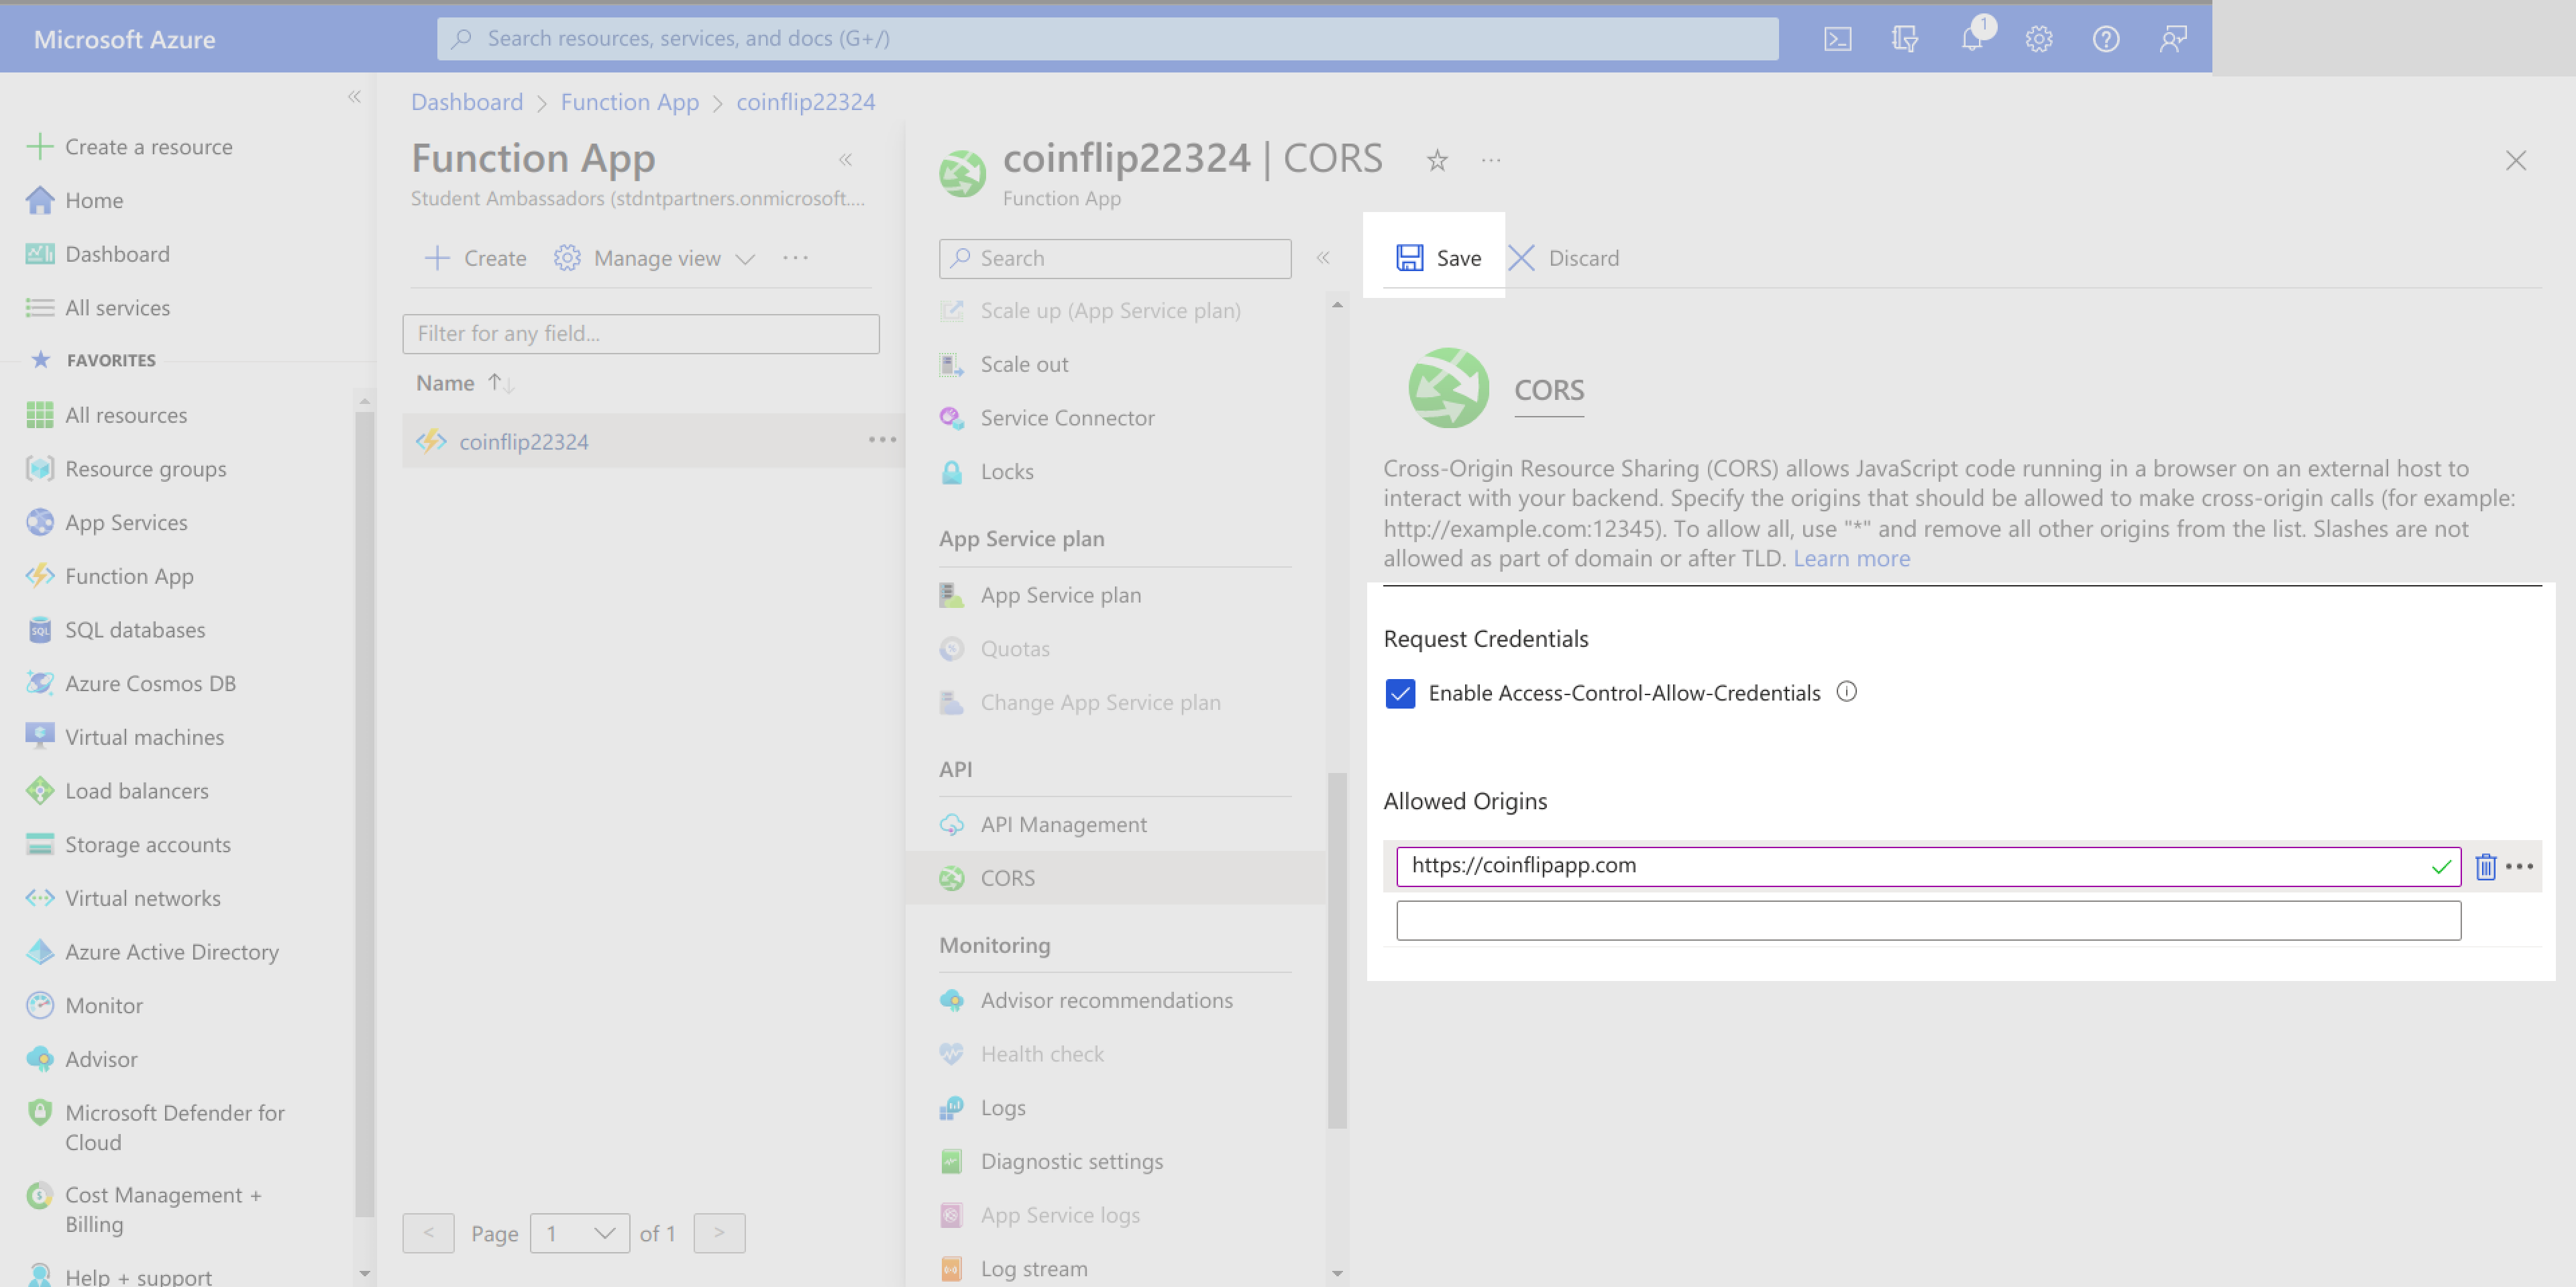
On the CORS page, check the Enable Access-Control-Allow-Credentials option. Add the domains you want to limit your application function to, then click Save:
Conclusion
You just learned how to create a serverless application using the function core tools. You also learned how to provision an Azure functions app on Azure using the Azure CLI as well as other services that enable the functions app to work effectively.
You made your function robust and production-ready by setting up the following:
- State management with Cosmos DB
- Logging and monitoring with Application Insights
- CI/CD and deployment with GitHub
- Functions security with CORS for your Azure functions
You also used a pipeline to deploy your function. Pipelines are a great way to automate the deployment process and ensure that your code is deployed consistently and reliably.
If you’re looking for a way to improve the speed, consistency, and ease of use of your CI/CD pipeline, consider using Earthly. An open source project, Earthly makes it easy to define and execute pipelines using simple, familiar syntax. It also leverages containers for isolation and caching, which can significantly improve build times. Sign up for an account today!
Turn your engineering standards into automated guardrails that provide feedback directly in pull requests, with 100+ guardrails included out of the box and support for the tools and CI/CD systems you already have.