Implementing OAuth 2.0 Flow in Non-Web Clients
Table of Contents
Our latest article provides insights into implementing OAuth for bots. Earthly significantly streamlines the build process for developers using OAuth for authentication. Learn more.
It’s easy and intuitive to implement OAuth 2.0 in web applications. However, when setting up OAuth 2.0 for non-web clients this becomes difficult as OAuth 2.0 requires redirect (callback) URLs.
Despite this difficulty, it’s possible to create a seamless OAuth 2.0 flow with a great user experience for non-web clients. The Heroku CLI is a great example of such. It provides an option that allows you to login into the CLI app without you entering your credentials directly using the command - heroku login.
In this guide, you’ll learn how Heroku CLI works behind the scenes while exploring OAuth 2.0 Device Authorization Grant flow.
You’ll also learn the following by implementing Facebook login for a discord bot:
- The concept of OAuth 2.0 Device Authorization Grant flow
- The potential issues you’ll encounter if you don’t use the Device Authorization grant flow and the benefit of using it
- How to configure a Facebook app for device login
Overview of OAuth 2.0 Flow
OAuth 2.0 is an authorization flow that allows client applications to access resources on behalf of a resource owner upon their approval or assent. The client application in this case can be categorized into:
- Web Client
- Non-web Client
Non-web clients are those client applications that don’t run on web browsers or don’t support browser redirects. Examples of non-web clients include command-line apps, bots, IoT devices, and more.
Challenges Associated With Implementing OAuth 2.0 in Non-Web Clients

“Although the web is the main platform for OAuth 2, the specification also describes how to handle this kind of delegated access to other client types (browser-based applications, server-side web applications, native/mobile apps, connected devices, etc”. - auth0.com
The above excerpt asserts that OAuth 2.0 flow is difficult to implement in non-web clients as OAuth 2.0 flow was originally designed for the web platform. This has led to several drawbacks including the need for a redirect URL which can be difficult to implement in a non-web client application.
Additionally, some non-web clients may not support user input, which can make it difficult to obtain consent from users during the authorization process. This can lead to a poor user experience and potential security vulnerabilities if not implemented correctly.
There are several “not-recommended” approaches to get past the challenges raised above. However, the optimal solution is the use of OAuth 2.0 Device Authorization Grant flow.
OAuth 2.0 Device Authorization Grant flow
OAuth 2.0 Device Authorization Grant flow has two flow paths or phases:
- Device flow
- Browser flow
You’ll be surprised to still see that a web browser is required. Well, it’s not required in the sense of (or used for) redirection.
The device and browser flows are well illustrated in the diagram below.
Note: The browser flow does not occur on the non-web client.
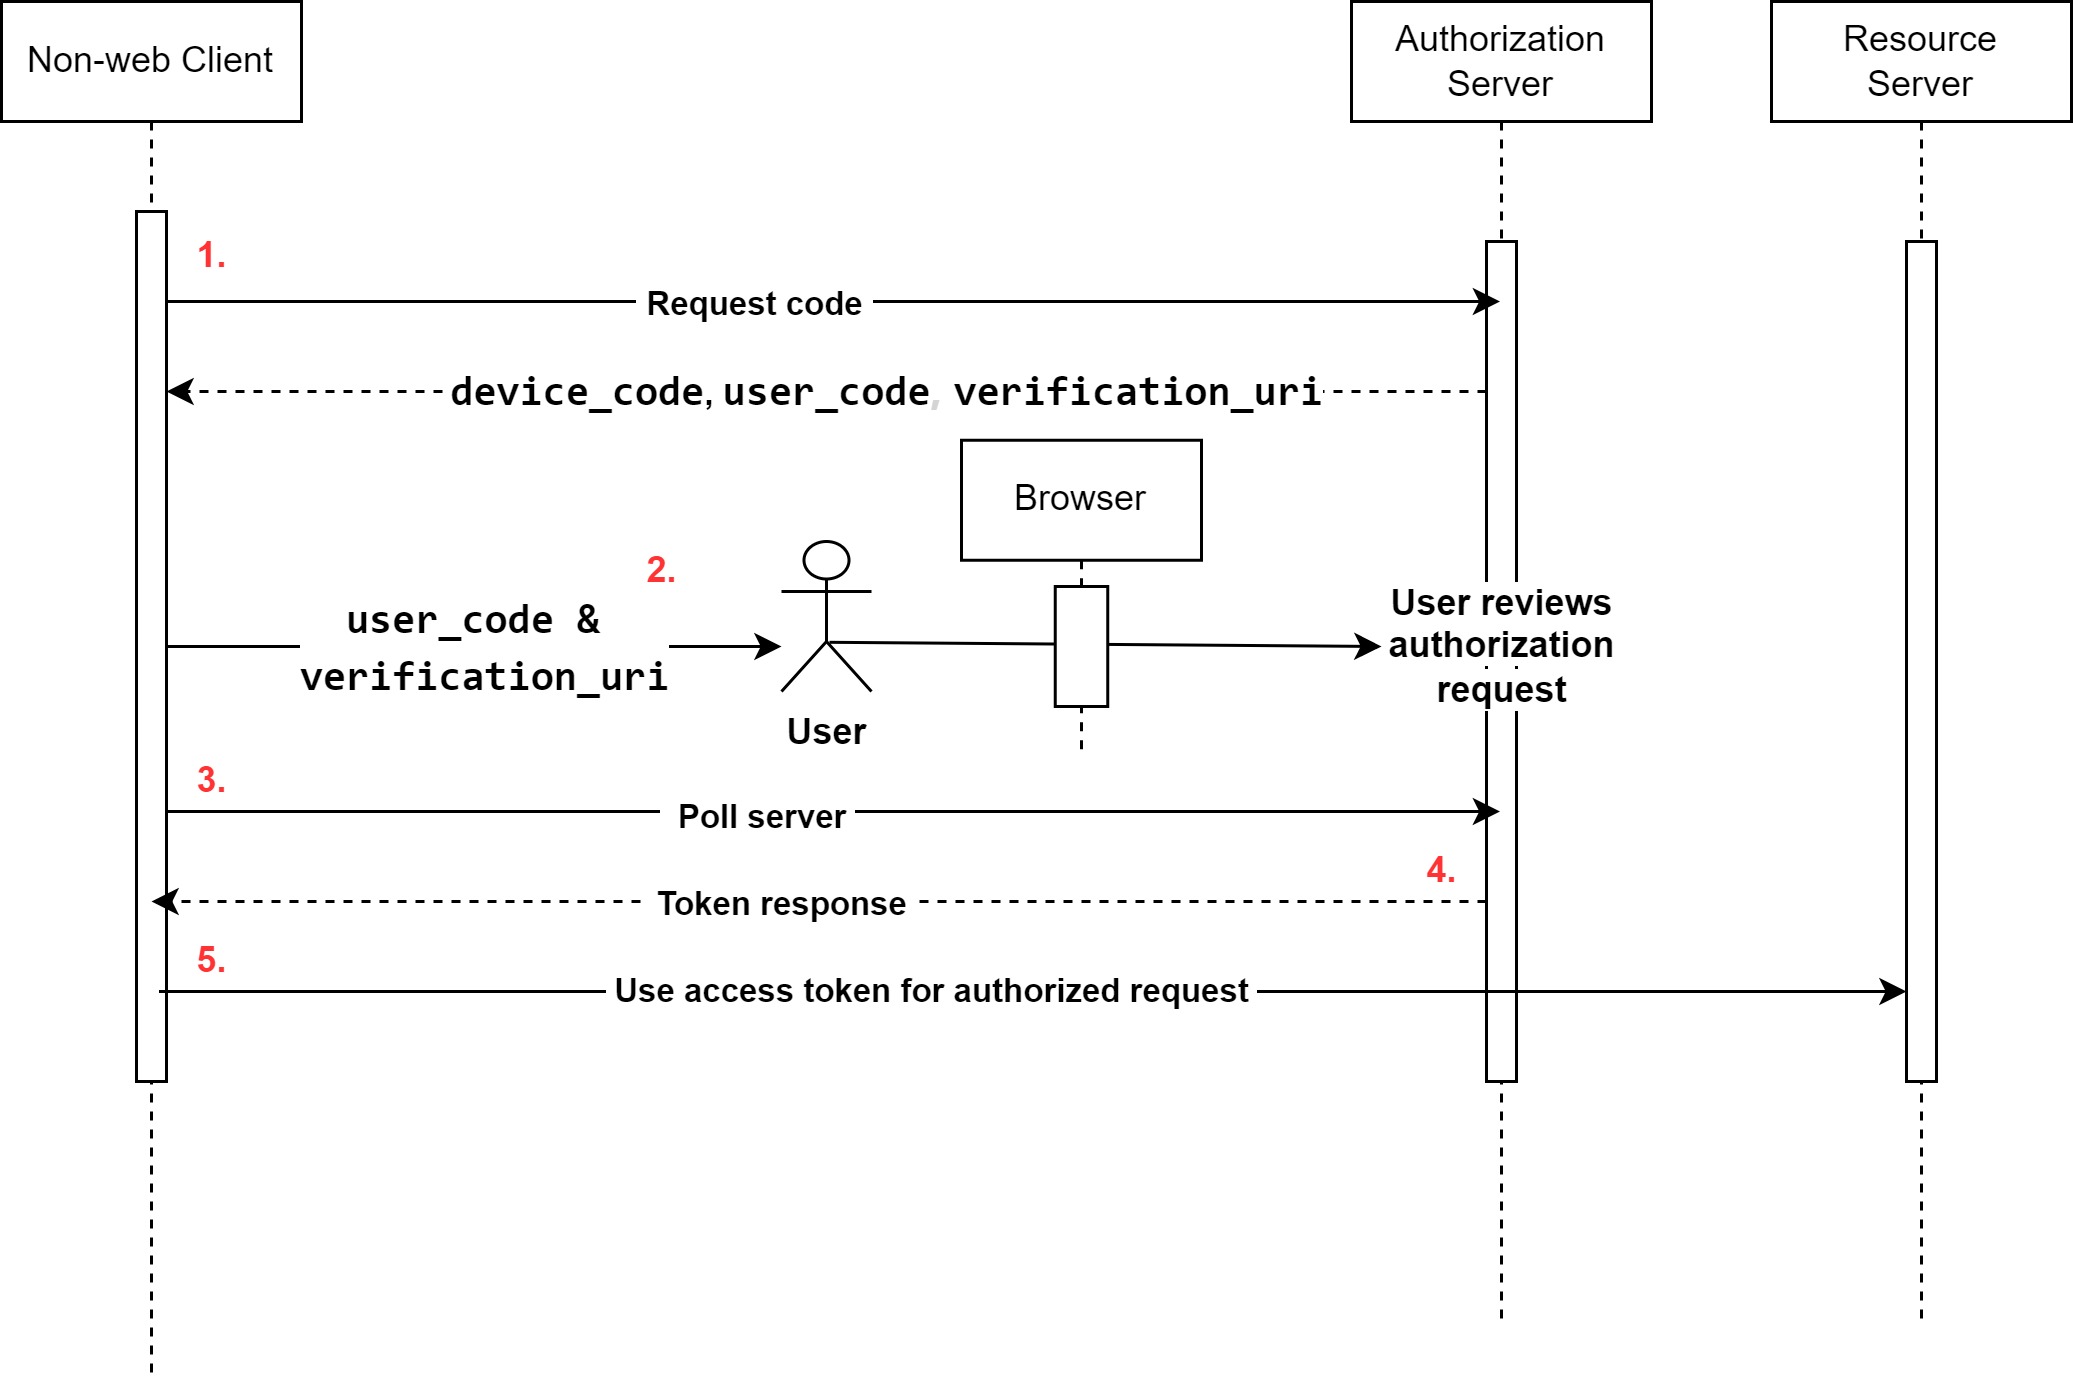
The flows indicated in the diagram above include the following steps:
- The process starts when the non-web clients communicate with the authorization server to obtain
device_code,user_code,verification_uri,polling interval, and (expiration in seconds for device_code and user_code). - The
user_codeis displayed to the user, requiring them to enter the code at the verification URI on their smartphone or computer. - The client will use the
device_codeto start polling the token endpoint at the polling interval specified to obtain an access token. - As soon as the user enters the
user_code, and approves the authorization request, the token endpoint will respond with anaccess_token. - The
access_tokenobtained can then be used for further authorized requests.
Note: The success of the device authorization grant flow is dependent on the browser flow i.e if the user does not enter the code before it expires then it won’t be successful.
As it can be inferred from the steps highlighted above, there is no need for a redirect URI. Because the client communicates with the authorization server via an API.
To understand the implementation of OAuth 2.0 Device Authorization Grant Flow, you can explore the Heroku CLI codebase as it employs a similar flow.
From the exploration of the codebase, I gathered the following:
- The Heroku CLI uses the hostname of the user’s computer as a unique identifier for the user’s authentication session.
- The hostname can be thought of as the state used in normal web client flow.
- The following will be returned when the authorization process starts:
browser_url,cli_urlandtoken. - The token is what is being used as the bearer token in the request to the
cli_url. Thecli_urlis theaccess_tokenendpoint. Thecli_urlgenerated has a code or jwt that links to the hostname and the token used to make a request to obtainaccess_token. - The
browser_urlis the one being displayed to you on the CLI that you click on to log in. - The
fetchAuthmethod is where the polling request occurs.
Implementing OAuth 2.0 Flow in Non-Web Clients
Let’s dive into the implementation of the OAuth 2.0 flow.
Prerequisites
You must have the following to continue with this article:
- Familiarity with Python (the bot is written in Python 3.7+)
- Understanding of OAuth 2.0 flow in web applications
- Understanding of HTTP request and response cycle
- A discord server you can control
The code used in this guide is available on GitHub.
Creating Discord Bot
In this section, you’ll implement Facebook login for a Discord bot you’ll create. This will serve as an example of how OAuth 2.0 can be implemented in non-web clients. Additionally, two methods will be showcased: the shutdown server method and the Device Authorization Grant flow, which is considered the optimal solution for non-web clients.
Discord Application Configuration
Go to Discord Developer Portal, sign up, or log in.

Click on the New Application button.

Click on Bot on the left-hand menu panel and then click on the Add Bot button.

Give the bot a name and assign it the necessary permissions and Privileged Gateway Intents. For this guide, turn on the Message Content Intent so your bot can access the content of messages it receives. Also, select or check Send Messages in the text permissions.
Note: By default, the bot name will be the same as your application name.
Click on the Reset Token button to get the bot’s token. Copy the token and save it as it’ll be used in the next section.
Click on OAuth on the left-hand menu panel and then click URL generator.
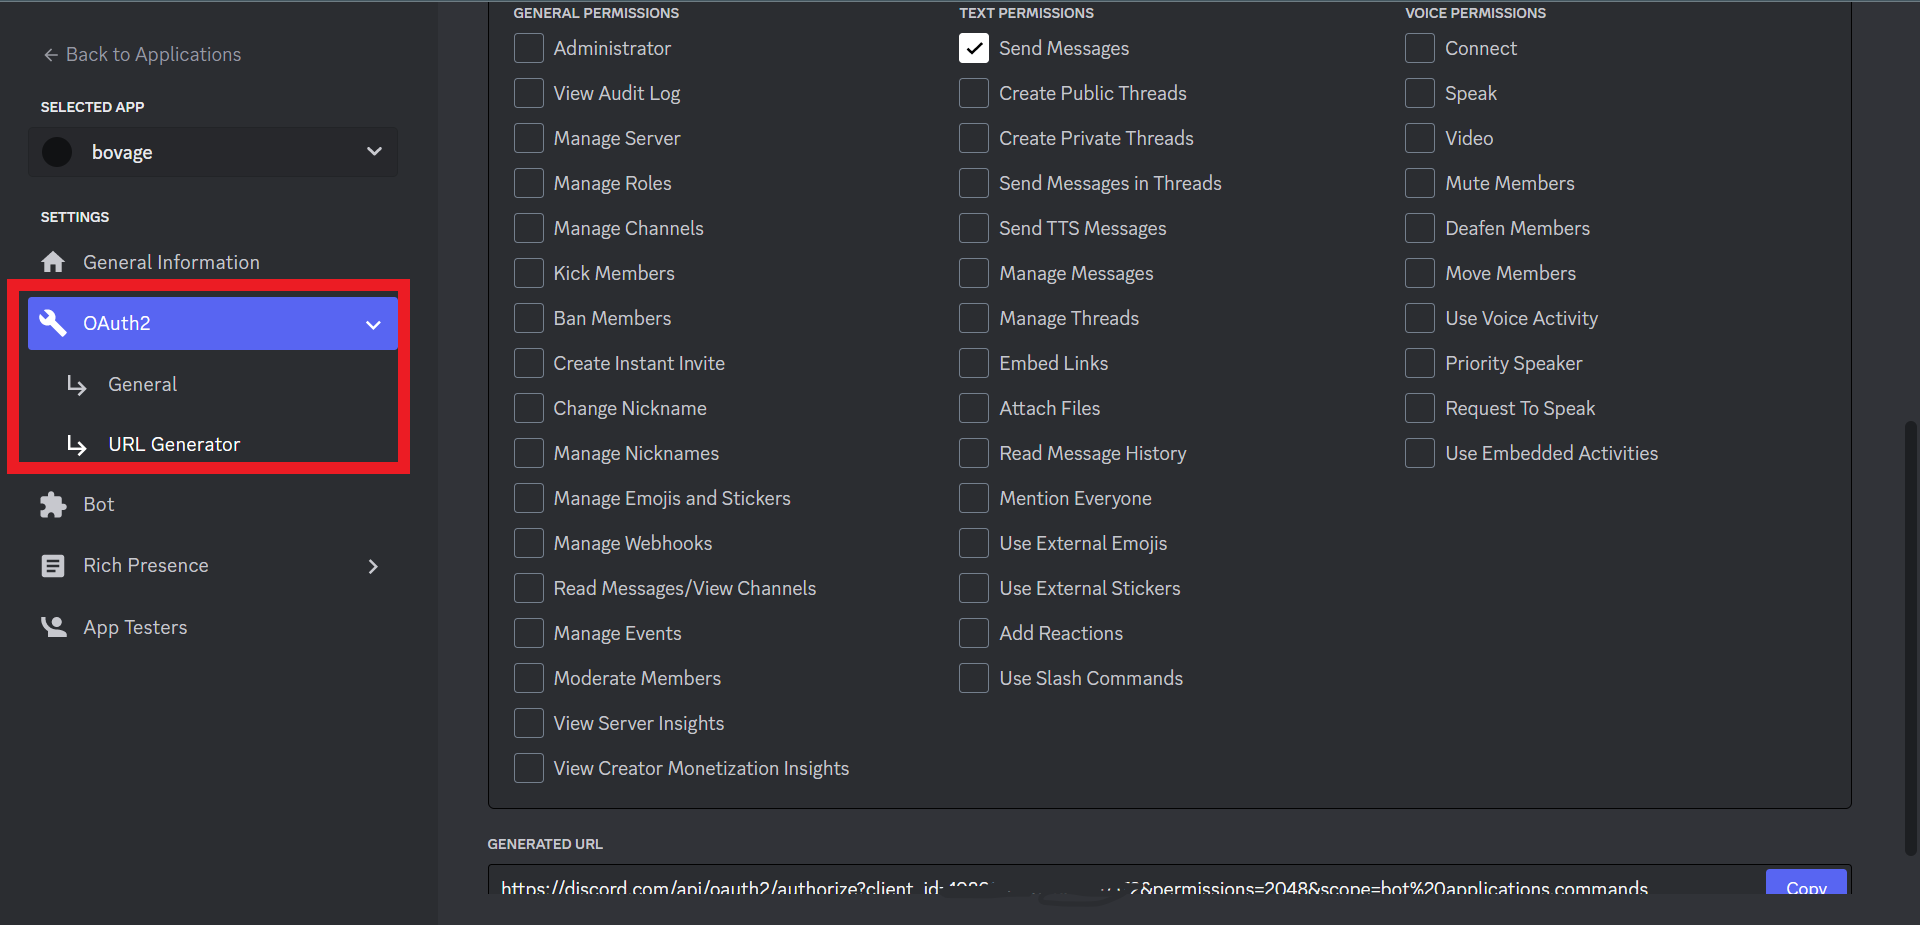
Select bot and applications.command under scope. Select send messages under text permissions as picked previously.
Copy the URL generated and open it.
Note: The process of you using the URL generated from the discord developer portal to add the bot to your server is an OAuth 2.0 flow that occurs on the browser.
Coding the Discord Bot
The following Python packages will be used:
Create a virtual environment and install the packages listed above by running the command below:
pip install discord.py python-dotenvCreate a .env file and store the bot token in it as an environment variable.
BOT_TOKEN=<YOUR_BOT_TOKEN>Create a file named config.py and add the following code to it:
# config.py

from dotenv import load_dotenv
import os

load_dotenv()

BOT_TOKEN = os.getenv("BOT_TOKEN")
Next, create a file named bot.py and add this code to it:
# bot.py

import discord
import logging
from discord.ext import commands
from config import BOT_TOKEN

logging.basicConfig(
    level=logging.INFO,
    format="%(asctime)s, %(levelname)s: %(name)s:%(lineno)d - %(message)s",
)
logger = logging.getLogger(__name__)

client_intents = discord.Intents.default()
client_intents.message_content = True
client = commands.Bot(command_prefix=".", intents=client_intents)
The above code snippet does the following:
Imports the required packages and the credential (
BOT_TOKEN) needed to run the bot.Configures logging to make bug detection and monitoring the bot activity easy.
Gets discord default intents and sets the
message_contenttoTrue.Creates a discord client - a bot and subscribes the bot to specific events specified in the
client_intents.Sets dot or period (“.”) as the commands prefix. This means all commands must be prefixed with a dot.
Note: You must recall that you set the message_content to True as well while configuring the bot under the privileged gateway intent section.
Add the functions below to the bot.py file to ping & login commands:
# bot.py
...
@client.event
async def on_ready() -> None:
    logger.info(f"Logged in as a bot {client.user.name}")

@client.command()
async def ping(ctx) -> None:
    """check whether bot is active or not
    ping ->  pong!!!"""
    await ctx.send("Pong!")

@client.command(name="login")
async def login_with_fb(ctx) -> None:
    """starts login with facebook process"""
    await ctx.send("Login with Facebook")

client.run(BOT_TOKEN)
The above code snippet does the following:
- Adds a function
on_readyto run whenever the bot is connected. - Creates two command functions. The
login_with_fbfunction will be updated in the next section. For now, it only sends “Login with Facebook” to the discord channel when thelogincommand is invoked. - In the end, runs the bot with the bot’s token passed in.
Run the bot.py by running the command below:
python bot.pyNavigate to the server in which the bot is installed and type “.ping” you will get a message “pong” from the bot back.
Before you can make use of Facebook login, you need to create a Facebook app. Proceed to the next section on how to do that.
Facebook App Configuration
In this section, you’ll create a Facebook app and set up Facebook login product on the app.
Go to Facebook Developer Portal, sign up, or log in.
Click on Create App. Select Consumer app as the app type since you’ll only be making use of Facebook Login in this guide.
Enter a name for the app and click the Create app button.
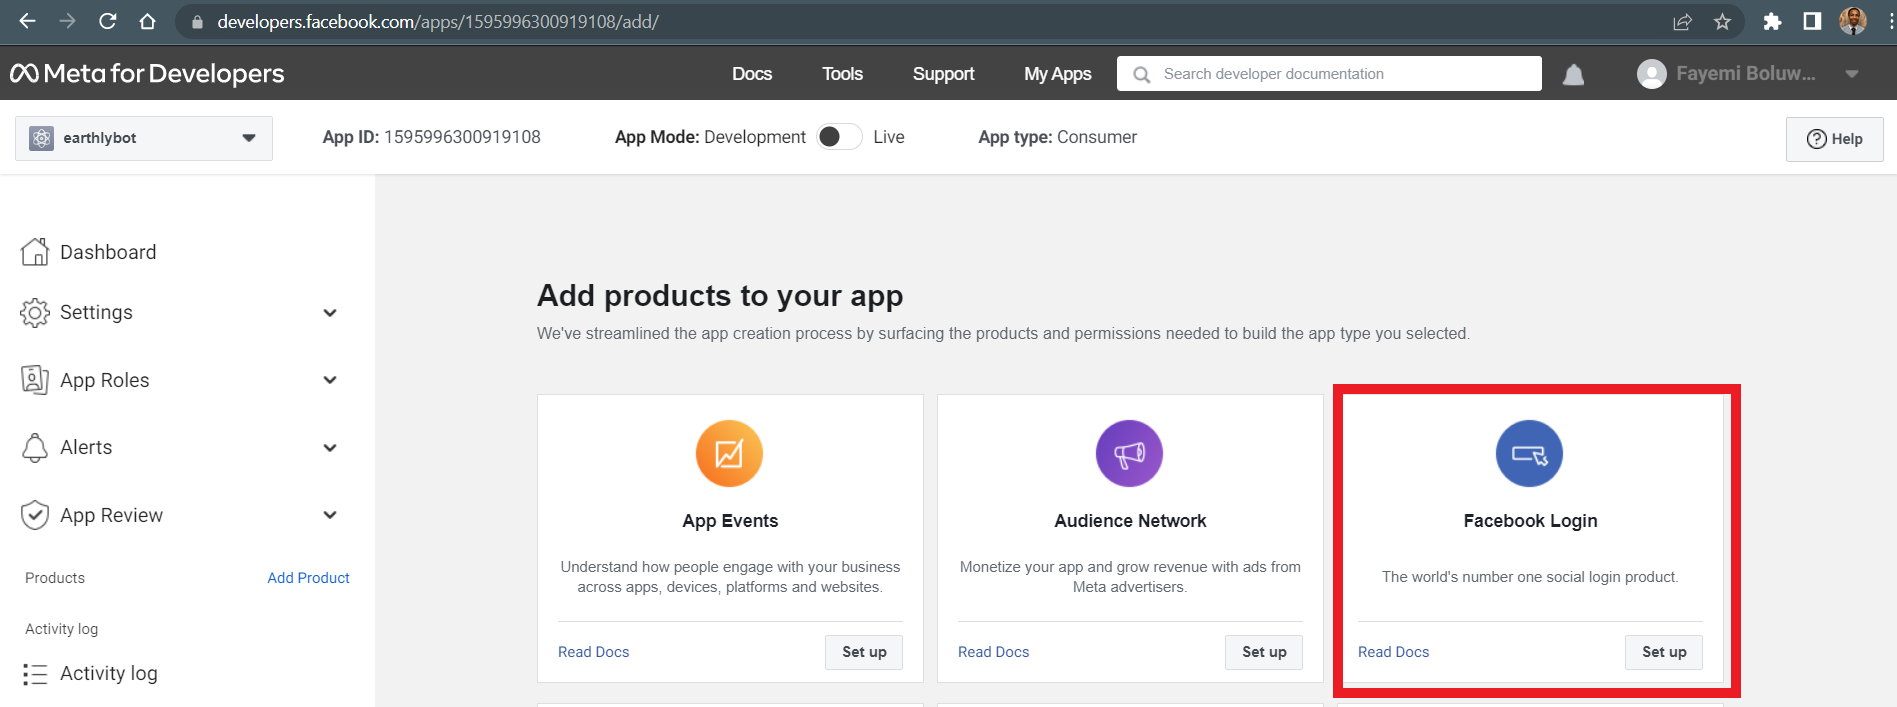
Facebook login card on Add Products Page Click on the Set up button on the Facebook Login product card on the newly created app page.
Look for Facebook Login on the left-hand panel and click on Settings under it for configuration.
For now, you will configure the app to work for normal browser-based login. However, since Facebook login is primarily focused on the web, the default configuration is okay.
Note: http://localhost redirects are automatically allowed while in development mode only and do not need to be added here.
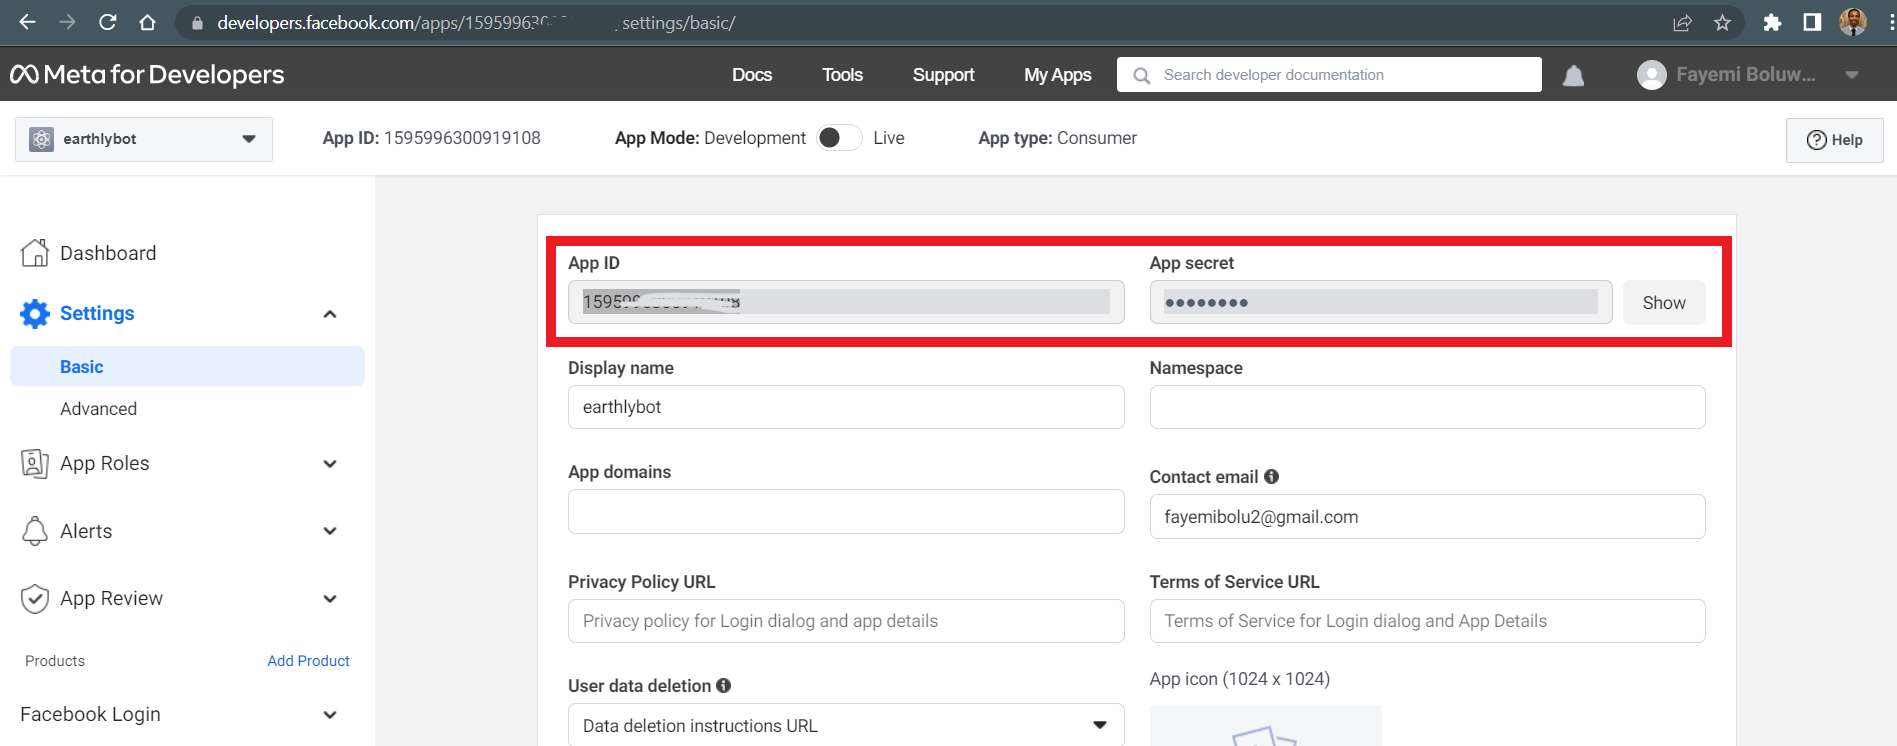
Go to the App settings and copy the client id and secret then save them as environment variables into the .env file.
By adding your credentials this way, you are following the 12-factor app methodology.
# .env

FACEBOOK_CLIENT_ID=<YOUR_FACEBOOK_APP_CLIENT_ID>
FACEBOOK_CLIENT_SECRET=<YOUR_FACEBOOK_APP_CLIENT_SECRET>
Go to the config.py file and get the newly added environment variables. Also, add the Facebook login dialog and access token URLs, and redirect URI.
Keeping your constants in a single place like this makes it easier for you to change them later without modifying the main code.
# config.py

FACEBOOK_CLIENT_ID = os.getenv("FACEBOOK_CLIENT_ID")
FACEBOOK_CLIENT_SECRET = os.getenv("FACEBOOK_CLIENT_SECRET")

BASE_URL = "https://graph.facebook.com/v16.0/"
FACEBOOK_LOGIN_URL = f"https://www.facebook.com/v16.0/dialog/oauth"
ACCESS_TOKEN_ENDPOINT=f"{BASE_URL}oauth/access_token"
USER_INFO_ENDPOINT=f"{BASE_URL}me"
REDIRECT_URI = "http://localhost:3000"Note: This guide will be followed to implement Facebook login.
Run the command below in your terminal to install authlib and httpx.
Installing Authlib and Httpx will enable you to handle OAuth requests and make API requests respectively in the implementation of OAuth 2.0.
pip install Authlib httpxUpdate the login command by adding the code below to bot.py file.
# bot.py
...

from config import (
    BOT_TOKEN,
    FACEBOOK_CLIENT_ID,
    FACEBOOK_LOGIN_URL,
    FACEBOOK_CLIENT_SECRET,
    REDIRECT_URI,
    ACCESS_TOKEN_ENDPOINT,
    USER_INFO_ENDPOINT,
)

from authlib.integrations.httpx_client import AsyncOAuth2Client
...

@client.command(name="login")
async def login_with_fb(ctx) -> None:
    """starts login with facebook process"""
    await ctx.send("Login with Facebook")
    fb_client = AsyncOAuth2Client(
        client_id=FACEBOOK_CLIENT_ID,
        client_secret=FACEBOOK_CLIENT_SECRET,
        redirect_uri=REDIRECT_URI,
    )
    uri, state = fb_client.create_authorization_url\
    (FACEBOOK_LOGIN_URL, state="test")
    await ctx.send(f"Click this link to login with facebook {uri}")
The above code snippet does the following:
Imports config vars and urls
Creates an async authlib client powered by httpx. You can also pass in scopes for the permission you need from the resource owner. For this guide, the default scope provided by Facebook (email and public profile) is enough.
Creates an authorization URL that will display the Facebook login dialog when opened.
The purpose of using
AsyncOAuth2Clientis to ease the stress of handling URL concatenation, getting data from URL query and fragment, and URL encoding and decoding.
Note: If you head over to the URL, the Facebook login dialog will show but the process won’t be successful because the redirect URI hasn’t been set up.
Of course, there are a few hacks to avoid creating redirect URI:
- You could create another command that enables users to paste the whole URL in their browser after redirecting and get the code from the URI then send a request to the access token endpoint to obtain access_token. Your redirect URL might not even exist or be up listening for requests.
- Using another
response type, “code” is the default. You could use “token” or “code%20token”. This way, the redirect URI will contain theaccess_token, no need to send an additional request.
Needless to say, these hacks are bad and you wouldn’t want to use a bot that works that way as a user or would you?
I will leave the hacks for you to try out but don’t do that for a real project.
Now back to using the code response type
Setting Up a Web Server to Handle Redirect
Create a file named server.py and add the following:
# server.py

import http.server
import asyncio

# Facebook Redirect handler class
class RedirectHandler(http.server.BaseHTTPRequestHandler):
    def __init__(self, handle_authorization_response, *args, **kwargs):
        self.handle_authorization_response = handle_authorization_response
        super().__init__(*args, **kwargs)

    def do_GET(self):
        self.send_response(200)
        self.send_header("Content-type", "text/html")
        self.end_headers()
        self.wfile.write(b"<html><body><h1>Authorization successful \
        </h1></body></html>")
        asyncio.create_task(self.handle_authorization_response(self.path))

def start(handle_code_callback, host: str="localhost", port: int=3000):
    server_address = (host, port)
    httpd = http.server.HTTPServer(
        server_address,
        lambda *args, **kwargs: RedirectHandler(handle_code_callback, \
         *args, **kwargs),
    )
    httpd.handle_request()
The above code snippet creates a simple HTTP server using the built-in server class in Python.
- The
RedirectHandlerclass is extended from thehttp.server.BaseHTTPRequestHandlerclass so you can add an async function that will be called once the user approves the authorization request. - The
startfunction is what you’ll call in thelogincommand of the bot to start the server.
- The
httpd.handle_requestfunction handles only one request and shut down afterward. It’s important to note that the function is blocking. This means that the server will keep running if there is no request sent to it.
Update the bot.py file with the code below in order to obtain the access token.
# bot.py
...
import server

@client.command(name="login")
async def login_with_fb(ctx) -> None:
    ...
    # define callback function to handle code parameter
    async def handle_authorization_response(authorization_response):
        # update state of the fb_client so it can match the
        # one sent in the authorization url
        fb_client.state = state
        token = await fb_client.fetch_token(
            ACCESS_TOKEN_ENDPOINT,
            authorization_response=f"{REDIRECT_URI}{authorization_response}",
        )
        fb_client.token = token
        user_info = await fb_client.get(f"{USER_INFO_ENDPOINT}")
        await ctx.send(user_info.json())

    # start http server
    server.start(handle_authorization_response)
The above code snippet does the following:
- You define a callback function named
handle_authorization_responseand pass it into thestartserver function. - In the callback function, you send a get request to the Facebook me endpoint to get the details of the user whose
access_tokenis obtained.
Run the command below to test it out:
python bot.pyThe approach you just implemented is what is usually termed “Starting a server and shutting it down after the login process”. While it does work, it has a few caveats in terms of the following:
- Deployment: When the bot is hosted online, the server will start on the host computer and the user using the bot won’t have access to it. This can still work if it’s a CLI app since the server will start on the user’s computer. But the port used by the server has to be available so as to prevent clashes.
- Public Use: The localhost works as a redirect URI while still in the development mode, it won’t work when you want to go live. So you might need to host the server online so it can be publicly accessible.
Using the Right and Recommended Approach - Device Authorization Flow
Before you proceed to write the code for this, you need to make some changes to your Facebook app configuration.
Go to your Facebook app settings and enable Login for Device.
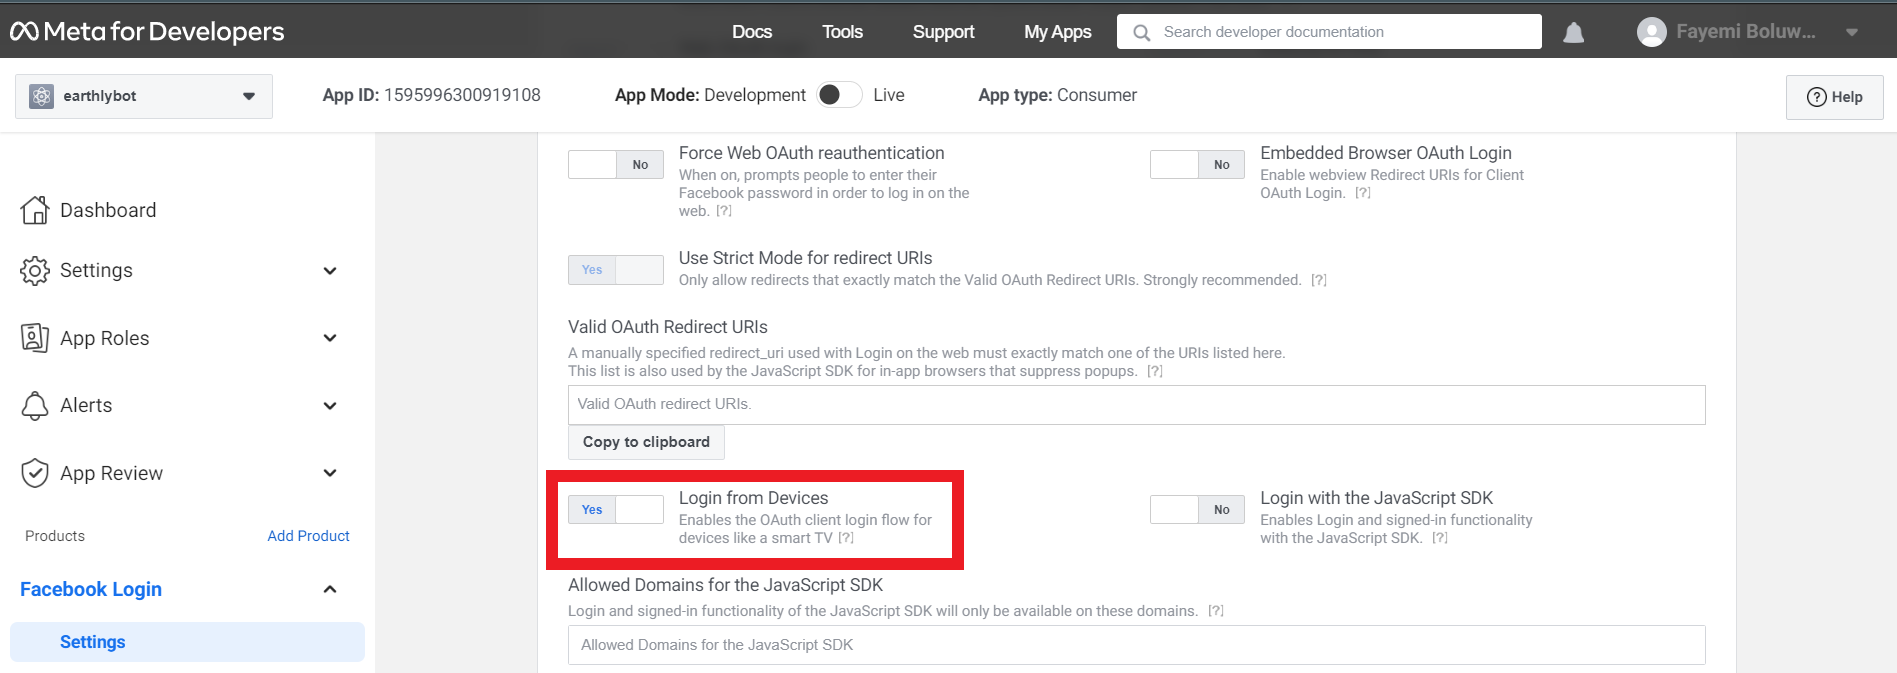
You also need to get CLIENT_TOKEN. The CLIENT_TOKEN will be used to generate your app access token. The access token will be used in the request to get device login details.

Copy the client token obtained and add it to the .env file.
CLIENT_TOKEN=<YOUR_CLIENT_TOKEN>Get the newly added environment variables in the config.py and generate your Facebook app access token as shown below.
# config.py
CLIENT_TOKEN = os.getenv("CLIENT_TOKEN")
FACEBOOK_APP_ACCESS_TOKEN = f"{FACEBOOK_CLIENT_ID}|{CLIENT_TOKEN}"Note: The app id here is the same as the client id.
Add the following constants to the config.py file.
# config.py

DEVICE_ACCESS_TOKEN_URL = f"{BASE_URL}device/login_status"
DEVICE_LOGIN_CODE_URL = f"{BASE_URL}device/login"
POLLING_INTERVAL_FOR_ACCESS_TOKEN = 5
Create a file named utils.py and add the following utility functions:
# utils.py

import httpx
from config import (
    FACEBOOK_APP_ACCESS_TOKEN,
    POLLING_INTERVAL_FOR_ACCESS_TOKEN,
    DEVICE_ACCESS_TOKEN_URL,
    DEVICE_LOGIN_CODE_URL,
)
import asyncio

async def get_device_login_codes() -> tuple[str]:
    """returns only the user_code and code to obtain access token"""
    async with httpx.AsyncClient() as client:
        resp = await client.post(
            DEVICE_LOGIN_CODE_URL, params={"access_token": \
            FACEBOOK_APP_ACCESS_TOKEN}
        )
        data = resp.json()
        return (data.get("code"), data.get("user_code"))
The above code snippet does the following:
- Imports the required packages, credentials, and constants - URLS needed.
- Defines the function
get_device_login_codesthat sends post request to theDEVICE_LOGIN_CODE_URLto obtain thedevice_codeanduser_code.
Add the function that will handle error from the OAuth 2.0 device authorization grant flow in utils.py.
# utils.py
…
def _handle_error_from_login_code(data_error, should_poll):
    """handle error from the login code
    it raises all errors if should_poll is set to False
    and raises all errors except PendingActionError if should_poll
    is set to True"""
    api_error_to_exception = {
        1349152: "ExpiredDeviceCodeError",
        1349174: "PendingActionError",
        1349172: "PollingLimitError",
    }
    if should_poll:
        if data_error.get("error_subcode") != 1349174:
            raise Exception[data_error.get("error_subcode")]
    else:
        raise api_error_to_exception[data_error.get("error_subcode")]
When the non-web client starts polling the authorization server to obtain access_token, one of these four cases can occur:
Pending action: this happens when the
device_code&user_codehave been generated but the user hasn’t entered the code & authorize the request. Facebook will return the PendingActionError.Expired device code: this happens when the codes have expired and are no longer valid. Facebook will return the ExpiredDeviceCodeError.
Polling too much: this happens when you don’t slow down with your request to obtain access_token. Facebook typically recommends that you space your request by 5s and it’s returned as part of the properties (polling interval) when the login codes are obtained.
Authorized: This is the success case. Facebook will not return any error, the access_token will be returned instead.
The function _handle_error_from_login_code purpose is to ensure that polling continues even if Facebook returns an error message (not just any error though). As read in the aforementioned cases, you’ll want the polling to continue if and only if the error returned is PendingActionError.
Update the utils.py file with the function that gets access tokens and handles polling:
# utils.py

async def get_access_token_from_login_code(
    code: str, should_poll: bool = False, poll_interval=0
):
    """Obtain access_token along its expiration details using the code

    NB: Polls the login status on maximum: 84 times if 5 s is used
    as poll interval.
    """
    # ensure poll interval isn't set when should_poll isn't True
    #and vice versa.
    if (
        should_poll == True
        and poll_interval < POLLING_INTERVAL_FOR_ACCESS_TOKEN
        or should_poll == False
        and poll_interval > 0
    ):
        msg = (
            "Poll interval should not be set when should_poll \
            is False and vice versa."
            f" Poll interval must be greater than or equal to \
            {POLLING_INTERVAL_FOR_ACCESS_TOKEN}"
        )
        raise AssertionError(msg)
    async with httpx.AsyncClient() as client:
        params = {"access_token": FACEBOOK_APP_ACCESS_TOKEN, "code": code}
        resp = await client.post(DEVICE_ACCESS_TOKEN_URL, params=params)
        data = resp.json()
        if resp.status_code == 200:
            if data.get("access_token"):
                return data
            elif data.get("error"):
                _handle_error_from_login_code(data.get("error"), should_poll)
            if should_poll:
                await asyncio.sleep(poll_interval)
                return await get_access_token_from_login_code(
                    code, should_poll, poll_interval
                )
        elif resp.status_code == 400:
            if data.get("error"):
                _handle_error_from_login_code(data.get("error"), should_poll)
Recall that the browser flow does not occur on the non-web client. So, the non-web client needs to know the status of the authorization request. The status can be known by polling the authorization server in an access_token request. The polling occurs in the get_access_token_from_login_code function.
The get_access_token_from_login_code function involves the following steps:
- Makes an API call to the Facebook access token endpoint with the device code and access token passed as query params.
- Calls the
_handle_error_from_login_codefunction if there is an error. If the error is not aPendingActionErrorit raises an exception that terminates the function execution and if otherwise, delays the code by the 5s usingawait asyncio.sleep(). - The polling is achieved by using recursion. You can also use a loop to achieve the polling.
The code is designed to avoid blocking the event loop for too long. Blocking the event loop for too long can cause the bot to freeze and become unresponsive. To avoid this, the code uses asyncio.sleep() instead of time.sleep(). The former is non-blocking, which means that other tasks can be processed while the function is waiting. The latter is blocking, which means that no other tasks can be processed while the function is waiting.
Additionally, the code uses httpx instead of the popular requests library. The reason for this is that httpx is designed to be fully async-compatible, whereas requests is synchronous by default. This means that using requests in an async environment can cause blocking issues. Httpx, on the other hand, is designed to work seamlessly with asyncio, making it a better choice in this case.
Facebook docs suggests that you create a button or interface that closely resembles that of the normal web login flow, for this reason, it’s nice to have a button that the user can click.
Make use of the UI module from discord to create a button.
# bot.py
...
import utils

class FacebookLogin(discord.ui.View):
    @discord.ui.button(label="Login with Facebook", \
    style=discord.ButtonStyle.primary)
    async def device_code_login(
        self, interaction: discord.Interaction, button: discord.ui.Button
    ):
        code, user_code = await utils.get_device_login_codes()
        login_code_embed = discord.Embed(
            title="Login with Facebook",
            description="Connecting to Facebook",
            color=discord.Colour.blue(),
        )
        login_code_embed.add_field(
            name="Instruction",
            value="Next, visit facebook.com/device \
            (http://facebook.com/device) on your desktop or smartphone \
            and enter this code. "
            "You could click the link below to avoid typing.",
        )
        code_link = f"http://facebook.com/device?user_code={user_code}"
        login_code_embed.add_field(name="Code Link", value=code_link)
        login_code_embed.add_field(name="Code", value=user_code)
        login_code_embed.set_footer(text="Awesome!")
        await interaction.response.send_message(embed=login_code_embed)

        access_token_details = await utils.get_access_token_from_login_code(
            code=code, should_poll=True, poll_interval=5
        )
        fb_client = AsyncOAuth2Client(token=access_token_details)
        user_info = await fb_client.get(f"{USER_INFO_ENDPOINT}")
        await interaction.channel.send(user_info.json())
The above code snippet does the following:
- Creates a class
FacebookViewwhich is a subclass ofdiscord.ui.View. - Creates a button with the text “Login with Facebook” and a blue color. The label argument is the text shown on the button and the style allows you to determine the color of the button.
- Calls the function defined in utils,
get_device_login_codesto getuser_code&device_code. - Displays the
user_codein an embed sent to the user alongside the URL to enter the code and other necessary instructions. - Calls the function defined in utils,
get_access_token_from_login_codeto start polling and obtain theaccess_token. - Calls the
USER_INFO_ENDPOINTwith the access_token returned from polling and then sends the JSON response as a message to the discord channel.
Note: You can think of the device_code_login method as the listener to the click event of the button decorating it. In other words, this function will be called when the button is clicked.
Add the command that will display the Facebook Login button.
# bot.py
@client.command(name="dlogin")
async def device_login(ctx) -> None:
    """Login using Device Authorization Grant Flow"""
    await ctx.send("Welcome to the Facebook Device Login!")
    fb_login_button = FacebookLogin()
    await ctx.reply(view=fb_login_button)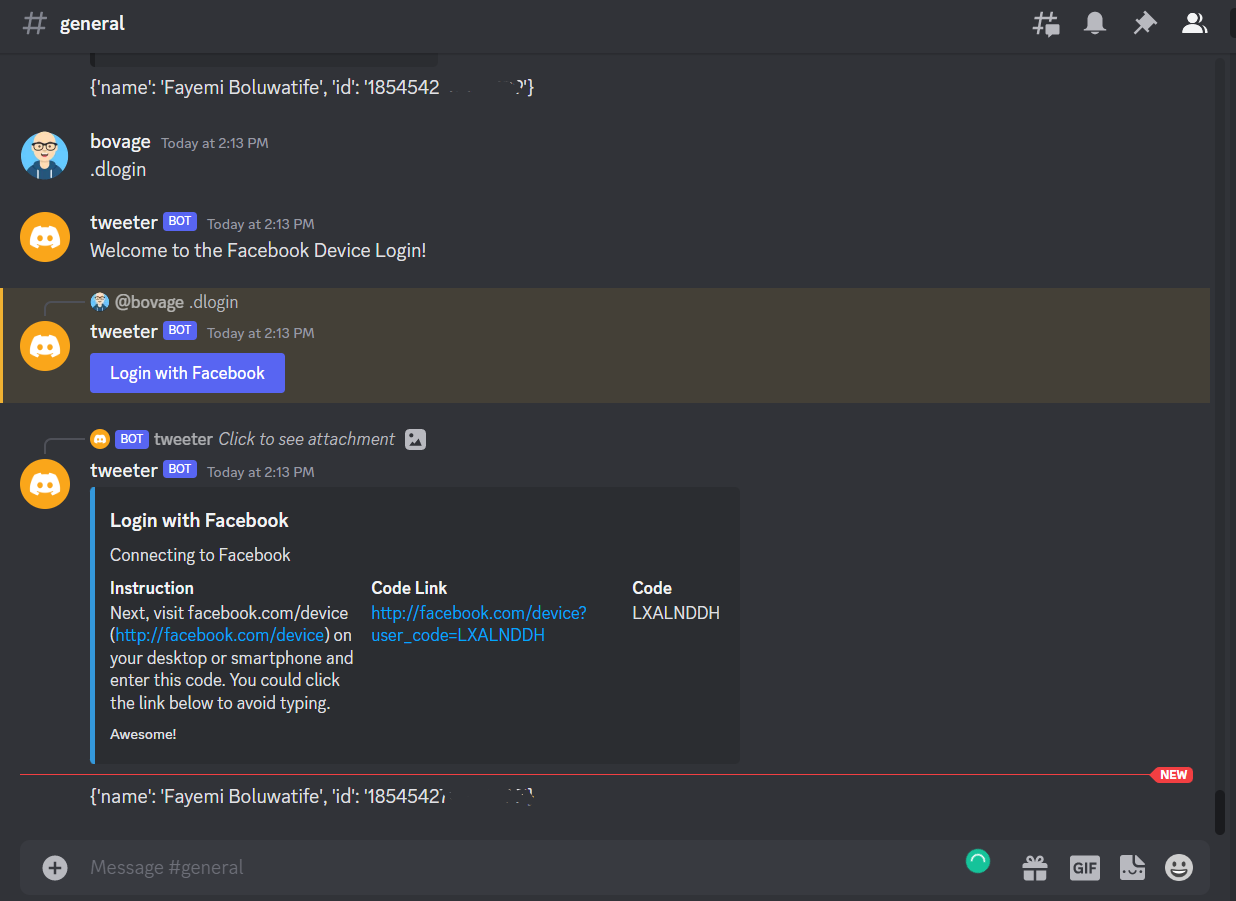
Conclusion
In this tutorial, we delved into Heroku CLI’s functionality, the Device Authorization Grant flow, and configuring Facebook app for device login. Use this knowledge to enhance the security and user experience of your non-web applications via OAuth 2.0 Device Authorization Grant flow.
And if you are looking to boost your command-line fu even further? Give Earthly a shot! It could be a valuable addition to your toolkit.
Earthly Lunar: Monitoring for your SDLC
Achieve Engineering Excellence with universal SDLC monitoring that works with every tech stack, microservice, and CI pipeline.


